In many community polls, a common question is what their favourite scenario is. And besides all of the saga ones, Flight of the Stormcaller is one of those quests. And for good reason too, this time we are chasing Sahir and his fleet after they raided Mithlond. We are racing to catch up to their ship and have to battle storms and corsairs along the way. The sense of urgency and the mechanic of separate staging areas made sure that the Dream-chaser cycle started with a bang! So today, I bring you one of my personal favourite quests in terms of theme and mechanics:
Flight of the Stormcaller
- Found in: The Flight of the Stormcaller Adventure Pack, Dream-chaser cycle 1.
- Official Difficulty: 6
- Community Difficulty: 6.1
- Encounter Sets: Flight of the Stormcaller, Vast Oceans, Dream-chaser fleet, Corsair Pirates, Stormy Weather
- Quest cards: 7 (4 for the players, and 3 for the Stormcaller)
- Play if: you want to play a Sailing test, you want to show players how this game interacts with mechanics while keeping its theme, you want an overall good time!
- What is different about this quest?: Sailing tests, separate staging areas for Stormcaller and players, different quest decks, race to catch up with the Stormcaller.
- Solo or multiplayer?: While the quest is certainly possible to beat in true solo, I feel that I get more enjoyment out of playing this quest with more players. This allows you to better equip yourself for both questing and combat, and you and your friends get to have an awesome quest together. 2 player is less ideal in the early game, as a solo player would start with the same number of ships than 2 players, but would only reveal half as many encounter cards.
- Can I run side-quests for this scenario?: That depends, do you work for Sahir? In that case, do try to convince people that you should go and gather information. But if you are looking to win, then you would do best to keep side-quest in your binder for this scenario. You want to be making progress on the main stage every turn, allowing you to keep up with the Stormcaller. You really don’t need side-quests to slow you down in that regard.
- What to look out for: Unique loss condition if the Stormcaller makes more progress than you, big ship enemies, noticeable spike in difficulty if the two staging areas merge, possible location lock, Boarding keyword.
The Quest
Setup
Get ready for another big setup phase before you begin. Not only do you need to do the regular setup for sailing quests, but you now also have to prepare 2 staging areas, 2 encounter decks, and 2 quest decks. So let’s walk through the setup one step at a time.
The first step is to prepare the Corsair deck. This deck remains unchanged from other sailing quests and involves you placing all Corsair enemies in a separate deck. This includes all enemies from the Corsair Pirates encounter set, as well as the 2 new Corsair enemy types from the Flight of the Stormcaller encounter set. This makes a pile of enemies that is placed next to the regular encounter deck, with its own discard pile. Next, players prepare their fleet. I have detailed ship choices and how these influence your game in this article on Ships and Sailing tests. Follow the instructions there, and you should be alright.
Now the Stormcaller’s Area is prepared. This is done by marking a separate area of your table and placing the unique Stormcaller ship enemy in that area. A second quest deck consisting out of stages 2C, 3C, and 4C is also placed there. Note that there is no stage 1 C/D, so the Stormcaller starts at stage 2 and has a significant lead on your fleet. In the regular staging area, the other quest cards will form the quest deck for the players. In this staging area, the players must add one copy of Rolling Seas that they find in the encounter deck. If there are 3 or 4 players, then 2 copies must be found. This follows the same setup as Voyage Across Belegaer, but without the ship in your staging area. The encounter deck is given a final shuffle, and the players are allowed to flip over the quest card.

Quest card 1: Swift Departure – 8 quest points
There is only an A and B side to this card, as the Stormcaller already has advanced to the second stage. It is the goal of this quest card to beat it as quickly as possible in order to catch up. Placing all progress on this card in 1-3 turns should put you in a good position in order to catch up with the Stormcaller on the next stage. Swift Departure requires you to place 8 progress, which is easier in multiplayer. This quest card will force the first player to make a Sailing test at the beginning of the quest phase, as will all following player quest cards. The punishment for being off-course at this stage is that at the end of the quest phase, the players have to move 2 progress from their quest card to the Stormcaller’s quest card. This not only provides the players with a setback, but it also speeds up the progress that the Stormcaller receives, on top of various other effects.
This quest card is one that the players will want to explore as quickly as possible. As there is no restriction on how much progress can be made on this stage per round, you can put every progress token on there in your first turn theoretically. For lower player counts that also need to keep sailing successfully, 2-3 turns is more realistic.
During this stage, the players should be playing a lot of allies that will help them to quest and sail at the same time. Spamming allies out through Swarm decks is a good idea for this early game. A Very Good Tale, Man the Walls, Herald of Anorien, and other cards that put out allies quickly will be of great value. You will also want to look at ways to get rid of those copies of Rolling Seas that start in the staging area. This can be done through various player card effects, such as Explorer’s Almanac, Heirs of Earendil, Rhovanion Outrider, Asfaloth, and The Evening Star. Getting rid of this location will free up a lot of threat from the staging area. Not having to travel to the Rolling Seas is also preferred, as you should avoid going off course if given the option. Recovering from being off course can be difficult if you are not scrying the encounter deck. If players draw an Heirs of Earendil in their opening hand for instance, they can clear 4 threat from the staging area, allowing the team to progress to stage 2 more quickly.
Quest card 2A/B: Full Sail Ahead – 12 quest points
When the players advance to this stage, a couple of things can happen. First of all, one copy of the Swift Raider enemy ship card is added to the staging area from the encounter deck or discard pile. If possible, take one from the encounter deck, as that removes a non-ship wheel card from the encounter deck, increasing your chances of passing a Sailing test. If the Stormcaller is still at stage 2D, then its area is joined with the staging area. This makes cards like the Stormcaller, Sahir’s Escort, and Vast Coastland to be considered to be in the player’s staging area, which can result in a lot of added threat.

To overcome this threat, the players will have to make sure that they remove as much as possible if they want to overquest the Stormcaller at this stage. Travelling to Vast Coastlands is a smart thing to do, as well as engaging more ships if you feel confident enough. If you are still at the same stage as the Stormcaller, then some effects may start to hurt more, such as shadow effects, be on the lookout for that. Players can also try to engage the Stormcaller and start damaging it, but in these relatively early rounds of the game, you won’t be having a lot of ways to pierce the 6 defence of the Stormcaller just yet. Even if you do, the Stormcaller can only take 4 damage per round, thanks to the restriction on stage 2D. Direct damage will be a better option, as the Stormcaller isn’t immune to player card effects like Hail of Stones or Skyward Volley.
Whether or not you are on the same stage as the Stormcaller, this quest card has a restriction in place which forces players to slow down. The restriction of only being able to place 8 progress on the main quest while on course (4 when off course) reduces the chance of heavy questing decks beating the scenario in 2 rounds. This stage can be completed in as little as 2 rounds, if the players remain on course. If the players remain off course for long, then it will take at least 3 rounds to progress. During this time, the Stormcaller will continue to make progress on its own stage, and will likely advance to stage 3C.
Another limiter to the progress made by the players, is the addition of the Swift Raider ship that got added to the staging area. This ship will engage players when they commit 4 or more characters to the sailing test or the quest. You can try to stack willpower on only 3 characters, and use the Dream-chaser and 3 characters from another player to sail for 5, but it isn’t really worth it to build your deck around this enemy alone. You can prepare yourself for this enemy by questing a little lighter than usual while waiting for your combat characters, but once this ship is engaged, you can go full sail ahead again!
Beating this stage in 2-4 turns will keep you in the race to beat the Stormcaller. If you manage to beat this stage before the Stormcaller clears 2D, then you win the game straight away! Else, you move on to 3A.

Quest card 2C/D: Full Sail Ahead – 12 quest points
This is the first Stormcaller stage, and will be the one at which the Stormcaller begins. Like the player version, it has 12 quest points, but the Stormcaller makes progress a little differently than the players. At the end of each round, the Stormcaller places as much progress on this stage, as it has threat. This is aided if the players are off course, as that gives the Stormcaller +2 threat, allowing it to beat this stage in 3 turns. It is therefore crucial to the players to stay on course, else the Stormcaller moves twice as fast.
On top of this static progress, there is an RNG aspect to the way the Stormcaller places progress. At the end of the round, the players discard the top card of the encounter deck. They also place X progress on this quest, where X is the printed threat of the discarded card. This can range from 0 threat treacheries, to 6 threat locations that can activate the Stormcaller’s Turbo mode, placing as much as 10 progress in a single round, and managing to beat this stage during the next round.
This stage also protects the Stormcaller against a sudden attack boost from all characters. This is done by limiting the amount of damage that can be placed on the Stormcaller to 4 per round. This means that the players would have to be at the same stage as the Stormcaller for 5 rounds, each round dealing 4 damage. This is pretty unlikely to happen, so the Stormcaller tends to progress to the next stage once it has 12 quest points on this quest card, and the players have not yet advanced to stage 3. It will also cause all cards in the Stormcaller’s area to no longer be considered to be in the staging area.
Quest card 3A/B: The Weather Turns Foul – 18 quest points
Ok, so you haven’t overquested or defeated the Stormcaller during the previous stage, but that is fine. You have at least managed to progress further and are likely again at the same stage as the Stormcaller now. If the Stormcaller is already at stage 4 when you reach this point, then you have had some bad luck and might want to consider restarting the game. But you can still try to catch up during this stage and pull out a win when all hope seems lost.
There is no When Revealed effect for this quest card, so the staging area remains the same, other than any cards from the Stormcaller’s Area may join your staging area if you are both at stage 3. Like with the previous set of quest cards, you will want to either complete this quest card before the Stormcaller or deal 18 points of damage to the Stormcaller. This is limited to only 8 damage per round, but that should allow you to defeat the Stormcaller in a few turns if you manage to keep it engaged.
The restriction on placing progress on this stage is gone, so you will be able to place all 18 progress during one turn if you have the willpower for it. This is unlikely though, and the stage can take you several turns to complete, depending on variables like heading, number of locations in the staging area, and how developed your boardstate is. The penalty for being off-course during this stage is that if the players are off-course at the end of the staging step, they must reveal an additional encounter card from the top of the encounter deck. This means that you must be able to pass your sailing tests, and must be ready to counter treacheries like Sudden Storms and Thrown Off Course. These treacheries can still put you off-course at the end of the staging step, resulting in you revealing an additional encounter card. This penalty is less punishing the more players there are, but is quite brutal in true solo. This additional encounter card can also result in the Stormcaller gaining more ground on you if it has already moved on to stage 4.
If you manage to make 18 progress on this stage before the Stormcaller advances its quest card, the players win. They can also win if they deal 18 points of damage to the Stormcaller while at this stage. Remember the limit of 8 damage per round.

Quest card 3C/D: The Weather Turns Foul – 18 quest points
Once the Stormcaller arrives at this stage, some help is coming its way in the form of 1 copy of Sahir’s Escort. This ship will aid the Stormcaller by also placing progress on the quest card equal to its threat. If the players get the choice, try to fish this one out of the encounter deck, as it improves your chances of passing a Sailing test slightly.
The same rules as quest card 2C/D apply here. The Stormcaller makes progress equal to its threat (and that of the Escort if it is in the Stormcaller’s area) and by discarding a card and placing progress equal to the threat of the card. Should the players continue to be off course, then the Stormcaller gets +2 threat and moves twice as fast. Some luck will apply here, but this quest tends to be beaten if left unchecked in 4-6 turns. The players can slow this down by being at the same stage as the Stormcaller, staying on course, and scrying the encounter deck, hopefully adding treacheries on top of the encounter deck to slow the Stormcaller down.
The damage cap from the last quest card has been increased from 4 to 8. This allows players to deal some solid damage to the Stormcaller each round, bringing it close to sinking. It will still take at least 3 turns to completely destroy the ship, but if the players have placed some damage in the past, it could easily just take 2 turns.
After the 18th progress token has been placed on this quest card and the players have not advanced this stage earlier, the Stormcaller returns to its own area, and moves on to stage 4C/D.
Quest card 4A/B: The Cape of Andrast – 24 quest points
Well, the Stormcaller has managed to escape you again, but at least you have caught up again. This is the last stage, whether you win or lose. The weather has also become worse, and the storms have been called by your foe. When this stage is revealed, the players will have to discard cards from the top of the encounter deck until a Weather treachery is discarded. The players have to reveal and resolve that treachery, and it cannot be cancelled. This means that you will have to take that treachery, no matter what. Sudden Storms will likely push you off-course, which is troublesome if you are hoping to beat this stage quickly. Winds of Wrath is probably your best option, as it doesn’t do anything if you managed to be on course when you progressed to this stage. Raging Squall is probably the worst you can get for this stage, unless you have packed some Condition removal. This one will stick to the quest card and won’t be discarded during the rest of the game, as this stage is the final one. Bringing a Miner of the Iron Hills for this one can help you keep your allies alive if you go off-course.
The B-side of the quest card does not punish you for being off-course, unlike the previous quest cards. You are going to need all the help you can get at this point, so the quest cards are a bit more in your favour. There is again no limit on how much progress you can make on this quest card, so you better quest hard if you are hoping to catch up to the Stormcaller. If you are looking to finish the quest by dealing enough damage to the Stormcaller, this quest card will help you a little bit. Whenever a Weather treachery is revealed while the players are at this stage, each Ship card in play (both player and enemy) will take one damage. This can deal the finishing blow to the Stormcaller if you are unable to bring it down to 0 hitpoints. However, this can also destroy your own ships, so be sure that you have enough hitpoints on them to survive the weather at this stage. Using a Hidden Cove wisely at this stage can help you to carry on through this storm.
This is the final push where you can catch up to the Stormcaller. If you can place your 24 progress before Sahir does, the players win the game. The players can also win the game by dealing 18 damage to the Stormcaller, for which no limit exists on this stage. If the players manage to do either one of these things, they win the game and can start to board the Stormcaller and battle the Corsairs. But below the watery surface of the Belegaer lurks a perhaps bigger threat to your fleet. The next scenario: The Thing in the Depths, will have you fight both enemies.

Quest card 4C/D: The Cape of Andrast – 24 quest points
The end is in sight for Sahir and his crew. If they manage to complete this stage before the players do, then he is safe for the rest of his voyage to Umbar. There are some limiters to prevent the Stormcaller from advancing too quickly though. First of all, the Stormcaller no longer has a damage cap per round, making it vulnerable to an all-out attack if the players manage to catch up. The Stormcaller also has lost its +2 threat bonus if the players are off course. This means that at most, the Stormcaller will take 12 turns to progress this stage. But the discarding mechanic is still used at this stage, and Sahir’s Escort can provide a boost as well, as long as the players aren’t at this stage yet.
Should the Stormcaller place its 24th quest point without the players beating stage 4B first or destroying the Stormcaller at this stage, then the players have lost the game and Sahir is safe to return home.
The Encounter deck
Global
- The Encounter deck consists out of 33 encounter cards in Normal mode, and 24 in Easy mode. This makes it likely to reshuffle it every few rounds, as a lot of cards are discarded through the Sailing test and the Stormcaller making progress.

- The chances on a shadow effect are lower than average, with only 55% of cards in both modes having a shadow effect.
- The chances of you revealing a Ship’s wheel icon during the sailing test is 54% in easy mode, and 51% in Normal mode, usually requiring 2-3 cards to be assured of one symbol.
- When players are not at the same stage as the Stormcaller, the average threat per card revealed is 1.35 threat per card in Normal mode, and 1.15 threat per card in Easy mode
- When players ARE on the same stage as the Stormcaller, Vast Coastland and Sahir’s Escort are also contributing their threat to the staging area, raising it to 1.7 threat per card in Normal mode, and 1.45 threat in Easy mode.
- Surge is present on the Jagged Reef and the Corsair Skiff, resulting in only 4 surging cards in both modes.
- Doomed 2 is on the Raging Squall, and it is the only occurance of the Doomed keyword. There are a few other threat raising abilities, but not a lot. You can get away with raising your threat through player card effects.
- Immunity
- All ship enemies cannot have attachments
- The Stormcaller cannot take more damage per round than specified on its quest card
- While your heading is at the worst setting, Man Overboard and Winds of Wrath cannot be cancelled.
The statistics above do not count the Corsair enemies that are in a separate encounter deck. There are some cards in this encounter deck that only add their threat to the staging area if the players are at the same stage as the Stormcaller, hence the two calculations of threat per card. The encounter deck is pretty light on enemies, so it can be a while before you encounter any. Be ready for lots of locations though, as location lock can be a deadly trap in quests like this.
Enemies
There are again 2 types of enemies in this scenario. The Corsair enemies have been set aside in the Corsair deck at the start of the game, and the new Ship enemies are shuffled into the encounter deck. The Stormcaller starts the game in its own area, and will be the target of this quest.
Ships
Sahir has quite the fleet with him, trying to slow you down. The ships range from very big cruisers to small but deadly skiffs, all packed with Corsair enemies!
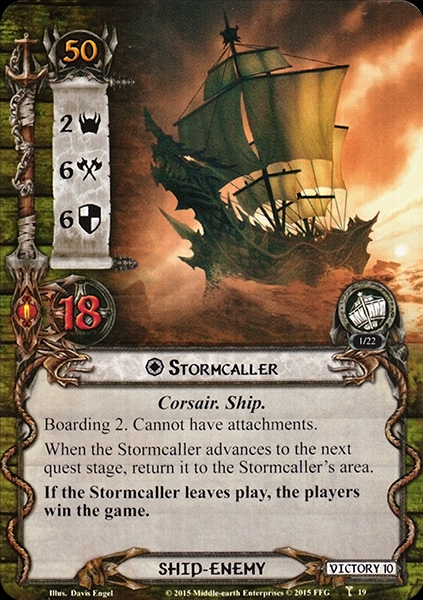
- Stormcaller: This is the ship that you will be chasing down, and defeating it will be one of the ways that you can win this scenario. The Stormcaller won’t be able to be engaged for a fair chunk of the quest, as it will be in its own area, trying to get away. But should you be at the same stage as the Stormcaller, the players can opt to engage this enemy ship and try to deal damage to it. This damage will be limited to what stage you are on, as to avoid you sinking the ship during round 3 or so. The Stormcaller will put 2 enemies from the Corsair deck engaged with you when you optionally engage it. So you must have defenders ready to take on this ship and 2 additional enemies, else you might be looking at a couple of undefended attacks. The Stormcaller cannot have attachments, which is a shame, but makes sense, as none of the ships can have attachments. The Stormcaller doesn’t really have an ability that helps it during combat or anything. Instead, it will flee to its own area when it has made enough progress to advance its quest stage. This means that you will likely be engaging this ship a few times during your game, each time triggering the Boarding keyword. The stats on the Stormcaller are pretty high, with 6 attack, 6 defence, and 18 hitpoints that you must overcome in order to sink it. The attacks from the Stormcaller can only be blocked by Ship objectives, and I will advise to have a Ship ready to block the attack, else you risk 6+ direct damage on your objective, which can be only save you a few times before a ship sinks and its player is eliminated. The Narelenya has the best stats to block these attacks, only resulting in one point of attack. This does mean that if the Stormcaller gets dealt the Rolling Seas as a shadow card, you will be shifting your heading off-course unless the effect is cancelled. Attacking the Stormcaller back will take some effort, but remember that the Stormcaller is not immune to player card effects. This means that its defence can be lowered, it can be deal direct damage, and is vulnerable to all combat tricks that don’t involve it having attachments. This can be a good way to bring it down, but remember the damage cap on the ship. Having enough characters to deal damage to it over time will see you victorious if you stay at the same stage as the Stormcaller. Once this ship leaves play, it is added to the Victory display and the players win the game.
- Sahir’s Escort: The escorting ships for the Stormcaller will help it on its way and try to protect the Stormcaller should the players be at the same stage as the Stormcaller. When this ship enemy is revealed from the encounter deck, it doesn’t get added to the staging area, but instead goes to the Stormcaller’s area. This means no threat for the players to worry about, but it does mean that its ability will help Sahir. This ability is that while the Escort is in the Stormcaller’s area (even if the players are at the same stage, the area is only considered to be the same as the staging area), the Escort adds its threat to the amount of progress that the Stormcaller makes. This means that the Stormcaller will be clearing stages a lot faster with these ships in tow. Players will want to engage this ship if they can, as that shuts down its ability. Engaging this ship will bring out an additional Corsair enemy though, so be prepared for 2 enemies. The stats of the Escort itself are not amazing, making it more likely that you will be dealing direct damage to your ships from its attack, while defending other engaged ships with your objectives. Attacking the Escort takes some effort, but the low defence of 3 makes it so you can chip away at its hitpoints for a few turns. Try engaging this ship if you can, as it will help slow down the Stormcaller. If the Stormcaller moves on to the next stage, any Escorts in the Stormcaller’s area move with it, and are no longer able to be engaged while the players are not at the same stage.
- Swift Raider: This ship will be encountered during the player’s transition to stage 2 and through regular reveals. The Swift Raider as some solid stats for a Ship enemy, and must be taken care off by the combat player before it gets the chance to engage a questing player. This is because the Swift Raider has an ability that will cause it to engage any player that commits 4 or more characters to either the sailing test or to the quest. This makes it important to know which player is the first player, as that player will likely be engaging this ship. A trick to committing more characters to the sailing test is to have the first player commit 3 characters, and to have another player commit the Dream-chaser. That counts as 5 sailing characters, but no single player is committing 4 or more characters. During the questing phase, the players will have to send only a few characters with high willpower each, such as the Ethir Swordsman and heroes like Eowyn. The players can also try to engage this ship during the encounter phase, as that shuts down the ability on the Swift Raider. Once engaged, the Swift Raider brings out 2 additional Corsair enemies, so be ready for 3 enemies to deal with. During combat, the Raider will deal a solid 5 damage which can be blocked entirely by the Narelenya if it is ready. Defeating the Swift Raider will take some effort, as it has some good stats to defend itself. Having 12 combined attack strength might require some ranged support, but that should be enough to sink this Raider.
- Corsair Skiff: Finally, an easy ship enemy that we can sink with ease. This Skiff is the weakest ship enemy in the game so far, and will take the roll of a swarm style enemy when it comes to Ships. First of all, this enemy surges into another encounter card, possibly chaining multiple Skiffs in a row. The Skiff has a very low engagement cost, forcing players to engage it early. When it engages a player, that player can choose to either take Boarding 1 or raise their threat by 3. This makes it so that low-threat decks either have to take an enemy that they might be unprepared for or raise their threat out of the relatively safe zone. When it comes to this choice, you will have to ask yourself if the threat is worth dealing with a Corsair enemy. It usually is, unless you have no threat reduction and you are approaching your limit. If you are not engaged with other enemies and have enough characters to deal with a Corsair, then that is a more logical choice. The ship itself poses little threat, as all Ship objectives can safely block this enemy. Attacking and sinking this sloop is easy as well, requiring just 7 attack. If you are not engaged with other ships, this enemy is no real threat if you pick it off one at a time. In swarms, these can be a danger, but even then, some direct damage and a regular attack will take care of this enemy.

Corsairs
While not a part of the encounter deck, the players will interact with the Corsair enemies through the Boarding keyword. Two new Corsair enemies appear in this scenario and will be added to the Corsair deck at the start of the game.
- Corsair Seafarer: Corsairs just love those resources, don’t they? This enemy continues the trend, with an ability that steals resources from engaged heroes whenever they commit to the sailing test or to the quest. This can be troublesome for lineups that require their heroes to quest, but combat orientated decks are better suited against this enemy. The Seafarer only steals from heroes with actual resources in their card pool, a bit like the Woses in Druadan Forest. The resources boost the Seafarer’s attack only, with +1 attack per resource on him. This is on top of his stat line of 2/2/2/3, which is decent, but can be overcome by players with ease. The problem you will encounter is when this enemy starts obtaining multiple resources per round, making his attack a big problem. In order to avoid this, you can adopt several strategies. First, you can make sure that you have no resources remaining on your sailing or questing heroes. This can be done by either spending resources on cards, or moving them to your attackers/defenders. Second, you can hold back your heroes from the sailing test or the quest. This is easier if you aren’t the first player and are in the later stages of the game, where your allies can carry the load. Third, you can try to kill the Seafarer quickly, before the next quest phase. He only has 3 hitpoints and 2 points of defence, so you only ever need 5 attack to get rid of this guy.
- Serpent’s Blade: These are some impressive stats for a Corsair enemy, with 3 for threat, attack, ánd defence! Luckily, the Serpent’s Blade does not get boosts to these stats, as he doesn’t get resources like the other Corsair enemies in the deck. Instead, this enemy will make several more attacks if he remains engaged with you while the Stormcaller moves on to the next stage. Another dangerous stat on this enemy is his low engagement cost of 10. This greatly reduces the potential of the Hobbit and Ranger synergies, that on enemies with higher engagement costs than your threat. You will likely have to defend this enemy with a hero or a dedicated defender like Defender of Rammas to be sure you’ll survive the attack. Killing the Serpent’s Blade will take some effort, though defence-reducing abilities should help out a lot. The 4 hitpoints also open up a Sneak Attack– Gandalf combo to get rid of this enemy quickly.

Locations
While the vast ocean of Belegaer will be the main setting for your quest, Middle-earth’s coastland also comes into play. Sahir is tracking the coastline towards Andrast. The coast gives you shelter, but can also provide Sahir with a lot of progress for his stage. You’ll also have to be careful of the shallow seas, where sharp rocks can destroy your ships.
- Jagged Reef: The Stormcaller won’t be too happy to see this location, as it only provides 1 progress for it. The players will probably be happy to see this location, as it is low threat and has the potential to clear itself if the players can remain on course. It does also surge, so it isn’t all good news, but hey, could have been a 6 threat location, so you got lucky. The Jagged Reef will only really pose a problem if the players are off-course, as they will then crash their ships onto the reef, dealing damage to their fleet. At the beginning of the travel phase, the Jagged Reef makes a check to see if the players are on course. If they are, the players make 2 progress on Jagged Reef while it is in the staging area or is the active location. This can clear the Reef in 2 turns, or open it up to location control cards more easily. If the players are off-course during this check, then each Ship-objective gets dealt 2 points of damage. There are some ways to avoid this damage, with the obvious one being that you should stay on course. You can also play Thror’s Key on this location, preventing it from damaging your ships. This does mean that the location won’t explore itself, but you can explore it through travelling or using location control cards. One thing you don’t want with this location, is to have multiple copies in the staging area and being off-course. Should that happen, your ships will get smashed in a few turns. Use an Eryn Galen Settler to get rid of more copies of the location if you are in such a situation.
- Vast Coastland: Yes, this is a 6 threat location, and no, you aren’t playing Nightmare mode. But this location isn’t as bad as you would think based on stats alone. This card was designed to give the Stormcaller a big lead over the players when questing. Placing 6 progress right then and there really helps out Sahir when it is discarded at the end of the round. If it is revealed through normal progression though, it is added to the Stormcaller’s area if the players are not on the same stage as the Stormcaller. This helps the players catch up a little, as they are given an encounter card with no threat that round. When the players catch up however, the location will start to add its threat to the staging area, creating a big blob of threat that has to be overcome. My advice for this location is to travel to it as soon as you can, as there is no penalty for travelling or having the Vast Coastland as the active location. The 4 quest points are a good deal when compared to the 6 threat you would otherwise face. You can also string together some location control cards to make 4 progress on the Coastland. Mirkwood Explorers, Asfaloth, and the Evening Star can all chip away at this location, getting rid of it while it is in the staging area, opening up the active location slot for the other locations you’ll have in the staging area. Having this active for Ghan-buri-Ghan is also great, allowing him to quest for 6 willpower! If the Stormcaller advances to the next stage before the players can travel to this location, the Vast Coastland is no longer considered to be in the staging area, and cannot be travelled to.
- Hidden Cove: This standard 3/3 location will come in handy during your games, as it offers you a way to heal your ships. This is important, as you cannot heal them yourself, and will be taking a lot of damage to the ships, especially if you are looking to defeat the Stormcaller in battle. The location isn’t all good though, as the players must move 2 progress from their quest stage to the Stormcaller’s quest stage in order to travel here. This will increase the gap between you and the Stormcaller while you repair your ships in the Cove. Once this location becomes the active location, each Ship objective heals 4 damage, enough to survive another attack or several Weather treacheries at stage 4. The location does slow your progress a little, and you are unable to travel here if you don’t yet have 2 progress on your quest stage. A way to avoid the delay that this card presents, is to bypass the Travel cost. South Away, Ghan, Thror’s Map, and West Road Traveller are all options that you can use to circumvent the Travel cost, while still benefitting from the healing boon once it becomes the active location. Discuss with your group whether or not you want to go here, sacrifycing time for hitpoints. If not every ship has 4 damage yet, it will be best to avoid this location.

Treacheries
Being in such a rush to catch up to the Stormcaller can leave you with making mistakes. On top of that, the weather isn’t really cooperating either, leaving you with dangerous situations. There are only 2 new treacheries in this encounter set. The good thing about these is that if the Stormcaller reveals them, they don’t provide any additional progress to it, which helps the players.
- Man Overboard!: The first of these new treacheries is the thematic Man Overboard! This treachery tries to reduce the willpower players commit, by punishing them for commiting 8 or more willpower each during the quest phase. When this treachery is revealed, all players committing at least 8 willpower will have to discard a questing character. The treachery can also not be cancelled if the players are on the worst heading. There is an obvious solution to this treachery: “Don’t quest for more than 7 willpower”. But this is a boring solution that will only work for the deck designed to take care of combat. The more interesting solutions are where you can either cancel this treachery, or have a specific target to discard. Since this has to be a questing character, you can just quest with a 0 willpower ally and not reduce your willpower after the treachery hits. This is best for when you are not Sailing that round. The Rohan archetype benefits a lot from this treachery, making it a perfect way to discard characters like Eomund, readying all other Rohan characters. If you are not prepared for this treachery, then you should just discard your lowest willpower ally and be done with it. Be careful with only questing with heroes, as that means that you could risk losing a hero this way. Lineups of Eowyn and Cirdan questing at the same time are dangerous, unless you have an ally to join in during the quest.
- Raging Squall: Other than the Corsairs and your speed, there is third threat to your fleet, the Weather. When a Raging Squall appears over the horizon, the first thing you do is to raise your threat by 2 through the Doomed keyword. You then attach the treachery to the current quest card (your current quest card). The chances of you going up against a side-quest are slim, so you will likely have this Condition attached to your main quest. While attached, the Squall will deal 1 damage to each ally as it is committed to the quest and the players are off-course. This is an extra incentive to stay on course, as the treachery won’t hurt in that case. But once the players lose the Sailing test, they must really consider not sending allies to the quest. Low hitpoint, high willpower allies are less ideal to bring if you want to keep them around but are going to be off-course for a while. Allies like the Sailor of Lune are protected against this, being used to weather like it. In order to get rid of this treacherous attachment, the players can use cards like Miner of the Iron Hills, but isn’t really recommended, as the effect is quite rare. If you manage to progress the current quest card before you are thrown off-course, then the attachment is discarded, allowing allies to quest again while off-course without taking damage. Only if you are at Stage 4 would I recommend discarding the Condition, as you need all the willpower you can get, and you won’t be discarding the attachment through advancing the quest.

Tips and Tricks
- Since there are 2 ways to win this scenario, there are 2 different approaches you can take in order to beat this quest. You can try to catch up to the Stormcaller and overquest it, advancing to the next stage before it does. This strategy is more for the heavy questing decks. The other option is more suited to the combat focused players, who can take out the Stormcaller to win.
- If you are going for the combat-approach, don’t forget to bring willpower. You still need to catch up to the Stormcaller in order to deal damage to it.
- As usual, it is highly advised that you DO NOT fail any sailing tests. Being off course allows the Stormcaller to increase its lead, and will force you to stall at your stage. Scrying the encounter deck and sailing with plenty of characters should allow you pass most sailing tests without too much trouble.
- Location control can allow you to bypass a lot of locations in this scenario, freeing up progress for the main stage. Not having to travel to locations like Rolling Seas also helps in your progress. Bring some form of location control to deal with this.
- You can help slowing down the Stormcaller if you scry the cards of the encounter deck and switch them around a little. If you can make sure that a treachery is on top of the encounter deck at the end of the round, the Stormcaller will progress at a much slower pace.
- If you want to slowly chip away at the Stormcaller early, try to use some direct damage events like Hail of Stones. In the early game, you won’t likely pierce the Stormcaller’s 6 defence, but since it has no immunity to player card effects, you can deal some damage every round that you are at the same stage. Remember the damage limiters on stages 2 and 3 though!
- A nice side note here: All of the art pieces for the quest cards that are shared between the players and the Stormcaller, are shared pieces of art of your fleet chasing the Stormcaller.
- Remember that stage 4B will not only damage your ships, but also all ship enemies in play. This allows you to put a ship one hitpoint away from sinking, and letting the next Weather treachery do the rest.
- Locations can start to build up in this quest, so be sure to travel each round and have some location control in place to chip away at the quest points of locations in the staging area. This frees up some threat in the staging area, allowing you to make more progress on the active location and the quest.
- Remember that cards in the Stormcaller’s Area move with the Stormcaller if it advances to the next stage. This means that non-engaged Escorts and copies of Vast Coastland that aren’t the active location are no longer considered to be in the staging area.
- If you grow tired of the Boarding keyword, the ships can be blanked through Revealed in Wrath. This blanks their textbox for the phase, allowing you to ignore Boarding when you engage the ships. Remember that this will take place during the Engagement phase, so the ships will have their card text back during the combat phase.
Playthroughs
With this quest being a community favourite, there are a lot of playthroughs that you can watch. Here are a couple of videos to prepare you for this scenario.
- True Solo, Seastan deck: https://www.youtube.com/watch?v=u0ZCmwjyhsY
- True Solo, Seastan deck: https://www.youtube.com/watch?v=9DXSo9Q7TdA
- Two players, progression style: https://www.youtube.com/watch?v=WDA9RrSEWiM
- Three players, updated decks: https://www.youtube.com/watch?v=z-aOH9NPI10
- Two handed, progression style: https://www.youtube.com/watch?v=OdpNRSFS9ko
- Four players: https://www.youtube.com/watch?v=CNizNIsO4L4
And so ends this article on one of the community’s most favourite quests. Stormcaller is a really fun quest to play and I am looking forward to playing it at Con of the Rings 2019. With this scenario now covered, only 2 remain before the cycle is complete. We will see you next time, as we draw closer to the Harad cycle!


One card I enjoy playing against this scenario is Revealed in Wrath. Blanking the Boarding keyword during the Ecounter phase is really strong!
LikeLiked by 1 person
Holy cow, i would like to play this quest. Unfortunetly it stands “on boat” on ffg site for more than two months 😦
LikeLike
The scenario is amazing and ranks high in terms of theme and replayability. I hope the pack arrives in stores soon for you to pick up. The player cards in that pack are great as well
LikeLike