We have come to it at last, the great battle of our time. Now made even more difficult in Nightmare mode! Let’s face it: You are only playing this quest in Nightmare mode to either punish yourself or test your deck to see if it can beat every quest in the game. If you are one of the few players who did Nightmare mode in progression style, then I’m afraid that this is a giant hurdle for you to overcome, especially if you are limiting your deck options.
The regular version of the Battle of Carn Dum is infamous for being the first real challenge since the Dunland Trap (though there are some arguments to be made that Nin-in-Eilph or Wastes of Eriador are harder than that one). This quest has a community ranking of 9.2, ranking the fourth most difficult quest in the game (the top 3 being Nine are Abroad, Mount Doom, and Attack on Dol Guldur). Yet that is in the regular version, and this is Nightmare mode. None of the other highly ranked quests by difficulty even have Nightmare mode, so you can understand that this is going to make things even harder on you, perhaps even pushing this to the absolute top. So strap yourselves in; we are going to go on a journey through the pits of Angband and hopefully come out on top against this brutal quest.
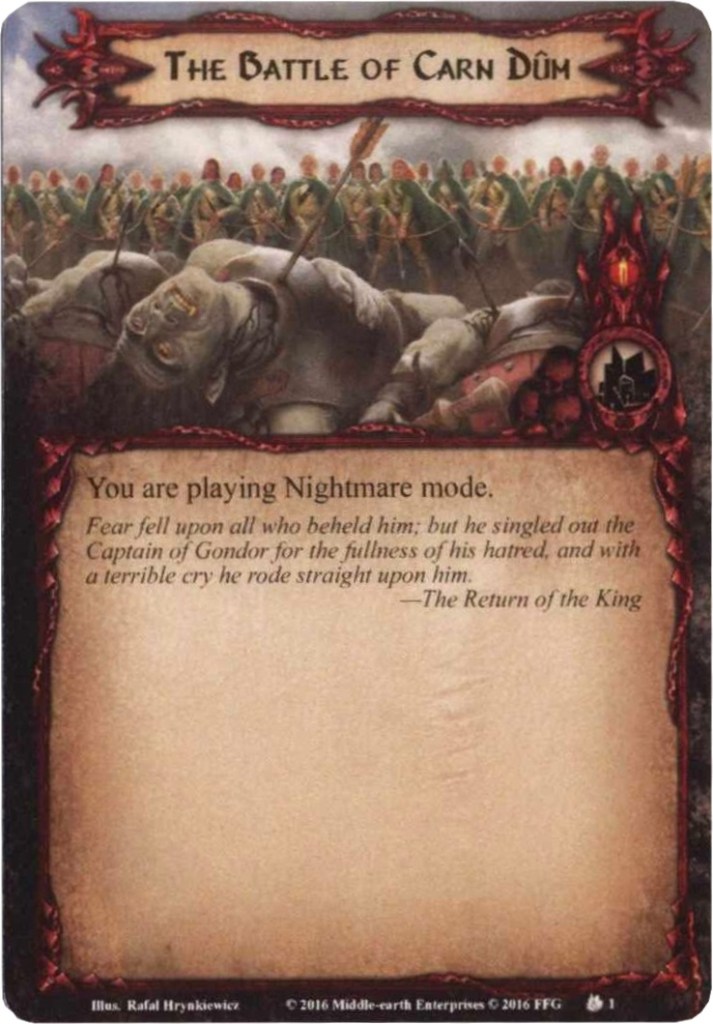
Nightmare The Battle of Carn Dum
- Found in: The Battle of Carn Dum Nightmare Pack, Angmar Awakened cycle, pack 5.
- Size: 19 new encounter cards, of which 3 new side-quests.
- Increase in Difficulty: Well, here’s the thing. The normal version of the quest is already so difficult that the Nightmare version cannot do much to add to the difficulty without making the game impossible. So, if you have a deck that can beat Carn Dum reliably in easy mode,
let me borrow that deck;it should do well against the Nightmare version. It might take you more attempts, but it would not require many changes to beat this quest once. - Fixed Loopholes: Players have tried to beat this quest in Normal mode by canceling a lot of shadow card effects or discarding shadow cards on enemies. Shadows Give Way really shines in the base version of this quest but is sadly not as useful in the Nightmare version. Players will face side-quests and locations that will grant immunity to player card effects to all shadow cards, meaning that you are going to have to stomach all those nasty effects and cannot even flip cards over with Silver Lamp or Dark Knowledge anymore. These immunities to player card effects are not permanent, though, and you could still discard them if you time it well. But know that heroes like Balin and Erkenbrand are less useful in this quest due to that immunity at certain times.
- New mechanics introduced: Several new side-quests are introduced, one of which will introduce the Siege keyword. This can have a serious impact on how well your deck performs, since you might need more defence or readying abilities on your defenders to make it through and survive the combat phase.
- Play this scenario if: You enjoy resetting the setup time after time until you get a start that works for you. Play this with a deck that could beat any quest, just to put it to the test.
- Solo or multiplayer?: Beating this quest solo is quite the feat, even more so in Nightmare mode. But I find that two players work best to keep a lid on the enemies while making enough progress to get through the quest. Higher player counts could lead to all the encounter cards being on the table all at once and there being no shadow cards left. This could be a strategy in 4-player games, but I would not risk it
- What to look out for: Shadow cards still stick to enemies, huge boss-fight against a boosted Thaurdir, quest switches to Siege and Battle, new side-quests, encounter cards, discard cards from your deck, and a lot more. It’s Nightmare Battle of Carn Dum, you have to be ready for anything and everything.
New Rules
There are no additional rules to keep in mind for the Nightmare version of this quest. The instructions simply state that you are playing Nightmare mode, though I feel that the space below could have easily fit a “Good Luck” message. Still, it’s nice that you do not have to worry about too many new mechanics for this version.
New Setup
The setup remains identical to the Normal version of this quest. Players still start with an Accursed Battlefield as the active location, meaning that they will be forced into a Battle quest on turn 1 unless they can explore/switch that location out before the first quest phase. Each player also adds a copy of Carn Dum Garrison to the staging area, and finally, Thaurdir is added. Make sure to start with him on his Captain-side face up. There should be no Nightmare cards in play at the beginning of the game, and with a bit of luck, you can even avoid them during your first turns.
Cards removed
The following cards were removed from the encounter deck to make space for the new Nightmare cards.
- 1x Vile Afflication (Create space for other sorceries)
- 1x Furious Charge (Replaced by other side-quests)
- 1x Orc Ambush (Replaced by other side-quests)
- 1x Angmar Orc (Easy enemy)
- 3x Angmar Marauder (Easy enemy)
- 3x Terror of the North (Treachery that doesn’t interact with the main mechanics of the scenario)
- 2x Accursed Battlefield (Players tended to avoid this location anyways. 1 copy remains for setup)
- 1x Blight of Carn Dum (Create space in the deck for other locations)
The Quest

In all honesty, the quest plays very similar to the Normal version of the scenario. Sure, the new Nightmare cards give you some new obstacles to overcome, but without additional rules or mechanics, you are going to find that this version of the quest doesn’t drastically change your experiences with it. We all know that The Battle of Carn Dum is a tricky quest, and the Nightmare version definitely doesn’t make it easier. But if you own a deck that can reliably beat this scenario in Normal mode, it should stand a fair chance against this one in Nightmare mode as well.
A few new things are added, though; the new side-quests will definitely shake things up. The introduction of almost mandatory Battle and Siege quests means that you will have to balance your stats a lot more than in the Normal version. Get those side-quests early on, and you might end up wasting a lot of attack or defence power on the side-quests, saving nothing for the combat phase when the new enemies and their shadow cards are attacking. Swarming with allies is also not encouraged, thanks to new direct damage effects and Thaurdir’s Elite killing off allies over the course of the game if you leave him unopposed.
The core mechanics and timing of the quest remain the same. The early game will be spent on clearing the initial active location, allowing you to quest with willpower against the main quest and clear the board of enemies. You will want to get a quick headstart over the encounter deck if you want to maintain control because if several side-quests are coming out and you are swarmed in the staging area with locations and enemies, you are likely not surviving this quest and are better off scooping. Just before you clear stage 1, remember to get rid of as many shadow cards as you can in order to avoid having to raise your threat by a million.

Stage 2 will have to be done swiftly, as you cannot take a ton of attacks from Thaurdir, especially when he has his new mount and Sever The Head is boosting his stats. You will need to clear that side-quest at some point, though, so make sure you time it correctly. Scrying the encounter deck can be a huge boon with this, as you can anticipate how big of a combat phase you are going to get. Be careful, though; Howling of Wargs can nullify your scrying efforts by shuffling up the deck or dealing a lot more cards from the deck as shadow cards.
Your goal will be to clear the main quest, allowing you to deal damage to Thaurdir. Since he heals whenever a Sorcery is revealed, I would recommend striking all at once. He cannot heal any damage that isn’t dealt to him, so prioritize killing other enemies until you have enough to fully kill Thaurdir. Remember to clear Sever the Head first and that Black Mare boosts his hit points by 3. All you need to do is to kill Thaurdir in order to win. Since he himself is not immune to player card effects, you could use something like Quick Strike in order to attack before the main combat phase begins. If you manage to kill him this Way, you can avoid having to first defend any enemies engaged with you. Still, these are standard tactics for this quest, so look up a guide on how to beat the regular version of this quest and bring that tech to the Nightmare version. It should work out fine! And once you finally do beat this quest on Nightmare difficulty, you can proudly proclaim that you have defeated arguably one of the toughest quests out there! (until some lunatic creates an NM deck for Fortress of Nurn…).
The Encounter Deck
Global

- It is a pretty thick encounter deck at 51 cards, though note that many of those will stay in play as shadow cards over time.
- Shadow chances are not as high as you’d think. 2 out of 3 shadow cards will have an effect. The effects themselves vary a lot, from threat increases to additional attacks and attack buffs. Note that any shadow card without an effect can get one while Mountains of Angmar is the active location, putting this at 100%.
- Average threat on cards revealed is only 1.45 threat/card, mostly due to the large number of treacheries in the deck. The highest threat a single card can add is 5.
- 9 cards in the deck will surge, with 5 additional treacheries surging if their conditions are not met.
- Doomed is not the most common way to raise your threat in this scenario, but 6 cards still carry the keyword. Keep an eye out for locations and shadow effects that will further raise your threat.
- Immunity
- While Stronghold Tower is in the staging area, shadow effects cannot be canceled
- While The Power of Angmar is in play, cards in each player’s discard pile cannot leave it by player card effects
- While Rally the Fighters is in play, shadow cards are immune to player card effects
- Thaurdir cannot take damage or leave the staging area during stage 1
- Thaurdir is Indestructible and cannot have attachments on either side
- While Sever the Head is in play, Thaurdir cannot take damage
The spread of encounter card types for this quest is pretty even, but keep an eye out for those shadow cards. It can very well happen that most treachery cards get dealt as shadow cards to enemies in play. This can tip the balance in favor of cards that stay in play for longer. If you are also not clearing enemies out of the staging area for a while, you can also run into the problem of your encounter deck being very thin. This can cause you to see more and more of the same cards. A good strategy against such thin encounter decks is to include some encounter cards of your own, such as Wind from the Sea.
Enemies
Some of the weaker and more generic Orc enemies were removed from the encounter deck to make way for two new enemy varieties. These focus more on the Shadow Card mechanic and will have stats to match the Nightmare title of this scenario.
- Orc Wight: All those Orcs you’ve killed during your campaign from Angmar? Yeah, they’ve been reanimated into this enemy, sorry. For a Nightmare enemy, the Orc Wight doesn’t have impressive stats, and he acts more as a fodder enemy to take the place of some smaller foes from the regular encounter deck. 3 attack isn’t anything to be scared by, but when he enters play, he gets two shadow cards right away. Be sure to deal him his regular shadow card as well whenever he makes an attack, and suddenly, his low attack becomes pretty unpredictable. After the initial attack, the Orc Wight isn’t too rough for the players to deal with, and you can even choose to keep him engaged for a while, allowing you to kill tougher enemies instead. It also keeps this enemy out of the encounter deck, where he can be dealt as a nasty shadow card that will return the attacking enemy to the staging area if they have another shadow card apart from this one. In this scenario, it is not uncommon to have 2+ shadow cards on an enemy, so they become more slippery. Shadow cancellation isn’t too reliable, with locations and side-quests potentially blocking the cancellation, so find a way to reengage the enemy. The Dunedain archetype is well-suited for this. Alternatively, having this enemy in the staging area can also allow heroes like Dunhere and Eomer to snag an easy kill in the staging area.
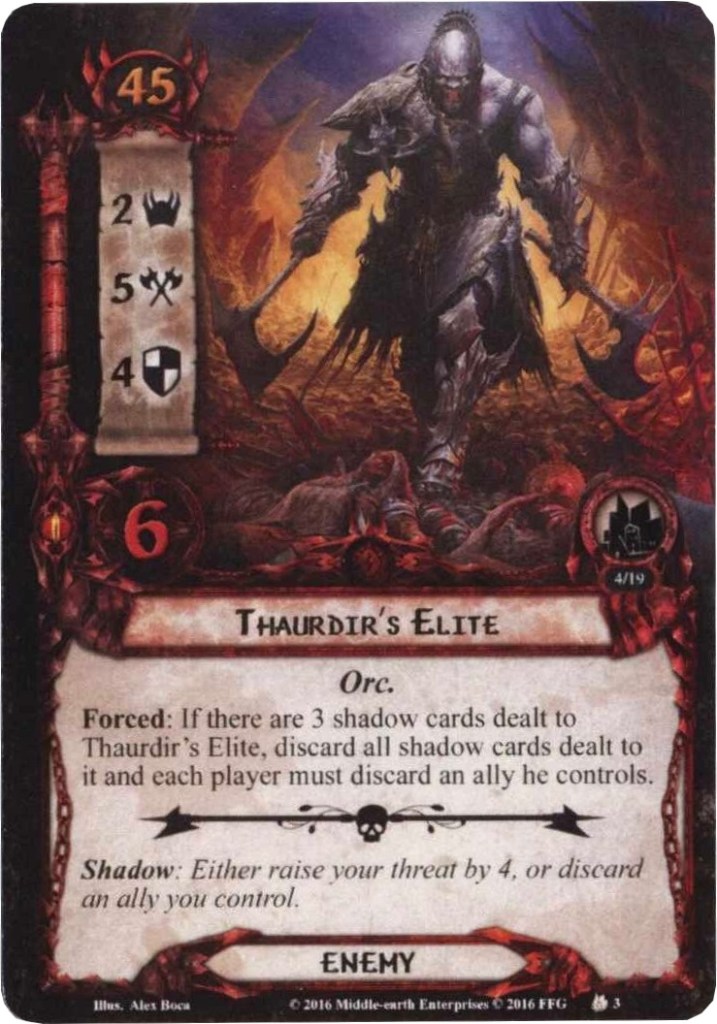
- Thaurdir’s Elite: It’s like Dwalin with his two axes, but cursed! This enemy has more of the stats you would expect from a Nightmare enemy. With an engagement cost of 45, you can avoid him for a while, but be wary of forced engagements and engagement cost-reducing effects. While the Elite is in the staging area, he won’t contribute a lot of threat to the total, so you can avoid him for a while in order to build up your strength. The issue comes in the fact that Thaurdir’s Elite will accumulate shadow cards from effects like Howling of Wargs. While this normally would only boost his danger level (which is already quite high before you give him cards), it also starts to add to his Forced effect. Whenever Thaurdir’s Elite has 3 shadow cards dealt to him, you must discard all shadow cards. This might make his attack easier to deal with, but it comes at a cost. Each player must then discard an ally they control, which hurts a lot in this quest. This is especially painful when you have to do it over and over again due to several copies of this enemy being in play and they’re continuously getting shadow cards. Blocking his attack doesn’t do much, and getting rid of his shadow cards only delays the inevitable. Your best strategy is to deal with this enemy quickly, preferably as soon as he comes out. This can be easier said than done since you might be engaged with other enemies and can’t deal with his 5 attack just yet. Killing him also takes a tremendous amount of effort, thanks to his 4 defence and 6 hitpoints. Another reason to keep him around is to avoid his shadow effect, which either raises your threat by 4 or forces you to discard an ally. Luckily, you can choose the ally yourself, so if you have already used an ally like Gandalf for the round, it is an easy target to discard.
Locations
The fields outside of the citadel of Carn Dum are now accompanied by two new locations. These include to towers and the walls of Carn Dum itself, providing protection to shadow cards and turning into shadow cards when explored.
- Stronghold Tower: The main strategy for this quest goes out the window when this location is in the staging area. No longer are you able to cancel shadow card effects, which will hinder your ability to control the flow of battle. If you were not bringing any shadow cancellation cards like Balin or Hasty Stroke, then this location won’t do much for you. But with so many horrible shadow cards being dealt during this scenario, there is a high chance that you are bringing such cards. If you are, then getting rid of the Stronghold Tower is going to be a high priority for you. While there are three copies of this location and a side-quest blocking you from interacting with shadow cards, there are some ways to still be able to use your cancellation effects. First up, you can put a copy of Thror’s Key onto the first Tower that enters play. This blanks the text box, preventing the passive effect from blocking your cancellation. Second, you have the option to travel to the Stronghold Tower. Once it is removed from the staging area, it no longer adds its 3 threat or its passive ability to the game. This is a viable destination unless there is more than one copy in the staging area. While you would still get rid of the threat, the other copy would still protect shadow cards. If you do decide to travel here, keep in mind that this location comes with a travel cost. Each player must deal 2 damage to a character they control in order to travel here. This damage has to be dealt to a single character per player, so you cannot put one damage on two separate characters instead. This direct damage can seriously harm most heroes or even kill some medium-level allies. Having a good target for this effect, like ally Gandalf or ally Galadriel, who all leave play at the end of the round anyway, is great! Otherwise, invest in some healing and perhaps bring Elrond to the table. 2 uses of Warden of Healing with Elrond can clear all the damage that this effect deals. Clearing the locations in the staging area is also a viable strategy, as the Tower only takes 4 progress to clear, which is doable for any serious location control deck.
- Gates of Carn Dum: The other location in this new encounter deck has some more extreme stats. 5 threat right out the gate (heh) is tough to overcome and will certainly delay your progress on the quest card or active location. However, this is one of the rare instances where a high-threat location can be knocked out right away by Asfaloth since it only has 2 quest points. With nothing else boosting quest points, you can easily clear this from the staging area, clearing the threat and allowing you to travel elsewhere. However, this is just what the developers intended. Because whenever the Gates of Carn Dum are explored, you must deal it as a shadow card instead of discarding it. It will go to the enemy in play with the lowest engagement cost, meaning that you will likely see it as soon as the next combat phase. However, since lower engagement cost enemies tend to be weaker, there is a way you can time this correctly, allowing the enemy to attack, then clear this location from the staging area (or active location slot by killing something else with Legolas). The location will then go to the enemy as a shadow card, but you can now kill the enemy before it gets to trigger the card! This will require some cards to align just right, but you can avoid the nasty shadow effect on this card. The shadow effect will protect the enemy from all damage that round and give it a small +1 attack bonus. Stacking these locations on one single enemy can also work well, though you have to keep in mind that the attack buff will stack. But since you know the card is going to come during the next attack, you can use a slightly stronger defender to take the attack!

Treacheries
The heat of battle against a sorcerer and his army is bound to include some nasty treacheries. Fortunately, this only includes one new Sorcery-traited treachery, which helps to reduce Thaurdir’s healing capabilities. The other treacheries aren’t great to encounter, though.
- Death and Decay: Another piece of art worthy to be included in a Nightmare scenario. This Sorcery treachery will force players to discard three cards from their deck. They then go through their discard pile and check to see if there are any attachments in there that are also under their control in play. If there are, those attachments are discarded. If there are no attachments discarded this way, the treachery gains surge, which is not something you want out of Sorcery treachery, as it could lead to additional attacks made by Thaurdir. The effect of this treachery can easily be avoided, though. Either don’t play with any attachments (Burglar’s Turn works well), don’t play with duplicates (Council of the Wise), or find a way to transfer attachments to other players. The Dunedain signal attachments work well for this reason. You can have them be controlled by other players so that if you happen to discard any other copy of them, you don’t have to discard any that are in play. This almost makes Renewed Friendship a viable card to bring for multiplayer games of this quest, as you can get some consistent threat reduction or readying out of it. Other cards, like Reforged, Second Breakfast, and Erebor Hammersmith, can be used to retrieve any cards lost in the discard pile, so your attachments won’t be gone forever. It’s not the worst treachery in the game, and the lack of shadow effect makes it sting a little less.
- Howling of Wargs: Heard you like shadow cards, so this treachery gives you the option to deal one to every enemy in the staging area! This can set up Thaurdir’s Elite or make any optional engagements extra tricky in the combat phase. Your other option is to search the encounter deck and discard pile for a side-quest and add it to the staging area. With three new Nightmare side-quests in the deck, you will be spoiled for choice, but unless you cannot make more progress on the main quest or you have no other side-quests in play, I would go for the additional shadow cards. It might hurt for a little while, but some of these side-quests can ruin the game many turns down the road if you get hit with too many of them all at once. The shadow effect on this treachery is also quite nasty, though it has the option to fail if you manage to time it right. When it is revealed, you must deal 1 additional shadow card to each enemy engaged with you that has not yet attacked. If this is the only enemy you have engaged, congrats, the effect does nothing. If this is on the last enemy to attack you this phase, also congrats, it still does nothing. If you are playing with effects that can flip over shadow cards before they are resolved (Dark Knowledge, Silver Lamp, etc.), and you see this shadow card on an enemy, make sure to have it attack last. The enemies don’t have to attack in any order, so you can at least ensure this effect doesn’t do anything.
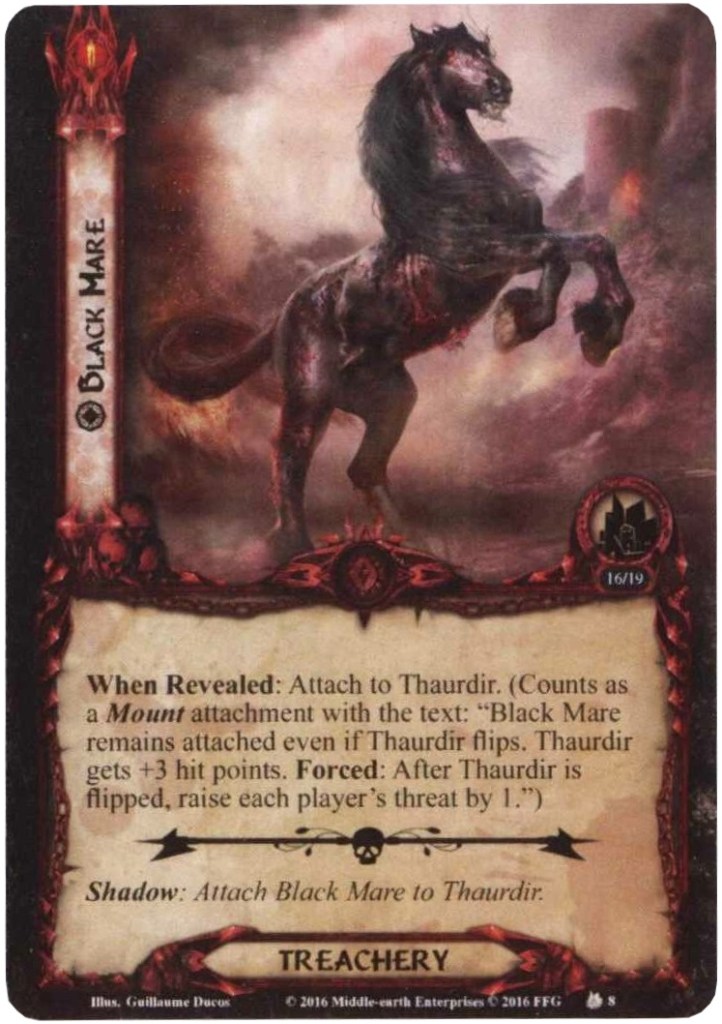
- Black Mare: Thaurdir joins the small club of elite enemies that get their own attachments, like Nazgul and the Balrog. Even better, this is a unique attachment for him, which we don’t see very often. This event will attach to Thaurdir and will stay on him whenever he is flipped. Since this card also attaches to him whenever it is revealed as a shadow card, it can be a difficult card to avoid, so you will have to keep in mind that Thaurdir will have this on him for the majority of the game. It cannot be unattached from him, so you will have to defeat him in order to be rid of this. Once attached, the Black Mare will grant Thaurdir a permanent +3 hitpoints, making him harder to kill and giving him an additional buffer to heal whenever he is flipped to his Champion side. The Mare also gives Thaurdir an additional effect whenever he flips. Each player must then raise their threat by a single point. This may seem small for a Nightmare card, but since this is triggering each time he flips to either side, it can start to add up to a monstrous amount of threat to overcome in this brutal quest. The only real remedy against this Mount is if you control Spirit ally Elfhelm, who will reduce your threat by 1 each time that this encounter card raises it. This only works for one player, though, so if you ever have the option, I would suggest canceling this treachery or shadow card. The only time I would let this go is if you are on the brink of killing Thaurdir. The additional 3 hitpoints will keep him alive for a little longer, but if you are in the endgame, the threat won’t matter too much.
Side-quests
With two out of three original side-quests removed from the encounter deck for this version, some room was left to be filled by new encounter side-quests. And the Nightmare version happily provides you with three new side-quests to encounter during your playthrough. While they are obviously bad to have in play, some will actually help you get through the quest more easily once you complete them. Others are mandatory to be cleared in order to win the game.
- Protect the Flanks: It’s nice seeing how you outnumber the enemies in this art; you don’t see that very often. It is important to clear this side-quest quickly, or you will accumulate a ton of damage over time. At the end of each combat phase, you must assign X damage to characters in play, where X is the total number of shadow cards dealt to enemies in the staging area. This works kind of like Archery, only at the end of combat instead of at the start. This means you can deal damage to any character that was going to leave play anyway, like Gandalf, Sneak Attacked allies, or allies brought in by Tactics Imrahil. But the point of this side-quest is to force players to engage more enemies and deal with them instead of letting them sit in the staging area for 5 turns, afraid to handle the tower of shadow cards gathering on top of them. You are going to have to deal with this side-quest sooner or later unless you have a good healing strategy and can keep the number of shadow cards in play to a minimum. When you are going to this side-quest, remember that it is a Siege-quest, so you are questing with your defence values. This will leave fewer characters available for defending during the combat phase unless you have readying effects. It can be difficult to time when to go to this side-quest, but it will relieve you from having to lose characters at the end of the turn or having your healers overworked.
- Rally the Fighters: This side-quest is annoying to anyone bringing any form of shadow cancellation or ways to flip over shadow effects ahead of the combat phase. The side-quest does two things and is probably the simplest out of them all. One, it surges, bringing forth another encounter card, letting the encounter deck likely outpace you. Second, it will provide every shadow card in the game immunity to player card effects. No more Balin, Dark Knowledge, Shadows Give Way, or Hasty Stroke for you. If you were not bringing any of those cards, then the immunity to player card effects might not bother you so much, allowing you to ignore this side-quest and prioritize any of the others. The surging bit is still annoying, but at least it won’t actively harm you during the game. If you are dependent on the player cards that interact with the shadow cards in this quest, then you will have to muster 8 progress on this side-quest in order to beat it. This is a regular willpower quest, so it might be a little easier than the other two new ones. Beating this side-quest also gives you a reward! Upon completion, you get to discard 1 shadow card from each enemy in play. This can buy you some time from Thaurdir’s Elite discarding allies, and it can also make Protect the Flanks hurt a little less. It’s not a bad reward, but you will probably like the ability to cancel shadows again a lot more!
- Sever the Head: I’m not sure how much that does to an undead, but hey, you go and sever that head! See if it works out! In all fairness, this quest is a Battle quest, meaning you will have to sacrifice some of the attack strength you have to overcome this quest. Hopefully, you manage to beat it on your first try since it otherwise is going to take away a lot of attack strength during multiple combat phases. You will need to commit to this side-quest anyways unless you get really lucky and hit this while Thaurdir has no hitpoints remaining and no chance to heal back up. That’s because this side-quest is meant to boost Thaurdir and make him even more of a challenge. It grants him +2 threat, +2 attack, and immunity to all damage. This means that he cannot take any more damage, but any damage already on him will remain there (unless he heals it off). The additional threat and attack are troublesome, but the fact that you cannot defeat Thaurdir with this in play means that you will have to go here eventually. Luckily, the Battle keyword should not come as a surprise, as round 1 of this quest already starts you off Battle-questing. Time this when you have fewer enemies to worry about, and hopefully, you can clear this right away. Now, you just have the rest of the body to deal with.

Tips and Tricks
- If at first you don’t succeed, try and try again. This is a rough quest, even outside of Nightmare mode. You may need several attempts here in order to even get through the initial 3 rounds. Once you have made it past stage 1, there is a real chance of beating this quest, but it can still pull the rug out from underneath you.
- While Stronghold Tower and Rally the Fighters protect the shadow cards in play from being cancelled or discarded, these effects are not permanent. You should still include ways to save yourself from a bad shadow card. The ultimate card to bring is Shadows Give Way, which will discard all shadow cards in play. This is a great move after having just cleared the location!
- Keep in mind that this scenario now adds Battle and Siege as questing mechanics. That means your decks should be well-balanced to fit any method of questing. Adding readying effects on your characters should allow them to quest and use their stats during combat as well!
- Healing will be important to protect you from many of the direct damage effects. Keeping your characters healthy allows you to take unexpected +1 attack shadows a lot more easily. You also prevent Protect the Flanks from thinning your board state in a turn or two.
- Threat can be a dangerous thing in this quest. While it won’t matter too much for your engagement costs, you will start to collect additional points from encounter card effects as you go, so bringing threat reduction will help to keep you in the game for longer. Once Thaurdir gets his steed, you are really on a timer and have to go through this quest a lot faster.
- Peeking at shadow cards can allow you to make the correct call on who to defend with. If encounter cards allow it (not protecting shadow cards with player card immunity), something like a Silver Lamp can show you how to best plan your defences. It won’t protect you from any “deal additional shadow cards” effects, but at least it is part of a solution to your defences.
Playthroughs
This is a notorious quest that has stopped many players from making videos on the Nightmare version since the chance of recording a successful run is quite small. The decks listed in the videos below are strong enough to bring to this scenario, so you can take pointers from those decks for yourself to hopefully make something that gets you through this quest!
- True solo, Outlands deck: https://www.youtube.com/watch?v=17KY7CNg7f8
- True solo, The One Deck: https://www.youtube.com/watch?v=79Vb0bC5X0U
It sure took a while to write this article, but I’m glad it is behind us now. Don’t think I’ll be seeing these Nightmare cards anytime soon again. But with this quest done, the NM Angmar Awakened cycle is now finished. I will move on to the Dream-chaser cycle and hope to finish that before the end of the year, though a lot of work will have to be put into that. I find myself having less and less free time to work on articles, but perhaps I can rely on help from the community. In any case, more Nightmare articles will be released soon, alongside other content!

