Here’s a piece of trivia: Venom and poison are two different things. Briefly, poison is ingested or inhaled and venom is directly injected into a wound. Both can make you unconscious if they are severe enough. In this scenario, whether it’s poison or venom, you want to make sure that you try not to find your characters unconscious. But more on that a little later.
Flies and Spiders
- Found in: On the Doorstep Saga expansion, scenario 1
- Community difficulty: 6.1
- Encounter sets: Wilderland, Flies and Spiders
- Quest cards: 4
- Play if: You are continuing the Hobbit saga, you want to play a quest with an interesting mechanic, you want a somewhat easy Hobbit saga quest
- What’s different about this quest?: Multiplayer games are split between 2 stages, Venom and Poison cards, Saga quest with the Baggins cards and the One Ring
- Solo or multiplayer?: The quest plays very different when adding more players to the game. They will be sent to stage 4 while the first player goes to stage 3 and has to catch up to the rest, much like the previous scenario in this saga. I will recommend trying both styles, and seeing which one you prefer.
- Can I run side-quests for this scenario?: I won’t recommend it, though you can get away with wasting one round at the beginning for a side-quest, just to have one in the VD. However, the longer you spend trying to clear side-quests, the more poison cards get in play and will cause characters to get unconscious. This is a quest where speed is pretty important, so clearing the main quest cards should be a priority. In multiplayer games, the players can go up against side-quests near the end of the game, while they wait for the first player to catch up.
- What to look out for: Strong enemies that hit hard and will deal poison damage to characters, characters getting unconscious if they take too much poison, lack of action advantage.

In this, the fourth scenario of the Hobbit Saga, players find themselves deep in the heart of Mirkwood, battling spiders galore. The scenario itself takes it’s name directly from the chapter title in the book where the dwarfs and Bilbo find themselves in the exact predicament that you are in. After defeating the previous quest, arguably the worst in the game, this quest does not miss at all. For the beginning of the quest, you find yourself in a fight for survival against some pretty nasty enemies. But, none of the spiders are “boss” spiders (I’m looking at you, Ungoliant’s Spawn!) but rather mid-level spiders that come out in numbers. The encounter deck has a total of 18 spider enemies, practically half of the 38 encounter cards in the deck (The Spider’s Glade doesn’t get added to the encounter deck) and then adding to that total the 3 copies of Dark Bats, that gives a decided advantage to drawing enemies from the encounter deck by pushing the total number of enemies to well over half of the deck. This makes your deck building pretty clear. You really need to be able to attack and defend pretty well in this scenario. Really, other than these bats, the enemies can be pretty hard to deal with right out of the gate. The spiders can attack for anywhere from 1 (an unbuffed Fat Spider) all the way up to 5 (Old Tomnoddy). But the majority of spiders attack for around 3 or 4. Having a hero defender like Beregond or Spirit Dain is a great way to help yourself from the beginning, and through the whole quest.
Poison mechanic and Venom keyword
The new mechanic in this quest (mentioned above) is the venom/poison mechanic. When a spider with the Venom keyword damages a character, you give that character a poison counter. When the number of poison counters are equal the the characters hit points, the character becomes unconscious. Unconscious characters can’t do much, at least on first glance. They “cannot quest, attack, defend, collect resources, trigger abilities, be poisoned, or ready (except by effects that target unconscious characters).” But, you know what unconscious characters can do? They can pay the cost of other cards. So those Silvan events like The Tree People and Feigned Voices could be used. Actually, bringing Feigned Voices is not a bad idea if you are playing even with just a little Silvan flavor. The fewer attacks are made against you, the fewer poison tokens you have to place in case things go wrong.
I love this mechanic (read: it sucks for players) for two reasons. First, the poison counters are cards from your own deck. While I get that its tough to lose cards from your deck, it means that poison counters are finite. If you run out of cards in your deck, you run out of poison counters. So going into the scenario, if you are playing with a Dwarf mining deck or with a Noldor draw deck, you may be able to avoid adding poison counters by the fourth quest stage. Also, the poison counters get discarded into your discard pile once a character is unconscious, so playing cards like Dwarven Tomb, Erebor Hammersmith, and Stand and Fight are solutions to the constant discarding of those cards. Because it’s possible to run out of cards in your deck and, therefore poison counters, you will want to weigh using Will of the West. It may be nice not to have poison counters, but it may be frustrating to have all your Steward’s of Gondor in your discard pile. Second, and probably more important for me, is that it seems super thematic to have spiders poisoning you and incapacitating your characters. After the previous quest and how it missed the mark with mechanics, this is a welcome change back to mechanics that are pretty great.
Lastly, the poison counters are considered condition attachments. While there may be some deck somewhere that runs aggro condition removal with, say Elrond, Miner of the Iron Hills and Athelas, I would advise against trying to win by only mitigating the poison counters. There will be WAY too many poison counters in play to try to remove them all. But, having a few of those cards in your deck is still a good method to keep key characters from suffering the effects of poison.
Quest card 1: Into Mirkwood – 9 quest points
Now that the generalities are out of the way, let’s talk specifics.

The first quest stage is a pretty standard, with the exception of adding a copy of Bilbo’s Magic Ring to your deck. While this version of campaign mechanics seems a little clunky, it gets the job done. And since you must use the Bilbo that comes in this box, fishing out the ring (and any other treasure you collected from the Hobbit: Over Hill and Under Hill) is pretty easy. If you are playing multiplayer, make sure to distribute the treasure to the correct players before the game that way you can easily fish out the appropriate cards on Bilbo’s first trip around the table. Also, I wouldn’t be nervous about saving resources on Bilbo in this scenario. Use them early and often to get everything you need out.
When you reveal the first encounter card from the deck, you will want it to be a low threat location, but unfortunately you don’t have any choice. Most encounter cards have either two or three threat. While the encounter deck isn’t trying to threat you out in this scenario, it should be part of your strategy to keep your threat low so that you can decide which enemies to engage and which enemies to leave in the staging area. So make sure that you quest successfully from the first round.
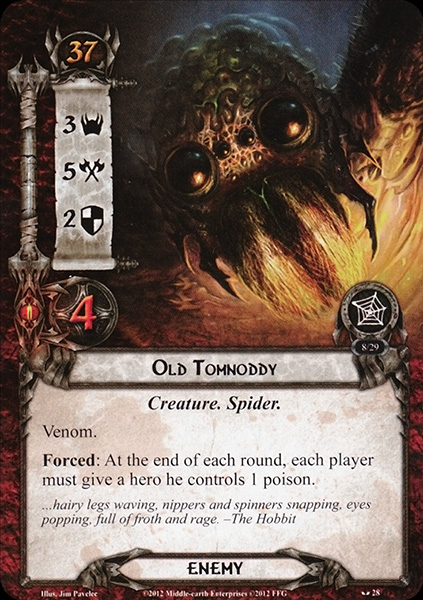
You will likely have an enemy in the staging area at this point and there are a few strategies that will work. First, don’t let the enemy attack by using cards like Feint or The Wizard’s Voice. A second strategy is to hope that the enemy isn’t Old Tomnoddy with 5 attack, or even the Wicked Spider with 4 attack. If hoping isn’t how you like to win a game, then either Beregond, Beorn Hero or even a Grimbeorn the Old can take a few swings from those nasty spiders. A third strategy is to use chump blockers and know that they are going to die pretty often. Defender of Rammas in an monosphere tactics deck is a great first round chump and in many cases will stay around for at least two defenses. The last method is the one I would not use unless I had to: Bilbo’s Magic Ring response. Yes, you get to avoid the damage altogether, but a three threat raise in the first round may be tricky to handle in the upcoming rounds. Of course you can play a deck that tries solely to mitigate threat with say three hobbit heroes and using the Shirefolk and Galadhrim’s Greeting let’s say, but I’m not sure that strategy can take you to the end. There are just too many enemies in the encounter deck.
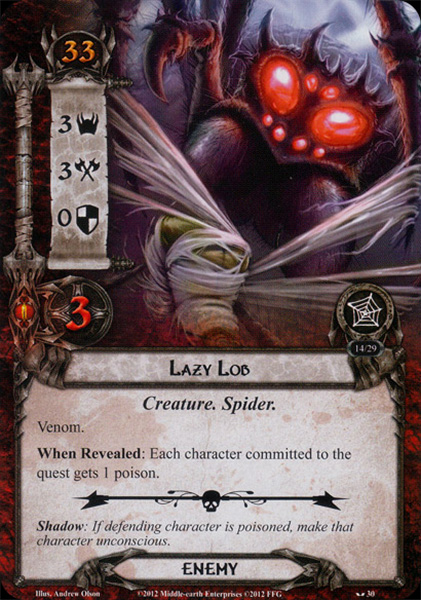
From the second round on, through the exploration of this quest card, you’ll want to do what you can to build up your board state. The poison mechanic keeps you moving forward because it’s possible that you keep losing characters to unconsciousness as fast as you can put them out on the board. There are several when revealed and forced effects in the deck that just add poison counters to your characters. The worst may be the when revealed effect on Lazy Lob that puts a poison counter on each character committed to the quest. Sure, a simple Test of Will can cancel it, but it can be nasty if you are running an ally swarm deck. You may find that half your allies and a hero end up unconscious. Now what? During the first stage, you may want to keep Forest Stream in the staging area to help get rid of the poison counters. And it’s only two threat, so it’s a definite consideration.
Another consideration that must go into your deck for this quest is shadow cancellation. Hasty Stroke and Quicker than Sight is great, but if you are constructing a deck from scratch, it may be worth using Hero Gandalf because he can quest and defend from the beginning. Couple that with Silver Lamp and Gandalf’s Staff, you can cancel some of the nastiest shadow effects that will go off. And trust me, there are some doosies.
So this isn’t like We Must Away, Ere Break of Day where you’ll want to turtle for 7 or 8 rounds to build up your board state. There is a balance that you have to find and, in my experience, it’s a little different with each deck you play as to how long to stall on the first quest stage. Also, there is no reason for you to keep any resource tokens, so spend all of them and don’t let them sit around. They soon will vanish.
Whenever your last round is at the first quest stage, make sure that you don’t exhaust Bilbo’s Magic Ring to get a resource. You will need to do it AFTER you move to the second quest stage.
Lastly, before you move on, you should also take into consideration the effect on the next quest card. If you are playing in true solo, it’ll be fine to leave all the enemies in the staging area during the last round of questing because they are going bye-bye in the next stage. If you are not playing true solo, ignore that advice because all those enemies and locations are going to still be hanging around for you to deal with. After the ninth point of progress is placed on the main quest, the players advance to stage 2.
Quest card 2: Lost in the Dark
The second quest card is where the fun really begins. If you are playing multiplayer, you’ll want to time this out as best you can so that each player has the best chance for survival. You are asked to split the party and set up separate staging areas for the first player and then the other players in the game. Sometimes these off-the-wall mechanics miss the mark, but in this case it’s a thematic home run. And the only thing this particular quest card does is set up for the next two stages.
If you are playing solo, the second quest card isn’t that confusing. You discard all the stuff in the staging area and move on to stage three. The theme here is when Bilbo gets separated from the dwarfs and needs to fight his way back to them to help rescue them. And how he does that will be apparent shortly.
If you are playing multiplayer, then the first player goes off with Bilbo to stage three, but the rest of the troop goes plodding along to stage 4 where the chances of getting decimated is greatly increased. This is one place where I feel playing solo has a big advantage to playing multiplayer. And, this is the reason that you want to make sure that your first player is the person who can defeat stage 3 the quickest.
Quest card 3: Captured by Spiders – 11 quest points
In stage three, the first player gets to keep Bilbo, but also must remove all resource tokens they have. In essence, you are starting over. Bilbo is the only character you have that can do anything. Everyone else is unconscious, and cannot ready. Fortunately, you saved Bilbo’s Magic Ring action to get one resource now, and, because you haven’t revealed anything new from this staging area, you have one round to set up. I have found that in solo play, by playing an ally and freeing up a character every turn with two Baggins tokens (one from Bilbo’s Magic Ring and the other from the resource phase) is enough to stay ahead of the encounter deck in most cases.

Like in most quests, Eowyn could be a lynch pin in beating this quest.
For this particular stage, the only real help I can be is that you’ll want to either free up your questing hero or, in some cases, your defending hero first. Heroes like Tactics Eowyn are great because even if she become unconscious, she doesn’t lose her attachments. Golden Shield and one Unexpected Courage from earlier in the game allows her to pull double duty. And while you may not feel like using the “Eowyn bomb,” it may be worth using especially if your threat is either really low, or high enough that you are going to be engaging enemies anyway. Every spider in the encounter deck will fall victim to her and her +9 attack. Also, this is another case where playing Silvans is nice. If you bounce them out of and in to play, they can come back into play fully healthy and conscious. The Host of Galadhrim is great for doing this to all your Silvans, and it feels even more like “achievement unlocked” when you do it here. Although getting four resource tokens to play it may be difficult since your unconscious heroes don’t collect resources.
If you are playing solo, you’ll want to spend enough time here to get your board state set up as good or better as it was during the first quest stage. If you are playing multiplayer, you’ll want to make sure to get through this stage quickly so that you can help everyone when you recombine staging areas at the fourth quest stage. Note that you can only join the other staging area at the end of the quest phase. This means that if you place your final bit of progress during the combat phase, you have to wait until after the next quest phase.
Quest card 4: Battle with the Spiders – 3 quest points

The fourth and final quest stage can be a challenge when playing multiplayer and less so if you are playing solo. The first thing is that The Spider’s Glade moves to the staging area from out of play and please note that it doesn’t have victory points. This means that you run the risk of seeing this location again once you explore it. Its the Forced effect on it that is really nasty. You have to add more spiders to the staging area with its affect. Also note that it’s only from the encounter deck and not from both the encounter deck and discard pile. This really thins the encounter deck down to make you more likely to draw one of the two copies of Poisoned by Spiders or Caught in Webs. The other things about draw from the encounter deck only is that it prevents you from taking a chump spider out of the discard every turn and makes you engage many different spiders.
So whether playing solo or multiplayer, you’ll want to travel here ASAP to give your characters a break. But, realize the spiders will be coming fast and furious. The delicate balance of questing and defending here is vital. Using cards that can boost will power after questing is certainly a plus. Elrond’s Counsel pulls double duty, Hero Treebeard with a few of his standard attachments like Ent Draught and Self Preservation can be great, too. But remember, healers are very squishy and likely to be unconscious, so make sure that Treebeard is self-sufficient. If you went with the Noldor discard theme or the Dwarf Mining theme, this is where you may reap the rewards for it. If you deck yourself, poison does not get added. You don’t have to worry about poison or the venom mechanic again!

Playing multiplayer, it’s safe to say that the first player will still have some characters unconscious and as the spiders swarm the other players, inevitably more characters are going to get poisoned. Remember my advice from earlier though, that while it doesn’t make sense to remove every poison counter, a Sneak Attack, Elrond to strategically remove a poison counter or to heal up someone could be a smart play. If you have been saving resources on Bilbo, this would be the time to spend them.
After you explore The Spider’s Glade, this quest stage (and the scenario) is pretty much down hill. If you aren’t location locked by this point, then 3 quest points is not a challenge. You should be able to cruise to victory during the next quest phase after exploring The Spider’s Glade.
In general, I find that you can be successful with many types of decks and using many types of play styles. In this scenario, good decision making is rewarded, maybe more so than in other scenarios. Do you send Bilbo to the quest? Do you use the Response on Bilbo’s Magic Ring? (usually that answer is no for me, but I have done both under the right circumstances!) One of the things you don’t see in this scenario is surge, except conditionally on a few treacheries, so surge mitigation, like Lanwyn or the Lampwright is not needed. In contrast, maybe one of the best utilities to have in your deck for this scenario is encounter scrying. While scrying is powerful usually, in this scenario with so much potential for possible poison, it can really be clutch. One copy of Henamarth Riversong could do wonders on figuring out what to do and how to get rewarded for your decisions when playing solo. Far-sighted in solo play is also very good for being able to plan out a few rounds because the shadow effects can be nasty. While it loses some potency in multiplayer play, it still can be worth having in your deck for this quest for a small cost of Doomed 1.
Playthroughs
There are not as many playthroughs of this quest, but I hope you will find these playthroughs enjoyable, and they should answer any questions you might have.
- True solo: https://www.youtube.com/watch?v=ZnlHjSaysCc
- Saga 2 player, progression style: https://www.youtube.com/watch?v=PjtZ5RMmaiI
- Sage 2 handed, progression style: https://www.youtube.com/watch?v=jt6VXP9V0Us
I hope you enjoy playing this scenario. It’s one of my favorites! With the forest of Mirkwood now behind them, the company is close to Erebor and will try to infitrate the mountain in the next quest in the sage: The Lonely Mountain.

I’m afraid I haven’t read the other articles in this series, but you reference resource acceleration on Bilbo. Just wanted to make sure you’re aware that both saga versions of Bilbo can’t gain resources from player card effects (except for his ring).
LikeLike
You are correct. This second Baggins version of Bilbo can’t gain resources from non-Treasure card effects, it was missed during the writing and the review of this article. Thanks for letting us know, the article has been adjusted.
LikeLike
We are playing this quest (2 players), 6 losses in 6 games. The player on stage 3 is never able to clear it quickly, and the player in stage 4 usually gets swarmed.
LikeLike
Made it after 11 attempts!
LikeLiked by 1 person