Right after the release of Encounter at Amon Din, we are finally back to a regular “Against the shadow” difficulty quest. In Normal mode of Assault on Osgiliath, we come across the infamous Treacheries, The Master’s Malice, and The Power of Mordor, along with other classic cards from this cycle. Thankfully, for players’ sanity, those treacheries have been removed in Nightmare mode and have been replaced with some milder treacheries, but they are still really effective. A lot of things have been fixed in nightmare mode. The most important is a first-turn win (as discussed below), which was possible with the right amount of luck. Now the game will last for much longer since Locations such as Palace Remains have been added to the quest. In general, the difficulty of the quest has slightly increased (as someone expects) even though some tough treacheries got removed. Responsible for this increase in difficulty is the new enemies and locations. As we discuss below, both nightmare mode enemies and locations seem to be much tougher than the normal mode ones, plus the toughest enemies from normal mode (such as Mûmak) still remain in the encounter deck. Overall, I recommend the nightmare mode of Assault on Osgiliath over the normal mode, as it gives a great challenge to the players (without the frustration of the nastiest treacheries), and also because it is much more well-rounded in comparison to the normal mode.
Nightmare Assault on Osgiliath
- Found in: Assault on Osgiliath Nightmare pack
- Size: 1 new rules card, and 19 new encounter cards
- Increase in Difficulty: Yes, but slightly. That means that some of the most dangerous treacheries have been removed from the quest (such as The Master’s Malice and The Power of Mordor), but other constraints don’t make the quest easier. For example, some of the weakest enemies (Southron Phalanx, Uruk Soldier) have been replaced with much tougher ones (Haradrim Warrior, Invading Orc). Overall, this quest became more balanced in the NM difficulty, and personally, by playing both difficulties, I have to say that I enjoyed the NM more, both as a challenge and as a balanced gameplay.
- Fixed Loopholes: As said above, the NM version of Assault on Osgiliath fixed a lot of gameplay imperfections. One of those is the possibility of 1st turn win from the players in two different ways. One of those ways is with The Power of Mordor. When this card is revealed (in Normal mode) on 1st turn, it would be possible for the players to win the quest if the revealed cards aren’t Osgiliath locations. The NM version removed that card, and for a good reason. The second way the players can achieve 1st turn win is by choosing The Old Bridge and Ancient Harbor as initial locations in the staging area and clearing them the same round using their effects. That will require, of course, that no Osgiliath location will be revealed during the staging step, but still, it is possible to give the players a 1st turn win. The NM version prevents that by adding an extra Osgiliath location to the staging area from the beginning of the game. Finally, the new rules card gives a unique mechanic which assists players in clearing Osgiliath locations in the staging area. That mechanic tends to preserve the momentum of the game and prevent it from slowing down.
- New mechanics introduced: No new mechanic has been introduced in NM version. The new rules card gives an additional assisting ability to the players, but still no new mechanic here.
- Play this scenario if: You want to avoid most of the frustrating treacheries of the normal difficulty of Assault on Osgiliath or if you want to play an overall well-rounded version of Assault on Osgiliath, which is able to give you a good challenge.
- Solo or multiplayer?: What happens in this quest, both in normal and NM mode, is that it becomes harder to win with more players. In a 4-player game, it is almost certain that the players will reveal new Osgiliath locations each round, and as a consequence, it will take forever to conquer all those locations. On the other side, in true solo, it is quite hard to handle everything with a single deck. To do so, one will need both a combat-heavy deck and some mid-high questing deck. Taking everything into account, the sweet spot is a 2-player game.
- What to look out for: A lot of archery damage, multiple attacks from enemies and attacks from the staging area. A lot of heavy enemies.
New Rules

After the players replace the necessary card to play the NM mode, they have to add Palace Remains to the staging area during the setup. That’s one of the two core changes that the new rules card brings to the quest. The second change is that if there are more Osgiliath locations at the staging area than players in the game, then the rules card gains a Response effect. That effect allows players to choose a non-unique location at the beginning of the quest phase, and if they quest successfully and clear the active location (if any), the remaining progress can be assigned to the chosen location. In practice, this effect seems to improve the quest in the sense that it becomes more familiar towards a larger player count. Of course, the limitation of the number of Osgiliath locations to the staging area being larger than the number of players doesn’t make this effect super useful. It has been added just to prevent location lock or extensive gameplay during 3 and 4-player games.
New Setup
The only thing added to the setup is the Palace Remains location to the staging area. As stated above, this additional location has been added as a measure to prevent players from winning in the 1st round, but also to make the quest more difficult (don’t forget that’s a Nightmare mode). The normal setup rules apply as usual. Each player needs to choose one enemy and one unique location and add them to the staging area. The combination of those setup rules makes the staging area quite crowded from round 0. For example, in a two-player game, there will be five encounter cards in the staging area, and two additional cards will be revealed from the encounter deck in the first round. That means that players need to hurry and clear as many locations or kill as many enemies as they can in the early game in order to avoid the worst.
Cards Removed
The following cards were removed from the regular encounter deck to make space for the new Nightmare cards:
- 4x Uruk Soldier (Simple enemy that got replaced with his much tougher version, Invading Orc).
- 3x Southron Phalanx (A pretty normal enemy that got removed for more locations).
- 2x West Quarter (A location that replaced with other locations).
- 2x East Quarter (Both West and East quarters were two interesting cards to have in an encounter deck. Personally, I like them but I guess they got removed under the umbrella of mitigation of mono sphere decks/avoiding quest specific decks).
- 1x Ruined Tower (Making space for new locations, still 2 remain).
- 1x Ruined Square (It’s always nice to see one less encounter card that surges. Still two copies remain).
- 2x The Master’s Malice (Thank god it was removed! We notice that in NM mode, they wanted to mitigate the “forced” mono sphere decks).
- 2x Street Fighting (A nasty treachery that stall players from defeating the quest).
- 3x Southron Mercenaries (One normal enemy with an unpleasant shadow effect, seems fair that he was removed).
- 1x Uruk Lieutenant (One less of the tough enemies, still one of them make it to he NM deck).
- 1x Orc Arbalesters (I wish more of those have been removed. We see once more the mitigation of mono sphere decks).
- 1x The Power of Mordor (One of the treacheries one expects to get removed cause it allows for easy win and possible 1st round win).
The Quest

After the setup, you might notice that the quest has not changed a lot. The only thing added is the Palace Remains to the staging area and a new rule that you should always have in mind. By playing the quest, I caught myself (several times) forgetting about the Response on the rules card. Thankfully that effect is optional (since it is a response), so by forgetting completely about it, the players don’t play against the rules; they just make the game “extra” Nightmare. I suggest that you place a token or a die on the rules card just to don’t forget to check whether or not you can use that Response. It can literally change the game; it can be really useful with high-threat non-unique locations, such as Orc War Camp (of course, if there is an Orc enemy in play).
In general, Assault on Osgiliath is a linear quest with just a single quest card and a well-established goal. You just have to clear and reclaim all Osgiliath locations taken by the enemy. As we will see later in our analysis, the nightmare locations make that goal much harder to achieve. The limitation on the single quest card that prevents player card effects from placing progress to locations in the staging area leaves few toys for players to play around with. Still, player cards can affect the active location (so Legolas still can explore by killing Orcs!), but that won’t benefit in obtaining Osgiliath locations faster. Moreover, the rules card effect won’t help players with their goal either since it is only available when there are more Osgiliath locations in the staging area than players in the game. Luck is a great component in this game and especially in this scenario. Only if the players are lucky enough not to reveal a lot of Osgiliath locations for a couple of rounds, and also if they are well prepared, outpace the encounter deck, and claim all the Osgiliath locations, then they will win the quest.
The Encounter Deck
Global
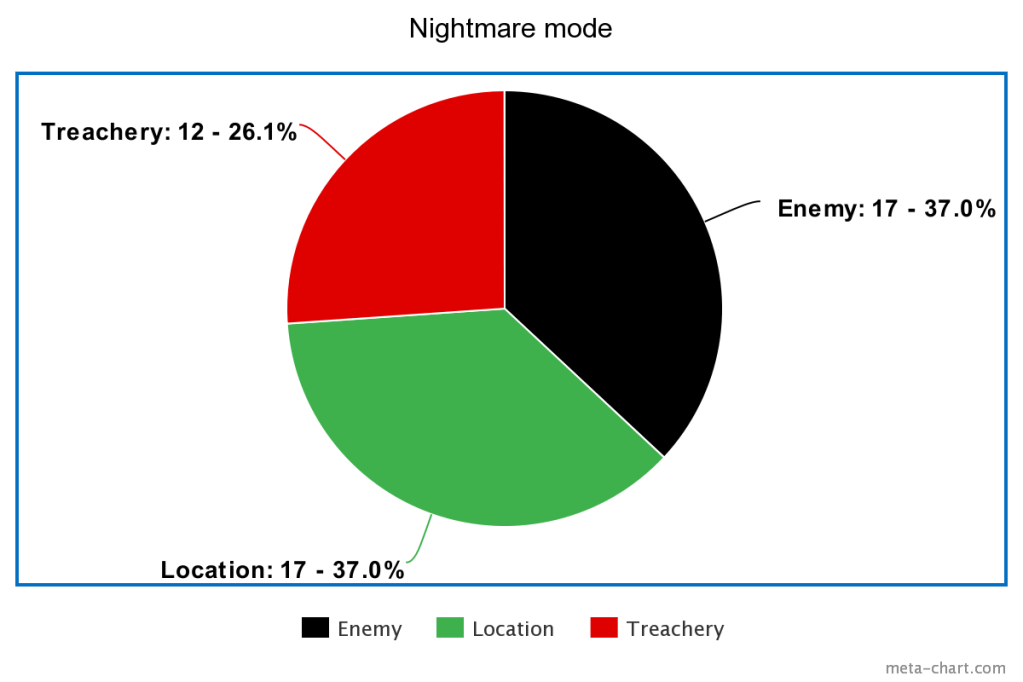
- The new encounter deck is made up of 46 encounter cards. 4 less than the regular version of this quest.
- The Shadow effect percentage drops significantly from the Normal mode by almost 10%. Only 46% of the cards in Nightmare mode have a shadow effect.
- The average threat per card remains at 1.56. But it should get a little bit bigger since there are cards, such as Haradrim Warrior, with a variable threat.
- The Surge keyword appears on only 4 cards, which is almost half of the surge in Normal mode. Still, many cards can reveal more encounter cards through their effect.
- Doomed keyword appears on 4 treacheries. Actually, they are two different treacheries with 2 copies each. One of them, Southron Support, has a really high value of Doomed 3, so players are advised to keep an eye on their threat level and try to keep it low.
- With so many Harad enemies, the Archery keyword is abandoned among the encounter cards. Healing is essential for this quest, especially with a high number of players.
- Immunity
- All locations are immune to getting progress from players when they are in the staging area. But keep in mind that technically they aren’t immune to player card effects, so players can still use Thror’s Key or Mariner’s Compass to their advantage. Only Palace Remains completely immune to player card effects.
- Mumak cannot have attachments or take more than 3 damage each round.
- Allies are unable to defend the Lieutenant of Mordor, and his When Revealed effect cannot be cancelled.
- Players are unable to travel to The Old Bridge or Ancient Harbor. They must clear these locations in the staging area.
The statistics above include the Palace Remains, which is added at the staging area during the setup. The same rule as the normal mode of this quest applies here. Be prepared for a combat-heavy quest. After you have taken control of most of the locations, then only Enemies and Treacheries (which might reveal more enemies) will be revealed from the encounter deck. So don’t forget to get that combat deck with you!
Enemies
Two new enemies were added in the Nightmare mode. One does not want more enemies in a quest with already pretty tough ones. One of the new enemies came to replace the Uruk Soldier as a much tougher version of it, and the other came to enhance the element of locations being controlled by the players, along with the Archery keyword.

- Invading Orc: As mentioned above, Invading Orc seems to have come to replace the Uruk Soldier. That seems to be the case because both enemies have exactly the same Forced effect. That effect states after the Invading Orc (or Uruk Soldier) attacks and destroys a character, that character’s controller returns a location he controls to the staging area. That effect might be devastating if that player control multiple Ruined Square and Ruined Tower locations, then he has to return all of them to the staging area!
Of course, Invading Orc has much higher stats in comparison to Uruk Soldier. Most impressive is his even higher attack (at 5), which is now more likely to trigger his Forced effect. To make matters worse, the shadow effect of Invading Orc is exactly the same as its Forced effect. In total, we notice that the return of Osgiliath locations has become much easier to happen in Nightmare mode. The high defense and hitpoints (of 3) doesn’t make Invading Orc easy to kill. You can no longer Straight Shot it with Aragorn, as you could do with Uruk Soldier. Now you will need some capable attackers to take it down, and you need to get them as soon as possible if you consider its low engagement cost of 20. The best strategy against Invading Orc (if you haven’t managed to build your combat line yet) is to try and keep it in the staging area (it has a relatively low threat) either by using a secrecy deck or by various threat reduction/engagement control cards.

- Haradrim Warrior: Is a pretty tough enemy to encounter, especially in the late game. That’s because his threat is equal to the number of locations controlled by the first player. In the late game, that number can easily be above five, so players should have been prepared with “engagement control” cards to move Haradrim Warrior out of the staging area as soon as possible. With 3/3 attack and defense and 4 hit points, he is a mid-heavy enemy to defeat. The best strategy against Haradrim Warrior is to remove him from the staging area and fight him as soon as possible. His Archery value is equal to his threat, which scales with more locations controlled by the first player. That means the player might deal a big portion of damage among their characters each round. To make matters worse, when Haradrim Warrior engages a player, he gets +X attack and defense till the end of the round, with X being the number of locations controlled by the first player. In general, this enemy scales really quickly when the first player controls many locations, and he is capable of threatening the whole game if the players are not prepared for him. His shadow effect is one of the worst, in my opinion. When you deal Haradrim Warrior as a shadow card, you have to deal one damage to the defending character. That is really dangerous when you chump block because if your defender needs just one more damage to be defeated, then the attack becomes undefended, and one of your heroes will be in trouble! So players need to consider this shadow effect and choose their defenders wisely.
Locations
There are four new locations added in nightmare mode. All of them are Osgiliath locations and don’t have any shadow effects. As will be discussed below, those locations are meant to prolong the duration of this quest and, of course, make the life of the players more difficult. Some of the new locations seem to punish players by discarding their cards (from hand or play) and by returning to the staging area after a player cancels the encounter card effect.

- Palace Remains: Is an interesting addition to the nightmare mode of this quest. As discussed above, the addition of this location not only prevents situations such as first turn win but also adds to the difficulty of the quest. At the beginning of the game, Palace Remains starts with zero threat, which is pretty rare to see, especially in a nightmare mode card. This location is immune to player card effects and gets +1 threat for every resource on it. A resource token is added to Palace Remains if it is in the staging area and after a player takes control of a location. Then, if there are 5 or more resource tokens on it, the players can travel to Palace Remains. In other words, the players as a group need to take control of at least 5 Osgiliath locations in order to be eligible to travel to Palace Remains. That effect works as a limiting factor against early wins and, as a consequence, prolongs the duration of the game. Palace Remains doesn’t have any shadow effect since it’ll never end up in the encounter deck. There is not much the players can do about it. The only thing I advise is to travel to it as soon as it gets 5 resources on it.
- Crumbled Battlements: This new location shouldn’t be a problem for Dunedain and Combat decks in general. It has some normal threat (at 3), and the only thing it does is to add an enemy engaged with a player. That effect triggers only when a player takes control of Crumbled Battlements. Then, that player discards cards from the top of the encounter deck until an enemy is discarded, and they put that enemy engaged with them. This Osgiliath location (like all of the nightmare mode locations) doesn’t have any shadow effect. That seems to be on purpose because Osgiliath locations cannot end up in the encounter deck after the first time they get revealed. That means as the game progresses, the players will notice a rise in the number of shadow effects. Finally, with just 2 quest points, it is fairly easy to clear that location (and discover the enemy “hiding beneath it”).
- Eastern Quarter: This is probably one of the most annoying locations in the quest. When a player takes control of Eastern Quarter, they have to discard all events from their hand. Without the proper preparation from the players’ side, this effect can lead to pretty inconvenient situations where the players can lose vital events. To make matters worse, the condition of losing control over that location is the cancellation of a “when revealed” effect of a treachery card. In other words, if a player (not just the player controlling Eastern Quarters) cancels the effect of a treachery (thankfully, that effect doesn’t apply for all encounter cards), then they have to return Eastern Quarters to the staging area. A good strategy against this location is for the players to avoid traveling to it as much as possible. Of course, that can’t happen forever. The threat (at 3) of this location is significant, so players cannot avoid it for a long time (unless they have some heavy questing deck or any workaround against encounter cards’ threat).

- Western Quarters: The final nightmare mode location addition is Western Quarters. Of course, its effect should resemble the Eastern Quarters location (as their name indicates). As a result, the two locations share the same “losing control” condition. That means that as Eastern Quarters so Western Quarters will return to the staging area if a player cancels the “When revealed” effect of a treachery card. Those two cards are here to restrict the use of “When revealed” cancellation cards (such as A Test of will). Additionally, when a player takes control of Western Quarters, they have to discard the highest-cost attachment they control. That effect isn’t so bad as the Eastern Quarters effect cause the players can calculate when they want to clear it, so an important attachment will not be discarded. In solo play, the player doesn’t have many options, though. On the bright side, Western Quarters has one less threat point (at 2) in comparison to Eastern Quarters. On the other hand, it requires more quest points in order to be cleared.
Treacheries
Three new Treacheries are added to the Nightmare mode. While we analyze them, you’ll notice that one seems worse than the other. Those treacheries are here to mess up with players’ threat and the engagement of enemies. Without further ado, let’s see the new treacheries.

- Relentless Attack: Is one really nasty treachery. Despite the Doomed 1, when this card is revealed, it attaches to the current quest. Then it counts as a Condition attachment with the text: “Each enemy gets -X engagement cost, where X is the number of locations controlled by players.” This effect can drop the engagement cost of enemies significantly, especially in the late game, when the players should control a lot of Osgiliath locations. On top of that, at the beginning of the encounter phase, if there are fewer than X enemies in the staging area, the players reveal an encounter card. In most cases (once again, especially in the late game), this effect will trigger, which means that players will regularly reveal an extra encounter card each round. That card seems to be catastrophic if you take into account that this quest has only a single quest card, so if Relentless Attack is revealed, it will stick with the players for the remaining of the game. Moreover, since there are two of those cards in the encounter deck, they can get stuck, which means they can both be in play at the same time, so enemies will get -2X threat, and the players will reveal 2 additional encounter cards each round (if they aren’t capable of canceling it)! Thankfully, it is quite easy to avoid sticking with this card for the whole game without cancelling it. The only thing you need are side quests! In general, this quest is really friendly to player-side quest decks, so it is highly advisable to bring them with you in nightmare mode too. A problem arises if you try to play in a progression style. The first player side quest cards aren’t introduced before Angmar Awakened cycle, so players either have to deal with it by cancelling it or they will stick with this card until the end of the game.
- Overrun Defenses: This Treachery has to do a lot with threat. When it is revealed, players have to add X threat to the total threat in the staging area, where X is the total number of locations the players’ control. Then, if X is less than 4, Overrun Defenses gains Doomed 2. If you thought this Treachery was pretty normal in comparison with Relentless Attack, you have to know that it comes with a shadow effect! The shadow effect states that the defending player should exhaust one character they control or 2 characters if they control less than 4 locations. Please keep in mind that the shadow effect refers to the locations that the defending player controls, but the when revealed effect refers to the total locations the players’ control. That makes it even harder to avoid exhausting two characters, which can easily lead to not defeating the attacking enemy this round. About the when-revealed effect, there are two worst scenarios here. Either the players control three locations (so Overrun Defense adds 3 threat and gets Doomed 2), or they have so many locations (probably in the late game) that Overrun Defense adds so much threat that they have to raise their threat score by a lot. Either way, this is a treachery you don’t want to see often in your game.

- Pressed On All Sides: This is the kind of Treachery that can be really annoying, especially because of its stalling effect. When players reveal Pressed On All Sides, they count the total threat of the controlled locations, and they compare it with the total threat on the staging area. If it is larger, then they raise 2 threat and immediately end the quest phase without resolving the quest. That is more probable to happen in the late game or if the players control a couple of locations and they have cleared the staging area (except Palace Remains, of course). This Treachery also comes with a shadow effect that gives +1 attack to the attacking enemy for each location the defending player controls. That shadow effect scales rapidly in the late game (as most of the nightmare mode encounter cards). This shadow might lead players to choose chump blocking, but you shouldn’t forget that other shadow effects (such as Haradrim Warrior‘s) might bring you into tough situations.
Tips and Tricks
- As discussed above, when the game comes to an end, or in late game, treacheries’ effects tend to be much worse. So, a general rule to have in mind is to try and finish the game as soon as possible! Unfortunately, cards that can place progress on locations in the staging area have no effect here because of the quest card. Although, despite exploring a location each round, players can affect the number of cards revealed in each quest phase and also the order of the encounter cards in the encounter deck (via encounter scrying effects). Some interesting cards are Risk Some Light, Firyal, Scout Ahead (!), and of course, Gildor’s Counsel.
- It is highly advisable to bring side-quests with you. Assault on Osgiliath is one of the best quests to bring your Thurindir deck with you, along with his toys (Scout Ahead, Legacy Blade, The Road Goes Ever On, Thalion).
- Players should pay attention when they want to cancel any when revealed effects. There are Osgiliath locations (such as Eastern Quarter and Western Quarter) that will return to the staging area when players do cancel such effects. Only on rare occasions should players cancel when revealed effects when they control such locations. In general, it doesn’t worth it to lose a couple of rounds to reclaim those locations from the staging area.
- It is advisable to avoid playing this quest in true solo. You will need to have one deck to focus more on combat and another for willpower and encounter deck control. So the best options are two-handed gameplay (if you want a solo game) or a 2-3 player game. With 4 players, the quest scales really fast, and it is possible to reveal almost all Osgiliath locations which will lead players to take control of all of them in order to win the scenario.
Playthroughs
If you decide you don’t want to test your nerves and patience on the nightmare mode of this quest, below, I provide some videos of other people playing it in NM mode. Enjoy!
- 2 Handed, Progression Style: https://www.youtube.com/watch?v=_giqIFDBlpk
- 2-Player with Seastan: https://www.youtube.com/watch?v=_PRIT2Ox624
I hope you enjoyed this article and that it gave you an overall idea of what to expect from the nightmare mode of Assault on Osgiliath and how you can beat it much easier. With only two more nightmare mode articles remaining, we have almost completed the Against the Shadow quests. There are still a lot more articles to cover all nightmare mode quests, but we are building some momentum to achieve this as soon as possible.

