Flight from Moria is an outrageous quest. It may not be precise, balanced and perfect game design, but it gives you the panicky, rushed, and uncertain feel that seems to perfectly represent the flight from the unknown Shadow and Flame. Unlike The Journey in the Dark and Shadow and Flame which also feature the Balrog, you never come face to face with the monster, but it chases you, grows stronger, and slowly picks off members of your party one by one until there is no one left or the remnants of your group finally escape from the Dwarrowdelf.
For some reason, the third quest in a deluxe box seems to be the most neglected and that holds true here. This quest is much less “standard” than Into the Pit or The Seventh Level but it can still offer some challenges and enjoyable games.
Flight from Moria
- Found in the Khazad-Dum deluxe box
- Official Difficulty: 8
- Best for multiplayer
- Play if you want to have a thematic but possibly punishing and very uncontrolled experience trying to escape an angry Balrog
- Unique Elements: numerous stage 2 quest cards that you can’t always plan for, an invincible enemy, dramatic choices and cinematic moments.
- Are sidequests appropriate? They can function here, but thematically they don’t make much sense and they work against you since the Balrog grows based on points in the Victory Display.
- 25-28 of the 50 cards in the deck have a shadow effect.
The Quest
Setup
Stage 1 merely sets up the quest and the players will get their first turn at a random stage 2. Stage 1 shuffles 1 copy per player of the terrible A Foe Beyond treachery Into the encounter deck and removes the rest from the game. 1B reveals 1 card per player, then stage 1 is added to the Victory Display which gives the Nameless Fear a 2/2/2/27 stat line at the beginning of the game.
Stage 2 is where things get interesting. There are seven stage 2 cards that all look the same on the 2A side. Each is unique on the 2B side and has a different effect with only 2 offering the possibility of escape. During the quest, you will be attempting to find your way out by finding one of the two stages that gives you a chance of escape. One of the trickiest and most unique elements of this quest is that after you change quest stages, you don’t reveal the B side until after you’ve committed characters to the quest during the quest phase. So you have to blindly commit characters no knowing what effect will be in play that round! You might be running upstairs trying to get away from the Nameless Fear, or you might be forced to remove nearly all your characters from the quest as you squeeze your party across a narrow ledge.
Before we look through the 7 stage 2 cards, we have to look at the central enemy and treachery in the encounter deck. The Nameless Fear enemy card represents the Balrog which can’t leave the staging area and is immune to player cards. The Nameless Fear has an X/X/X/27 stat line where X is the number of victory points in the victory display. Each quest stage has between 1 and 2 victory points so as you complete stages, the Balrog grows usually reaching somewhere between 5-8 threat, attack, and defence by the end of a game. The threat can be manageable, but the attack becomes difficult when you consider the central treachery card in the encounter deck: A Foe Beyond.
When Revealed: The last player deal damage equal to The Nameless Fear’s attack to a hero he controls. This effect cannot be cancelled.


As the game progresses, this effect will certainly start to kill heroes as The Nameless Fear starts to incinerate the stragglers. This treachery encourages you to not complete quest cards so the Balrog’s attack will remain at a reasonable 2-4. Once it hits 5, its hard to survive a hit like that on a hero.
The encounter deck only includes 1 copy of A Foe Beyond per player in the game. In a solo game, that means you may never see that single copy of that treachery, but in a 4 player game, you’re bound to see these come up pretty often. The scaling isn’t perfect and it can lead to some “feel bad moments” if more than one copy of this treachery is revealed in one quest phase, but if you go into the quest knowing that you don’t have control and you might see you heroes gobbled up one by one, its actually pretty fun.
Now let’s look at various stage 2 quest cards! First, we have the two most generic and most often seen quest cards: Heading Up and Heading Down. These quest cards are basically wasted energy. They can be completed, but they always return to quest deck at the end of the quest phase if they’re in the victory display. You still don’t want to complete these stages since you shuffle them back into the quest deck. If you don’t complete the stage you can bypass the quest card at the end of the combat phase and put it on the bottom of the quest deck. If you bypass enough quest stages, you can ensure that you eventually find the quest stage you want, but if you shuffle it back into the deck, that desirable quest stage might end up at the bottom of the deck again. After completing or bypassing a quest card (in most cases), instead of revealing the next stage, as usual, you draw a new stage 2, but don’t reveal its B side until you start the staging step on the next turn. This gives you the wonderfully torturous decision of how heavily to quest every turn. You have the decide how many characters to send before you know where you’re going!


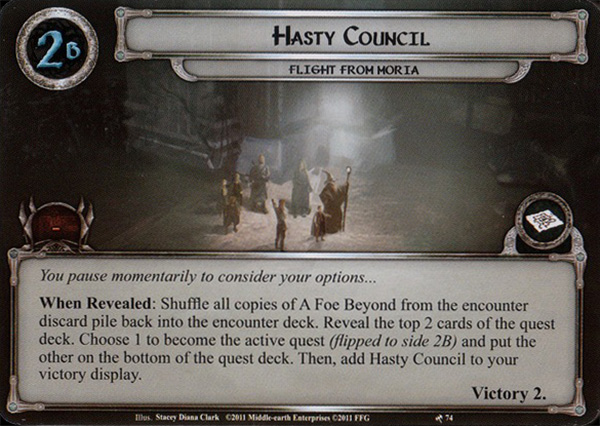
Hasty Council is a double-edged sword. You get to look at the B sides of the next two quest cards and choose one to quest on, but after your council, you add those 2 victory points to the display making the Nameless Fear stronger and you shuffle any copies of that dreaded treachery that might be in the discard pile back into the encounter deck!
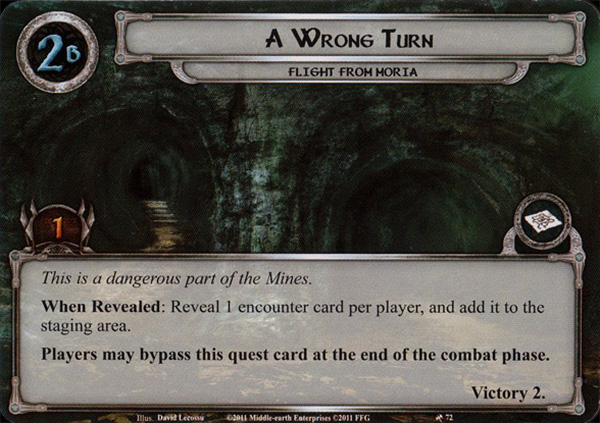
A Wrong Turn is another terrible quest card. It reveals a whole new batch of encounter cards and only takes 1 progress point to complete. If you quest lightly, you may be “fine” and not complete it since you’re revealing more encounter cards, but if you quest heavily and clear it, you’ve added 2 more points to the victory display.
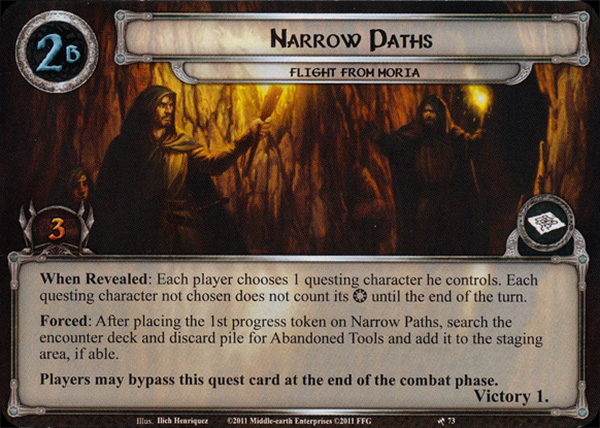
The Narrow Paths is the quest card you want to see fairly early. It hurts when you reveal it since it removes all but one questing character per player, but after you place the first progress on the stage, you can fetch the Abandoned Tools objective card from the deck and add it to the staging area. This objective is the best way make your escape if you can make your way to the next quest card: Escape from Darkness.
While questing against Escape from Darkness, you can’t place progress conventionally but can only place progress by slowly and painstakingly digging your way out with the tools. It provides a refresh phase action where can exhaust the hero with the tools to place one progress. With 4 progress points needed, you can place one progress per turn, or you can load a hero up with Unexpected Courage to make an Unexpectedly Vigorous Digger and dig your way out in one turn. There are treachery cards that force you to shuffle your current quest card into the deck which could remove 3 turns worth of progress and make you start all over again, so using some readying for that digging hero is a good idea!


This brings us to the last and most controversial quest card, Blocked by Shadow.
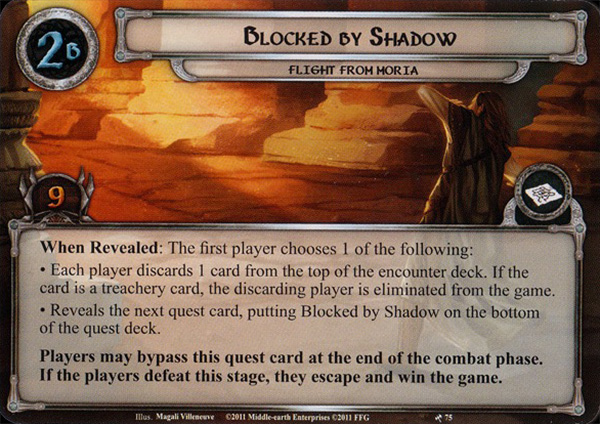
Here the first player gets to decide if they are going to continue running and move to the next quest card or try to race past the Balrog one at a time and see who survives. It’s a crazy effect, relying on the luck of drawing a card that has around a 50% chance of eliminating you from the game, but I really enjoy having that option. If you’re a careful player, you can run the other way, but if you’re getting up towards your threat elimination level and you want to make a desperate attempt to win, or you just feel lucky, or want to see some of your friends get toasted, this can be a very fun option. I have had several epic moments with this card in multiplayer games.
There are no stage 3 cards, so you will continue cycling through these stage 2’s until you either find your way out of the Dwarrowdelf, or the Balrog destroys you.
Locations
This quest is actually location light with a total of only 9 copies of 4 different locations in the deck. We’ve seen a couple of them before including the terrible Dreadful Gap (which is usually worthy of a Test of Will), and the annoying Fouled Well. The Plundered Armory actually has a very helpful effect for this quest. If you explore this location, each player can play a weapon or armor card from their hand for free! With that brutal Foe Beyond treachery in the deck, there is a good reason to bring your Citadel Plates to this quest, even if you don’t have a resource match! You can play it for free giving your hero 4 more hitpoints to withstand that unstoppable damage.
")


The Mountains’ Roots location is generic and just scales up according to the number of players in the game.
Enemies
While the Balrog and treacheries take center stage in this quest, there are still some other enemies that can give you grief. You will run into plenty of little 2/2/2/2 Goblin Spearmen and the Stray Goblin which is a pushover in solo play and a nasty 4/4/4 enemy in a four-player game.


The Goblin Archer can be annoying as he shoots arrows at you from the safety of his 48 engagement cost, but you are able to shoot back at him in the staging area with Ranged characters. I like this enemy’s design a lot. He’s still thematic and can be super annoying if you forgot to bring a bow along, but he’s doesn’t punish you too much like the bats from Rhosgobel that can’t be attacked or defended by any character without the Ranged keyword. The Orc Drummer can be a terrible draw if accompanied by other enemies in the staging area. He can balloon the threat in the staging area to insane numbers if you’re playing with 3 or more players. With only 1 hitpoint, a little direct damage through Thalin, Galadhon Archer, or even something like Hail of Stones can save you a lot of questing trouble.


The other terrible orc you may run up against can hit for a massive 8 attack on the turn he enters play. With a low engagement level of 27 and a starting attack of 5, his When Revealed effect makes him even worse on that first turn he hits the table. There are numerous targets for Test of Will in this quest, but sometimes cancelling this effect can make the difference between defeat and victory if you don’t have an ally ready to take that first angry blow from the Chieftain of the Pit. The relatively new Dunedain Lookout might be a good card to bring along just to cancel this effect (although you could just chump block with an ally and basically accomplish the same thing).
The last enemy you might encounter while running from the Nameless Fear is the classic Great Cave Troll. He’s not messing around with that 7 attack and 10 hitpoints. Not even Legolas’s arrows can pierce this fellow’s skull. Not only can he not have attachments (no Forest Snare tricks), but he’s immune to ranged damage which means no one can help take this guy down. Whoever engages this enemy had better have a bunch of attack power ready to hit back right away or he’ll start to bash your allies’ heads in with that rock. Even if you are able to kill the Great Cave Troll, he adds 3 points to the victory display making the Nameless Fear much stronger! Hunting Party and Fierce Defense would be excellent cards to deal with this enemy. If you can discard him from play rather than defeating him, he won’t go to the victory display and make your life harder.


Treacheries
Of the 47-50 card encounter deck, at least 23 of those cards will be treacheries (23 in solo, 26 in a four player game). There are 10 different treacheries and none are particularly gentle… We’ve already looked at A Foe Beyond, so let’s review the other 9.
Cave In is actually not too bad most of the time, but it can be horribly frustrating if you’ve been slowly digging with those tools and your hope of victory collapses leaving you to start that digging process all over again.


Chance Encounter usually isn’t too rough unless there’s a Great Cave Troll in the discard pile.
Dark and Dreadful is the cycle’s version of Necromancer’s Reach, but it can be doubly deadly if your current active location has the Dark trait. If you’re playing dwarves, 1 damage to your questers won’t ruin everything, but if you’re playing Silvan or Hobbits, this might be worth cancelling. The other option is to try to keep your questing characters ready with effects like Unexpected Courage, Light of Valinor, Fast Hitch, Galadriel etc.


Undisturbed Bones is annoying, but it will likely just kill one of your allies every time it’s revealed which is usually less painful that Dark and Dreadful.
Crumbling Ruin needs to be accounted for. If you quest with everyone but your backup defender, this treachery may exhaust that character leaving you vulnerable to whatever enemy might engage you later in the turn.


Sudden Pitfall is a scary treachery that always has to be considered as well. It can very easily discard a hero if the players haven’t been careful. It can’t be cancelled so the first player should either not quest at all so it does nothing, or quest with at least one ally you’re willing to part with. With only one copy in the encounter deck, you really need to be mindful of where this card is. As soon as it’s in the discard pile, both your questing and defending become much safer. The shadow effect is super terrible as well.
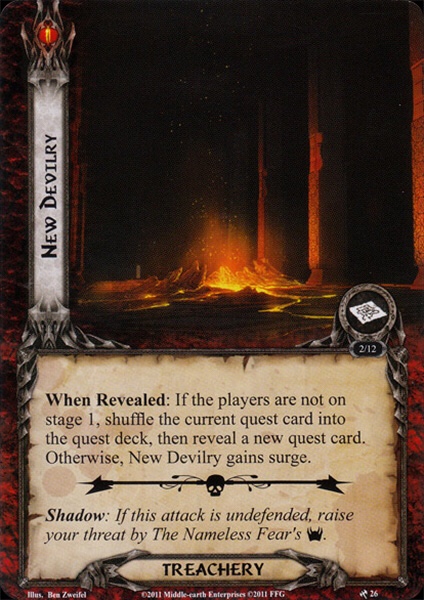
New Devilry can be a easy draw during the first part of the game, but if you’ve started questing through either of the stages that let you escape, this treachery can be game-crushing. It not only forces you to switch to a new random quest card, but you have to shuffle the entire quest deck which may destroy your efforts to get those beneficial quest cards towards the top. If you’ve made any substantial progress through the quest, this card should be cancelled if possible.


Massing in the Deep is another card that scales really aggressively for a larger game. In solo or 2-player, it’s not too painful, but in larger games, it becomes a top priority target for being cancelled. No one loves a quadruple surge! Shadow of Fear is the final treachery and I think its a well-designed card. It attaches to one of the first players’ heroes as a condition that basically renders that hero useless until its removed. Unlike the Caught in a Web condition attachment from the last cycle, there’s a built-in way to remove if you haven’t included any condition removal cards in your deck. This is the only condition attachment in the encounter deck so cards like Miner of the Iron Hills and Bulwark of the West might be chosen over Power of Orthanc, but your chosen spheres will likely dictate which option will be best for your deck. If you don’t want to run condition removal, you can always pay resources to get rid of it
Tips and Tactics
As mentioned before, heroes with plenty of hitpoints will be very appropriate for this quest. Dwarves are an easy first choice since they are thematic, they have plenty of starting hitpoints and can be helped with Hardy Leadership and the powerful Citadel Plate. Ring Mail, Boots from Erebor and Vigilant Guard can also grant further hitpoints to your heroes to help withstand the constant direct damage along with the occasional Foe Beyond treachery. Hitpoints are great but healing will obviously be helpful as well!
Damage prevention could also be very helpful in keeping your heroes alive. Close Call, Honor Guard and Weather-Stained Cloak could be good choices.
Beorn might be a decent hero choice as well since he could likely take a couple hits from the Balrog before dying. Another clever hero option would be Spirit Frodo. As long as you have enough threat control in your deck, he can stand toe-to-hairy-toe with that Balrog and take all that direct damage as threat. You could even get silly in multiplayer and pass Frodo to the last player with Desperate Alliance during the quest phase!
With so many treacheries in the deck, lots of cancelling cards will be appropriate. Test of Will is the gold standard, but you could also bring Eleanor, Dwarven Tomb to recycle Test of Will, and even a Halfling Bounder if you’re bold enough to bring your sidequests. Firyal is also a great option for solo play since she can discard some of those terrible cards that you can’t even cancel before they even trigger.
With the very real danger of losing 1 or even 2 heroes, you may want to avoid super tricky decks or tri-sphere decks that will be crippled if you’re down a hero. You should probably even consider which hero you plan to feed to the Balrog first when the time comes.
Options to manipulate your willpower numbers after the staging step can be helpful as well. The encounter deck is very swingy as far as quantity of threat it will put into the staging area. That combined with not knowing which stage 2 you may be questing against can make questing control very valuable. Helpful options might include Spirit Eowyn, Galadriel/Nenya, Rosie Cotton, Elrond’s Counsel, Courage Awakened, or even the more global buffs like ally Faramir, Astonishing Speed and Untroubled by Darkness.
As far as game play strategy I find it effective to quest fairly conservatively to avoid completing stages. Try to avoid or cancel any effect that would make you shuffle the quest deck. Keep bypassing stages until you find the tools then start digging your way out of that crack. If that tactic fails, you can attempt to run past the Balrog and escape if presented with the chance.
Due to the random nature of the quest cards it is technically possible to win on the first or second turn but the quest has usually functioned the way it was designed to in my play experience.
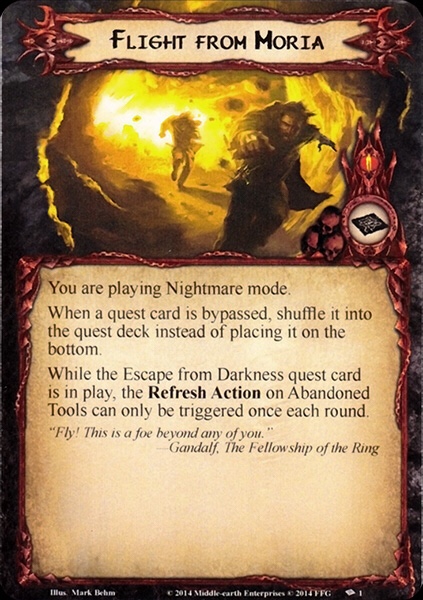
Nightmare Mode
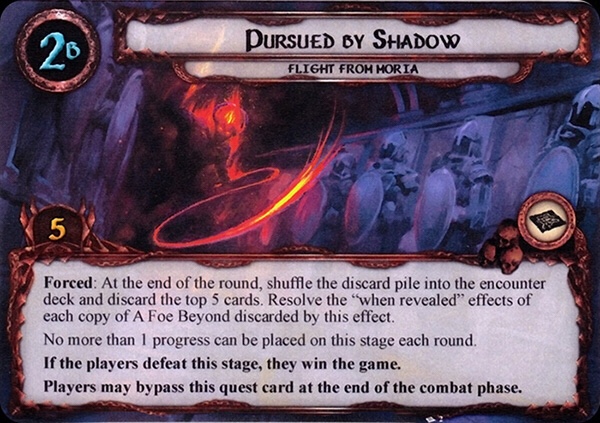
I won’t go through all the nightmare cards but I wanted to highlight a couple changes they made to the quest. While there are several very thematic enemies and a couple more cruel treacheries, the two new quest cards impact the quest the most. The Blocked By Shadow quest card has been removed and it’s replaced with Pursued By Shadow which has a similar theme and effect without the extreme reward/punishment for succeeding or failing.
We have an eighth stage 2 quest card which forces you to confront the Balrog before you can bypass the stage. This adds some excitement and encourages you to pack some serious attack power. 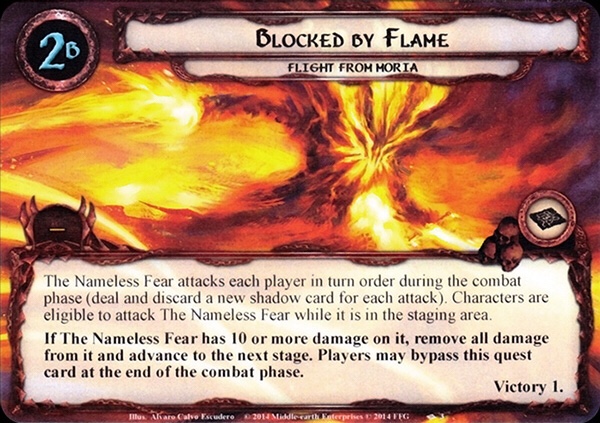
The nightmare card also introduces two new effects to make the quest more difficult. It forces you to shuffle the quest deck every time you bypass a stage and it limits the speed of your digging with the Abandoned Tools. You can no longer dig like a crazy person with readying effects but you’re limited to one trigger of the tools’ effect per turn. The nightmare version successfully “fixes” both of the final quest cards so they are more thematic and you can’t cheat your way through them.
Final Thoughts
I know this isn’t the best or most balanced quest out there, but if you go into it with the right mindset, you can get some excellent game experiences out of it. This isn’t the best quest to test your shiny new deck against but if you’re looking for a thematic and potentially dramatic and deadly story of a game, this quest will dish it up.
I find solo games to be much tamer experiences overall but as soon as you hit two players and up, it will usually be an exciting game!
Decks
I played several games against the quest with various decks and here some of the decks I succeeded with in a solo context.
Minimum Purchase – Into the Pit Solo
This deck uses cards from one core set and the Khazad Dum box. It’s a bit of a trick to win, but I beat it with this deck.
This deck is a nice combo of the mining deck and the dwarf swarm and while its not “teched” against this quest in any way, it’s a strong dwarf deck and I was able to beat this quest with it. It does a good job of keeping A Test of Will in hand which is great for this quest. It has no healing at all, so you might hurt if you get bogged down.
I built this deck after writing this article. I got super lucky and dug my way out with the tools winning on turn 4 on the first game and had a good second game that lasted 8 turns. I’m sure it won’t win all the time, but it worked for me two times in a row.

8 thoughts on “Flight from Moria”