The City of the Corsairs is the final chapter pack of the epic Dreamchaser cycle, and is one of the most uniquely designed quests in the entire game. Thematically up to this point in the cycle, we have been dealing with two story arcs. The first involved a search for an ancient Numenorean artifact based on dreams of a descendant of Numenor; and the second followed a fleet of Corsair raiders led by the pirate captain Sahir as they have harassed, harried, and now stolen the artifact from you. These story arcs come to a head as the heroes begin this scenario in pursuit of Sahir (who possesses the artifact) in his ship the Stormcaller after the Corsair defeat at Cobas Haven.
Mechanically, this scenario presents a 2 phase game. Initially, it begins on sea implementing the sailing keyword, and then ends with a final boss battle on land. It also presents one of the most unique challenges in the game on turn 1, making it a bit of a toolbox scenario which introduces a unique deckbuilding challenge, atleast in solo. Essentially, you have to deal with a very large turn 1 enemy that engages at 20 threat, spawns another enemy each time it engages, and keeps you off course while you maintain engagement (thus making quest progress impossible). There are really three approaches that I have seen to beat this scenario in solo; kill the Stormcaller quickly (ideally turn 1), quest past stage 1 on turn 1, or use secrecy to build up while remaining dis-engaged from the Stormcaller. I have chosen the secrecy option for two reasons: 1. The other two options require a very specific deck and very specific opening hand and are not terribly consistent, and 2. the secrecy option feels the most satisfying in my opinion. In fact, this is one of the best scenarios in the game to try out your secrecy decks against!
The City of the Corsairs
- Found in: 6th chapter pack of Dreamchaser cycle
- Official difficulty: 8
- Community difficulty: 7.3 at time of writing
- Encounter sets: The City of the Corsairs, Coasts of Umbar, Stormy Weather, Umbar Fleet, Voyage across Belagaer, Corsair Raiders, The Dreamchaser’s Fleet
- Quest cards: 4
- Play if: you are looking for a unique challenge that incorporates a unique deckbuilding challenge, like a good boss fight, like sailing quests, or like playing scenarios with major paradigm shifts mid game (like Foundations of Stone). Also a good quest to test the mettle of your favorite secrecy deck.
- What is different about this quest: the “Stormcaller challenge” on turn 1, Double boss quest… one at beginning and one at end of scenario, the most difficult quest for the sailing mechanic (statistically speaking), a huge change in setting mid-game (going from sea to shore).
- Solo or Multiplayer?: I believe this to be a much more difficult scenario in solo. This is because the Stormcaller is easier to deal with when players can “share” engagement, and sailing is much easier to commit allies to when one player doesn’t have to deal with all the enemy engagements. Multiplayer will result in a slightly more balanced and less “toolboxy” experience as player count increases.
- Can I run Side-Quests for this scenario?: Yes, definitely. In fact there is a good chance that you will spend several turns in the first phase unable to put progress on the main quest due to being off course. Having a sidequest available can mitigate the “lost” questing capacity for gain.
Special Mechanics
Sailing
This is the third Grey Havens/Dreamchaser quest that utilizes the sailing mechanic. The sailing mechanic works by introducing a Compass card that has 4 positions: on course, and 3 degrees of off-course. Every turn prior to the quest phase, the players have to rotate the compass clockwise 1 degree off course. They then can choose to commit allies to a “sailing test” with each ally equivalent to one encounter card discard. Every encounter card discarded with sailing icon(s) results rotates the compass counter-clockwise 1 degree towards “on-course”. As a result, sailing quests tend to favor decks that can supply a lot of cheap allies (sailors!). For more info on the Sailing tests, see this article on it.
The Dreamchaser’s Fleet
Along with the sailing mechanic comes the Dreamchaser’s Fleet, where one player takes the Dreamchaser Ship Objective and every other player chooses a different other Ship Objective. In Solo play, the player chooses the Dreamchaser and one other ship of choice. For more in depth analysis of what ships to pick, see this article. In most cases, Narelenya is the best solo or cooperative choice just because it helps jump allies into play fast, but there are decks that may take a different ship for a different approach in this scenario.
The Corsair Deck/Boarding mechanic
This is simply a separate deck that represents Corsairs that board the players’ ships when enemy ships engage. They are triggered by the boarding (x) mechanic, where x corsair enemies are “revealed” from the corsair and automatically engage the player that the ship engaged.
The Stormcaller

This enemy is the card that really gives this scenario its unique flavor and challenge. It lurks in the staging area from the start of the game and with an engagement cost of 20, engages anything that is not in secrecy. It’s stout enough with 6 defense and 18 hitpoints that it can take a lot of damage, hits for 6 attack, and of course has the dreadful boarding mechanic. The real challenge though is the terrible dilemma it presents you with at the end of the round; either remain engaged in which case you will quickly progress towards the worst course setting and get stuck there, or return the Stormcaller to staging in which case it will re-engage next round, dumping yet another corsair enemy on you and quickly overwhelming most decks. Engaging this thing is even worse than it looks on paper, and unless you have a very special deck set up to kill it quickly, the best recommendation is to just keep threat low and avoid it altogether.
The Quest
Quest Card 1A – Setup “The Coast of Umbar”
The setup is a little bit wonky since you will end up with an active encounter deck, inactive encounter deck, and a corsair deck! It’s less complicated than it sounds though… just set the City of the Corsairs encounter group aside and gather all the corsairs into their own corsair deck (which I generally place next to the quest cards in my setup). The fleet is prepared like all other sailing quests as mentioned in the sailing mechanic above. You then add the Stormcaller and 1 copy of Southern Belfalas location to the staging area (two if 3-4 players) and you are set.
Quest card 1B – The Coast of Umbar – 15 quest points
This is the only quest card of the scenario that uses the sailing mechanic. It is also likely the stage that you will spend most of the game in. There are actually two ways to progress to the next stage; destroy the Stormcaller or quest through. The catch is that you can’t actually make progress unless you are on course (which is difficult to do in the early turns of this scenario).
The most important factor to consider in this first stage is the Stormcaller. This is where secrecy really comes into play, as the absolutely best way to deal with it is just to avoid engagement altogether. In the current state of the game maintaining secrecy has become much more consistent, although progression style players may have a challenge remaining in secrecy long enough to build up a strong “crew” base of allies. Regardless, I’ve found that even when you are ready to move on to the next stage, dealing with the Stormcaller is more hassle than it’s worth. It has the capability to do a lot of damage to your board state and the only penalty for failing to kill it is 1 resource on the raider enemy you pick out of the encounter deck at stage 3A. Just treat the Stormcaller as a 20 threat ceiling you must not pass and you shouldn’t have too difficult of a time building up.

Generally, the best strategy at this phase is to spend the first few turns focusing on getting allies out, clearing locations, and avoid engaging the high engagement cost ship enemies (especially the Stormcaller!). The sailing tests are very rigorous in this quest, and it usually takes about 5 allies sailing every turn to maintain course. Therefore, you are going to want to try and build a deck that can generate about two allies a turn, with the Narelenya being the obvious ship choice to help facilitate the flow of your “sailors”. If able, being able to handle a corsair enemy early on will help smooth questing by removing the early 3 threat in staging. You more than likely will be able to ignore most of the ship enemies in this stage as long as you stay on top of willpower.
Once you have a solid base of allies and are able to start getting a handle on maintaining course and questing, the game progresses quickly towards it’s endpoint.
Quest Card 2A – Fate of the Dreamchaser
This card basically represents the shipwrecking of your fleet and transition from a sailing scenario to a land based scenario. The when revealed effect punishes you with direct damage if your ship objectives were damaged in the first phase. It then removes all ships (ally and enemy) and ocean locations from the game (but not Corsairs or Watch Towers if any happen to be hanging out in play!) This is very important and central to the quest, as it essentially gives you a clean slate to potentially recover if you just narrowly got past the first stage.
Quest Card 2B – Fate of the Dreamchaser – 0 quest points
This busy card just does the administrative work of removing the “sailing” encounter deck from play and transitioning to the “city” encounter deck. This consists of putting the second set aside encounter deck from set-up into play plus the Corsair deck (and discard pile!) as well as the 2x each of Battle Hardened and Watch Tower from the original encounter deck and discard pile. Think of it like a second setup. It then progresses automatically to stage 3A.

Quest Card 3A – The Haven of Umbar
This card directs you to find Sahir and the Shattered monument and set them aside out of play. Each player then searches for 1 enemy and 1 location and adds them to staging. Note that they don’t have to be “different” enemies and locations; so nothing is stopping 2 players from grabbing two corsair infiltrators for a usually easy option. Note that if the Stormcaller wasn’t destroyed, the raider(s) come(s) into play with 1 resource token
Quest Card 3B – The Haven of Umbar – 18 quest points
This is a pretty straightforward card. You simply make 18 progress with no strings attached, something you will probably skate through pretty quickly if you built up sufficiently in phase 1. If you travelled to the location and engaged the enemy, you will start the next turn with 0 staging threat. You can take some time to pause here if you aren’t quite ready to face Sahir, but if you are ready to go, better just to breeze it in a turn or two.

Quest Card 4A – Final Confrontation
And now we come to the man himself. You’ve chased him, been chased by him, fought along side him; now it’s time to ice him. Except now he reveals the artifact that you have hunted all along, a shiny black sword of DOOM, and he’s ready to fight. This is a good place to take a second to carefully read all of the cards, because it can get a bit complicated to keep all of the running effects straight at first. Sahir engages you, The Shattered Monument goes to the staging area, each player puts an enemy in staging, and then every raider in play gets a resource. This sets you up for the final battle.
Quest Card 4B – Final Confrontation – 0 quest points

This can get a bit tricky if you didn’t come to stage 3 with overwhelming force or had enemies left over unkilled (now buffed with an additional resource). Sahir is indestructible while he has resources, and not only that but gains resources from slain enemies (and heros!) Keep in mind that indestructible doesn’t mean you can’t place damage, it just means your damage can’t kill him while he has that trait. You can deliver fatal damage to him but you cannot win the fight until you’ve cleared every resource off of every raider enemy including him. With the Shattered Monument granting each enemy a resource every planning phase (on top of protecting resourced raiders from events), this can get out of hand if you don’t quickly clear the monument and catch a lot of enemies in play. You essentially have to “double kill” all resources… by killing the enemy and then chewing through those resources again once Sahir gets them. Also, don’t forget that once Sahir gets to 5 (which he often does), he gets an extra attack every round. Once you place 8 damage on Sahir and there are no more resources on any enemy in play, you win the game. Keeping track of all the effects can be puzzling on the first play through but it’s worth it the end.
The Encounter Deck
Global
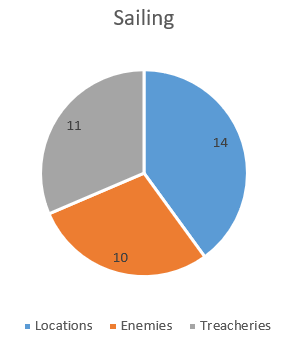
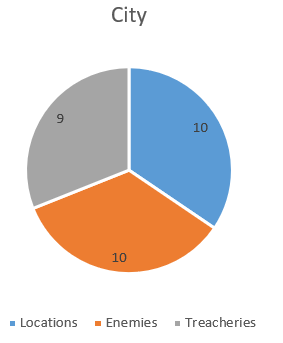
- There are two separate encounter decks in this scenario, which for simplicity’s sake I’ll refer to as the “Sailing” deck and “City” deck. The Sailing encounter deck has 35 cards and the City deck has 29 cards (which includes the Corsair deck + 4 cards from the sailing deck). A separate supplementary Corsair deck has 10 cards, all enemies.
- This is a very rare scenario in that there is no surge present in either encounter deck! The only surge effects are conditionally used for treachery cards that fizzle. However, it’s important to note that the boarding mechanic has some similarities to the surge mechanic if you engage ship enemies.
- There are also no doomed effects! This is much appreciated since this helps to avoid engaging enemy ships
- Immunity: Captain Sahir is “indestructible” while any raider enemy (including himself) has resource tokens. Also the Shattered Monument grants immunity from events to any Raider enemy with atleast 1 resource. Ship enemies also have immunity to attachments
- Shadow effects: 21/33 cards of the Sailing deck have shadow effects (discounting the Stormcaller and 1 Coast of Umbar that are in play from setup). This means as of turn 1, 63% of cards have shadow effects… almost 2/3.
10/29 cards of the City deck have shadow effects, or a tiny nudge over 1/3 (34%). Shadow cancellation will be most useful in the first phase of the quest. - Sailing icons: of the 33 cards in the sailing deck at game start, only 9 have sailing icons (with another on the Southern Belfalas in staging). That’s 27% or about 1 out of every 4th
Enemies
The Enemies of this scenario are either ships or the resource hungry Raider corsairs. Beyond all the nuances of ship ally/enemy rules, ships make use of the boarding mechanic to “jump” raider enemies into play when they engage. The Raider enemies of this set operate with a common theme of stealing your resources and then buffing themselves with the stolen resources. As annoying as it can be, I do think it’s a thematic home run for a mechanic representing raiding pirates. It’s worth noting that if you attempt to go the secrecy route as I suggest, it is recommended to try and avoid being engaged by ship enemies as much as possible in the first stage.
- The Stormcaller: This single enemy that starts in your staging area is arguably the central and very unique challenge of this scenario. You essentially have to have an answer to this card at setup since it engages you at 20 threat, is very difficult to kill early on with 18 hit points and 6 defense, “locks” you off course so you can’t advance and are more susceptible to negative effects… and all of this while you are trying to sail! In solo, this can sink even the best designed general purpose power decks really quickly. I’ve already discussed the central strategy of dealing with the Stormcaller in the introduction so won’t rehash it here, but it’s worth noting. The best policy is outright avoidance.
- Slave Ship: The lone “new” ship of the scenario. She’s a particularly nasty little vessel that engages at a lower engagement cost than it’s peers, and is pretty efficient at passing out a lot of damage. With it’s 7 attack, it essentially does “double damage” by doing direct damage to non-ship enemies equivalent to the damage just done to a ship enemy. I guess this represents capturing your crew as slaves, which is nice and thematic, but you really don’t want a run in with this guy.
- Corsair Warship: This behemoth is back, and continues to dominate the waves when it shows up. It hits harder than any other ship, but the real danger is the legions of corsairs that will swarm your decks when it’s ridiculous boarding 3 keyword triggers. Thankfully, engagement is generally easy to avoid but even from a distance, it rains down 4 archery on you which can quickly sink squishier decks without healing. The best policy is really just to hope it doesn’t show up until you are nearly ready to quest past it. Bring healing!
- Light Cruiser: Essentially the “assault” ship of the corsair fleet, it brings boarding 2 to your play area and “equips” it’s raiders with a resource when they engage. Like usual, the best policy is to avoid it but it’s 4 staging threat can be annoying and threaten staging threat-lock if you aren’t careful.
- Scouting Ship: This is the corsair’s reconnaissance vessel. It normally keeps you honest by dropping down to 20 engagement cost if you go off course. However since in this scenario you have MUCH LARGER problems at 20 threat, you are probably already below 20 if you are still alive and can thus easily ignore it.
- Umbar Slaver: The raider counterpart to the Slave Ship, this is the unique raider enemy for the scenario. He’s basically a souped up Umbar Raider, gaining an attack AND a threat bonus for each resource he steals. His method of stealing resources is one every time the engaged player spends resources. Each resource boosts his attack and threat, and because of his high defense and hitpoints, he’s probably going to hang around for a planning phase or two, punishing you for playing cards. However, I do like the design as it gives you an option to avoid triggering him.
- Corsair Infiltrator: This is the chumpy enemy of the corsairs with only 2 hitpoints. He tends to be slightly less effective in this scenario since when you are most likely to see him (in the city quest phases), there are less shadow effects to go around… meaning even if he does survive a turn to trigger his ability, it has a high chance of fizzling. With that said, he still is the only corsair enemy that can engage a player deck still in secrecy.
- Umbar Raider: The rank and file of the Corsair raiders. Pretty straightforward, as he attacks, steals a resource, and then gains +1 attack for the following round. It is worth noting that his forced effect takes precedence over responses that trigger “after attack”, which can be annoying when it strips a resource off of Grimbeorn before Grimbeorn can trigger “his” response.
- Raid Leader: The Raid Leader is probably the biggest headache of the corsair enemies, as he has high staging threat, a solid attack, and can steal a resource from each of your heroes when he engages bringing his defense up to a very stout 4. The good news is the engagement cost is high, so you can generally keep him in staging until you’ve spent all of your resources and are prepared to slay.

Locations
The locations are where the scenery changes dramatically mid scenario, as you go from sailing the waves and coasts of Umbar to fighting in the streets. The ocean locations have a variety of effects where the city locations buff raiders, either directly or by playing around with synergy regarding resources on raiders.
- Southern Belfalas: Starts the game in staging and forces you to take an early corsair if you want to travel to it. I suppose this represents coastal raiders harrying your ship as you pursue the Stormcaller into enemy territory.
- Water Spout: This location’s effect of dealing 4 direct damage to each ship enemy is a pretty nasty burst of direct damage, and provides good motivation to stay on course. Best left in staging and avoided by not slipping too far off course.
- Rough Waters: This annoying card is doubly potent in this scenario as it has been in previous. This is because sailing icons are quite a bit harder to come by than previously, meaning being forced to ignore one is quite a bit costlier than it has been in the past. You want to make sure that neither of these hang around the staging area long.
- Starlit Sea: This location has one job, boost your threat so the Stormcaller can engage you. Probably a pretty benign card that is not going to cause you too much problem since it’s 2 quest points makes it easily nuked out of staging.
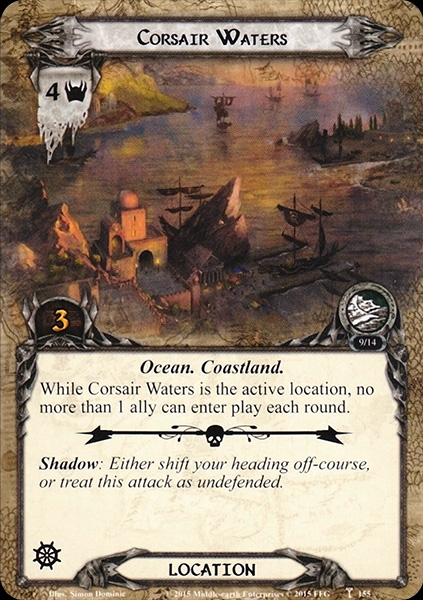
- Corsair Waters: This is probably the most notorious ocean location of the bunch. The High threat to low quest point ratio make you want to explore it as soon as possible, but it’s effect counters the very strategy most effective towards beating this quest… trying to jump more than one ally into play a turn. You don’t like to see it in staging but you also don’t like it in the active slot. This is annoying in a solo deck meant to spawn quick allies, but can be devastating at high player counts.
- Fog Bank – This is the friendly location of the batch. It essentially shuts down ship combat and prevents them from engaging you while active. That doesn’t mean that you can’t engage them! This can be a good strategy to get a ship enemy out of staging, deal with the corsair, and then deal with the ship separately once fog bank is cleared. Can also protect against Stormcaller engagement if you find yourself at 20 threat or higher!
- Watch Tower – This is the lone location that can be encountered both at sea and on land. It essentially “alerts” corsairs to your presence, making sure they are equipt and ready when they come into play. Very thematic but annoying, and especially so at the last stage boss fight. Also worth noting that when you transition from the sailing deck to the city deck, any Watch Tower in staging remains and buffs any corsairs that come into play at stage 3.
Treacheries
Like the rest of the encounter deck, the treacheries are split between the two encounter decks, with the exception of Battle Hardened which straddles both. The Sailing shadow cards focus on bad weather messing with your course heading and also surprising you with enemy engagements. The city treacheries play with corsair raiders, either buffing with resources or jumping them back to the staging area.
- Sudden Storms: A squall blowing in gives you the choice of damage or going off course to avoid it. I generally choose the latter but it’s very situation dependent.
- Winds of Wrath: More bad weather! Punishes you pretty heavily for being off course and can be a horrible follow up to Sudden Storms. Since most decks geared towards sailing are going to tend towards lots of smaller, squishier allies, these area damage effects can wipe crews out pretty fast!
- Boarding Party: Surprise! Keeps you honest by making sure you don’t completely let your guard down when you are sailing below the detection level of enemy ships.
- Serpent’s Tail: Potential game ender. Whatever this serpent’s tail maneuver is suppose to represent, it can trigger a surprise engagement form the Stormcaller and perhaps even a friend, and if you aren’t prepare for that it can easily ruin your day.
- Battle Hardened: This card sticks around in both encounter decks, but will probably only trigger in the “city” phases. This can be pretty rough playing on both the scenario’s resource mechanic on corsairs as well as generating extra unplanned attacks. The shadow effect is nothing to sneeze at either, as 2 extra resources on an enemy can really do some damage in this quest. Has conditional surge as a failsafe.
- Fury and Malice: Doubles up on equipping enemies with resources and dealing damage to players equivalent to enemy resources, playing into two of the major themes of this scenario. Has conditional surge as a failsafe.
- Foes of Ecthelion: I love the thematic lore of the name, but hate the effect. It can both blow up staging threat and buff up enemies with more of those stinkin’ resources! Also has the failsafe surge.
- Umbar Patrol: Bounces enemies back to staging and then makings sure you can’t optionally engage them. Synergizes very well with Foes of Ecthelion but also has a tendency to keep enemies alive longer, so they can gather more resources from other effects and harry you some more.

Tips and Tricks
I’ve probably talked ad nauseum at this point that the essential “problem” you need to solve in this scenario is the Stormcaller on turn 1. If you can get past the initial hurdle and build up a board state, the quest difficulty decreases quite a bit. You are going to need a plan to get past that hurdle (atleast in solo) with deckbuilding. All in all, the main mechanic of the quest is piling resources on raiders and buffing them, as well as a pretty fair share of direct damage. If you have a good open and leave the first stage with a decent board state, the rest of the scenario isn’t that terribly difficult.
- I’ll just once again briefly mention it. Build a deck to either kill or quest past the Stormcaller immediately (or at least in turn 2), or just plan in avoiding it by staying in secrecy. As I’ve stated, the latter is the most consistent and fun.
- Sailing is quite challenging in this quest. With a sailing success rate of 27%, that means statistically you need to be committing 4 allies a turn just to maintain course, and 5-8 to get ahead! That can be a lot of allies that you have to put on the board that are not questing, fighting, or doing other things. That’s why the decks that work best are going to try very hard to get 2 “chump” allies a turn into play on average. The Dreamchaser also helps early on as well counting as two sailing allies and being usable no matter who is first player. The flow of the game in solo is generally to avoid combat altogether while building up a “crew” fast and using them to sail on course.
- There is a fair bit of direct damage potential from this scenario so you will want to bring healing!
- Make sure and take your time in Stage 3 if you don’t feel you are ready. Sahir can be quite tricky in the final fight, and you’ll want to go in with a strong board state and ideally no enemies in staging (who will get resources) as well as no active location (so you can clear the Shattered Monument ASAP). If you handled stage 1 well, stage 3 is relatively benign and can be played slowly to build your board state.
- If you do for some reason feel the need to engage ships in the first stage, try to minimize the amount of damage on your ships, or you will be in for a nasty surprise in stage 2 when it rains damage all across your board. Healing really makes this scenario a lot smoother.
Playthrough:
- Here is the deck that I created to play through this scenario. Once you learn the nuances of the deck and the scenario, you can achieve a nearly 100% win rate.
https://www.ringsdb.com/decklist/view/12642/sneakacrossumbarcityofthecorsairssolodeck-1.0 - If you feel like killing the Stormcaller, here is a deck that Seastan built to do just that in turn 1
https://www.ringsdb.com/decklist/view/3614/city-of-corsairs-turn-1-stormcaller-smackdown-1.0 - If you are in for some jank, here is another deck built by Seastan to bypass the Stormcaller by progressing to phase 2 in the first turn (also includes video)
https://www.ringsdb.com/decklist/view/3947/city-of-corsairs-turn-1-stormcaller-sneakby-1.0
- 3 player, updated decks: https://www.youtube.com/watch?v=dXB5oQNpuJ4
- 2 handed, progression style: https://www.youtube.com/watch?v=ffZjG2kvMCo

4 thoughts on “The City of Corsairs”