Nightmare Calamari 🐙
Durinsfather, when I told him I would cover this article
Being one of the most Pirates of the Caribbean-like quests in the Pirates of the Caribbean cycle, The Thing in the Depths has always been intriguing to me. First, a quick and messy battle against the corsairs you pursued, then a more drawn-out one against a Kraken/octopus creature sounds incredibly fun, right?
Sadly, while the original had lots of great ideas in it, the Thing-half always felt too easy and tedious compared to the difficult corsair part that always required you to get set up fast. The quest has still always been playable and enjoyable, but something was missing. Luckily, Nightmare mode is here to fix the problems and make The Thing in the Depths into a great experience (and also a lot harder).

Nightmare The Thing in the Depths
- Found in: The Thing in the Depths Nightmare Deck
- Size: 1 Rules card, 19 encounter cards (divided into three encounter sets with symbols from the original quest)
- Increase in Difficulty: Stage 1 gets its difficulty increased by quite a bit but not too much. The new enemy card is mainly annoying. Battling the Thing gets a lot harder, though: The new rules setup card has three effects that apply to stage 3‘s play patterns, and the new Tentacle enemies are harsh. It easily becomes possible to lose from a location getting grappled into oblivion just after advancing to stage 3.
- Fixed Loopholes: The original quest is rather new, so there weren’t any game-breaking loopholes. That being said, Grapple now happening on every enemy in play each round certainly gives that mechanic and the enemies a lot more importance than before.
- New Mechanics introduced: As a new twist on the Grapple keyword from the old scenario, each enemy’s Grapple is now triggered at the end of the refresh phase, making it far more meaningful than in the original. There are some other mechanical twists in this Nightmare deck but no full-on mechanics.
- Play this scenario if: You want more tentacles in this tentacle-based quest. You like a robust challenge with fun mechanics. You want to play the one quest that does a “board reset” right.
- Solo or Multiplayer?: With how easy it is to get location-locked even in solo, I’d argue that fewer players are better for this quest. Playing with more players grants you the advantage of sharing Na’asiyah and Captain Sahír, but you also have to share the ally versions at stage 3, and Na’asiyah‘s first Forced effect might trigger repeatedly stealing valuable events from your hands.
- What to look out for: Location-lock being a constant threat, enemies stealing resources and cards from you, Tentacles being very hard to kill.
New Rules/Setup
First, the Nightmare setup card has you remove the following cards from the encounter deck:
- 2x Corsair Infiltrator (weak, not very thematic enemy, no copies remain)
- 1x Crew Quarters (weak except for the shadow effect, one copy remains and is usually pretty awesome to reveal… hmm.)
- 1x Crushing Arm (not actually weak, but opens space for the new tentacles)
- 1x Grasping Arm (rather weak, also makes space for new enemies)
- 1x Giant Arm (similar to Grasping Arm)
It is worth noting that only one card gets cut entirely from the encounter deck. This helps diversity and interest, but it does mean that some rather “weak” cards remain as nice surprises to reveal.
The main part of the new Nightmare setup is only implied: The new encounter cards are divided into three sets, which are identical to three of the sets from the original. When setting up and during the game, all nightmare cards with The Stormcaller symbol count as cards from The Stormcaller set, same with the Corsair Raiders and The Thing in the Depths sets. This means that the new cards with The Stormcaller and Corsair Raiders symbols are added to the encounter deck, while the new cards with The Thing in the Depths symbol are set aside with the others.
Other than that, there is no new setup, but there are some very interesting effects on the setup card revolving around stage 3. Let’s check out the actual quest and how it plays!
The Quest
Stage 1A has you do the usual setup, none of which is randomised. This means that the staging area will look the same as in the original version. The rest also works very similarly: You try to set up your board as effectively and quickly as possible while being battered by annoying Corsairs. Once you feel ready, you travel to the Helm of the Stormcaller to fight Captain Sahír and Na’asiyah.
The new Nightmare cards can be annoying enemies and deadly locations. Some, however, just do nothing (see Aft Cabin). This means that Nightmare mode also doesn’t impact difficulty too much at this point: While stage 1 doesn’t get easier, it also doesn’t become much harder. Location lock does stay a huge problem, however, and you often finish stage 1 with multiple locations in the staging area (which isn’t all bad, though).
Once you have cleared the Helm of the Stormcaller and stage 1B, the magic starts to happen. Stage 2 has you flip Sahír and Na’asiyah to their ally sides, then remove all cards from the Corsair Raiders set from the encounter deck and all play areas. In Nightmare mode, you also remove all three copies of Corsair Duelist, but all other Nightmare cards remain where they are. Then you add The Thing in the Depths to the staging area. It makes an immediate attack against each player because of the Nightmare setup card. Here things get a little weird: You are instructed to give it a shadow card for each attack, as usual. However, you just searched the encounter deck for the Corsair Raiders cards, which can make the situation confusing.
I’d advise you to either shuffle the encounter deck before dealing shadow cards or not resolving the attacks until a bit later: Players now shuffle the encounter discard pile and the set aside The Thing in the Depths encounter set into the encounter deck, filling it with all manners of nasty tentacles. I think having the Thing make its attacks after this step makes the most sense since it will then have the potential to reveal annoying cards like Giant Arm, which will add to the tentacles you immediately have to fight.
When advancing to stage 3A, players discard cards from the encounter deck until X plus one tentacle enemies are discarded, X being the number of players. They then resolve each of these enemies’ Grapple keyword. Since there will usually be a few locations in the staging area, players then have to choose during the travel phase which location to travel to. Obviously, you want to not immediately lose to a location having a threat of 9 at the end of the round (remember, each Grappled location gets plus two threat for each enemy grappling it), so traveling to a location with many enemies is often a good idea.
That being said, the Nightmare setup card also says that at the end of the refresh phase, each enemy’s Grapple keyword is resolved. That means you rarely want to bite off more than you can chew because grappling a location essentially heals all damage from an enemy. Additionally, this refresh phase trigger happens before the end of the round: You can now lose rather unexpectedly because enemies you couldn’t defeat grapple a location and bring it up to 9 threat!
The rest of this stage stays roughly the same: You kill tentacles as efficiently as possible to damage the Thing, try not to threat out during questing, and keep locations tentacle-free if possible. Stage 3B gets another new effect from the Nightmare setup card, though: If there are fewer locations in play than the number of players at the beginning of the quest phase, you discard cards from the encounter deck until you discard a location, then reveal that location. This ensures that there is always something to grapple for new tentacles. Keep in mind that the active location is counted here, so just traveling to a location will never make this effect trigger. Play patterns really don’t change all that much with the Nightmare version; there’s just some added complexity (and the new Tentacle enemies combined with the repeated Grapple triggers are just awfully harsh).
The Encounter Deck
Global
Since the quest uses two different encounter decks for stages 1 and 3, there also have to be two sets of information about them:
Deck One
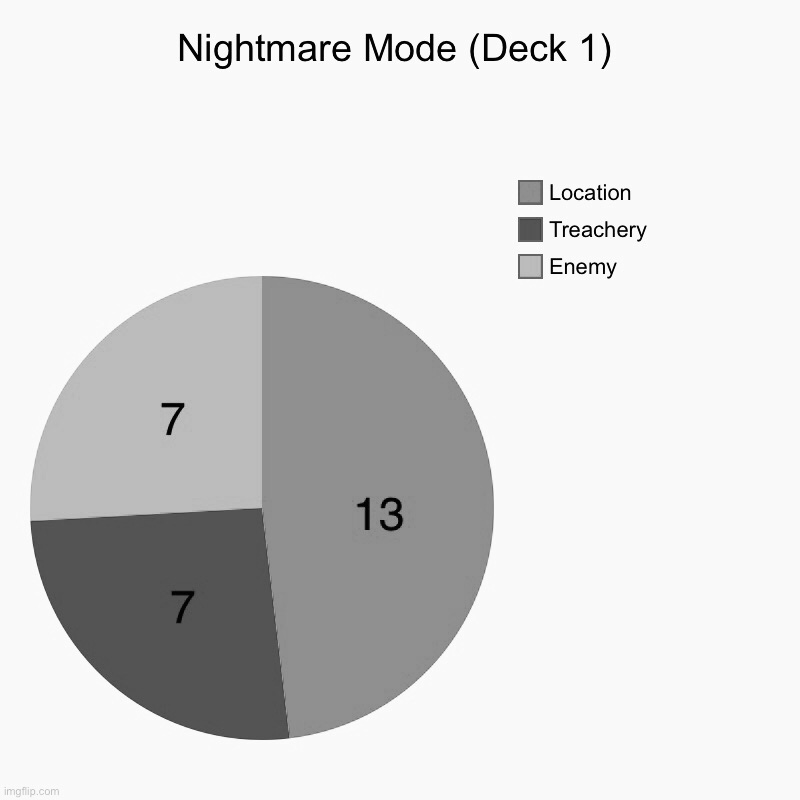
- The first encounter deck is quite thin at only 27 cards and has a heavy skew towards locations.
- Shadow chance is extremely high at ~70%. This rate is incredibly rare! Shadow cards feature various effects that can raise the attacker’s attack or defense value or do some other stuff. You particularly want to defend with characters that have at least one defense and two willpower, though the latter may be hard to achieve with allies.
- Average threat revealed is quite high at ~2.1. This is due to many enemies and locations having three or more threat, though more than that is rare.
- No cards initially have Surge; only the two copies of Battle-Hardened gain it if they don’t have their full impact.
- Doomed is not present on any cards either, meaning that Doomed player cards can reasonably help you gain momentum early on.
- Archery and direct damage are both very rare, as well. Most damage comes from the multitude of attacks you have to endure.
- Immunity
- Captain Sahír and Na’asiyah gain Indestructible from stage 1B
- Progress cannot be placed on stage 1B while Helm of the Stormcaller is in play
- Helm of the Stormcaller is immune to player card effects
Deck 2
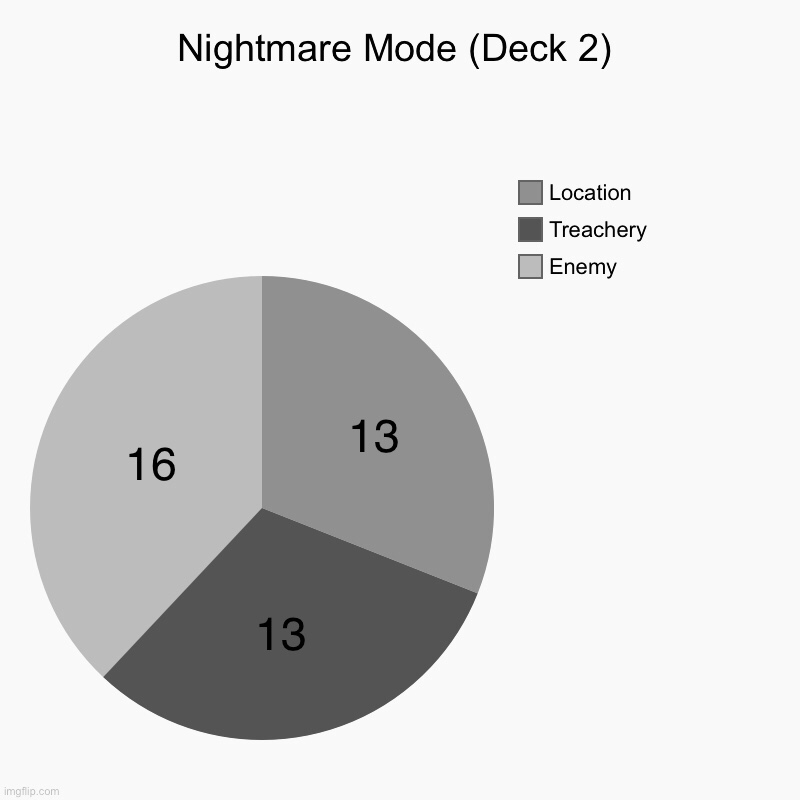
- Deck #2 is much more balanced and thicker with 42 cards. It gets even more balanced from stage 3A‘s effect, which dumps 2-5 enemies into play.
- Shadow chance is even higher, at a whopping 76%! Many shadow cards add themselves to play if they are enemies or cause additional attacks and other nasty effects.
- Average threat revealed is very high (~2.38). This is because many enemies surge and because Grapple usually adds 2 threat (I calculated all Grapple enemies like this). If there are no locations in the staging area to grapple, the average threat revealed will be lower (~2).
- 7 cards innately have Surge, and 6 treacheries have similar effects that reveal extra encounter cards. Because the 7 surging cards are all enemies, they can swarm you quickly if you reveal multiples!
- Doomed is not present on any cards, but Deep Maelstrom can gain Doomed 5. Bringing some threat reduction can help alleviate the risk of just losing randomly.
- Immunity
- The Thing in the Depths is immune to player card effects and cannot be optionally engaged
- Deep Maelstrom cannot be cancelled.
New Cards: Corsair Raiders
There is only one new card for the Corsair Raiders set, which is only used during stage 1.
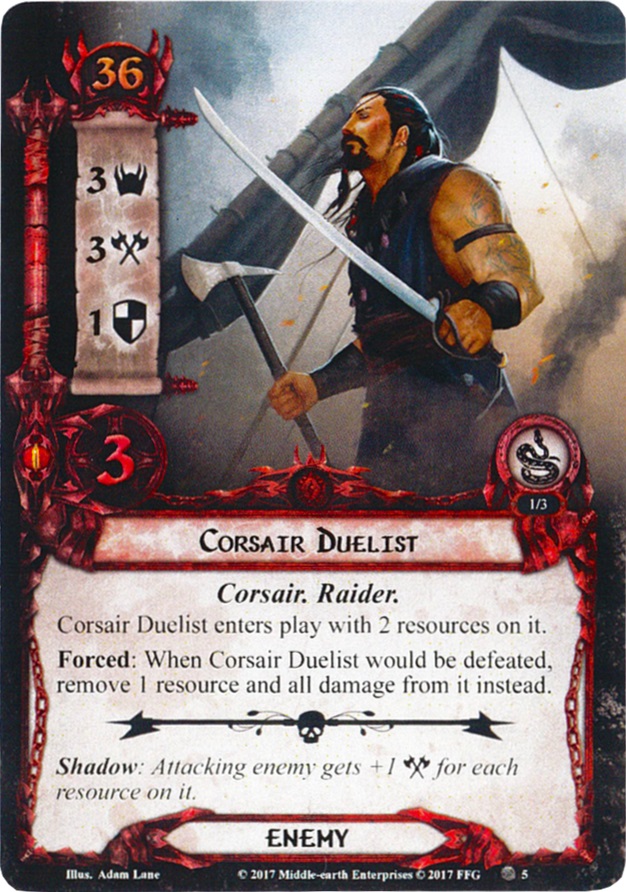
Corsair Duelist (3 Copies)

These guys are just annoying. Three threat is distinctly above average at stage 1, so they can seriously hinder your questing. With their very low stats, they seem like a small threat; Three attack is just average or even low, making the Duelists easy to defend against. Only four combined defense and hit points mean a hero like Tactagorn can easily defeat them in one swoop. Theoretically.
The twist on this Corsair is that he already enters play with two resources and doesn’t steal them like the other Raider enemies. Also, whenever he would be killed, you remove a resource and all damage from him instead. That means you have to kill the Duelist three times before it dies. Remember that you can only attack each enemy once per round by standard, so this process is going to take three rounds usually. Grimbeorn can safely accelerate the process at the cost of some resources.
Ultimately, the question is whether you even need to get rid of the Duelist. Because he only has three attack, it is often quite easy to repeatedly and safely defend against him. The Helm does count the resources on all raider enemies, but removing the ones on the Duelist can be quite annoying and take up valuable actions, especially if you are engaged with Sahír and/or Na’asiyah. However, you shouldn’t let the enemies swarm you. Letting the Duelists live can lead to you getting overwhelmed in the end.
New Cards: The Stormcaller
The Stormcaller set provides locations and a few treacheries for both stages 1 and 3. Both new locations are much more interesting at stage 3, though. They also both interact with Grapple a bit.
Captain’s Quarters (1 Copy)
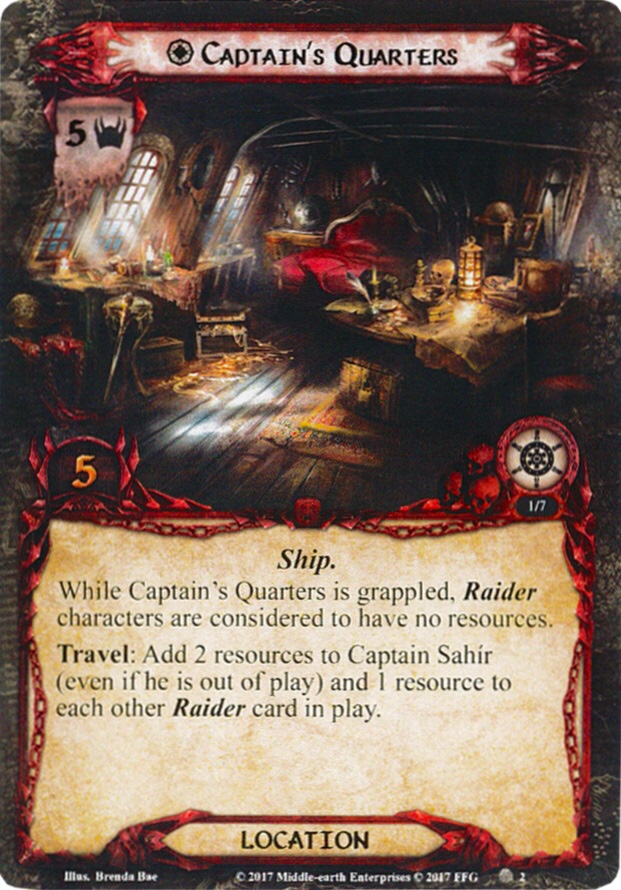
As a location that just sits in the encounter deck, Captain’s Quarters has some serious stats. Five threat and five quest points make it a terrible reveal at all times and hard to clear. While it is grappled at stage 3, Raider characters are considered to have no resources. This mainly hits the ally sides of Sahír and Na’asiyah: The former just has willpower and combat values of 0, regardless of how many resources you already put onto him, while the latter cannot spend resources to increase her relevant stats. Both of the Raider allies are hit very hard by this, so having the Quarters not grappled is important.
In addition to its high stats, the Captain’s Quarters also have an interesting travel cost that mimics the one on Crew Quarters: To travel here, you have to add two resources to Captain Sahír and one to each other Raider card in play. At stage 1 this is purely negative because extra resources just boost the enemies’ danger level and make it harder to clear the Helm. At stage 3, however, this suddenly becomes a boon: You get to add two resources to Sahír and one to Na’asiyah for free! If you can stomach the five threat on this, you might actually be happy to reveal it on stage 3.
Aft Cabin (3 Copies)
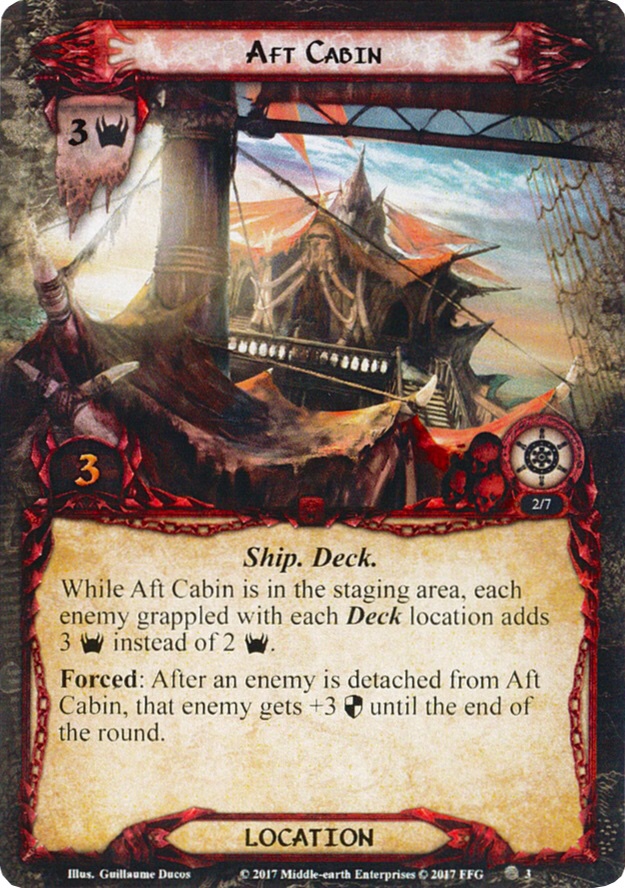
I really like the Harad-esque aesthetic and the Mûmak skull on this card! The corsairs are from Harad, after all, so it’s nice to see this connection.
During stage 1, Aft Cabin is just a plain 3/3 location. This is not a bad reveal if you were previously able to deal with locations well, but it can get dangerous if you are location-locked already.
At stage 3, this essentially gains two new abilities: The first one has grappled enemies add 3 threat to their location instead of 2. Not only does this make it far easier to lose by a location having 9 threat at the end of the round, but it will also make questing much more difficult because threat in the staging area can rise very quickly. Luckily, this effect only applies if Aft Cabin is in the staging area, so when you travel to it, the effect is gone either way. Keep in mind that if you can’t clear it next round, you might need to travel to another location, returning the cabin to the staging area.
When you do travel to the Aft Cabin, you also, as usual, detach all enemies grappling it. All of these enemies also gain a bonus of three defense until the end of the round, making it much harder to kill them. If you have to travel to the Aft Cabin multiple times… Just don’t. Try to clear it quickly after traveling to it or clear it from the staging area: At only three quest points, this can be quite easy.
Tumultuous Waters (3 Copies)
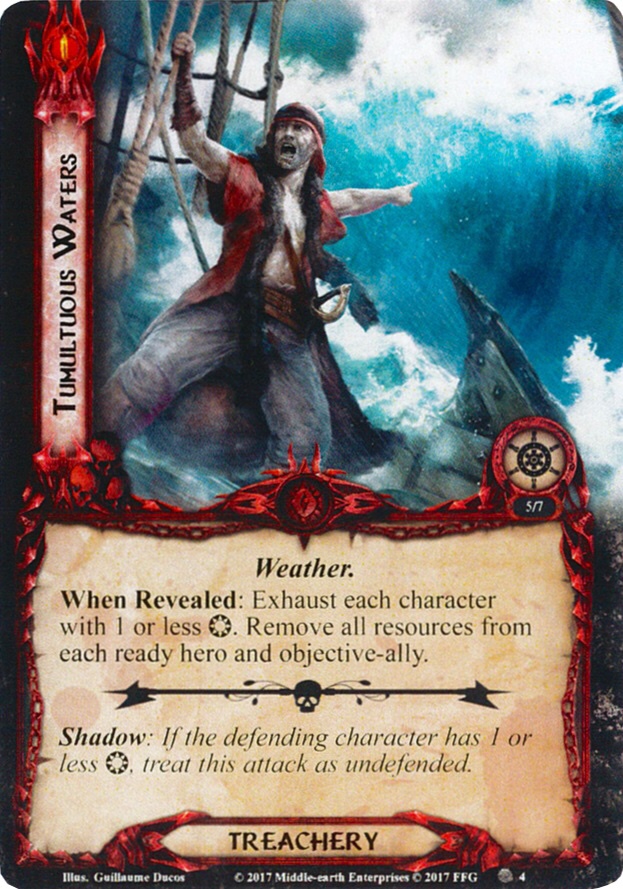
Tumultuous Waters mirrors Hold Steady!‘s effect. Exhausting all characters with one or zero willpower can be a big problem because these tend to be the more combat-focused ones like Éomer and Na’asiyah at stage 3. You will rarely have many characters with two or more willpower that are not committed to the quest, so this usually hits just the right characters to be a big problem.
The second effect removes all resources from each ready hero and objective-ally. Since all characters that have committed to the quest and all characters with one or less willpower are exhausted now, this usually affects the more important and “premium” heroes like Gandalf or Radagast, whose resources are also more valuable than usual. Sahír can also lose resources to this, which is a real bummer. If you can, just use him for questing. Additionally, other allies that collect resources like Treebeard are not affected by this. Don’t forget this; it might save you the game!
New Cards: The Thing in the Depths
Lastly, the Nightmare deck adds some cards to stage 3. Two new enemies are both serious combat threats, and a new Treachery gives the encounter deck a way to recover if the players are doing too well. All of these cards are very strong: You can tell that the designers wanted to make stage 3 harder.
Slithering Arm (3 Copies)

The first new enemy immediately stands out because it surges and has some very relevant stats. Its zero threat doesn’t really matter because it will usually Grapple something anyways, while four attack and six defense/hit points are decent enough combat stats not to ignore this one.
Even more annoying, when Slithering Arm engages a player, it makes an immediate attack. This means you have to defend against it twice in one round, and at the end of the round, it will either Grapple a location or be returned to the staging area for this ability to trigger again if there is no location to grapple. Killing these is a priority. It grappling the location with the most enemies also means that it usually brings that location very close to nine threat, the consequence being that you usually want to travel to its location soon. Then you have to deal with at least two attacks just from this one enemy.
Overall, Slithering Arm is a card you never want to see. With Surge and its extra attack, it applies a lot of pressure, especially because so many shadow effects add extra enemies. Even its own shadow effect can add it to the board to do those same things. When you kill it, you don’t even get to damage the Thing because Slithering Arm has zero threat. Awful.
Crashing Arm (3 Copies)
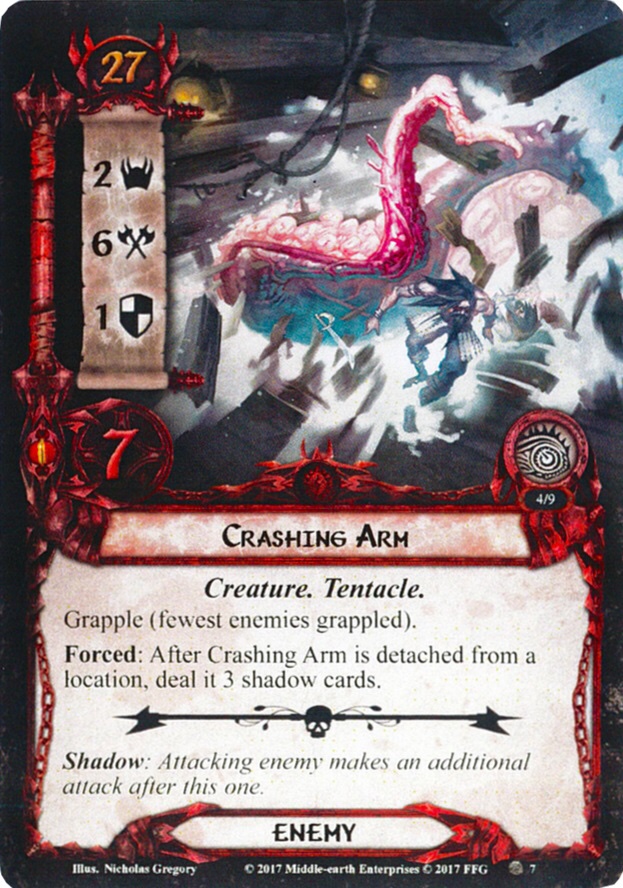
Wow. Where Slithering Arm added to the tentacles swarming, Crushing Arm just surprisingly comes thrashing through the side of the ship and applies its own raw strength. It even grapples the location with the fewest enemies because it is so self-centered.
Its stats are very high for a quest that features as many enemies as this one: Two threat are normal, meaning that killing the Arm will yield a decent amount of damage on the Thing. Six attack is about the highest of what non-boss enemies have, usually seen on trolls. One defense is usually low but normal for this quest’s tentacles, and seven hit points still make this enemy tanky.
Crashing Arm also has an effect that gives it three shadow cards whenever it is detached from a location: This means that it will often attack with four shadow cards. Keep your cancellation ready for this; at an average of three shadow effects on these, you are bound to have some awful effect in there! Additionally, you really want to kill the Crashing Arm as soon as possible, so it doesn’t reattach: Too many shadow cards revealed will have a lasting impact on the board state.
Deep Maelstrom (3 Copies)
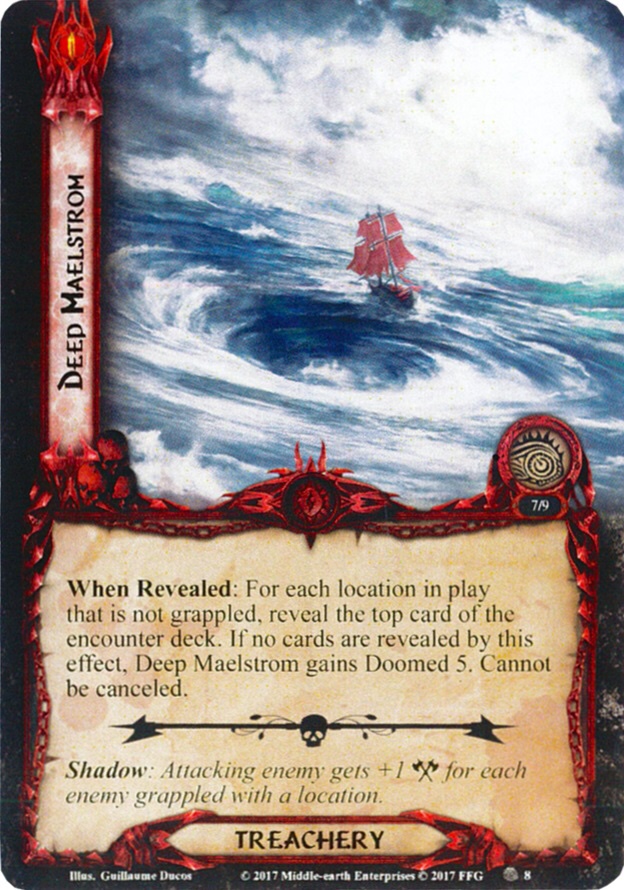
While the two enemies are both very aggressive, Deep Maelstrom gives the encounter deck a way to catch up if the players are ahead. It cannot be cancelled, which is sad because it is the only treachery card really worth cancelling.
When it is revealed, you reveal an extra card for each location in play that is not grappled. Because of the play pattern where you travel to different locations as quickly as possible to detach the enemies from them and the new effect on the Nightmare setup card that dumps extra locations into the staging area, three to five extra cards revealed by Deep Maelstrom are quite possible (remember that the active location is also counted). That is awful! Since you cannot cancel it, teching to avoid the Maelstrom revealing too many cards is done best by just trying to clear as many locations as possible, be it active ones or others, via location control effects.
If, however, Deep Maelstrom would completely fail, it just gains Doomed 5. This is a nice reference to the game’s other tentacle-based quest, but it can also be a big problem if the scenario goes on for too long or if you used any Doomed player cards. Thus I recommend to try and always have one non-grappled location, so Deep Maelstrom essentially is just a blank card with Surge. Whether Doomed 5 or two or more new encounter cards are better, you have to decide for yourself.
Tips and Tricks
- Getting set up early and having sufficient defenders and action advantage are very important. Don’t be scared to use expensive and powerful heroes or Doomed player cards: Threat usually isn’t a big concern.
- All of the tentacle enemies only have one point of defense, so Rivendell Blade often isn’t helpful…
- Tactics Aragorn, however, is incredibly useful. He can one-shot a Corsair Duelist and opens up all tentacles for a Straight Shot! (Remember that this discards enemies and doesn’t defeat them so that the Thing won’t be dealt damage.)
- For such a location-based quest, there is nothing in the encounter deck that discourages location control effects. Use as many Northern Trackers as you want!
- Cancellation isn’t needed nearly as much as in other quests. It is helpful, but prioritising combat and action control is usually going to be a better idea.
- Just prepare to defend against a ton of attacks. Use cards like Desperate Defense in a pinch, but repeatable readying like Unexpected Courage or Armored Destrier are just plain better. Also, have some shadow cancellation ready, preferably A Burning Brand or the Armored Destrier I just mentioned.
Playthroughs
Even though this quest is a lot of fun, I only managed to find one playthrough. I attribute this to the fact that the Nightmare deck is comparatively new and that it is quite hard.
- Two players: https://youtu.be/X7mLiDyH-j0
Well, this was a quick article. I finished the last one not even two weeks ago!
Hope you all are enjoying summer. If you can, go to the beach sometime! But if you see anything with too many tentacles, run.
Don’t forget to take some pictures for me, though.
