The heroes return from their expedition to find a relic of lost Numenor only to find themselves in the middle of an assault on the Grey Havens themselves. This quest is a brutally difficult quest that hits hard and fast, leaving no time to turtle or to build up a decent board presence. It’s unique mechanic involves damaging ship-locations, representing the fires that threaten to consume both the Havens and the Elven-fleet alike. At the climax of the quest arc, we are introduced to Captain Sahir and Na’asiyah, who we will become quite familiar with over the course of the upcoming cycle. But in order to do that, first we have to survive the Raid on the Grey Havens.
Raid on the Grey Havens
- Found in: The Grey Havens Deluxe box, quest 3
- Official Difficulty: 6
- Community Difficulty: 7.7
- Encounter Sets: Raid on the Grey Havens, Stormcaller Elite, Corsair Raiders
- Quest cards: 2
- Play if: You want an aggressive quest that starts hard and never lets up. You want a quest that has multiple alternate loss conditions that you have to manage at the same time. You like the theme of fighting Corsairs through the burning wreckage of the Elven fleet. You always wanted to fight more than one boss enemy at the same time with no events in your hand.
- What is different about this quest?: The Aflame keyword, representing the Elven fleet burning down around you. Unique loss condition if either the Dreamchaser burns or enough other ships burn. Multiple boss enemies on the final stage.
- Solo or multiplayer?: This quest can be beaten in solo, but it requires a very well-tuned deck that can handle massive questing and difficult combat from turn 1. In multiplayer, it is much easier to tech against the quest and provide answers for the different ways it can challenge you. More players does mean more cards that deal Flame damage, so you will need to bring cancellation and be able to deal with all enemies that come out of the encounter deck in higher player counts.
- Can I run side-quests for this scenario?: This quest is not punishing against side quests in the same way that quests like Intruders in Chetwood or Escape from Umbar are, but with the way it hits hard from the beginning makes it difficult to have a spare moment to clear a side quest. The built-in timer on the Dream-chaser also means that the turtling style that side quests facilitate is going to be under a lot more pressure to perform quickly.
- What to look out for: Location lock, ships burning down, enemies that mess with your resources, and a huge pile of threat in the staging area in setup.
The Quest
Setup
Setup is rather simple for this quest, especially compared to the sailing quests later on in this cycle. However, simple is not the same as easy. You start out with the Dreamchaser – a 2 threat location that can never be traveled to and is immune to player card effects – in staging, along with a copy of Sahir’s Ravager.
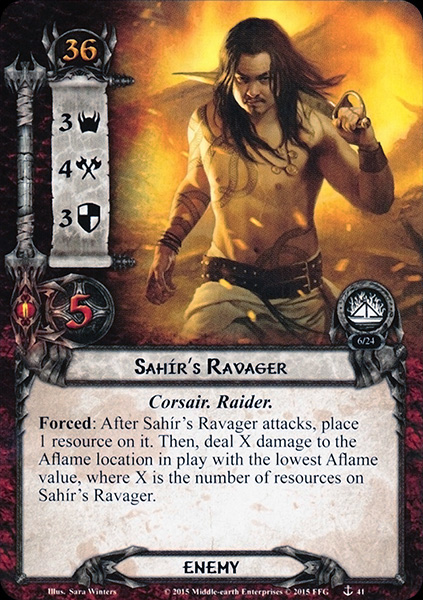
The Ravager is an annoying enemy – 4 attack means that many decks will struggle being able to defend it on the first turn, but 3 threat makes it difficult to quest past. In addition, it takes 8 attack to kill, which means that it will likely stay around for a while. That will give its Forced effect time to trigger more than once, potentially burning down a location or two early on and leaving you in a much more precarious situation. Since you add just as many Ravagers in solo as in 4 player games, this part of the quest is significantly easier in multiplayer, as you will have decks that are better equipped for enemies like this.
In addition to the Dreamchaser and the Ravager, you discard cards from the top of the encounter deck until X locations with the Aflame keyword are discarded (all but 1 location in the deck have the Aflame keyword), and add them to the staging area. X, of course, is the number of players in the game. The amount of threat on the locations in this quest can range from 1 to 4, but the average threat of an Aflame location is 2.6.

So setup guarantees between 6 and 9 threat in staging for a solo game, and more as the player count increases.
Finally, you will add the objective card The Havens Burn to the staging area. This card tracks how many Elven ships have been burned by the Corsairs. Every time you lose a ship to the Corsair’s fire, it will go under The Havens Burn and you will have to reveal an additional encounter card. If you have lost 3 more ships than the number of players in the game, you lose the game.
Quest Card 1: The Corsairs’ Assault – 18 quest points

Your goal at this first stage of the quest is focussed around preventing the encounter deck from getting out of control and burning down the Elven fleet – in this quest, the ships are represented by locations. The encounter deck will try to do this in 2 main ways. First, at the end of every round, each location with the Aflame keyword in the staging area will take a damage. This is not mentioned on any encounter card and is therefore easily missed by players who don’t read the rules inserts. Second, at the end of the combat phase, you will have to pick the location in play with the lowest Aflame value and deal damage to it equal to the number of enemies in play. Killing enemies before the end of the combat phase should be a priority because of this, since they will otherwise quickly burn down locations, especially in multiplayer.
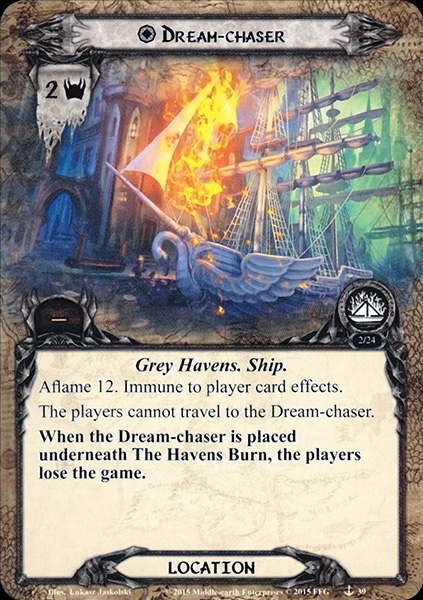
If a location with the Aflame keyword ever has damage equal to its Aflame value, the ship has been burned beyond saving, and it goes beneath the objective card. You can lose up to 2 more ships than the number of players – if you lose more, the Corsairs have won. In addition, the Dreamchaser will serve as a sort of timer on this quest stage. It has an Aflame value of 12, and cannot leave the staging area. If it is placed under The Havens Burn, you also lose the game. So you have at most 11 rounds to complete this stage of the quest before the Dreamchaser burns. However, due to various other encounter cards placing damage on Aflame locations, you will likely have much less time than this.
From a deckbuilding perspective, you will want to have a way to take down Sahir’s Ravager on the first turn of the game. This means being able to defend a 4-attack enemy and then come back and attack for 8. Not being able to defeat him early means either questing past a 3-threat enemy until you can, or potentially losing Aflame locations to his Forced effect, which can very easily snowball out of control if you can’t get rid of the enemy. Getting rid of him from the staging area will be a good move, using either direct damage or cards like The Great Hunt and Put off Pursuit to get rid of him without having to suffer his attack. Cancelling his attacks will also prevent him from dealing damage to locations.

In addition, you will need to be able to quest well from turn 1, or else risk location lock. As noted above, in solo, setup alone guarantees you between and 6 and 9 threat, and you could easily reveal a 3 or 4 threat location in the first turn’s staging. Location control is another option for this quest, but many of the locations have 5 or 6 quest points, and can therefore be difficult to quickly burn down, even with powerful location control cards like Asfaloth. In addition, be aware of the Mithlond Harbor, which prevents progress from being placed on locations in the staging area. This card can single-handedly shut down many forms of location control, increasing the risk of location lock.
Both a strong combat presence and a powerful questing push will be essential in overcoming the central mechanic of this quest: managing the damage on Aflame locations in play. Every round, each Aflame location in the staging area takes a damage. In addition, every round you deal damage equal to the number of enemies in play to the Aflame location with the lowest Aflame value. This encourages you to quickly engage and dispatch enemies, and also gives you a sort of timer for how long you can afford to leave locations in the staging area unexplored. If you take too long, they will burn down. If you feel tempted to let one go away because you just can’t quest past its threat, the encounter deck has bad news for you. Each Aflame location placed under The Havens Burn is replaced by revealing a new card from the encounter deck.
This combination of pressures means that the first few turns are going to be absolutely critical. If you start getting overwhelmed by enemies and can’t clear them out quickly, or if you get location locked early on, the encounter deck will have an advantage that is extremely difficult to overcome. So, to be really successful at this quest, you need to be able to clear the active location every round and to engage and destroy each enemy as it comes off of the encounter deck. Simple enough, right?
But just as you feel like you have gotten a little bit of control over the encounter deck, it is time for the quest to ratchet the pressure up a notch. It’s time for stage 2.
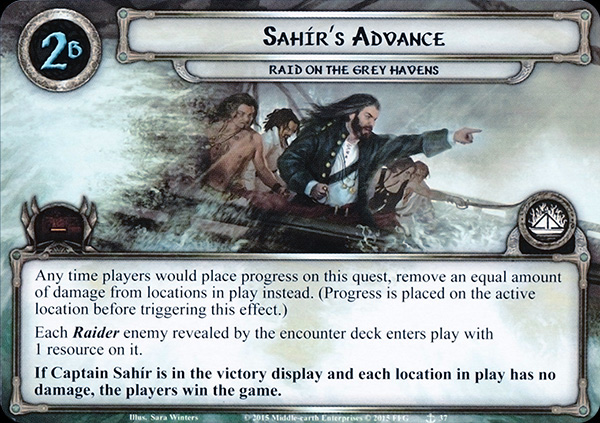
Quest card 2: Sahir’s Advance
The second stage features everyone’s favorite tag-team boss duo, Captain Sahir and Na’asiyah.

Captain Sahir is a beast of an enemy. With 6 attack, he’s not easy to defend. 2 defense and 5 hit points seems like it would be easy to defeat, but every time he attacks, he gains 2 resources (4 if you chump block his powerful blows). Each of his resources soaks up a point of damage, so it is effectively as if he is gaining 2-4 hit points every single time he attacks. In addition, he enters play with as many resources as there is damage on the Dreamchaser – possibly up to 10 extra hit points! When combined with shadow effects that make him attack again, add resources, or even boost his attack based on the number of resources on him, he becomes a truly formidable opponent.

Na’asiyah may turn to our side later on, but for now, she is a lean, mean killing machine. Don’t let her printed 2 attack and 2 defense fool you. She will be destroying a character of yours every single round, and will require incredible amounts of attack to even damage her, let alone destroy her.
The trick is in her resources. She gets +1 attack and +1 defense for every resource in her resource pool. Like Sahir, she will start play with resources equal to the damage on the Dream-chaser. In addition, however, whenever she engages a player, that player discards all events in their hand. She adds an additional resource for each event discarded in this way. It is not out of the question to see her with 10-14 resources on the turn she enters play, which translates to an attack and/or defense value of 12-16. That’s just not feasible to defend, especially not round after round. Luckily for us, she discards a resource after every attack and defense she gets involved in. So even if you can’t damage her, attack anyways. It will lower the power of her next attack, and hasten the process of her losing her combat power.
Defeating Na’asiyah isn’t required to beat the scenario, but it does help to lighten the combat phase to dispatch her quickly. Direct Damage is very powerful against her, since defending with a Gondorian Spearman with a Spear of the Citadel will be able to deal 2 damage to her, bypassing her insane defence early on. During attacking, a Bow of Yew or Sting will be able to go around her defence as well, allowing you to get rid of Na’asiyah relatively quickly if you build for it.
If 2 boss-level enemies weren’t enough to challenge your board state, each player also reveals an extra card from the encounter deck, adding a resource to each Corsair enemy in play. In addition, any new enemies revealed on this stage enter play with a resource on them.
This stage has no quest points, but that doesn’t mean that we can slack off on the questing power. Any time we would normally put progress on the quest, we instead remove damage from an Aflame location in play. This allows us to prevent the Dream-chaser from burning down while we deal with the new Corsair raiding party.
If, despite the horrendous odds arrayed against you, you can muster enough attack power to bring down Captain Sahir, and enough questing power to remove the damage from each Aflame location in play, you have won the quest. Congratulations!
The Encounter Deck
Global
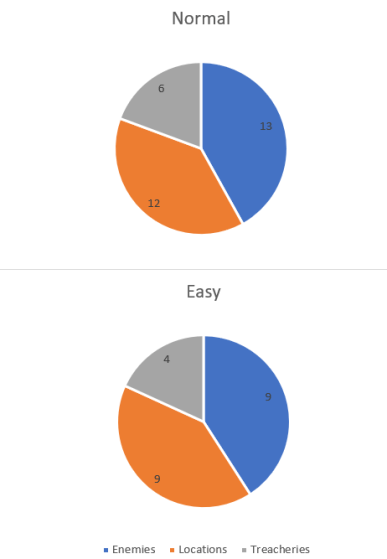
- The encounter deck is average sized, with 31 cards in normal mode and 22 cards in Easy mode.
- Only 14 of the 31 encounter cards have shadow effects in normal mode. In easy mode, 3 of these cards are removed, leaving 11 out of 22 cards with shadow effects. Several of these shadow effects have attack boosts that scale with the number of damage tokens on the active location or the number of resources on the attacking enemy, which can quickly grow to astronomical values. In addition, one shadow effect deals 1 damage to a defending character, so be wary when chump blocking.
- The average threat revealed off of the encounter deck is 1.7 in normal mode and 1.5 in easy mode. Don’t be fooled, however. This does not take into account several surging locations and treacheries, and a 1-threat location that can easily ramp threat up significantly higher.
- Only 1 card (a location with 2 copies) in the encounter deck has the surge keyword natively, although two other treacheries (with 2 copies each) can gain the surge keyword if their effects aren’t sufficiently shattering. One of the surging locations and two of the treacheries are removed in easy mode.
- The Doomed keyword shows up only on 1 treachery (Doomed 2), with 2 copies in the deck.
- One location in the deck (2 copies) gives locations in the staging area immunity to progress placed on them. The Dream-chaser is also immune to player card effects.
Objectives
The Havens Burn: We have already covered the effects of this objective in previous sections. However, a brief recap is in order here: After an Aflame location has damage on it equal to its Aflame value, it is placed under The Havens Burn, and we reveal an additional encounter card to replace it. When there are 3 + the number of locations under the objective, the players lose the game.
Enemies
The Corsair enemies we encountered from the Corsair deck in Voyage Across Belegaer have returned with a vengeance, but this time they aren’t restricted to the Boarding keyword. They are focused around building up resources, and then using those to punish the players in various ways.
- Captain Sahir: Captain Sahir is a terrible opponent, with 6 attack. In addition, he’ll start out with a lot of resources, gaining more with every attack. Each resource acts as an additional hit point, soaking up a point of damage before it actually hits his card. You have to defeat him in order to win the quest, and he will automatically engage the first player, regardless of your threat. His engagement cost is also just 4, so don’t expect to trigger any Hobbit abilities off of him.
- Na’asiyah: Na’asiyah is perhaps even more formidable of an opponent than Sahir. She also enters play with a ton of resources on her, discards all of your events (which add more resources to her), and uses her resources to boost her attack and defense into the stratosphere. She also automatically engages the last player (discarding their events as well, and gaining even more resources), and her engagement cost of 8 makes it extremely difficult to trigger effects based off of engaging enemies with a higher engagement cost than your threat. She is not immune to player card effects, so if you draw a Feint or a Feigned Voices after her initial engagement discards all of your events (or if you can recur one of them from your discard pile), you can avoid her incredible attack. Even better, her 4 hit points makes her an attractive target for direct damage, using Firefoot, Gandalf, or similar effects. Since her defense boost only triggers during an attack, if you can reduce her defense to zero until the end of the round or phase, you can also use Straight Shot to discard her.
- Corsair Arsonist: The Arsonist is a throwaway enemy. With only 2 threat and 2 attack, it’s not an existential threat to your board state. However, its When Revealed effect can mess up your plans – either adding damage to an Aflame location or adding an additional Aflame location to the staging area. There are some circumstances when it can be beneficial to add an additional Aflame location – especially there are no Aflame locations in play or if all of the Aflame locations in play will have the same Aflame value as the one you are bringing out. This will give you more targets to spread the damage from Sahir’s Ravager or the forced effect on Stage 1. But most often, you will want to add damage to an Aflame location to avoid the extra encounter card. If you will have enough willpower to clear the active location this round, the damage can often be safely placed on the active location, effectively neutering the When-Revealed effect from this enemy.
- Sahir’s Ravager: This is the definitive enemy of this quest. Every time he attacks, he adds a resource to himself, and then deals damage to the Aflame location in play with the lowest Aflame value equal to the number of resources on him. His 4 attack can be difficult to defend, and he takes 8 attack to defeat. Do not leave this enemy around to attack next round if you can avoid it. Being able to muster 8 attack early on is important, and you should prioritize taking out this enemy.
- Raid Leader: This is one of the most dangerous enemies in the set. At 5 attack, he’ll require special attention to defend well. He takes 6 attack to kill normally, but steals a resource from each of your heroes when he engages you, gaining +1 defense for each resource on him. This brings him up to 4 defense and 5 hit points if each hero has a resource, meaning that it can be really difficult to defeat him in one round. At 3 threat and 40 engagement cost, he can be left for a while if you can’t yet handle his attacks. One way to mitigate his difficulty is to spend all of your resources on the round you intend to engage him.
- Corsair Infiltrator: Like most of these Corsair enemies, this one steals your resources. Unlike the others, he steals a resource when your heroes collect them at the beginning of the round, so there is no way to get around it. He also is dealt an additional shadow card for each resource he has on him, which can get pretty dicey with his 3 base attack. With only 2 hit points, he’s a good target for direct damage effects like Goblin-Cleaver, especially because his 3 defense is hard to punch through immediately. But if you have already brought enough attack to take down a Ravager, you can probably deal with this lesser cousin pretty well.
- Umbar Raider: This is another enemy which you don’t want to leave around for a while. Every time he attacks, he steals one of your resources. And each resource he gains gives him +1 attack. As with the Raid Leader, you can somewhat mitigate this effect by spending all of your resources every round, but that means not saving a resource for Hasty Stroke or A Test of Will.
Locations
The locations are the thematic center of this deck. All but one of them have the Aflame keyword, and many of them have passive, Forced, or Travel effects that interact with the Aflame keyword or the damage tokens it places on them.
- Mithlond Harbor: The is the only card with the native surge keyword in the encounter deck. It is only 1 threat and 2 quest points, but it prevents progress from being placed on locations in the staging area. As a result, if you plan on using location control cards to manage the Aflame locations in play, traveling to and clearing this location is a primary priority. If not, you can leave this location until the end of the game, if you like. Note that this location does not have the Aflame keyword, so it will take no damage from any of the quest effects, and will never go underneath The Havens Burn.
- Burning Piers: This location is tied for the highest Aflame value in the deck – if you choose to pull a location out of the deck or discard pile instead of dealing damage for the Corsair Arsonist’s When Revealed effect, this is one of the location you can pull out. At only 1 threat, it’s relatively harmless on the turn it comes out, and you might be tempted to leave it in the location for a little bit while you deal with other, more pressing problems. This, however, would be a trap. Every point of damage on this location gives it +1 threat, which means that it can become a formidable obstacle to your questing in a very short time. The good news is that it does nothing harmful if it burns down, unlike some other Aflame locations – at least, nothing beyond revealing another encounter card. The other good news is that it has only 3 quest points, meaning that you should fairly quickly be able to clear it in the staging area during those few turns in between having copies of the Mithlond Harbor mess with your location control. All in all, this is probably one of the least objectionable cards in the deck when it is revealed, but you have to deal with it quickly.
- Pillaged Ship: This card also has an Aflame value of 5, tying it with the Burning Piers (see above). It has an extra point of threat, but doesn’t get worse as it gets more damaged. However, when it is revealed from the encounter deck, you must either deal 3 damage to it or add the topmost enemy in the encounter discard pile to the staging area. Both choices have advantages, but the best choice is often to deal the damage to Pillaged Ship, unless you are in trouble with other Aflame locations and your board state can handle whatever enemy would be pulled out.
- White Ship: This is probably the most difficult location to deal with in the deck. At 4 threat, it will put a significant crimp in your questing, and 6 quest points mean that it is difficult to clear in staging or as the active location. If this comes off the encounter deck, it can be the start of a chain reaction – fail to clear the active location, lose a location to the fires that you were planning on traveling to this turn, face another enemy on top of that from the new reveal, and so on. Its travel cost is also annoying – you have to seearch for an enemy from the encounter deck and discard pile. Unless you have some sort of specific plan, the best enemy to pull out for this travel effect is the Corsair Arsonist. You won’t have to deal with any resource-stealing effects, the 2 attack is something you can pretty easily deal with, and you avoid the When Revealed effect. If you have to let a ship go under The Havens Burn, however, this is probably the ship to do it with. It gets 4 threat out of the staging area – and whatever card replaces it will not likely have similar threat. In addition, traveling here would have pulled out an additional encounter card anyways. Unlike the Aflame locations we have hitherto discussed, however, this one has additional negative effects when it goes beneath The Havens Burn – you must place a resource on each Corsair enemy in play. As effects go, this is unlikely to be game-ending, but it is something to watch out for. If you have one or two copies of Sahir’s Ravager in play, then strategically losing this location could have nasty ramifications. If you are generally on top of your enemies, then an extra resource is unlikely to cause significant problems.
- Elven Wave-runner: This is both a really fun card to see come out, and a really nerve-wracking one as well. It has the lowest Aflame value in the deck, at 3, and will thus be the target for both the Quest effect and the effect on Sahir’s Ravager. 3 damage will be enough to lose this location, and that damage can come incredibly fast. But if you can clear this location, each player draws a card, and you add it to the victory display, reducing the number of locations in the encounter deck.
- Elven Caravel: Where White Ship is the card most likely to cause you location lock, this is the location most likely to outright lose you the game. Its Aflame value of 4 means that it is a little bit resilient to the quest’s propensity to put damage everywhere. But at 3 threat and 5 quest points, it’s still not easy to clear. And you do NOT want to lose this card. Doing so will mean that you take 1 damage on every single character in play. Against most decks, that is a debilitating effect, and very possibly game-ending. Note that this is in addition to the additional encounter card reveal from The Havens Burn. The Travel effect is likewise odious, forcing each player to deal damage among their characters equal to the damage on the location. Your best bet against this location is to travel to it immediately after it is revealed, avoiding the worst of the Travel effect and hopefully clearing it before damage piles up.
Treacheries
There are only 3 different treacheries in the deck, for a total of 6 cards in the entire encounter deck. You can almost get along without bringing cancellation, but Battle-Hardened can really wreck your day. So if you are skipping A Test of Will, have some other plan for dealing with every engaged enemy making an immediate attack.
- Put to the Torch: There isn’t much direct damage in this quest, so this treachery isn’t bad. Deal 3 damage to a character you control, or to an Aflame location in play. If you have questing or attacking heroes with 4 or more hit points, it’s pretty simple to just deal the damage to them and heal it off later. Or you can deal the damage to a less-important ally. Generally, this is not worth cancelling. This treachery is also easily countered with Ioreth if you are running Lore.
- The Fires Spread: Deal 1 damage to each Aflame location in play. If less than 3 damage is dealt, it gains surge. It’s also Doomed 2. Can mess up your plans if you aren’t careful, but it isn’t the worst thing in the world.
- Battle-Hardened: Save your Tests of Will for this one. Adding a resource to each enemy in play can be nasty, but the worse effect is having each engaged enemy make an immediate attack. If there are no engaged enemies, it gains surge, which just adds insult to injury. If you can’t cancel it, having defenders that don’t exhaust to defend can take care of it.
Tips and Tricks
- Attack cancellation is particularly effective against the opening Sahir’s Ravager – you avoid the 4 attack, saving your defender or chump blocker for a second enemy, as well as avoiding the damage he deals to a location in play. Then, if you can either recur it from the discard pile or find another copy on Stage 2, it can save you an ally when Na’asiyah attacks.
- Be able to muster at least 8 attack or deal at least 5 direct damage on the first turn to take out that Ravager and get yourself a much gentler staging area.
- Ally Gandalf is particularly good at dispatching Na’asiyah with extreme prejudice. Any other effects that can deal 4 direct damage are also useful to get rid of her. As a bonus, any leftover direct damage can be done to Sahir, to burn down some of his tokens before you attack.
- Location control or extremely heavy questing is a must.
- Thror’s Key can be very useful – use it to blank the Mithlond Harbor so that you can keep using location control in the staging area. Alternatively, use it to blank an innocuous location so that it loses the Alfame keyword and leave it in staging forever.
Playthroughs
- 3 players, progression decks: https://www.youtube.com/watch?v=rejiOGc4vrk
- 2 handed, progression style: https://www.youtube.com/watch?v=JytypJMqGIs
- 2 handed, adjusted cards from first cycle: https://www.youtube.com/watch?v=e4GOydhkRCA
- 3 players, updated decks: https://www.youtube.com/watch?v=_G5qCg3NK8s
And that’s that. This is a very difficult quest – easily in the top 20% of the quests in the game (and in my personal opinion, rather higher than that). But it’s also a very fun quest, and a very thematic one – I love how the story and mechanics blend together to create a powerful experience. The quest really feels like a desperate battle through the wreckage of a burning fleet, trying beyond hope to salvage something from the flames while fighting off determined enemies at every turn. And Captain Sahir is one of my favorite villains in the card game. The remainder of the cycle will follow his story, through a number of fascinating twists and turns, before it culminates in an incredible land and sea battle in the City of the Corsairs.

3 thoughts on “Raid on the Grey Havens”