The Wastes of Eriador kicks off the Angmar Awakened cycle with a pretty long, challenging, and aggressive scenario. The story so far is that your heroes have aided a Dunedain by the name of Iarion to help ambush a war party of orcs headed for Bree-land. Upon successful ambush and pursuit of survivors into the Weather Hills, it is learned that the war party is far more organized than usual with a distinct mission, to capture living survivors. Meanwhile back at the Dunedain outpost of Fornost Erain, the wraith Thaurdir reveals himself and launches and undead assault on the Dunedain, taking captives in the chaos including Iarion himself. You are now setting off with Iarion’s cohort, Amarthiul in pursuit of Thaurdir across northern Eriador with a particularly vicious pack of wargs nipping at your heals.
This is actually one of my favorite scenarios in the game, as not only is it very challenging to a lot of deck archetypes, but it does a brilliant job of thematically creating a day/night mechanic. During the day, the wargs retreat to the staging area and try to thwart your progress. During the night they move in and attack. The theme is perfectly executed, as you can literally feel the tension and escalating danger of darkness approaching, and the subsequent relief of daybreak.
Wastes of Eriador
- Found in: 1st pack of the Angmar Awakened cycle
- Official difficulty: 6
- Community Difficulty: Mean rating of 7.2 with the majority of players rating it at 8
- Encounter sets: The Wastes of Eriador, Eriador Wilds, Foul Weather
- Quest cards: 3
- Play if: You want to be challenged by a fairly aggressive scenario with a fun and unique mechanic that really creates a cycle of tension/danger and relief/safety. Be prepared for a long game, as this one can be a slog, ending with a fairly unique (and irritatingly tricky) boss.
- What is different about this quest?: Day/Night Cycle, objective ally with good combat stats and the ability to bounce back and forth to where the enemies are engaging, a boss that uses both nighttime and pack support to his advantage.
- Solo or Multiplayer?: There are some significant challenges in solo because it demands a lot of questing power and requires you to have a way of defending early against potentially multiple attacks….which can be difficult to deal with in a single balanced deck. It does, however, have some decent scaling mechanics for multiple players, and some encounters cards and encounter card combos are more impactful against multiple players, so I’d call it about even. It’s challenging in any mode of play
- Can I run side-quests for this scenario?: No, that is probably a really bad idea for two reasons. First of all, the Eriador Wilds encounter set actually punishes having side quests in play. Second, you have a good deal of quest progress to slog through and can only make progress during half of the game turns thanks to the Night mechanic. You are already in a race against time/threat and the side quests the encounter deck throws at you are already a major distraction.
Special Mechanics
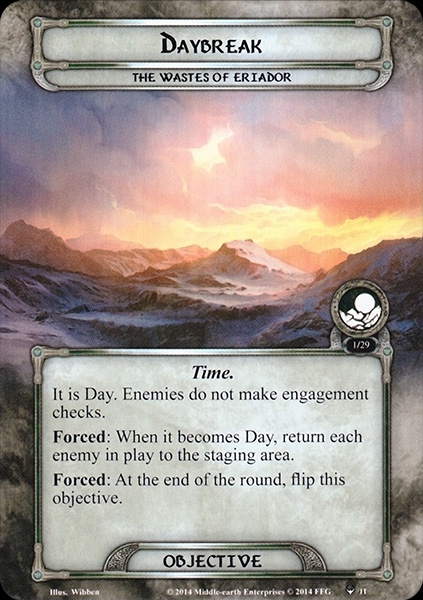
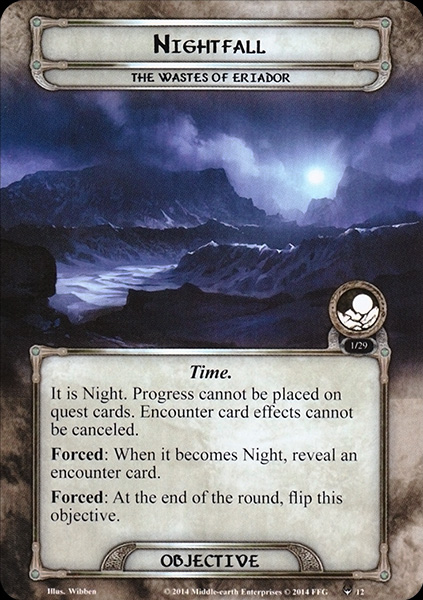
Day/Night Cycle
This double-sided Time Objective card that remains in the staging area is the central distinction of this quest. When the day side is face-up, engaged enemies run back to the staging area and do not make engagement checks, as well as other bonuses depending on what quest stage you are at. At the end of the round, the objective flips to the night side. This triggers an end of round reveal from the encounter deck, and shuts down all quest progress for the entire turn that it is night side up… as well as other negative effects depending on the quest stage.
This is honestly one of my favorite quest mechanics, although it does make the game long by shutting down quest progress for half of all rounds. It creates a basic rhythm where during the day, you are trying to, build up, make as much progress as possible (and pick off a warg if you are smart); and then at night it’s all about “turtling up” and surviving what is often a ravenous pack of wolves who descend on you. To make it worse, many of the enemies, locations, and shadow effects are more dangerous and threatening at night.
Amarthiul
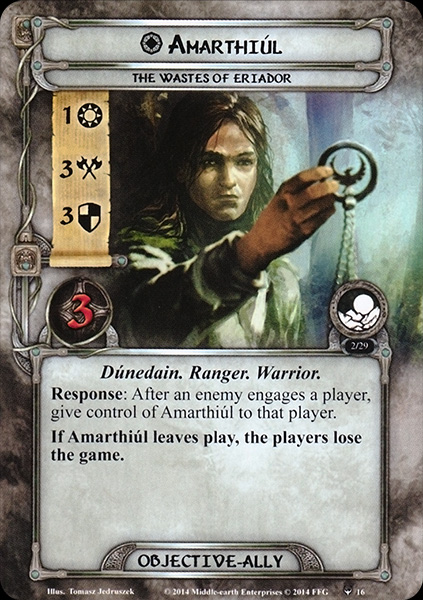 As bad as this quest is, it does give you what might be the most solid combat focused objective ally in the game to date. Even better, he has the scripted ability to jump from player to player as they engage enemies, ensuring that he is better positioned to be effective. Early on he typically helps you to defend with 3 def and 3 hit points, and later when (hopefully) your deck’s defensive strategy is in place, he provides a stout 3 attack to help bring down wargs. A word of caution though…. like most objective allies, losing him is game over. The most dangerous enemy for him to defend is the Blood Thirsty Warg because its 4 attack can be boosted to 6 if you catch the wrong shadow effect at nighttime.
The Pack Leader
This guy is one slippery dude of a boss. Looking at raw stats, he doesn’t look “that” scary ….but the way he ties into the scenario mechanics can make him very difficult to deal with. He can’t be affected by attachments (traps), and cannot take damage unless you first put 5 progress on the quest. This is actually trickier than it sounds because when quest stage 3 brings him into play, the time objective is instantly flipped to night. That means there is no possible way to damage him during his initial attack…which almost certainly will happen with an engagement cost of 1 and the inability to be trapped (although player card effects that shut down enemy engagement do work and are indeed a good strategy). You have to wait until daylight, try to put 5 progress on the quest (with his 4 threat contributing to staging threat), and can’t engage him during the daytime (again, outside of specific player card mechanics that do so) when he’d be most vulnerable. If you fail to get 5 progress up during the day, you have to survive another night where you can’t damage him back! If that isn’t bad enough, he even has a character exhausting effect that is almost always magnified by multiple pack mates. This is a bad one if you aren’t prepared for him and don’t tech for him. This is where sideboarding in cards that can engage enemies outside the normal framework or block enemy engagement checks are probably a good idea. You aren’t going to take him down without both high willpower and high combat readiness.
The Quest
Quest Card 1A – Setup
Setup is pretty straightforward. Set the boss aside, find Shrouded hills for an active, set time objective at daybreak, and random draw for setup encounter card. I’ve never been a large fan of the “random reveal” setups because they can really add a lot of variation and swinginess to games, getting you off on an unusually easy or difficult start based on luck. This game normally requires you to “win” the first three rounds in order to beat it and I don’t like that sort of luck dependency at setup, but it is what is, and fairly common still in this deluxe/chapter cycle.
Day/Night Rhythm
Because of the unusual nature of this quest’s mechanics, I’d like to take a moment to talk about a basic strategy that applies to all quest stages equally. You will find there is a rhythm. Every time day breaks, besides relaxing (enemies disengage and will not make engagement checks this round), you also want to really focus on making your quest progress because you are effectively questing for 2 game turns instead of 1. The next turn is night and will shut down your ability to put progress on the quest…although you can still clear locations! You will ideally want to really focus on trying to keep the active location empty during the day (and subsequently focusing on clearing high progress locations at night). You want as much daytime progress as possible to go on quest cards and try to clear locations at night if you can spare the character stats.
With that said you might be tempted to just all out quest during the day but this is actually a trap. In fact, paradoxically, day time is the best time to deal with enemies. The enemies themselves and shadow effects are often less dangerous at day, and you have better control over what you engage. You will probably want to strategically engage a warg a day (since you can only optionally engage 1/player under normal circumstances) and take him down to make the following night time combat phase that much easier to survive. Like most well-developed quests, you will need to carefully balance your resources between questing and fighting in both day and night phases, with one placing a greater emphasis on combat and the other on questing.
Also important to remember, the Night mechanic is going to result in an extra encounter reveal at the End of Turn step, which is a bit awkward to get used to. Thankfully, a lot of the treacheries are whiffs at the end of the round, so you’ll hopefully get lucky a few times. Make sure you aren’t forgetting the end of turn encounter reveal and plan for it accordingly. This mechanic can be really tough for the solo player but it’s an effect that scales favorably with more players in the game, since it’s still only 1 reveal regardless of player count.
Quest card 1B – Across the Wastes – 20 quest points
1B is a slog, and you will probably spend a good majority of the game here. However, it’s daytime effect of giving all heroes a boost to willpower does help you through it. Obviously, you probably want to quest with all 3 heroes every day cycle to maximize this bonus as much as possible (which is a bit easier since you are protected from enemy engagement checks). Unfortunately, every night cycle you spend at this phase boosts your threat by 1, meaning it takes very little time for even low threat decks to find themselves in the 30s and being engaged by the majority of enemies. Decks that are dependant on controlling enemy engagement, as well as decks starting at high threat and depending on the valour mechanic are probably really going to struggle with threat control. On top of this “baked in” threat increase, many of the treachery cards either feature the doomed keyword or have threat raising effects, so threat is definitely a real problem.
Quest Card 2A – Howling at Night
Shuffles discard pile back into the encounter deck and discards down to a warg enemy to add to the staging area. Note, the enemy is added and NOT revealed! This is a good thing, meaning it bypasses when revealed effects and surge.
Quest Card 2B – Howling at Night – 15 quest points
This card allows the players to draw a card whenever the time objective flips to daybreak and discards and ally when flipped to night. You really want to be sure you have a good willpower base set up when you get to this stage because the costs of an ally a night can weaken you fast, and you have less willpower during the day than you are used to now since you no longer have the bonus.
Quest Card 3A – Battle With the Pack
This is where it gets real. This card flips the token back to night and introduces the pack leader into play. Also if you are not playing solo, you get another warg in staging as well (although once again, “add with no reveal” is important!). Don’t forget that flipping to night also means that you have to do another encounter reveal.
Quest Card 3B – Battle with the Pack – 5 quest points
This is one of those “end stage boss” cards that require you to put progress on the card before you can harm the boss. It’s a mechanic built in to ensure that you still have to pay attention to questing and can’t just go all out kill. It is ESPECIALLY problematic in this one though, because you only get an opportunity to put progress on it during the day, and only get an opportunity to engage the boss at night. On top of that, if you don’t get the full 5 progress, you have to discard progress and start again…. The next Day phase!
At the very least, the Pack leader and his cohorts are going to get one free swipe at you the turn you flip this quest card. The following day, you must make 5 progress on the quest to even get a shot at damaging him the following night. On top of that, his card effect causes you to exhaust a character after he engages….for every warg you are engaged with! With this scenario that can be quite a bit at this point, including forest snared wargs! It sort of creates a snowball effect… the more wargs engaged, the less standing characters you have to defend against more wargs. It pretty much means that you want to try VERY hard to not be engaged to any wargs before you progress to this stage! Defeating the boss means you win the scenario.
The Encounter Deck
Global
- With the removal of Pack Leader and setting a Shrouded Hills as the active location, the remaining encounter deck is 45 cards in Normal mode and slims down to 31 in easy mode…so a fairly hefty encounter deck.

- At setup, Shadow effects are present on well over half of the encounter cards (62%). They are nasty too, with quite a few extra attacks, extra damage, and exhaust effects. Shadow effects make this scenario more dangerous than it first appears, and should be taken into account in any strategy to beat it.
- Surge is present on 3 enemies and 1 of the side quests, and conditionally on 2 locations, one of which thankfully starts the game as an active. Not particularly prevalent (thankfully!). However, it should be noted that there are several effects that “fetch” other encounter cards into staging or player engagement.
- Doomed is present on 4 treacheries. Its prevalence is quite unwelcome given how this scenario has a knack for raising your threat fairly quickly…through other cards and even a quest card mechanic. What is worse, many of the enemies tend to be on the lower end of engagement cost, ensuring that they will be coming down on you pretty frequently.
- Immunity: The Pack Leader and 2 Hunting Pack enemies have attachment immunity. On top of this, the Pack Leader has immunity to optional engagement, and cannot be damaged until 5 progress have been placed on quest card 3B
The distribution of enemies, treacheries and locations is pretty even, but be aware that the scenario has a lot of “swarm” effects that finds way to put more wargs into play than just through staging.
Enemies
At first glance, the enemies in this quest don’t look that difficult from a combat stat perspective but don’t be fooled. The encounter deck has a tendency to swarm, the shadow effects are nasty, and enemies AND shadow effects tend to be more dangerous at night (when you are typically engaging in the most combat). They are particularly dangerous in the last stage of the game, where they exhaust characters when the players engage the Pack Leader. It’s cool thematically, representing wargs incapacitating and crippling their prey as a pack, but nasty none the less. All of the enemies are unique to this quest.
- Pack Leader: The Pack Leader is mostly dealt with throughout the analysis as a major mechanic of the quest so I won’t rehash it here. Needless to say, he is both the win condition and the scenario’s greatest challenge.
- Hunting Pack: This is the standard non-unique “big enemy” of the scenario, and there are two. This is the only non-unique enemy that can’t be trapped so you will have to deal with him the old-fashioned way. He will probably hang out in the staging area for most of the game but you will want to definitely deal with him before getting to the last stage. Also, don’t forget that his engagement cost lowers as characters are wounded! This can catch you by surprise when he goes from staging area ornament to engaging after a particularly bloody round.
- Wolf of Angmar: This is the token “annoying little surg-ey” enemy of the pack, although he gets considerably more intimidating at night, with 4 attack being a potential hero killer! His low engagement makes this guy pretty dangerous at night where he quite likely surges into another warg, and then comes down on you with a boosted attack. Shadow effect is pretty ugly at night time too.
- Northern Warg: I’m usually not too unhappy to see this enemy because I think in a lot of cases, his shadow effect is worse than he himself is. The card effect can really slow you down in a bad way if you have a staging area full of wargs (and according to the most recent ruling, it’s been reversed since he came out and he “does” boost himself)
- Bloodthirsty Warg: I’ve found this to be one of the most manageable enemies of the group. He does have a relatively dangerous attack, but also has high engagement cost and his auto-engage + extra attack effect can easily be bypassed by ensuring that you always engage him when he is in the staging area during day time. Make sure you take care of him before progressing to stage 3! as the automatic night flip will trigger the engagement and extra attack, and this is where he is most dangerous. Extra points for the art though!
- White Warg: Another enemy that you really want to see in the daytime and handle him there. He’s generally not that dangerous on his own but he is pretty much auto-engaging if it happens to be night and his direct damage effect synergizes with other card effects that punish damaged characters. You will want to deal with him fairly quickly though because multiple engagements with him each night round can really add up fast. The obvious play is to, at the very least, engage him during the day when you see him even if you can’t kill him. This is also the other awful “multiple attack” shadow effect making this card probably better dealt with as encounter rather than shadow effect.

Locations
The Locations in this pack come from two sets. The “Eriador Wilds” locations interact with side quests (3 punish you and 2 reward you for having them in play.) The “Wastes of Eriador” locations work to make questing progress more difficult as well as forcing interactions with wargs as travel effects.
- North Downs: Adds extra staging threat at night. It’s annoying when trying to hold characters back for combat, but generally not game ending.
- Warg’s Den: This is the worst location of the bunch in my estimation and you want to swear every time it reveals. It forces you to fetch and engage a warg, and you can’t just ignore it because it’s 4 threat will really slow you down from the staging area … AND it’s immune to card effects! I usually end up picking the norther warg just to get it’s when revealed effect and shadow effect out of the encounter deck. This location is the penultimate target for “Distant Stars” since technically it’s immunity isn’t in effect until after it enters play (according to my understanding of most recent rulings).
- Eriador Wastes – This location is extremely annoying when it gets revealed during the quest phase because it can really put the brakes on a big quest push….something you can’t afford much of in this quest. Be wary of the travel effect as well, as extra shadow effects tend to hurt more in this quest. Definitely, want to travel during the day.
- Shrouded Hills – Basically a progress soak that’s almost certainly going to surge, since this is not the quest to have side quests in play if you can help it. Best left in the staging area where it generally doesn’t do much harm.
- Rugged Country – Probably the least imposing encounter card in the set, as it’s low quest points and you are generally going to be avoiding side quests!

Treacheries
Treacheries come from all three sets. The Foul Weather treacheries are trying to damage your characters, impede questing, and then punish damaged characters, the “Eriador Wilds” treacheries interact with Side Quests, and the “Waste of Eriador” treacheries enhance and support built in scenario mechanics in general.
- Predatory Wolves – This treachery seems to scale quite a bit in difficulty with number of players. I’ve found in solo, it generally isn’t too bad. You basically are revealing a warg, except one of your choice…unless your highest cost character is cheap enough to easily lose. Either way is paradoxically kind of helpful. I do wish you didn’t have to “reveal” the warg, but that might bake it “too good” in solo. In multiplayer it’s downright punishing…either loading up the staging area or taking out the highest quality allies on the board.
- Sudden Darkness – Sudden Darkness is the Test of Will bait of this scenario, as it has two versions of horrifying effects depending on where the time objective is at. If you catch it at night, it’s a large threat boost in a scenario that is already jacking up your threat. If you catch it during the day, it potentially puts a full stop to a big quest push and opens you up to an unexpected night-time warg attack with your guard down (since most everyone was probably questing)! Of course, flipping to nighttime also triggers an encounter reveal and whatever effects are generated by the current quest card. Nasty, nasty card (but thematic homerun!)
- Pressing Needs – I actually find this card to generally be a little worse than usual in this scenario. Both the doomed and the side quest fetch tend to hurt more since the general scenario is hard on threat and quest progress.
- Weight of Responsibility – Potentially devastating with multiple side quests in play but in this scenario, mostly going to be just an empty surge most of the time. Better drawn as encounter card than shadow effect.
- Biting Wind – Pretty punishing to a big quest push, but otherwise normally not too bad. The shadow effect can be bad if it kills a defender resulting in an unexpected undefended attack. This card totally whiffs if you reveal it as a result of a time objective flip.
- Cold from Angmar – This treachery is potentially devastating if you have no healing. If you have repeatable healing available, it becomes a paper tiger. It is worth noting that quest stages tend to hang around for quite a while in this scenario.
- Freezing Blast – Potentially devastating if you have taken a lot of damage, but otherwise the Doomed:2 is probably worst and the shadow effect is almost certainly worst. This one is also a dud if revealed during time objective flip.

Side Quests
Not a big side quest scenario but you don’t really want to see them when they do rear their ugly heads. The reason Side Questing is hard is because you are limiting to making quest progress to 50% of the game turns. This scenario does not come with any new side-quests, only the two from the encounter sets.
- Make Camp – The most annoying aspect of this quest card is that it’s one of those “I’m going to instigate an effect that is probably minor but might be horrible…and then I’m going to surge and replace myself”. Definitely not a fan of surging side quests. 6 quest points makes it potentially difficult to clear in one turn, forcing you to waste 4 turns trying to clear it! This is one you might just leave sitting and pray the Eriador Wilds cards don’t turn up too much.
- Lost in the Wilderness – The potency of this card is largely based on the stage of the game. Early on it’s probably a game ender/scoop. Later on when you have some board position, it becomes merely annoying. The silver lining here is that it doesn’t surge to replace itself, so if you can part with your hand without too much trouble for a round, it can actually be a good thing.

Tips and Tricks
This scenario really challenges your deck in a lot of different ways. It boosts threat, throws out direct damage, slows down questing, throws a lot of enemies at you (with bad shadow effects), is a long slog, and has a tricky boss at the end to top it off. It’s a fairly good test of whether a deck is top tier or not, as it doesn’t pull many punches. There are some deckbuilding and gameplay tips that help tremendously though.
- The most important tip of all is to make as much possible use as you can of maximizing your daylight cycles. This is not only your chance to make quest progress but also the most opportune time to deal with troublesome enemies and locations to make survival during night easier. The ideal is to try and optionally engage/kill a warg as often as possible during the day, as enemies and shadow effects are less dangerous and can be “picked off” since they don’t make engagement checks. This requires a pretty tremendous balancing act that makes this a bit of a skill curve quest. When night time comes, be prepared to cut your losses and just mostly survive to the next day period!
- There are a lot of ways you can build, sideboard, or optimize your deck to make this scenario more manageable. The first thing to note is that besides making sure you have some answer for potential multiple attacks and bad shadow effects, you will also want to bring some healing since the Foul Weather encounter set is in here. Other player cards that are really fantastic in this scenario are cards that control engagement (both preventing enemy engagement and engaging enemies outside of the “optional engagement” framework). Controlling engagement is huge, being able to stop certain enemies from engaging at night while being able to engage extra enemies during the day (or the boss with his optional engagement immunity). You ideally want some form of shadow cancellation or at least having a way to avoid shadow effects (such as traps). Finally, probably want to set the side quests aside for this one, as main quest progress is too rare and precious.
- There are a lot of “warg fetch” effects in this deck. Using them smartly can benefit you. Putting Northern Wargs or White Wargs into play can ensure you don’t see their multiple attack shadow effects coming up. Travel to the “warg fetch” locations during the day time, and grab wargs that are more dangerous at night, like the White Warg or Wolf of Angmar (although be cautious that the WoA will still surge on reveal and may not be ideal). This is one of those quests where you are controlling what you remove from the encounter deck as much as you are controlling what you can manage to put into play against you. If you have any encounter deck manipulation, try to set up weather cards to reveal when the time objective flips (and thus they are impotent).
- Be prepared before you move to stage 3, as it will flip to night and introduce the boss simultaneously. You want to have a lot of questing AND combat power built up at this point. Clear the board of wargs as much as possible before travelling here… as they will have the added effect of exhausting characters when the Pack Leader engages. This is where you want to save up any engagement stopping effects, as preventing the Pack Leader from engaging on the first night where you can’t damage him is huge. It’s worth it to stall in stage 2 for a couple turns if you can achieve this board state in that time…although be careful, as you are losing an ally every second turn.
- Use Amarthiul to your advantage. He is great for defending early on and equally good at helping take down wargs later. His ability also allows him to be where he is most needed for combat. Just be wary of anything with a 4 or 5 attack, as damage boosting/causing shadow effects are fairly common in this scenario and if he dies it’s game over. He is most effective if you are able to keep him healed to full strength so he can take up to a 5 damage attack in a pinch.
Playthroughs
I used this Argalad Trap deck to beat this scenario in solo play. It turns out to be a good scenario for Argalad because the enemies spend a lot of time in the staging area. Trapping is one way to keep the wargs under control, even though you will need an alternative plan to deal with the attachment immune boss.
Also, here are some online playthroughs for the scenario.
- 2 player, updated decks: https://www.youtube.com/watch?v=lkLWwrBF56M
- 2 player, updated decks: https://www.youtube.com/watch?v=cTK1rzx5ktg
- 1 player, progression style: https://www.youtube.com/watch?v=2WNP5OlwLG4
- 2 handed, progression style: https://www.youtube.com/watch?v=RHr1bLYKzec
- 1 player, updated decks: https://www.youtube.com/watch?v=KsGtMUmsGuc
Having made it past the hell puppies of Angmar, you now proceed to the Mountains of the North. Here you will be captured by Orcs that keep you in cells in the westernmost peak of the southern mountain range of Angmar: Mount Gram. Next time, you will be escaping your prison and will try to make it out alive in a fun scenario that throws your deck into disarray.


I may have missed it in the write-up, but one of the toughest parts of this one is that encounter cards can’t be cancelled at night. Saving that Test of Will for the worst-case scenario is great and all, but you always seem to flip the worst treacheries at night!
LikeLike