
Fog is not unusual in Wilderland, particularly at this time of year. All the same, there is something ominous about the wall of grey which has crept in overnight. It blankets the Anduin from all sides, stretching almost to the eaves of Mirkwood. A sniff of the air brings nervous anticipation. This is no ordinary weather – some foul devilry is at work around the Carrock…
Greetings, readers of Vision of the Palantir! Guest author Beorn here with a very special scenario review: Nightmare Conflict at the Carrock. Going back to the earliest days of the game, the original version of this quest was my favorite from the first cycle – and not just because it takes place right in my neck of the woods. Each of the Shadows of Mirkwood scenarios introduced a new concept to the players, expanding the horizons of what the game would ultimately become. While the Core Set established a general pattern, players were to learn that quests come in a myriad of forms, and a strategy which worked to perfection in one could easily prove disastrous in the next.
The central strategy for the original version of Conflict at the Carrock was pace. Many a player met a grizzly end by power questing through the first stage of that quest, only to run smack into a fearsome pack of trolls. This quest was an early archetype of “Boss Fights”, of which it remains an exemplar. As an experienced warrior knows, one must needs spend adequate time to prepare; giving the heroes time to arm themselves for the task ahead.
An eerie stillness holds the air. The night is waiting, a new moon refusing to reveal what secrets are below. Determined to discover what holds the lands under enchantment, I stalk the shrouded mists. Instinct has long ago taught me the art of investigation. Barging into unknown danger with naught but paws and wits for allies is foolishness of the first rank.
Shrill calls of far away birds break the silence. In a surprising turn, the bird calls are not swallowed by the void of night. Instead, a strange shuffling sound seems to emanate from the ground itself. While the source of the sounds is unknown, the hairs on my back stand on end. I roam silently on four paws, eager to solve this mystery…
The original quest had effectively no punishment for stall tactics. Players would quest for just enough to clear the staging area, even using other locations to slow their progress toward the second quest stage and the inevitable conflict. This allowed crucial early rounds to find Weapons and Armor attachments, readying effects, and support allies. The second stage of this quest features an epic battle, so it important to find effects which boost combat stats, provide healing and card draw, or even simply to serve as fodder. Unlike the Hill Troll from the Core Set, these trolls are less punishing to chump blocking, so many players were not above sacrificing a squire or two – roughage in a troll stew.
Upon my approach, muttering and curt curses become audible through the trees and my suspicions are confirmed. Before I can reconnoiter further, my other faculties deliver the fateful truth: trolls. The foul creatures have brazenly crossed the mountains and forded the banks of the Anduin!

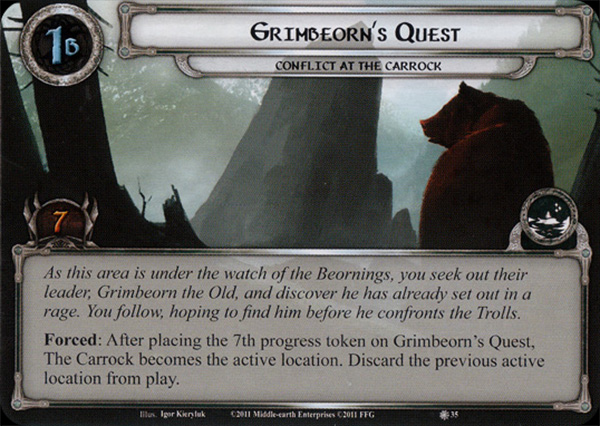
Like many Nightmare scenarios, Conflict at the Carrock removes some of the loop holes which players exploited from the original version of the quest. In this case, the ability of players to stall on the first stage is lessened by a forced effect on the nightmare setup card, “Forced: At the end of the quest phase, if no progress was placed on the current quest this phase, place 1 progress on the current quest (bypassing the active location).”. This means that even with perfect quest control, the players have at most 7 rounds to setup before they advance to stage 2 to face the onslaught.
There is nothing more incongruous than discovering a troop of trolls in your backyard. These barbarous louts are ransacking my beloved forest. There are two kinds of mess: the mess one makes while baking honey-cakes, and whatever this is…
The trolls themselves are of a tougher sort, this time around. To be sure, they were not exactly slouches in the original, but they have all been given a boost in stats and abilities. Whereas before, their abilities all took effect when they were in play, the battle became easier as it wore on, with fewer trolls in play. That is a common pattern with enemies in Lord of the Rings LCG, they are often manageable in ones or twos, but can become overwhelming when they engage players all at once. Nightmare Conflict at the Carrock turns that pattern on its head, like a Hobbit held over a troll’s stew pot.
Shock turns to dismay, then galvanizes into a cold anger to heat the belly. Recovered, I turn back immediately in search of help. Much as pride might vie to fight all of them here and now, I calm my temper. A troop of trolls is no laughing matter – even for a bear. Lucky for me, friends are nearby who loathe trolls as much as I…
In the nightmare version each of the trolls has a passive effect which applies while they are in the victory display. This means that the fighting to some extent becomes more fierce as the battle wages on. By the time you are finishing off the final troll, it will have a bounty of bonuses granted it by its vanquished comrades. The fun puzzle at the heart of both versions of this scenario is finding out the optimal order for engaging and dispatching each troll. Threat control is often critical in this quest, as only the most powerful decks can withstand attacks from all of the trolls at once.
At a safe remove, I quicken my pace. These woods are known to me, their secrets laid bare even on a night enshrouded by fog. These ways are used by Woodmen, though not recently. I cross onto a narrow path, poorly maintained. Adrenaline delivers me at my destination sooner than expected.
With no time to waste, I explain my conundrum to the wizard. No sooner have I finished speaking than he dispatches a messenger raven westwards, in the direction of The Eyrie…
Not all of the changes in a Nightmare quest involve obvious high-level strategy. By removing some cards and replacing them with others, the designers have an opportunity to make subtle changes to the theme and pattern of a scenario. The encounter sets where larger in the early days of the game, meaning the quests have a high degree of variability from one game to the next. Still, the changes to this quest can definitely be felt, as much by what was removed as by what has been added.
Eagles are a fickle creatures. They cannot be summoned like a dog to heel at the side of his master. Like all wild things, one must never take an eagle for granted. A mistake can cost an eye, or even a limb, if the eagle in question is hungry. All the same, announcing the arrival of a catastrophe of trolls is remarkably effective at joining eagles to my cause.
Gwaihir does not disappoint. He and his brother are waiting for us at the Old Ford as we return North…
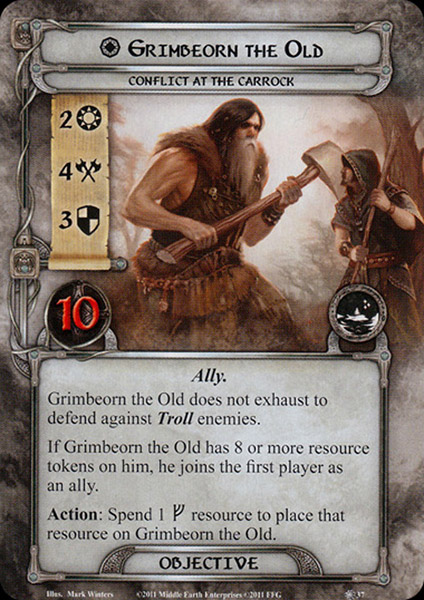 Gone is Grimbeorn, to this day one of the most powerful objective allies in the game. Likewise, Bee Pastures and Oak-wood Grove have been removed. These two locations interacted with the Bear and offered some respite during your travels. Worse still, weaker enemies like Misty Mountain Goblins and Wargs have been replaced with still more trolls. Essentially any card which could be a relief to see revealed from the encounter deck has been removed entirely or reduced in number. What is left can best be described as a heap of trouble.
Our ad hoc army approaches the Carrock with a singular purpose: remove all trace of the intruders. Even with our assembled might, none desire a grand melee. That would place everyone in far too great a danger. Better to encircle them, lure them out one and two at a time, and finish them off with precise and deadly attacks. The danger of a full-scale battle with so unpredictable an enemy is best avoided…
The designers had so many ugly troll heads, that they actually ran out of bodies atop which to attach them. Rob and Bob, a two-headed troll, is the boss over all the other bosses and must be defeated in the (new) final quest stage. In a surprise twist, the additional head does not hinder his/their ability to fight. With two or more players, Rob and Bob will engaged the next player and make a second attack each round.
The plan works well, at first. The creatures are sleepy from whatever noxious concoction they’ve been stewing in their cauldrons. The stench of this tells us where they are long before we get within sight range.
Trolls are not exactly quick-witted on their best day, and these trolls are already well in their cups. One is taken so completely by surprise that Gwaihir simply lifts it half off the ground and slams it against the rocky outcropping which we have chosen for cover. The next is dispatched in similar fashion, first with a clever distraction from the wizard, followed up with my paw making stupendous contact with every inch of the monster’s face. It is at this point that everything goes awry…
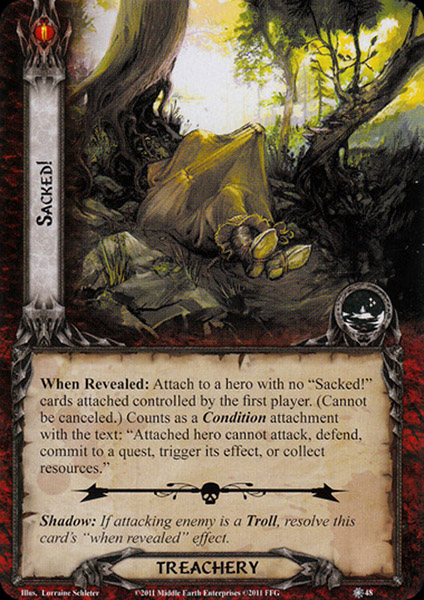
While treacheries like Despair and Roasted Slowly have been removed, the signature treachery of the deck remains. Sacked! is the card which can quickly turn a winning game into a woeful defeat. It was one of the few elements in the original quest which truly punished a turtle strategy, especially for decks without Condition removal. Losing the use of a hero can be a fatal blow in this quest.
Because of the over-sized encounter sets of the first cycle, this quest can swing the spectrum of perniciously difficult to pathetically easy. An early game Sacked! without condition removal at the ready can easily ruin your board state. Unlike the other treacheries in this quest, Sacked! cannot be canceled, so your only recourse is condition removal or finding a troll to kill. In the unlucky event that Sacked or an early troll attack fells a hero, Time for Supper doubles the indignity by removing that hero from your discard pile. If that wasn’t bad enough, every troll in play will heal.
The cry of pain from the troll I just dispatched alerts his companions. Even in such a languorous state, trolls are formidable. After they see what befell their friends, the remaining trolls charge in a rage. How we survive what follows is as much luck as it is bravery.
One of the smaller trolls falls to a cleverly concealed trap laid by Radagast. The larger trolls would prove too strong for such tactics, but at least this gives us one less foe to worry about. We use the outcropping strategically, forcing the enraged creatures to approach us single file. At their lord’s command, eagle sentinels swoop in to harry the trolls. In their haste, many hapless foes have stuck themselves in the natural bottleneck formed between the outcropping and the banks of the river.
Suffice it to say, this quest places players on the edge of the knife from the word “go”. It is highly recommended to bring A Test of Will and some form of Condition removal, if not both. As this is a combat-heavy affair, a dedicated attacker and defender are also strongly encouraged. Chump blocking and combat tricks like Feint also work, but there are so many trolls that these are unlikely to be sufficient in and of themselves.
Beyond that, it is impossible to give an exact description of everything which happens – such is the chaos of battle. I do distinctly recall one particularly brutish fellow delivering a blow with his cudgel which nearly took my paw off at the elbow. For that, I repaid him by grabbing his head in my jaws and shaking until he stopped moving.
When the field clears, the bodies of slain trolls and wounded eagles lay everywhere in bloody spectacle. Radagast has a purple bruise spreading over half of his face, and I am beginning to wonder if I will be lame in one paw for the rest of my life. In the middle of this horrific scene stands a two-headed troll so large and ugly as could only exist in an old wives’ tale.

Regardless, you need some way of killing the foul beasts in order to complete the quest. Hunting Party and the Great Hunt can only target the non-unique trolls, so these are of less utility when the most fearsome enemies are all unique. Threat reduction combined with powerful questing will give you time to decide which enemies to take in which order. The unique trolls all have high threat, and you want to engage them one or two a time, so willpower is as important as combat prowess.
The sequence you choose will to some extent depend on the strengths and weaknesses of your deck, but there are some enemies which must be dispatched immediately. These enemies often need to be taken individually, to ensure that you can finish them quickly. Multiplayer helps greatly here, as each player can potentially focus on a single troll. Cards which cancel an enemy attack are best saved for Louis, who raises the defender’s threat by 3 every time he attacks.
It is here that Gwahir and Landroval exhibit true valor. With a flurry of syncrhonized attacks from razor sharp talons, they keep the foul creature busy while we rally ourselves for one final push. Its heads cannot seem to agree on which of the two eagles is the greater danger, and this buys us valuable time to plan our attack.
Exhausted, we know without saying that it is now or never. We cannot sustain repeated blows from so gargantuan a monster. Heedless of danger, we all charge the troll in unison and push it screaming into the river!
However you approach it, Nightmare Conflict at the Carrock succeeds in taking a beloved quest and making it even more epic. This bear gives two massive paws up and a hearty recommendation to anyone who wants to take a turn at troll-slaying. You can find a detailed breakdown of the quest statistics below. As a bear, I seldom find a need to count beyond what I can count in my paws, but the learned masters of lore among you will doubtless find these details of use. I hope that you enjoyed my narrative of my staycation. Stay safe from trolls who refuse to wear proper protective material, and happy adventures in Middle-earth!

A big thanks to Beorn for describing the quest in such an incredible way. Since I didn’t want to break up the narrative with spreadsheets and lists, I will now give a quick recap of the quest for some more statistical information.
Cards removed for Nightmare mode
The following cards are removed from the encounter deck and replaced by the Nightmare cards included in the pack. All of the unique Trolls are replaced with Nightmare versions of themselves, so I won’t put them on this list.
- 1x Grimbeorn the Old (very useful objective ally that will have to be rescued instead)
- 3x Bee Pastures (No Grimbeorn to find)
- 3x Oak-wood Grove (No Grimbeorn to use those resources on)
- 1x Roasted Slowly (would otherwise cripple solo players too quickly)
- 3x Misty Mountain Goblins (Easy enemy)
- 2x Banks of the Anduin (Easy location that is often exploited for loops or shadows)
- 1x Wolf Rider (Easy enemy)
- 2x Goblin Sniper (Removing a double Sniper lock)
- 2x Wargs (Relatively easy enemy)
- 2x Despair (This would help the players stall on stage 1, which the quest is trying to avoid)
- 2x The Brown Lands (Easy location to counter with location control)
- 2x The East Bight (Makes it so that players will have to travel to NM locations more often)
Encounter deck information
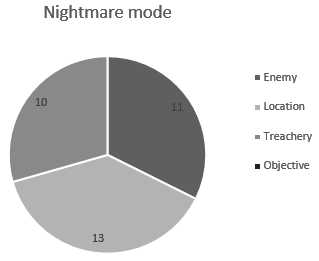
- The encounter deck is made up of 34 encounter cards, of which 13 are Nightmare cards
- The chances of getting a shadow card are surprisingly low for an NM deck, at 53%. For non-Troll enemies, this is even lower, since many effects only trigger if the attacking enemy is a Troll.
- Average threat per card revealed is also quite low, at 1.3 threat per card. This is mostly due to the fact that all enemies besides the Marsh Adder have only 1 threat. Note that River Langflood will increase this if it is in the staging area.
- There is little surge in the encounter deck, with the exception of Time for Supper failing to heal, and technically Massing at Night will reveal more encounter cards, though the surge keyword isn’t used. You can rely on revealing just one card per player each round.
- The Doomed keyword is absent from this quest, though there are several effects that raise your threat in the encounter deck. Combine this with the engagement cost of the unique Trolls being 34, and you will want to bring some threat reduction and avoid Doomed player cards if you can help it.
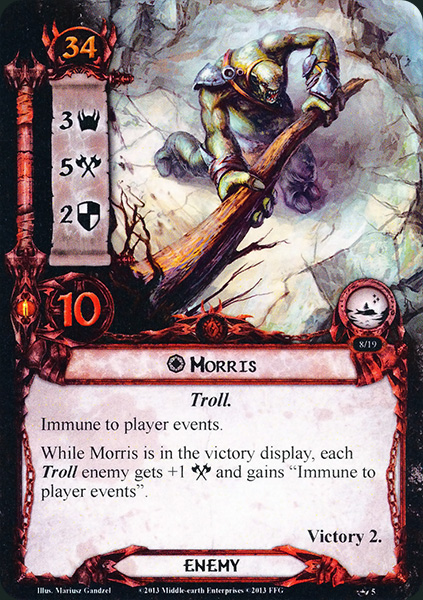
- Immunity
- Morris is immune to player events, and will give this immunity to all other Trolls when defeated
- Rupert’s defence cannot be reduced, and will give this immunity to other Trolls when defeated.
- Stuart cannot have player card attachments, and will give this immunity to other Trolls when defeated.
- The Carrock is immune to player card effects, and cannot be travelled to unless by quest effects.
Note that the statistics above do not count The Carrock or the unique Trolls, as those do not start in the encounter deck. While the Carrock can be shuffled back in after you explore it, it is quite rare and wouldn’t change the composition that much. The statistics also only count two copies of Sacked, which is the number for a solo playthrough. For each additional player in the game, an extra copy is added, which lowers the average threat per card, increases shadow chances, and will skew the chances of revealing a treachery a little higher.
Tips and Tricks
- Now that the ally version of Grimbeorn is no longer in the encounter deck, you are technically allowed to run his hero version, which will help during combat.
- Since Savage Hilltroll will benefit the Trolls when it is in the victory display, use effects that discard him instead of killing him. Discarding him through The Great Hunt and similar effects won’t send the Troll to the Victory Display.
- Despite the quest trying to advance stage 1, there are a few tricks you can use to delay your progress on the stage. The obvious first choice is side-quests, since the extra rule that places progress on the current quest can actually target side-quests as well, as long as they are active. The second useful card here is Backtrack, which allows you to spend progress from the main quest to be placed on locations. This gives you enough time to set up for the second and third stage of the quest.

- Treachery cancellation is important here, and I would advise to double-down on this with having Halfling Bounder in play ánd having Test of Will available to you. Eleanor is also a possibilty, though the extra card she adds can potentially be worse. Just remember that Sacked! cannot be canceled, so your cancelation effects are saved for Roasted Slowly (if a Sack is already attached), or other nasty treacheries like A Frightened Beast or Massing at Night (in multiplayer).
- Keep a low threat. I cannot stress this enough, but keep your threat below 34. While raising the engagement cost of enemies will work too, be sure you don’t use events for this, else Morris will protect the Trolls when he is defeated.
- You can take care of some Trolls early on by killing them in the staging area. Poisoned Stakes can take out one of the Trolls if you wait long enough (until Stuart is defeated). Direct damage and attacks into the staging area are also a good way to get through their 10 hitpoints quickly. Be sure to spread the damage as equal as you can, else the one Troll you leave at full health will get all the buffs from his defeated bretheren. Time for Supper can ruin you day by healing the Trolls, but cancellation will save the day here.
- In case Sacks do get attached to your heroes, be sure to bring some Condition removal. This will save your heroes from being Roasted Slowly. Miner of the Iron Hills, ally Elrond, and Bulwark of the West come to mind. Don’t go for Power of Orthanc, unless you can deal with the added threat.
- With the Trolls getting so many boosts from things in the staging area, active location slot, and victory display, it can be difficult to keep track. Use tokens or make a list of all passive buffs that Trolls get, as that avoids you missing things.
Playthroughs
As with most Nightmare scenarios, there aren’t that many playthroughs to be found online of this quest. Still, here are a few videos that I could find where players take on the fearsome trolls.
- True solo: https://www.youtube.com/watch?v=6KYfOj43Vmg
- Two handed, progression style: https://www.youtube.com/watch?v=khCcnI734Hk
- Three players: https://www.youtube.com/watch?v=gryDMnhHiLo
- Two players: https://www.youtube.com/watch?v=_5Ga4Hyq0YY
- Two players, BoF decks: https://www.youtube.com/watch?v=BKGtem9yhII
Again, a huge thanks to Beorn for this article. For more of his excellent articles, visit his own blog Hall of Beorn here. That’s right, HoB isn’t just the best card search engine around, it also comes with a blog full of interesting reads and some amazing alt art decks that you can also request to print for yourself. It is one of the oldest running blogs in the community, so there is a ton of content for new players to read up on.
As for the Nightmare scenario analyses, the Purple Wizard is currently working hard on the NM Lord of the Rings Saga analyses, which should hopefully see the light of day soon. The regular Nightmare scenarios will also continue, though I will have to skip the second cycle, as I myself do not own any of the NM packs. They are quite difficult to find in Europe, and I would like to cover quests I have the packs of. I do own a lot of Against the Shadow and Dream-chaser Nightmare packs though, so maybe those will get looked at in the near future.

Hi nice rreading your blog
LikeLike