Lore is a fickle thing. When in Middle-Earth’s history is this siege supposed to happen? That is a question one might ask when looking at this scenario: After all, Annúminas is never a place of action in Tolkien’s main stories. After some research, I think I have been able to develop a decent thesis on the time frame that The Siege of Annúminas is supposed to take place.
Annúminas was a great city of the men of the West in the Second Age, ruled by Elendil. It was maintained by the Dúnedain until around the year 860 of the Third Age when it was left because there simply weren’t enough inhabitants anymore. That was also when Arnor was divided into Arthedain, Cardolan, and Rhudaur. After that, Annúminas was left in ruins. Around the year 1974, when Arthedain fell in its war against Angmar, Annúminas was probably left for good, only occasionally being used as a “safe” place for rangers.
We can assume that this quest is supposed to be one of the sieges that happened during Angmar’s push southwards, placing it somewhere around 1970 TA. That makes sense, doesn’t it? Well, it does create some problems if you want to play fully thematically since the only two Dúnedain heroes that don’t have an assigned time of life around 2940 TA or later are Beravor and Idraen. Good luck building a thematic deck for this quest, Authraw!
After a short lesson of fictional history, let’s get to the analysis!
The Siege of Annúminas
- Found in: The Siege of Annúminas POD
- Community Difficulty: 8.2
- Quest Cards: 3
- Play if: You want a very consistent, hard quest; you like being besieged; you like a more strategic challenge than most quests offer (which gets even more complex and fun when you add players)
- What is different about this quest?: Progress tokens on the quest are important during the combat phase; lots of effects to keep track of; many huge enemies.
- Solo or Multiplayer?: Multiplayer probably makes putting progress on quests easier, but additional copies of Host of Angmar will be shuffled into the encounter deck for each player beyond the second and most Treacheries affect all players at once. Two players will usually be the easiest way to play.
- Can I run side-quests in this scenario?: Side-quests are dangerous because you need to place a lot of progress on the main quests. You will lose precious momentum if you go for side-quests. Enemies also have you remove progress from the main quest or resolve harmful effects, so going for side-quests takes your choice away in these cases.
- Can I bring Guarded (X) cards?: There are many big enemies and locations in the encounter deck that will impede your progress significantly. If you want to gamble, you might just get a small enemy, though. Still, I wouldn’t recommend running any Guarded cards.
- What to look out for?: There are some huge enemies in the encounter deck. Apart from that, most of the treacheries are awful in various ways, so bring cancellation. You should also try to keep progress on the quest because if you don’t, the combat phase becomes much harder!
The Quest
Since I haven’t been able to enjoy this quest in Epic Multiplayer Mode, I won’t talk about it here. I imagine it would be a very interesting quest then, with even more moving parts. Sadly, many of the interesting strategy decisions get lost when transitioning to normal mode because the scenario seems designed mainly with Epic Multiplayer Mode in mind. Still, there’s a lot of content to enjoy and for me to analyse!
Setup
Standard Mode uses its own Setup card before any effects from Quest 1A are applied:
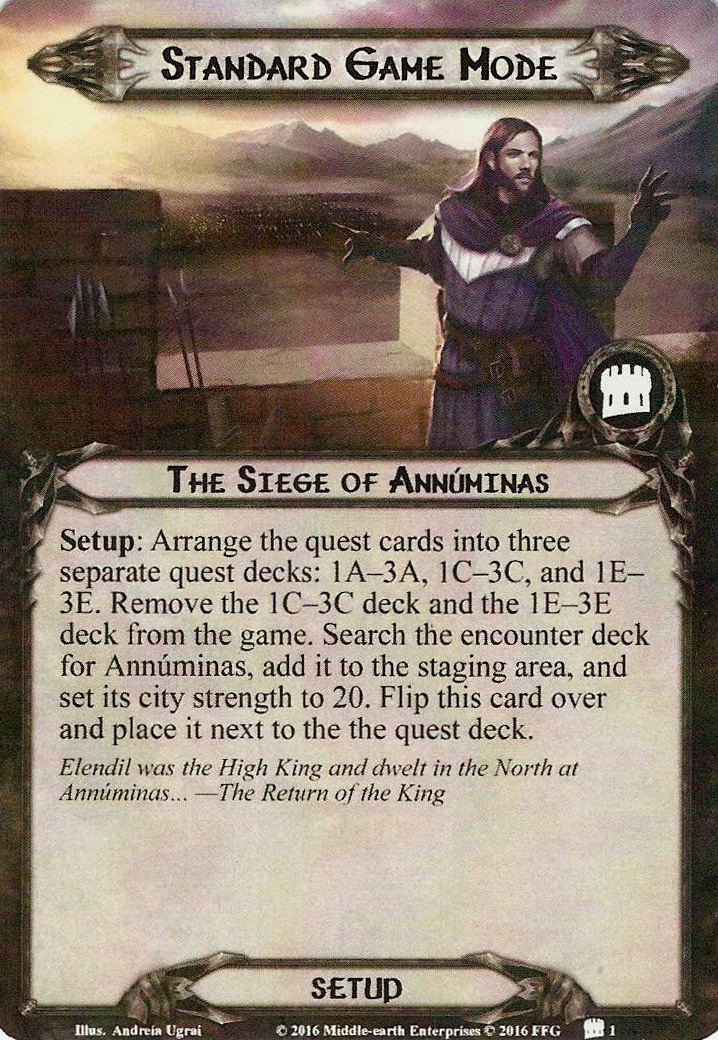
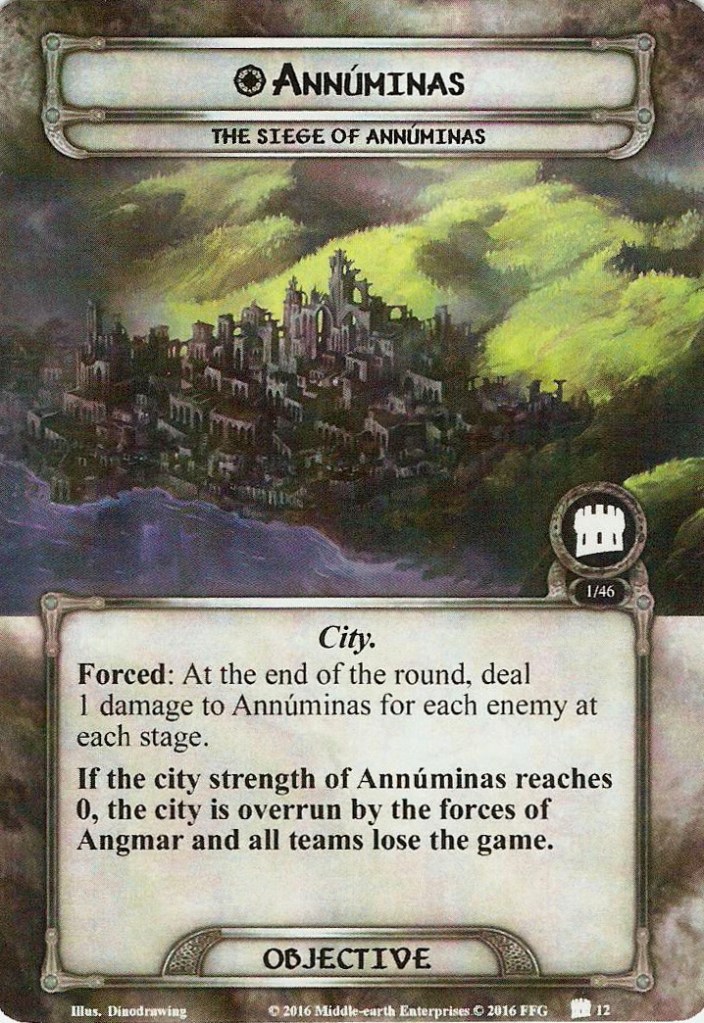
In Standard Mode, you only use the 1A/B to 3A/B quest cards; the others are removed from play and not used. You then search the encounter deck for Annúminas and add it to the staging area, setting its “City Strength” to 20.
If you are familiar with the LotR saga expansions, Annúminas works very similarly to Minas Tirith: Many effects will deal damage to it, reducing its City Strength by that many points. Once its City Strength falls to 0, the city is overrun by the enemy, and the players lose the game. Note that Annúminas has its own Forced effect that reduces its strength by 1 for each enemy in play at the end of the round.
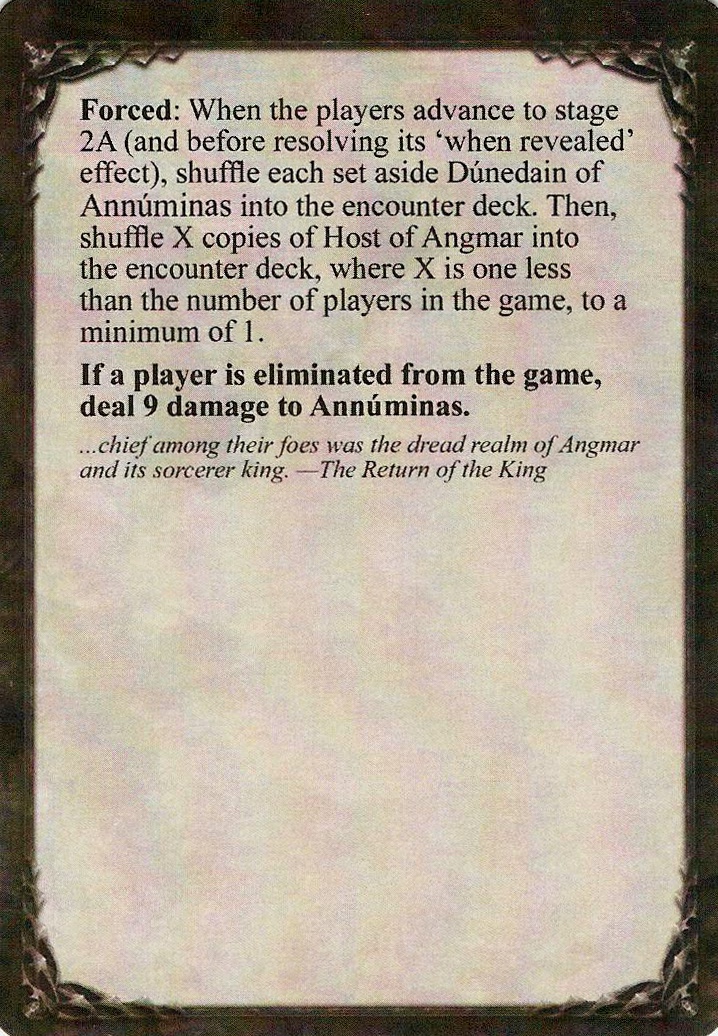
Once you have set up Annúminas for the siege, the Setup card has you turn it over. The other side has one Forced effect that triggers upon advancing to stage 2, while a second effect is always in play. The latter causes you to reduce the City Strength by 9 whenever a player is eliminated from the game, bringing you that much closer to defeat! This is one of many effects that you have to keep track of. Later in the article, there will be a list of all encounter, quest, and similar effects that might happen so you won’t forget any!
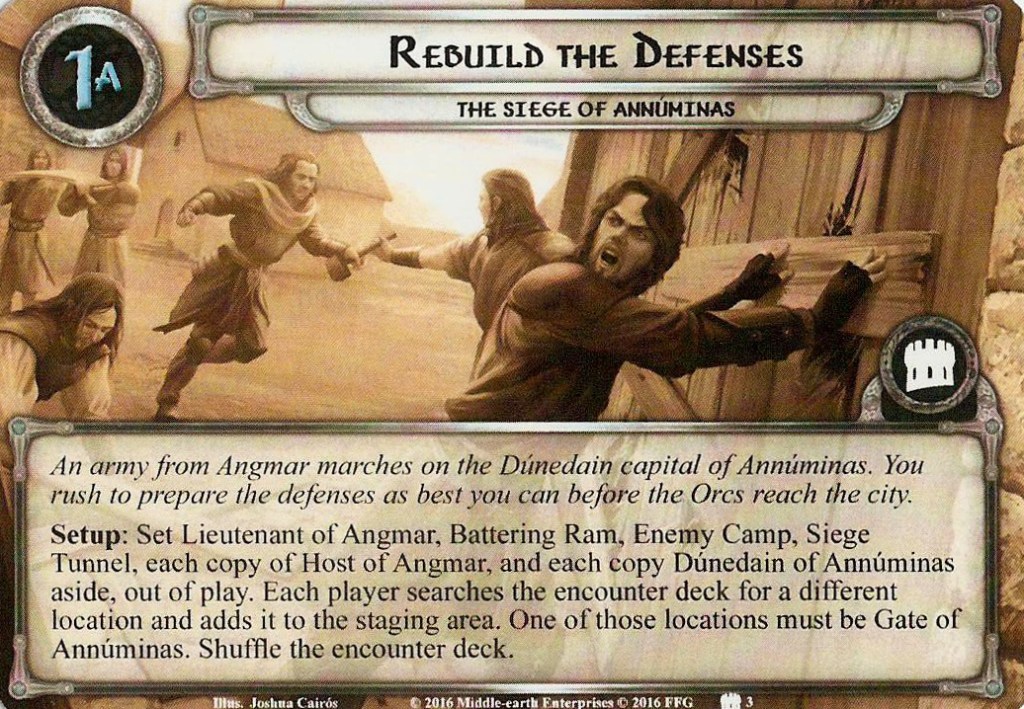
Setup is continued on quest stage 1A: You set aside Lieutenant of Angmar, all unique locations, all Hosts of Angmar, and all Dúnedain of Annúminas. Then each player searches the encounter deck for a different location, one of which has to be Gate of Annúminas, adding them to the encounter deck. As the second choice, I would advise Arnor Battlefield, then Shores of Lake Nenuial, and then City Wall. The latter is a brutal card, so if you think you won’t be able to build up momentum to clear it quickly or if your decks can handle an early enemy, you could take Hills of Evendim instead.
Stage 1 – Rebuild the Defenses
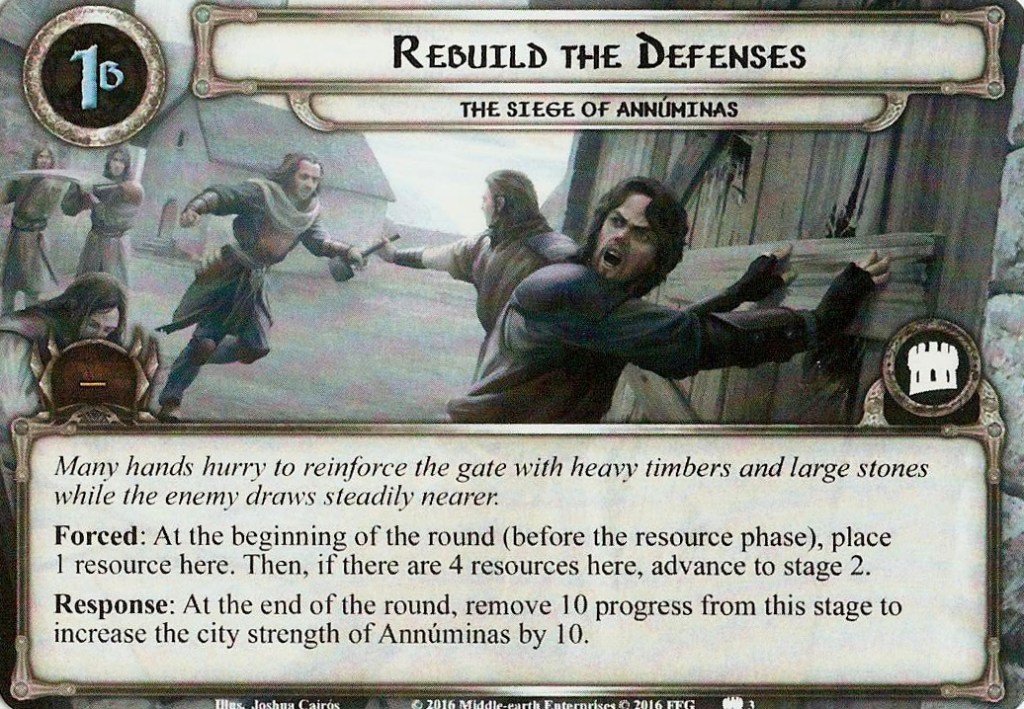
After a lengthy setup, stage 1B continues with an interesting approach on questing. It has no progress threshold: Instead, you will advance at the end of the fourth round you spend here. While you are here, you can literally bolster the city’s defenses by spending 10 progress from this stage at the end of the round to increase the City Strength by 10!

This is not only greatly thematic but also causes a lot of strategic decisions: Do you spend progress on killing an Orc of Angmar now, keeping up a defender against a Warg of Carn Dûm, or do you save up to gain a buffer in City Strength for the later stages? In either case, moving quickly is important for this quest. If you can’t quest well, enemies will kill you because you cannot spend progress on them, and if you can’t kill enemies well, they will also siphon progress that you need.
In general, willpower and questing are important. However, if you can deal with enemies well early on, you might be able to save progress, making increasing City Strength easier. There is a balance to achieve, and I find that a deck than can emerge from stage 1B with a decent board and at least one increase in City Strength should have decent chances for the rest of the quest. Don’t get scared into hard-questing early on, though: A good board state can certainly make up for a lower City Strength. Your decks will determine your strategy a lot at this stage.
Stage 2 – Defend the City
Upon advancing to stage 2A, multiple things happen. First, the Setup Card instructs you to shuffle all set-aside Dúnedain of Annúminas and X copies of Host of Angmar into the encounter deck, where X is the number of players minus one (to a minimum of one). Secondly, stage 2A has the players shuffle the discard pile into the encounter deck, then discard cards from it until X enemies are discarded, X again being the number of players minus one, to a minimum of one. All enemies discarded this way are added to the staging area. This can mean a sudden jump in threat for the next questing phase since players will always advance before the resource phase.
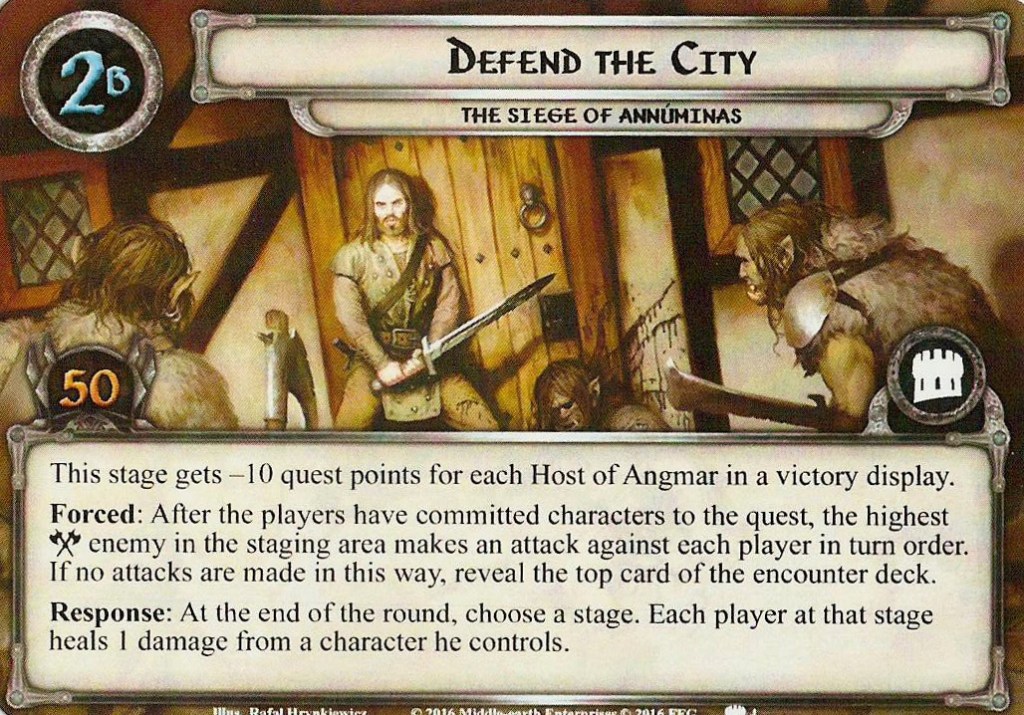
Stage 2B itself is obviously intended to be the main part of the quest. It has a colossal 50 quest points, which are only reduced by 10 for each Host of Angmar in the victory display. This, combined with enemies constantly siphoning progress, makes advancing very hard, especially in low player counts where there will only be one Host of Angmar in the encounter deck.
The stage also has an awful Forced effect that makes the enemy with the highest attack strength in the staging area make an attack against each player after committing characters to the quest. If no attacks are made this way (for example, if there is no enemy in the staging area), an encounter card is revealed instead. In lower player counts, the extra attack will almost always be more beneficial than an extra encounter card, so keeping an enemy in the staging area via Ranger Spikes. If you are able to catch a Warg of Carn Dûm this way, you can almost ignore this effect! If playing with higher player counts, the non-scaling encounter card may be better to receive than the scaling attacks, though. In that case, try to engage all enemies each round, so none remain in the staging area. Keep in mind that an extra encounter card per round may lead to location-lock, though!
Things are not all dire, though: While at this stage, at the end of the round, each player may heal one damage from a character they control. This can slightly offset the Archery from enemies but usually isn’t enough to replace healing entirely. Bring Elrond to gain some extra value from the healing: He essentially doubles it!
While at stage 2B, you will just want to try and establish and keep a decent board state while slowly questing your way through the 50 (maybe less) quest points. Luckily, there is little threat from threat in this quest; only a few cards have Doomed. That means you only have to keep the staging area clear without getting locked.
Stage 3 – Lead the Sortie
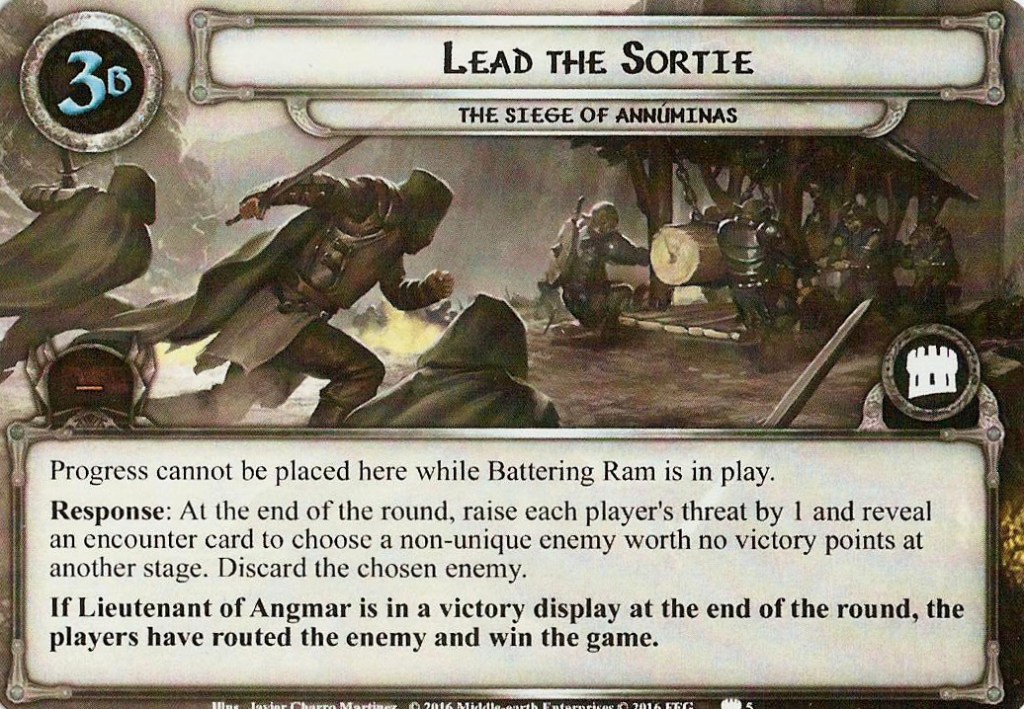
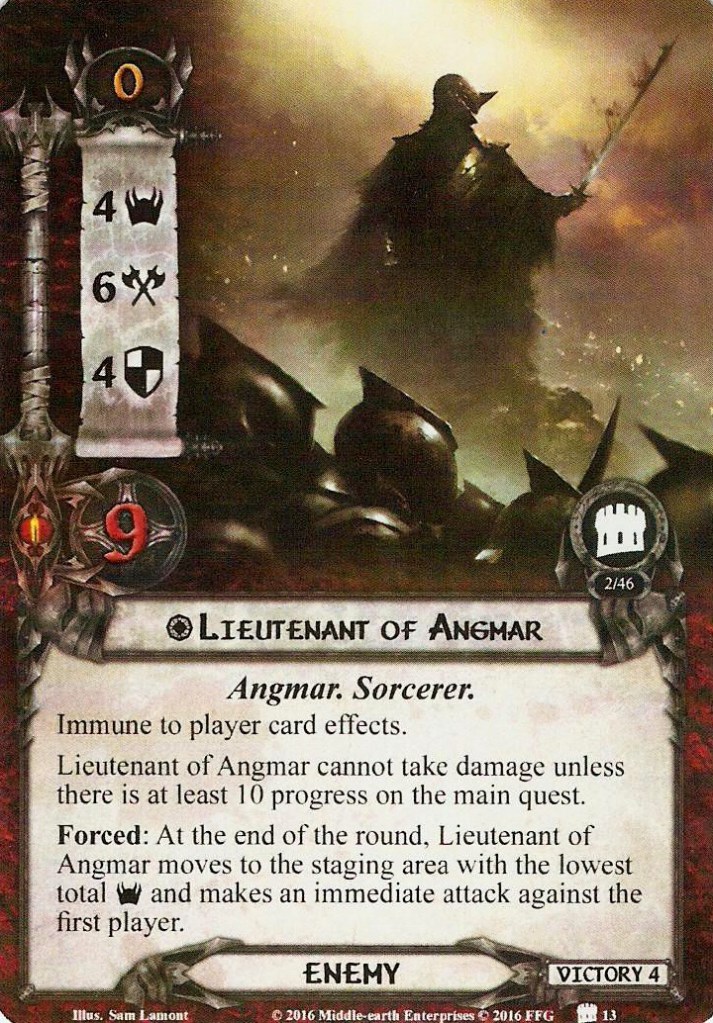
After being besieged for two stages, you get to lead an advance against the enemy forces! The battlefield outside of the city’s walls looks a fair bit different, so you shuffle the encounter discard pile into the deck and add Lieutenant of Angmar and Battering Ram to the staging area. For every player except the first player, you also get to reveal an encounter card!
Now, stage 3 is about complicated. Your goal is to defeat the Lieutenant of Angmar and get it into the victory display. Then, if you survive until the round, you win the quest!
Sadly, the Lieutenant cannot take damage until there are 10 progress counters on stage 3B. Stage 3B, however, states that progress cannot be placed on it while Battering Ram is in play. This makes for a linear play pattern: First, you travel to and clear Battering Ram.
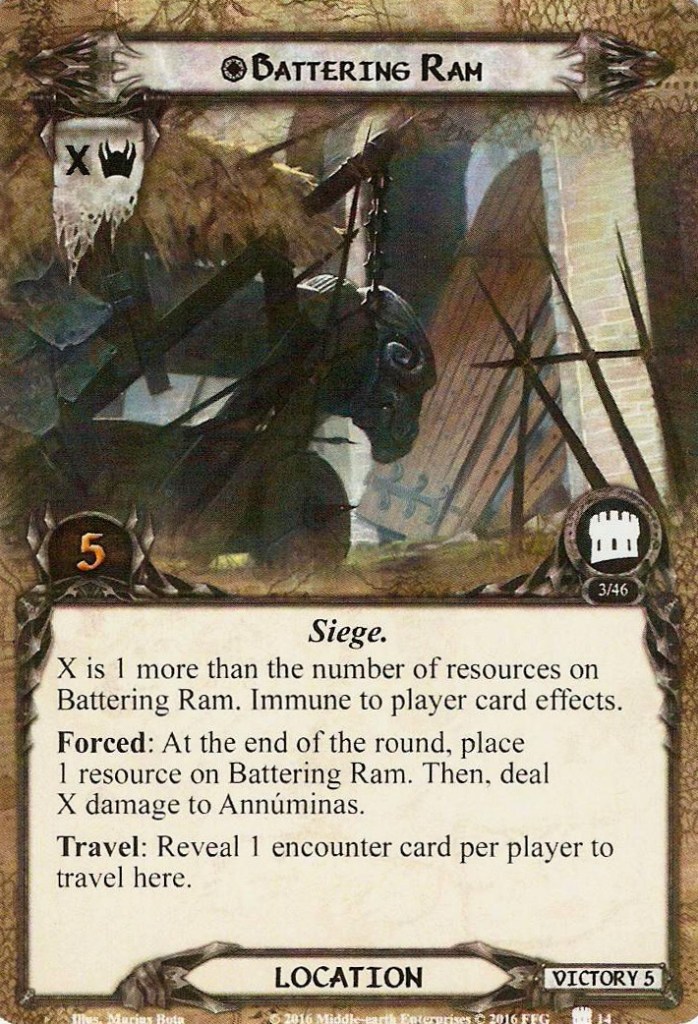
That is an excellent idea in any case since it accumulates resource counters, increasing its threat value, and deals ever-increasing damage to Annúminas! You do have to reveal an encounter card per player to travel to it, though.
Once the Battering Ram is destroyed, you get to place progress on the main quest again. Players need to amass another 10 progress. Then you get to attack the Lieutenant and defeat it. The Lieutenant has an engagement cost of 0, so it will engage a player as soon as possible. Then it will harass you with its 6 attack and return to the staging area at the end of each round, attacking the first player again. Terrible. However, once the Lieutenant has at least 9 damage on it, it is added to the victory display. If at least one player is still alive at the end of the round, you drive Angmar’s forces back and win the game!
The Encounter Deck
Global
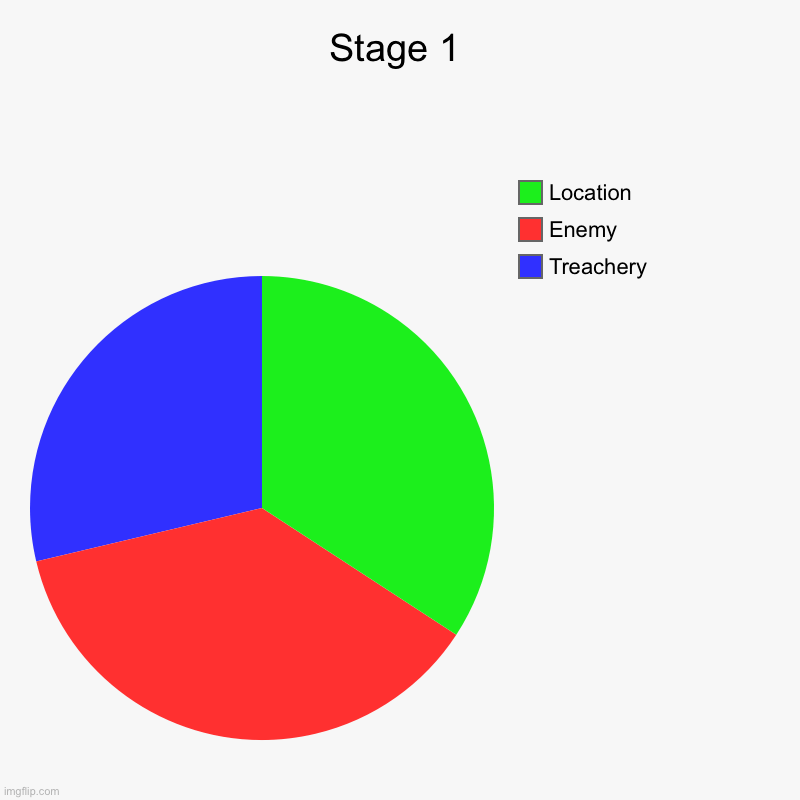
- On stage 1, the encounter deck consists of 35 cards (not counting the locations added during setup).
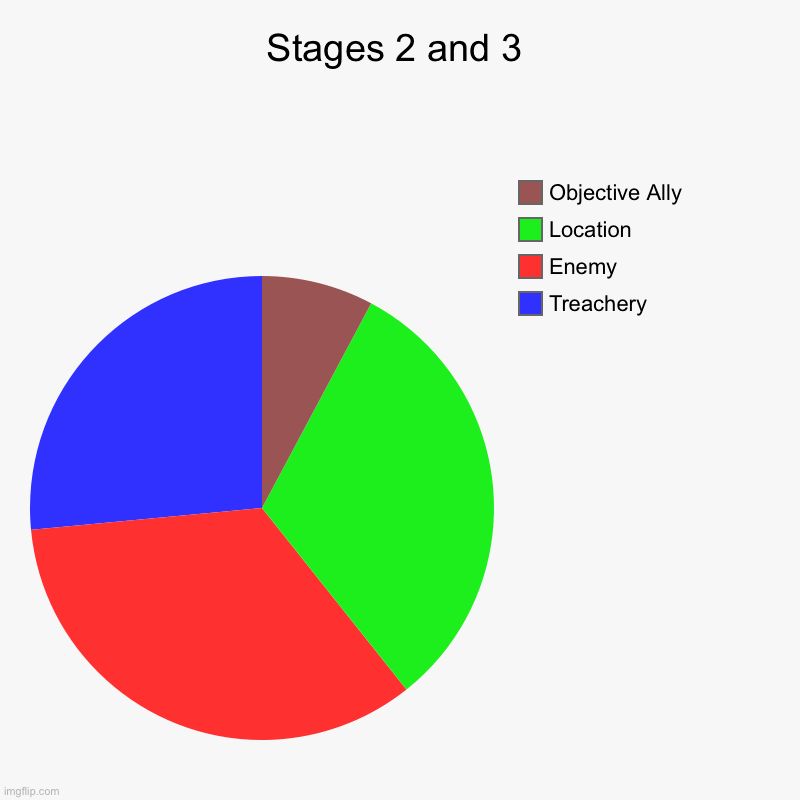
- On stages 2 and 3, three copies of Dúnedain of Annúminas and up to three copies (not counted in the graphic above) of Host of Angmar are added to the deck.
- At stage 1, ~57% of the encounter cards have shadow effects. These are all around the spectrum, from adding attack strength to conditionally revealing extra encounter cards.
- At stages 2 and 3, the chance of revealing a detrimental shadow effect is brought down to ~53% by the beneficial effect of the Dúnedain of Annúminas and the Hosts of Angmar not having shadow effects at all.
- Average threat revealed is at exactly 2 due to many cards having Surge. However, Gate of Annúminas, The Hordes of Angmar, and Caught in the Press may have a variable influence on threat and your characters’ willpower, making reliable questing more difficult.
- Only the three copies of Dúnedain of Annúminas and the three copies of Warg of Carn Dûm have Surge.
- Doomed is present only on Sorcery of Carn Dûm, and the travel cost on Shores of Lake Nenuial raises each player’s threat by 2. This means that threat will mostly be a problem because of the quest’s length.
- Immunity
- The cards important to the quest’s structure (Lieutenant of Angmar, Battering Ram and Host of Angmar), and City Wall are Immune to player card effects.
- While Hills of Evendim is in the staging area, ‘when revealed’ effects cannot be cancelled.
- Vanguard of Carn Dûm cannot have attachments.
Enemies
The enemies in this quest are mostly Orcs. Most of them try to steal progress from the main quest, making increasing the City Strength at stage one, advancing from stage 2, and travelling to Battering Ram at stage 3 harder.
Overall, combat in this quest feels very tactical as you have to balance progress on the quest against pressure from enemies constantly. You will also have to decide which enemies to block or leave unblocked so you can defeat some. Interesting decisions are not rare, which I find to be a main trait of the scenario.
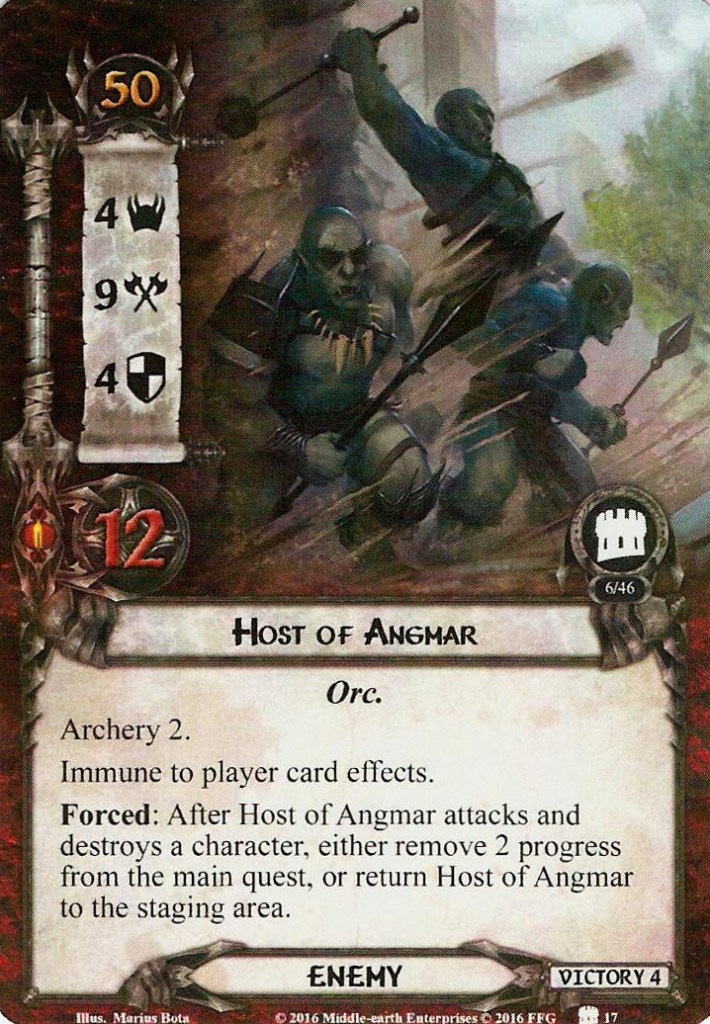
Host of Angmar (1-3 Copies)

Host of Angmar is one of the “Army”-type enemies. It has crazy stats (9attack!) and Immune to player card effects. That already makes dealing with it a pain. It has an engagement cost of 50, though; maybe you can leave it in the staging area? Wrong! Firstly, it’s Archery 2 still applies while in the staging area, and this quest already has lots of Archery and direct damage. Secondly, Stage 2B, the one where you are likely to encounter a Host, has that clause where every round, the enemy with the highest attack value in the staging area will make an attack. You definitely don’t want that to be the 9-attack-enemy, do you?
Host of Angmar also has a Forced effect that punishes chump blocking: Whenever it attacks and destroys a character, the players have to either pay progress or return it to the staging area. We just saw how much we don’t want the Host in the staging area, so paying the progress is usually the better choice (especially because returning the Host means a jump of four threat in the staging area!)
Warg of Carn Dûm (3 Copies)
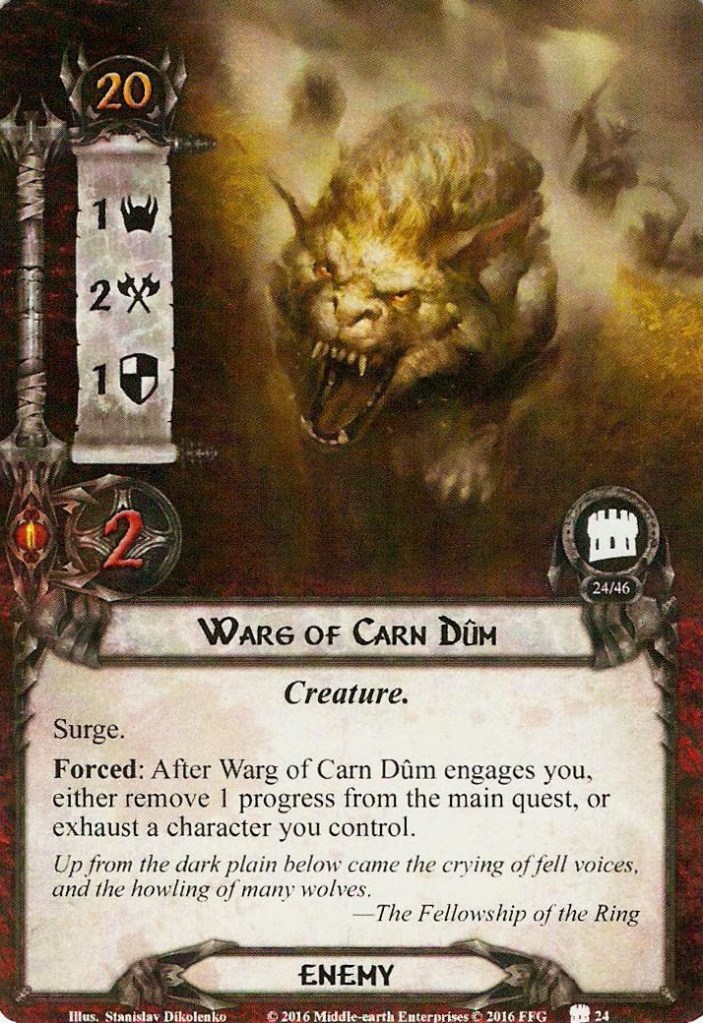
These small Wargs are essentially the antithesis of the Host of Angmar. With harmless stats and an ability that is mostly just annoying, the Wargs are easy to underestimate, but of course, there’s more to them.
Firstly, they have Surge, so you’ll almost never be happy to reveal one. If you reveal an additional enemy, these can overwhelm you. They are hard to avoid with an engagement cost of 20, so their Forced ability is almost guaranteed to trigger. When you engage a Warg, you either spend one progress from the main quest or exhaust a character. This can exhaust the one more blocker you need or, which is almost as bad, an attacker you need to stay on top of your enemies.
Overall, the Wargs of Carn Dûm can mainly be described as action denial: they simply cost ready characters to satisfy their ability, to block them, and kill them. Luckily, they are vulnerable to many direct damage effects like Azain Silverbeard or Westfold Lancer. The latter is especially effective because it can kill a Warg before it engages, so it won’t even get to trigger its Forced effect!
Orc of Angmar (3 Copies)
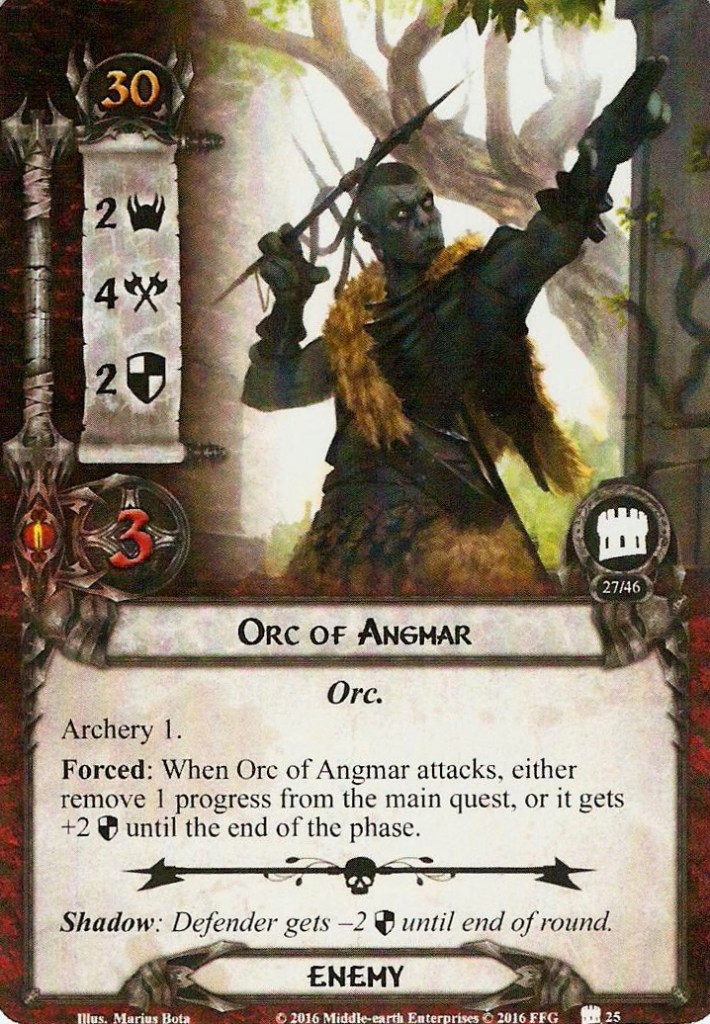
The Orc of Angmar is a fairly standard-sized enemy. It has fair stats and Archery 1, more or less the standard for later cycles. Of course, there has to be some progress stealing going on with these orcs as well, so whenever one attacks you, you either remove a progress from the main quest or increase its defense until the end of the phase.
Attacking and defeating these enemies becomes a bit harder to do if you can’t spare progress, but leaving them alive means they will use their Archery next turn, attack, and trigger their Forced ability again! Getting rid of the Orcs of Angmar thus becomes important, though some other enemies certainly are more dangerous. Direct damage circumvents their defense increase, making it a viable alternative to attacking these normally. Goblin-Cleaver is incredibly efficient here!
Angmar Warg-Rider (3 Copies)

After “basic” Warg and Orc enemies, the designers probably thought, “Hey, let’s smash them together and make it a new enemy!” (Though it doesn’t have the Creature trait…) The new enemy has average stats and shares the Orc of Angmar’s Archery 1. However, it trades in a point of attack strength for an additional hit point, making it less dangerous but also hard for traditional direct damage to kill it (Gandalf works well, though).
The new Forced ability triggers only when the Warg-Rider engages a player: Either you remove two progress from the quest (quite literally backing away), or it makes an immediate attack. There isn’t a lot to say here: You should always try to have two semi-dedicated blockers up anyways, so you might be able to defend against the attack. Chump-blocking feels bad against an attack of three and two progress is a lot, so defending obviously is the best case. At least the effect usually only triggers once and not every round.
Together with the normal Warg exhausting characters and the Angmar Orc sometimes being hard to kill, this extra attack just adds to how complicated combat can get in this scenario: You constantly have to decide which characters to sacrifice, block with, attack, or how much progress you can afford to spend.
Savage Werewolf (2 Copies)
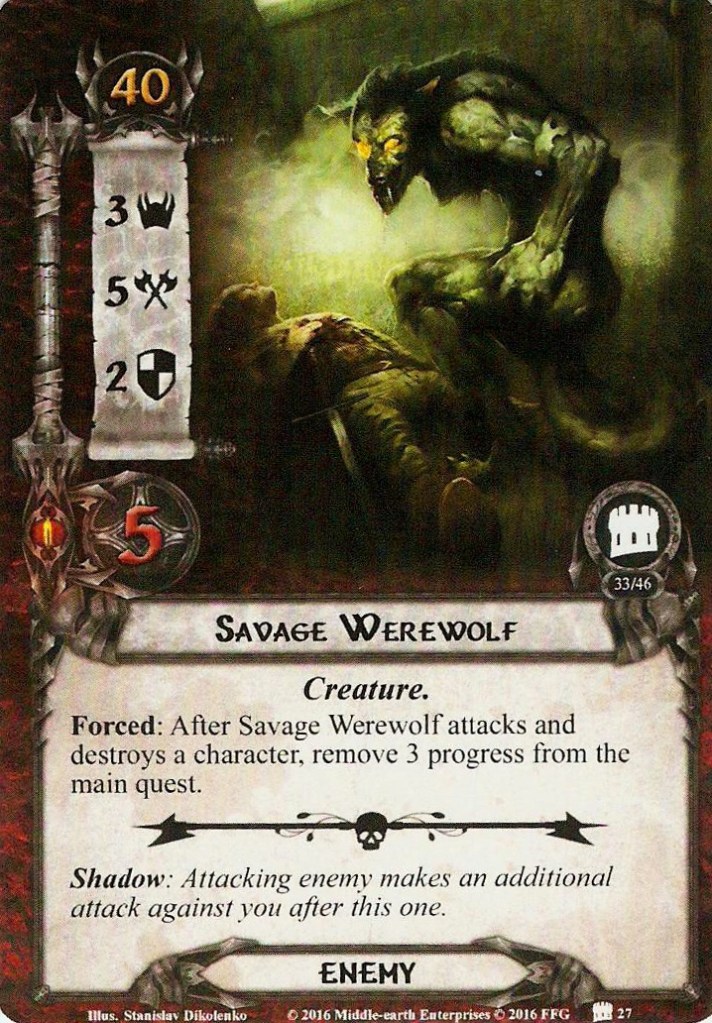
Angmar isn’t just like Mordor, and this is the main card in the scenario that symbolises that. Instead of, say, a troll, you get an actual werewolf. It has comparatively high stats with a notable three threat and five attack. The Werewolf’s Forced effect only triggers when it destroys a character, making you remove three progress from the main quest. However, because of its five attack, you will hopefully block it with your dedicated defender, so it will rarely trigger… Right?
Honestly, I cannot recall a Werewolf ever triggering its Forced ability against me. You should not let it live for long because a rogue shadow effect (like its own) can lead to quick character deaths. Unless you reveal other strong enemies, this one isn’t too bad as long as you have a dedicated enemy defence/killing engine set up.
Vanguard of Carn Dûm (2 Copies)
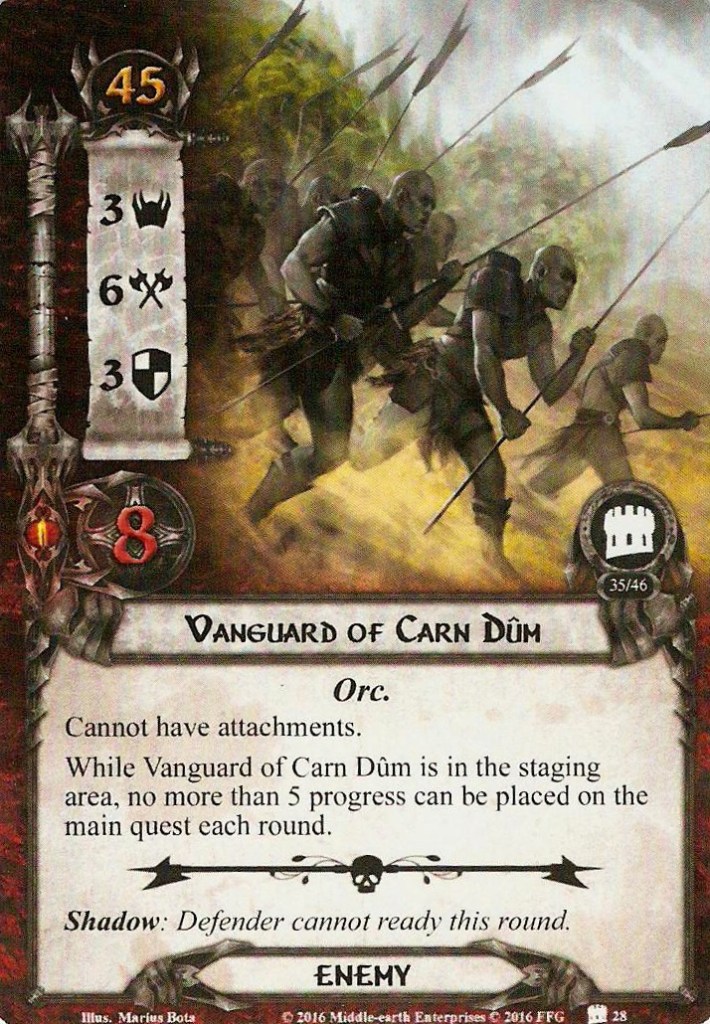
Even though it doesn’t have the text “remove progress from the main quest,” our last enemy still works toward the goal of making the decision whether to spend progress on enemies hard. This is achieved by the Vanguard preventing players from placing more than five progress on the main quest each round while it is in the staging area. Notably, this doesn’t apply to side-quests, although these aren’t a very viable strategy anyways. Engaging a Vanguard is going to be necessary if you want to keep progressing whilst also spending progress on enemies.
Other than that, the Vanguard of Carn Dûm almost has “troll-esque” stats with high threat, defense and hit points, and the iconic six attack. It also cannot have attachments, making Forest Snare shenanigans useless against anything larger than one of the Werewolves. Because only the Host of Angmar is Immune to player cards effects, the Vanguard becomes a prime target for the ever-trusty Feint.
Locations
The locations in this quest are obviously all firmly set in Annúminas and its surroundings. In terms of gameplay, many effects we already know are used to challenge different kinds of decks. Sadly, this means there isn’t a cohesive mechanical theme. Travelling is always important in this quest because you will want to always keep progress on the main quest.
Gate of Annúminas (2 Copies)
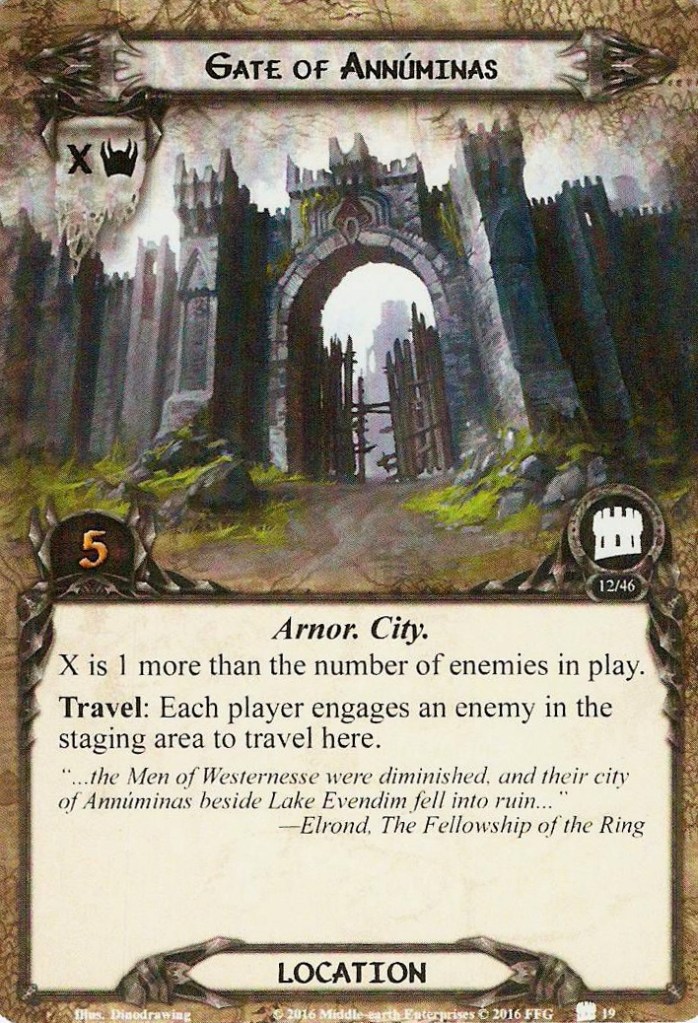
A copy of Gate of Annúminas starts in play at stage 1, which means that only one copy remains in the encounter deck. That is nice because the Gate’s threat scales with the number of enemies in play, and you won’t have too many of those in the early rounds. If you are getting swarmed by enemies, you definitely want to travel to this location because that should make questing easier, at least.
There is a travel cost to the Gate, and it can be quite hard to fulfill: Each player has to engage an enemy in the staging area. This can be very hard with increasing player counts because enemies tend not to just wait in the staging area. Keeping your threat low, for this reason, may be a viable strategy.
City Wall (3 Copies)
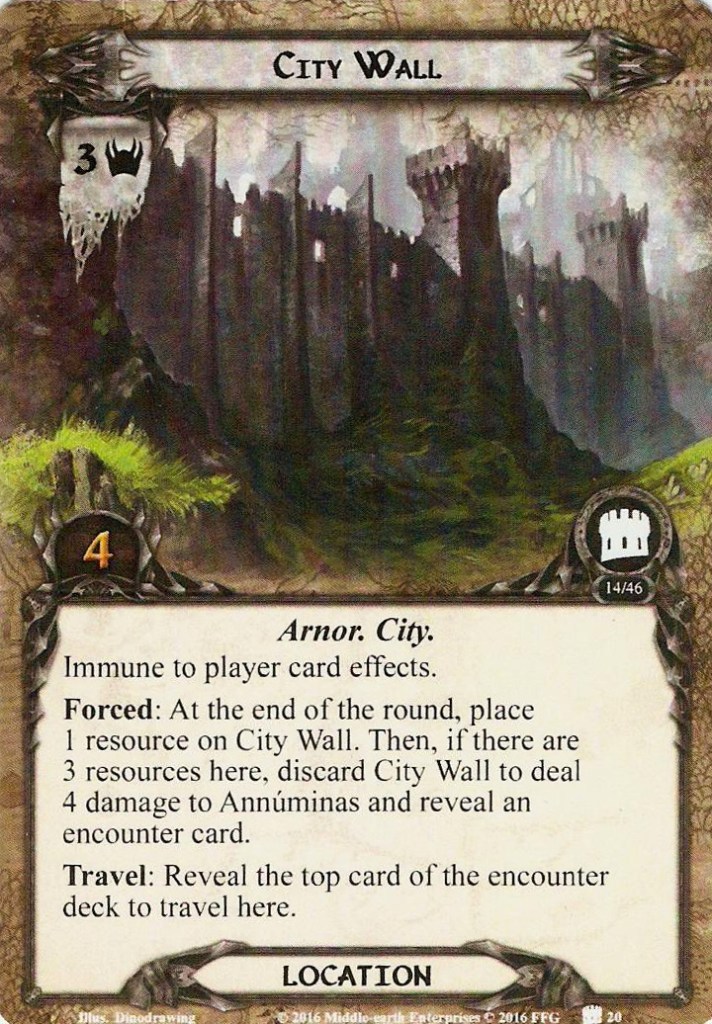
City Wall is a location that has a “Time X”-esque ability: At the end of each round, you place a resource on it. Then, if there are three resources on it, you discard it, deal four damage to Annúminas and replace the Wall with a new encounter card.
Since you definitely don’t want time to run out on the Wall, travelling to it is almost mandatory if possible. It will make you reveal an additional encounter card, but since it is Immune to Player Card effects, it can only be cleared by questing while it is the active location. Keep in mind that the resources still get placed while the Wall is not in the staging area.
Arnor Battlefield (3 Copies)
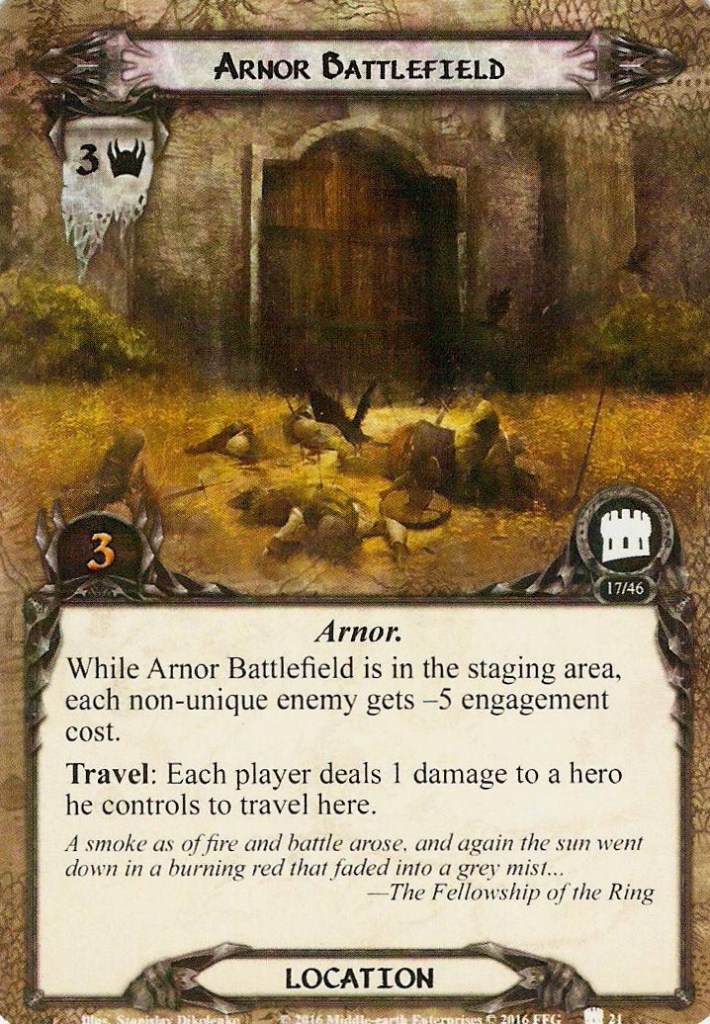
With only three threat and quest points, Arnor Battlefield seems like a quite unimpactful location. While it is in the staging area, each non-unique enemy gets -5 engagement cost, but even that is a pretty weak effect because it doesn’t change the board state by itself. Of course, if you are running a deck that really doesn’t want to engage enemies, the Battlefield may be a problem, but otherwise, it rarely does a lot. Even its travel cost is weak because it deals at most four damage, and only one Treachery even addresses damaged characters. It does add to the overall high amount of Archery, but since it can be easily healed off by stage 2B’s effect, it is rarely threatening by itself.
Hills of Evendim (2 Copies)
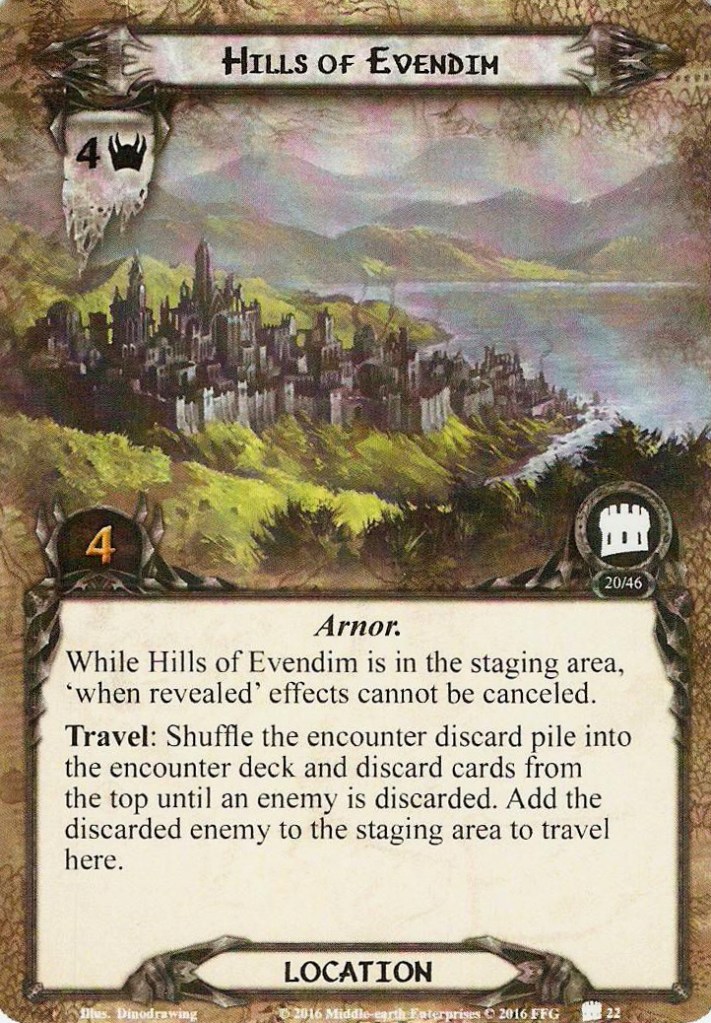
Hills of Evendim is your standard location that makes cancelling ‘when revealed’ effects impossible while it sits in the staging area. Because several of the quest’s treachery cards are very dangerous, this can seriously impact the game. A Test of Will just becomes unusable, so if you relied on cancellation, you would want to get the Hills out of the staging area as soon as possible. When playing solo, this is rarely a problem because you don’t reveal more than one card per round (so you won’t reveal this and a treachery). Location control effects work quite well, though, and they can be reasonably applied to most other locations of the scenario, so they will rarely be wasted deck space.
If you don’t have access to location control, the Hills’ travel cost has you shuffle the encounter, discard pile into the deck and discard until you reveal an enemy which you add to the staging area. The enemy isn’t revealed, so Surge on the Wargs of Carn Dûm doesn’t trigger. Keep in mind that reshuffling the encounter deck may return some bad cards from the discard pile into the deck, although the discarding bit can obviously also get rid of some for you.
Shores of Lake Nenuial (2 Copies)
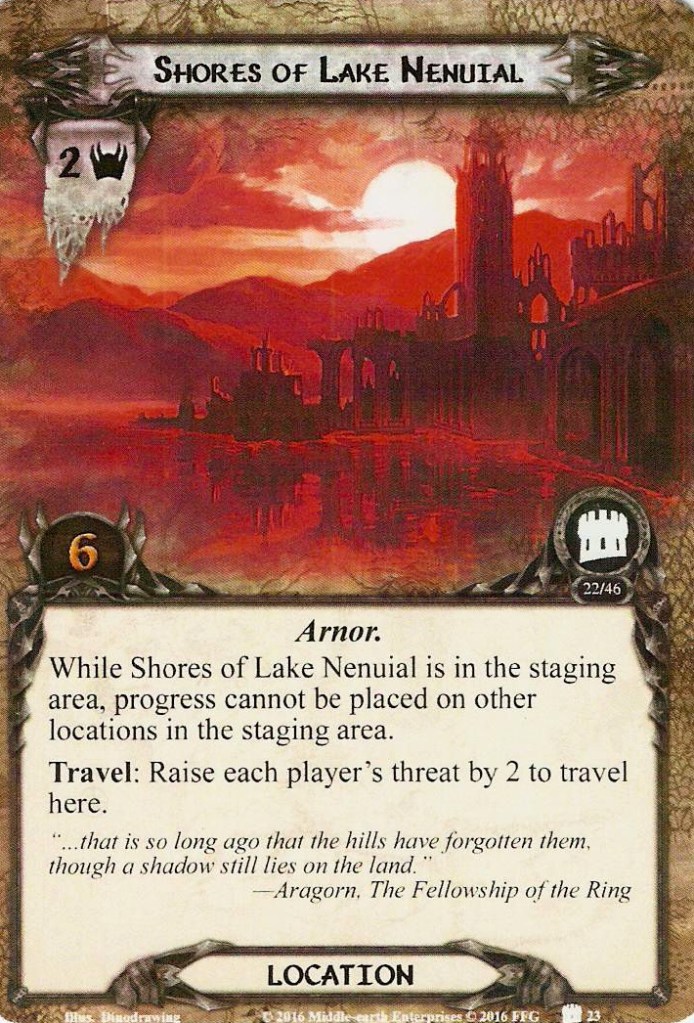
The last location takes a hard turn in terms of art: It is painted exclusively in shades of red, showcasing the afterglow over Lake Evendim. While this is obviously a deviation from the other locations ‘ greens and greys, it just looks pretty! This also fits the lake’s Sindarin name “Nenuial” very well since that just means “Twilight,” which is exactly what we are seeing.
In terms of gameplay, Shores of Lake Nenuial simply prevents placing progress on other locations in the staging area while it is in the staging area. The location control effects I just mentioned certainly get a lot harder to use with this and because of the Shores’ own six quest points, slowly clearing it while it is in the staging area won’t be a very viable strategy. Traveling to the Shores only costs two threat, so at least that won’t be a huge problem. If you aren’t relying on location control effects anyways, it might even be beneficial to just leave this location and its two threat in the staging area and simply use your progress for something else.
Treacheries
The Treachery cards in the encounter deck are similar to the locations in that they don’t share a common theme but instead feature different effects that have been used in other quests in a similar way. None of the Treacheries are nice or forgiving, so cancellation is important. Also, each of the cards affects every player, making this especially helpful in bigger groups.
The Hordes of Angmar (2 Copies)
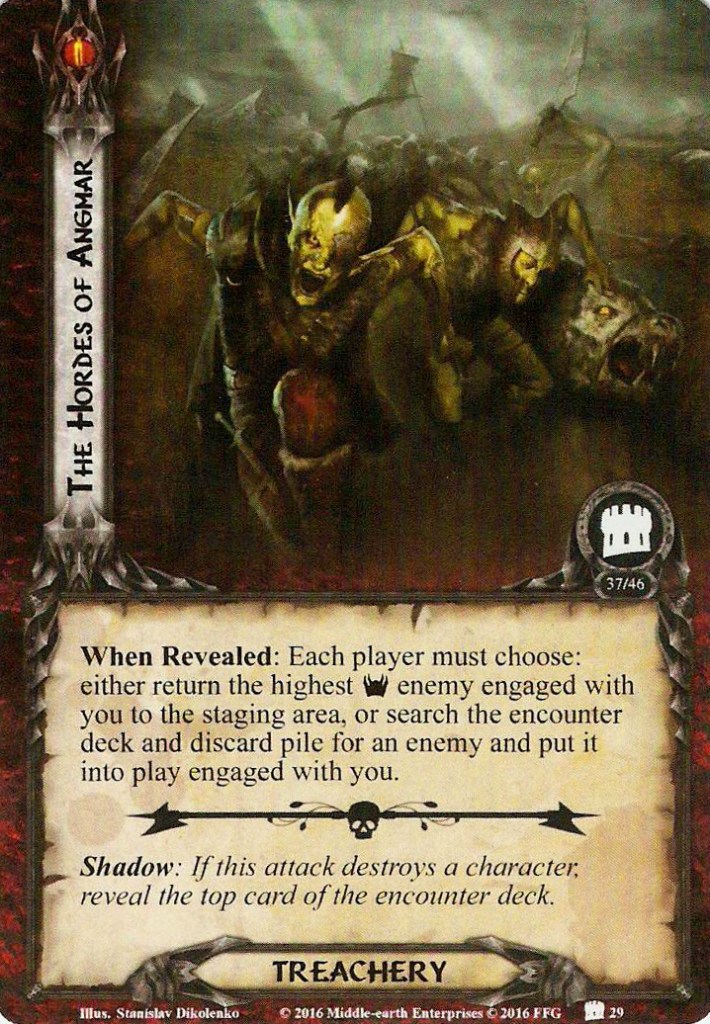
When revealing Hordes of Angmar, each player must either return the enemy with the highest threat engaged with them to the staging area or search the encounter deck and discard pile for an enemy and engage it. Note that every player can individually choose the most optimal option.
The first option not only increases threat for the questing phase, but it can also make any abilities that trigger upon engaging an enemy (like the Angmar Warg-Rider’s) trigger again. Whether this helps depends on your deck as well: some Hobbit or Dúnedain decks might actually benefit from this. This mode of the Treachery also has the benefit of not actually adding anything permanent to the game.
Option #2 obviously does add something permanent to the game: potential tons of enemies. Anything bigger than a Warg of Carn Dûm is probably a bad idea, and even these can be a problem because their ability triggers when they engage a player. Still, every deck should be able to defeat at least one, so this will probably be the more popular choice. Keep in mind that there are only three copies of this enemy, so if you are playing with four players, one will either have to choose option #1 or a different enemy.
Sorcery of Carn Dûm (2 Copies)
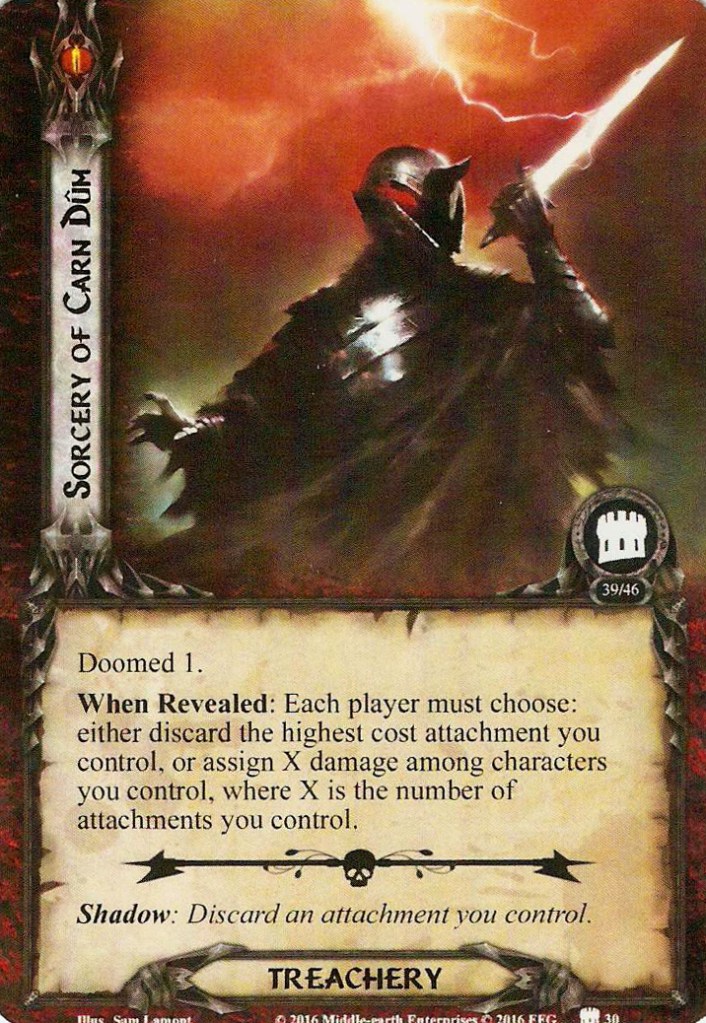
Featuring another piece of art with the awesome-looking Lieutenant of Angmar, Sorcery of Carn Dûm is a truly horrible card against Dale decks that rely on attachments. It has Doomed 1 (Probably more for flavor than for a mechanical reason) and again makes each individual player choose: Either they discard the most expensive (and therefore probably most powerful) attachment they control, or they assign X damage among characters they control, X, being the number of attachments they control.
There isn’t much you can do to make this effect weaker other than having multiple copies of your attachments in your deck or building in a way that has you control mostly similarly-costed attachments, so none of them individually will be a huge loss.
Caught in the Press (3 Copies)
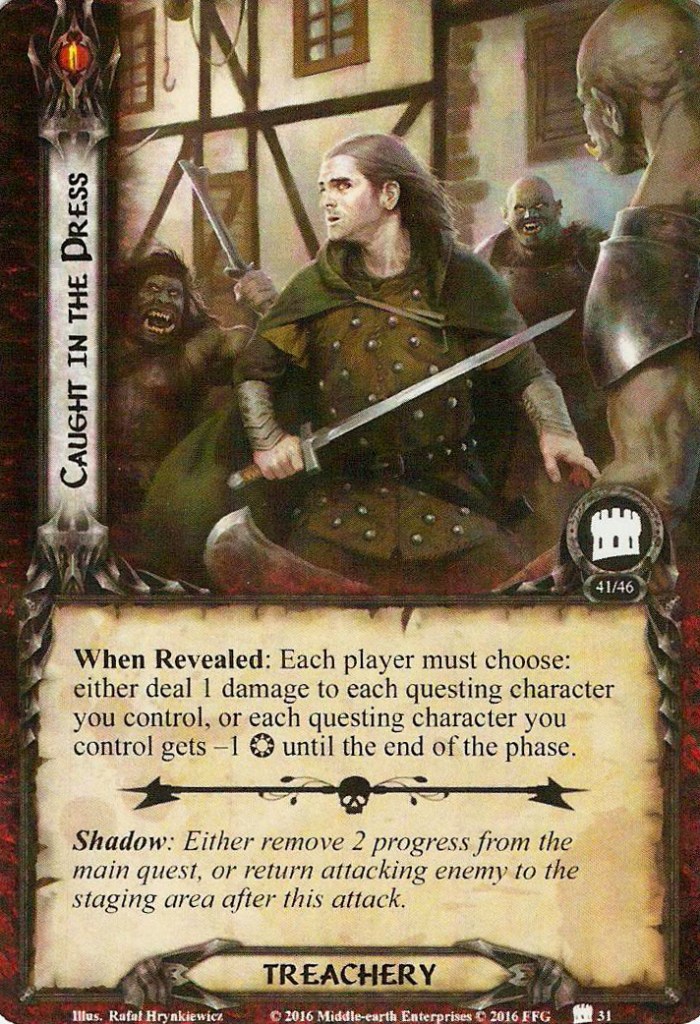
Of course, this quest also had to have a Necromancer’s Reach effect. Caught in the Press also makes each player choose (I sense a theme here) whether to deal one damage to each of their questing characters or lower each of their questing characters’ willpower by one. Both effects are far easier to stomach if you focus on a few great questers over many weak ones, and at three copies of Caught in the Press, this may be a good idea to build around.
The first effect is obviously very harmful if you rely on one-HP-characters like Galadriel’s Handmaiden to do the questing for you. Otherwise, it shouldn’t be too bad because you are bringing healing to this quest anyways (Yes, you are.)
The second effect mainly just punishes you for having your questing done by many low-willpower questers instead of a few stronger ones like Éowyn. Since you need to start with questing right away, having one or two good questers as heroes will be a good idea anyway. Overall, this effect usually just has you put less progress on the quest than you thought; it will rarely just take everything away unless your staging area is very well filled.
Weary Warriors (3 Copies)
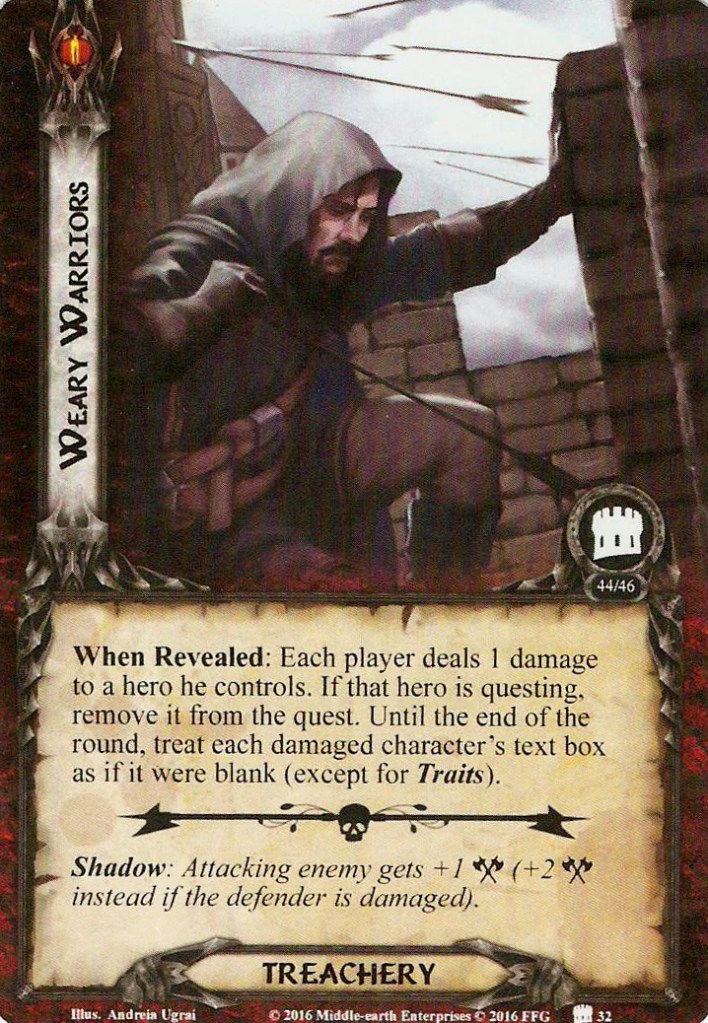
Our final Treachery is the only one that doesn’t give players a choice between two evils. Instead, it just has every player deal a damage to a hero they control, remove that hero from the quest if able, then treat each damaged character’s text box as blank for the rest of the round. This can completely hose certain strategies (looking at you, Dain!) or even be somewhat helpful (I really want to build a deck around dealing tons of damage to Beorn, revealing Weary Warriors, and healing it all off with Lore of Imladris). Mostly, it will be awful, though, hosing strategies you really wanted to use. Weary Warriors provides another payoff to the many direct damage effects in this quest. Healing is key!
Tips and Tricks
- This is a scenario where you have to be defensive. Treachery and Shadow cancellation, as well as location control and healing, should all be in your decks, meaning you will usually want to have Spirit and Lore as two of your spheres.
- Elrond is a great choice because he doubles most of your efficient healing like Warden of Healing as well as the healing from stage 2B. He also offers access to Lore by himself and to Spirit with Vilya. Also, he is arguably the most overpowered hero in the game.
- As already mentioned, you need to start questing well fast. 20 City Strength is usually not enough, so you will want to increase it at least once during stage 1. Again, Spirit offers the best questing out of all the spheres!
- Because multiple shadow cards cause additional attacks, you should always be able to defend against at least two enemies at a time. If possible, try even to include some more readying for the worst cases.
- Efficiently defeating enemies is as important as defending against them because most enemies will provide additional annoyance on top of just attacking. 7 attack can kill most of the normal enemies in one swoop, but you also need to be able to deal with Vanguards of Carn Dûm and Hosts of Angmar.
Phase Overview
Since I promised it, here’s the list of everything from this scenario that triggers at a specific point in the round (It’s not as much as I expected, but there are still lots of effects that can be triggered, e.g., when a Savage Werewolf kills a character
- At the end of the round:
- Deal one damage to Annúminas for each enemy in play
- Resolve the timing mechanic on stage 1 and possibly spend 10 progress to increase the City Strength by 10
- Each player may heal one damage from a character they control if you are at stage 2
- If you are at stage 3 and the Lieutenant of Angmar is in the victory display, you win the game
- Add a resource token to Battering Ram and deal X damage to Annúminas (X is the number of resources on Battering Ram)
- Move Lieutenant of Angmar to the staging area and it makes an attack
- Resolve the timing effect on City Wall
- After committing characters to the quest:
- If at stage 2, have the highest attack value enemy in the staging area, make an attack against every player or reveal an encounter card if no attack was made this way
Playthroughs
Because this quest is really hard, there aren’t many playthroughs online. People using outlands decks also is a good indicator of its sheer difficulty, though I really advise you to use Elrond!
- Solo outlands deck: https://www.youtube.com/watch?v=Wk9s_LCy7yI
- Another solo outlands deck: https://www.youtube.com/watch?v=Egvi_PjDanA
- Epic Multiplayer (part 1 of a series): https://www.youtube.com/watch?v=kGgWB6Yandc
Well, this was a long analysis! I hope some of you will now have an easier time winning against this tough monster of a scenario, and maybe now that Covid is getting better, you might be able to organize a game of Epic Multiplayer!
Take care, everyone.
VeggieGollum

3 thoughts on “The Siege of Annúminas”