For some people, regular Emyn Muil is already a nightmare to play due to the monotomous gameplay and the lack of twists as you clear locations. With very few enemies and Northern Tracker taking care of annoying locations, even progression players can beat this scenario with ease. However, as a location control player myself, I enjoy testing those kinds of decks against this scenario, so I have played it more often than most people who kept it in their boxes after beating it once. The Nightmare version of the scenario spices things up a little, and makes the scenario less of a walk in the park, and more of a struggle. With locations getting lost from the victory display and new enemies, Nightmare Emyn Muil hopes to bring some people back to this quest.
Nightmare The Hills of Emyn Muil
- Found in: Separate Nightmare pack: The Hills of Emyn Muil
- Size: 19 new cards, recognisable by the red borders
- Increase in difficulty?: Yes, it is not as easy as Normal mode, but not too difficult for players to beat with a bit of deckbuilding. It will also take longer to clear, as locations can be bounced back to the staging area from the victory display.
- Fixed loopholes?: Yes, location control cards (and especially Northern Tracker) have been nerfed for this quest, preventing you to place a lot of progress on the locations in the staging area.
- New mechanics introduced: Prevention of location control, Hazards get some synergy.
- Play this scenario if: you want to struggle against an otherwise easy quest, you haven’t played Emyn Muil in a while, you enjoy location control but want a tough quest for your deck, you can’t get enough of Nameless enemies.
- Can I run side-quests for this scenario?: Yes, that is one thing that wasn’t patched in the Nightmare mode, as side-quests weren’t a thing back then. The main quest stage still only requires 1 progress, making it so that players can go to side-quests of their choice, granting them buffs that will make the quest a little easier. Explore Secret Ways is a great side-quest for this scenario, as well as Rally the West and Double Back. Honestly, bring as many side-quests as you can clear, as they will also count their victory value to the total.
- What to look out for: Location lock, terrible treacheries, big enemies that bounce in and out of the staging area, added surge to treacheries if players can’t find locations, a lot more nastier enemies than in the regular version.
New Rules
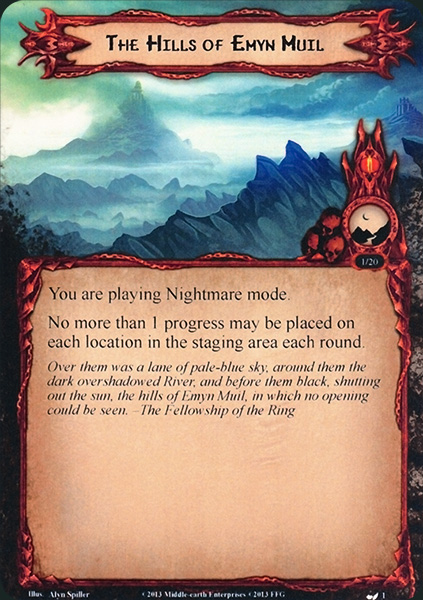
The new rules card that is included in every nightmare scenario has some extra rulings for this quest. Though the new rule may be short, it does impact the normal way players would take on Emyn Muil, so it does have to be kept in mind during the entire game. The new rule states that no more than 1 progress can be placed on each location in the staging area per round. This means that players cannot exploit cards that place multiple points of progress at once, like Asfaloth or Mirkwood Explorer. It also counters the strategy where players play multiple copies of Northern Tracker and clear all locations in the staging area. Only 1 progress per turn, per location, period.
This does not include the active location slot though, so any active location can still be targetted by player card effects that place progress on the location. If players can clear the active location this way, and continue to travel with South Away and Thror’s Map, they can get rid of a lot of locations in the staging area and get closer to the victory conditions.
New Setup
The setup of this Nightmare scenario is identical to the Normal version of the game. The players will start off with Amon Hen and Amon Lhaw in the staging area, each with a threat of two times the number of players in the game. No other cards get revealed from the encounter deck. However, before the players begin the quest, they must shuffle the new Nightmare encounter cards into the encounter deck and remove certain cards from the encounter deck to make it thinner (and more difficult).
Cards removed
- 1x The East Wall of Rohan (Unbalaced location, though one remains in the deck)
- 1x The North Stair (General thinning of the encounter deck, also removed 3 victory points)
- 2x The Shores of Nen Hithoel (Easy location)
- 4x The Highlands (Very easy location, even with the new rules)
- 2x Slick Footing (With the new rule, not much progress would be in play)
- 2x Impassable Chasm (Not sure why it was removed, one copy remains in the deck)
- 2x Dol Guldur Orcs (Easy enemy, though one remains in the deck)
- 1x Chieftain Ufthak (Removes 4 victory points from the game)
- 2x Dol Guldur Beastmaster (Not thematic enough)
- 2x The Necromancer’s Reach (Would have been too much direct damage, though one copy remains in the deck)
- 2x Necromancer’s Pass (Not a thematic location in this region)
- 2x Enchanted Stream (Not a thematic location in this region)
- 3x Evil Storm (Easy treachery to avoid and often whiffs)
- 2x Pursued by Shadow (Pretty easy treachery)
The Quest
The quest plays a lot like the normal version of Emyn Muil, with not a lot of things that changed besides the new rule and the new Nightmare cards. It will still be necessary for you to obtain 20 victory points before you can win the game. You will also need to have no other Emyn Muil location in play. With most non-Emyn Muil locations now removed from the encounter deck, this boils down to having no locations in play period. The way you obtain these victory points is up to you, as cards like player side-quests will count towards that 20 goal. Other player cards like the Fall of Gil-Galad and Justice Shall Be Done will also count.
With the added restriction that only one point of progress can be placed on locations in the staging area, players will need to adjust some of their decks. Location control cards like Northern Trackers are not very useful in this quest anymore, except for the first Northern Tracker you play. Instead, try to focus on cards that make locations the active location, so that you can make progress on that location while it is active. The Hidden Way is a prime example for this. Another thing that you don’t really have to fear in this scenario are travel costs. While it is still wise to add Thror’s Map and South Away to your deck in order to travel multiple times, you don’t need them for travel cost avoidance.

The real threat in this new mode are the treacheries. They can hit hard and ramp up your threat, deal a crazy amount of damage, boost threat on locations in play, and shuffle the Hazards back into the encounter deck. Having a Test of Will ready at all time will help you a lot by cancelling the treacheries. Remember that the Sarn Gebir Rapids location will prevent you from cancelling Hazards, so you will have to progress through that location quickly, or never travel to it at all.
My strategy would be to quickly go through the Amon Lhaw location, before you have too many attachments on the table. Have progress-placing cards slowly explore the Amon Hen location, since you must be able to play cancellation events if needed. Location attachments like Woodmen’s Path will be critical in clearing large locations like the Sarn Gebir Rapids quickly. Try to get every player to use Woodmen’s Path, so that each location can have one of them attached. Whenever a Northern Tracker puts progress on a location with the attachment, try to travel to that location during the next Travel phase. This will immediately explore the location, allowing you to use Thror’s Map or South Away to go to the next location. Repeat this cycle and perhaps use events like Strength of Will to explore the active location multiple times per round. The active location is not protected by the new rules, so it can serve as a focal point for all location control cards you have.
Remember that the quest card will instruct you to have the first treachery revealed surge if there are no locations in the staging area. Since some treacheries already surge of themselves, this keyword can stack if you are not careful. Try to leave one location in the staging area at all times, preventing you from having to reveal extra cards. You can chip away at this location before exploring it to meet your victory conditions.
When preparing for the next staging step, try to always have an active location in play. This can be done through The Hidden Way, or by using West Road Traveller or Distant Stars in order to switch the active location with a worse location in the staging area. Short Cut is also a great card if you need to win but have too many locations in play. It will allow you to thin the encounter deck a little by shuffling a newly revealed location back into the encounter deck. Then, you need to reveal a new card. This will allow you to hopefully make the staging area a bit lighter on locations. In the end, you will need to have obtained 20 victory points and 1 progress on the main quest in order to win. There also need to be no other locations in play. Careful planning and playing with a small number of players will help with this.
The Encounter deck
Global
- The new Nightmare encounter deck consists out of 44 cards, of which 25 are from the Normal version.
- Combat isn’t the focus of this quest, but still 48% of encounter cards have a shadow effect.

- Average threat on cards revealed is 1.5 threat per card. This can vary up to a 5 threat location though, so be aware that threat can shoot up all of a sudden.
- Surge is very much present in this scenario, with 10 cards surging into new encounter cards. This is the perfect quest to bring Lanwyn to, as she will be able to ready frequently.
- Doomed is another keyword that is heavily represented in this encounter deck, with 8 cards having Doomed 2 printed on them. Besides that, there are other cards that raise threat in the encounter deck.
- Immunity:
- While Sarn Gebir Rapids is the active location, Hazards cannot be cancelled.
- Locations in the staging area can only receive 1 point of progress per round
For these statistics, I did not count the two unique locations that start off in the staging area for setup. The composition of the encounter deck is pretty evenly spread, with slightly more treacheries than normal. In the end, the players can receive 41 victory points in total from locations in this scenario. They will only need half of this, making it easier for lower player counts.
Enemies
The Nightmare version of this quest removes quite a lot of enemies from the encounter deck and gives you 2 new sorts of enemies that will hit you hard during the quest. You should definitely be able to fend them off while you try and clear the locations to get to those 20 victory points.
- Tunneling Nameless Thing: I think most of us remember these enemies from the third Hobbit movie, so here they are in enemy form. The enemies are Nameless, going back to the enemies we have encountered during Foundations of Stone and Ruins of Belegost. These enemies are huge though, at 6 attack and requiring 14 attack at once to kill. Despite having boss-level stats, there are actually multiple copies of this enemy, which means that you will have to find a solution to them quickly. One of these solutions would be to use traps like Poisoned Stakes that will damage it over time. Forest Snare also helps a lot, as the Tunneling Nameless Thing won’t be able to attack any more. The Nameless thing also has an engagement ability with which it will engage the first player whenever the group travels to a location. While this can be predictable, the first player will still need a solution to handle the 6 attack that comes during the combat phase. One such solution would be to clear the active location during the travel phase, which would return the Nameless Thing to the staging area. Other solutions involve cancelling the attack with any cancellation event, or to have a Sentinel defender like Beregond that can more easily take the Nameless Thing down. It is important to kill the Nameless Thing if you can, as multiple copies will make it very difficult to win. Also, try to run some cards that benefit from the Nameless Thing having a higher engagement cost than your threat. Gaffer Gamgee will be worth his weight in gold against this enemy.
- Orc Interceptor: The other enemy in this Nightmare expansion starts out with lower stats, but will require the same urgency to kill as the Tunneling Nameless Thing. During the scenario, you are expected to clear locations, but each time a location leaves play as an explored location (added to the victory display), the Interceptor will get a resource token. These resource tokens will bump the threat and the attack stat of the Interceptor up by 1, making him more dangerous. The best thing to do would be to engage this enemy early, since he will at best have only 1 resource on him, making him a reasonable 3/3/3/5 enemy. This can still be defended with relative ease, though players should start to deal damage to the Interceptor as well to prevent him from staying in play for too long. Blanking the Orc Interceptor’s textbox will also help in reducing his stats to just 2/2/3/5 in case you can’t defend a monstrous attack from him in the early game. With the Interceptor having a relatively high engagement cost, Hobbits and Rangers would be well equipped to handle the Interceptor, using cards like Dagger of Westernesse helps in bringing the Interceptor down.

Locations
Locations are what Emyn Muil is all about. The Nightmare version adds two new locations to the mix that will try to waylay you during your quest. Location control is still key here, but it will be trickier than before.
- Brambles and Thorns: If you ever needed a good target for Thror’s Key, here it is. Brambles and Thorns is a very painful location that should be explored as soon as possible. Otherwise, players will have to continuously trigger the Forced effect on this location. This effect deals 1 damage to every questing character, whenever it is committed to the quest. This does not only damage your heroes, but also allies, and questing allies tend to not be the strongest allies in the game. You will have to bring a lot of general healing like Waters of Nimrodel or Beorn’s Hospitality to avoid having to destroy all your allies in the questing phase. Ways around the effect can be through the use of Rosie Cotton and Galadriel, who both don’t quest by themselves, but boost the willpower of other characters. Sailor of Lune can also be used frequently, as she doesn’t take damage during the quest phase as long as you have an event on the top of your discard pile. With 5 quest points, this location will require some attention before it is completely explored, so using a Woodmen’s Path can save you from having to spend another quest phase damaging characters. The good thing is that the first copy that comes off the encounter deck can be blocked completely with Thror’s Key, while other copies can be recycled using Distant Stars to swap it for other, less harmful locations. Remember that having multiple copies of Brambles and Thorns will only damage each questing character once, the effects do not stack.
- Sarn Gebir Rapids: Seeing 5 threat revealed in one card can be brutal, so revealing the Rapids is never nice to see. It is also not worth that many victory points, so exploring it doesn’t seem to help you all that much. Even so, you will want to get rid of this location over time, so that you have less threat in the staging area and can make more progress on the active location and the (side-)quest. That involves making the Rapids the active location. While this can be great for characters like Ghan-buri-Ghan, it does limit your cancellation options. Whenever the Rapids are the active location, the When Revealed effect on Hazard cards cannot be cancelled. This means that A Test of Will becomes useless for the majority of treacheries in the encounter deck, but due to phrasing, you can still cancel the effects of treacheries using The Door Is Closed, provided you have a similar copy in the victory display. I tend to travel to the Rapids using The Hidden Way, as it lowers the chances of revealing a treachery during the next quest phase (or even to 0 in true solo), making it easier to get out of the way quickly. The Rapids can also be left in the staging area, where Guarded Ceaselessly and Power in the Earth in combination with Familiar Lands can leave the location harmless. You will still have to explore the location eventually, though in the long term location control cards can place the 5 required quest points.

Treacheries
The treacheries in this quest will appear more frequently and will hit you harder than before. On top of the new treacheries, some of the old ones are kept in the encounter deck like Rockslide, which is horrible to reveal in all modes. Cancellation will be required, but won’t always be an option.
- A Hurrying Darkness: Make way, this darkness is in a hurry! This Hazard treachery will put each player at a decision to either raise their threat by 5 or to reveal an encounter card from the encounter deck. This decision must be made by each player, and not as a group. This can lead to revealing 4 additional cards in a 4 player game. This is almost never a good idea, except for when you are desperately looking for more locations to explore. I would argue to pick the threat raise of 5 at most times since the engagement cost of enemies tends to be either very high or very low in this scenario, so your threat doesn’t really matter. Free to Choose is a nice card to counter the gain in threat, so that might be worth it if you find yourself up against this treachery a lot.
- Hazardous Terrain: This treachery does not affect the players directly, but will make sure that the encounter deck is stacked against them. When it is revealed, the players raise their threat by 2. They then shuffle all of the Hazard treacheries back into the encounter deck before revealing a new encounter card. This treachery has the potential to just whiff if the players have no Hazards in the discard pile, so it will just replace itself and raise the threat of all players. If you can, try to set up the encounter deck whereby the treachery surges into another copy of itself again, as multiple copies back-to-back aren’t the worst thing to happen to you. You will only be Doomed because of it. Since it surges, it would be safe for you to use Minas Tirith Lampwright and call “Treachery” as you just filled the encounter deck with more copies, potentially saving you the surging card. This card can be cancelled at all times, since it is not a Hazard of itself, thereby not getting the protection from Sarn Gebit Rapids.
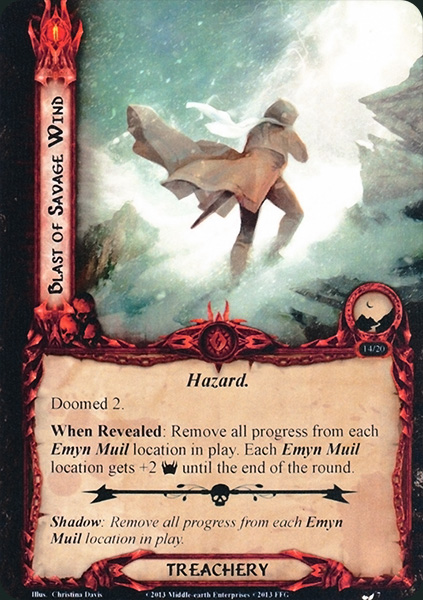
- Blast of Savage Wind: A combination of Slick Footing, Doomed 2, and Treacherous Fog makes this treachery into one of the worst cards to reveal in this scenario. It hurts in several ways: first, all players have to raise their threat by 2. This seems easy enough, but it is one of many Doomed effects in the game, making your threat climb much faster than normal. Second, all progress tokens on Emyn Muil locations in play must be removed. This hurts, since you might have been close to clearing some locations in the staging area at the slow pace of 1 progress per round, and now you have to discard all the progress you made. On top of it all, the final line on the treachery makes it so that each Emyn Muil location in play gets +2 threat until the end of the round. This is downright devastating to many players who are facing location lock. Not only did their effort at exploring the locations get thwarted, but now all locations get +2 threat. These are all reasons to cancel this treachery if you can. Luckily, the card does not surge, but revealing more than one copy per round can end the game then and there, as locations get +4 threat. To counter this treachery, players can also use Familiar Lands and multiple uses of Guarded Ceaselessly to lower the threat of locations in play, allowing them to at least make some progress that round. In solo, this treachery is less awful, especially if you weren’t focussing on making progress on locations in the staging area.
- Retraced Steps: Just when you thought you had met all the victory conditions, this treachery comes up and ruins everything. Once this treachery is revealed, players will have to discard one Emyn Muil location from the victory display at random. If you are in luck, it will discard a location with only 2 victory points, but if Amon Hen or Amon Lhaw are discarded, you will have to make up for it by clearing 2 additional locations. Since the discarded location is put into the discard pile, you can try to use Shadow of the Past to put that location back on top of the encounter deck. That way, you know exactly what card will be revealed next round, and it gives you a location with the same number of victory points than you just lost. Cancelling the treachery is also a good move, else you will be stuck in the hills for a few more rounds. I like the fact that this treachery goes back to when Frodo and Sam are lost in the Emyn Muil as well, and I also think that revealing this treachery is as bad as finding your old footsteps again when you thought you were getting out of this place.
Tips and Tricks
- Although it is not as strong as before, location control will still help you in clearing these locations faster than you normally would. Remember that the restriction on progress on locations only counts for locations in the staging area. This means that cards like Asfaloth can still put 2 progress on the active location, potentially clearing it.
- 1 progress per round may not seem like much, but it will still slowly widdle down locations in the staging area, especially the two unique ones. This can also put them in range of other location control cards once the locations do become active.
- Play side-quests. Honestly, there is no downside for adding side-quests to your deck. Not only will it give you benefits such as free allies or removing enemies from play, but it will also raise the Victory value in the victory display once you clear the side-quest. Though most side-quests only have 1 victory point, it is a point that cannot be removed from the display, and it might just get you over that 20 point threshold. You will still need to have no Emyn Muil locations in play, but at least you have one less thing to worry about.
- The Hidden Way is a crazy good card to play in this scenario, as it will have a decent chance of hitting. This will pull out a location from the top 5 cards of the encounter deck and make it active. This allows you to bypass any Travel effect and allows you to have an active location if you explored the previous one during the combat phase for example. On top of it all, you now have to reveal 1 encounter card less than usual, which is amazing in true solo.
- Try to explore the active location multiple times per round. Not only will this allow you to fill the victory display, but it also lightens the threat in the staging area. Use Thror’s Map and South Away to travel multiple times per round. You can then use location control cards to explore the active location before travelling again.
- Try to play attachments on locations. Since you will have to explore the locations eventually, why not get some benefits out of it? Woodmen’s Path is the strongest choice for any location, especially the higher quest point ones. In combination with progress placing cards, this can explore the active location in a heartbeat. Having more attachments on locations in the staging area will also open up South Away and the new Familiar Lands event.
- There are many instances where you will have to raise your threat because of encounter card effects. Having threat reduction will allow you to avoid the new enemies for a while, while also preventing you from threating out. Spirit Elfhelm ally will do his part in this scenario so it may be a good investment. Free to Choose is also good to counter the big increases in your threat from A Hurrying Darkness.
Playthroughs
- True Solo, mono-Spirit deck: https://www.youtube.com/watch?v=NfZ1BL7I0V4
- Two-handed, progression style: https://www.youtube.com/watch?v=YBuqRpJ8-ps
- 2 players, updated decks: https://www.youtube.com/watch?v=8TmqDAiiPBE
- 2 players, updated decks: Part 1 and Part 2
So ends another Nightmare review of a quest that isn’t the most popular among the players of this game. I might do another one of these soon, as I picked up a lot of Nightmare packs a while ago, so maybe next time we take a nightmare-ish Journey Along the Anduin.
