“It was Sam’s first view of a battle of Men against Men, and he did not like it much. He was glad that he could not see the dead face. He wondered what the man’s name was and where he came from; and if he was really evil of heart, or what lies or threats had led him on the long march from his home; and if he would rather have stayed there in peace.”
– The Two Towers, Journey to the Cross-roads
It might almost be a cliché at this point, but the quote above is one of my favorites from the Lord of the Rings books. The enemy is so often depicted as inhumane, faceless, and frightening, but here Sam takes the time to think about the person underneath the helmet. One cannot help but wonder whether Tolkien had a similar experience as a young man at the battle of the Somme, facing the Kaiser’s armies in the trenches. It is therefore only appropriate that our beloved card game really takes the time to show that in spite of their service to Sauron, the Haradrim have a rich culture and are capable of great feats of heroism and kindne… Oh wait, sorry about that; I am getting a call from my editor…
Hello? Yes, yes, I’m writing it now. Tons of good stuff about the humanity of the Haradrim… What, you don’t want that? Why? Is this NOT the intro for the Long Arm of Mordor quest? Which one is it, then? Crossroads? Oh. I see. OK, I’ll get to it.
Ahem. Scratch the above. Time to kill some Haradrim.
.
.
.
.
.
Journey to the Cross-roads
- Found in The Land of Shadow Saga Expansion
- Official Difficulty: –
- Community Difficulty: 8.3
- Encounter sets: Journey to the Cross-roads, Men of Harad
- Quest cards: 1
- Play if: You like to fight the Haradrim. You like Tower Defense games. You like combat-heavy quests. You like to see how well you can win a quest. You like playing tempo decks that require little setup.
- What is different about this quest?: Enemies cannot be left in the staging area. You only have a single quest card. You need to be ready to fight very quickly.
- Solo or Multiplayer?: No matter the player count, you reveal at least one enemy each round. This means that the game is much harder for solo players. At high player counts, you risk some pretty nasty surge trains and location lock, so it’s no walk in the park.
- Can I bring Side Quests for this scenario?: You might not have the time for it, and threat in the staging area can build to a level where side quests become unfeasible. But if you have a lot of questing power, you definitely can bring side quests here.
The Quest
Setup
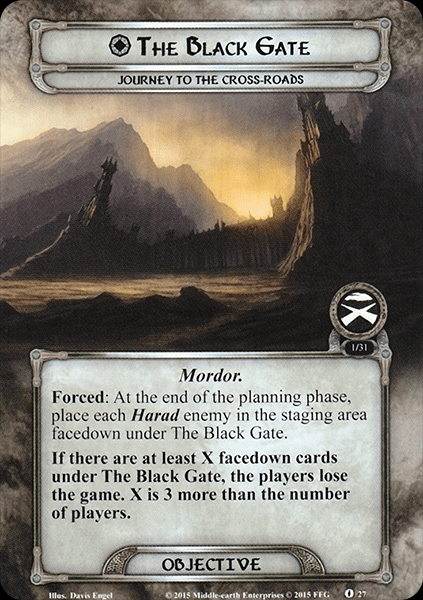
All jokes aside, the quest actually manages to convey the theme of the battle quite well, where Faramir and his rangers try to stop the Haradrim from joining up with Sauron’s forces at the black gate. Because the mission here is so straightforward, the setup for this quest is fairly straightforward as well. The first thing you add to the staging area is the Black Gate. Despite the name, it is not an actual location in this quest but an objective. It has a Forced effect, stating that at the end of the planning phase, all Harad enemies in the staging area are placed under the Black Gate. If there are at least X enemies at the Black Gate, where X is the number of players in the game +3, you lose the game. As mentioned above, this represents that you failed to stop the Haradrim from joining forces with Sauron. Do it too many times, and you lose the game. But surely, this is only a problem if you draw enemies from the encounter deck, right? Well, this scenario has a trick up its sleeve…
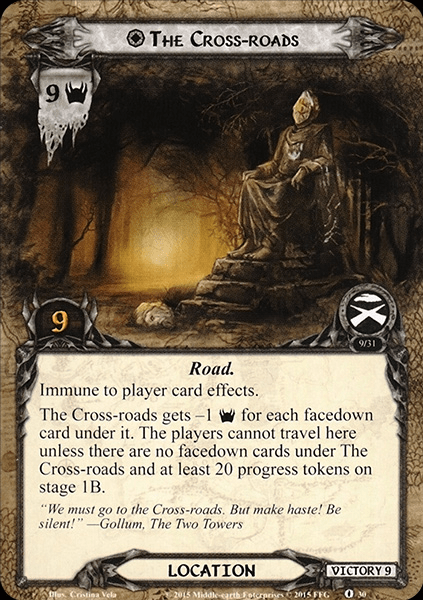
The next thing you add to the staging area is The Cross-roads location. With 9 threat and 9 progress required to clear it, it’s a beefy location. Additionally, it is immune to player card effects. However, you don’t really start with 9 threat in the staging area because of a text clause stating that the Cross-roads gets -1 threat per facedown card under it. The next step of setup is to shuffle the 9-card Harad encounter set and place it facedown underneath the Cross-Roads. 9 cards means -9 threat, meaning it starts as 0! Aren’t you a lucky one? Not really. Because there’s an additional clause stating that you cannot travel to the Cross-roads until there is 20 progress on stage 1B, and you have no cards underneath the Cross-roads. When you realize that all encounter cards from the Harad encounter set are enemies, you might get a hunch of what this quest is all about…
Finally, each player, except the first player, must search the encounter deck for a different non-unique location and add it to the staging area. This means that at other player counts than true solo, you will begin the game with some threat in the staging area. Some locations in the encounter deck can be pretty nasty, but my priorities for selection are Hills of Ithilien (no travel cost and low threat), Foothills of Ephel Dúath (travel cost is to engage an enemy in the staging area, and you need to do that anyways) and Ithilien Woods (I do not like revealing extra encounter cards, but you might be lucky and get a softball here. Low threat cost and few quest points mean that you might be able to snipe it with location control or other tricks).
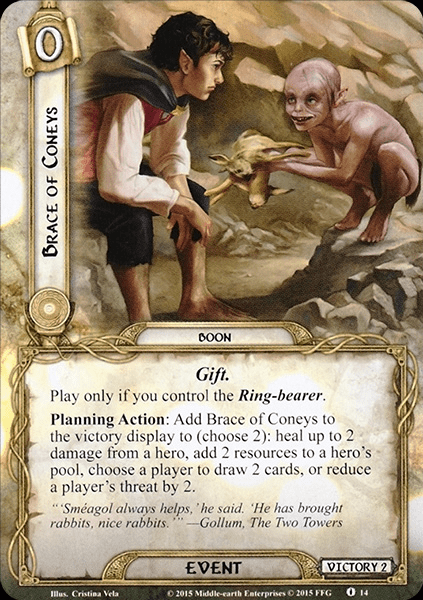
If you play saga mode, you have an additional setup step: Either you add 1 resource to each of your hero’s resource pool (letting you play a pseudo-easy mode!), or you shuffle a boon called “A brace of Coneys” into your deck. A Brace of Coneys costs 0 and has a victory point value of 2, meaning that it goes to the victory display after you play it. You can only play it if you control the ring-bearer. As a planning action, you can add it to the victory display to pick two of the following options: heal up to 2 damage from a hero, add 2 resources to a hero’s pool, choose a player to draw 2 cards, or reduce a player’s threat by 2. A nice versatile bonus, but at the expense of hitting the ground running with 3 extra resources. I tend to go for the boon because I love the flavor. But make no mistake, in saga mode, you want as few enemies as possible from reaching the black gate. So if you think you can achieve that goal more efficiently by taking the resources, this might be a good option. You WILL regret letting enemies reach The Black Gate in saga mode… More about this is below. Additionally, you remove all Burdens from the deck with the Helm’s Deep and The Road to Isengard symbols. These are not relevant for Frodo.
No matter if you play Saga or not, the first player takes control of a Ring-bearer hero. You can use any of the Fellowship versions of Frodo Baggins, but I am personally fond of the Black Riders version. The ability to cancel encounter cards can come in quite handy.
With all the admin out of the way, it is time to look at the quest itself!
Ambush the Men of Harad (20 quest points)

The title really says it all, doesn’t it? The quest card states that the players cannot win the game while The Cross-roads is in play. When the Cross-roads is cleared, the players win the game. So the play here is pretty simple: Slam down 20 progress on the quest, travel to the Cross-roads once that is done, place 9 progress, and win the game. Wham, bam, thank you, ma’am! However, the attentive ones might have caught a tiny complication in that plan – we cannot travel to the Cross-roads until there are no cards underneath it. The game is going to help us with that because the quest cards also have a Forced effect saying that at the beginning of the quest phase, reveal the top facedown card from under The Cross-roads and add it to the staging area. So you will get an extra encounter card per turn. In a four-player game, this is not the end of the world, but in true solo, this makes the quest very, VERY hard. The removal of a card from under the Cross-roads also means that the location gets +1 threat per turn, so if you get stuck with a couple of locations in the staging area, you can end up in a situation where threat just keeps piling up because you cannot clear the active location. And the game does not provide you with any breaks. As we will see in a minute, the game will give you at least one enemy per turn, regardless of the player count. And you need to clear the enemies because if you leave them in the staging area, they will go to the Black Gate. The nature of the quest reminds me of tower defense games, where you have to stop waves of enemies from reaching a specific target. Because the Harad encounter set is so central to the flow of the quest, it is worthwhile going through the cards it contains here. All the encounter cards from that set are enemies, and they come in three different flavors:
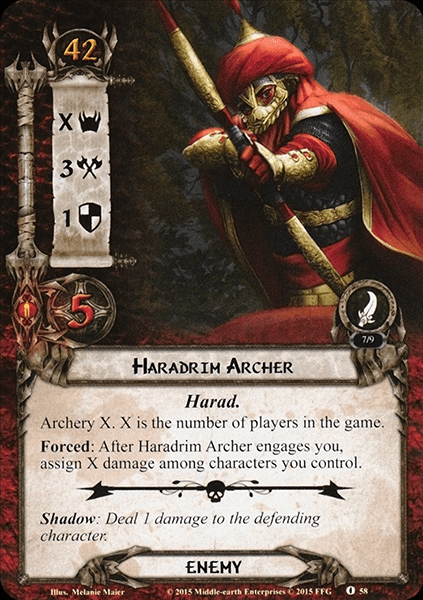
At lower player counts, my preferred enemy to emerge from the Cross-roads is the Haradrim Archer. X threat (where X is the number of players in the game) means that he doesn’t contribute much at lower player counts. 3 attacks mean that even average defenders can block him without too much effort during the combat phase. 1 defense and 5 hit points mean that if you need to take him down over a few rounds, all of your attack power is not eaten up by defense. After you engage him, you deal X damage amongst characters you control (which, again, at lower player counts, isn’t too bad), and he has Archery X, so he will ping you if you leave him out for too long. But due to all the factors mentioned above, it feels like you have a chance against this one. I especially like to see this one mid-game, once I’m hitting critical mass for my board state, and I have the attack power to take him down in one attack phase. He has a threat threshold of 42, meaning that you can often let him run to the Black Gate if you are so inclined. The Cross-roads deck has three copies so you will see a few of them. If he enters the encounter discard pile and becomes a shadow card later, he deals one point of damage to the defending character, which has been the bane of many a Defender of Rammas…
The second flavor of enemy is the Haradrim Soldier. I’ve found him to be deceptively hard. 2 threat means that he doesn’t cause too much trouble when he appears, regardless of player count. 3 defense means that he is more difficult to take down over multiple rounds, and 4 hit points mean that sometimes you’ll just be short of the required attack power to take him down. But the greatest problem with him is the combination of 4 attack power and the forced ability that causes him to make an immediate attack when he engages you. Because this quest is so combat-heavy, I’ve found it can be a big ask to take two 4-attacks and afterwards have 7 attack power to take him down, especially early game. With a threat threshold of 40, you can let him go, but in a minute, you will see why that might be a dangerous idea.. An alternative is to bring a defender that can ready or have a defender somewhere in play with Sentinel, so they can take one of the attacks for you. He is also a prime target for attack cancellations and forest snare. As for the archer, the encounter deck contains three copies. I prefer to see him in the mid and late game too, so I am ready to take his attacks and deal sufficient damage to kill him swiftly. As a shadow card, he has the dreaded “attacking enemy makes an additional attack after this one,” but this should only be relevant at higher player counts.

Finally, we have the big one: The Oliphaunt. A threat threshold of 44 means that you can let it go, and you might very well have to. 3 threat, 6 attack, 2 defense, and 9 hit points is a major threat in itself. Additionally, it has the usual mumakil clause from Against the Shadow, stating that you can only deal it 3 damage per round, and cannot have attachments, so no forest snares. This means that you are stuck with it for at least three rounds. Additionally, once you engage it, you exhaust all of your allies. So no chump blocking on the turn you engage it. In true solo, I’ve found it very hard to deal with even a single one of them. The relentless pressure means that it is very hard to get the resources to chip away at its giant health pool, defend against it without wrecking your board state, and deal with the next enemy coming up. This is an enemy that you are very likely to let go to the black gate. This might be a decision future you might regret if you are playing Saga mode (because, spoiler alert: the enemies you let go will come back to bite your juicy behind), but you might have to do it out of necessity. I prefer to see one of them early, perhaps as my first enemy from the Cross-roads – because then I can just let it go and build up my board state. If I see it late in the game, I can either tank it or use a bunch of tricks to deal with it. Either you can use recurring Feint tricks, such as OG Feint or Grimbold. You might be able to take down one or two in true solo – especially if you use some of the tricks, like using Helm! Helm! or Using the Great Hunt. Another tried-and-true method of dealing with them is through the combo of Rivendell blade (to lower its defense to 0) and Straight Shot (to flat-out discard it). But that is mainly if you build for the quest specifically. At higher player counts, one player can focus on dealing with a mumak while the others take on other enemies in the meantime. But again, in true solo, the pressure might just mean that you have to let it go.
These are the enemies you will face, so you need to be prepared to fight from turn one. While it might be possible to make a clean slate and beat the quest without letting any enemy through t The Black Gate, I have never managed in true solo. I usually plan to let one or two of the Oliphaunts through. The game becomes really tense if you hit that threshold where one more enemy underneath the Gate will cost you the game – several card effects can return enemies to the staging area, or pull out additional enemies from the encounter set, so you might get into a situation where a shadow effect suddenly cost you the game. One advantage you do have is that the enemy is revealed at the beginning of the quest phase. This means you can make a strategy depending on what emerges from The Cross-Roads. If it is one of the first turns and an Oliphaunt appears, I am not even going to try to do anything about it. I’ll instead focus on putting down some quest power (while, of course, having a blocker left in case more enemies come out of the encounter deck). In the early turns, I generally try to quest as much as possible so that I can get to the 20 progress on the main quest, so once the Cross-Roads is empty, I can go ahead and travel to it. Because the threat on the Cross-Roads ticks up and up, it becomes increasingly harder to place progress if you do not build off your board state in parallel. So a very real danger is that the enemies are gone, but you have location-locked yourself into a situation where it is very difficult to place enough progress. I also generally try to avoid chump blocking because the tempo here means that it is just too expensive. If you pour all your resources into chump blockers, chances are that you won’t build up your willpower or attack power. Exceptions exist, of course, for deck types like Rohan, Gondor, or Dwarves that try to cycle cheap allies. And I’ll keep an emergency chump blocker handy if I need something to take the engagement attack from Haradrim Soldier or once I have blocked the initial Oliphaunt onslaught with a hero. With these tips in mind, I just try to place progress whenever I can, deal with enemies as they appear, let a few through at times when I need a moment of respite or to focus on an existing combat, and once I can go to the Cross-Roads, I travel there right away and try to clear it on one big yolo-quest round. If you make it to the point where you can travel there, that generally shouldn’t be a problem.

If you make it through and you play the campaign, you have a little bit of housekeeping to do. First of all, each player who picked A Brace of Coneys during setup gets to add that card to the campaign pool. This is a nice reason to pick the card at setup because you can benefit from it multiple times. But as discussed above, this should also be up to your general strategy. Secondly, you have to write down the name of each enemy that made it to the Black Gate in the Campaign Log. This is bad news and the reason why this quest is so much tougher in Saga mode than in normal mode. The enemies will come into play during the Battle of the Pelennor Fields, and all enter play during stage 5B. This means that if you let 3 oliphaunts through, you have to face them at the same time in that quest. So if you play Saga, think long and hard about what you are willing to let through. In my Saga playthrough, I found that if I made it that far in the Battle of Pelennor Fields, I could handle whatever the encounter deck was throwing at me. But it is something to keep in mind when you play this scenario.
Now that we have talked about general strategy let’s take a look at the encounter deck and see what tricks it has to keep you from getting there…
The Encounter Deck
Global
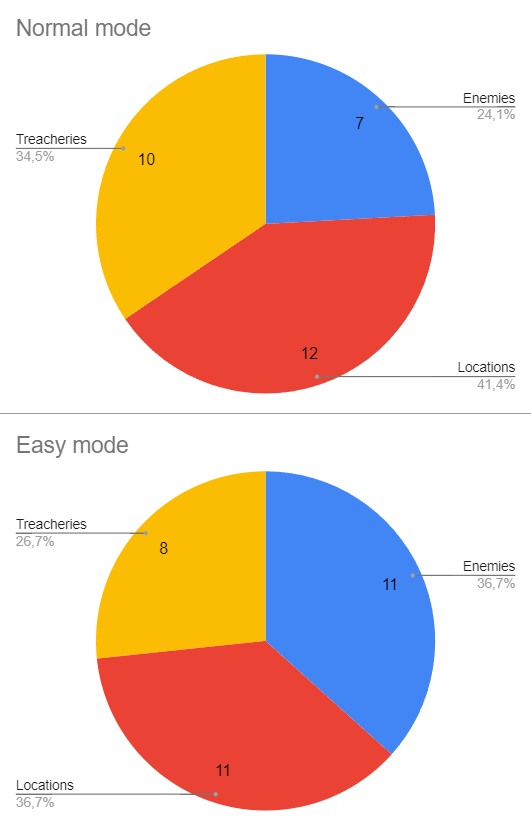
- The encounter deck consists of 29 cards (25 cards on easy mode)
- 16 cards have shadow effects, bringing the risk of shadow effects to 55% (56% on easy mode with 14 cards)
- Average threat is roughly equal for both modes, at 1.52 threat per card. This can range up to 4 threat locations and enemies, so you can get rather unlucky.
- Archery can be found on the Haradrim Archer. The value will scale with the number of players.
- Surge is present on 4 cards (Man of Harad)
- Peril is present on 5 cards
- Immunity:
- The Cross-Roads is immune to player card effects.
- Oliphaunt cannot have attachments or take more than 3 damage each round.
The stats above do not count the Cross-roads, since it will never go to the encounter deck. The Haradrim enemies that go under the Cross-roads are also not counted, which means that average threat revealed will go up each round as more enemies enter play.
Enemies
In addition to the enemies under the Cross-roads, the encounter deck also packs a few. And I am sorry to say that both of them are the kind you’ll want to avoid at lower player counts.
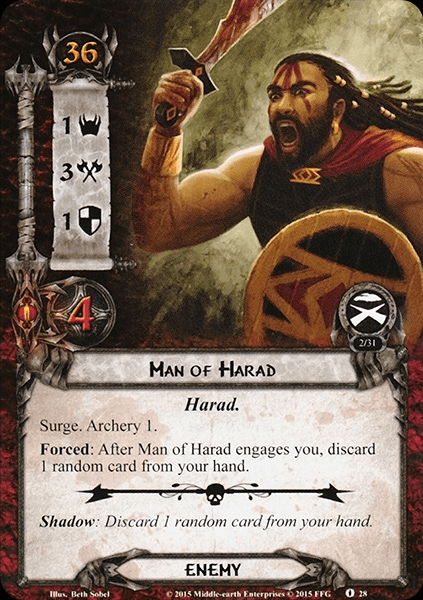
- The Man of Harad is a weenie enemy that you normally wouldn’t mind too much. Four copies in the encounter deck means that you will see him fairly often. Strength wise, he reminds me a little bit of the smaller goblin enemies we saw around the Dwarrowdelf cycle. 1 threat, 3 attack, 1 defense, and 4 health makes him a manageable threat, where you might make his attacks undefended, and a well-buffed attacker can take him out in one hit. An engagement cost of 36 means that you could leave him in the staging area early in the game. However, on this Journey to the Cross-roads, so you know that is not really an option. To have this enemy be one of your foes that goes on to the black gate can be catastrophic – it severely limits your wiggle room. At higher player counts, this might be ok, but in true solo, he might require you to block his attack, which easily can lead to a situation where you suddenly don’t have enough attack power to deal with the archer or the soldier you also were engaged with. Additionally, he has Archery 1 and Surges. Yes, you might get a little Surge train, where you suddenly reveal multiple copies of this guy, followed by the enemy we will discuss below. And as if that wasn’t enough: When you engage him, you discard a random card from your hand. That Feint you were saving for the Oliphaunt? That’s trash now. I find this enemy so unpredictable and hard to handle that I often end up canceling the card with Black Riders Frodo and drawing a new one. Occasionally you get a treachery that makes things worse, or you just draw a different copy because there are so many copies. But to get this enemy out of the way is often worth it. If your group can handle him in four-player, he is an easier threat to manage. If you get him as a shadow card, you must also discard a random card from your hand. This can be a very steep price if you throw out something useful, but I’m often very happy to see him as a shadow card anyways.
- The second enemy is the Captain of Harad, a mini-boss that can severely mess up your plans. On normal, you include three copies, which means you are very likely to see him. 4 threat can really mess up your plans and keep you from placing progress and from clearing locations. He has a printed attack power of 4, 3 defense, and 5 hit points. For that reason, it is very unlikely that you can deal with him and the enemy from the Cross-roads the same turn in true solo. He has a high engagement cost of 38, meaning that you often will have the option to let him go to The Black Gate by leaving him in the staging area. I have often used that possibility. On the turn you engage him, Harad enemies get +1 attack and -10 engagement cost, which might deal damage to your defender if the attacker is sufficiently strong. The -10 engagement matters more in multiplayer, where it can cause a surprise engagement to a player you did not expect. Since the reduced engagement cost and attack bonus only trigger upon engagement, he is a prime target for a Forest Snare. I have often cancelled this enemy with Black Riders Frodo in the hope of getting a location. I am usually very happy to see him as a shadow card because that means I won’t have to face him during the questing and combat. However, his shadow ability can be very punishing and potentially cost you the game: If the attack destroys a character, return the enemy to the staging area. This will likely lead to the enemy in question going to The Black Gate. So think about this card when you use chump blockers. I have rarely done so because I feel like chump blockers are too slow for this scenario. Proceed with caution.
Locations
When I review encounter cards, I often state that I’m happy to see specific cards as shadow cards. Our first location in this scenario is one that I am very sad to see it during the combat phase.
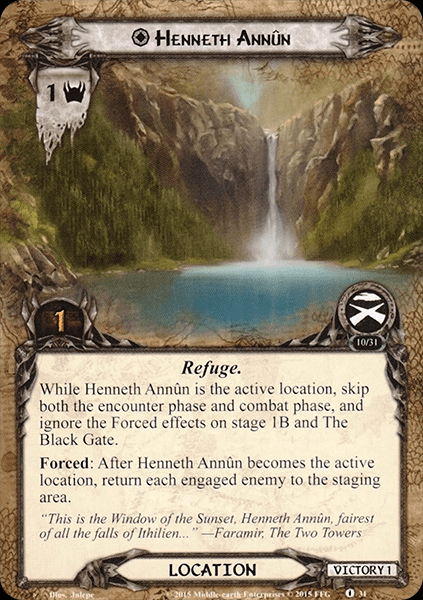
- Henneth Annûn is something as unusual as a beneficial location. The encounter deck has a single copy and contributes 1 threat, making it a very soft blow in the round where it appears. It is also a highly thematic location, representing the location where the rangers hide out away from the Harad soldiers. If you can travel there, things get pretty wild: While Henneth Annûn is the active location, you skip both the Encounter phase and the combat phase, and you ignore the Forced effect on BOTH Stage 1B and the black gate! When Henneth Annûn becomes the active location, you return each engaged enemy to the Staging area. This, of course, means that you need to make time when you travel there. If you have been chipping away at an oliphaunt, you don’t want to send it back to the staging area and eat the engagement Forced effect one more time. It is also a bit of a non-bo with Forest Snare because it will return any engaged enemies to the staging area, and you will have to eat the engagement effect again. But if you have cleared out your enemies and you aren’t location locked, this is a prime opportunity to take a breather, build up your board state and enjoy a round without combat. This is not without risks, of course. You do not skip the quest phase, so you might build up a conga line of Men of Harad and the Captain, meaning you have to face some serious combat once you clear it. And you will likely clear it the minute you quest successfully because it only requires a single progress to clear. If you use scrying tricks, you might be able to break even and stall for a few turns, but I won’t recommend that because of the risk of additional enemies. But I have found this to be a very helpful step on the way to succeed in this quest. Once it is cleared, you are ready to take on the enemies and give them hell. Make the most of this location if you are lucky enough to see it. It has no shadow effect.
- Southward Road is a 4 threat location with 5 quest points, and a location I’m happy to see as a shadow card because it has no shadow effect and because it is a nasty location. The encounter deck contains two copies in standard. While it is the active location, players may optionally engage an additional enemy during the combat phase, which can be quite practical during multiplayer. It gives you more control over where enemies go, sending enemies to the more combat-focused players. However, the travel cost is steep – the first player must reveal the top facedown card under the Cross-Roads to travel here. This travel cost makes it a prime target for Thror’s Key and Thror’s Map to bypass the travel effect. Whether it is a cost you think you can handle depends entirely on your board state, how much progress is on the quest card, and what’s left in the Cross-Roads deck. If you plan on making an oliphaunt pass on to the Black gate, or you are all set up and can handle both an Archer and a Soldier, go for it and clear it. That might mean you are actually closer to traveling to the Cross-roads itself. If you draw it late and have a lot of quest power, it might be worth just questing over it instead of traveling there. But it is a judgement you will have to make.
- Foothills of Ephel Dúath comes in 3 copies and is a location with 3 threat and 6 quest points. While it is the active location, each Harad enemy gets -1 threat, making it a little easier to place some progress and prevent you from getting stalled due to accumulating threat. In my experience, it is a bit of a trap, though – because it requires 6 progress to clear, you will rarely benefit much from -1 threat unless you are under so much pressure that you can barely quest successfully. And even then, -1 or -2 threat will only really make a difference in very specific cases. To travel there, the first player engages an enemy from the staging area. In true solo, you’ll probably want to do that anyway, but at higher player counts, this can mean that an enemy will have to go to a different player than you planned. It might be worth it to bring some Ranged attackers and Sentinel defenders, so enemies can be dealt with no matter where they go. The location has no shadow effect.
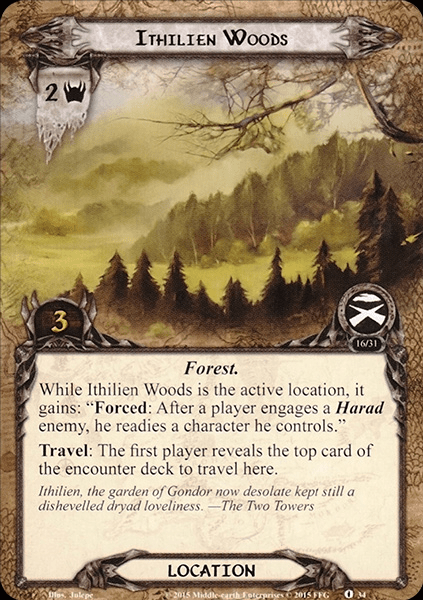
- Ithilien Woods is a 2 threat location with 3 quest points and comes with two copies. When Ithilien Woods is the active location, it gains Forced: Whenever a player engages a Harad enemy, they ready a character they control. This is a niche effect that lets you quest a little harder if you have a character with both high will and high combat/defense. Suddenly you can take advantage of this character in both questing and combat. However, the travel cost of this location makes it a bit deceptive and can lead to a situation that backfires. To travel there, you must reveal a card from the encounter deck, and by now, we know that this can be bad news. You might just get another location to replace it or a treachery that you can deal with easily. But you might also get a nasty treachery (as we will discuss in a moment) or a Surge train with Men of Harad and the Captains that you are unable to deal with. Try to bypass the travel cost if you can with Thror’s Map or The Hidden Way, or just quest over the 2 threat. Alternatively, use Scrying effects to know what it will bring out, so you can make an informed decision on whether it is worth it. It has no shadow effect.
- Hills of Ithilien is my favorite location of the deck, and luckily you get four copies in the encounter deck. 2 threat and 4 progress means that it will not impair your progress too much, and it has no travel effect. While it is the active location, you deal 1 damage to Harad enemies after engaging them. It is a card I am very happy to see during the questing phase. As a shadow card, it can be a bit more problematic, as it forces you to discard a non-objective attachment. Sometimes this is a trivial setback, but other times it costs you an important one. Remember, this quest really wants you to build a strong defender. Losing attachments is very counterproductive to that.
Treacheries
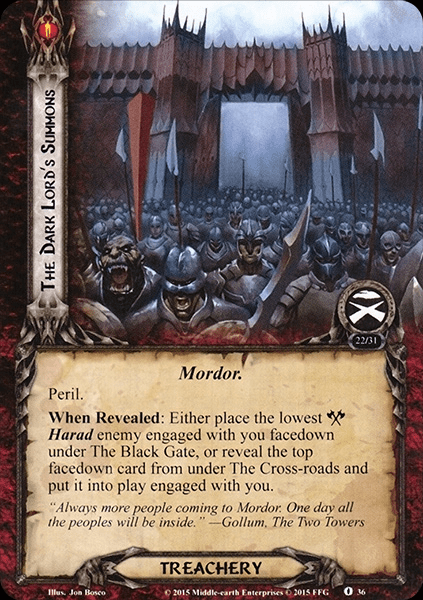
- The Dark Lord’s Summons is a nasty treachery that can cost you the game if you draw it early. It has Peril, so you are on your own for that one! When revealed, you must either place the Harad enemy with the lowest attack power under the Black Gate (booooh!) or reveal the top card from under the Cross-Roads and put the enemy into play engaged with you. There is no better way to get a surprise Oliphaunt. At lower player counts, this can actually come with a slight benefit – the enemy does not go to the staging area, so that you will have no additional threat added to the staging area for the round. But now you have two enemies from the Cross-Roads deck to deal with. In true solo, you will likely have to let one of them go. I’ve often found that this card causes me to take an Oliphaunt I have chipped away at and put it under the Black Gate. If you have cancellation options, it might be worth using them here. If it is late game, you are all set up, and you are feeling lucky, then go and take the enemy! The card has no shadow effect and comes in three copies.
- Marching Up the Road is an odd one because I do not mind seeing it that much at lower player counts. When revealed, each player must either return an enemy engaged with them to the staging area (adding a bunch of threat and forcing you to endure engagement effects in the following combat round) or search the encounter deck and discard pile for a Harad enemy and put it into play engaged with them. This is a perfect opportunity to get the Men of Harad out of the encounter deck if you can handle them. You will still get the random discard, but you will avoid the surge. If I am engaged with a Man of Harad or a Forest Snared enemy, it’s usually not the end of the world, but an Oliphaunt can just destroy you due to the exhaustion effect. I’ll rarely cancel this one unless it is going to cost me the game. The encounter deck has two copies, and as a shadow card, it has “attacking enemy gets +1 attack power. If this attack destroys a character, put the attacking enemy under the Black Gate”. This ability means that you should keep an eye on how many copies of this card are in the discard pile. Until both copies are there, chump blocking is risky business. Proceed at your own risk.
- Fierce Southrons is another card with Peril, where you have to make a decision based on the tactical state of the board. When revealed, you must either place the lowest attack Harad enemy in the staging area under the Black Gate and reveal another encounter card or take an attack from each enemy in the staging area. Usually, this will be one, but at higher player counts or due to a surging Man of Harad, you might have to take a few. If this comes out and I have an oliphaunt that I’m determined to let through anyways, I’ll just let it go to the gate, take an additional encounter card and hope for an easy location. If I have the defenders/chumps to spare, I might just take the attack and enjoy that I get no more threat added for the round. But as with many other cards in this deck, your decision depends on how many enemies are under the Black Gate and the state of your board. The deck has two copies, and the card has no shadow effect.
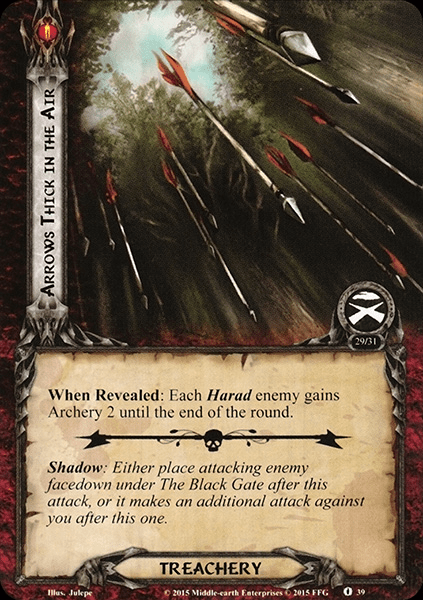
- Arrows Thick in the Air is a simple one: Each Harad enemy gets Archery 2 until the end of the round. At lower player counts, this is usually two points of damage, maybe four if you have forest-snared a Captain. But at higher player counts, this can add up. Usually, I’m pretty happy to see this card. It should be noted that as I interpret the rules, a card can have multiple instances of archery, so a Harad Archer will have archery 2 and archery X when this is revealed (please comment if you believe I am in the wrong here). So you might end up taking quite a bit of archery damage, but if you can handle that, it can be a bit of a freebie. I really prefer to see this one during questing instead of as a shadow card – as a shadow card, it gains “either place the attacking enemy under The Black Gate, or attacking enemy makes an additional attack.” This can be absolutely brutal to your board state and leave you without sufficient attack power to finish an enemy. Bring your shadow cancellation!
Tips and Tricks
- Your deck needs to hit the ground running. You have no time for setup, so you need to be able to gain an advantage. Use tricks to play allies cheaply, use Tactics Eowyn for dealing with an enemy early, or Steward to generate an obscene amount of resources. This quest does not wait for you.
- Have a plan for how you will deal with the Oliphaunts. Will you let them through? In that case, how many? And how do you plan to deal with their attack and engage abilities? Ideally, you want to deal with the Haradrim on the same turn as they engage you. You do not have that luxury with the Oliphaunt. They truly are the Oliphaunts in the room. I will not apologize for that joke.
- If you play saga mode, set yourself a goal that you can live with regarding enemies under The Black Gate. Enemies that get through will come back to haunt you, so consider if it is worth it to take 3 Oliphaunts under the Black Gate.
- It is easy to over-focus on combat in this quest but remember that you need quite a bit of progress to win as well. Don’t forget willpower when setting yourself up for this quest.
- If you play true solo and get repeatedly ground into dust, consider giving two-handed a shot. It is an extremely punishing quest in true solo, and you should be aware of that if you decide to take it to the table for some solo play.
- Do not hesitate to cancel enemies if you use Black Riders Frodo. This quest is all about momentum, and managing tempo is key to victory.
- All tricks count here. Remember that you can use The Great Hunt to discard enemies from the Staging Area or the good ol’ G-slap with a Sneak Attack if the need arises.
- I cannot stress enough how beneficial Henneth Annûn is in true solo. Use scrying if you can so you ensure it comes out and doesn’t get wasted as a shadow card.
- Remember, enemies, do not go to a special discard pile but to the regular one. So if you cycle the deck at higher player counts, enemies might start re-appearing.
Playthroughs
- One-stop Coop show did a video you can find here as part of their Saga playthrough.
- LOTRLCGSolo also did an OCTGN playthrough in true solo, playing an Outlands-Gondor deck progression style.
- Warden of Arnor did another progression playthrough in their Line Unbroken series. There is also a video of a second playthrough.
- Card Talk did a Saga Playthrough with a hobbit deck and a stream with a Guest Star.
- Another hobbit playthrough was done by Chad from Cardboard of the Rings (his first attempt can be found here).
- Onidsen did a playthrough as part of their “Lorefindel walks to Mordor” series.
And with that we won’t talk more about the Haradrim until we face them at the Pelennor Fields. But first, we have a certain Spider to face…

These have been beyond helpful as I make my way through the campaign for the first time! Keep up the great work!
LikeLike
I agree with your ruling on “Arrows Thick in the Air”, I treat it as +2 archery to anything already in play. I had an odd situation with the treachery “Marching Up the Road”, it states to move an enemy back to staging or “search the encounter deck for a Harad enemy”, it does not mention discard pile (as so many other similar effects do). Unfortunately I didn’t have an engaged enemy and I only had copies of the Captain of Harad left in the deck, which left me in a bit of a bind. Do you assume “search the encounter deck” always allows/implies searching the encounter deck and discard pile, even when it is not explicitly stated? Great write up as always.
LikeLike
I personally feel that “Search the encounter deck” would not allow you to also search the discard pile, it has to be stated explicitely. Then again, I would not fault anyone for taking an enemy from the discard pile during their games, since you don’t have to be so strict to yourself when playing this game. As long as it is enjoyable to you, I would be ok with taking an enemy from the discard pile instead of the encounter deck. But usually these things are stated on the encounter cards themselves. I’m not sure why this is not the case for Marching up the Road.
LikeLike
I wasn’t trying to be critical, just to offer a note, since in your analysis you stated “search the encounter deck or discard pile” while Marching Up The Road does not explicitly state you can search the discard pile. Likely you reflexively wrote that since it’s such a common phrase on encounter cards. But since the number of enemies in the encounter deck is proportionally a little low, it wouldn’t be too hard for that encounter card to whiff completely (if you didn’t have an engaged enemy nor any enemies left in the encounter draw deck). It’s just a minor irregularity.
LikeLike
G” day from Byron Bay Australia… 2024
1 year into game. Thank you for all you do. Very cool site. 🌈
LikeLike