I am quite unfamiliar with this quest, to be honest. It never grabbed my attention during any progression playthroughs, and I even gave the original analysis to a fellow author in order to cover this quest in greater detail. But I suppose I have to face this quest once more in a more difficult variant!
The Weather Hills is quite a unique quest, where most of the enemies are placed in a separate Orc deck, and you are instead battling the elements for the first half of the quest. While you are busy exploring the surrounding hills and valleys, you accumulate resources on an objective that will flip once you hit stage 2. At that point, the quest becomes a fight for survival against the Orcs while the enchanted weather of Angmar keeps battering you down with hail and winds. The Nightmare version adds more Weather treacheries, a new side-quest that makes it harder to find enemies, and new objective allies that must be protected during your trek through the wilderness. Better bring your raincoat for this one!
Nightmare The Weather Hills
- Found in: The Lost Realm Nightmare Pack, Quest 2
- Size: 19 cards of which 3 are objective allies
- Increase in Difficulty: Yes, there is a deeper focus on dealing damage to your characters, and certain protection cards are added to hone in on what the quest is doing. There is also a new loss condition if any of the Captive Villagers are killed.
- Fixed Loopholes: It is more difficult to find enemies in this version of the quest, making it take longer to clear the first stage. There is now also a location that will protect Weather treacheries from being cancelled.
- New Mechanics Introduced: Objective allies that will have to be rescued in order to win. These objective-allies can be found in the Orc deck and should not leave play, or else the players will lose the game. These allies are practically useless, but you can still use them as bodies for cards like Hail of Stones.
- Play this scenario if: You are Scottish and want to play a quest that feels like home. You enjoy a quest with a clear first and second stage that feel very different. You have ways to negate damage dealt to you.
- Solo or multiplayer?: An even number of players will be best for this scenario, as many cards and effects will scale up past 3 players in the game. So, in order to get the best chance against the number of enemies you will be facing, either play this with two players or four. Four players will struggle against the many more Weather treacheries, though, so make sure you have scrying, cancelation, and ways to reduce the number of encounter cards and prevent being location-locked.
- What to look out for: Losing Captive Villagers is an instant loss; enemies will be infrequent at the beginning but can pop out of the deck without warning, sometimes being boosted by side-quests or locations. Difficult locations will hinder your progress. Weather treacheries deal direct damage to your characters. Punishments for having damaged characters.
New Rules

The only new rule added to the Nightmare version of this quest occurs at the end of the game, really. The players are not able to win if there is a Captive Villager being guarded by an encounter card. The players will need to have rescued all villagers in play in order to win. It can happen that no villagers are in play at the end of the round, in which case, game resolution happens as normal. This means that Amon Forn has to be cleared, and the players must still have tokens left on Savage Counter-attack. Captured Villagers must also not have left play due to taking too much damage, as that will cost you the game as well. Beyond those rules related to the new objective card, the rest of the game plays as normal.
New Setup
The additional Setup text instructs players to add all copies of Captive Villager (3 copies) and Rearguard Ambusher (3 copies) to the Orc deck. Make sure you remove the required cards from the Orc deck as well so that you have a higher chance of encountering the new cards. The rest of the setup is the same as normal. This will mean that all four copies of Orc Ambusher are shuffled into the regular encounter deck, taking the place of the Cornered Orc from the original version of this quest. Exposed Ridge is made the active location, and a copy of Weathered Hilltop is added to the staging area. The Objective card should be on the side of Hunting the Orcs, adding it to the staging area as well. The Amon Forn location and Orc Ambush side-quest are set aside, out of play. These will enter play when the players advance to stage 2.
Cards removed
The following cards were removed from the encounter deck and Orc deck to make room for the new Nightmare cards, or because they somehow benefitted the players:
- 3x Cornered Orc: Replaced by a much stronger enemy in the encounter deck.
- 2x Sheltered Valley: Beneficial location
- 1x Concealed Orc-camp: Beneficial location
- 2x Angmar Marauder: Easy enemy
- 2x Angmar Orc: Easy enemy
- 3x Ruins of Arnor: Easy location, though this does allow for treacheries to be canceled a little more easily
- 2x Tragic Discovery: Non-Weather treachery.
The Quest

While the initial setup of this quest makes it look like the regular version, it won’t be long until you stumble across the first new Nightmare cards. That is in large part to thank to the high amount of surge in the encounter deck courtesy of stage 1B’s added surge to the first Weather treachery revealed each round. The added surge and possible protection by Weather-torn Valley make the Weather treacheries the worst thing about this quest early on. You will be forced to take damage and remove characters from the quest, which can greatly hinder your progress. While you can, try to heal any damage on your characters, as this will also matter for combat later on.
Stage 1 gives you very little time to set up, as you might get distracted by side-quests that require your attention. Find Shelter has to be cleared within 4 turns since you otherwise have to deal a lot of damage to a single hero, potentially losing them. Make Camp should also be cleared as fast as possible, as you will need to be healing your characters from all the different Weather effects. Search the Ruins is less pressing, but the constant threat increase can make the final part of the quest quite difficult, as all enemies will engage at once. The new Track the Orcs side-quest is also a relatively low priority, though it depends on the situation and the number of enemies in the staging area. As stage 1 does not require any progress by itself, use this time to clear side-quests and locations in the staging area with Back-track or Explorer’s Almanac. You do want to keep traveling each turn, as clearing active locations will get you the enemies required for clearing stage 1.
Whenever a card is drawn from the Orc deck, try to prioritize killing that enemy. Killing enemies is how you get the resource tokens on the objective that you need to advance to stage 2. It also can serve to cancel Rain-washed Tracks, though you can also take the threat instead. The only enemies I wouldn’t kill immediately are those that are guarding a Villager objective, as I find that they can better be claimed at the end of stage 2, as they are less of a liability by then. Remember that losing any Villager is an automatic Game Over.
Once enough enemies have been killed, the objective flips over, and players advance to stage 2. This transition is also identical to the regular version of this quest, with Amon Forn and the Orc Ambush side-quest added to the staging area. Players can now find more enemies in the encounter deck and are punished for chumping by having to remove a resource each time a character is destroyed in an attack. Resources are also removed as an option to save you from having to reveal an additional encounter card each turn. This replaces the surge on Weather treacheries. Since characters also get -1 willpower when they are damaged, you will start to struggle here to overcome the threat in the staging area. You will need to prioritize the main quest here, clearing that will give you the best route to victory. Along the way, try and kill as many enemies as possible, and try to travel to Amon Forn if you are in a good position against the encounter deck. It can be worth taking a token off the objective for a turn and going to the location that same turn.
Once you have the 20 progress on the main quest, see if Amon Forn is still in play. If so, travel here and use the remaining progress to clear side-quests like Orc Ambush. At this point, you should also rescue any Captured Villagers, as none can be left guarded in order to win. Once you have 20 progress, have cleared Amon Forn, and control all Captured Villagers without any of them dying, you have won the game. It’s not an easy quest, as it flips between different things to focus on, but you have managed to get through it! Now the Undead await you at Fornost.
The Encounter Deck
Global
- The encounter deck starts with 33 cards, not including the Orc Deck or the locations that start in play.
- Shadow chances are average, at 51.5%. A lot of effects are triggered or boosted if the defending character is damaged already.
- Average threat is 1.36 threat/card. While this looks low, it gravitates towards 3 threat cards since all treacheries and side-quests are counted as having 0 threat. This can change, though, as Weathered Hilltop quickly increases in threat, and Rain-washed Tracks can be considered an 8-threat card as well. Otherwise, the highest threat on a single card is 5.
- Surge is rather common, thanks to the passive effect on stage 1 that makes the first Weather treachery surge each round. All treacheries have the Weather trait, so that puts your chances at 40% before counting the 3 side-quests that have the keyword as well. Add to this the additional Orc enemies you get when exploring the active location, and you’ll find that the encounter deck is outpacing you rather quickly in this quest.
- Doomed 2 appears on Freezing Blast, though there are various other ways that cause you to have to raise your threat. This ranges from Ancient Causeway to Search the Ruins, and can cause you to get a lot of threat over the course of the game.
- Immunity
- While Track the Orcs is in play, enemies cannot be optionally engaged.
- While Weather-torn Valley is the active location, Weather treacheries cannot be canceled.
- While Make Camp is in play, characters cannot be healed.
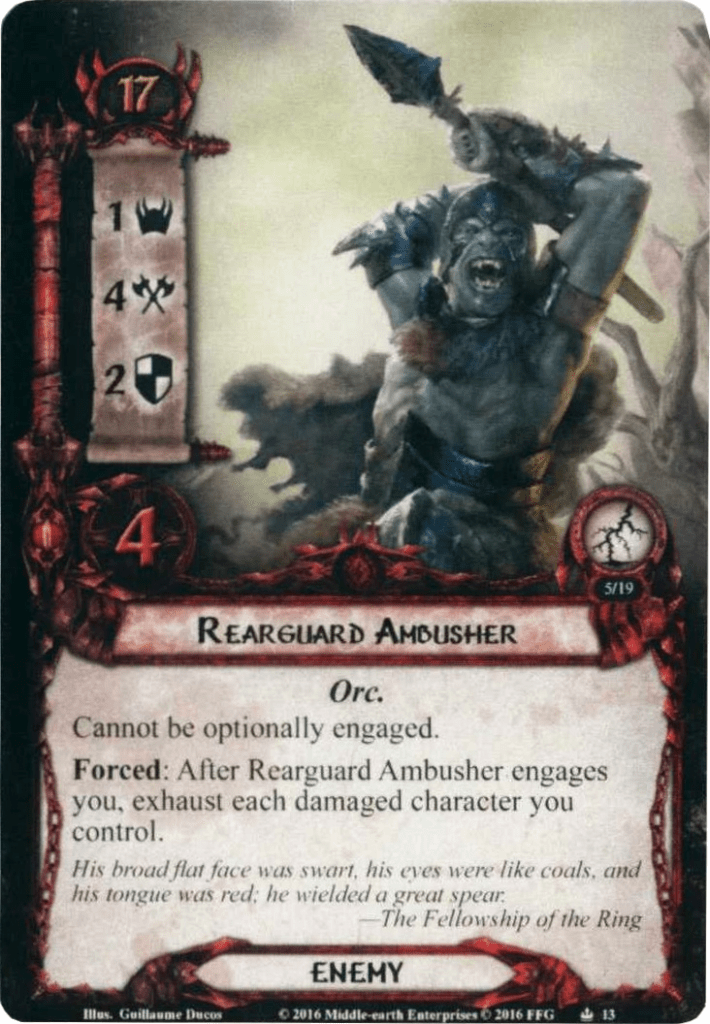
- Rearguard Ambusher cannot be optionally engaged.
- Amon Forn is immune to player card effects.
Obviously, the composition of the encounter deck will change after the players have moved on to stage 2. More enemies will be in the encounter deck, which can saturate it a bit if you have a lot of the locations already in play. Also note that the average threat on cards will also increase, as all enemies will get the threat boost from Orc Ambush when you transition. Since it is difficult to estimate which cards are in play when you transition, I cannot give an accurate encounter deck overview for this second phase.
Objectives

Captive Villager is a new objective ally that is made for just the Nightmare version of this quest. There are 3 copies, all of which will start in the Orc deck. This means that you can come across them whenever you clear a location, but don’t think that this is a free card. Whenever a Captive Villager enters play, the top card of the Orc deck is revealed and attached to Captive Villager, guarding the objective. During the second half of the game, the Orc deck is shuffled into the encounter deck, so the Forced effect on the Villager cannot occur. During stage 1 though, you will have to defeat the enemy guarding the card (or clear the location guarding the Villager) in order to set him free. Doing this allows the first player to gain control of the Villager as an ally. This ally will move with the first player token and comes with a negative passive ability. When making encounter checks, the player with the Captive Villagers is considered to have +5 threat per Captive Villager. This means you can get a max of +15 to your threat during engagement checks once all villagers have been rescued. Note that this does not cause you to threat out, even if you are considered to have a threat above your elimination level.
Aside from kicking and screaming so that each Orc in the area can hear you, the Captive Villager does little else. It has 1 point of defence and 2 hitpoints, meaning that it won’t die from the first weather treachery that you hit. But the defence is wasted on him since you are never going to defend with him. Losing any of the Captive Villagers will instantly lose you the game, plus the enemies in Nightmare mode hit like a truck. The Bree-trait also doesn’t help this ally unless you are investing in the Bree-trait from the AleP project. Even then, you are better off leaving an attack undefended than defending with this guy. The Captive Villager does work with cards that require you to exhaust a character, such as Hail of Stones. Spare Hood and Cloak also works, though you’d have to find a way to put it back on the Villager.
The best thing to do is to avoid these objectives if you can, as they cause more trouble than they are worth. Note that you do have to rescue any that are in play if you want to win this scenario. The best thing you can do is to keep them attached to an enemy and only rescue them when the end of the game is near at hand. That reduces the chance of losing them by a treachery.
Enemies
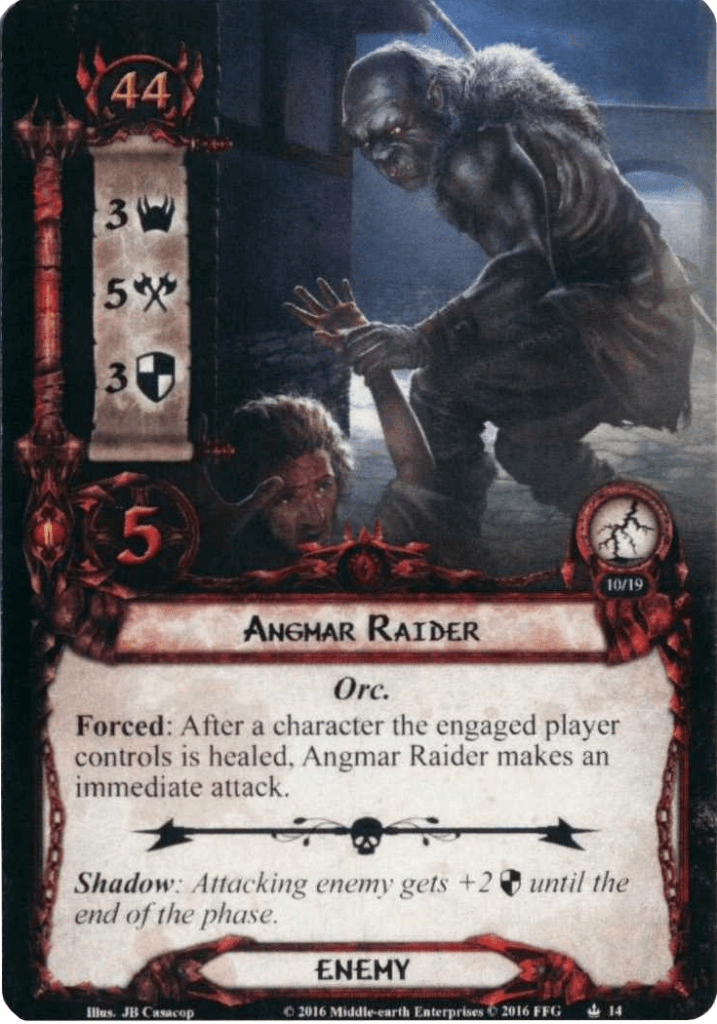
The Orcs you face are mostly kept in the Orc deck, like the regular version of this quest. But the Cornered Orcs from the original have now been replaced by the Angmar Raiders, which are a lot stronger. Get ready for some serious combat during the second half of this quest.
- Angmar Raider: This surprisingly strong enemy can pop up out of the encounter deck when you least expect it, adding 3 threat to the total in the staging area. At 44 threat, you can ignore this enemy for a while, during which you can handle any enemies that come out of the Orc deck whenever you clear the active location. While in the staging area, the Raider does nothing, though I would advise engaging this enemy at some point during stage 1. If you don’t, the Orc Ambush treachery will make this enemy into an even more nasty one that will be more difficult to kill. Once you do engage the Raider, make sure that you aren’t at a Ruined Watch-tower, as that would give him 6 defence, on top of which you could have buffs like the Raider’s shadow effect if you hit a copy as its shadow card. 5 attack is difficult to deal with, and with plenty of attack buffs as shadow effects, I would advise defending this with a hero. Preferably an undamaged hero, as that triggers a lot of shadow effects. Killing the Raider quickly is essential, as it will otherwise continue to make attacks every time a character from the engaged player is healed. While Make Camp is in play, you can ignore the textbox of this enemy and give him lower priority, but remember that clearing that side quest will force an additional attack. Invest in some good attackers to take care of this one; you’ll need 8 attack in total. It’s one of the toughest enemies in the encounter deck, so feel free to use any abilities or events that you have for this guy!
- Rearguard Ambusher: This enemy is a bit easier than the Raider but can hurt in different ways, mainly action advantage. This enemy starts out in the Orc deck and cannot be optionally engaged. Even with Track the Orcs in play, this is an enemy you will likely be engaging early, though, thanks to its 17 engagement cost. Since you cannot determine which player is going to be engaging this enemy, it might require some tactical engagements on other players to make sure this guy engages a deck that can deal with it. The real problems start when this enemy engages you. You have to exhaust all damaged characters you have, costing you a lot of action advantage. If you’ve been hit by Ice Storm this turn, though, you might not have any damaged characters left ready. You can also heal up before engaging this enemy, as long as Make Camp is not in play and you have no Angmar Raiders engaged, as they would make an immediate attack. The Ambusher is also a good target for Revealed in Wrath, which would allow any player to engage him optionally without having to exhaust any characters. Once engaged, the Ambusher is not that tough for a Nightmare enemy. 4 attack can be bothersome, especially when boosted by side-quests and shadow effects, but you should be ready for such an attack going into this mode. 2 defence and 4 hitpoints is nothing special. A well-timed Gandalf can take care of this enemy if you want to. You can also keep this enemy around for a while if you want, as it is worse to have in the staging area than engaged with you. If you have traps, you can keep this enemy around for a while.
Locations
The Weather Hills make for quite a unique setting for this quest. On the one hand, you have the valleys and hills between Arthedain and Rhudaur. On the other hand, you battle through the various forts that top this natural barrier.
- Weather-torn Valley: At 5 threat, this location is certainly the meaner one out of the two new locations introduced in this Nightmare mode. The Valley will hinder a lot of progress at once, and you could even get unlucky and reveal both copies during the same quest phase, adding 10 threat to the total in the staging area. While the location is in the staging area, no progress can be placed on it, so you will have to travel here or use cards like Bilbo’s Plan or Heirs of Earendil to clear the location. But chances are that you’ll end up making this the active location soon after it is revealed, as it will likely remove the most threat out of the staging area at once unless you have been unfortunate with a Weathered Hilltop during the game. While active, the Valley isn’t much better, as it will protect all Weather cards from being cancelled by the players. This is bad, as you will be left to the elements and might either take a lot of damage or have to raise your threat by a ton during the next quest phase if you cannot clear the location fast enough. My advice would be to clear this location during the combat phase so that you won’t have to enter the quest phase without protection. If you do not have any treachery cancellation in your deck, then you can mostly ignore this location while it is active, though I admire your bravery in entering this quest without a Test of Will.
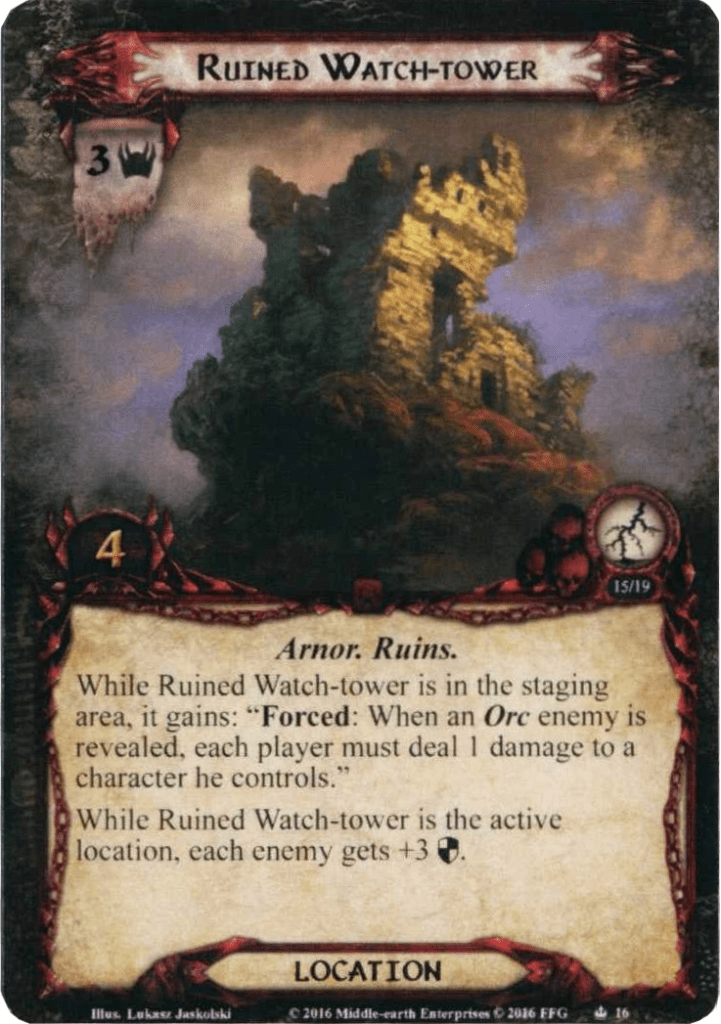
- Ruined Watch-tower: This is a really interesting design on a location, as the Watch-tower is a sort of fortification for the Orcs to hang out in and harass the players from. While it is in the staging area, it will contribute only 3 threat but adds a passive effect that players must deal 1 damage to a character whenever an enemy is revealed (either from the main deck or the Orc deck). This single point of damage can easily be cancelled with Mithril Shirt, Weather-stained Cloak, or Honour Guard, but it adds more damage to your board, setting you up for worse Weather treacheries. It might be worth traveling to in order to get rid of this passive (especially when several copies are in play), though it does come with a different passive effect. While the Ruined Watch-tower is the active location, each enemy gains +3 defence, making them very hard to kill. This boost can even stack with the defence boost of Orc Ambush, making a nearly unkillable set of Orcs. Defence reduction can help, but even an attacker with two Rivendell Blades might not bring the defence down to 0. But when enemies have high defence, there is a rather easy solution: direct damage. Invest in ways to deal damage to enemies even if you cannot get past their defence. Dwarrowdelf Axe, Bow of Yew, or defending with a Spear of the Citadel will eventually wear down the enemies. Your other attackers can then try and make a single big attack to bring down any enemies that remain. The other option is to clear the Ruined Watch-tower in the combat phase, which will take some effort by cards like Legolas. Remember that clearing the location during stage 1 will also get you another enemy, though they are without the +3 defence at least.
Treacheries
There are plenty of treacheries in the game already, so the Nightmare version just adds one more. It is a tough one, though, having the Weather trait and causing massive delays if you are not prepared for it.
- Rain-washed Tracks: How about one more Weather treachery in the encounter deck? It is a simple treachery that doesn’t damage your characters but will instead delay you or get you closer to your loss-condition of having no resources on the Mission objective once it has been flipped. When the treachery is revealed, the players are given a choice. Either they must remove a resource token from the Mission objective, or the treachery will contribute 8 threat to the total in the staging area. Adding 8 threat will greatly hinder the amount of progress you are going to make, but it might just be worth stalling for a turn or taking it as threat if you lose the quest phase due to this treachery. Losing resources on the Mission objective should be avoided as much as possible. During the first stage, this would delay you flipping the Mission and advancing to the next stage. At the second stage, the punishment is a lot harsher, as you will get closer to having no more resources on the objective, which will cost you the game. The option of getting 8 threat will always be the better call if you don’t threat out because of it. Sadly, you cannot cancel this threat with Radagast’s Cunning/Secret Paths, but with enough willpower and perhaps some threat cancelation on other cards, you might even still quest successfully. Towards the end of the game, it might be worth sacrificing a resource in order to make more progress but only do this if you have enough to spare. Canceling this treachery is, of course, also possible, but not if Weather-torn Valley prevents this.

Side-quests
There is one more side-quest added to the encounter deck. This brings the total to 5, which will mean that you have plenty of distractions along your path through the hills. At least the side-quests stay in the victory display upon completion.
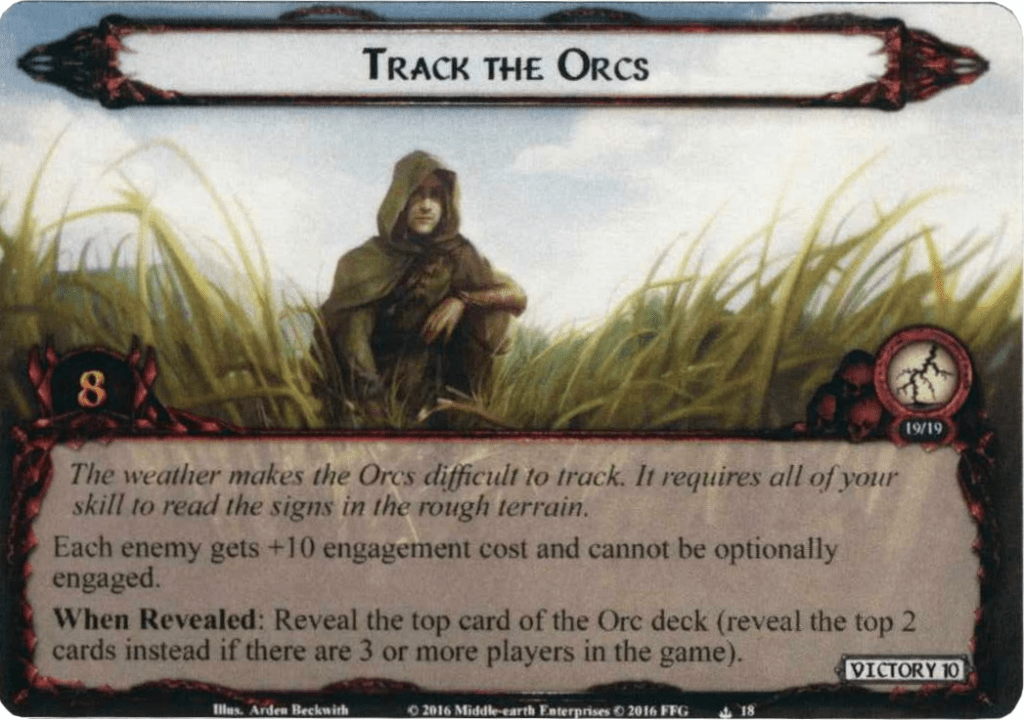
- Track the Orcs: The new side-quest will prevent players from engaging enemies as fast as they would like and will slow down the players a lot during the first stage. When the card is revealed, the players have to reveal the top card of the Orc deck or the top 2 if there are 3 or more players. So the side-quest doesn’t literally surge, but it does give you 1 or 2 additional cards. This will usually be enemies, though you can also get a Captive Villager or a Concealed Orc-Camp with it. The side-quest will boost any revealed enemies with +10 engagement cost and give them immunity to optional engagements. This will keep a lot more enemies in the staging area, and you will either need a high threat or play a Dunedain deck to engage any new enemies. This can also be useful for decks that attack into the staging area with cards like Great Yew Bow, Dunhere, or Haldir. Dunedain and Ranger decks can still engage enemies with cards like Lore ally Faramir, Son of Arnor, ally Mablung, etc. Note that the optional engagements only affect the check in the engagement phase. This will also mean that enemies will engage players based on their threat, and a combat deck will be unable to prevent enemies from engaging other players. So you might want to clear this side-quest soon. This is easy to do during the first phase of the quest, where you do not need any progress on the main quest. Other side-quests might be worth prioritizing, though, as they harm you more actively. If Track the Orcs is the only side-quest in play, then it is an obvious destination. There is no penalty for selecting this as the active quest, though there is also no reward for clearing it, except for being able to engage enemies optionally again. 8 progress can be a lot to ask of the players in the early game, especially if you also have a big active location to clear. So perhaps you’ll need a few turns to clear this, during which time you will have to accept that enemies can pile up in the staging area. Be ready for combat once you clear this side-quest, though, as enemies lose their engagement cost bonus and can suddenly force an engagement.
Tips and Tricks
- You are going to need healing for this quest, as it will punish you for having damaged characters. Having an Elrond on the table will help with the healing, though you will also need to have allies like Warden of Healing, Imladris Caregiver, and Ioreth out early.
- Since damage is dealt so frequently, Cold from Angmar might end up blanking most textboxes. You can lean into this with heroes like Saruman and Beorn. These usually have passive restrictions in their textboxes (cannot be healed, cannot have attachments, threat cannot be reduced by more than one per turn, etc.). If Cold from Angmar ends up on the main quest, you can largely ignore these passives while they have damage on them. While you can also use this for Eagles getting Restricted attachments, remember that these attachments will fall off if they are ever healed to full health or the players clear Cold from Angmar (or the attached quest).
- Treachery cancelation will be important during the game in order to cancel at least some of the Weather treacheries. You can only do this while Weather-torn Valley is not the active location, but it will still help to ignore some of the damage or other horrible effect it would inflict. Remember the surge during stage 1 though!
- In higher player counts, the location lock can set in really early, thanks to most of the encounter deck consisting of locations. Have a way to clear locations early on or to clear several per round. Remember that you only reveal cards from the Orc Deck when clearing the active location. Explorer’s Almanac can be really useful to send over excess progress that would otherwise go to waste on the main quest.
- Side-quests should really be explored during stage 1 since the main quest requires no progress, and you’ll be on a timer during the second half of this quest. The more side-quests you clear, the less distracted you’ll be during stage 2, with the exception of Orc Ambush entering play as soon as you advance.
- Bring enough hitpoints to the table. Not just on your heroes, but allies should also have at least 2 hitpoints, and ideally 3+. This helps to spread the damage a little bit, preventing an early hero death.
- Be ready for combat once you know you will transition to stage 2. You can time this yourself but know that you will get Orc Ambush into play once you progress. Stall a bit if needed, and clear locations and side-quests from the staging area so that you can make enough progress to get through stage 2 as fast as possible.
Playthroughs
While not that popular, this quest is used in some instances to test decks against tricky scenarios. There are some long playthroughs to be found here, giving you a detailed analysis of this quest in video format.
- True solo, Restricted Progression: https://www.youtube.com/watch?v=MRbBV2nHZEE
- Two Players: https://www.youtube.com/watch?v=npyK3djn7tQ
- True Solo, Outlands deck: https://www.youtube.com/watch?v=7YIxheH11Ew
With the worst of the weather behind us, we conclude the Lost Realm NM pack with Deadmen’s Dike in the next scenario analysis. From there, we will jump around a bit, covering NM scenarios from the Angmar Awakened cycle that have not been discussed before. I will try to at least release one article on this every month, though I hope you understand that NM Carn Dum might take a while to complete. Hopefully, this will conclude the NM cycle by the end of the year. Between NM articles, I also hope to bring more articles on other topics, so if you have suggestions, let me know.

