Among all the battles that took place at the end of the War of the Ring, I feel this one has flown under the radar a bit. The battle at Erebor between the armies of Dale and the remnants of Durin’s Folk against Sauron’s eastern armies was hard fought, and victory came only at the destruction of the Ring. If this battle had ended sooner, Rhovanion would have been ravaged, and many kingdoms would have been lost at the victory of the Free Peoples.
Though FFG has given us the climactic battles at Pelennor Fields and The Black Gate in the Sagas and Lorien’s assault on Dol Guldur in the PODs, there were still gaps in the game that the books covered. The A Long-extended Party (AleP) project has worked hard to cover these gaps, releasing a special Scouring of the Shire quest to play after the main Saga and now bringing us the battle at Erebor. This is not the first time that the battle has been covered in the game, as a version of this quest had existed well before AleP was even a thing. Seastan, the lead on AleP, had designed a version of the quest a couple of years before. Now, with the help of the AleP team, a more fleshed-out version of that quest has been released as a stand-alone scenario. Many of the design elements remain, such as enemies moving between stages defended by the players. But with new cards introduced and better balancing, the quest has reached its final state!
The Siege of Erebor
- Found in: The Siege of Erebor Standalone scenario by AleP. Released during Con of the Rings 2023
- Difficulty: None, this is a fan-made POD quest. But I’d give it an 8/10. It is not impossible to beat if you keep the easternmost quest cards in play for a while, but it certainly can be difficult with the wrong encounter cards appearing quickly.
- Encounter Sets: The Siege of Erebor
- Quest cards: 5, with 1 card of setup, and 4 quest stages being in play at the same time.
- Play if: You are running a campaign and want to feature all the battles that took place in the War of the Ring. You are looking for a challenging quest with really cool mechanics. You want some revenge on Easterlings for the Vengeance of Mordor cycle.
- What is different about this quest: You defend one quest card from being destroyed by placing layers of defences around it. You have to last 8 rounds, like you would in Helm’s Deep. Players split up at different stages, making it feel like 4 solo playthroughs happening at the same time.
- Solo or multiplayer?: Since players get to decide where they want to go at the beginning of the round, it can make for some really cool conversations. Being a POD quest, this is obviously meant to be played with more players to manage all the quest stages. I would advise a 4 player game, though, in lower player counts, you do get some compensation for the difficulty with some helpful objective cards.
- Can I run side-quests for this scenario?: You could, considering that the quest’s mechanics allow for it. There are some stages where this works pretty well, such as at Erebor. Once you’ve claimed the gate, you don’t need any more progress at that stage, so it might as well go to a side-quest at that stage. The Eastern Defences can also be a good stage for side-quests, though it will be difficult to make enough progress there since the bulk of the threat revealed each turn arrives at that stage. Combat-focused side-quests can be really effective in this quest.
- Can I run Guarded (X) cards for this scenario?: You could, but considering you are revealing one more card than there are players each turn, you will likely end up being outpaced by the encounter deck. No point in aiding the deck in that by adding an additional encounter card. You might also not like where the Guarded attachment ends up, as the card you reveal might end up at a different stage than you’d like.
- What to look out for: Overwhelmed by enemies at stage 2, stages getting damaged each turn, location lock at stage 3, once one stage falls, the others might follow soon after, big siege engine enemies continuously damaging stages. Losing stage 5 is an automatic loss.
The Quest
Setup / Quest card 1B: The Siege of Erebor – No quest points
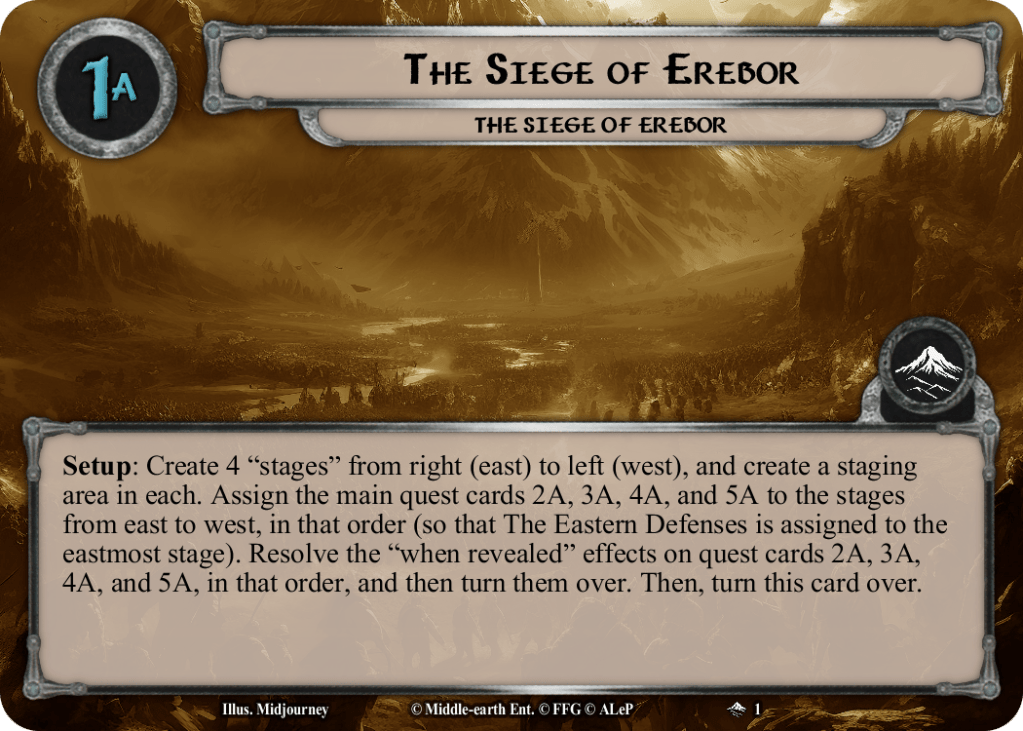
It may go unnoticed since this stage leaves play relatively early, but the artwork on this quest card is actually really cool. The slow march of hordes of Easterlings on the Lonely Mountain gives a real feeling of dread that the defenders cannot win this fight. It sets the scene for a desperate defence until the Ring is destroyed.
To setup the game, you add all four other quest cards to the staging area and lay them out in a line. Erebor should be at the left (west) side, and the stage numbers should decrease the further you move right (east) until The Eastern Defenses. These symbolize the layers of defence and the different settings for your defence against the Easterling armies. Once a stage falls, it is deleted from this line, and you lose that staging area. Make sure each stage has enough room on the table for its own staging area, as you’ll start with four staging areas.
When you have laid out the stages, resolve each of their When Revealed effects in order from stag 2A to 5A. This will do the following:
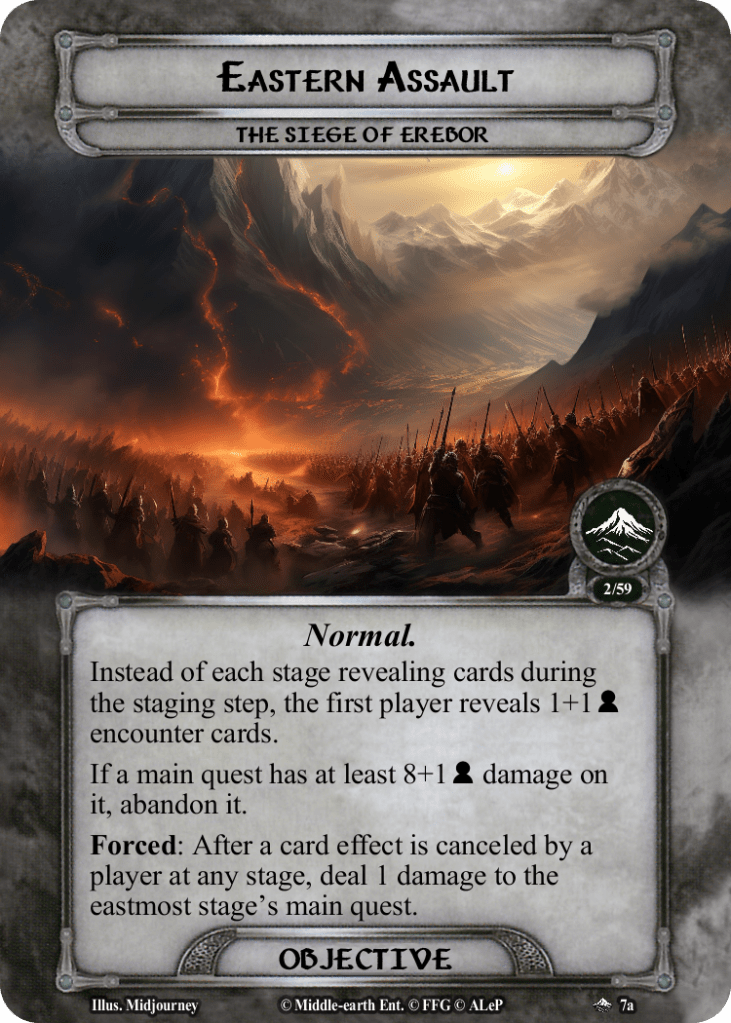
- 2A: Put the two objectives (Hold the North and Eastern Assault) to the side of the game. These will act as your rules card, difficulty tracker, and timer for the game. They are not in any staging area, but it will be important to keep them around. Set Eastern Assault to either Normal or Easy mode, depending on what mode you want to do. The main difference is the number of hitpoints on the stages and a clause where cancelling a card effect will deal damage to the easternmost stage in Normal mode. No cards are added to 2A’s staging area.
- 3A: Find one copy of the Desolation of Smaug location and make it the active location. This will accelerate the damage at stage 3A and put a buffer between players at this stage and healing damage for the stage’s effect. No cards are added to 3A’s staging area.
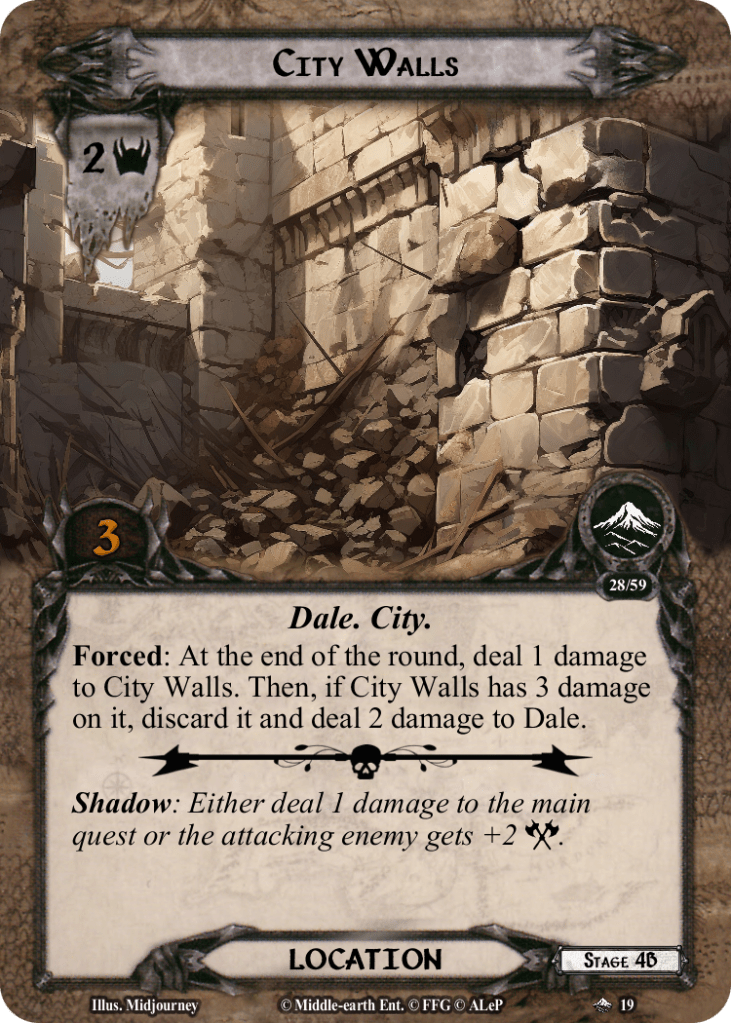
- 4A: If there is one player in the game, you may find a copy of Iron Hills Reinforcements and add them to the staging area. They will help you to save the backline of the defence while you, the player, are fighting on the frontline. If there are 4 players in the game, a copy of City Wall is added to the staging area instead. For 2 or 3 players, nothing happens for this stage’s When Revealed effect.
- 5A: Set the Gate of Erebor objective aside. I prefer to place it underneath the quest card to keep it close by. If there are 1 or 2 players for this game, a copy of Iron Hills Reinforcements is added to Erebor as well to help defend the mountain. Any leftover copies of Iron Hills Reinforcements (1 copy in a 2-player game, 2 copies in a 3-4 player game) are removed from the game. You won’t need these for the playthrough, so just put them back in the deckbox or something. You may also now shuffle the encounter deck.

Once you have done all that, go back to stage 1A. This stage may now be flipped over to stage 1B, which will inform you to reveal one card from the encounter deck per player. This is where you will start to see which stage might need the most attention at the start of the game. Reveal more enemies, and you might want to send additional players to stage 2. Reveal a ton of locations; you might want more people to help relieve the location lock at stage 3. There are also treacheries and enemies that will advance quickly through the stages, so you might end up splitting your entire party around the four stages based on this setup alone. Once one card per player has been revealed, you may remove this quest card from the game. You may now begin the first round of the game!
Mechanics
I don’t often have a separate segment for this, but the setup and layout of this quest deserve some explanation. Before you begin, I would highly advise you to read through all the rules cards that came included with the printed deck. If you are playing this scenario digitally, the rules are off to the side of the table; make sure you read the front and back. These fan-made quests can get quite difficult with their mechanics, and since I could not find any playthrough videos on this quest, you’ll have to either play with someone who has played this quest before or keep the rules nearby.
Different stages
To start with, this is not your typical quest where all players battle at the same stage against the encounter deck. All four stages are in play at the same time and will receive encounter cards during the staging step. Each location and enemy has a small box in the lower right corner that denotes to which stage it goes. When the players are in the quest phase, the cards will be sent to their corresponding staging area, regardless of where the players are. The treacheries are an exception to this rule and will usually target all players or just the easternmost stage at the time.
This brings me to player positions. At the start of the round, each player chooses a quest card still in play. They will be at that stage for this round to help waylay the enemies or clear the locations. Each player may choose for themselves where they want to go, but planning this with your group is one of the highlights of this quest. Players may select similar stages and will only have to deal with the staging area of that stage. Any enemies that are still engaged with a player move with them to that stage. This allows you to pull a Besieger enemy down to you on one turn and then travel with them to another stage further east during the next turn. Being able to push enemies back into the staging area allows you to reset some enemies all the way back at The Eastern Defenses if they were just at Erebor in the previous turn.
The important part to note with these different stages is that there is very little to no interaction possible between the players at different stages. You cannot select a hero at Erebor to get your Arwen‘s +1 defence and Sentinel boost if you are at the Riverlands, for example. Ranged and Sentinel also don’t work unless players are at the same stage. This means that players have to be able to rely on their own deck to do most of the heavy lifting and not so much on cross-deck interactions unless they are at the same stage as other players. While this does isolate the players a bit, it makes a lot of sense thematically and makes the quest stand out a little more. Think of these different stages as if it was the opening of Escape from Mount Gram or Stage 4 of Foundations of Stone. This time, however, you can move to your allies at the start of each new round as long as you communicate with each other.
The different stages also mess with your interactions with encounter cards. You cannot target enemies at a stage other than yours, and you cannot place progress or travel to locations at other stages. This is offset by the fact that you do not calculate threat of the staging areas where there were no players that round. It does hinder your deckbuilding options a bit, so you should really take this into account when you are preparing a deck and when you draw certain cards. Perhaps getting Asfaloth after a few turns means that you can take over from another player at the Riverlands while they deal with cards at Dale or Erebor. It makes for a very fun, dynamic quest, but it can seem a bit weird if you are playing for the first time.
Losing stages
I’ve mentioned it a few times before, but you are dealing with a losing battle here. You have four stages to defend, yet you are certainly going to be losing a few during your games. This happens when a stage reaches the number of damage tokens equal to the amount set on Eastern Assault. This is 8+1 points per player in Normal mode or 10+1 per player in Easy mode. You are very likely to lose some stages due to the fact that you have to endure 8 rounds, and just Hold the North alone will deal 2 points of damage to the easternmost quest stage at the end of each round. Add to that all the encounter card effects, and you’ll be dealing more damage than you can heal with some of the beneficial effects.
So, what happens when a stage reaches that threshold of damage? AleP has provided a list of things that happen in order, so I will just duplicate that here and add a bit of commentary to it:
- From lowest to highest engagement cost, each enemy in the staging area of the abandoned quest stage moves west. This is done in order so that some enemies like Rhun Vanguard have a chance of moving an additional stage to the west.
- Discard each location at the abandoned quest’s stage from play. Then, raise the threat of each player in the game by the number of locations discarded. Note that the locations are set aside, out of play, and don’t go into the discard pile. The threat increase also targets each player, not just those at the abandoned quest. While this won’t be too bad for stage 2, you can end up having to raise your threat a lot if you lose stage 3 and have a location lock going on up there.
- Each player at the abandoned quest’s stage immediately changes their stage to the nearest stage to the west. Enemies engaged with a player remain engaged with that player. If it is the quest phase, committed characters become committed to the main quest at the new stage (or to a side quest if that was the active quest selected at this new stage). This simply means that you cannot escape the enemies engaged with you, but do support your allies at the new stage by adding to the quest. This will likely make the quest phase a bit easier, though this new stage is likely the easternmost stage now and will get more encounter cards dealt to it.
- Remove any other cards at the abandoned quest’s stage (such as objectives and side quests) from the game. The abandoned quest stage has now left play. More of a cleanup step here, making sure that all objectives and other cards are gone. This does mean that if you have left an Iron Hills Battalion at the abandoned stage, they are put out of play. Keep this in mind and make sure they are set a bit further back if you have any of those objectives.
- Add the abandoned quest to the victory display and trigger the Forced effect on it. I will cover those Forced effects in the segment on the individual quests but know that they aren’t good effects to have to trigger.
- Play resumes.
Important to note here is that once a quest card has left play, certain encounter cards won’t have a destination anymore. If, for instance, Eastern Defenses falls, but you reveal an Easterling Supply Camp in the following turn, it has nowhere to go. In this case, you discard the card (to the discard pile, not out of play) and deal 2 damage to the easternmost quest card in play. This can be a contributing factor to the decision to accept location locks, as you will at least have those locations out of the encounter deck once the stage is abandoned. It’s better than clearing them and having to deal damage later on in the game. But this only becomes a problem after the players have to fall back to Dale.
As I said, please consult your rules cards that came with your copy of the Siege of Erebor in case things aren’t clear to you. It can be a complicated quest to have to learn, but you’ll know how to set things up after a game or two. With that said, let’s dive into the four quest stages that you have to defend!
Quest card 2: The Eastern Defenses – No quest points

The easternmost stage will be where your focus should lie in the early game. Hanging on to this stage will prevent enemies from cascading down towards Erebor. Based on my experience, once The Eastern Defenses fall, the Riverlands will follow soon after. Really invest in keeping this stage clear by always having one player at this stage, preferably two at a high player count, or if the backline is pretty cleaned up.
This stage has the honor of starting as the easternmost stage, which is where most of the enemies will pop up. There are a few that will skip this stage, but most enemies will pass through this stage on their way towards Erebor. Because of that, the combat-heavy decks should gather here, lest any enemies might advance further.

In the early game, this stage will be the focus of your efforts. There should always be at least one player here, preferably two. Not only to deal with all the enemies but also because the staging area here will have quite a lot of threat that needs to be compensated. You really want to quest successfully here so as to not get a super high threat early on. You are helped a bit by the lack of locations at this stage, though the Easterling Supply Camps are worth travelling to and exploring as fast as possible. Not just to get their threat out of the staging area and to negate their damaging Forced effect but also because exploring the location will allow you to heal the stage by quite a lot. Questing successfully at this stage also benefits each player at The Eastern Defenses by allowing them to draw one card from their deck. It’s not much, but combat-heavy decks can use the additional card draw!
This stage will likely fall within 4-5 turns, especially if the Riverlands is struggling to heal this stage. Hold the North will constantly damage the easternmost stage, and treacheries will specify that damage likely has to be dealt to the easternmost stage as well. However, if you manage to clear locations effectively here, and Ravenhill+Riverlands heals this stage, you could survive for a bit longer than usual. It is inevitable that you lose this stage, though, as I haven’t heard of any players lasting 8 rounds and then killing enough enemies to win the game. So once this stage is abandoned, the players should ensure as many copies of the Supply Camp are put out of play. After the stage has been added to the victory display, 2 encounter cards must be revealed. The severity of this punishment depends a bit on the number of players in the game. It is a full round of staging for a solo player, but just an encounter card per 2 players in a 4-player game. Still, combine this with the enemies arriving one stage further west (likely, the Riverlands), and you will still struggle to not let the enemies advance further.
Quest card 3: The Riverlands – No quest points

The encounter deck features quite a few locations of the surroundings of Erebor. Most of those locations will accumulate in this staging area, hindering players from making much progress here. You do want to have progress at this stage, though, and not ignore the location lock since making progress on this stage will allow you to heal any stage of a point of damage. Clearing some of the locations will also add benefits across the table.
Because of the lack of enemies at this stage early on, willpower-focused decks should be at this stage to clear locations and make enough progress to spill over to the quest card. Location control decks should definitely make this stage a priority. Other stages will have their locations, but none as many as the Riverlands. This is another stage where there should really always be at least one player. Not just to handle the locations and make sure you can travel each turn but also for the benefit that this stage provides when they quest successfully at this stage. This allows the players to choose one stage and heal a point of damage from it. This might not seem like much, but healing 8 damage off of stages over the course of a game is pretty significant. Another reason why there should always be a player at this stage is that any enemies that spill over from the Eastern Defences can be mopped up here before they advance to the more critical stages. Rhun Vanguard and Wainriders are enemies that often show up at this stage, even if stage 2 is still in play.

In the early game, your main goal should be to clear the Desolation of Smaug that is in the active location slot. With a bit of luck, there should be no other location added to the staging area during the first turn, which would allow you to clear the active location quickly and then have a more relaxed time travelling in subsequent rounds and dealing with enemies that are coming down from The Eastern Defenses. Questing successfully each round should be the priority, and you could even start investing in location control a bit.
In the mid-game, there is a fair chance that The Eastern Defenses will fall. That makes this the new frontline. Aside from nearly all locations, you will now also have all enemies arriving at this stage. It makes it really difficult to hang on to the Riverlands for very long. At least 2 players should be at this stage, perhaps even 3 players. It is also in this situation where you should explore Esgaroth if you managed to get it in the staging area. Clearing Esgaroth from the active location slot will prevent any damage from being dealt to the Riverlands for a turn. It buys valuable time towards the 8-round counter from Hold the North.
It is quite common that the players are unable to stop the tide from flowing further west than the Riverlands. In about 2-3 turns after the Eastern Defences fall, the Riverlands are likely to fall as well. If they do, make sure as many locations as possible leave play so that they won’t be revealed later, dealing damage to Dale and Erebor. The players now move to more defensive positions in the cities, but not before triggering the Forced effect on the Riverlands. This requires each player to discard the ally they control with the highest printed cost. If you see this stage falling this turn, you can anticipate it by playing Sneak Attack with a high-cost ally so that you don’t use anything worth keeping. Alternatively, decks like Gondor and Beornings aren’t too bothered by this since they have high-cost allies they can easily miss or bring back to play (Citadel Custodian, Beorn). Still, losing an expensive ally can be difficult to deal with, especially if you are not doing too well so far.
Quest card 4: Dale – No quest points

Dale is often the most forgotten stage in the early game, as there is not much to do here. There are a few locations that accumulate in its staging area, and the timer on the City Walls will mean that you do have to go here eventually. Enemies that outflank you will also often appear at this stage, where you have the best chance of stopping them.
This stage is a Battle-quest stage, meaning that players will quest with their attack strength over their willpower. To boost this, the quest card will grant an additional point of attack to each character during the quest phase. You can use this for questing, but you can also make good use of this with characters that attack in the quest phase. Leadership Eomer and anyone with Hands Upon the Bow will be very happy with the additional attack buff if it means clearing an enemy in the staging area here.
In the early game, there is little reason to go to Dale. You could go here to clear some City Walls, but you will have a bigger impact further to the East of the battlefield. There are also not any permanent buffs like there are for Erebor, though you could try and clear some City Gates if you want to keep this stage as healthy as possible in anticipation of the hordes of Easterlings. Questing successfully will also indirectly help other players, as you get to trigger the stage’s Response. This gives you the choice to either deal 4 damage to an enemy at this stage or to deal 2 damage to any enemy at any other stage. 4 direct damage is huge and allows you to help with combat a bit, even if you just got to this stage to get rid of some locations. The 2 damage to an enemy at any stage is less impactful, though you get to trigger this before enemy attacks. So you can land the final blow on an enemy engaged with a player before they would attack. This might allow a player to take on another enemy from their staging area.
The mid-game will see players appear at Dale a little more often since there are fewer stages to choose from. At this stage, you will want to keep a player in reserve to handle any enemies that pass the Riverlands. Here, you get to do some real damage to them whenever you quest successfully, but the Battle-questing might come back to bite you since you might not have enough attack left after the quest phase in order to actually kill enemies. Readying effects on your attackers will be useful here!

Once the Riverlands fall, most of the gameplay will take place in Dale, where most players will deal with the enemies that now come down to this stage as it is the easternmost. While you are decently equipped to handle the enemies now, the stage will likely fall to encounter cards belonging to stages 2 and 3 that are still in the deck. They will deal 2 damage to Dale and combine this with Hold the North, treacheries, and any enemies that deal damage to the stage, and you might be overwhelmed. It can take long enough that the players have survived the 8 rounds, though, at which point they would only need to kill all but 1 enemy in order to win.
If the players can’t kill enemies fast enough, though, they will have to deal with the consequences of abandoning this stage. They are severe, as each player must choose and discard 1 hero they control. Until the end of the game, heroes can no longer be healed or leave a player’s discard pile. The no-reviving part is fine, but the fact that heroes can no longer be healed is pretty bad. It means that players will have to use the second effect on Gate of Erebor with the knowledge that they cannot heal the damage off of a hero. Heal your heroes as best as possible before losing this stage since it will be the last time you can do that. As for which heroes to discard, willpower is a pretty useless stat at this point. Erebor is a Siege-quest, and you will need combat characters to hold off the enemy. Discard your quester with the lowest defence, and let’s hope that their sacrifice wasn’t for nothing.
Quest card 5: Erebor – No quest points

The final refuge of your people is the stronghold of Thror, Erebor. This stage must not fall in your 8 rounds of gameplay, or else you lose. To aid in this, the locations that appear at this stage will be high-threat but beneficial once you clear them. You also get the Gate of Erebor upon your first round of making progress at this stage. This will damage enemies arriving at this stage, which will be a while (I hope). The only enemy that will go straight to Erebor is the Erebor Besieger, as well as any enemy that was revealed by Flanked! and you didn’t put in Dale.

As this is the last holdout during the quest, you will find that players must be Siege-questing in order to make progress. You now use defence instead of willpower during the quest phase. In order to help with this, the stage grants +1 defence to every character during the quest phase. This makes it so that even the wimpiest allies can help in the defence, and it allows you to save your defenders for combat.
In the early game, you can mostly ignore Erebor. Have it take a bit of damage from treacheries, but make sure you also heal that damage if you are able to. After a few turns, you will notice a couple of locations do start to accumulate in Erebor’s staging area. You can take two turns here to try and explore the locations and prepare Erebor for the final siege. Ravenhill can be used to heal all stages, which is quite useful, but the Armoury and the Treasure Hoard are what you are hoping to clear early on. Questing successfully at this stage will also get you the Gate of Erebor, which is a useful tool to deal with enemies arriving at this stage. Note that its responses can only trigger when there are players at Erebor.
In the mid-game, you will start losing the outer defences and will have to ensure that you protect the frontline. Erebor can be an afterthought unless you haven’t prepared it yet. If there are a lot of enemies getting past and ending up in Erebor’s staging area, it will be worth going here to kill those enemies before they deal enough damage to Erebor. If you get the Erebor Besieger, it might be a good idea to engage it and then, next turn, get as far away from Erebor as possible.

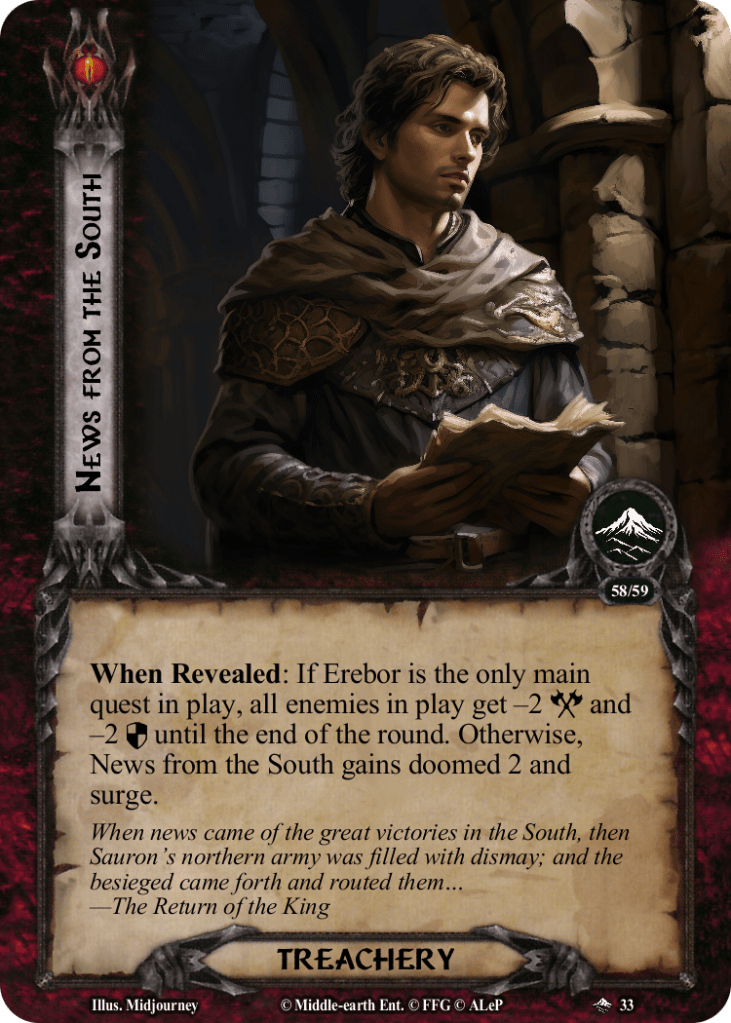
In the late game, Erebor might be all that is left if things haven’t been going so well. You might have a couple of turns where Erebor is the only stage left, at which point things are dire. However, if Erebor was properly prepared, enemies should enter play with damage on it; players can also take damage on their heroes to prevent damage dealt to Erebor, and with the Armoury explored, you might even find that the combat phase is a little easier. All you have to do here is survive. You are also aided in this by News from the South. This treachery has done nothing much for most of the game, but if Erebor is your final stage remaining, then enemies get -2 attack and defence when this treachery is revealed. It is a helpful boost to try and survive a bit longer.
The goal is to survive until the eighth resource token is placed on Hold the North. Then, players have to give it their all to kill all enemies in play until there are fewer enemies in play than in the remaining stages. If Erebor is the final stage, that means you have to kill them all. While this can take a few rounds, you might get lucky and not reveal many enemies in one round. Should all enemies be defeated and there are eight resource tokens on Hold the North, then the players win. If Erebor ever gets damage equal to the amount specified by Eastern Assault, then the stage is abandoned. With Erebor defeated, you cannot move any further west, and you lose the game.
The Encounter deck
Global

- There are a total of 54 encounter cards that can be in the deck at once.
- There is a 52% chance of getting a shadow effect. Most of these effects deal damage to a stage or mess with the enemy’s movement east or west.
- With a full encounter deck, there is a 33% chance of a card entering the easternmost stage. There is an additional 5% chance of the card going to Eastern Defenses, 15% chance for both the Riverlands and Dale, and a 7% chance of going to Erebor. The remaining 24% of cards are treacheries that don’t go to any stage.
- Average threat on cards revealed is relatively high at 2.17 threat/card. This is not distributed evenly, though, as later stages get the bulk of the high-threat locations.
- The only surge in the encounter deck is when News from the South hits when stages other than Erebor are in play. This will hopefully be the entire game, so count 2 cards as surging cards.
- Doomed 1 appears on Fight or Flight (2 cards), and Doomed 2 appears on News from the South if Erebor is not the only stage remaining. Aside from that, there are a few other threat-raising effects, so don’t get too comfortable with your threat.
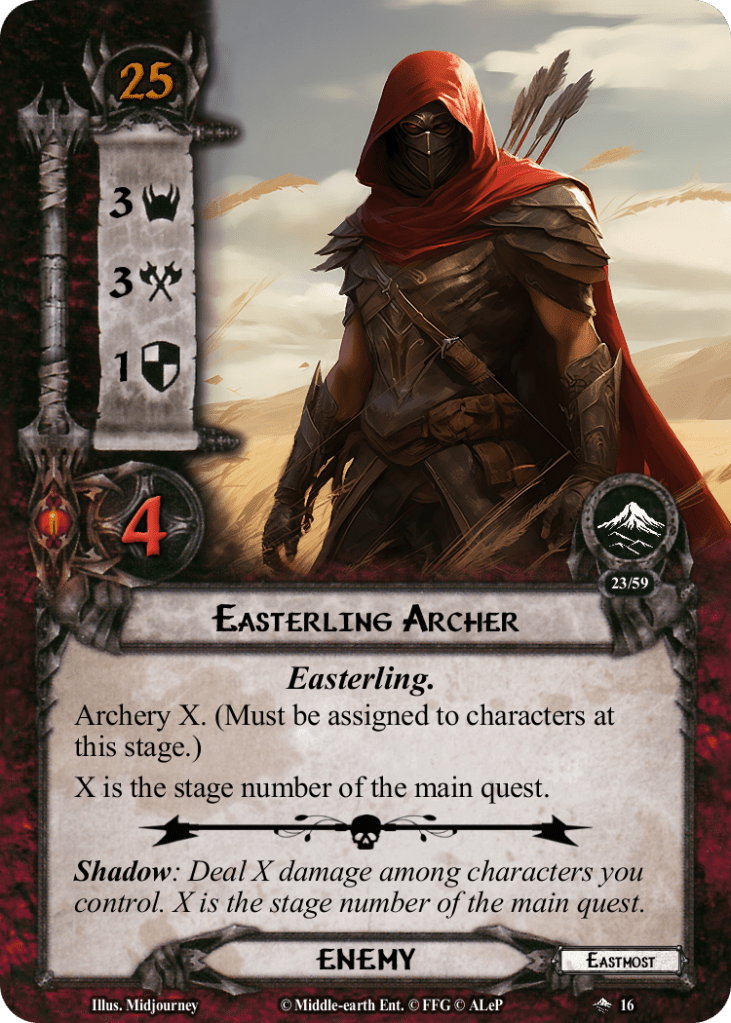
- Archery X appears on 3 copies of Easterling Archer. It’s the only direct damage that gets dealt to characters; most other effects target the stages.
- The Toughness keyword makes a return on the two Besieger enemies. 2 damage is automatically cancelled on both enemies whenever damage is dealt. Play the Treason of Saruman Saga box for more info on this keyword.
- Immunity
- The North Burns cannot be cancelled.
- Once Dale is in the Victory Display, heroes cannot be healed or leave the discard pile.
These stats assumed the setup for 1 player, meaning that City Walls does not start in Dale’s staging area. One copy of Desolation of Smaug was left out of the stats, since it starts as the Riverlands’ active location. Setup should also reveal one card per player, but that was not done for this analysis to keep things simple.
Objectives
There are a few objectives during this quest that deserve some attention. While some are glorified rule cards, others may have a serious impact on gameplay in lower player counts.

- Hold the North: This isn’t much of an objective, more of a rules sheet so that you know what to do at the end of the round. You would first trigger all of the End-of-Round steps at the individual stages. Once that is done, you deal X damage to each stage, where X is the number of enemies in the staging area at that particular stage. This triggers regardless of whether or not there are players at that stage. This is your main motivator to move between stages so that you can catch enemies before they deal too much damage at the end of the turn. You trigger this damage from West to East so that if any stage is abandoned, you do not deal extra damage to the next stage because a bunch of enemies spilled over. Once the damage is assigned to all stages, the easternmost stage gets dealt 2 more points of damage. This is a constant thing you have to worry about at the end of the round, and this will likely cause you to have to abandon several stages during your playthroughs. Once you have dealt all that damage (and resolved any stages being abandoned), you may place a resource on Hold the North. Once there are 8 resources here, you meet your first requirement to win the game. The second requirement is that there are fewer enemies in play at any time than there are stages remaining. If Erebor is your final stage, then you must kill all enemies. If you somehow still hold on to The Eastern Defenses by turn 8, you can leave 3 enemies alive.
- Eastern Assault (double-sided): This is another rules card, though it is far less involved than Hold the North. At the start of the game, you flip to either the Normal or Easy side, which will determine how much damage each stage can take before it has to be abandoned. In Normal mode, this is 8+1 per player; in Easy mode, this is 10+1 per player. Another change between Easy and Normal modes is that players in Normal mode will have to damage the stage that they are at whenever they cancel a card effect. This is mostly to counter A Test of Will, but it also hinders your ability to cancel shadow cards. Really ask yourself if it is worth canceling these effects in exchange for a point of damage on the main quest. There will be some cases where this can save your skin, but if you want to be safe, then don’t bring any cancellation. In Easy mode, you can cancel what you like; there is no penalty.
The one thing both versions of this quest have in common is that the players will have the first player deal out all the encounter cards. This is different than the Sagas, where effects like Peril interact with the player who drew the card. Instead, the first player now deals for everyone. Per round, you have to reveal one more card than there are players in the game. This adds to the feeling of being overrun, but the quest is balanced around this additional encounter card. If you want to reduce the number of cards revealed each turn, I would suggest running Gildor’s Counsel, The Hidden Way, and Wait no Longer! - Iron Hills Reinforcements: It can be difficult to be at four stages at once. That’s why the game gives you this objective whenever you are playing this quest solo (2 copies in both Erebor and Dale) or with 2 players (1 copy starting in Erebor). These reinforcements act as if they were objective allies, but they don’t quest like characters would. Instead, you can use this objective once per round to select one of a few benefits. These benefits can be directed from any stage but only affect the stage that the Reinforcements are at. First, you can place two points of progress on any location at the stage where the Reinforcements are at. This is important, as you cannot travel to a location at a different stage than where you are at. Clearing them in the staging area this way might be slow, but it’s better than leaving the location untouched. This is ideal for City Walls, as they can be cleared before they pop. Watch out with the Eaves of Mirkwood, though, as that will damage the stages when it is explored in the staging area. The other option that the Reinforcements can do is to heal 1 damage from the quest that they are at. This might not seem much, but getting to heal 1 point per Reinforcement per round is quite a lot when looking at the entire game. The caveat is that you do have to have the Reinforcements on a stage that is damaged in order to heal it. But you can direct the damage a bit to make this easier. The third option also helps with this. You may exhaust the Reinforcements to move them either one stage west, or east. You cannot move them through multiple stages, so if you want your reinforcements to come to The Eastern Defenses from Erebor, it’s going to take you three turns. Moving the Reinforcements can be important to get to trigger their other abilities in future turns. Usually, it is best to keep them in the back in order to heal Dale and Erebor and set up some progress on locations as well. You can then fight off the enemies further east. Be careful with where these objectives go because if they are caught on a stage that is abandoned, they are discarded!
- Gate of Erebor: Once you quest successfully at Erebor, you are instructed to find the Gate of Erebor from the set-aside cards and add it to Erebor‘s staging area. This is your reward and an additional layer of defence for when the fighting draws near the mountain. Once you quest successfully one time here, you earn it, and it is yours. There is no need to quest successfully at stage 5 again after that (though it helps with keeping a low threat). Once in the staging area, the Gate of Erebor has two Responses that the players can trigger if they have Erebor as their main stage. The first is that any enemy that enters Erebor’s staging area gets dealt a point of damage. While it is only one point of damage, it can kill some enemies that were hurt before, either by the players or Dale‘s effect. Don’t sleep on that single point of threat, as it can help you win a little easier. Combine this with Thalin’s damage whenever he quests, and enemies appearing at this stage in the late game enter with half their HP left. The other Response that the Gate provides is that the players can cancel X damage that would be dealt to the main stage (Erebor) by dealing X damage to one hero they control instead. This effect can be triggered by any player, but they must be at this stage to do so. It seems obvious to want to do this. If Erebor gets enough damage, the players lose. But dealing damage to heroes is not as free as it might sound. If the players are pushed back, and Erebor is in the final stage, then that means that Dale is in the Victory Display. Players would have had to discard one hero already, and their remaining heroes cannot be healed. That makes this far more brutal, and it can cost you a few heroes. However, willpower-heavy heroes are no longer needed at this stage since it is a Siege quest. So those make for excellent sacrifices against the Gate. Note that the damage may not be spread. This is usually not a big deal, as damage is dealt in single points anyway to the stages, but The North Burns is a good exception to the rule. This deals 3 damage, which would be 3 direct damage to a hero if you want to cancel it.
All in all, the Gate is a great tool to have at your disposal when defending Erebor, and don’t forget you have access to it once someone quests successfully at this stage!

Enemies
Sauron had many more forces than he used against Gondor. The bulk of the Rhunnic forces were sent north to the Celduin and Carnen rivers and then upstream to Dale and Erebor. These forces get worse as they get closer to their objective: Taking Erebor and its wealth for Sauron. All non-unique enemies will enter the game at the easternmost quest stage and will move westward if you don’t kill them quickly.

- Dale Besieger: The first of the two unique Besieger enemies will enter Dale’s staging area first. With an engagement cost of 40 and 3 threat, you might not want to engage it too soon, as you can clear any other enemies at this stage first. However, there is a Forced effect on this enemy that will trigger at the end of each turn. As long as Dale Besieger is in play (engaged or in a staging area), it will deal 1 damage to the main quest at the end of the turn. This will start to add up, so you have to deal with this enemy soon. Preferably, you draw this enemy in rounds 3-5 so that Dale is not the easternmost stage yet, and you have a boardstate that is able to deal with the stats on this enemy. It has 7 attack, which will either require a very strong defender to take care of or you need a chump blocker for this one. Shadow effects don’t punish chump blocking that much, so that is my preferred strategy. Killing this Besieger is made a bit more difficult than usual, thanks to the Toughness 2 keyword. This is an extra layer of defence that will block the first two points of damage that bypass the defence on this enemy. This includes direct damage, making Dale’s main quest effect a lot less useful against this enemy. In reality, you will need 10 total attack to bring this enemy down. It’s not a ton, but if you are at Dale, you needed some attackers to quest as well. Your best strategy is to bring this enemy down in one turn, so that it deals as little damage as possible, and you don’t have to defend that many attacks. Alternatively, you can engage this enemy, survive for a turn, and then head to another stage that isn’t Battle-questing. This frees up attack strength to use against this enemy. Once defeated, the Dale Besieger is removed from the game, and 1 point of damage is healed from the stage it was defeated at. This makes it a net-zero if you took 2 rounds to defeat this enemy.
- Erebor Besieger: The Erebor Besieger is a direct copy of the Dale Besieger, so the same strategy goes. It has the same stats, engagement cost, and effects, so it is nothing new. This is the only enemy for a long time that goes to Erebor, so you might need a player to go to that stage and clear this enemy before damage is dealt to the stage. While here, the player can use their time to also set up the Gate of Erebor and perhaps clear some of its locations if they appeared earlier. Being a siege-quest, stage 5 allows you to have more attackers in play (especially with the Armory up already), so that makes killing this enemy a little easier. You can also transport it to stages further west if you cannot deal with it at the moment but don’t want it to hit Erebor constantly. If you do decide to destroy this enemy quickly, you get another point of healing at the stage you defeat it.
- Rhûn Vanguard: This is a slippery enemy that is very hard to keep at one stage. While not having very high stats (2/3/3/3 is pretty average), this enemy has the tendency to bypass the players and deal damage at stages where there are no players. This is thanks to its ability, which triggers whenever he is in a staging area and another non-Rhun-Vanguard enemy enters that staging area. When that happens, the Rhun Vanguard will move one stage to the west. This removes his threat from the staging area but brings him closer to Erebor. This can happen several times a round with treacheries like Driven by the Eye, causing this enemy to quickly get to Dale and Erebor in a round or two. There is no active threat of this enemy moving further west, but having him in a staging area without any players there to engage him will start to deal damage to the stages, thanks to Hold the North. Your best counter to this enemy is to engage him quickly, perhaps even using some Dunedain tricks to engage him earlier than the encounter phase. Once engaged, he cannot move west! Another option is to have a player waiting at Erebor to engage all of these enemies. They cannot move further west than Erebor, but you’ll want to prevent these enemies from damaging that stage. In combat, this enemy will take 6 attack to kill, but you should be able to reach this. You can also kill them immediately at Dale once you quest successfully, clearing the board a bit.
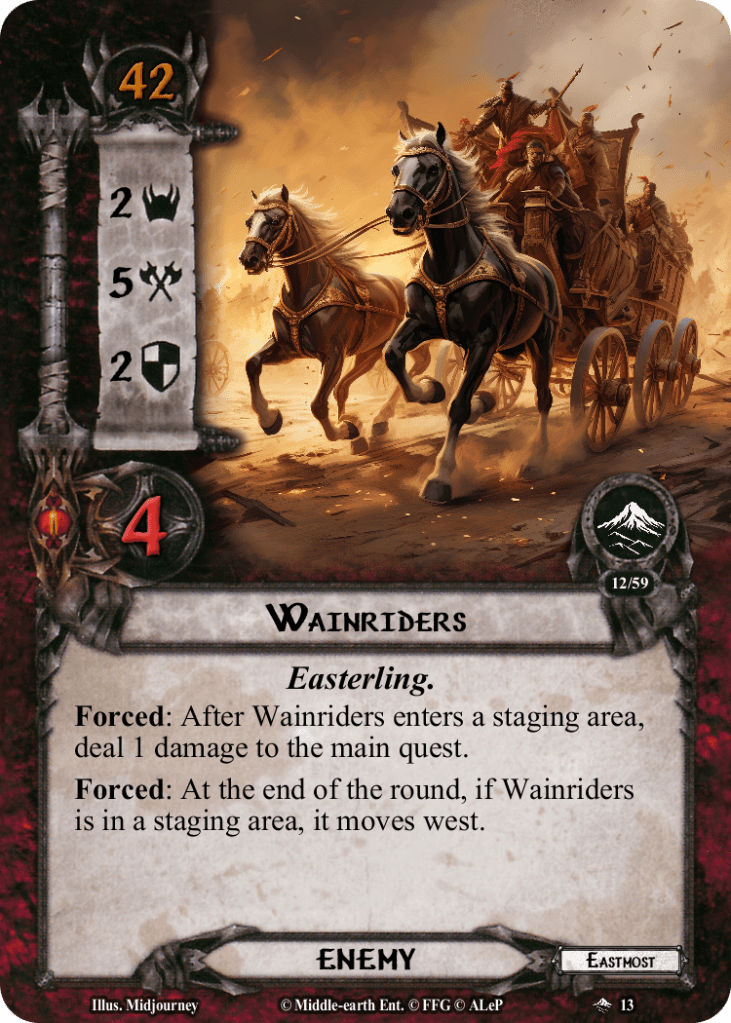
- Wainriders: This is another enemy that likes to move around a bit, though it is more predictable than the Rhun Vanguard. The Wainriders will move at the end of the turn-one stage further west. This combos well with their other Forced effect, which deals 1 damage to a stage whenever they enter a staging area. This includes whenever they are first revealed and added to the easternmost stage. The potential to deal several points of damage as they race west makes this a priority target for engaging. The engagement cost of 42 will mean that players likely have to optionally engage this enemy, as their threat might not be high enough early on. But with the Wainriders having 5 attack, you might want to reconsider and get a proper defender up first. Remember that none of these enemies are immune to player card effects, so you could use a Feint on these Wainriders if you cannot deal with the high attack but want to prevent them from moving on at the end of the round. While defending these enemies might be tricky, killing them isn’t that big of a deal. They only have 2 defence and 4 hitpoints, allowing direct damage effects like Dale and Gandalf to kill them. This is also a good enemy to add to Erebor‘s staging area for Flanked! as they cannot move further west from there, blanking their textbox. You do still have to deal with Hold the North’s damage at the end of each turn, so they will have to be engaged sooner rather than later. But add Erebor’s buffs to your characters, and you can swiftly kill these enemies.
- Rhûn Rearguard: The textbox on this enemy is just 9 words long, but it makes this enemy so much worse in the late game than you’d like. With 48 engagement costs, no ability that deals damage to the stages, and no way to move west on his own, players can largely ignore this enemy early in the game, focusing on other foes first. The gimmick with this enemy is that his stats grow with the stage he is at. So if you get to the late game, he will have higher stats than most other enemies in the deck. This enemy is a terrible one to get for Flanked! and Driven by the Eye isn’t much better. You will want to keep this enemy East as long as possible. At The Eastern Defenses, you can easily deal with his 2/2/2/5 stats, but if the game drags on to Erebor and he becomes a 5/5/5/5, you will wish you put him in the victory display a long time ago. A fun card to use with him is Revealed in Wrath, which blanks his textbox. This nullifies his stats, making him easy prey for your attackers. At the later stages, you will also want to use some direct damage effects to kill this enemy without having to deal with a defence value of 4 or 5. Poisoned Stakes is a great attachment for him, as well as using other effects that deal damage.
- Balchoth Avenger: There is no “chieftain-like” enemy in this encounter deck, so this will have to fill that role for me. The Avenger is probably the worst enemy outside of the Besiegers to get early, as it has pretty serious stats, a low engagement cost, and a horrible effect whenever he deals damage to a character. When damage is dealt from his 4 attack, the player controlling the damaged character must choose to either deal 4 damage directly to a hero or have the Avenger move west. The second option is usually chosen, as not all heroes can be dealt 4 damage and expect to survive. This is especially true when Dale is abandoned, and heroes cannot be healed anymore. The problem arises when you have this enemy at Erebor, and he deals damage. You can no longer push this enemy west, so you have to deal damage to a hero. There are various ways to counter this. First of all, invest in a proper defender who always defends this enemy so that you do not take damage in the first place. Better yet, you can Feint this enemy to prevent the Forced effect altogether. If you do happen to take damage from this enemy and you have to deal 4 damage to a hero, either have some damage cancellation at the ready like Honour Guards or buff the hitpoints on your heroes where they can take the 4 damage and still live. You will want to kill this enemy as soon as you can, but that will be difficult in the early game, as you will have to amass 7 attack to kill the Avenger. The 5 hitpoints also make it difficult to kill him before he attacks.
- Easterling Archer: The final enemy on this list is probably the easiest of the bunch throughout the entire scenario and one that you will encounter early on, thanks to its 25 engagement cost. The 3 threat won’t matter too much since the Archer won’t stick around in the staging area too long. Another contributing factor to this is that you will want to engage it early, thanks to its Archery X value. Archery can only be dealt at players at the same stage as the Easterling Archer (which means that no damage is dealt if an Archer is at a stage without players). This is the only source of Archery in the game, but characters will have to be careful with taking damage from other sources such as Fight or Flight. X represents the stage where the Archer is at. So he starts with 2 Archery but can grow to deal 5 points of damage when he’s at Erebor. It’s better to deal with this guy early on then. When engaged, the Easterling Archer has 3 attack, 1 defence, and 4 hit points. This number of hitpoints makes it an ideal target at Dale to deal the damage to so that you avoid having to take 4 damage among characters instead! The 3 attack isn’t too scary, and attacking back for 5 should not be that big an issue. You will want to keep this guy as far west as possible, as you won’t have too many hitpoints left at stage 5, since heroes can no longer be healed. He’s one of the better cards to get early on since he doesn’t do any damage to the stages!
Locations
The lands of northern Rhovanion must be protected by your forces against the Easterlings for as long as possible. These locations include notable landmarks that will grant you some benefits upon clearing them. Most of these locations go to stage 3B, though not all.
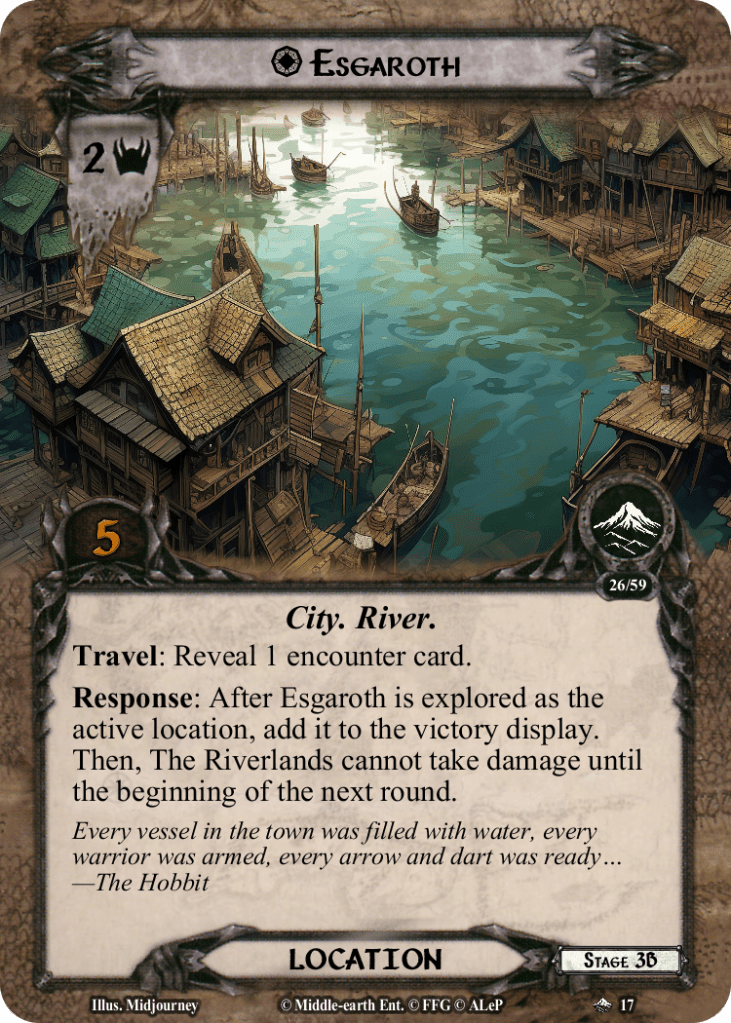
- Esgaroth: The first unique location that you can come across in the encounter deck is Esgaroth. Lake-town wasn’t featured as much in the actual war, as it proved difficult to defend from such a large army. Instead, the players will be able to use Esgaroth as a way to stall the attackers from dealing damage to the Riverlands for a while. In order to achieve this, the players at the Riverlands main quest must travel to Esgaroth when they get the chance. In order to do this, they must reveal one encounter card. Please assess the situation before revealing that card since a stage might not be able to take another encounter card if they are already overwhelmed. If the Riverlands is the easternmost quest stage, there is a high chance that the revealed encounter card will end up at this stage. Once active, the players must make the 5 progress on Esgaroth to explore it. When you do this, it really matters, so I would advise clearing this location before the quest phase. Map of Rhovanion or Lorien Guide can achieve this. This is important since, upon completion, Esgaroth is added to the Victory Display (despite not having a victory score), and the Riverlands is unable to take any damage until the beginning of the next round. The earlier you achieve this in a round, the more value you will get out of this effect. This is especially true if the Eastern Defences have fallen already since this effect will cancel the damage from enemies that arrive at this stage, as well as Hold the North, which triggers at the end of the round. Clearing it ahead of the staging step will also counter treacheries like The North Burns, saving you at least a round before the Riverlands fall. This is a great location to hold on to, with just 2 threat and plenty of alternative destinations at this stage.
- Ravenhill: This unique location will be added to the staging area at Erebor, being one of only 4 cards that go straight to the westernmost stage. This makes the 4 threat less of a pain since not many encounter cards will be added here if you are trying to complete this location early. Players looking to get the benefit of Ravenhill will have to travel here first. This requires that you reveal an encounter card. Doing this in the early game won’t usually affect stage 5, but do coordinate with other players if getting an additional encounter card is worth it. Once active, Ravenhill requires 5 progress to be cleared. Upon exploring Ravenhill as the active location, you must add it to the Victory Display and then get to heal 1 damage from each quest card in play. This is really useful if you were just hit by a copy of The North Burns, as it will heal all that damage. Exploring this location will require some timing, as it seems a waste to explore this if there are only 1-2 damaged quest stages in play (unless those are the final stages left…). Healing stages is always a nice thing to do, as it buys you more time to keep that stage around before being forced back. As a shadow card, Ravenhill is also surprisingly beneficial. It will heal any main quest of your choice by 1 point when it is revealed as a shadow card to an enemy. This allows you to heal any of the main quest stages, not just the one where you are at. I would suggest healing the easternmost stage, buying you more time before Hold the North destroys it.
- Easterling Supply Camp: This is the only location that will go to The Eastern Defenses stage, but there are quite a few copies of it. At 3 threat and 4 quest points, it is not that easy to explore in the staging area and will add a fair bit of threat on top of the enemies that are added to this stage. As long as only copy comes out per turn and you quest successfully, there isn’t much to fear. You have no other destinations in the travel phase, and there is no Travel cost for this location either. So I see no reason not to travel here since you should have at least 1 player at this stage at all times to hold off the enemies. The trouble with this location starts when you are not clearing these fast enough by not questing successfully or getting several copies at once. That’s because of the Forced effect that happens at the end of each round. You must deal a point of damage to Eastern Defenses for each copy of Easterling Supply Camp in the staging area or in the active location slot. This greatly accelerates the rate at which that stage takes damage, especially combined with other effects and Hold the North’s constant damaging ability. However, if you can suffer through this location for a turn and explore it, you get to trigger the Response (even if you explore it in the staging area). That allows you to heal the stage by 2 points, which is a great tool to keep you in the game. This is especially useful if stage 3 had to put its healing to use on other stages last turn. The healing is even better when you can explore this location on the turn it entered play so that it doesn’t deal damage. An example of how to do this is, for instance, to make it active and then have Tactics hero Legolas kill two enemies at this stage. You bypass the Forced effect and still get to heal 2 points of damage! Just don’t let these locations stack up to prevent you from questing successfully.
- The River Running: There are a lot of beneficial locations in the encounter deck, but this is not one of them. This location gains a lot by having the players travel elsewhere, keeping this in the staging area for longer. Its initial threat of 3 isn’t terrible, but the When Revealed on all copies of this location makes it worse. When the River Running is revealed at stage 3, it deals a point of damage to the Riverlands. It deals an additional point of damage for each copy of The River Running already in the staging area, potentially adding 2 more points of damage on the stage. Luckily, there is a max of 3 copies in the encounter deck, but this on top of the damage from Desolation of Smaug, can be brutal in the mid-game. There are two strategies around this location. Either you travel here as soon as you can, or you keep all copies in the staging area. Travelling is probably the better option, as having it be the active location already prevents the next copy from gaining additional damage. Travelling does come at the cost of discarding a random card from each player at this stage. If you have no cards to discard, you cannot travel here. The river only needs 3 progress to be cleared, so you can likely clear it next turn and heal some damage off a stage. If you are saving the locations in the staging area, invest in A Test of Will for the final copy. Yes, it will still damage the stage you are at because you are cancelling an effect, but it won’t be as much damage as the regular When Revealed effect. You will have to overcome a total of 9 threat in the staging area constantly, so make sure you travel to other locations to quickly clear some threat.
- Eaves of Mirkwood: The locations at stage 3 keep getting worse and worse as we now reach the Eaves of Mirkwood. This location has a higher threat at 4, but it only takes 2 progress to clear. While I would be eager to suggest cards like Asfaloth and Northern Tracker for low quest point locations like this, it has built-in protection from such effects. If the Eaves of Mirkwood ever leaves play from the staging area, you must deal 2 damage to quest cards in play. This is meant to protect locations in the staging area from effects like Northern Tracker, which would otherwise easily handle the many locations here. The only way you are clearing this location without it dealing damage to a stage is by making it the active location and clearing it there. It makes for a pretty decent destination in the travel phase, allowing you to get a lot of threat out of the staging area and only needing 2 progress next turn to clear it. However, the travel cost on this location is a bit punishing. You must deal 1 damage to a stage in play. It can be any stage, but it will take a tiny bit of damage from travelling here. Because of that, cards that negate travel costs, like Ghan-buri-Ghan and West Road Traveller, are ideal counters to this location. Alternatively, you can also keep this in the staging area and place some attachments on it to lower its threat (Power in the Earth, Guarded Ceaselessly). If you still want to clear this location in the staging area without dealing damage to any stage, then Thror’s Key is a good solution. You’ll have to be quick, though, as that card is unique, and you might want to play it on another location soon. There are definitely ways to play around this location, but simply travelling here and healing the damage next turn when questing successfully at this stage works as well.
- The Desolation of Smaug: The final location that goes to Stage 3 is the Desolation of Smaug. This starts in play as the active location for stage 3, but will also have additional copies in the encounter deck. This location is a nasty piece of work that I would suggest you put in the victory display to permanently be rid of it. This is not because of the 4 threat and 4 quest points, which is relatively high for this quest, but mostly due to its Forced effect. After another location enters the staging area at this stage, you must deal 1 damage to the Riverlands. Seeing how there are quite a lot of locations that go to this stage, you can tell that this is going to be dealing a lot of damage over the course of a game. This text is not only active while the Desolation is in the staging area but also as the active location. It also stacks with copies of itself, making it very dangerous to keep this in play for very long. Hit your third copy of River Running during the staging step with both copies of Desolation of Smaug in play, and you’ll have to deal 5 damage to the Riverlands! You must do what you can to prevent this, but luckily, there are some options you get. The first is baked into the Forced effect itself. Any player at this stage may discard an ally they control to cancel the effect. Unless you have a chump who did their thing and you no longer need it, this is going to be a bad trade for you. The other option is to rush this location and clear it as soon as possible. 4 quest points do not make that easy, though. Players will have to use a lot of progress-placing effects that avoid the Eaves of Mirkwood but hit this location. You can also travel here as soon as possible, thanks to there being no travel cost. But you will still have to live through a staging step with this as the active location. Once you clear it, I strongly recommend you use Leave No Trace to put it in the victory display, where it cannot hurt you anymore.
- City Walls: It is very easy to know which locations have to go to Dale. They all start with “City” in their title. City Walls is likely the first location you encounter since it is included in setup for 4 players. As a 2 threat, 3 quest point location, it is a relatively small location, but players are not able to really ignore this for too long. That is because at the end of each round, a damage token is placed on City Walls. After 3 rounds, the location is discarded, and 2 damage is dealt to Dale. Players will have to be quick in clearing this location since it will take a turn to travel here and a turn to clear it. The location will still accumulate damage while it is active. So it will take 2 turns of a player in Dale to get rid of these Walls, which means that you should send someone to Dale the turn after City Walls hits the staging area, or it is too late. 2 damage on Dale isn’t huge, but there are several copies of this location in play, and you have to deal with other sources of damage coming from enemies that outflank the players and the Dale Besieger. This is a good location to clear in the staging area as well, allowing you to go to other locations at this stage instead. It can also buy you a turn before you have to go to Dale if you are able to make 3 progress here.
- City Gates: This is the biggest location that can be added to Dale, adding 5 threat to the staging area. With there being two copies of this location, you could end up adding 10 threat during a single quest phase, though this is offset by the fact that not many enemies will be added to this stage in the early game. The location only takes 3 progress to clear and does not have a Travel cost. This makes it an ideal travel destination, unless you want to clear a City Walls. You can also clear this location in the staging area if you’d like. This does not take away the Response on this location when clearing it. Whenever you explore the City Gates (either as an active location or in the staging area), one player at the stage gets to spend 1 resource from a hero (or Treebeard/Radagast) to place one resource token on Dale. The next time Dale would take damage, the resource token is taken off to prevent one point of damage. This helps against damage taken from City Streets or delaying the Dale Besieger from taking down the stage. In an ideal world, you recycle this location with A Watchful Peace to keep adding resource tokens to the stage. Build up enough of them, and you can cancel a lot of damage over the course of the game. It doesn’t take a lot to clear this location; you just have to have a spare resource to trigger the Response with.
- City Streets: The final Dale location is the inverse of the City Walls. 3 threat and 2 quest points make it easier to clear and a higher priority to travel here if you want to get rid of some threat in the staging area. However, the only negative thing that the Streets do is when they are revealed. You must do a single point of damage to Dale. Since nothing else triggers off of this location, there is really no point in going here if you can also go to City Walls, which is a more active threat to your stage. I would argue that you’d be better off saving all copies of this location in the staging area and never exploring them. That way, you never have to reveal the When Revealed effect again, and you also get rid of a very nasty shadow effect that can cost you a hero. With there being just 2 copies, I feel that having the constant +6 threat in the staging area is a good trade against not having to deal more damage or risking heroes over and over again.
- Treasure Hoard: Aside from Ravenhill, there are two more locations that will go to Erebor when they are revealed. While not unique, they only have 1 copy in the encounter deck but are still beneficial to the player. The Treasure Hoard of Thror is one of the reasons why Sauron wanted Erebor to begin with, so it seems only fair to use it against his forces. The location comes in at 4 threat and 5 quest points, but since not many other cards go straight to Erebor in the early game, the high threat is of little concern. Players will have to explore this location as the active location, though, meaning that they will need at least 2 turns here to fully explore the location and reap the benefits. Perhaps they can do this whilst battling enemies that arrived at this stage due to Flanked! or the Erebor Besieger. Once explored as the active location, the Treasure Hoard will attach itself to the quest stage and will gain the Response: After questing successfully at this stage, each player, at this stage, adds 2 resources to the pool of 1 hero they control. This is fantastic for getting more resources on your heroes, but players will have to be at this stage to gain the benefit. This will usually be during the end game if the players are driven back to Erebor. The additional resources will help to fund events or replace allies that fell in the combat phase. If you get this location completed early enough, you might even get the benefit while exploring Ravenhill and/or the Armoury before rejoining your fellow players at the front lines. Note that as a shadow, this location will also be beneficial, granting a hero you control 2 resources.
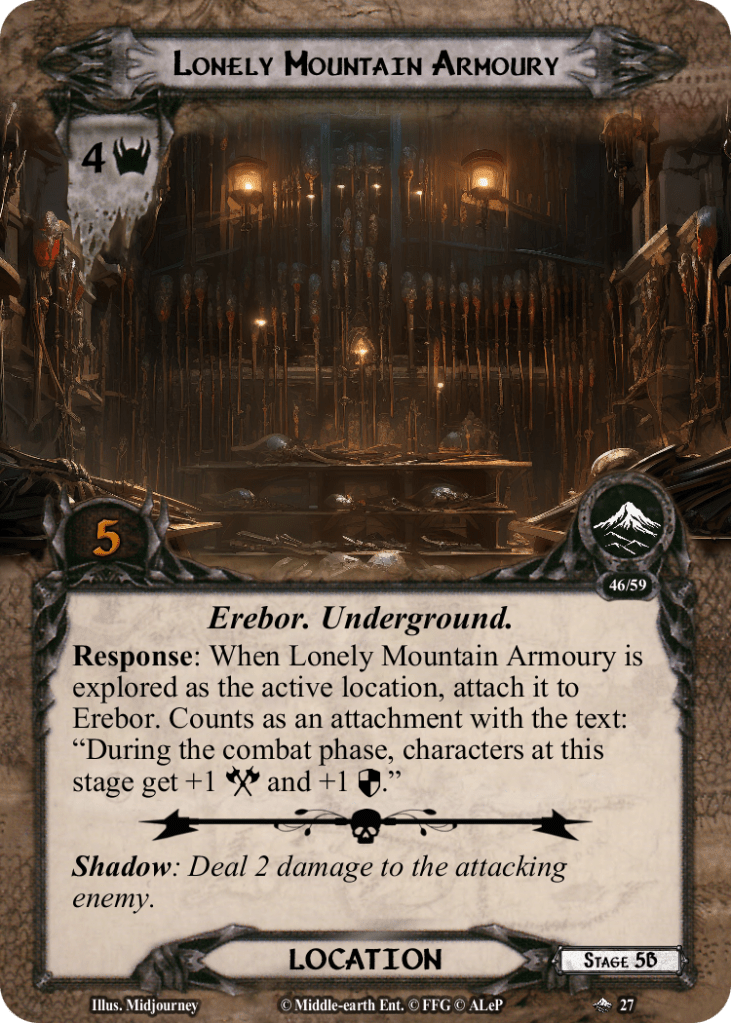
- Lonely Mountain Armoury: The final location of them all is a single copy of the Armoury, which will obviously go to Erebor. Like the Treasure Hoard, it has 4 threat and 5 quest points. If players decide to prepare Erebor for the endgame, then this will take priority over the Hoard, as it will help a lot more in the combat phase. Players need to explore this location as the active location, after which the Armoury will attach itself to the stage and will grant all characters at stage 5 a +1 attack and defence buff during the combat phase. This does not stack with Erebor’s +1 defence buff since that only happens in the quest phase. But giving all characters +1 to their combat stats is super useful in defending this stage from all the enemies that arrive here in the end game. I would highly suggest that in a 3-4 player game, a player goes to Erebor for a while to prepare it with this location, allowing the players an easier time if they are pushed all the way back. Alternatively, this location is also beneficial while it is in the encounter deck. It will deal 2 damage to the attacking enemy if it is dealt as a shadow card. While this is absorbed by the Toughness of the Besiegers, each other enemy will be greatly wounded by this damage. If it kills the enemy, then the attack doesn’t resolve, making for an easier combat phase.
Treacheries
Driven by Sauron’s will, the Easterlings will have various tricks up their sleeves. These include flanking the players at different stages and dealing damage to stages so that they have to be abandoned faster than they otherwise would be. Keep in mind that canceling these effects in Normal mode will mean dealing damage to the easternmost stage.
- Flanked!: Remember how I mentioned that most enemies would go to the easternmost quest stage and that you should prioritize your combat decks there? Well, this treachery throws that strategy to the wind once it is revealed, Flanked! will discard cards from the top of the deck until an enemy is revealed. That enemy must be added to either Dale‘s or Erebor‘s staging area, no matter what is mentioned in the lower-right corner. Where you should put the enemy depends on which one is discarded. The two Besiegers were going to these stages anyway, so it was better to put them at Dale so that its quest effect could damage them. The Vanguard and Wainriders are better placed at Erebor since they won’t be able to trigger their abilities to move further. The Rearguard and Archer will have lower stats at Dale, so place them there. The Avenger is tricky. If you are considering triggering his Forced effect due to having a character be damaged, then it might be best to have him in Dale so that you have the option to move him to Erebor instead of dealing damage to a hero. If you don’t care, or if a player happens to be at Erebor at the moment with the Gate up, then put him there so that he takes some damage from the Gate. Prioritize killing whichever enemy was revealed during this or the next turn, as having enemies in the final staging areas won’t be ideal, as they start to damage the stages. During the late game, this treachery just reveals an enemy, and Dale and/or Erebor will be the final stages left, so it doesn’t matter too much.
- The North Burns:A treachery that cannot be cancelled always rings some alarm bells in my head whenever I see one. But it makes sense with this one since cancelling The North Burns would be better than taking the 3 damage that it forces upon you. It is a rather straightforward treachery that seeks to deal some damage to the quests in play. You must spread the damage as evenly as possible (so three stages with 1 damage if you still have that many in play). At least one of the points of damage must be dealt to the easternmost stage in play, which will increase the rate at which it will be defeated. In the early game, the point of damage on Eastern Defenses is inevitable. I would put a point of damage on Riverlands and Erebor as well. Riverlands has ways to heal the damage with locations and its own quest effect. Erebor is still far enough away that the single point of damage won’t cost you the game. It gives time to find Ravenhill and heal the damage. Dale would only be a good target if you happened to explore the City Gates and still have a token on there. In the late game, a direct 3 points of damage on Erebor (if that is the final stage left) can end the game, so be careful around the two copies of this treachery that are in the deck.
- Driven by the Eye: A very dangerous treachery that can really mess with your enemy distribution. When Driven by the Eye is revealed, you discard cards from the encounter deck until an enemy is discarded. Add that enemy to the staging area it belongs in (denoted by the lower-right box). Then, you start to move enemies from west to east. Starting with Dale (since enemies at Erebor cannot move further west), move the lowest engagement cost enemy one stage to the west. Do the same for the Riverlands and The Eastern Defenses. Note that this can cause some additional triggers, like Rhun Vanguard moving even further, Wainriders dealing damage to the stage they arrive at, and Rhun Rearguard getting better stats. You will want to prevent this march from happening if possible, as it will really mess with the location of the enemies in relation to the players. You can even end up with both Besiegers at Erebor, making that a very difficult stage to defend. However, if you are in the late game and only Erebor is left, this treachery just adds an enemy to the staging area. It also doesn’t do a lot when there are almost no enemies in play; you simply move the enemy you just revealed one stage further. You can repair the damage that this treachery did to your strategy in the next turn, but be wary of this treachery, as it can put some players within engagement cost of enemies they’d rather avoid.
- Fight or Flight: This treachery offers each player an interesting choice. They must either take one damage on each of their exhausted characters or deal a point of damage to their current stage. If you have the option, I would consider cancelling this treachery, considering that it would only deal 1 damage to the stage instead of 1 per player. You can also go for the 1 damage to each exhausted character, but you will need some time to heal after that. Luckily, there are only 2 copies of this card in the deck, so you have pretty good odds at healing up in time before this hits again. In lower player counts, the damage to the stage might be preferable, but it really depends on the situation. But since players can decide for themselves to go with the damage on character or on the stage, you can mix and match a bit before fully resolving this treachery. Also, don’t forget the Doomed 1 here. It’s a small hit of threat, but over the course of 8 rounds, it really starts to add up.
- Focused Onslaught: Honestly, this might be my least favourite treachery of them all. It acts as a Condition attachment, which goes onto the easternmost quest stage without a copy of Focused Onslaught attached. Once attached, it will deal 1 damage to the quest. This will be on top of any other damage that the quest has taken so far and the two damage that it takes from Hold the North. Having a copy of this treachery attached will greatly accelerate your loss at this stage. Luckily, it is a Condition attachment, and we have ways to discard those. Power of Orthanc, Elrond, and Miner of the Iron Hills are great cards to bring against this treachery. You won’t be able to avoid it through a shadow card either since its shadow effect will resolve the When Revealed effect on the card. Your best bet is to either cancel this (the one damage you take is better than the constant damage you’d otherwise take) or put this treachery in the Victory Display through Out of the Wild or other effects. The less you have to deal with this horrible attachment, the longer your defences will hold!
- News from the South: This final treachery is one I really enjoy from a thematic standpoint. As long as the fight near Mordor is going on and Sauron is winning, this treachery does nothing besides Doomed 2 and Surge. But if you are pushed to the brink, and Erebor is the only stage remaining, word reaches the Easterlings that Sauron has been defeated, lowering their attack and defence by 2 for the end of the round. This is very beneficial to the players being stuck at the final stage and fighting off the hordes of enemies that are gathering at the gates. Lowering their stats can give the players a breather and allow them to clean up a bit. Hopefully, this helps you to hang on until the final progress token is placed on Hold the North. A rare case of a beneficial treachery, though getting this early (or never having Erebor as your one stage remaining) will make this card an easy one to pass up on. Just be ready to cheer when it appears when you most need it!
Tips and Tricks
- Set up your team so that there is always someone at stages 2 and 3. The other two stages should really only be prioritized if enemies slip through. Erebor has the lowest priority unless the sieger shows up, and you should ideally only spend one turn here to get the Gate up early. Dale helps with damage being dealt to enemies at other stages, but you can usually do more by actually being at that stage.
- Fun fact: the entire artwork for this quest was actually generated by Midjourney, an image-generating AI. It helped to make a pretty consistent theme throughout the artwork and prevented the team from having to repurpose artwork from elsewhere.
- Hang on to stage 2 as long as possible. Once that falls, stage 3 will likely quickly fall as well, causing all the cards to approach Erebor at lightning speed. You’d be better off defending for as long as possible up front while some players are preparing Dale and Erebor for the final siege.
- Do not play a Grey Wanderer deck for this quest. Losing stage 4 will cost you a hero without an option of reviving them, causing you to be a player down for the remainder of the game.
- Direct damage decks work pretty well later on in this quest. Combine any damage you can deal with player cards with the effects of Gate of Erebor and questing successfully at Dale, and you can keep a lid on the number of enemies that make it through!
- As players cannot heal their heroes once Dale falls, you won’t be able to take a ton of damage on them. Ensure you heal your heroes before Dale falls, and invest in ways to boost the hitpoints of your heroes. Citadel Plate is quite a good investment so that you can make optimal use of the Gate of Erebor‘s damage cancellation effect.
- Another effect to invest in is damage cancellation. Not only will this soak some Archery and effects like Fight or Flight, but you will also be able to cancel damage from the Balcoth Avenger, preventing further damage from being done to your heroes.
Playthroughs
As this is a new quest, there are no recent playthroughs to be found yet. I will update the list as new videos are released. I am also missing the playthroughs of the older quests, though I know some of the Cardboard of the Rings streams will have featured the quest in the past. If anyone can find the right video, let me know, and I’ll put it on the list.
I hope you all enjoyed this article on an AleP quest. I have not been focusing much on the project because there is still official content for me to cover. I would like to complete the NM and Saga quests first before extending the blog to fan-made projects. Still, this does not mean that such projects aren’t welcome on the blog. Even better, I have hired someone from the AleP team to come and do articles on their first cycle here on the blog. That will hopefully help some players tackle the more complex scenarios! This also does not exclude fan-made scenarios from other projects, so let me know if there is anyone who wants to cover some of the other quests as well. In the meantime, I will keep working on the official content articles, which will hopefully last me another year!

One thought on “The Siege of Erebor”