Having survived the Ambush at Erelas, players have little time to rest as quickly they find the Erelas Beacon under assault by Dunlendings and need to rush to recapture and defend it. This second quest in the Children of Eorl deluxe box and the Oaths of the Rohirrim cycle is not the hardest quest in the game but is a difficult one that requires players to bring strong decks in order to complete it. It also forces players to be well-balanced between questing, attack, and defense as all three are required for victory. However, the challenge of the quest just makes the victory at the end feel that much sweeter as the quest is filled with epic moments, ebbs and flows in the tide of battle, and a constant feeling of tension. If you want to push yourself and your deck, this is a great quest to do it with and one I personally find myself returning to often – perhaps more than any other quest in this cycle. The Dunlendings have taken the Erelas Beacon, it’s time for you to take it back!
Battle for the Beacon
- Found in: Children of Eorl Deluxe, Scenario 2
- Official difficulty: 7
- Community difficulty: 7.4
- Encounter sets: The Battle for the Beacon, Dunlending Warriors, Faithless Rohirrim
- Quest cards: 3
- Play if: You have completed Ambush at Erelas and want to continue the Oaths of the Rohirrim story. You want a balanced quest that requires equal amounts of strong willpower, attack, and defense. You like the feeling of an intense battle but are looking for something a little less epic than Helm’s Deep or Pelennor Fields.
- What’s different about this quest?: Double-sided side quest that will flip back and forth. Limiting damage to the Beacon objective will determine victory or defeat more than player elimination.
- Solo or multiplayer?: This quest is difficult at any player count, but especially solo as it requires good questing round 1 and lots of combat. Also, because the damage on the Erelas Beacon and the quest points on Defend the Beacon are based on player count, a solo player has a fairly narrow path to victory and there is not much room for things to go wrong. The quest becomes a bit easier at higher player counts where each deck can play a bit more to their strengths.
- Can I run side-quests in this scenario?: No. Players may be able to sneak in a side-quest if they absolutely need to for their deck to work, but if progress is not needed on the main quest then players will almost always want to focus on reclaiming or defending the Beacon.
- What to look out for: Lack of shadow cancellation. Limits on attacks against enemies in staging. Surrounding Grassland guarantees there will always be at least Archery 1 in play so damage cancellation and/or healing is helpful.
The Quest
Setup

The setup for this quest contains several elements, but is fairly simple in that players will not need to make decisions about which cards to retrieve from the encounter deck or reveal random cards. First, players set the objective-ally Host of Rohan aside (this will return in stage 3). Then, players add the side quest Reclaim the Beacon (note: this side quest is double-sided and you want to make sure Reclaim the Beacon is face up, not Defend the Beacon) and the unique objective Erelas Beacon to the staging area. Finally, players make a copy of Surrounding Grassland the active location, and add one copy per player of the Enraged Dunlending to the staging area. So you should have an active location, a side quest, an objective, and 1-4 enemies depending on player count.
Erelas Beacon
It’s worth talking about the Erelas Beacon objective and the Reclaim the Beacon/Defend the Beacon double-sided side quest here because these two cards define the quest that is to follow. The Erelas Beacon is an objective with hit points equal to 2 plus 3 per player. So if you are playing solo it has 5 hit points. If you have 4 players it has a much more significant 14. These hit points are important because if the Beacon ever takes damage equal to its hit points you lose the game. Damage can add up very quickly on the Beacon and this loss condition will likely be the primary way players fail this scenario.
The Beacon also shows one way damage is added to it with a Forced effect that does 1 damage at the end of the round for each enemy in staging. This is far from the only way damage is done to the Beacon, you need only look at the Forced effect on the Enraged Dunlending to see another, but is worth noting. This effect will be a significant limitation on decks that want to keep enemies in staging. Characters will have to think twice before kicking an enemy back into staging with Fastred or a Deeping Defender. Ranger Spikes are particularly unhelpful in this quest as they leave the enemy in staging to do damage to the Beacon every round. Low threat decks will also be challenged since while Reclaim the Beacon is face-up they can not optionally engage enemies to pull them from staging and prevent this damage. So this effect alone presents some limitations on the kinds of decks you may want to bring.
Reclaim the Beacon/Defend the Beacon
So with many ways to damage the beacon, how can players protect it? This is where the double-sided Reclaim the Beacon/Defend the Beacon side quest comes in. Reclaim the Beacon begins the quest in play and if you can place progress equal to 2 + 1 per player then this will flip to the Defend the Beacon side. It is important to note that this amount of progress (3-6 depending on player count) is the maximum that can be on this quest and this progress remains on the side quest when it is flipped.
It is also important to note that each side of this side quest has a different limitation for players: while Reclaim the Beacon is face-up enemies in the staging area can not be optionally engaged or take damage. So as tempting as it is to bring leadership Eomer along to take out an Enraged Dunlending first turn, sadly this is not allowed. While Defend the Beacon is face-up, shadow effects are immune to player card effects and so can’t be canceled. Hopefully, players will be spending a significant portion of the quest with Defend the Beacon face-up so as much as shadow cancellation could help at times, it is probably not worth bringing a lot of it to this quest.
The main value in this side quest though is that while Defend the Beacon is face-up progress can be removed from it instead of placing damage on the Beacon itself. So players will want to flip this quest to Defend the Beacon as fast as they can and then continuously refill it with progress to prevent as much damage as possible from hitting the beacon itself.
In summary, while each stage of the quest presents its own twists and turns, the core dynamic of the quest is to continuously place progress on Reclaim the Beacon/Defend the Beacon to prevent damage to the Beacon itself.
Quest Card 1: Battle for the Hill – 12 progress

In order to complete this quest stage, you will need to place 12 progress and control the Beacon. There also is an additional Forced effect on this stage that requires each player to either exhaust a character or place 1 damage on the Beacon when progress is placed on it.
However, as this stage begins, the quest stage itself should only be a secondary concern. First, you need focus on the Reclaim the Beacon side quest and take control of the Beacon as soon as possible. The sooner this side quest can be flipped the better. This is often a difficult task round one, but if not done by round two or three then you will likely be near a loss due to damage on the Beacon if they aren’t there already. Because of this decks that are slow to setup will likely struggle with this quest, especially in solo. Players may find they have lost the Beacon (and the game!) before their deck is ready to go. There are many ways to damage the Beacon in this quest so players need the buffer Defend the Beacon provides.
At this stage losing the Beacon is not the end of the world, but it should definitely be avoided if possible. Also it is likely that the majority of the damage the Beacon receive will be in the first few rounds of the game while you are getting set up and working to flip the Reclaim the Beacon side quest. If the Beacon takes several hits the first round or two and is nearly lost don’t feel you need to scoop the table and start over. Several effects in the quest will give you the choice of doing something bad or damaging the Beacon. It’s good to be cautious and try to avoid damaging the Beacon if possible, but if it would severely set your deck back or add an encounter card when you are already feeling overwhelmed then it is okay to damage the Beacon some. If damaging the Beacon means you get to a good board state sooner, then it is probably worth it.
Even once you have captured the Beacon, I would not recommend immediately targeting Battle for the Hill and moving to the second quest stage. Instead, it is not a bad idea to simply refill Defend the Beacon for a few rounds while you build up your board state. If you brought side quests and feel confident that you can hold the Beacon for a round then this would be the best place to complete them, but unless it is really important for your deck I would recommend leaving the side quests in your side board. The next round players will be revealing an extra encounter card each round so players need to be prepared for this escalation. Take a few rounds here to get set up and then when you feel you have a good board state then shift your focus to Battle for the Hill. Hopefully this should only take you a round or two which is a good sign that you are ready to move on.
Quest Card 2: Hold the Hilltop
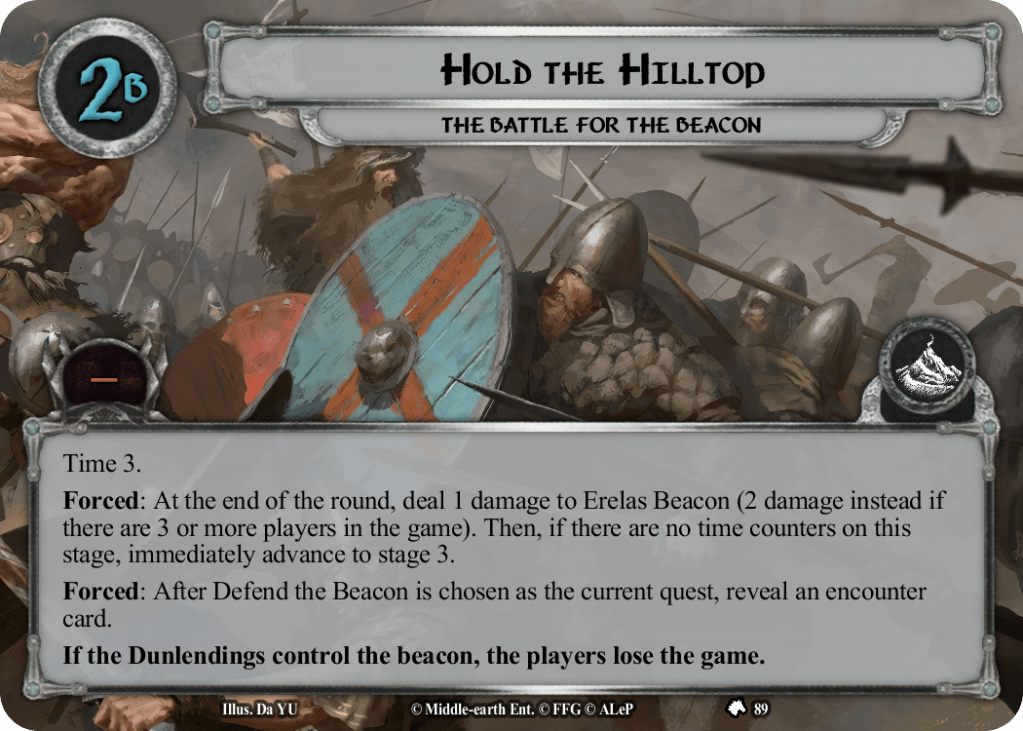
Quest 2A instructs you to fill the Defend the Beacon side quest and each player will add an enemy from the encounter deck. This quest requires players to hold the Beacon for three rounds which is tracked by a time counter on the main quest. If you lose the Beacon (by having no progress on Defend the Beacon) you lose the game. This task is also made more difficult by a couple of forced effects on Hold the Hilltop: one will have you reveal an extra encounter card when you choose to quest against Defend the Beacon (which will likely be every round) and the other will do an extra damage to the Beacon each round (two if there are three or more players).

As mentioned before, this stage is difficult and requires your board state to be pretty well set up – especially in a solo game. If you are not ready, the extra damage on the beacon and the additional encounter card can quickly overwhelm you. If you find yourself knocked out quickly at this stage, you might want to try staying at Stage 1 a bit longer on subsequent attempts.
Your goal is going to be questing enough to make sure Defend the Beacon has the maximum amount of progress allowed each round and trying to remove enemies as they arrive so as not to damage the Beacon too much. It’s helpful to continue to remove progress from Defend the Beacon to prevent damage to the Beacon itself, but you can’t remove the last progress or you lose the game at this stage so you may simply have to let damage through. This is especially difficult solo because Defend the Beacon can only prevent a maximum of 2 damage to the beacon each round and 1 damage will always be done by the main quest itself (2 if there are 3 or 4 players). In multiplayer you have more flexibility, but also have more potential for damaging treacheries and shadows (and shadows can’t be canceled because of Defend the Beacon).
Hang in there for 3 rounds and prepare for one last push.
Quest Card 3: The Last Push
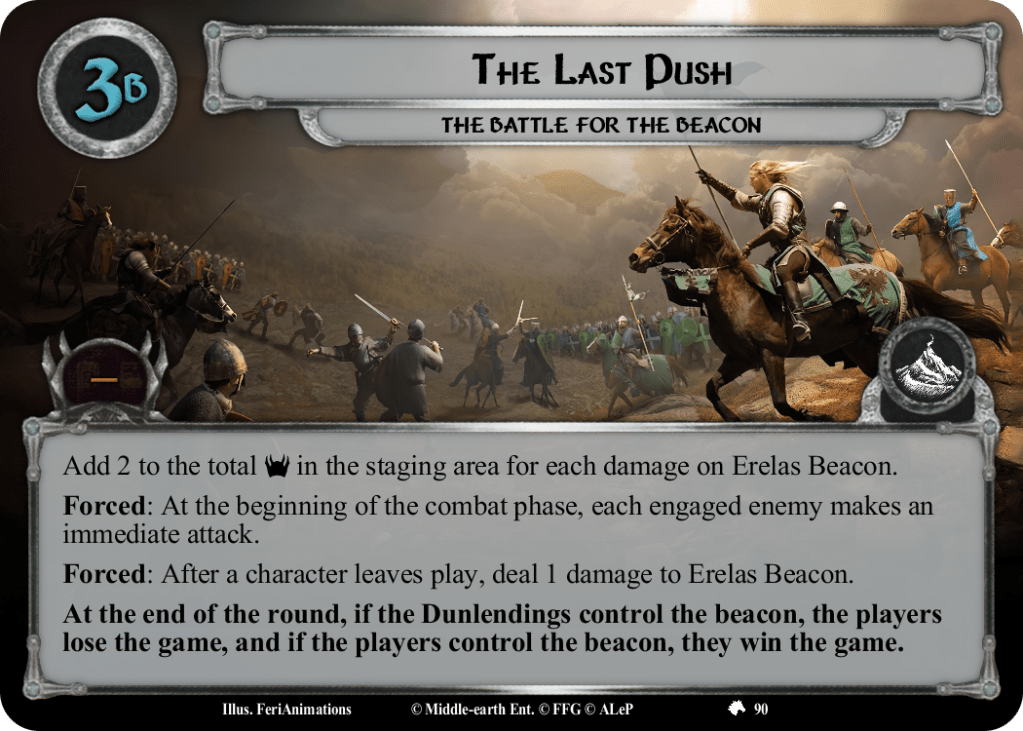
The final quest phase forces you to relinquish control of the beacon by removing all progress from Defend the Beacon and each player needs to add a random enemy to the staging area by discarding from the encounter deck until an enemy is revealed. On the positive side, the first player gains control of the Host of Rohan objective-ally to add a bit of willpower and, most importantly, a sentinel defender.

This quest stage forces you to quest hard in order to regain control of the beacon and then hold on while the enemies make a vicious counterattack. At the end of the round, if players control the beacon then they have won the game. However, if the Dunlendings control the beacon the players lose.
It’s absolutely crucial that you take back the beacon in the questing phase. If you don’t, you lose. So make sure you commit enough to questing to flip Reclaim the Beacon with a good cushion for staging. You have made it this far in the quest, you don’t want to leave your victory up to chance in staging! Depending on your deck, cards that can ready characters so you don’t have to choose between committing them to the quest and saving them for defense are great here. For swarm decks cards like “Strength of Arms” or “Lure of Moria” can be great for this purpose. If you are playing Rohan and have some resources to spare this would be a great opportunity to use “We do not Sleep” and/or “Astonishing Speed” to ensure you can successfully quest through. This is the last round, so no need to save your events for the future.
After you have taken back the Beacon, you need to survive a round of combat with the added challenge of each character that is killed adds 1 damage to the Beacon. You don’t need to kill the enemies so don’t worry about attacking, but you can’t entirely rely on chump blocking either. Making this even more challenging is the fact that each engaged enemy will make an immediate attack at the beginning of the combat phase allowing them to essentially attack twice. At this point if you have some direct damage that can kill an enemy that would be very helpful as it would save you 2 attacks. All enemies (other than the Chieftan) have 4 or less health so are susceptible to Gandalf. Grimbeorn would also be very helpful in this stage because he could eliminate an enemy after its first attack before it made a second (and he has sentinel). Finally, don’t forget the Host of Rohan! They have good defense, sentinel, and can ready once per phase if the group (not just the controlling player!) spends 2 resources. This should at least take care of 2 attacks.
Hang in there, defend what you can, remove progress from Defend the Beacon if you need to chump (but don’t remove the last one!), and even damage the Beacon itself if you are under the 2 + 3 per player threshold. Your victory doesn’t need to look pretty, you just need to cross the finish line. Make it to the end of the round in control of the Beacon and you have won!
The Encounter Deck
Global

- The encounter deck has 42 cards total, 31 in easy mode.
- 5 Cards have Surge so it is not a significant part of the quest. However, in Stage 2 you are often revealing an extra encounter card already.
- Only 2 Cards have Doomed 1. Threat is often not an issue in this quest. It is much more likely you will lose due to damage on the beacon or simply falling in combat to a poorly timed Recreant Rider.
- 5 Cards have Archery. This is not very many, but because at least 1 Surrounding Grassland with Archery 1 will be in play come prepared for it.
Enemies
- Enraged Dunlending – This will be first enemy you encounter in the quest because 1 per player is added during setup. His stats are not that threatening (2 threat, 3 attack, 1 defense, 3 health), but his ability that you have to deal 1 damage to the Beacon when engaged presents an early challenge. You cannot make optional engagements while Reclaim the Beacon is face-up so if you are under his 30 engagement cost you will need to take control of the Beacon quickly to remove him from staging. If you have at least 30 threat you will need to engage him and deal damage to the Beacon, but at least he won’t continually damage the Beacon while he sits in staging.
- Dunland Chieftan – This enemy is unique and comes with boss-like stats (4 threat, 4 attack, 4 defense, and 6 health). Luckily there is only 1 of him in the deck and he goes to the victory display once defeated so you will only need to fight him once. When engaged he will also discard all copies of a random card from your hand. He will require a significant investment of attack power to kill, but his 4 attack is lighter than many other boss enemies in the game. He also is not immune to player card effects.
- Wild Ravager – The Wild Ravager has a pretty typical 2/3/2/3 statline for these Dunlending enemies. What’s unique about him is his ability where he will engage a random player at the start of the encounter phase so you can’t really control where he will go. Since this happens at the beginning of the encounter phase though you can plan the rest of your engagements accordingly. All in all this guy isn’t too much of a threat and is one of the weaker enemies in the set.
- Dunlending Berserker – The Berserker brings a 3/4/2/4 statline which is the highest attack outside of the Chieftan. His ability is an interesting one though that deals 1 damage to a hero you control and to a non-unique enemy engaged with you (basically anyone but the Chieftan). If possible, it helps to plan your engagements to take advantage of this ability and ensure you have another enemy engaged to take this damage. This is rarely enough to kill an enemy outright, but can certainly help – especially if you are running a direct damage deck.
- Hillman Scout – The Scout has a 4/2/3/2 statline and brings a relatively low attack, but 2 archery and a Forced effect that exhausts the highest cost ally you control when engaged. Because of the archery damage and the fairly high threat you will want to quickly engage and eliminate the Scout, but depending on your deck exhausting your highest cost ally could present a challenge if, for example, that ally was a key defender. It’s a far cry from Druadan Forest, but due to this enemy and the constant presence of archery from Surrounding Grassland hopefully you have healing, damage mitigation, or simply lots of allies ready to turn into pincushions.
- Deadly Defector – The Defector is a light to moderate enemy with 2/3/2/3 stats and only becomes a problem if his Forced effect activates where he makes an immediate attack against the last player if in staging at the end of the round. Hopefully because of the effect on the Erelas Beacon you are engaging or otherwise eliminating enemies as they come out anyway. However, several shadows return attacking enemies to staging which will then trigger this extra attack.
- Recreant Rider – Saving the best (or worst) for last we finally come to the Recreant Rider. You can hopefully avoid the extra attack from the Defector, but the Recreant Rider’s Forced effect triggers his extra attack immediately as soon as he enters the staging area. If you are particularly unlucky and he draws the Defector as a shadow card that allows enemies attacking from staging to immediately attack again and the first player can have a rough quest phase. His 3/3/3/3 statline can make even these worst case scenarios manageable if you are prepared for it, but with some inopportune timing this guy can ruin your day. He is a great target for Wait No Longer, however, because then he can bypass the staging area entirely.

Locations
- Surrounding Grassland – This location begins the quest as the active location and is notable for two things: It has archery 1 and because of its Forced effect you are guaranteed to always have at least one Grassland in play. Likely you will clear this location while reclaiming the beacon and then leave it in staging for the rest of the game. However, if a second shows up you may find yourself traveling to the Grassland again because the extra copy could actually be discarded if explored.
- Bald Hill – Depending on whether you or the Dunlendings control the beacon Bald Hill is either one of the best or worst locations. If you do not control the beacon, then the Bald Hill is only 2 threat with no travel effect. If you do control the beacon, all of a sudden the Bald Hill jumps to 5 threat and you have to do 2 damage to the beacon to travel to it. If it’s the first stage and you are not in control of the beacon then take the chance to travel to this location as soon as you can to remove it from staging. If you do control the beacon, then likely you will want to prioritize it anyway and just take the damage. If you are on stage 2 make sure you leave yourself some cushion on Defend the Beacon (if you can) as many shadows in the combat phase can also damage the Beacon. If you are already in a precarious position it may be good to wait to refill this side quest with progress and travel later.
- Wooden Barricade – The Barricade only adds 1 threat to staging which is low for a location, but it has a forced effect that will deal 1 damage to the Erelas Beacon each round it is in staging. This effect also adds a progress to the Barricade so will only occur for a maximum of 3 rounds, but this can either remove precious progress from Defend the Beacon or, even worse, damage the Beacon itself. Due to its low threat you may need to travel to other locations first, but if you have the choice it is nice to travel to the Barricade as its effect doesn’t trigger when it is the active location. If you have the means to add progress to the Barricade while in staging that can also be very effective given the fact that its effect also is adding progress.
- Narrow Stair – Narrow Stair appropriately limits your ability to attack and defend by only allowing each player to have 1 character attack and to defend 1 attack from enemies. All other attacks will be counted as undefended. With 4 threat this is a hard location to leave in staging, but you will have to be very careful about when you choose to travel to this location and wait until there aren’t that many enemies in play (which isn’t often in this quest).
- Rocky Slope – Rocky Slope deals 1 damage to the Beacon each time an encounter card is cancelled and has a travel effect that forces the first player to discard all event cards from their hand. Clearly this is targeted toward limiting the power of A Test of Will, but the treacheries are not the most dangerous part of this quest so this isn’t overly threatening.

Treacheries
- Surprise Attack – This treachery surges and makes it so the next enemy engaged this round cannot take damage and returns to the staging area after it attacks. The most immediate effect of this is that you are likely to have an enemy in staging at the end of the round and thus need to do a damage to the Beacon. Where this becomes more of a problem is if the Deadly Defector triggers this treachery and thus ends the round in staging to make his extra attack. Keep in mind though that this is not looking for the next enemy revealed, but the next enemy engaged so especially at higher player counts where there are likely more enemies to choose from you can exercise some choice in which enemy this attaches to due to optional engagements. Many of the enemies have fairly high engagement cost so at lower player counts it may be possible to simply not trigger this treachery by leaving enemies in staging. If you can’t kill them anyway, why deal with the extra combat?
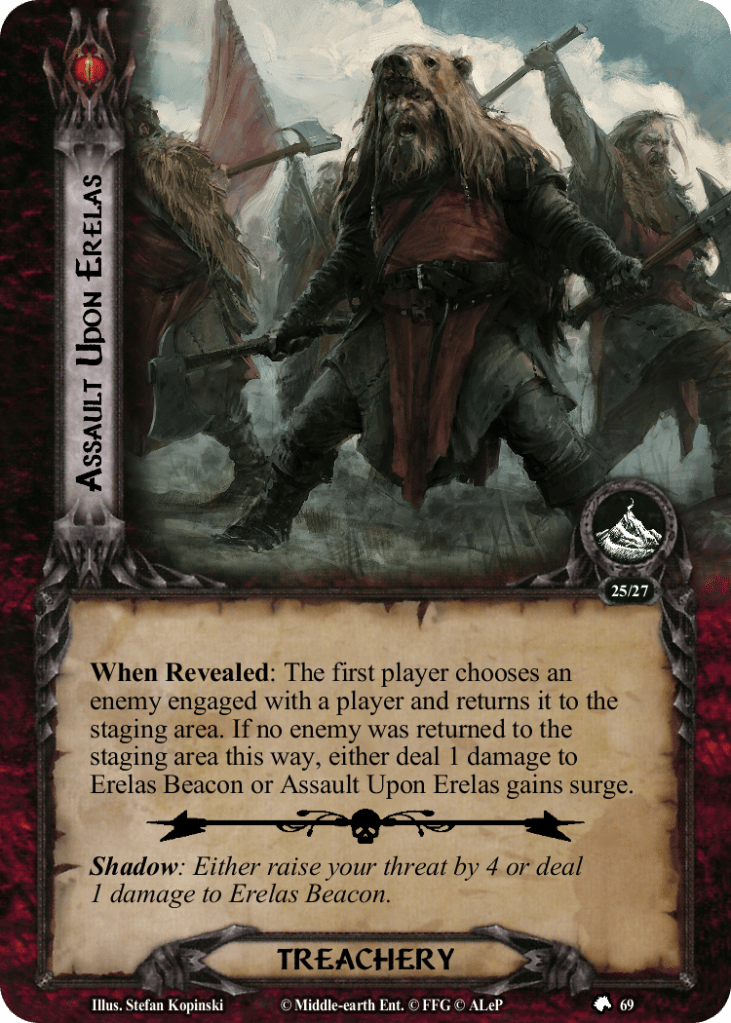
- Assault Upon Erelas – The first player must return an enemy to staging or, if they can’t, choose between giving Assault Upon Erelas surge and dealing 1 damage to the beacon. Worst case for this card is if your only engaged enemy is a Recreant Rider as that will trigger his attack. Often you will want to be killing enemies if possible so in many cases you will be forced to choose between the two secondary options. At higher player counts especially (where you can have more progress on Defend the Beacon) simply dealing a damage to the Beacon is a pretty low cost for an encounter card reveal.
- Another Wave – If you do not control the beacon, then this card simply has surge and doomed 1. If you do, then it forces you to make an additional choice between dealing 2 damage to the Beacon or revealing an extra encounter card. Early on this isn’t too bad, but in stage 2 where you are likely revealing an extra encounter card anyway when Defend the Beacon is chosen as the current quest and then this card forces you to reveal 2 more encounter cards (1 for the surge and another if you don’t want to damage the Beacon) it is easy to get overwhelmed quickly. This is one of the nastier treacheries in the deck.
- From All Sides – Similar to the secondary choice on Assault Upon Erelas, here you have to either deal 1 damage to 4 different characters or deal 1 damage to the Beacon. 3H decks won’t have a choice here and other decks will be limited by not being able to focus the damage on a few characters, but if you have damage reduction and/or healing (good ideas for this quest!) 4 damage is a manageable amount.

Side Quests
- A History of Strife – Like many side quests this has surge and adds an effect that you must discard a resource each time you engage a Dunland enemy. Depending on your deck and when this comes out this may not have much of an impact. Early in the game you will likely want to get rid of this quickly, but can probably afford to let Defend the Beacon flip while you take the time to do so. Later though in stage 2 when you must Defend the Beacon you may simply need to deal with the effect and let this quest remain in staging for the rest of the game.

Tips and Tricks
- None of the locations are immune to player card effects so having some location control, especially in multiplayer, can help clear some of the more problematic locations without having to trigger their travel effects or having to make Narrow Stair the active location.
- Because of the Forced effect on the Erelas Beacon and enemies like Recreant Rider and Deadly Defector you do not want enemies in staging. This limits some Rohan cards like Fastred and Deeping Defender that bounce cards to staging often cause more problems than they are worth in this quest. Similarly traps like Ranger Spikes that trap enemies in staging will only continuously damage the Beacon.
- For much of the quest you will (hopefully) be in control of the Beacon which makes shadow cards immune to player card effects. So best to leave cards like Burning Brand and Hasty Stroke in the sideboard for this quest.
- The majority of the enemies in this quest have decent defense (2-3), but fairly low hit points (2-4) so direct damage is an effective way to manage enemies – especially when you control the beacon and enemies in staging are no longer immune to player card effects. As mentioned previously, Grimbeorn is also a great option to block and kill enemies (and limit their ability to attack again).
- Unless playing multiplayer where other players can help with questing the first few rounds, slow developing decks will struggle with this quest as they may find the Beacon nearing its damage limit by the time their deck is ready to go. The sooner you can take control of the beacon the better! However, once you have control don’t feel the need to rush to stage 2. Spending a few rounds refilling Defend the Beacon while you build your board state will definitely pay off down the road.
Playthroughs
- COTR – https://www.youtube.com/watch?v=ocnne9nujEI
- One Stop Co-op Shop – https://www.youtube.com/watch?v=j5Zf7_b0fiY
