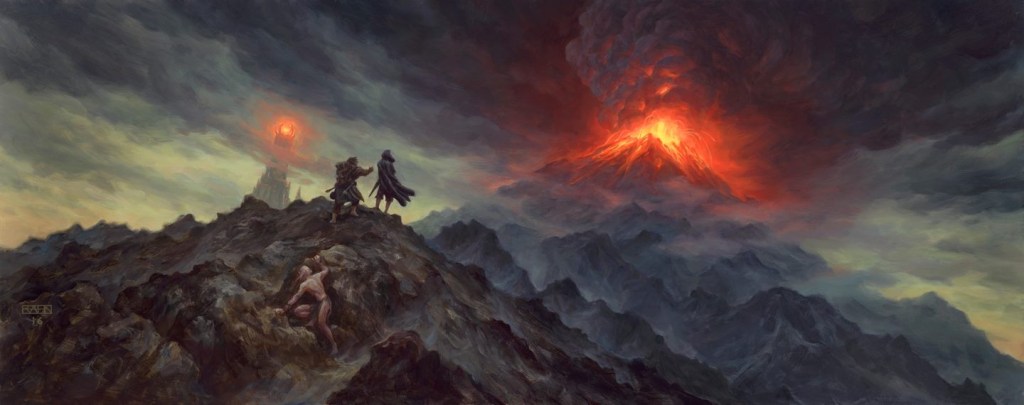
“Sam looked at him and wept in his heart, but no tears came to his dry and stinging eyes. ‘I said I’d carry him, if it broke my back,’ he muttered, ‘and I will!’ ‘Come, Mr. Frodo!’ he cried. ‘I can’t carry it for you, but I can carry you and it as well. So up you get! Come on, Mr. Frodo dear! Sam will give you a ride. Just tell him where to go, and he’ll go.’“
– The Return of the King, Mount Doom
This is it. We have finally reached the last scenario of the saga campaign. An exhausting, perilous trek through a hostile land, filled with enemies attempting to destroy Evil forever. And to make matters even worse, the clock is ticking – you have to destroy The One Ring before time runs out for your friends at the Black Gate. From the titanic last stand at the Black Gate, we now focus on covert action and extreme endurance. Join us for the final leg of the journey to the place where it all began – Mount Doom.
- Found in The Mountain of Fire Expansion
- Official Difficulty: –
- Community Difficulty: 9.2
- Encounter sets: Mount Doom, Deep Shadows
- Quest cards: 4
- Play if: You want to finish the saga. You want a scenario with a tight time schedule, where the number of rounds is limited
- What is different about this quest?: You have to rush to succeed. The quest tries to stall you with fortitude tests and is extremely punishing for playing allies.
- Solo or Multiplayer?: It will be rough either way. There is a thematic satisfaction in doing it solo – it is what Sam did after all.
- Can I bring Side Quests for this scenario? Short answer: No. Long answer: No, dear Lord, no…… (you won’t have the time).
Setup

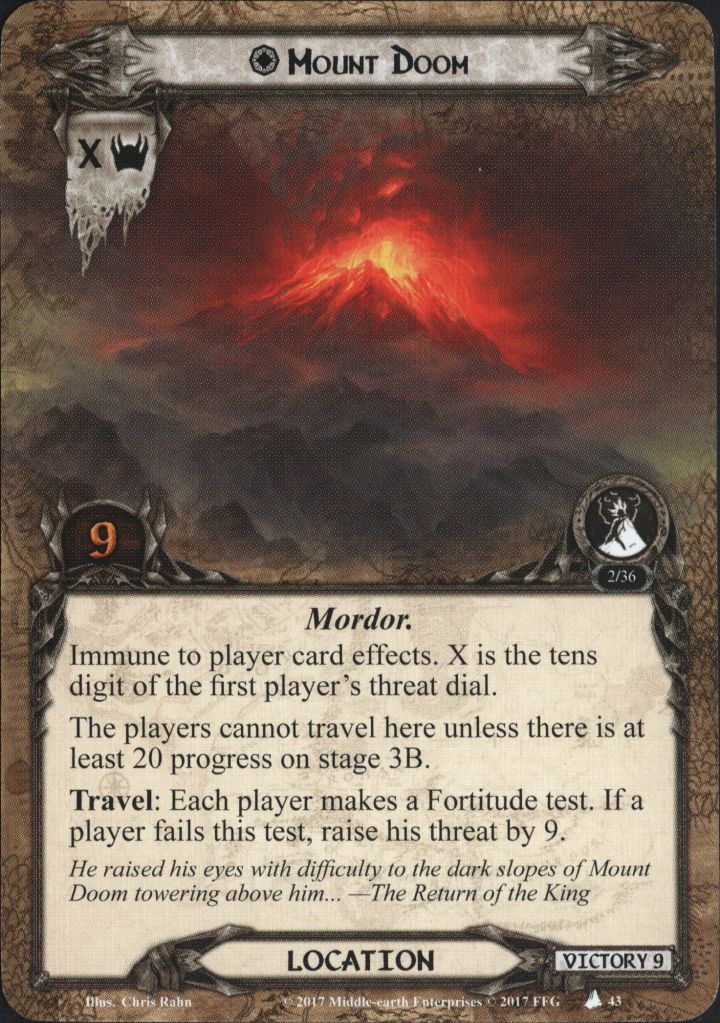
We begin setup by adding Mount Doom and The Tower of Barad-Dûr to the staging area. If you didn’t know we were in for a hard ride, those locations should be tell-tale signs. The Tower of Barad-Dûr is not a location but an objective, and it adds a surprising curveball to the game: At the end of the Refresh phase, players do not increase their threat by 1, as they usually would. Instead, each player increases their threat by 1 for EACH non-fellowship CHARACTER they control. Not ally. Character. One does not simply walk into Mordor, indeed. This severely punishes swarm decks, and even modest boards with 5+ allies can lead to a 10 point threat increase per turn. This really turns the game on its head. As you can imagine, this causes the game to end rather quickly for swarms of Dwarves or Outlands decks. Threat increase and punishment of controlling major characters will become a recurring theme. And this is evident on Mount Doom as well. Mount Doom is a unique location with X threat, where X is the ten-digit digit of the First Player’s threat dial. It requires 9 progress to clear, is immune to player card effects, and the players cannot travel here unless there is at least 20 progress on stage 3B. Hence, for now, Mount Doom will sit on the horizon, gradually increasing threat and becoming an ever-increasing menace. The more allies you play, the faster Mount Doom becomes a literal mountain of threat. Once you want to travel to Mount Doom, each player has to make a so-called Fortitude test, which is a unique type of test for this scenario. If they fail, they increase their threat by 9.
To do a Fortitude test, a player exhausts any number of heroes (and only heroes – no allies here) and totals their willpower. Then they discard a number of cards from the encounter deck, equal to the ten digit of their threat dial. In this encounter deck, many cards will contain between 1 and 3 Eye of Sauron icons. The total number of icons are counted, and there is a player window if the player can boost their willpower further. If the committed willpower is greater than the number of icons revealed, the test is passed. Otherwise, it fails, which can trigger all sorts of nasty things.
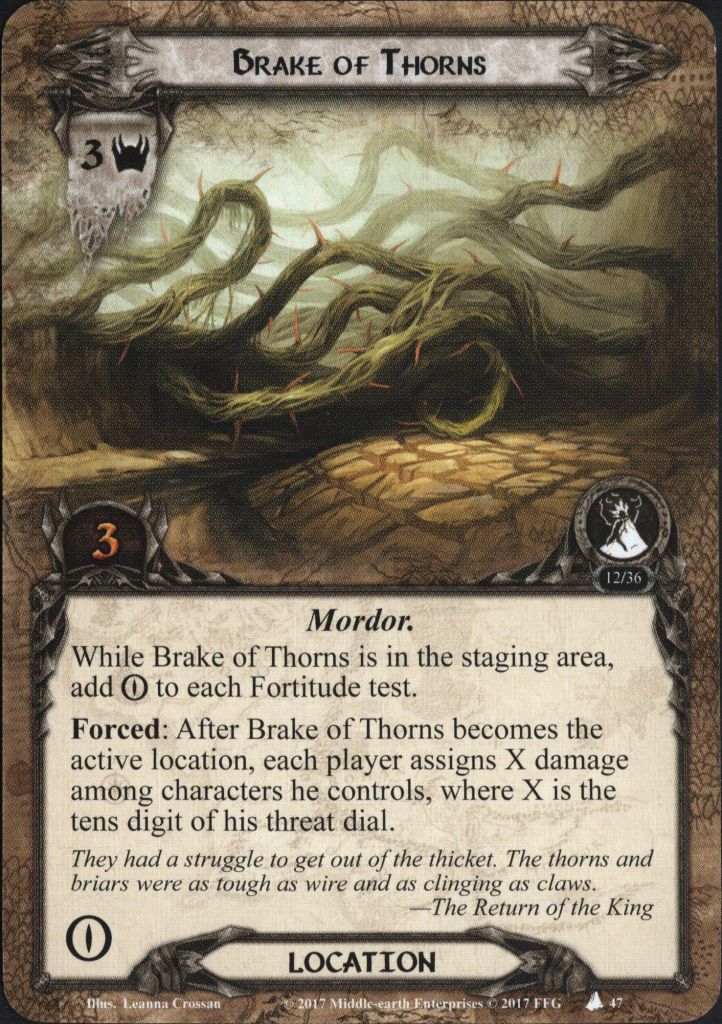
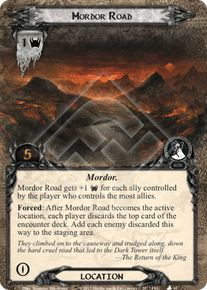
After we add the Mountain and the Tower, we find a copy of Brake of Thorns and make it the active location. When Brake of Thorns is in the staging area, it adds an Eye of Sauron to the Fortitude tests. But it also ensures that you start the game with some damage on your characters. After it becomes the active location, each player assigns X damage, where X is (you guessed it) the tens-digit on each player’s threat dial. So, you will begin the game with some damage sprinkled out. This can be particularly burdensome if you previously earned the Grievous Wound burden, which will attach to the first character that takes damage. And even then, we are not done – now each player must search the encounter deck for a different location and add them to the staging area. My first pick will always be Old water-course because it rewards you for exploring it, and has a rather trivial travel cost (exhaust a hero). For more players, it gets trickier. Mordor Road is not too bad if you travel there early. It begins the game at one threat, and gets +1 threat for each ally controlled by the player with the highest number of allies. To travel there, each player discards the top card of the encounter deck and adds each discarded enemy to the staging area – this can be bad, but will often fizzle at lower player counts. You can add a second Brake of Thorns to the staging area if you can travel there early, so it won’t deal a ton of damage later in the game. But beware – the extra icons it adds to fortitude tests can come back to haunt you! My third (or even second) choice would be Plain of Gorgoroth. It gets a threat increase when you fail Fortitude tests, but has no immediate downsides. To travel there, you make a fortitude test, and that can be tricky to pass early game. Hence, it is a location I will leave in the staging area for a while. Orc Hold blocks location control and gets the first player engaged with an orc (and as we will see, the deck has some nasty orc enemies as well). I try to avoid this one.
If we play Saga, we have some additional housekeeping. Firstly, each player may change heroes without incurring the +1 threat penalty. Secondly, a number of resources are placed on the saga setup card, equal to the number of resources that were placed at the Black Gate. At the end of the round, one resource will be removed, and if the last resource is removed, the players lose the game. The clock is ticking fast! Lastly, burdens from Helm’s Deep, The Road to Isengard, and The Passing of the Grey Company are removed from the campaign pool.
As discussed in our article for the Black Gate Opens, you can also play the two scenarios simultaneously as epic multiplayer. If you choose to do so, you will setup two separate staging areas. We will discuss how epic multiplayer affects the game in its own section later.
Stage 1B: The Land of Mordor (4 Progress + 4 pr player)
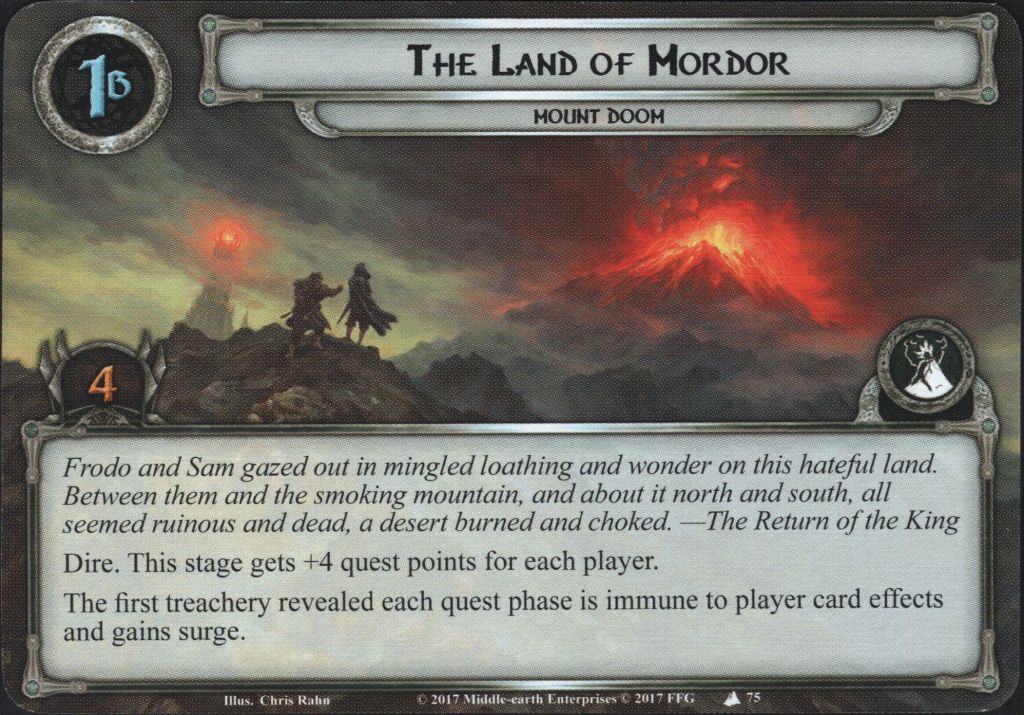
Once again, we are faced with the Dire keyword, meaning the elimination threshold is 99 rather than 50. Otherwise, the only game text we see is that the stage gains 4 quest points per player, and that the first treachery revealed each round is immune to player card effects and gain surge. As far as I have been able to discern, encounter cards can have multiple instances of Surge, so if you, for example, have a Burden with Surge, it can force a reveal of two encounter cards. While this stage looks passable, I found that it can be extremely tough to breeze through, especially at lower player counts. Brake of Thorns means that the stage is actually 3 more progress. The encounter deck is highly prone to surge trains, where the first treachery surges into a little snuffler surging into something else nasty. The treachery-surge effect is, of course, worse at lower player counts, but this quest gets weird in multiplayer because of the ally hate, and if someone plays a traditional deck of vomiting out allies, their threat will rapidly climb into the sky. Fortitude tests mean you have to keep your willpower high, and have readying effects for your heroes. And once the Ringwraith of Sauron comes out, you cannot afford to fail fortitude tests, unless your deck is built for combat.
The most important thing about this quest is to keep a steady questing pace and build up your willpower on your heroes. If you played the Black Gate opens without shenanigans, you may only have a handful of rounds to get through this – you have to play hard and fast. In a solo game, you will begin with 4-5 threat in the staging area, with roughly 2-3 extra per player. In multiplayer games, you may be able to push hard enough so you clear the stage in one go, but in solo, I find I usually need at least two rounds to clear it. I try to have some readying in my opening hand, so I can ready a hero and use them to travel to the Old Watercourse in round 1. It raises the quest point threshold by 5, but it also provides a neat bonus once you clear it (a 5 threat decrease for each player) and you remove a location from the staging area. Note that the cost is markedly steeper in multiplayer, as EACH player must exhaust a hero. In solo, this is usually more trivial.
I try to clear this stage as quickly as I can to get a moment of respite from the surge-bonus to treacheries. Try to keep some readying around so you can commit heroes to Fortitude tests (we will talk more about those in a minute). The Lidless Eye early on can ramp up your threat quickly in the early game, causing you to engage enemies you would rather avoid, and because you need to quest so heavily, I often find I have too little offensive firepower to kill enemies. You need lucky draws as well.
In multiplayer, it may be beneficial to have a player as a dedicated fighter so enemies can be removed and the staging area kept clean. I often find that in solo, I don’t have time to clear enemies, and I have to quest over them. As a result, I try to keep my threat as low as possible by playing more or less without allies. Note that the Dire keyword prevents you from lowering your threat by more than one – something I repeatedly forget while playing these quests.
With some lucky draws and strong willpower on the board, you should be able to progress from this stage by round two.
Stage 2: The Road to Isenmouthe (- quest points)

When we advance to this stage, we start by searching the encounter deck, discard pile, and victory display for a copy of Mordor Road and make it the active location. Remember that the Forced effect on Mordor Road triggers when Mordor Road becomes the active location, and not when you travel – hence each player must discard a card from the encounter deck, and if it is an enemy, add it to the staging area. Hence, advancing to this stage can cause some pretty significant changes to the staging area. Then we shuffle the encounter discard pile into the encounter deck, and flip the quest card.
The first thing we see is the Dire Keyword. Then, we note that there is no progress value to advance to the next stage! The game has other plans for us. Instead, we get a forced effect: When progress would be placed on this stage, each player must make a Fortitude test. For each player, if they pass, they place a resource on the stage, but if they fail, cards get discarded from the encounter deck until an enemy is discarded, and this enemy is then put into play engaged with the player who failed. Ouch. You do not want to fail this. The goal here is to place a number of resources equal to or greater than the number of players in the game. Once that is accomplished, you get to advance. Hopefully, your heroes will be equipped with sufficient readying effects so they can quest over whatever is present in the staging area, clear Mordor road , and ace the fortitude test. Ideally, you want to place a single progress on the stage so you have plenty of heroes available for tests and to handle enemies (remember, Mordor road may have added a few, so you may have to face them if your threat is high enough). How much should you commit to a fortitude test? I’ve done the calculations, and the average eye icon count is just short of 1 eye per encounter card. Hence, you should be able to commit at least 1 willpower per 10-digit on your dial. Keep in mind that this can vary, and if you want to be more or less certain to pass, you need at least double of that. Hence, your heroes may need to get their willpower boosted to reliably pass tests. If you’ve made it this far, your deck will probably be made to pass these tests, so we will assume you can clear this stage in one round, maybe two at higher player counts. This should mean that we are ready for stage 3 in turn 4 or turn 5.
Stage 3: The Last Gasp (20 Progress)
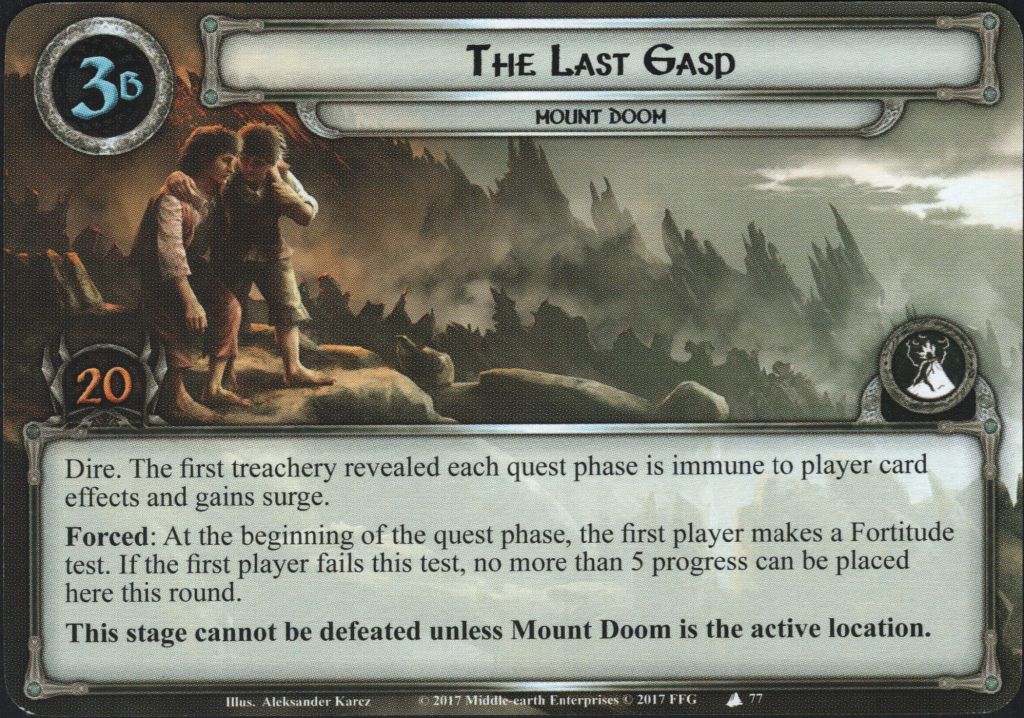
We begin this stage by shuffling the encounter discard pile into the encounter deck. Then we discard cards until X locations are discarded, where X is the number of players. These are added to the staging area. With the amount of locations from setup, extra encounter cards from stage 1 treacheries, and enemies discarded during stage 2 from Mordor road, the staging area can get busy. I’ve found that you rarely have the time to deal with everything, so try to quest over enemies and locations as much as you can. Once we flip, we see the Dire keyword and that the first treachery revealed will get Surge and be immune to player card effects once again. This is a brutal effect in Solo and means that you have to rush through – otherwise the encounter deck will grind you down. We see that at the beginning of the quest phase, the first player must make a Fortitude test, and if they fail, no more than five progress can be placed on the stage this round. Lastly, the stage cannot be defeated unless Mount Doom is the active location.
This stage is another reason why you need to make your heroes capable of questing for insanely high values, and take advantage of this willpower multiple times per round. Remember, only heroes can contribute will to Fortitude tests. And if you run a ton of allies to handle questing, your threat will ramp up dramatically, making fortitude tests harder to pass. It is a clever piece of design that forces players towards a Voltron deck strategy, where heroes are built into super questers through willpower boosts and readying effects. The challenge is to balance tempo (playing down your attachments fast enough) and to avoid location lock and getting swarmed by dangerous enemies. You will require a good deal of luck here. Consider how you can ready your heroes – unexpected courage is, of course, an evergreen, and some heroes have access to tribe- or hero-specific readying effects such as Fast Hitch or Shadowfax. But don’t underestimate one-shot readying, such as Cram or Miruvor, so a hero can ready if the encounter deck is throwing an extra fortitude test at you. Especially Miruvor has been helpful to me, because you can essentially recur it. If you have some card draw, it becomes a reliable backup plan. Light of Valinor is another good way to ensure you will have a Noldor quester available for subsequent Fortitude tests. Use all the tricks available.
In the best of worlds, you will ace the Fortitude test and blast over the stage in a few rounds, questing with everything you have. Remember, in saga you may not have that many rounds, so speed is essential. It is also highly likely that you will have a Nazgûl in the staging area at this point, and then failing Fortitude tests is no longer optional. In lower player counts, you cannot afford to linger, because you will start revealing multiple encounter cards per round, which will tax your resources by forcing additional fortitude tests on you, or draw out enemies or other nasty tricks. If everything goes to plan, and you get to place the 20 progress, then you are ready to travel to Mount Doom. To travel, each player must make a fortitude test, and if they fail, they raise their threat by 9, which can cause enemies you have managed to avoid to engage, and potentially trigger nasty failed-fortitude effects, like the above-mentioned Nazgûl. It is likely that you won’t have the resources to pass this and take it on the chin – you may have to commit what you have, pray to the Valar, and see if you can deal with the consequences. If you are lucky and soldier through, you get to advance to stage 4.
Stage 4: The Crack of Doom (- Progress)
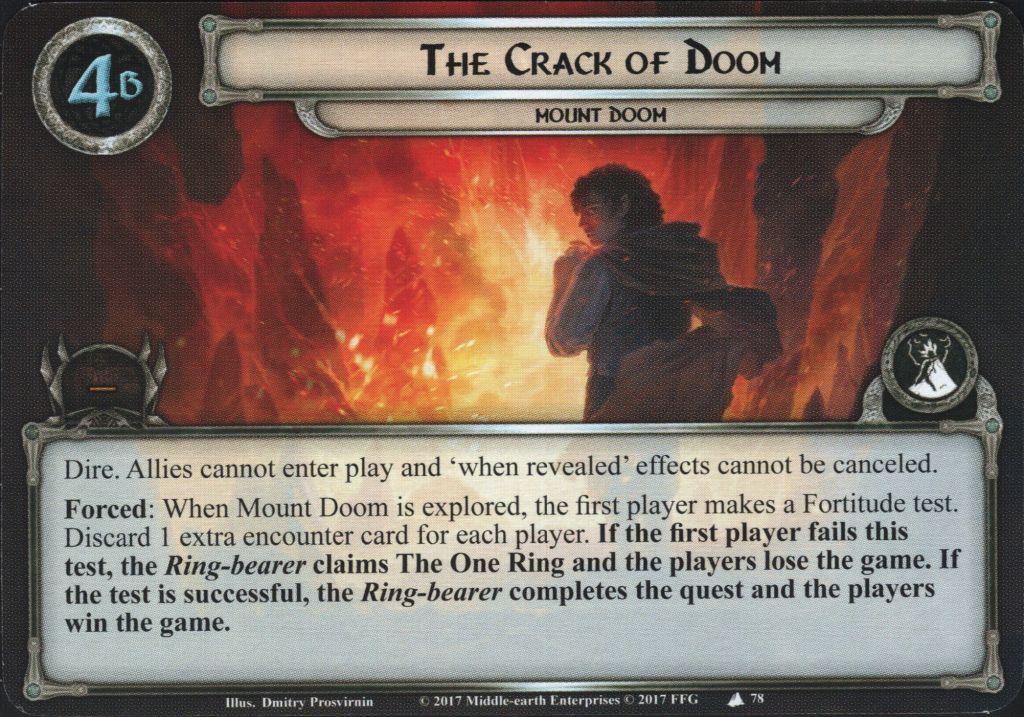
Mount Doom is no longer in the staging area, so that is potentially a huge chunk of threat disappearing. However, we cannot rest on our laurels. The first thing we do upon advancing is to shuffle the encounter discard pile into the encounter deck, discarding cards until X enemies are discarded, where X is the number of players in the game. Then each enemy is added to the staging area- This could mean that you’ll have to face combat in this same round, if your threat level is high enough. It can also mean Gollum will make a thematic appearance. Nevertheless, this effect is worth keeping in mind, especially if you went all in on questing/fortitude tests. Emergency readying is your friend.
Once all the enemies have joined the fray, it is time for the final quest stage of the Saga boxes. We once again face the Dire keyword and an additional curve ball – allies can no longer enter play. You are on your own, and no charging Rohirrim will save you now. Our goal is to explore Mount Doom. Once that is done, the first player makes one final fortitude test, discarding one extra card per player. If the players fail the test, the Ring-bearer claims the ring for themselves, and the players lose the game. If that test is successful, the players win the game and The One Ring is destroyed forever.
As mentioned above, I found the most difficult thing about this stage is surviving the enemies entering play through the advancement, and from the round of questing. This can seriously mess you up, especially because you tend to run low on allies. Emergency readying is your friend, as is the occasional undefended attack (if you can survive it) and the rare sacrifice of a hero. If you made it this far, you will have ample readying effects to commit your remaining heroes, and hopefully add the final 9 progress. The trick is to hold enough resources so you can make the fortitude test. One player has to do it, which can be tricky, especially if you have divided questing/attack among the players in your fellowship. Because Fortitude tests grant you a player window, you can boost willpower if you have the effects – keeping a Rosie Cotton back can literally be the difference between victory and defeat. The general rule is one willpower per card. You’d better prepare for it.
Once this is done, the players have won the campaign.. Unless you play Saga! There, the First Player gets to choose: keep The One Ring and succumb to the Power of Sauron. This means the players lose the campaign. Alternatively, you can destroy The One Ring Card and free Middle-earth of Evil forever. There are several memorable moments of people destroying the cards – The Chad famously shot it with a hunting bow. I saw someone burn it on a gas stove. And I handed the card to my 1-year-old, who had always been eyeing my player cards. Make the most of it and be creative! You have earned it.
(Make sure to share your favourite ways to destroy The One Ring card in the comments under this article!)
Epic Multiplayer Mode
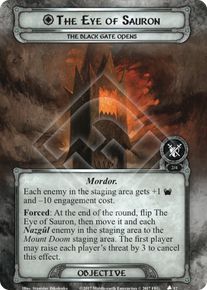
We went over how to setup for epic multiplayer mode in the Black Gate opens, but we will repeat it here for the Mount Doom specific parts. You set up two separate staging areas and divide the players among the two. You have to have at least as many players at the Black Gate as you have in Mount Doom, but you can go more at Black Gate if you choose. You then add the Eye of Sauron to the staging area for Mount Doom. The eye adds an eye-icon to each fortitude test, meaning you have to commit additional willpower to these tests to increase the odds of passing them. At the end of the round, you flip the card, so the Black Gate side is up, and move it, together with each Nazgûl enemy in play to the Black Gate. The first player can increase their threat by 3 to prevent this effect. You will recall that at the Black Gate, the Eye grants each enemy +1 threat (increasing the risk of threating out) and -10 engagement cost (increasing the risk of getting swarmed). The quest becomes a balancing act of preventing one side from being overrun. Key communication and strong decks are a must here.
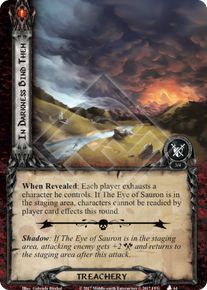
Each encounter deck also gets a copy of In Darkness Bind Them shuffled in. This treachery causes each player to exhaust a character they control, and if the Eye of Sauron is in their staging area, characters cannot be readied until the end of the round. It is a brutal treachery that can easily cost you the game – by now, you will have realized how crucial readying is to be victorious. So this is a bad treachery, well worth canceling. As a shadow card, it punishes you for having the Eye in your staging area, granting the attacking enemy +2 attack and returning them to the staging area. Ouch.
Once setup is done, you flip the Epic Multiplayer card over and place it next to the encounter deck in the Mount Doom staging area. It negates the effect of the Mount Doom campaign card, where resources tick down each round. Instead, both stages must survive until the Mount Doom crew can destroy the Ring. To help the brutal odds, the Valar show the players a little grace – at the end of each round, the first player at Mount Doom gets to choose a staging area (Black Gate or Mount Doom). Each player at the chosen scenario draws one card, whereas the players at the other scenario reduce their threat by 3. The players exchange control of Gwaihir between scenarios if he is in play. If every player at one of the stages is defeated, the players lose. If the Mount Doom scenario is defeated, the players win. Pat yourself on the back and crack open the best ale in the Green Dragon – you have earned it.
The Encounter Deck
Global
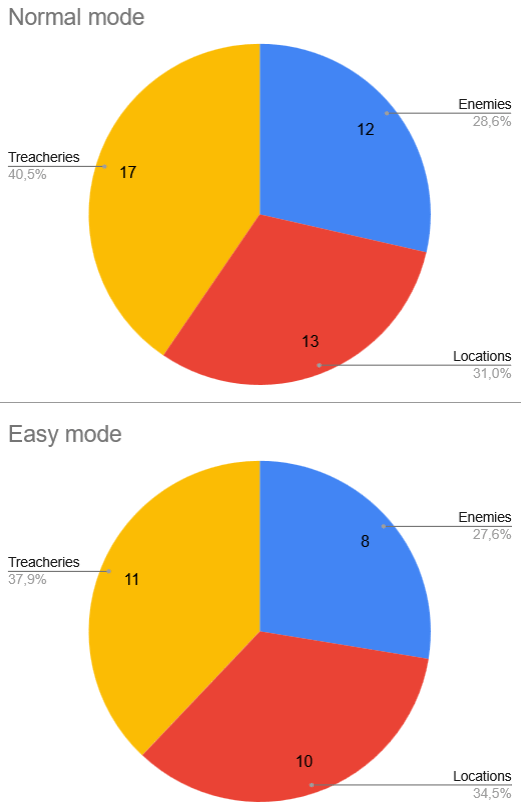
- The encounter deck consists of 42 cards on normal and 29 cards on easy
- 24 cards have shadow effects bringing the risk of encountering a shadow effect to 57%. On easy the risk is 55% (16 cards)
- Average threat is 1.29 on normal and 1.34 on easy, which is surprisingly low. This is because the encounter deck is 40 % treacheries.
- 5 cards have Surge on normal, and 3 on easy (Gollum and Little Snuffler)
- Peril is present on 8 cards on Normal, and 5 cards on Easy (Little Snuffler and The Lidless Eye)
- Doomed 2 is present on two cards on normal, and one card on easy (Deep Shadows)
- Immunities
- Gollum is immune to non-fellowship player card effects
- Mount Doom is immune to player card effects.
As mentioned above, average threat is very low in this quest because there are so many treacheries. This does not take into account that for the majority of stages, the first treachery will Surge because of the stage effects.
Enemies
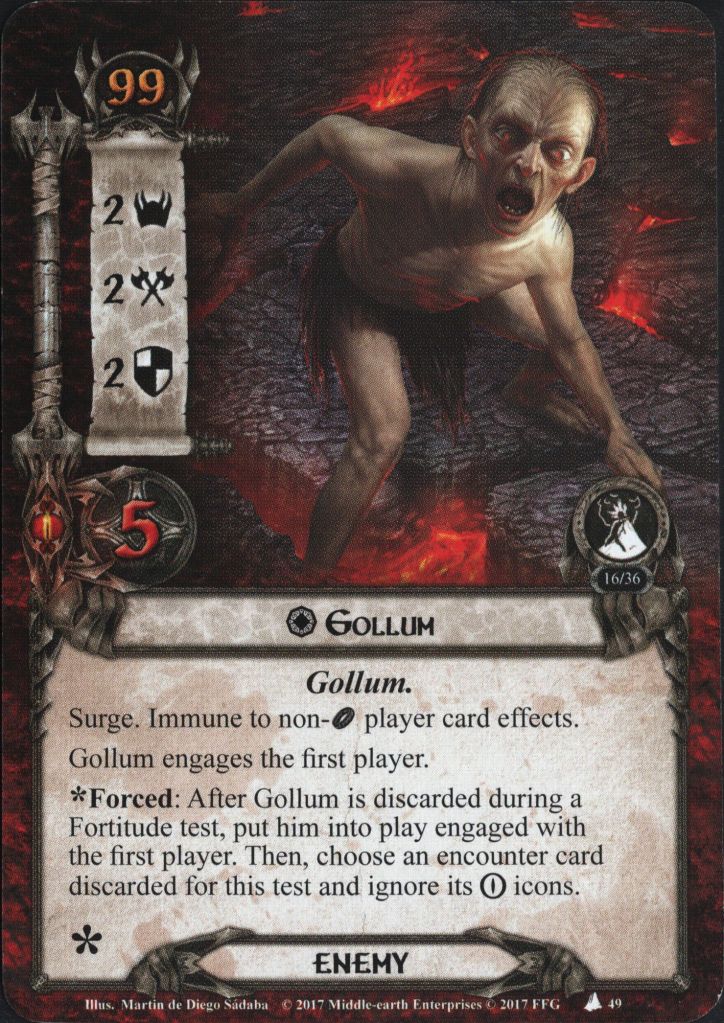
- We begin with something as extraordinary as a unique enemy – Gollum. 2 threat, 2 attack, 2 defense makes Gollum rather trivial in combat, but with 5 hit points, he takes some resources to kill. He has an engagement cost of 99, but engages the First Player (he is coming for the Precious!). He is immune to non-fellowship player card effects and has Surge. If he is discarded during a Fortitude test, he is put into play, engaged with the first player. Then you get to choose an encounter card discarded during the Fortitude test and cancel all Eye icons. Yep, you can technically pull off the sequence of events from the book where the attack from Gollum saves the day and causes victory. A thematic homerun. Gollum does not have a shadow effect, but the combination of Surge and all the combat strength it takes to kill him means I’m rarely happy to see him. An exception will be when you discard to find a random enemy – there Gollum is actually not too bad. As he is unique (and because he is Gollum), there is only a single copy regardless of difficulty. As we will see, there is another way to bring him out. Gollum has no shadow effect and no Eye icons.
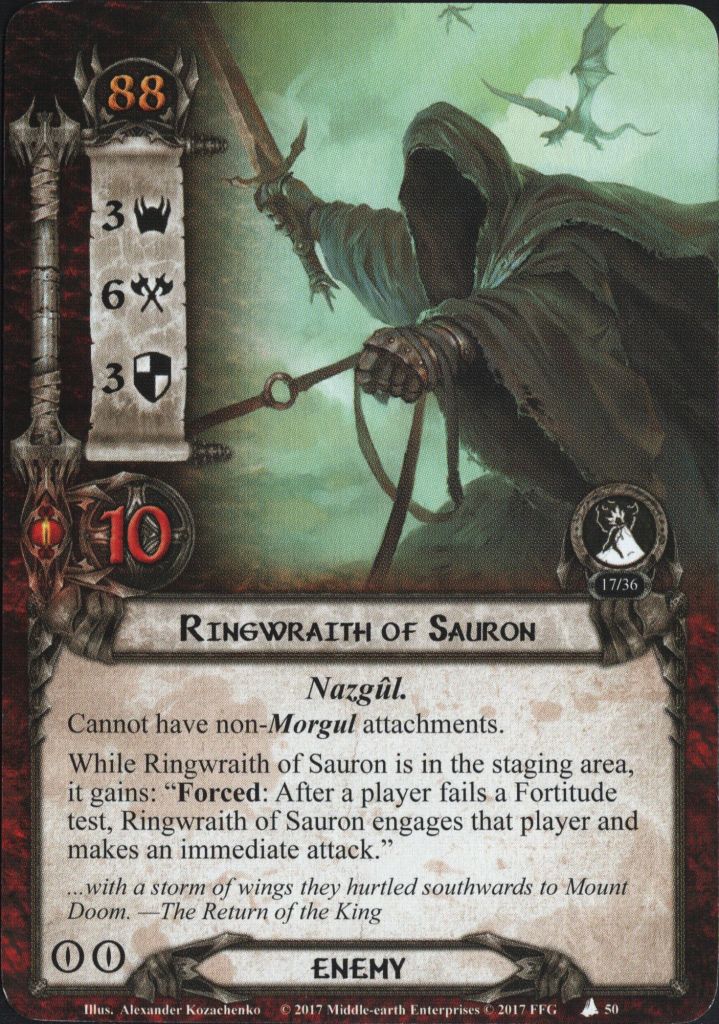
- Next, we go to the Ringwraith of Sauron – a terrible enemy I absolutely hate to see. 3 threat, 6 attack. 3 defense and 10 hit points make the Ringwraiths an all-out terrible experience. 0 stars, wouldn’t visit again. It cannot have non-Morgul attachments and has an engagement cost of 88. This means you can keep it in the staging area until the Ring is safely dumped in the bowels of Mount Doom, right? Yeah, if you are lucky. Besides adding 3 threat to the staging area, which is never pleasant, the Ringwraith lurks like a knife over your head. If the Wraith is in the staging area, it gains “Forced: after a player fails a Fortitude test, the Ringwraith engages that player and makes an immediate attack”. When this guy is around, failing Fortitude tests is no longer an option. It can be absolutely brutal with the right encounter card combination. With two Eye icons, this is not ideal to see during a Fortitude test, but at least this means it is out of the encounter deck. It has no shadow effect, making it my favorite Shadow card in this scenario. You get two copies on Normal and one on Easy. In Epic Multiplayer, this will follow the Eye of Sauron between the two staging areas – if you are lucky, the other table can deal with them.
- Orc Captain is your second mini-boss, although nowhere nearly as bad as the Ringwraith. 3 threat, 5 attack, 4 defense, and 6 hit points means you have to swing pretty hard to kill it if you are unfortunate enough to engage it. He combos well with the Ringwraith, which is terrible for you: after you engage the Captain, you must make a Fortitude test, and if you fail, you get an encounter card. If you have to engage this enemy (an engagement cost of 55), then you likely do not have a ton of resources to spare to commit to Fortitude tests and defend + kill this enemy. The extra encounter card makes everything extra rough. This enemy is just an all-out bad time. As a shadow card, it punishes you for chump blocking, which is a rare thing in this scenario; if the attack kills a character, the attacking enemy is returned to the staging area. It has two Eye icons, comes in two copies on normal, and one on Easy.
- Big Uruk is a meaty but not unreasonable enemy. 2 threat, 4 attack, 3 defense, and 5 hit points means it can take a lot of hurt, and cannot be trivially blocked, but it is also something that does not wreck your questing too much. 44 engagement makes it a mid-range engagement, unless you are really unlucky. When Big Uruk engages you, you must either raise your threat by 4, or it makes an immediate attack. Unless I have a strong defender with readying, I go for the threat, unless this would push me into territory where I would start engaging an Orc Captain or Nâzgul. Otherwise, I try to leave him in the staging area. As a shadow card, it grants +1 attack per ally, which can make it incredibly deadly. This is the kind of shadow effect you cancel if you can, unless you happen to play without allies. It contributes a single Eye icon and comes in three copies regardless of difficulty.
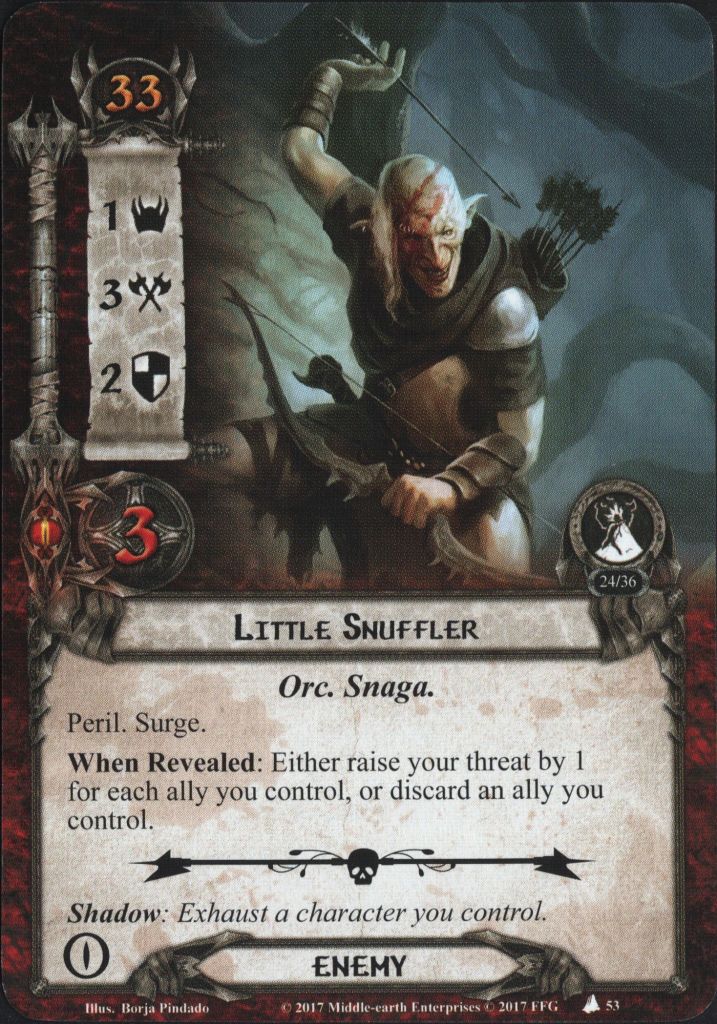
- Little Snuffler is your standard Surge-orc weenie. 1 threat, 3 attack, 2 defense, and 3 hit points makes it easy to kill, and something you can block with a more casual defender. With an engagement cost of 33, it is something you will have to deal with quite early in the game, unless you run some hobbit secrecy shenanigans. When revealed, you must either raise your threat by one for each ally you control or discard an ally you control. I usually go for the threat option, because in this scenario, I don’t have allies that aren’t crucial for my strategy. As a shadow card, it exhausts a character you control, which can be inconvenient when you suddenly don’t have enough attack power to kill that enemy. It contributes a single Eye icon, comes in four copies on Normal, and two on Easy. It is a nuisance, but rarely deadly.
Locations
- Orc-Hold is a 3-threat location that requires 4 progress to clear. As such, it is a location that you might as well clear if you have the chance – it does not take away a lot of your progress to do so. Especially because it works as a hard counter to location control while in the staging area, preventing you from placing progress on other locations in the staging area (though importantly not at Orc-Hold itself). However, traveling to Orc-Hold comes with risks regardless of player counts, and for that reason, you might consider leaving it, unless location control is a key component of your strategy. When you travel to Orc-Hold, you reshuffle the encounter discard pile into the encounter deck, letting all those nasty Nâzgul you discarded back into the encounter deck. Then you discard cards from the top of the encounter deck until an orc is discarded, and put it into play engaged with the First Player. Chances are good you will get a little snuffler (especially on Normal), but you could also be unlucky and pull the Captain. And you don’t want to pull the Captain. Travel with caution. It has no shadow effect and one Eye icon. There are three copies on standard (meaning they can disable location control on each other) and two on easy.
- Next, we have Mordor Road, a hard counter to playing any allies. With 1 threat and 5 progress, it seems benevolent, and especially in true solo, if you build decks without allies, it can become trivial. But if just one player at the table plays any allies, it can become a wall that location locks you indefinitely. Mordor Road gains +1 threat per ally from the player that has the most allies. Suddenly, that Fellowship will have a hard time making any progress. After Mordor Road becomes the active location, each player discards the top card of the encounter deck and adds each enemy discarded this way to the staging area. Hence, Mordor Road is a prime candidate for Thror’s Key. Blanking this will feel goooood. If you don’t have any allies, you laugh at this card and leave it in the staging area. It has no shadow effect, a single Eye icon, and comes in two copies on normal and one on easy.
- Plain of Gorgoroth is a card I’m usually not too concerned about. With 2 threat and 4 progress, it is a bit of a softball. If a player has failed a Fortitude test this round, it gets +2 threat. Still, this is in the milder end, and I count myself quite lucky when this is what I draw. As we previously discussed, it can easily become very dangerous to fail Fortitude tests. To travel there, the First Player must make a Fortitude test, and if they fail, each player raises their threat by 4. This means you can often choose a good time point to make the test, or alternatively, leave the location and quest over it. It comes in four copies regardless of difficulty and has no shadow effect. It has no Eye icons.
- Brake of Thorns has 3 threat and requires 3 progress to clear it. It adds +1 eye to each fortitude test while in the staging area, which messes up the math we previously established around fortitude tests. However, the method to clear it can get a bit nasty. When it becomes the active location, each player assigns X damage to characters they control, where X is the ten-digit of their threat dial. This can get quite severe later in the game, and you could easily reach a point where it becomes unfeasible to travel to it, instead taking advantage of high willpower to clear tests. It has no shadow effect, has a single Eye icon, and comes in three copies on standard and two on easy.
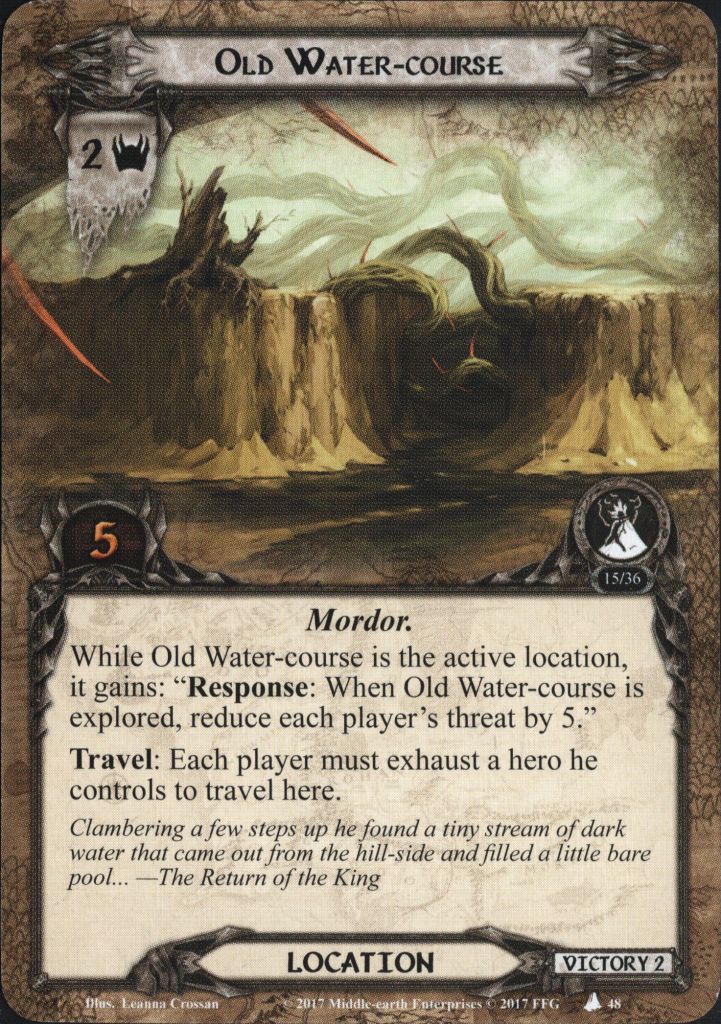
- Hello, Old Water-Course, my old friend. Chances are good this location will start in play. 2 threat and 5 progress means this takes some resources to clear and will delay you slightly. To travel there, each player must exhaust a hero they control, which can be tricky to coordinate at higher player counts. At lower player counts, this is likely quite trivial. But the sweet reward when you clear it is worth it – when it is the active location, it gains “when Old water-course is explored, reduce each player’s threat by 5”. In a game where your threat means so much, and Dire prevents drastic threat lowering, this can be a godsend. It has no Eye icons, no shadow effect, and comes in a single copy regardless of difficulty. It has Victory 2, so you will never get to see it twice.
Treacheries
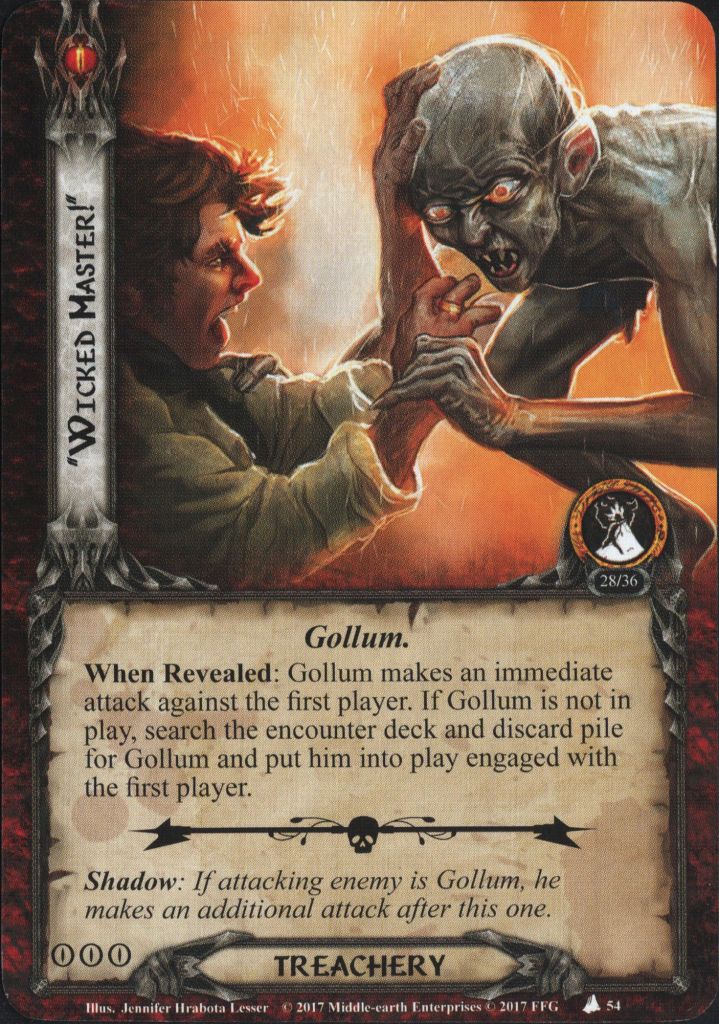
- We begin with ‘Wicked Master’, a Gollum-specific treachery. If Gollum is in play, he immediately makes an attack against the first player. Otherwise, you search the encounter deck and discard pile for Gollum, and puts him into play, engaged with the first player. This effect is a minor inconvenience because Gollum takes some resources to clear, as described above. However, this card actually bypasses Gollum’s Surge, so it is preferable to drawing Gollum outright. The extra attack can be an annoyance, though it is rarely deadly (though never say never in this scenario!). The largest inconvenience is actually that it exhausts your heroes by forcing them to deal with Gollum. This card is much more troublesome when you draw it as part of a Fortitude test – 3 icons can really mess you up, and suddenly call down all sorts of disasters on you. As a shadow card, it grants an extra attack if the attacking enemy is Gollum – rarely a disaster. It comes in a single copy on Normal and is removed on Easy.
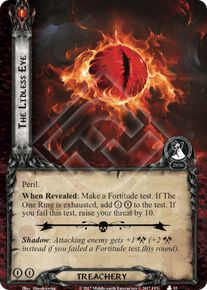
- Lidless Eye is a card you will see a lot, as it is present in four copies on Normal, and three on Easy. It has two eye icons, making it a challenge when it appears during tests. It has Peril, and when revealed, the player who drew it must make a Fortitude test. If The One Ring is exhausted, you add two eyes to the result. If you fail, your threat is raised by 10. This can be dangerous and will make all subsequent Fortitude tests harder (as a raise of 10 will cause an additional card to be discarded). Furthermore, failing Fortitude tests can trigger enemies and locations, and you want to avoid that if possible. I usually try to keep enough resources to pass this rather than canceling it. But if you feel this would keel you over, it is worth a cancel.
- Foul Fumes is another treachery that forces a Fortitude test. When revealed, each player must make a Fortitude test, and if they fail, they deal one damage to each character they control. Until the end of the round, the text box of each damaged character is treated as if it were blank. This is a treachery that you may be able to tank if revealed during the first couple of rounds, but later in the game, it is worth canceling if you can, especially at higher player counts. This is an extreme toll on your resources. As a shadow card, this also punishes failed Fortitude tests – if the defending player failed a Fortitude test, the attack is considered undefended. Needless to say, this can easily cost you a hero. Don’t fail Fortitude tests! The card has two Eye icons, and comes in two copies on Normal and one on Easy.
- Heavy and Tired is the reason why you bring Power of Orthanc to this scenario. When revealed, it is attached as a condition attachment to the hero with most attachments, with a limit of one per hero. It then gains “Attached hero cannot commit to Fortitude tests. After you fail a Fortitude test, exhaust attached hero and discard each non-objective attachment on it.”. This will target Voltron decks and essentially remove your most valuable resource. If you have one hero who is super important for your strategy, you can try to work around this by placing cheaper attachments on a secondary hero, but this is rarely worth the effort. Better to cancel or to remove. The card has a single Eye icon and no shadow effect. It comes in two copies on Normal and a single copy on Easy.
- Drawn to the Ring is a risky card that works as a combo enabler for Lidless Eye by tempting you to exhaust the ring. When revealed, you must either exhaust The One Ring or discard cards until you get an enemy, and put it into play engaged with you. When considering this, it is worth looking at the discard pile and the staging area. Have you seen any Nâzguls? What about the Orc Captain? Chances are you will get a snuffler, but the others can end the game quickly. If you draw this early game, you might have used the Ring for Frodo’s actions, but later you should keep this card in mind when using Frodo for a resource or similar. In solo, it is safe to exhaust the Ring most of the time. In multiplayer, you can get one-two’ed by a Lidless Eye, where an exhausted character makes the Fortitude test harder. But this is still often better than an unknown enemy. It may be worth canceling, depending on the circumstances. It has no Eye icons, and as a shadow card, it forces you to discard a non-objective Attachment you control. It comes in three copies on Normal and two on Easy.
- Deep Shadows has Doomed 2, and forces each player to choose: Either they must discard their hand (consisting of at minimum three cards) or reveal an encounter card. This is a card that more or less whiffs in Solo (you take the extra card and move on), but in Four player, this is well worth a cancel, unless everyone is setup and don’t mind tossing their hands. Needless to say, four extra encounter cards can cause things to spiral out of hand rather quickly. As a shadow card, the attacking enemy makes an additional attack after this, so it is worth it if you have shadow cancels. It has no Eye icons, and comes in two copies on Normal, and a single copy on Easy.
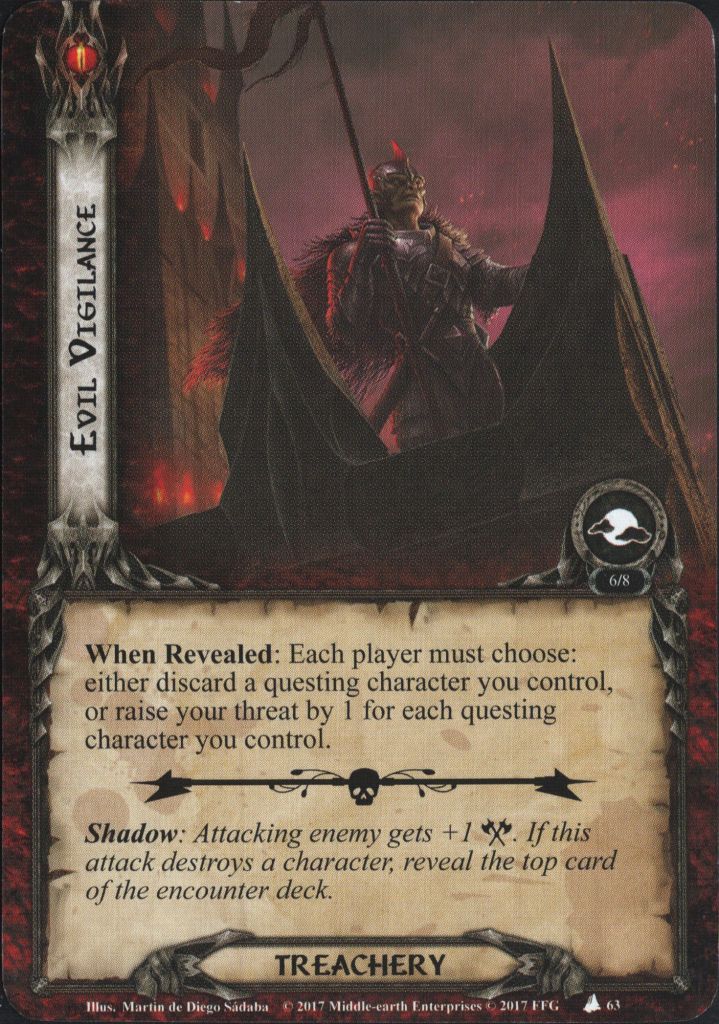
- Evil Vigilance is another card that punishes you for playing allies, but is strangely a card I’m mostly happy to see. When revealed, each player must either discard a questing character or raise their threat by one for each questing character they control. As this scenario really punishes you for playing allies, most decks will naturally have few allies. If you, for some reason, include some cheap questers, you toss one of them to this effect and move on. If you invest more in attachments and willpower boosts for a few voltrons, you take the threat increase and move on – it will rarely be more than 4-5. This can, of course, be an issue, but compared to the other things hidden in this encounter deck, it is nothing – it is not even tied to a Fortitude test. As a shadow card, it punishes chump blocking, as it grants +1 attack, and if the attack destroys a character, you reveal an encounter card. This is bad, but it should rarely trigger in this scenario. Every round counts; you can’t afford to run chump blockers. It has no Eye icons and comes in three copies regardless of difficulty.
Tips and Tricks
- Always keep Willpower and Heroes in reserve for Fortitude tests. They can come at you from unexpected sides, so you need to be ready for them. Failing them can often be deadly, so try to avoid taking them in the first place.
- Remember the Dire keyword prevents you from lowering your threat by more than one from Player card effects. I tend to forget all the time that Dire isn’t just raising the threat elimination cap.
- Cheap readying effects like Cram and Miruvor really are your friends in this scenario. They can be the enabler that suddenly allows you to take a Fortitude test you didn’t plan on.
- Think long and hard about when you travel to locations and if you need to travel to them at all. If you play Saga, you potentially have few rounds to defeat this scenario. Every point of Progress counts, and the scenario forces at least two locations on you through scenario card effects. This leaves you with little opportunity to travel.
- The same goes for enemies – devoting attack power and defense to enemies is taking away resources you could spend on questing and passing Fortitude tests. This scenario is a questing sprint, so try to avoid combat as much as you can.
- Remember, you have a player window during Fortitude tests after the Eye icons are tallied. Consider adding some willpower boosts to your deck. Especially, Lay of Nimrodel can be useful if you stack a lot of resources on one spirit hero, and can help you plow through stage 3B.
- Orc-Hold prevents location control, but placing progress on the active location can mean the difference between making it and being one progress short. Consider adding some location control to be safe.
- Are you planning to play with only a few, or without allies entirely to avoid the negative effects of playing allies? Consider if your deck could be converted into a Three Hunters deck. You may get an extra bonus for doing something you planned in the first place.
Playthroughs
- LOTRLCGSolo made a progression style playthrough in octgn
- Cardboard of the rings made multiple videos, including a thematic epic multiplayer one (in two parts) with physical cards. That one has an accompanying strategy video, discussing deckbuilding choices. Originally, Chad from Cardboard of the Rings also made a octgn video for his original campaign.
- One-stop coop shop also made an epic multiplayer playthrough with physical cards
- Carl Swanson also did a playthrough (and another one) with physical cards as part of a Saga campaign. Later, he also did an epic multiplayer playthrough
- Tryhard academy made a version in a format I do not recognize – I believe it is Tabletop simulator.
We have now reached the end of the Saga. The One Ring is destroyed, and Evil has been vanquished forever. Thank you for joining us on this journey, through Tolkien’s wonderful lands. Go in peace! I will not say: do not weep; for not all tears are an evil. And we from Visions of the Palantir? We aren’t going anywhere. There is still plenty of ground to cover.
