I like it when a scenario breaks the regular flow of the game, offering a unique hook to the quest that makes it stand out among all others. Temple of the Deceived is one of the most recognisable cases of this, as it is probably better known as “That one quest with the map”. This is quite a unique feature and shows a relationship to Arkham Horror as well. The map mechanic was liked a lot by the community, but it hasn’t really been reused after this quest (though AleP tried to mimic it with The Nine are Abroad). So if you have played the regular version of this quest and wanted more, there’s a good reason to try it in Nightmare Mode!
This mode adds to the difficulty of the quest, but it also adds another column to the map, making the quest take longer as you search through the jungle. New treacheries also mess with your map, making it useful to keep notes on which locations you have already seen. This version of the quest is going to take you a lot longer, but if you are not killed by the dead soldiers patrolling the ruins, you might actually make it to the end!
Nightmare Temple of the Deceived
- Found in: Temple of the Deceived Nightmare Pack, Dream-chaser cycle pack 3.
- Size: 19 cards, of which 6 locations will be added to the island map.
- Increase in Difficulty: Adding another column to the map will extend the duration of this quest, making it more likely to threat out in the end. The new section of the map is also more difficult with new Nightmare locations and higher threat on locations in the staging area. Tougher enemies are also added, though their difficulty will depend on the location on the map. It’s not as easy as the regular version of this quest, but not brutally difficult, making it a decent challenge to overcome once you have mastered the normal variant. One thing that makes this quest arguably easier than the normal version is that you won’t run into the Temple Guardian on turn 2. The Cursed Temple that brings him down will be in the second portion of the map, and you should be pretty well equipped to deal with him by that time.
- Fixed Loopholes: There was a very small chance that you could lock yourself out of getting the key with a certain map setup. This is now taken away with the addition of new locations and the removal of a Jungle Path. This means that it is in theory possible to beat every setup of the map. Another loophole that was somewhat patched is where players were going to flip locations to look at them through progress or the Aimless Wandering treachery. This is made more difficult by the removal of 2 copies of that treachery, and the requirement of 8 progress instead of 4 for the Edge of the Temple locations. This version of the quest also prevents players from getting benefits from attachments on locations over and over again.
- New mechanics introduced: 6 new Uncharted locations are added to the map, bordering the Temple of the Deceived column at the far-right. These locations will make it more difficult to advance, the closer you get to the Temple, but since two of these locations are the Cursed Temple that you need in order to claim the Gate Key, you can’t stall too much on the far left. The new Nightmare cards also now look at where you are on the map (both column and row) in order to change up enemies and treacheries. This adds to the difficult decision of where to travel to next.
- Play this scenario if: You enjoyed the regular version of this quest and want an even bigger map! You like the Exploration keyword where you get to flip over some locations and have to take notes on what you find there.
- Solo or multiplayer: I enjoy this quest more in multiplayer, as it will spark interesting discussions during the travel phase on where to move next. There are more things to consider in this mode, and moving right on the map is a risk you are going to have to take. It also adds to the enjoyment of finding the right locations when you need them most.
- What to look out for: Tougher enemies, more difficult locations in the second portion of the map, you still need to kill the Temple Guardian.
New Rules
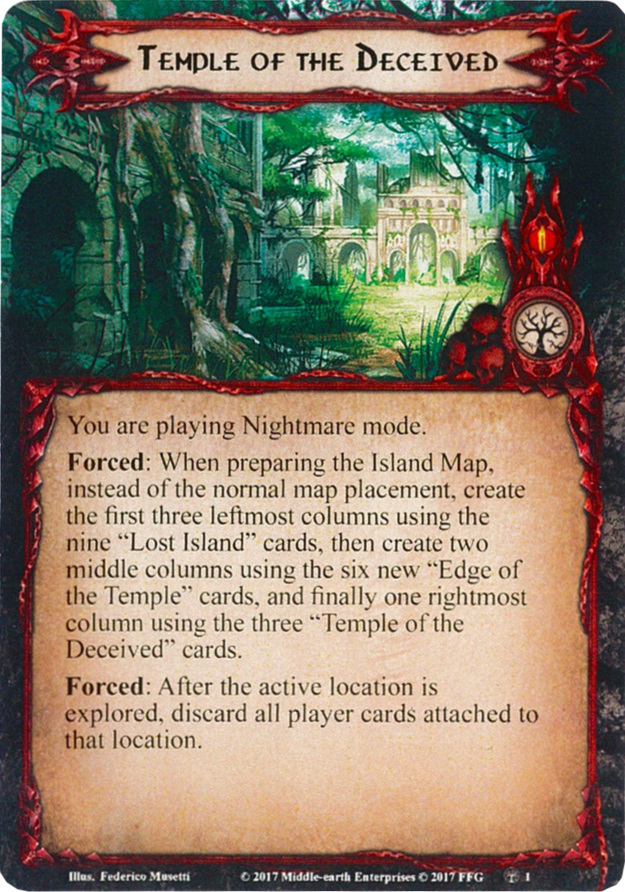
While there are technically two new rules on the Nightmare card for this scenario, one is really just meant to be done during setup and is not a continuous rule during the game. So I will cover that one in the next segment. The other rule will harm decks that are trying to leave marks on locations to figure out which way they have come from. In the original version of this quest, you could leave an Ancient Mathom or another attachment on a location, explore it, move to the next location, and eventually travel back to the original location with the Mathom on it. Continuously exploring the same active location would grant the players a bunch of benefits from those attachments. Since the locations never left play, as they were a part of the map, the attachments also stayed.
That all changes in this Nightmare version of the quest, where it is more likely players will revisit certain locations thanks to some of the treacheries in this new deck. Now, whenever the active location is explored, all player cards attached to it will be discarded. Note that you still do not discard the location itself, which stays as part of the map. This new rule lowers the effectiveness of Woodmen decks against this quest, though at least you are still able to play attachments on these locations at all. Just make sure that you only play the attachments on the non-Uncharted (Charted?) sides of the location cards.
New Setup
While there is technically no new setup mentioned on the rules card, there are some new rules when it comes to setting up your map. From the original scenario, you are instructed to remove three of the double-sided locations (2x Cursed Temple and 1x Jungle Path). These are then replaced by the six “Edge of the Temple” double-sided locations. This means that your new map will have an additional column, as 3 locations get added in total.
The way you set this up is with the three “Temple of the Deceived” locations shuffled and forming the right-most column on the map. You then place the six “Edge of the Temple” locations to the left, forming two columns of harder locations, which will also contain the Cursed Temple that you need to find in order to locate the Gate Key. To the left of that, you shuffle and place the nine leftover “Lost Island” locations. You flip the two corner locations over, and decide which of the two you want to start as your active location (ignoring any Forced effects when you flip it over. At the start of the game, your map should look something like this (though the flipped-over left corners can be different locations).
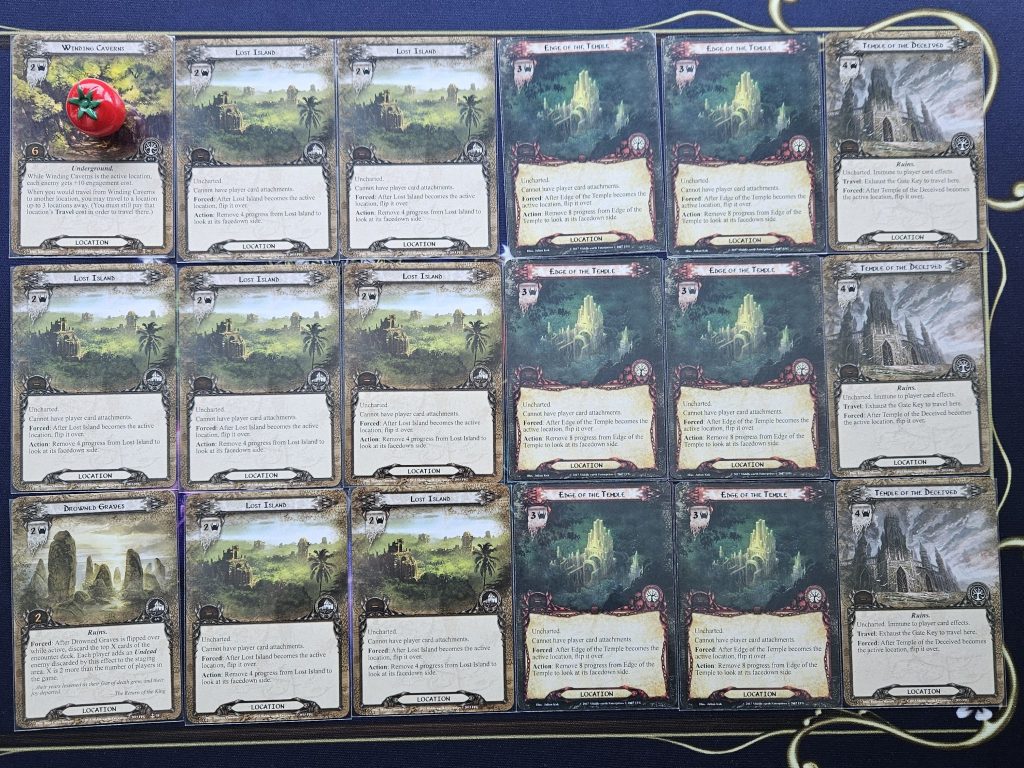
The rest of setup is the same. Players divide up the two objective allies, add the Temple Guardian to the staging area with the Gate Key attached, and shuffle the encounter deck. The downside of this increased map is that you will need some extra table space for your physical playthroughs, or an additional monitor when playing digitally. Aside from that, setup should be easy to get used to within a few resets of this scenario. Remember to have shuffled the locations and have not peeked at any of the backsides. Only the two left corners may be flipped at the start of the game, not the others.
Cards removed
The following cards were removed from the deck for being too easy or to make space for the new Nightmare cards. This includes three locations, which get replaced with the six new locations to increase the size of the map.
- 1x Jungle Path (Making space for new locations on the map)
- 2x Cursed Temple (Replaced by a new Cursed Temple in order to find the Gate Key)
- 1x Deeper into the Ruins (There are still 3 copies of this treachery in the deck, and it will hit harder as the map is wider than before)
- 3x Sunken Ruins (This was never really a big deal during the regular scenario)
- 2x Aimless Wandering (One copy remains of this treachery that can be used to scout out Uncharted locations)
- 2x Curse of the Downfallen (You could build around this treachery by including expensive allies or focusing more on heroes instead)
- 1x Dwindling Supplies (Outside of the first few rounds, this card doesn’t hurt that much, Noldor deck are also not impacted as much by this)
- 3x Faithless Desecrator (Replaced by King’s Knight, which is a straight upgrade in stats and ability)
The Quest
Overall, the quest doesn’t change much; it just becomes a bit longer and a lot more difficult as you get closer to your goal. The main thing that is different for your progression through the map is that you have a better guess of where the Cursed Temples are in order to get the Gate Key. They are now somewhere in columns 4 and 5 of the map, on the flipside of the new Nightmare locations. There are still two of them, so you have a 33% chance of finding one whenever you travel from the third column. This gives you time to prepare for your battle with the Temple Guardian, and some relative safety in the early game. But be careful, because the new enemies in this quest can hit very hard, plus the Call of the Curse treachery can greatly boost their stats the further to the right of the map you go.
Your best course of action would be to head to the right immediately, stalling on column three for a while in case you need to build up your boardstate more or want to scry locations in the area via the Uncharted keyword. You can also use extra progress to clear side-quests to give some long-lasting advantages for this game. While stalling is not going to win you the game, this quest does allow for taking your time a little before entering the right half of the map. That’s where things get more dangerous, with more brutal locations and stronger effects from treacheries.
Your goal should be to find a copy of Cursed Temple and stay there long enough to slay the Temple Guardian in order to claim the Gate Key. From there, you move to the rightmost column of the map in search of the Grotto’s Entrance location. The best way to do this is to enter either the top or the bottom location in this column first. Entering from the middle gives you a hard choice of going either up or down, and choosing incorrectly can make the game last even longer. There is also no scrying these Temple of the Deceived locations, so it would be a 50/50 guess if the middle location isn’t the Grotto’s Entrance.
Finally, you should probably keep a log of the locations you’ve seen during your exploration. New treacheries will shift the map or cause roadblocks on your way to the right. Keeping a log will help you to remember what sort of Forced effect is waiting on you if you advance to a certain location. You can also scry most of these locations, but that progress is often better used for side-quests or for clearing the active location.
Once the players find the Grotto’s Entrance and place all eight progress tokens on the location, they win the game. It will take a while, and your threat might be higher than you are comfortable with. Enemies at the endgame will also hit a lot harder if you don’t cancel Call of the Curse, so be prepared for some serious combat in the later half of the game. All in all, it is not the worst Nightmare quest to have to face, and the expanded map can be pretty fun to explore. Reason enough to come back someday after having claimed your victory!
The Encounter deck
Global
- The encounter deck is made up of 33 cards after the Island Map has been created.
- The chance to get a shadow card with an effect is 54%
- Average threat per card revealed from the encounter deck is about 1.2 threat/card. This seems too low for Nightmare mode, but the added threat of the locations on the map and various threat boosts on treacheries make up for this.
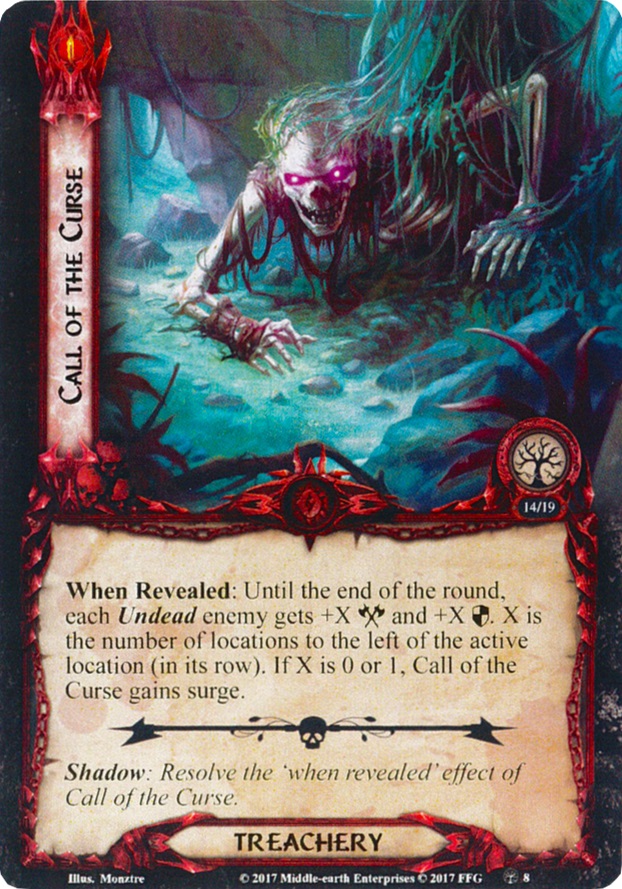
- There are two copies of Throngs of Unfaithful in the deck that will surge. Call of the Curse can also surge if the players are still in the two leftmost columns of the map when the treachery hits.
- There is a lot of Doomed in this deck, so your threat will be under pressure here. Deceitful Island is the only card that raises threat directly; the other six treacheries are more situational. Bring threat reduction to counter this.
- Immunity
- Temple Guardian is immune to player card effects and cannot be optionally engaged.
- Temple of the Deceived is immune to player card effects, so you cannot flip them over to find the right way to go.
- All Lost Island and Edge of the Temple locations cannot have attachments.
- Island Watcher cannot be optionally engaged.
- While you are engaged with Soulless Cadaver, you cannot search your deck.
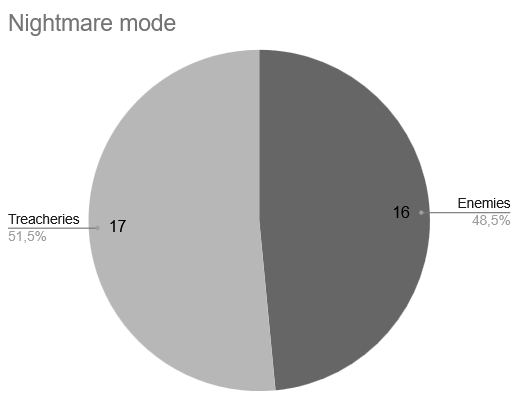
These stats do not take the Island Map into account, which will constantly be adding threat as you move through it. Temple Guardian is also not counted, as it will never appear in the encounter deck. Because all locations are removed from the encounter deck, you can find that the distribution of the deck is a bit weird, and almost an even split between enemies and treacheries. You can benefit from this with cards like Wingfoot, which will have to replace Leather Boots in any deck going up against this quest.
Enemies
More Undead enemies stalk the jungle and the ruins waiting for you. Their low engagement cost can certainly cause problems during the engagement phase, so make sure to kill everything engaged with you before new foes come down.
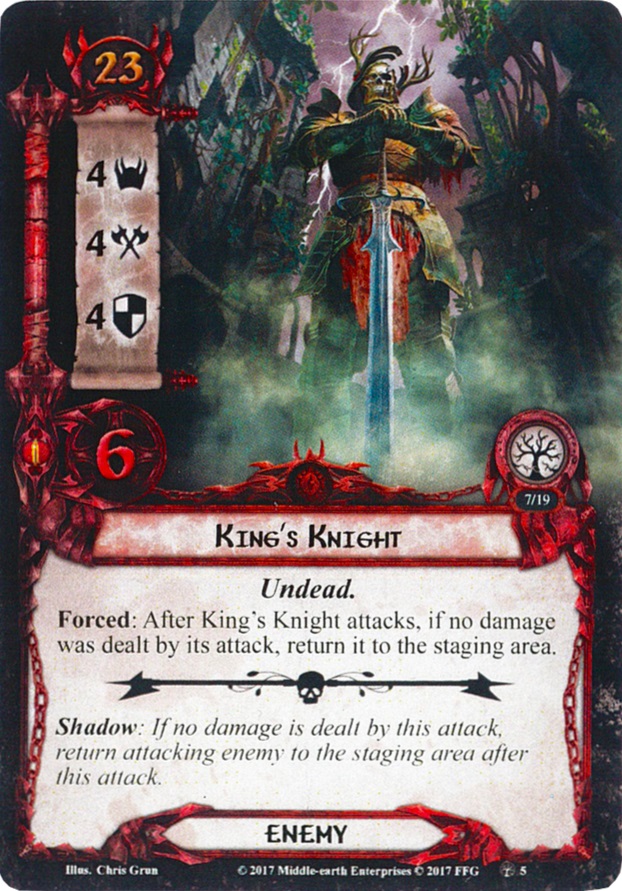
- King’s Knight: Now that’s a killer pose! And I’m not just saying that because this enemy killed 5 of my allies. The King’s Knight has some big stats to start with, and considering that Call of the Curse can increase that attack and defence further, you are going to be in for a tough fight against this enemy. The high attack stat can also be useful in combination with his ability. That requires the King’s Knight to do some damage with his attack, or else he returns to the staging area. With an engagement cost of 23, you can count on it that he will bounce between players and the staging area if you don’t lock him down somewhere. Traps are a good idea here, with Ranger Spikes keeping him in the staging area, and Ithilien Pit opening up the ability to attack him wherever he runs off to. Abilities to kill in the staging area are also going to be useful, though a base defence of 4 with 6 hitpoints (not to mention any boosts) is going to be tough to get through. If you can find a way to adjust your defence after revealing a shadow card from his attack, you can find a way to only have the King’s Knight deal a point or two in damage. Blood of Numenor, Livery of the Tower, or Protector of Lorien give this sort of flexibility (as long as you have resources/cards to spend). This allows you to keep the Knight engaged with you, giving you the best chance to clear this tough enemy.
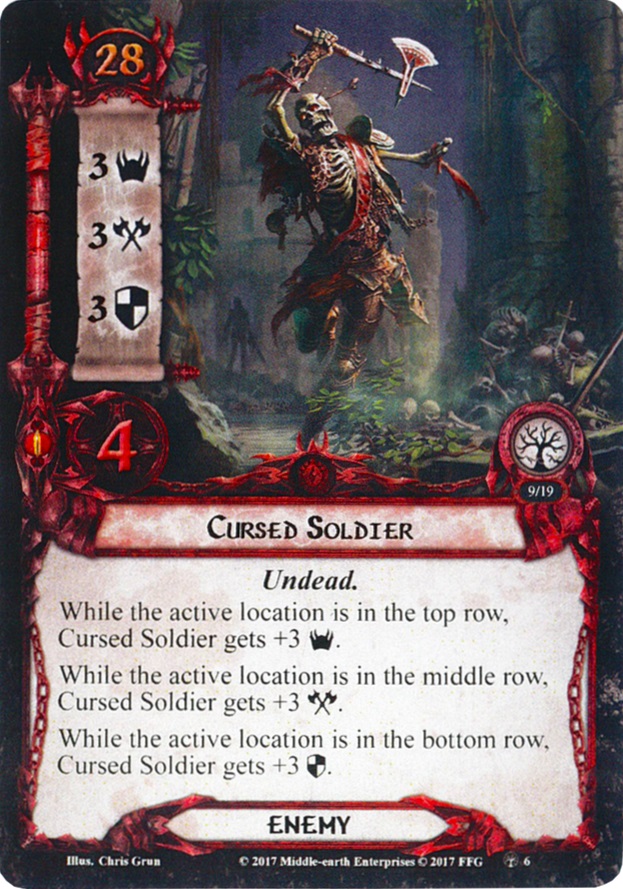
- Cursed Soldier: It’s tricky when the enemies keep switching up their stats, and the Cursed Soldier in an expert in this. Depending on the row of your active location this round, he will gain +3 to his threat, attack, or defence. With an engagement cost of 28, you will have to deal with him soon. In an ideal world, you would reveal him while you are in the middle row, and then travel upwards to reduce his attack once he is engaged with you. But that’s the sneaky trick to this enemy; it wants you to swap rows, and not progress further to the right. It’s a dilemma between finishing off a rather nasty enemy or progressing the game, and you will find that the decision on where to travel is going to be trickier the more of these Soldiers are in play. Note that you can also use the Deceitful Island treachery to your favor in case you are revealing this enemy while you are at the top row. Moving down will save you some threat. The four hitpoints on this enemy will mean that you might have to break out some direct damage to finish him off, especially once he has 6 defence, if you are on the bottom row. Gandalf can one-shot this enemy, but you can also use Poisoned Stakes or a combination of other effects to bring him down without having to attack him directly.
Locations
Note that these locations will be added to the map as the fourth and fifth column, separating the Temple of the Deceived locations from the Lost Island locations. Put them on the map grid with the Edge of the Temple side face-up.
- Edge of the Temple: The three new Nightmare locations should be placed in columns 4 and 5 of the map with this side face-up, while the players do not peek at the backside of the location. This side is a buffed version of the Lost Island location you have traversed before, made only a little more difficult by the fact that it has 3 threat instead of 2. This means that the total threat in the staging area can suddenly increase once you venture into the right half of the map. Like Lost Island, this side of the location cannot have attachments, and when it becomes the active location, players must flip it over. The players are allowed to look at the back of the location, but in exchange for 8 progress on Edge of the Temple. This is double of Lost Island, and not easy to get in one try. Players might need additional turns to make that much progress on a copy of Edge of the Temple while also clearing the threat in the staging area and their own active location. But flipping over a copy of this location does provide players with important information. There are three backsides to this location, each with a punishing Forced effect if players travel there. Being prepared for what is to come is worth a lot for this version of the quest. Ideally, you get a Cursed Temple right away so that you can claim the Gate Key and swiftly move to the Temple of the Deceived.
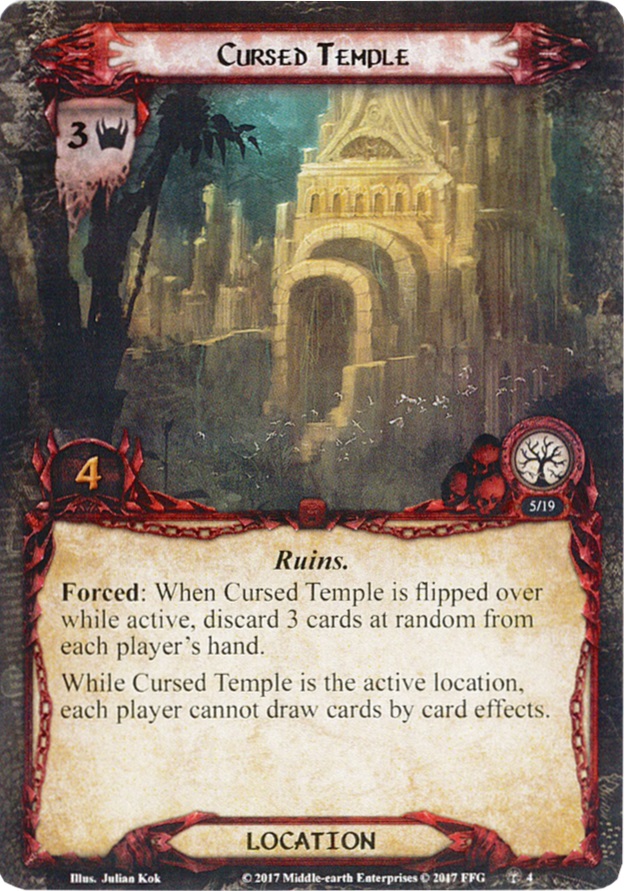
- Cursed Temple: Get used to some pretty brutal locations for the rest of this segment, because these are not going to be fun to have to trek through. The Cursed Temple cannot be avoided, though, and ideally is the only one of the three locations you have to go through before reaching the Temple of the Deceived at the other end. This location replaces the Cursed Temple from the normal set and will be the point where the Temple Guardian starts attacking the players. You will have to defeat him in order to claim the key he is guarding that opens up the final column of locations. That makes this a mandatory location to find and have active. When doing that, the Cursed Temple will trigger its Forced effect. This makes each player discard 3 cards from their hand at random. This is not the worst effect out there, and hopefully you have already played the cards you needed before venturing into this side of the map. But if you were holding on to some events, there is a risk that you have to discard them here. You also don’t get to pick, so if you have more than 3 cards in your hand when moving here, you can roll a die or have another player pick the three cards for you. After the Forced effect has resolved, there is still a passive effect that will linger while the players have Cursed Temple as the active locations. They are not allowed to draw cards through player card effects to replenish their hand. You do still draw a card for the round though, so you are not totally out of options just yet. Noldor decks and those playing hero Gandalf will be at an advantage, since they can play cards from the top of their deck or from their discard pile, having some options available. The location only takes 4 progress to clear, so if you make 12 progress total, you are able to look at one adjacent location in order to see if you want to go there next.
- Desecrated Ruins: This location has the highest stats of the new locations, but no passive effect while you are here. This makes it a sort of safe location this far into the map if you need to recover from the other things this quest is throwing at you. But arriving here is not very welcoming, as you will need to discard all resources on heroes and objective-allies when the Desecrated Ruins is flipped over. This will reduce your ability to play cards immediately, but if you stall here, you can save up some resources and draw some cards that you can play immediately. With 6 progress required to advance from here, you can stall a little to clear enemies, but scrying adjacent locations is going to be difficult. Hitting both copies of this location back-to-back is also not the worst thing, as the second time, you probably don’t have as many resources to discard for the Forced effect as the first time.
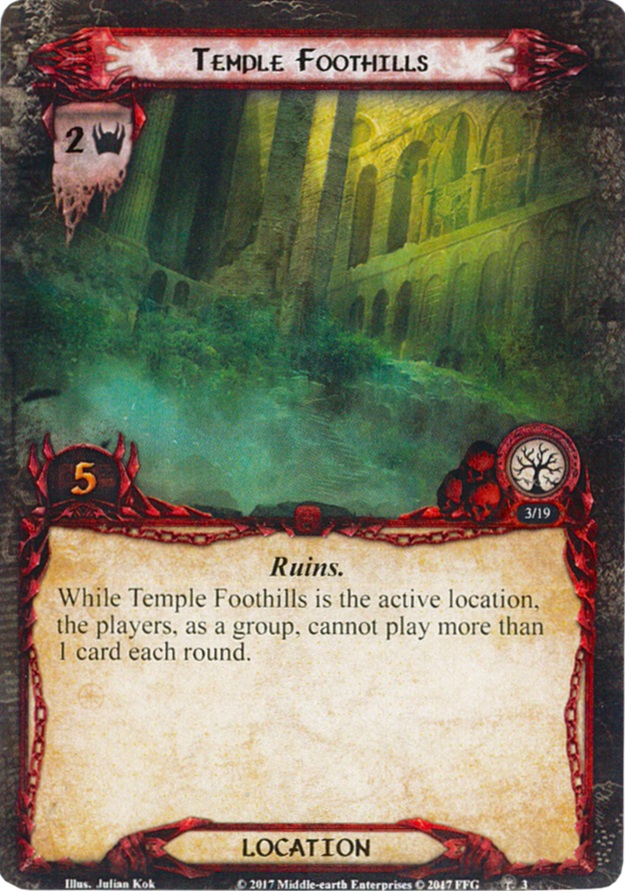
- Temple Foothills: You will be wanting to move away from this location as soon as you possibly can, as it is very dangerous to your group to stay for very long. There is no Forced effect when you travel here, but the passive effect will restrict players to only playing a single card per turn as a group. Not 1 ally, not 1 card per player, no. Players as a group may only play a single card that turn. This means that you have to discuss on whether you need to cancel a card that came from the encounter deck, or save it in order to play an ally in the combat phase to handle a big attack. Note that players may still put cards into play via effects like Vilya or A Very Good Tale (though that event would count as your one card per round). This passive puts you at a major disadvantage against the encounter deck, so you will want to make the 5 progress on the location as soon as possible. There is also no blanking this passive effect through cards like Thror’s Key, unfortunately, since the location was not added to the staging area. So you are out of luck and have to quickly move on to a different location to minimize the damage this delay in playing cards will do to you. This location also makes the other two options worse, as you are likely saving up cards and resources during your rounds here, which will be discarded as soon as you move to another Edge of the Temple location. Try to use resources and cards for hero abilities instead, before you have to discard them for nothing.
Treacheries
Three new treacheries are included in this Nightmare pack, and they aim to punish you for your location on the map. Especially when moving right, towards the Temple of the Deceived.
- Call of the Curse: That looks and sounds like a sweet metal album for sure. It does, however, pose a serious danger to your boardstate as this treachery will boost the stats on every Undead enemy in play until the end of the round. If you are hitting this card for a shadow card, too bad, you are going to have to resolve the When Revealed effect all the same. This will boost the attack and defence of every Undead enemy in play by X, where X is the number of locations to the left of your active location. This does not count the active location itself, so if you just started the game, X is zero, and you can just have combat as normal. If X is zero or one, you do have to resolve Surge on this card. In the late game, this is going to hurt a lot, as you will have up to five locations to the left of your active location. This will make any fight a struggle for survival, and makes this a treachery worth cancelling. You can also try to cancel attacks instead, though the increased defence will mean you are unlikely to kill any of the enemies engaged with you. This also won’t work on the Temple Guardian, who is immune to player card effects and will hit you for even more damage thanks to this treachery. At that point, chumping is the only real option you have left. It’s a deadly treachery that is worth putting in the Victory Display during the early game so that you won’t have to deal with it later.
- Sudden Precipice: This is a cool modifier for the locations on the map. Once it hits, you have to attach it to the active location as if you have suddenly found a sheer cliff to the east of you. If you travel up or down the map (or back to the west), you will not have to interact with this treachery at all. However, your goal is further to the east, and this cliff would delay you even more. You can also choose to travel east from this location, though you will have to deal 2 damage to each exhausted character who won’t like having to scale this cliff. Note that this effect can stack if several copies of Sudden Precipice attach to the same location, and with 3 copies, you can also run into a large cliff that stretches along the entire map. That will mean that you have to take the damage at some point. Having a global readying effect like Grim Resolve or The Free Peoples before you travel will limit the amount of damage you have to take. You can also try to discard this Condition attachment with cards like Miner of the Iron Hills and such, but I’d argue that this is a perfectly fine card to leave in play. Once you are past it, you should be able to avoid it for the rest of the game. That also means you avoid the nasty shadow effect where enemies can make unexpected additional attacks. Hitting this in the end-game is also a free encounter card that doesn’t surge, and since you cannot travel further west, you can mostly ignore the effect! All in all, I don’t find this card to be too punishing for a Nightmare card, and instead find it a very strong thematic inclusion for this quest.
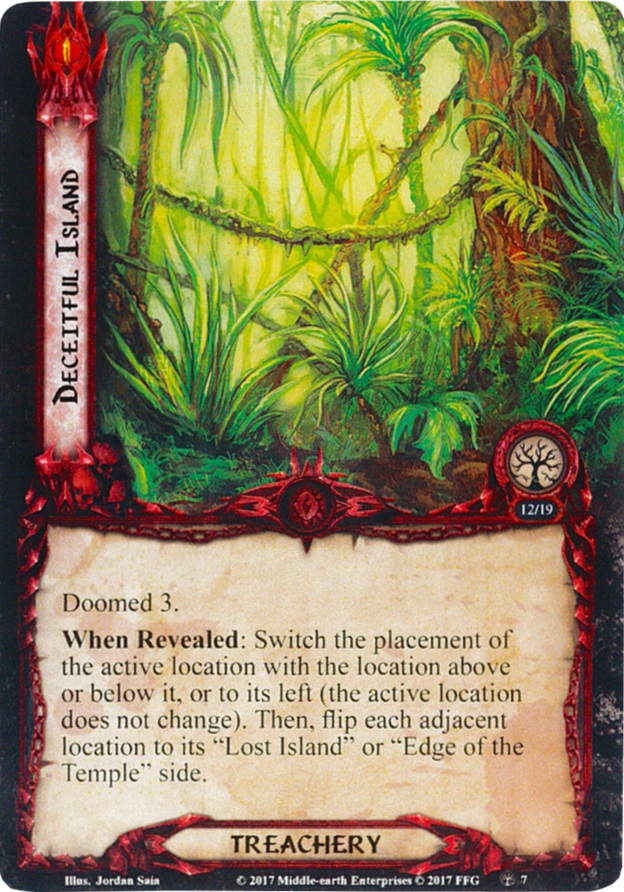
- Deceitful Island: Did you memorise the map and take notes during your playthrough? Good job, that’s going to be very important here. If not, you are going to be even more lost than you already were. On top of the 3 threat that each player must take for the Doomed keyword, the active location’s location on the map is going to shift. The players will remain at this location, but the card is physically moved on the map to a spot above, below, or to the left of it. This will confuse the players a bit, but it can also set them back a round, having to travel further to the temple. On top of this movement, you now also have to flip every adjacent location that you might have flipped over the course of the game back to “Lost Island” or “Edge of the Temple”. Note that the “Temple of the Deceived” locations at the far right are excluded from this effect. Overall, this will likely lower the threat from locations in the staging area, but if you were not paying attention, you might end up revisiting some locations by accident. And after this treachery has hit several times, you might be completely lost, in which case, just go east!
Tips and Tricks
- Be prepared for the Temple Guardian. You will be given more time than during the regular version of the game, but once you start advancing to the Edge of the Temple, know that this 6-attack enemy can come down. Call of the Curse will also add at least 3 to his attack and defence, making it more difficult to claim the key. Have your combat strategy in place before advancing.
- Keep a notepad with you during the game to keep track of the map and your route across the island. This will help when Deceitful Island flips over past locations, and helps you to remember the location of Cursed Temples you may have spotted by making progress on Edge of the Temple.
- You can end up having a pretty long game trying to find the right locations. The threat increase at the end of each round on top of the many Doomed keywords on treacheries will require you to bring some form of threat reduction. Double Back is a good card to bring, as side-quests are pretty free to use as you explore the island and don’t care about flipping Uncharted locations.
- Any other side-quest is also worth including, as it gives you something to do with your excess progress. There is little punishment for going to these instead of the main quest.
- Enter the final column at either the top or the bottom row. This helps to find the Grotto’s Entrance in at most 3 turns, instead of 4 turns if you enter from the middle and choose the wrong direction.
- The second half of the quest really drains your ability to play cards, so only advance when you know your boardstate is strong enough to last a few rounds without too many plays from your hand. Stalling on column 3 for a while also avoids the surge from Call of the Curse and allows you to scry column 4 to make an informed decision on where to move next.
Playthroughs
There are two playthroughs of this quest in Nightmare mode to be found online. Have a look in case you have questions on how the mechanics of this quest actually work.
- True solo, Outlands deck: https://www.youtube.com/watch?v=rdcCMWPCpXo
- Two player: https://www.youtube.com/watch?v=lVljr0k__Es
Only two quests remaining for the Nightmare Dream-chaser cycle. I hope to have enough time in order to complete those two by the end of this year, allowing me to start on the Ringmaker cycle. Unfortunately, NM Raid on the Grey Havens and NM City of Corsairs are quite brutal, so I will need to take some time with them. Hopefully, we can close this chapter soon. It would put us only 1 cycle away from completing all of the NM cycles, leaving just the Saga stuff. Plenty to cover still.
