Every once in a while, the developers make a scenario that is radically different than usual. Quests like Foundations of Stone or Flight of the Stormcaller have separate staging area’s, and quests like Steward’s Fear have an interesting way to add replayability while also adding more loss conditions. Noticed any trends between those three quests I mentioned? Yup, they rank up there as the community’s most favourite quests (excluding Saga). In those ranks is the map mechanic that the Temple of the Deceived introduced. This mechanic threw the normal balance of locations out the window and made progression feel more natural, as you are working to a set goal at the end of the map. While traversing the island, you must find certain objectives in order to make it to the end, which make the quest sometimes surprisingly difficult. I hope that the developers will some day bring this mechanic back (like they did with the Discover keyword). So without further delay, let’s discuss the unique quest that has become known as “the one with the map”.
The Temple of the Deceived
- Found in: The Temple of the Deceived Adventure Pack, Dream-chaser cycle 3.
- Official Difficulty: 4
- Community Difficulty: 4
- Encounter Sets: The Temple of the Deceived, Stormcaller Elite, Drowned Dead, Ruins of Numenor
- Quest cards: 1
- Play if: You want to play a fun quest with a unique gimmick, you have enough time on your hands to play this quest, you want to battle some more Undead while exploring an island.
- What is different about this quest?: Unique map mechanic, search for the way out at the end, real D&D feeling with you trying to find the key and the correct location to travel to.
- Solo or multiplayer?: Since the threat of the locations in the staging area is the same for every amount of players, this quest scales best for higher player counts. However, this will mean that the table is going to be pretty full, as the map takes up quite some space. Multiplayer is the way to go though, but the quest isn’t impossible in solo, as long as you bring enough willpower and can handle the Temple Guardian with the same deck.
- Can I run side-quests for this scenario?: Yes, this is another one of those quests where side-quest decks are going to shine. While the main quest does allow you to scry locations in the staging area if you make progress on it, you will likely be better off with playing side-quests. Double Back is a must have, as your threat can get pretty high. Explore Secret Ways is likely going to be useless, as you won’t have the same location as your active location in the staging area. Most other side-quests are great to bring to the board.
- What to look out for: Long quest, high threat near the end, boss-type enemy that comes back to bite you in the end, unknown locations where you must find the way out and must find the Gate Key.
The Quest
Setup
Get ready for another wall of text for your setup. This quest will take a while to get ready, but if you follow these steps, you should be alright. First of all, the players should create the Island Map. They do this by shuffling all Lost Island locations together and then make a 3×4 grid out of the Lost Island locations. They then shuffle the Temple of the Deceived locations together, and add them to the grid as the right most column. You should now have a map of 3 locations high, and 5 locations wide. The players now flip over the top and bottom left most locations and don’t trigger the forced effects if there are any. One of these locations must become the starting active location, so choose wisely. If one of the flipped over locations is the Cursed Temple, don’t pick that one as your active location, as that will mean that you will be engaging a boss-level enemy in the very first round. However, it is nice to know where one of the Cursed Temples is, so that you can make your way there when looking for the key. The players are instructed to place a resource token on the active location, but any token will do if you have custom ones (don’t use progress, obviously).

With the Island Map now prepared, the players distribute the two objective allies. The first player gets control of Captain Sahir, and the last player gets Na’asiyah. If there is only one player in the game, they get control of both allies. Be sure to pass these allies along with the first player token when playing the game in multiplayer. The players now add the Temple Guardian to the staging area and attach the Gate Key to the Guardian. Getting this key will be the first step of this scenario, but a powerful Undead enemy will be standing in the way. With all of that setup out of the way, the players flip the quest card and begin their first round.
Quest stage 1: Searching the Island – Exploration
When flipping over the quest card for the first time, things may seem a bit odd. There is only 1 quest card, and it doesn’t tell you your goal directly. Instead, it has the new Exploration keyword, and a clause that moves progress from this quest card to locations in the staging area. The eventual goal of this scenario consists out of several steps that eventually lead to the player’s victory. Lets go over each one.
Build up your board state
Obviously, everyone starts at the beginning, and that is to build up your board state. Get some allies out, gear up your heroes, and start getting your engines going. While doing all of this, you may want to keep the staging area clear of enemies while you prepare to move across the map in search of the next goal. Clearing side-quests at this stage isn’t a terrible idea, as that can help in the later game. If you do not have side-quests with you, the excess progress you make on the main quest can help you in getting a better understanding of your surroundings. The progress can be placed on Lost Island locations in the staging area (orthogonally connected to your active location) and be used to flip them over for a quick peek. This can help you in plotting a course across the map without discovering some nasty locations.

A nice mechanic of this scenario is that the players do not always have to travel. That means that if the active location is explored, the players can keep the progress on the location and stay at the same location if they don’t want to travel yet. This offers some possibilities to cheat the system a little with attachments on the active location. One in particular stands out as a perfect tool to gain action advantage over the scenario: Path of Need. Having this attachment on the active location helps you in having your heroes ready to quest and deal with combat, on top of having them available for their own actions. The Nightmare version of this quest does remove attachments when the active location is explored, but this cheat is still allowed for the Normal version of the quest.
This preparation phase of the quest shouldn’t take forever though, as threat will eventually become an issue. After the players have explored a little of the map and have a board state that is capable of holding its own, the players can go onto the next step of this quest.
Find a Cursed Temple

In order to claim the key that is required to open the Temple of the Deceived locations, the players must first find a Cursed Temple and make it the active location. There are 2 copies of this location on the map, though you can never be too sure where they are exactly. Proper exploration through the main quest card or by moving around the map a little will help in finding one of these locations. If one is flipped over for the setup step, then that can make for a great target to travel to, though you will need to traverse a lot of the map later. It would be best to go a few columns deep in the map in order to find the location you are looking for.
Once you finally have found one of the Cursed Temples, the Temple Guardian that is in the staging area will get -50 engagement cost and will engage the first player during the next engagement phase. Careful timing of who this will be can be important, though a Sentinel defender will also provide the players with a solution to the enemy’s 6 attack. The Guardian will be guarding the key you want to get your hands on, so defeating him is required to do so.
Claim the Key

Killing the Temple Guardian is easier said than done though, as 10 hitpoints will take a while to chew through. Have some ranged support help out, and make sure to deal enough damage in order to not have to take another hit from this enemy. This is where solo players can struggle as well, especially if they have not been preparing for this enemy. With it being immune to player card events, its attacks cannot be cancelled, and chumping has a risk of harming the defending players with shadow effects like Furious Rainstorm. But defending with a dedicated defender is dangerous too, as the shadow effect on Dwindling supplies can lower the defence of the defender by 2, potentially causing an early death. Shadow card cancellation will be an important tool to prevent these attacks from killing any major characters.

Once the players do defeat the Temple Guardian, they add it to the Victory Display and move the Gate Key to the staging area. There it gains the Action where players can exhaust any hero in order to claim the key. Claiming the key will have to be done eventually, but players may want to hold off on doing this, as some shadow effects, like the Profane Dead will be devastating if the players control the key. Keeping it in the staging area will keep it safe and ready to be picked up if the players want to progress to the far side of the map.
When the players have claimed the key, they can exhaust the key and the attached hero AND spend 3 resources from that heroes resource pool to look at the facedown side of a Temple of the Deceived location. This is a pretty steep cost, but provides important intelligence on the final location that the players must travel to.
Find the Flooded Grotto

Where there is a key, there must be a door! So now the quest becomes a search to find that door. These doors are the Temple of the Deceived locations on the far right of the map, and can only be unlocked through the use of the Gate Key. When making the Temple of the Deceived the active location, the players must flip it after having exhausted the Gate Key to travel there. 2 of these flip sides are the Temple Halls location, which is the wrong location to be at. Not only do these locations have a lot of threat that they eventually add to the staging area, but they also give each character in the game a -1 debuff to attack and defence. To make matters worse, the Temple Guardian that you killed to claim the key from, gets returned from the Victory Display and engages the player with the highest threat. While players don’t need to defeat the enemy, it can be a tough opponent, especially with all characters at -1 attack and -1 defence.

The location that the players actually want to find is The Grotto’s Entrance. While this location also brings back the Temple Guardian, it doesn’t debuff all characters. To find this location, I would recommend using the Gate Key’s effect to look at the other sides of the Temple of the Deceived locations as you move to the right of the map. Stall at the fourth column, and try to find the correct location in the mean time. This should take you no more than 2 attempts, after which you will know where to go to next. Doing this in the fourth column allows you to avoid the Temple Guardian and makes it so that you don’t have to use the Gate Key to move up or down on the map. Being in the middle row would give you the best flexibility when you find the correct location. Try to avoid going to Temple Halls if you can, though locations like Jagged Cliffs can force you to go the long way round.
Win!
With the Grotto’s Entrance‘s location known, the players must make it the active location and make 8 progress there. The Temple Guardian will engage the player with the highest threat from the Victory Display, but he does not have to be killed a second time if the players don’t want to. His attack will be dangerous, but if the players quest all-out when they are at the right location, they can win there and then by placing the 8th progress token. Note that this cannot be avoided through Woodmen’s Path, which is interesting. Once the final progress token has been placed on the location, the players win the game and go underground to the Drowned Ruins.
The Encounter Deck
Global
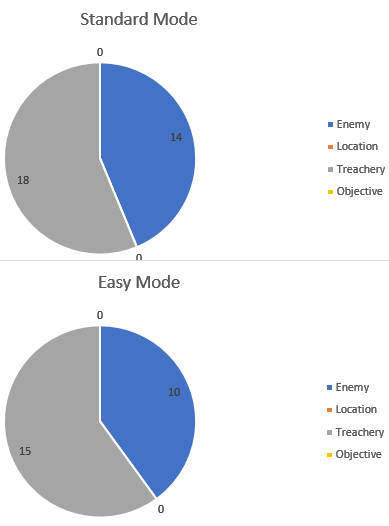
- The encounter deck is of average size, ranging from 32 cards in Normal mode, to 25 in Easy mode.
- Shadow effects are distributed 50/50 between cards in both Normal and Easy mode. Be sure to have some cancellation ready, as a +3 attack is not uncommon.
- Average threat on cards in the encounter deck is really low, ranging around 0.8 threat/card. This is because of locations in the staging area adding a lot of threat as well, and the high density of treacheries.
- Only 2 cards in the encounter deck Surge
- The Doomed keyword is very much present in this scenario. 10 treacheries have the Doomed keyword, though most only trigger if their effect doesn’t hurt the players much. Aimless Wandering also has the option to raise your threat, though I’d advise against it. There are a lot of other threat raising abilities in the encounter deck, so definitely bring threat reduction.
- Immunity
- While you are engaged with Soulless Cadaver, your deck cannot be searched
- Temple Guardian is immune to player card effects.
- Temple Guardian and Island Watcher cannot be optionally engaged.
- While players are at Jagged Cliffs, the location to the right is not in the staging area and cannot be travelled to
- While players are at Jungle Path, the locations above and below it are not in the staging area and cannot be travelled to.
- Temple of the Deceived is immune to player card effects.
These statistics do not include any of the locations, as they will never enter the encounter deck or discard pile. The Temple Guardian and all objectives are also not included for the same reason. As can be seen in the pie chart, there are no other locations in the encounter deck, making this scenario worthless for cards like The Hidden Way.
Objectives
- Gate Key: I have already covered what the Key does in detail during the quest analysis. However, for those too lazy to scroll back, here is a quick recap. The Key is both an Artifact and an Item, making it suitable for Ring of Barahir and the Dale archetype. When the players first encounter the Key, it will be attached to the Temple Guardian. In order to claim the key, the players have to defeat the Guardian, which is when the Key goes back to the staging area, unattached. The players may exhaust any hero they have to claim the key. Note that while the Key does not fill up a Restricted slot, it can be wise to pick the guarding hero wisely. The Key interacts with the resources of that hero, so be sure to put it on a hero for whom resources are easy to get by. Any hero with Steward of Gondor or Resourceful will do. The Action on the Gate Key allows you to peek at the other side of the Temples of the Deceived locations. This is incredibly useful, as it saves time exploring all three, and can save you from entering the Temple Halls as well. The cost of 3 resources and having to exhaust both the Key and the attached hero is steep, but you won’t have to use the action more than twice. If you are far from the Temples of the Deceived when you claim the key, you will have enough time to find your destination and still have the key ready to travel there. The resources must come from the attached hero’s pool, but Errand-riders can resolve this if other heroes have resources to spare. Bifur also makes for a good target, as well as any Gondor hero with Denethor on the table.
- Captain Sahir: Since Sahir and Na’asiyah agreed to help you in your quest, they have become objective allies to the players. This is the only quest in which both of them are on your side for the entire time, so you may as well want to get to use them. Sahir starts off pretty useless, except for when you need an additional defender. However, don’t take too much damage with Sahir, as losing him will result in an automatic loss. Instead, the players can start to spend resources to Sahir which buff his attack and willpower stat. Sahir can receive up to 6 resources during the course of the game, and will turn into a formidable quester and attacker if the players invest in him. The players as a group can only invest one resource per turn on Sahir, so it will be a while before he becomes a powerhouse. But since the quest can take a long time, you can spend your resources later in order to help you get that final point of willpower needed to quest through a location, or the last point of attack to kill an enemy.
- Na’asiyah: The captain’s first mate is also a solid ally to start the game with, as she has decent stats right out of the gate. Unlike Sahir, Na’asiyah doesn’t have an upper limit to the number of resources she can have, but is still restricted to receive 1 per turn. These resources can be spent to give Na’asiyah a boost to attack and defence for a turn, which is a direct copy of her hero version. Stacking a lot of resources on her makes her a solid attacker against the final boss of the scenario, allowing her to dish out a lot of damage if the players have invested a little in her. I personally like Na’asiyah in a more offence-based role, as defending with her can lead to her losing her final hitpoint, at which case, the players lose the game.

Enemies
The undead you encountered during the Fate of Númenor have remained on the island and will hinder your progress through the map. On top of the generic Drowned Dead, some other spooky skeletons will be encountered during this game.
- Temple Guardian: We have already discussed this enemy during the scenario analysis, as this enemy is the one guarding the Gate Key that you need to find. With a threat equal to the number of players, this enemy will remain in the staging area until the players have Cursed Temple as the active location. At that point, the Temple Guardian gets -50 engagement cost and will engage the first player. The base of 6 attack will require a dedicated defender to tank the blow, especially since you will be at a Ruins location, making shadow effects tougher. Killing the Temple Guardian will require some solid attack strength, considering that the enemy is immune to player card effects, and thereby immune to any combat tricks that target it. A large combined attack with Ranged characters will defeat the Guardian, who goes to the Victory Display upon defeat. He will make a come-back when you arrive at the right most part of the map, though killing him at that point is not required.
- Profane Dead: This pile of zombies are not a real threat to the players when they are in the staging area, as they only have 1 threat. Keeping your threat below 35 will be a smart thing to do, else you may get swarmed by these enemies. When they are engaged, the Profane Dead will make additional attacks if the players move to a location to the right of the previously active location. This can be a pain, as that leaves a defender down before the combat phase. The trick to these enemies is to kill them when they engage you, thereby preventing them attacking during the travel phase. Defending the Profane Dead isn’t difficult, as they are only a 2 attack enemy. But with 3 defence and 3 hitpoints, you may want to dedicate some proper attackers to these enemies before you manage to destroy them. Their shadow effect deserves a special mention as it can be a convincing reason why not to pick up the Gate Key until you reach the Temples of the Deceived. +3 attack really throws a wrench in your plans and can cause the death of a hero if you are not careful.
- Island Watcher: The art on this enemy really is something different, but that doesn’t take away that this enemy is one of the toughest in the scenario. With 3 threat, 46 engagement cost and immunity to optional engagements, the Watcher will provide a long term damper on your progress. While the enemy is in the staging area, it gains a Forced ability that allows the Island Watcher to engage the player with the highest threat. Be aware, that this only comes into effect if the active location has the Ruins trait. This includes a large portion of the map, so you will likely be engaging this enemy at some point. When the active location does have the Ruins trait, the player with the highest threat is forced to engage the Island Watcher. On top of that, it gets dealt 2 shadow cards. This makes it so that the enemy will attack during the combat phase with 4 base attack, and 3 shadow cards. A Burning Brand will prove to be really useful against this enemy. Since you will also be at a Ruins location, shadow effects will hurt more, so chumping might be the way to go when defending against this enemy. Returning the favour, attacking the Island Watcher will take a combined total of 6 attack strength. With the enemy only having 1 point of defence, placing damage on it will be easy enough, though a Sneak Attack Gandalf will not be sufficient.
- Faithless Desecrator: Seems like all new enemies in this scenario require 6 attack to kill at once, as the Faithless Desecrator is no exception to that rule. This enemy is much more likely to engage players than the Island Watcher, as it only has an engagement cost of 25. The stat line of 2/2/2/4 makes for a rather simple enemy, though the effect on the Desecrator will make you want to kill him as fast as you can. This is because the threat of the enemy will be counted as threat in the staging area, even when the enemy is engaged with a player. This is an easy thing to miss, so I would make sure that you either use a token to represent his threat in the staging area, or kill the enemy during the round he engages a player. That way, you won’t have to account for his threat in the next turn. 2 attack is not that big of a deal and can be blocked by allies or even be attempted undefended if you really need to. Be sure to have some backup plan in case the enemy gets an attack bonus, but you should be ok. Silver Lamp can prove very important with this. Killing the Desecrator shouldn’t be a problem, as 2 defence and 4 hitpoints allows players to deal enough damage with their characters. On top of this, direct damage and Rivendell Blade can be used to further widdle down the enemy until it is defeated.

Locations
While the map will include all locations in this scenario, you don’t necessarily have to encounter all of them. The Lost Island side has already been discussed in the Fate of Númenor, as well as some of the more used locations. The scenario-specific locations will be discussed here, on top of a location that has a new meaning in this quest. The Ruins locations in particular deserve mention, as a lot of treacheries, shadow effects, and enemies get worse if you are at one of these locations. Try to stick to the jungle for the most part, you’ll have a better time.
- Temple of the Deceived: The three copies of this card will make up the fifth and right-most column of the map during setup. The players should have shuffled them beforehand, so that they don’t know which is which. The Temple itself is Uncharted, making it a valid target for Sunken Ruins. The Temples are immune to player card effects and do not have the same ability as the Lost Islands, so there is no way to peek at these locations without the Gate Key. Speaking of the Key, it is required to own it before you can travel to any one of the three Temples. When the players have exhausted the key to travel there, the players flip the Temple and make the other side the active location. In order to avoid the Temple Halls, try to use the Gate Key’s ability to find the location you are looking for. While in the staging area, players must remember that the Temple will add 4 threat instead of 2 like the Lost Islands. This also means that once you are at one of the Temple’s other sides, the other 1 or 2 copies in the staging area will contribute a high threat to the staging area as well, in order to compensate for the lack of a location to your right.
- Jagged Cliffs: The Cliffs are an interesting double edged sword in this scenario, offering both important information, and an obstacle. When the Cliffs are flipped over from their Lost Island side, the players get to look at each adjacent side of Lost Island (not any Temples of the Deceived). This can allow players to find where they want to go next. However, while the Cliffs are the active location, the location to the right of the Cliffs is not considered to be in the staging area. This means that the location doesn’t add its threat to the staging area, but it also cannot be travelled to. Since the players eventually have to travel to the right of the map, these Cliffs can offer an obstacle, making the players go the long way around. If this location appears in the fourth column, the players will have to first go to another Temple of the Deceived before going to the one that is to the right of the Cliffs. When no longer active, the Cliffs add 4 threat to the staging area, making it harder to make progress on your new active location. The Mountain trait does offer a little synergy with Dwarves, but you are not likely bringing cards like Ever My Heart Rises to this quest.
- Jungle Path: This 3/3 Forest location is another limiting location that can make the map feel like a maze. When it is flipped over, each player must exhaust a character with at least 2 attack strength. This makes it a less than ideal location to go to if you are engaged with enemies, and need all hands on deck. The Path cuts through the jungle and makes it impossible to travel up or down, as those locations are no longer considered to be in the staging area. Instead, the players can only travel left or right. This can offer a brief break in threat though, as the locations above and below also don’t contribute their threat to the staging area. Stalling at this location is easy, especially in solo, as you don’t need that much willpower to overcome what is in the staging area. However, this location can be frustrating, if you know that there is a Cursed Temple above or below it, and you want to reach that location. Once this location is explored, the players can move left or right, at which point the Jungle Path will contribute 3 threat to the staging area.
- Winding Caverns: Another new location, the Winding Caverns offers some safety against enemies while also allowing players to jump ahead on the map using the secret tunnels underneath the island. Nothing happens directly when the players flip this location over, but the Winding Caverns do increase the engagement cost of all enemies by 10. This means that Hobbit players can get some extra bonuses out of engaging enemies in the staging area, and allows players to take a little time to get their decks sorted out for combat before moving on. The Winding Caverns take 6 progress to explore, which is considerable. However, upon travelling from the Winding Caverns, the players may move up to 3 locations away, without flipping any locations on the route. This is extremely useful for covering a lot of ground quickly, and allows players to get to the right side of the map with ease. Note that the Travel cost of Temple of the Deceived must still be paid when travelling this way. This is a welcome sight to the players if they need to bypass a restricting location or need to get to a Cursed Temple or Temple of the Deceived fast.
- Temple Halls: I have talked about this location already in the scenario analysis, and the advice still stands: Try to avoid going here. Not only are your characters debuffed and is the first player engaged with the Guardian, but there is also a lot of threat now in the staging area. The Temple Halls themselves have 5 threat, making them even worse when exploring neighbouring locations in the staging area.
- The Grotto’s Entrance: Again, I have discussed this location already. This is the ultimate end zone of the scenario and you should find this location underneath one of the Temples of the Deceived. The location has 8 questpoints that need 8 matching points of progress before the location is explored. There is no way to cheat the location with Woodmen’s Path, but players are allowed to place progress through player cards here. Remember that the Temple Guardian will be revived when you travel here, and will engage the player with the highest threat. Placing the 8th point of progress here will result in a win.
- Cursed Temple: I have included this location to the list again, as it serves a different purpose than it did in Fate of Númenor, where it was just a regular old location. Instead, this Temple will be the first destination for your fellowship, as there is a Key to be found there. Once the players have found the correct Lost Island with the Cursed Temple on the opposite side, they should try and get to it once they are ready for combat. Making the Cursed Temple active will force the Temple Guardian to engage the first player during the next encounter phase. On top of this, the players should keep an eye out for Island Watchers, as this is a Ruins location. That means that there may be more than just the Guardian to worry about. When travelling to this location, keep in mind that your characters will not ready during the refresh phase if they have less than 2 willpower. Global willpower boosting effects will help resolve this, but remember this as you may need some attackers with a decent pool of willpower as well. Dale allies would fit this description well. When the players have explored this location, try to stay here until the Temple Guardian is dead. Then, you can move on to the rest of the map, now that the Key is available to the players.

Treacheries
It is quite easy to imagine a jungle trip on a zombie-infested island will have enough treacheries to make things harder. You will feel the sting of these treacheries, as they are quite common in the encounter deck, now that the locations are removed.
- Furious Rainstorm: I hope you brought a poncho for this quest, as sometimes these jungle islands can have a monsoon coming down on you with little notice. The Furious Rainstorm treachery gives each player a choice between either raising their threat by 1 for each character committed to the quest, or deal 1 damage to each character committed to the quest. In most cases, the threat will be the better option, unless your questing characters can survive taking a hit. There are multiple copies of this treachery in the game, so threat reduction or even cancellation events would be good to bring with you as well.
- Dwindling Supplies: You are very much likely to run out of food and fresh water when you are stuck in the jungle for a while and lack survival skills. The treachery can be brutal to players who are looking to play a lot of cards from their hand during the next round. The treachery forces each player to randomly discard cards until only 3 remain. This is downright devastating to players who wanted to play their cards, as they don’t even get to pick the cards they can keep. For that reason, I would advise to actually save your cancellation for this treachery, as you might lose that Test of Will in your hand anyway. Should a second copy be revealed or should the players already have 3 or fewer cards in their hands, then this treachery gains Doomed 2 instead.
- Deeper into the Ruins: The deeper you venture into the map, the more horrible this treachery becomes. While not the worst card to reveal, Deeper into the Ruins will add a lot of threat in the later stages of the game, as you approach the Temples. When this card is revealed, the players must add 1 threat to the staging area for each location to the left of the active one. Should this value ever be 0 (if you are in the left-most column), then the treachery gains Doomed 1 instead. This treachery could have been a lot worse, but will only ever add 4 threat to the staging area. This is a pretty soft treachery that you can overcome by questing with a lot of willpower.
- Sunken Ruins: First things first, this treachery raises the threat of each player by 1. Since this is not the only threat raising ability in the game, you will start to approach 50 near the end, so threat cancellation is a good thing to bring, I will stress again. On top of the Doomed keyword, the treachery has the effect whereby each uncharted location in the staging area (Lost Island and Temple of the Deceived) will get +1 threat to it. This in most will add 4 threat to the staging area, which can be overcome with ease by questing hard enough. Note that locations that you have previously visited do not flip back to their Uncharted side, and therefore are unaffected by this treachery. Besides this, should the players be at a Ruins location at the time that this treachery is revealed, then the players must discard 1 resource off of each hero and objective-ally in the game. Be sure to either stack up on resources on your heroes, or spend it all during the planning phase to prevent losing as many resources. Note that this will also affect Sahir and Na’asiyah, thereby lowering Sahir’s stats and preventing Na’asiyah from attacking or defending for an additional +2.

Tips and Tricks
- Get some tokens out to mark where on the map you are and which locations are considered to be in the staging area. This will help you with determining the threat in the staging area more easily and can show you what locations you can travel to. You can also use tokens to mark where you have been before, allowing you to track your journey across the map.
- Since the Temple Guardian is guarding a card at the beginning of the game, it wouldn’t be a bad idea to run cards like Valour of the North that give your heroes a boost from attacking or defending against an enemy with an attachment. Ranger Spear is also a nice way to boost attack strength in order to kill the Temple Guardian quickly and get a hold of the Gate Key.
- There is actually a possibility that your Island Map is impossible to explore completely. While rare, this can be a game-ending scenario as you are stuck behind locations you cannot travel to. Reset the game if your map ends up looking like this.

- Give the rules insert a read for this scenario. It can be really useful if you are struggling to understand the mechanics of this scenario. Better to check the rules first before playing the game and finding out you are playing it wrong.
- Path of Need will allow you to have a lot of action advantage over the encounter deck with your heroes. It does not get discarded if you explore the active location, so you can stay at that location and deal some damage to engaged enemies.
- Bring some threat reduction for the group, as there are several threat raising abilities in the encounter deck. Double Back is a solid option, as that side-quest can be explored with relative ease. Be sure to keep your threat low throughout the quest to have an easier time.
- Have a plan for which hero is going to take control of the Gate Key. This hero will have to be loaded with resources and might want to have a way to ready themselves in order to negate the cost of using the Gate Key’s effect multiple times. The hero with Steward of Gondor attached will make for a good target, let that player pay a little for claiming Steward as well 😉
- Knowing what locations are where on the map can make you plan out your route like a real explorer. This can make you avoid nasty surprises like a Jagged Cliffs right next to the Grotto’s Entrance without you knowing. It can also be used to avoid nasty locations earlier in the map, and allows you to find the Cursed Temple more easily.
- Be sure to bring Mithril Shirt to this quest. Since you cannot resolve the Guarded keyword on it, due to a lack of locations in the encounter deck, you can claim it without resolving the Guarded keyword. This makes it a great value card to put in any deck that can use some damage mitigation.
- Forget cards like Celduin Traveller and the Hidden Way for this quest, as there will be no locations in the encounter deck to trigger on. This can free up space in your decks to test out different cards.
Playthroughs
With such a unique mechanic, there are lots of channels who have posted videos on this quest. Be sure to check them out!
- True solo, Seastan deck: https://www.youtube.com/watch?v=NHDkBpv7nlc
- 3 players, modern decks: https://www.youtube.com/watch?v=Ci6s6fbW-3w
- 2 handed, progression style: https://www.youtube.com/watch?v=Zs8bj2uABQY
After having gone over this gem of a quest, we will turn our focus to some quests that appear earlier in the narrative but got skipped. I might move on to Flight of the Stormcaller next, as that quest is also amazing, and has some unique features.

12 thoughts on “The Temple of the Deceived”