Well, the time of the fun and easy quests is over. And since nobody stepped up to do these hard quests for me, I suppose I will have to try and come up with strategies for a Nightmare quest I have never personally beaten. Raid on the Grey Havens is a tough quest that puts you on a strict timer and demands a lot of your deck right from the start. It doesn’t let down either, adding in two bosses for the second stage that can really mess with your boardstate.
The Nightmare version of the quest makes things get even harder, though it is mostly felt in the second stage of this quest. It patches some common ways to end the fight quickly, and players have to really work for their progress against the bosses. The several lose-conditions don’t help things either, but it will make victory over this scenario all the sweeter once you beat it. Let’s get started on this brutal quest and save some boats from a second Alqualondë!
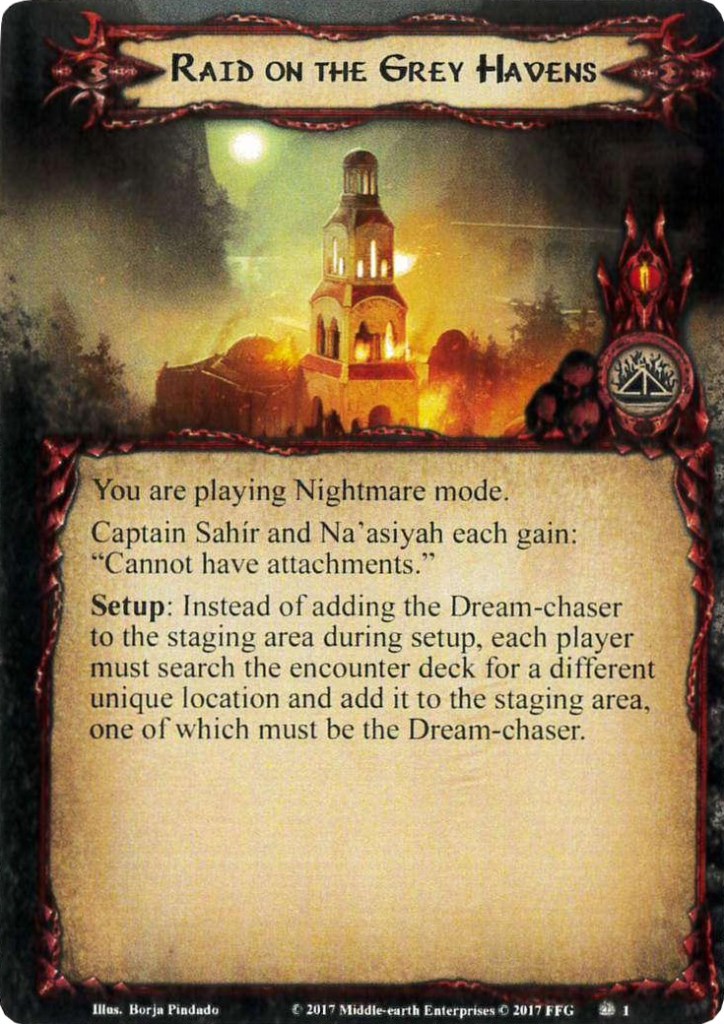
Nightmare Raid on the Grey Havens
- Found in: The Grey Havens Nightmare pack, quest 3
- Size: 17 encounter cards, 1 new quest card, 1 rules card.
- Increase in Difficulty: Of course, this is Nightmare after all. But the difficulty spike is more noticeable during the second stage, especially if you get lucky and don’t get dealt that many Nightmare cards in the early game. The removal of healing of ships does mean that there is a constant threat and time pressure to finish the game before everything burns, making this one of the most difficult Nightmare quests of at least this cycle, but possibly ranking high among all other Nightmare quests as well.
- Fixed Loopholes: Players can no longer trap Sahir or Na’asiyah, as they are now immune to player card effects. Players must also now kill both bosses instead of just Sahir. In the normal version of the quest, you could focus everything on Sahir and finish the fight quickly. They now share their pool of resources, making it harder to burst down Sahir and ending the fight. Players are also no longer able to heal ships at stage 2, preventing them from saving locations from ending up underneath The Havens Burn. This is a tough change, and you will have to be a lot faster with the scenario to have time for the boss-fight.
- New Mechanics Introduced: The rest of the ships from your fleet are now also burning down. While they are less critical than the Dream-chaser, they will continue to hurt the first player while they are in play. Sahir and Na’asiyah also share their resources during stage 2, which is not a completely new mechanic, but does prolong the fight with them.
- Play this scenario if: Your hands need warming by the fire, you wondered what happened to the rest of the fleet while the Dream-chaser was burning, you want a tougher boss-fight in a high-pressure environment.
- Solo or multiplayer?: The unique locations added in this quest greatly punish the first player for doing… anything, really. So it would be in your best interest to at least bring a friend to this quest. Adding more players will make it hard to keep up with all the locations leaving play through the Aflame keyword, so if you are taking on this quest with 3 or 4 players, have a way to clear locations in the staging area so that you can keep up with the Aflame keyword burning down the harbour.
- What to look out for: Several loss-conditions, Aflame keyword triggering at the end of each round, double bossfight to win the quest, Corsairs getting a ton of resources on them and using those to hit you more often and way harder! There is also still the Dream-chaser acting as a timer of at most 12 rounds before the game concludes.
New Rules
There is only one new rule to the quest, which makes it easy to play, but you shouldn’t forget this rule once it actually becomes relevant. During stage 2, Captain Sahir and Na’asiyah are added to the staging area to fight against your heroes. They are now immune to attachments, meaning that they can no longer be trapped while they enter the staging area or engage a player. This was done because these bosses occasionally ended up in traps like Outmatched or Forest Snare, taking away the thrill of that fight. Another common tactic was to play Poisoned Stakes on Sahir, forcing him to discard 2 resources at the end of each turn, bypassing his Forced effect. This was not 100% consistent, but if it worked, players could easily finish the fight.
It should be noted that Sahir and Na’asiyah are still vulnerable to events. They are not immune to all player card effects, just to attachments. This will still allow you to cancel their attacks with Feint, reduce stats with Beorn’s Rage, or be pinged for direct damage through various events. Taking this direct damage is important to chip away at the resources on Sahir, allowing players to get to the end of the fight faster. But just make sure you either save your traps for the other Corsairs in this quest, or leave them in the binder when deckbuilding.
New Setup
There is some new setup for playing this quest in multiplayer. If you are attempting this solo, nothing changes. You still start with the Dream-chaser and a copy of Sahir’s Ravager in the staging area, before you discard cards from the top of the encounter deck until you get one location with the Aflame keyword.
In higher player counts however, things change a lot. The players must each search the encounter deck for a unique location and add it to the staging area. In a four-player game, that means you will eventually start with 8 locations in the staging area… plus one enemy.
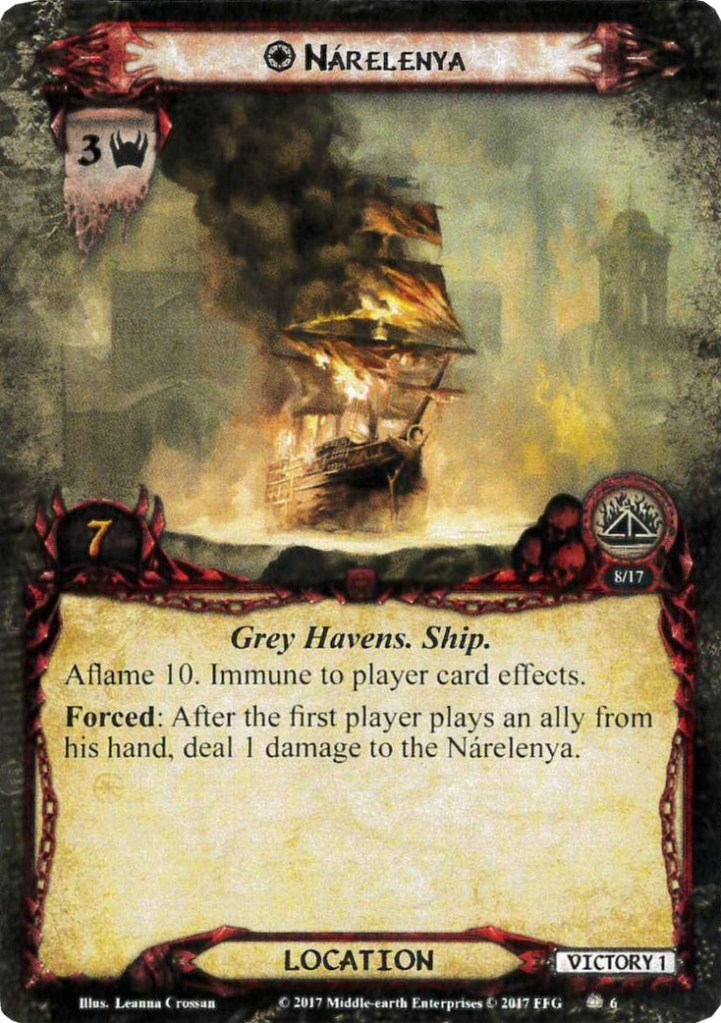
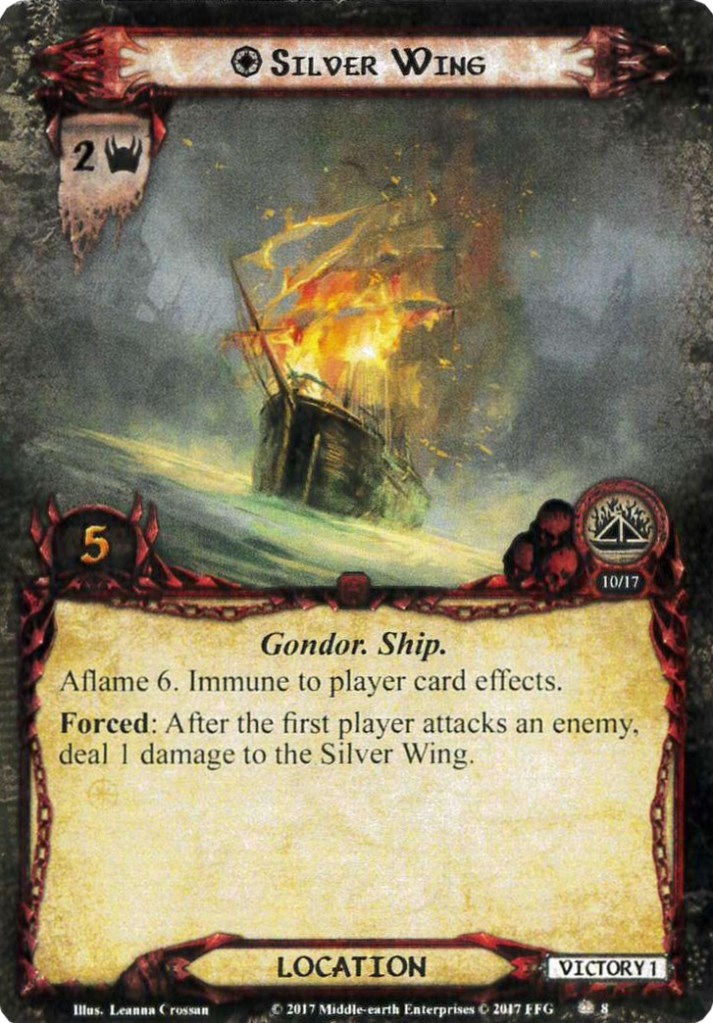
Players should still at least pick the Dream-chaser; there’s no avoiding that one, but once that one is picked, you have the choice of the Dawn Star, Silver Wing, and Nárelenya. These mirror their Ship-objective versions a little bit, as they will gain damage when the first player plays an ally, draws a card, or attacks an enemy. All locations are also immune to player card effects, so in order to save these important ships, you should travel to them as soon as you can. In higher player games, you will likely end up with at least one of the unique ships burned down. There will just be too much happening to save them all. In lower player counts, the threat in the staging area is lower, and you will have some time before the other unique locations are revealed from the encounter deck (assuming they don’t appear during the random-discard-until-an-Aflame-location effect from staging).
Nárelenya and Dawn Star are probably the ones that are going to take damage the earliest, so you will want to take those last. Start with the Silver Wing for a 2-player game, and pick from the rest if you are going for a 3-player game. Note that the more players are in the game, the more damage you have to place if the first player wants to do anything with their deck. Have the first player focus on questing, avoid drawing cards, and save playing allies until the next turn.
Set-up in higher player counts is rough, so definitely come out of the gate strong with a lot of willpower and a plan to tackle these locations quickly. Their Aflame keyword is pretty high, but the emotional damage of seeing your fleet burn down can be a lot to handle.
Cards removed
The following cards have been removed from the regular encounter sets to make space for the new Nightmare cards. The list is quite short, meaning that the encounter deck itself will be much larger than in the normal version of the quest.
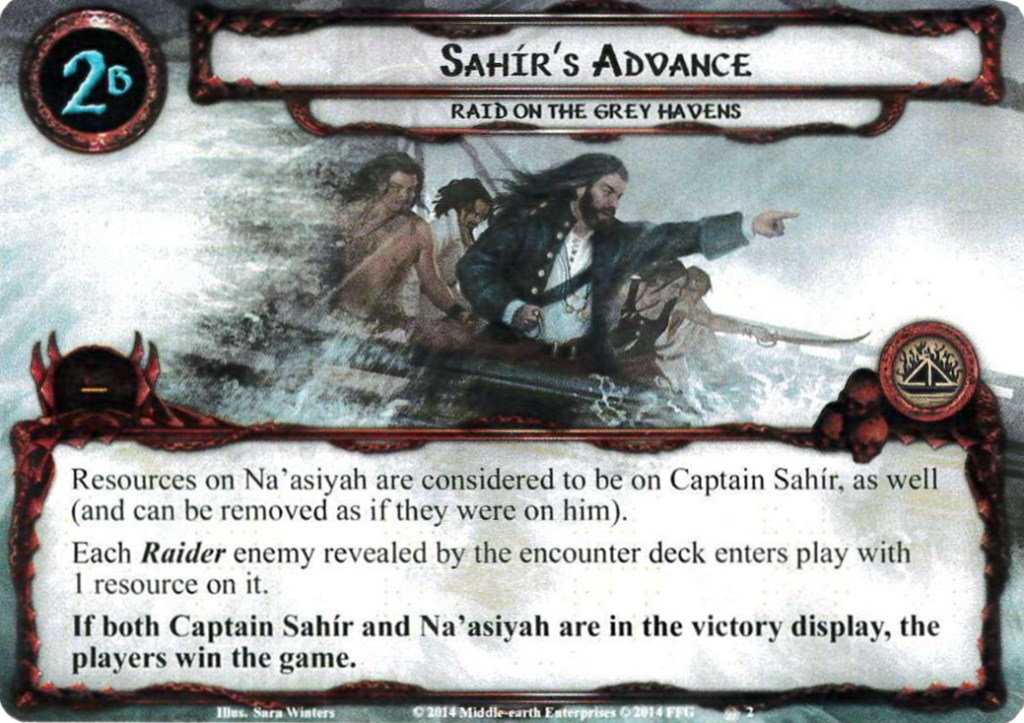
- 1x Sahir’s Advance (quest stage 2) [Replaced by a version that makes the final fight more difficult]
- 3x Corsair Arsonist [Didn’t interact with the resource mechanic and with the new unique ships having a high Aflame keyword, it would quickly make the quest unplayable in solo]
- 2x Elven Wave-Runner [Beneficial location if it is cleared fast enough]
- 1x Umbar Raider [Making space for the newer Corsair enemies]
The Quest
Starting this quest is rough in Nightmare mode with more than one player, as you will be facing a lot of locations in the staging area on top of a copy of Sahir’s Ravager. It will be very difficult to quest successfully on turn 1, so you have to hit the ground running; no time for slow plays and stalling. There are a lot of things on fire in the harbor, and you should get moving quickly before the various lose conditions cause a game-over.
That’s the main concern here, the various ways to lose the game. You might get a handle on the enemies in this quest, and perhaps find a way out of location lock if you bring enough cards that can place progress on locations in the staging area while you are between Mithlond Harbors. But The Havens Burn and the Dream-chaser will be ticking clocks that can lead to the end of your game, even if you were doing well in some other departments. The inclusion of more ships that have the Aflame keyword at the start of the game will almost certainly guarantee that you are going to lose some locations under The Havens Burn. It snowballs from there, as certain cards like the Corsair Pyromaniac get tougher.
The key is to always travel to an Aflame location, possibly leaving some tools like Thror’s Key for the locations with passive effects that would otherwise just slow you down. If you can clear a location each turn, you could outpace the encounter deck in lower player counts. If you eventually clear all locations (except the Dream-chaser), there is far less pressure on you, and you can dedicate more characters to combat.
The Dream-chaser is also a big ticking clock that only gives you 12 turns before the end of the game, which can even become fewer rounds if you are hit with some combination of treacheries or shadow effects that burn it a little faster. There is no saving it as players cannot travel here, so speed is the only solution. It can definitely happen that you’ll lose a few games due to losing The Dream-chaser, so take that as a sign to push your deck even harder next time.
During stage 1, enemies should also not be ignored. The passive effect on stage 1B will damage the ship with the lowest Aflame value at the end of each combat phase based on how many Corsair enemies are left in play. This is followed up by the end-of-round trigger from Aflame, so a quick 1-2-punch can get rid of some pretty big locations, forcing you to reveal a new encounter card from the top of the deck for The Havens Burn.
Rushing stage 1 to limit the number of ships burning down is advised, though it will be very difficult to overcome the threat in the staging area, clear a location each turn, and get 18 progress in total on the quest card. Bring all the willpower you have, and tools that place progress on the active location or locations in the staging area are also welcome. If you have ways to lower the threat in the staging area in any way, it will also help you to reach stage 2 faster.
Stage 2 might be easier on the ships, but it ramps up the combat as both Captain Sahir and Na’asiyah join the party. Remember to use the new Nightmare Stage 2 for this version of the quest, as the wording is a little different. Side 2A is still the same, adding one encounter card per player to the staging area and gifting both Na’asiyah and Sahir resources equal to the number of damage tokens on the Dream-chaser. If you have been moving quickly, this will still be single-digits, but you will want to keep this number as low as possible. To further add fuel to the Corsair-fire, each Raider enemy in play gains another resource. Note that this does not affect the Elite Marauder, though he doesn’t interact with resources at all in the first place. Sahir and Na’asiyah also don’t get another resource this way; they only get the number of damage tokens on the Dream-chaser.
The real difference in this stage 2 is on side B. Let’s first discuss the things you lose from in Normal mode. You no longer heal damage on locations in the staging area by making progress on this quest card. This means that the ships will continue to burn, and you won’t have very long to bring this game to an end. It would have been useful to keep this ability for the players to stand a chance against The Havens Burn or even The Dream-chaser’s lose condition, but both are going to continue being a viable way to lose this quest. This does mean that you can slow down a bit with the progress once you reach stage 2. Clearing the active location is still a good idea, but excess progress on the quest card is going to do very little. Using Backtrack or an Explorer’s Almanac will allow you to clear some additional locations from the staging area, if you are allowed to place progress there from Mithlond Harbor.
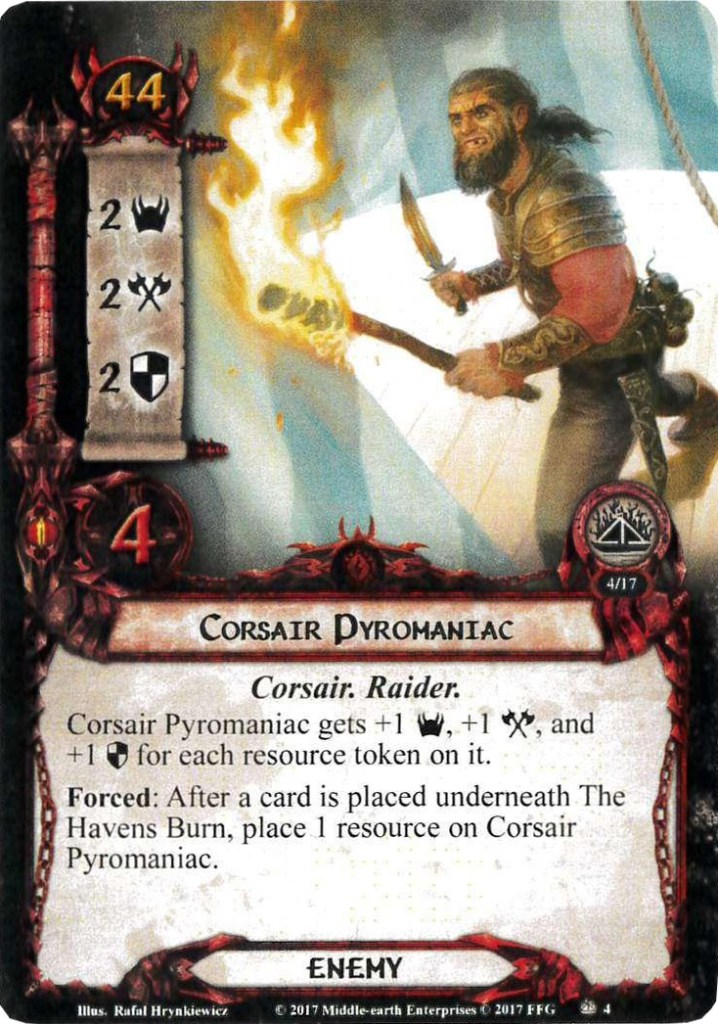
Raider enemies will also still gain 1 resource upon entering play. This is most noticeable on the Corsair Pyromaniac, who will now always be at least a 3/3/3/4 enemy. His Forced effect doesn’t trigger often each game, so getting a free resource this way greatly increases the threat this enemy poses. Still, his engagement cost of 44 means you can prioritize other enemies if you don’t have enough attackers.
The enemies you should prioritise? Sahir and Na’asiyah, of course! If both of these enemies are in the Victory Display, you win the game. The win condition that no locations in play should have any damage is removed, since players can no longer heal locations. Players now also have to kill Na’asiyah in order to win. You used to be able to focus Sahir and win, but now the pair of them need to be in the Victory Display. This is tough, since Na’asiyah will have a lot of defence and will regenerate resources whenever she engages a player who has events in their hand. The new twist on this Nightmare stage is that Na’asiyah’s resources are also considered to be on Captain Sahir. This means he has double the damage negation, though you can remove resources from Na’asiyah if you had damaged Sahir. This allows you to drain her of resources by attacking Sahir, thereby lowering the stat buffs she would get when you attack her next.
The main strategy is to hit Sahir as hard as you can, draining his resources faster than he can get them by attacking back. If you are able to bring down Na’asiyah with direct damage, it would greatly help. Dropping a Gandalf on stage 2 and taking out Na’asiyah immediately would already see you get halfway to your win goals, and Sahir’s resources would be cut in half. Waiting on Na’asiyah’s resources to drain naturally isn’t going to happen before the Dream-chaser burns down, so taking her out first by either hitting Sahir hard and removing her resources or by dealing direct damage will be the best strategy.
Next, there is Sahir, who will engage the first player and hit pretty hard. He is not immune to player card effects though, so if you can prevent him from attacking, he will not trigger his Forced effect to build up even more resources. You won’t be able to Forest Snare him anymore, thanks to the rules card giving him and Na’asiyah protection from attachments. But events are still fair game as long as Na’asiyah didn’t discard them last turn. Direct damage effects will also work on Sahir, chipping away at his resources (or Na’asiyah’s) for each point of damage he would take. Once you do manage to get through his pool of resources, his 5 hitpoints should be easy to clear before he attacks again. With both him and Na’asiyah in the Victory Display, you immediately win. It will be tough to time this correctly with the Aflame keyword triggering all around you, but if you pull it off, you have cleared one of the hardest Nightmare quests in the game!
The Encounter deck
Global
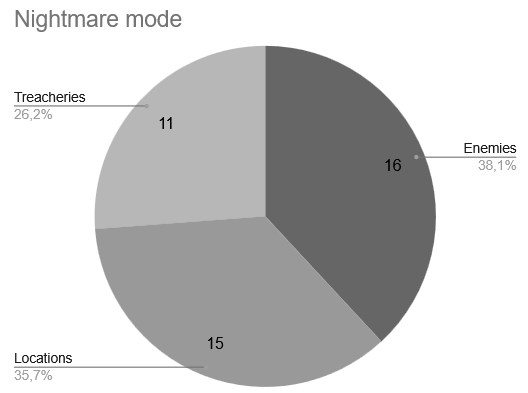
- Not a lot of cards get removed from the Normal version of the quest, so the encounter deck is quite large at 42 cards at the start of the game.
- Shadow chances are relatively low at 40%. Most effects deal extra damage to Aflame locations.
- Average threat on cards revealed is 1.8 threat/card, ranging up to 4 threat on certain enemies and locations.
- The two copies of Mithlond Harbor will always surge. 4 more instances of Surge can occur if the When Revealed effects of Battle-Hardened and The Fires Spread are not fulfilled.
- Doomed 2 appears on the 2 copies of The Fires Spread. This is the only real threat interaction in the encounter deck, so you could opt to play around with your threat yourself.
- Immunity
- Captain Sahir and Na’asiyah both cannot have attachments.
- Dream-chaser, Silver Wing, Dawn Star, and Nárelenya are all immune to player card effects.
- Players cannot travel to Dream-chaser.
- While Mithlond Harbor is in the staging area, progress cannot be placed on locations in the staging area.
- While Burning Tower is in the staging area, damage cannot be healed.
These stats do not count the Dream-chaser, since it will start in the staging area and cannot enter the encounter deck. It does not take the setup locations into account, so the actual encounter deck at the start of the game might be a little different.
Enemies
Three new enemies have been added to the encounter deck to have some more interaction with the Aflame keyword, and less with Ship enemies. These Corsairs will still plunder resources and grow bigger the longer you leave them alive, so it is best to kill them early.
- Corsair Pyromaniac: The first enemy starts out pretty basic as a 2/2/2/4, but will quickly get tougher as he collects more resources. Each resource will add one to his threat, attack, and defence stat, meaning that he will already be a tricky foe during stage 2 when all Corsairs enter play with a resource on them. The other way that the Pyromaniac will gain resources is whenever a card is placed underneath The Havens Burn. Luckily, this isn’t very often, and you would have plenty of times when you do lose a location, but this enemy isn’t in play yet. The 44 engagement cost is also not really a threat in the early game, as long as you can match his increasing threat whenever you lose a location. By the time this enemy would be a serious issue, you most likely lost to The Havens Burn anyways. You can definitely engage this enemy sooner if no other enemies were revealed this turn, as his 2 attack and 2 defence won’t be much trouble for any deck going up against a Nightmare quest. 4 hitpoints makes him also susceptible to direct damage, as Gandalf can nuke him in the staging area if he has grown too large for you to handle. All in all, this is not the worst enemy to have to deal with, but considering that you have two bosses to face in the second half of the quest, this sort of filler enemy is best left ignored if you can help it.
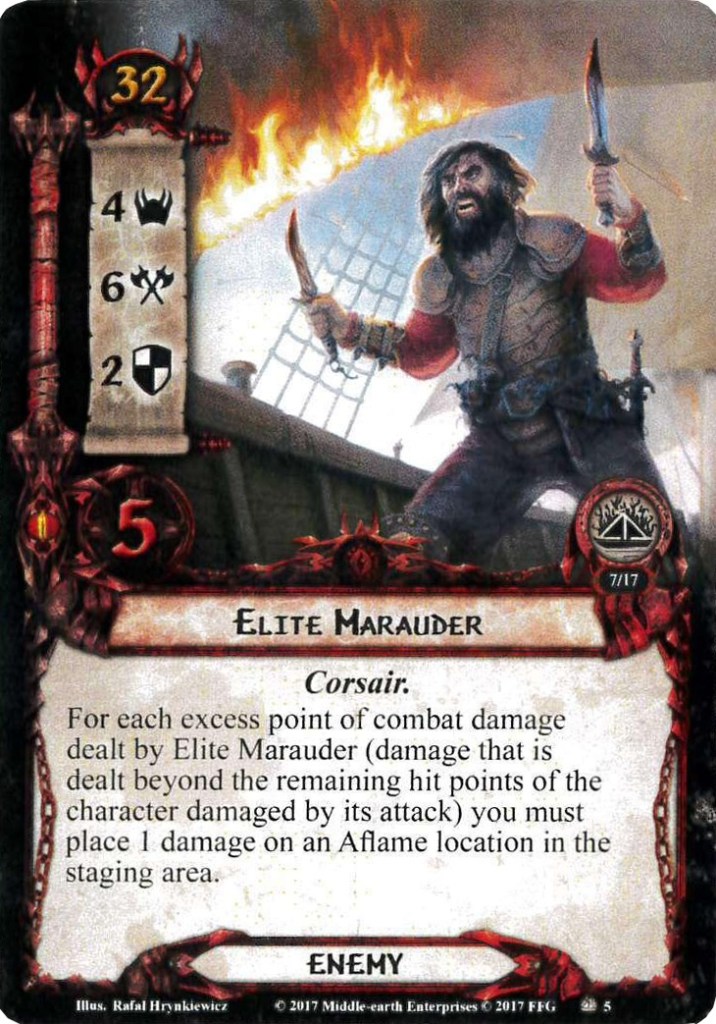
- Elite Marauder: I almost missed this enemy from the article, since there is only 1 copy of him and his art kinda looks like the Pyromaniac (same artist, so no wonder). However, this enemy is a serious threat if he comes out, as he has the highest printed stats of all the new enemies from the Nightmare deck. 4 threat is already rough to reveal, but with an engagement cost of 32, you will quickly have to engage this enemy. What stands out is his Troll-level attack stat of 6, meaning that you will either have to chump or have a dedicated defender able to block this for you. If you decide to chump, the textbox of the Marauder will become active. Excess damage dealt by attacks from the Marauder will have to be dealt as damage to an Aflame location in the staging area. That’s 1 damage to each ship that would otherwise have been taken by the defender, so you can quickly get 5 damage on a single location through this enemy if you chump his attack. The best approach is to either defend him with a character who can survive his attack, or to cancel the attack entirely. 2 defence and 5 hitpoints isn’t nothing, but he is not nearly as hard to take down as he is to block. Feint and then a swift counterattack will rid you of this one-off enemy. The good news is that he does absolutely nothing with resources on him. So you can safely stack them from shadow effects like Battle-Hardened on him without any consequence.
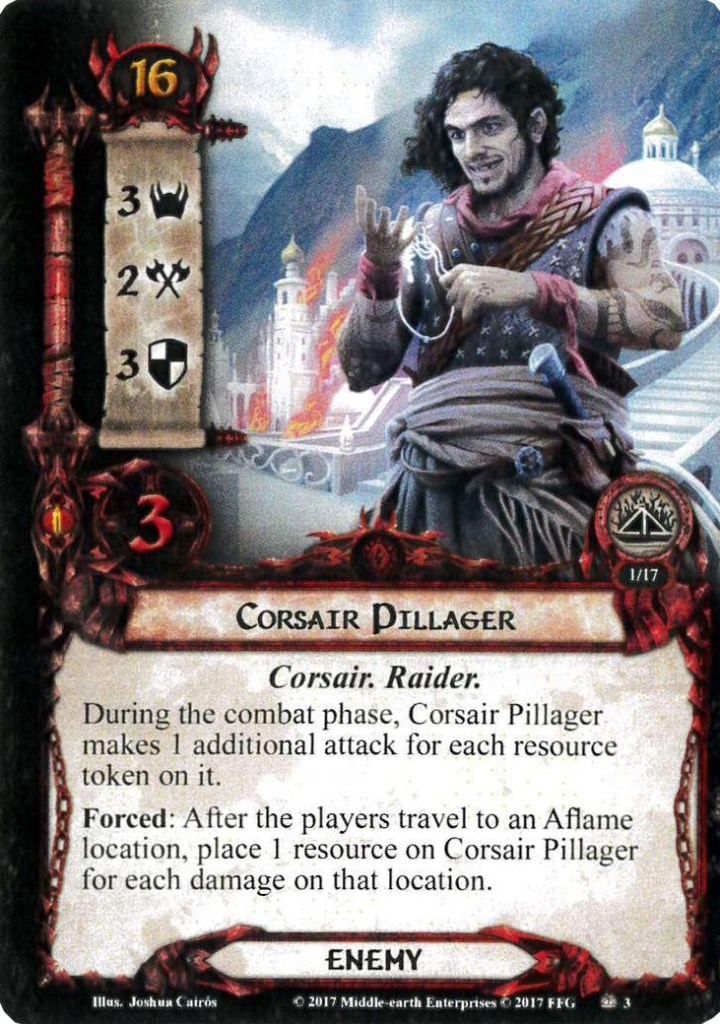
- Corsair Pillager: The next enemy is a tricky one, as you will be facing him a lot throughout the game. This is in large part thanks to his low engagement cost, but also because of his ability, which will have him make multiple attacks each combat phase. Since it is not specified, the Pillager won’t get new shadow cards after his first attack, so you at least know what is coming after that initial attack. The Pillager will get resources after the players travel to an Aflame location. This will trigger when he is in the staging area as well as when he is engaged with a player. He will get 1 resource per damage token on that location, which can reach some pretty high numbers if you have waited for a while before travelling to a location. This effect can trigger multiple times if you aren’t killing the Pillager between travel phases. All these resources will stack the number of attacks this enemy makes during the combat phase, which can get pretty overwhelming. Luckily, this enemy only hits for 2 attack, and there are various ways to counter him. You could try and trap this enemy in something like Outmatched so that your defender readies each time he attacks, effectively cancelling his ability. Entangling Nets will bring his attack down to 0, which means you only have the first shadow card to deal with. But cards like Feint will block all his attacks during the entire phase, so it won’t matter how many resources he has. You can also equip a defender with Spear of the Citadel so that he pokes himself to death after 3 attacks. Plenty of options, and once you have a strategy for him, you could consider keeping him around and see how many resources he gets up to!
Locations
The four new locations added to the encounter deck all have relatively high Aflame values, but also take a lot of progress to explore. Luckily, the three unique Ships all go to the Victory Display upon exploration, so that helps to prevent their passive effect returning in the late game.
- Nárelenya: It is a bit ironic (and fully intended by the developers) that the Nightmare location version of the ship that supports playing more allies now receives damage each time the first player plays an ally. Luckily, the first player does not need to do a sailing test in this scenario, but dealing damage each time you play an ally is rough. Other players can still play allies without problem, but if you are playing this quest by yourself, then this location can quickly shut down your action advantage. The Nárelenya is also the biggest of the three new Nightmare ship locations, having 7 quest points and 3 threat. This means that it is unlikely you will explore this location in a single turn. You will also have to travel here to place any progress, as this location is immune to player card effects. Luckily, you could still play a few important allies before this location burns down, since it has an Aflame value of 10. You also only have to encounter this location once, as you will be able to add it to the Victory Display upon clearing it. Remember that if it burns down however, it will go underneath The Havens Burn instead.
- Silver Wing: You really don’t want to be the first player in this scenario if multiple of these unique ship locations are in play at the same time. The Silver Wing will receive damage whenever the first player attacks an enemy. With Aflame 6, this makes it really important that the first player just takes the punches of the encounter deck and does not strike back if you want to keep this location around. The good news is that you can still kill enemies through direct damage, as long as you are not declaring attacks. Goblin-cleaver comes to mind as a decent event to kill some Corsairs with, without it dealing damage to the Silver Wing. With only 5 progress required, this will be the easiest Nightmare location in the deck to clear, and I would suggest doing this quickly. In higher player counts, you could hold off and ask for Ranged support from other players instead. As with the Nárelenya, this location is immune to player card effects and will go to the Victory Display upon clearing it through progress.
- Dawn Star: Finally, there is the Dawnstar, mimicking its card draw ability by punishing the first player for drawing any number of cards. This will include the card drawn during the resource phase, so this location can burn down rather quickly through no fault of the first player. Luckily, the Dawn Star can take 8 points of damage before it is completely burned down, giving the players a little time to explore its 6 quest points. It will be important to travel here quickly though, as the Aflame keyword trigger at the end of the round will mean that this location gets 2 damage each round, before the first player would draw cards from card effects or encounter cards deal additional damage to this location. It won’t survive longer than 4 rounds after it is revealed, hence why I would suggest saving this location for last if you are deciding on locations for setup. The same features as the other unique Nightmare locations will apply to the Dawn Star, so you only have to face this location once.
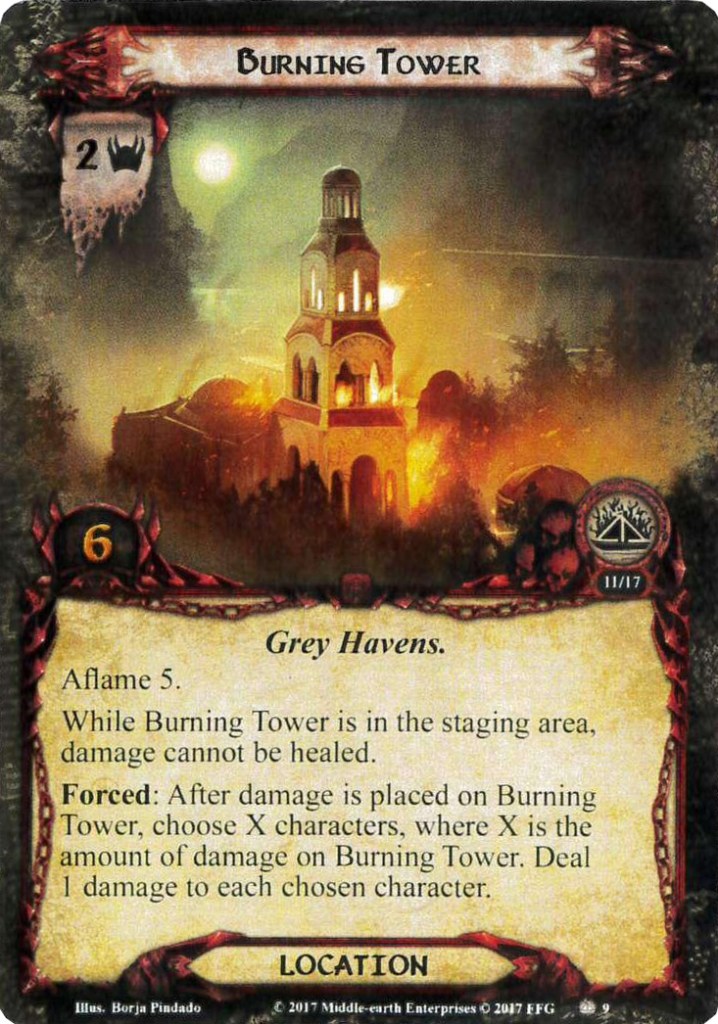
- Burning Tower: This is the only new non-unique location in the Nightmare deck, and luckily, it will take a while to burn down, since it has Aflame 5. This means you could prioritize other locations for a while, but the passive effect of the Burning Tower is going to hurt a lot over time. It states that damage cannot be healed, which is going to be problematic with direct damage effects and constant attacks from Corsairs piling up the damage on your characters. One way to avoid this is to cancel dealt damage through cards like Mithril Shirt, Honour Guard, and Raven-winged Helm. If no damage is dealt, you don’t have to worry about healing it off later. Players can also try to increase hitpoints on characters, though that is not a maintainable solution if you aren’t healing. Blanking this location with a Thror’s Key will get rid of this nasty passive effect, though it only protects against the first copy of the location. To make matters worse, the Burning Tower will contribute to the direct damage effects that you can’t heal off, with its Forced effect. This will deal damage to a number of characters equal to the total damage on Burning Tower. This only triggers whenever the Tower takes damage, but considering that Aflame will trigger on this location when it is in the staging area at the end of the round, it will be a source of constant damage each round. 6 quest points make this a tough location to clear, but if you can time it right with an Eryn Galen Settler, you can get rid of another copy in the staging area and hopefully have a window in which to heal. Due to the amount of damage this card can inflict, I would suggest a timely Waters of Nimrodel to heal everything all at once.
Treacheries
Two new treacheries have been added to the Nightmare deck to force some more interaction with the Aflame keyword, and to give Corsair enemies more resources.
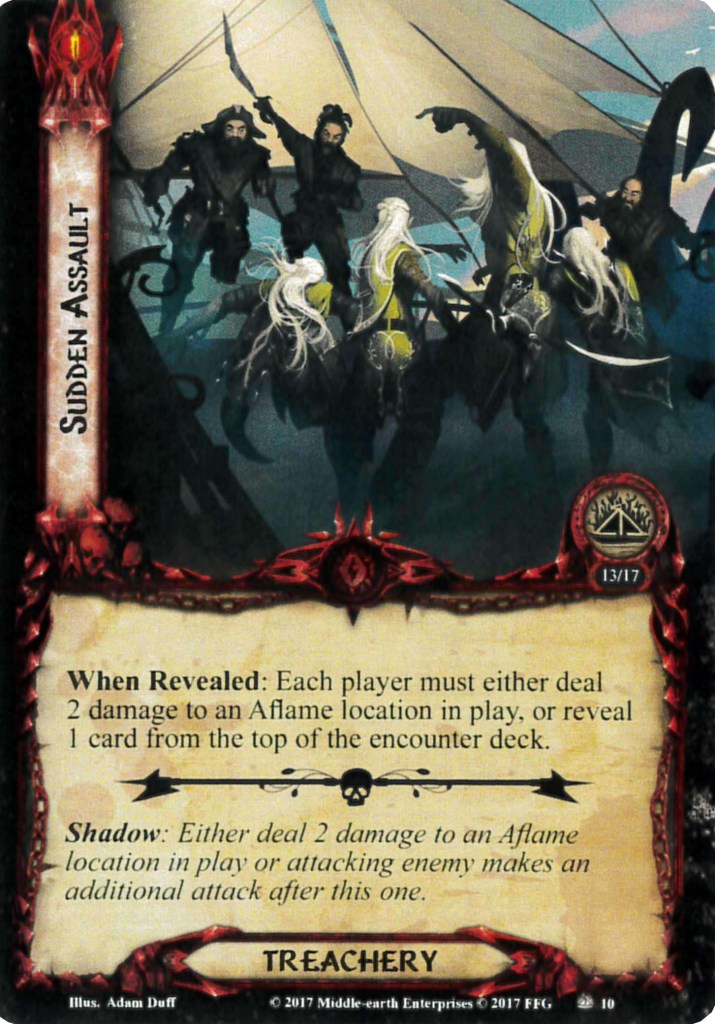
- Sudden Assault: This is a rather simple treachery, but if it comes up over and over again, it can be deadly to any locations out there. Sudden Assault offers each player a choice: Either deal 2 damage to an Aflame location in play (not one damage on two locations, but two damage on a single location), or reveal an additional encounter card. Dealing the damage seems the safer option if you have locations that are still rather healthy and which you plan to explore soon. Alternatively, you can also go for locations that are only a single damage away from being destroyed, and which you cannot save before the end of the turn. You are going to lose that location anyways, but if it leaves now, you clear a bit of threat in the staging area. The additional encounter card is risky, especially in the early game, where you are having a lot of threat in the staging area already. In solo, go for the encounter card, since it would just replace this treachery without it doing much else. Though if you can deal the damage to your active location, then that’s a free quest phase for you this round! In higher player counts, I can definitely see the argument for cancelling this treachery. It’s a lot of damage, and might be a lot worse if everyone picks to reveal another encounter card.
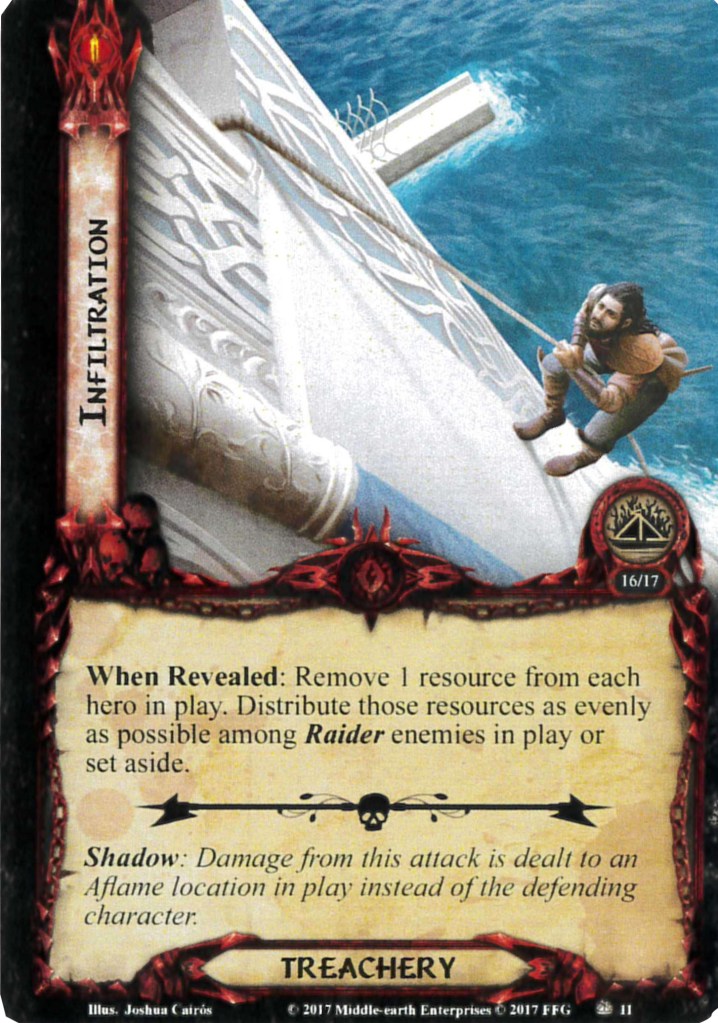
- Infiltration: Great art on this one. I can already imagine this guy casually climbing a tower while there is chaos everywhere else in the harbor. The effect on this guy is a little less casual, as this treachery will steal 1 resource from every hero in play, and deal it to enemies instead. They do not pile onto a single enemy, but are spread as evenly as possible. This prevents players from putting everything on a Southron Sailor, who doesn’t interact with resources at all. If this card appears when there is just one enemy in play though… you are not going to have a good time defeating that enemy. They can become really tough (Corsair Pyromaniac, Corsair Pirate) or be an absolute monster with their secondary effects (Corsair Pillager, Corsair Marauder). Best to cancel this treachery in that case, or to hit the buffed enemy with direct damage until it dies. Another way to negate most of the problems this card causes is to spend your resources during the planning phase. Luckily, it only steals a single resource per hero, not all of them, so if you have the option, stack all resources you want to keep on a single hero, instead of spreading them out.
Tips and Tricks
- I will say it again in case you have forgotten, but the Aflame keyword will deal one damage to the location it is printed on if the location is still in the staging area at the end of the round. This is an easy rule to forget, but hopefully it doesn’t invalidate your playthrough of the normal version of this quest. If so, try again, and then get back to this version once you can consistently beat the normal mode and are looking for more of a challenge.
- There will be a lot of damage being dealt to your characters, so ensure to have either damage cancellation or healing at your disposal to negate that. Healing will not always be possible, so make the most of the windows of opportunity that you do get.
- The first player is really going to struggle in this quest as the three new unique locations will get damaged whenever the first player does something. Good teamwork is required for this quest, especially with Ranged support and timely event cards to help the first player draw more cards and play more allies during the next round.
- Bring willpower, lots and lots and lots of willpower to get past stage 1 as fast as you can. Doing so will limit the number of resources on the bosses and should help to prevent many ships from burning down. Alternative ways to lower threat in the staging area are also welcome.
- Direct damage to enemies will help overcome some high defence stats, especially for Na’asiyah!
- The boss enemies might be immune to attachments in this version of the quest, but not from player card effects. You can use this to hit harder or chip away at their resources with more direct damage.
Playthroughs
Only a single playthrough to be found of this quest, but if more exist, please let me know so that I can add them to the list.
- True solo, Outlands deck: https://www.youtube.com/watch?v=ngVYsnh9ZGQ
Only one quest now stands between me and completing the NM Dreamchaser cycle. And it’s the last one of the cycle’s narrative as well. That will make for a nice ending to the year if I can find a way to beat it consistently. City of Corsairs is a long quest that has a lot of moving parts, and it isn’t made any easier in Nightmare mode. Stay tuned for the article on that quest before the year is over!
