It’s time to crack the final cycle of Nightmare scenarios on the blog. Hopefully, I manage to finish the NM Ringmaker cycle before the end of the year, though I won’t be keeping to a strict deadline. I hope to finish a scenario per month. That way, 2027 will allow me to tackle (NM) Hobbit and LOTR Saga scenarios before we run out of official content published for the game. But I’m getting ahead of myself. The road to Ost-in-Edhil is long, and plenty of dangers lie before us, enhanced by the more difficult Nightmare cards added to the encounter deck.
The first of these scenarios is The Fords of Isen, which is meant as an introduction to the way that Dunland enemies grow stronger as you draw more cards. It also teaches players about the Time keyword, which will become a recurring mechanic throughout the cycle. In Nightmare mode, the gloves are off, and it’s time to see how well the players have adapted their decks and playstyles to this cycle. The Nightmare version mostly focuses on balancing the number of cards in your hand. Have too few, and you won’t be able to attack certain enemies. Have too many, and locations grow in threat, and enemies come down faster. This version also blocks some strategies to lose cards from your hand, which means that you may need to rethink your deck a little.
Nightmare Fords of Isen
- Found in: The Voice of Isengard Nightmare pack, scenario 1
- Size: 19 new encounter cards and one Nightmare Rules card.
- Increase in difficulty: Yes, but not by much. This Nightmare version takes the training wheels off for the Dunland enemies. The stats are not insane, but players will need to balance the number of cards in their hand more carefully. There are not that many major hurdles added to overcome, but the barrage of attacks will just be more focused.
- Fixed loopholes: It’s not really a loophole, but the Nightmare version does patch a few ways to discard cards from your hand quickly. It can limit the number of events you can play for a quick discard. It also shuts down effects for Noldor decks that straight-up discard cards from your hand. These are only on locations, so you could work around them, but it does add to the difficulty of the quest.
- New mechanics introduced: None. It’s the same old Dunland enemies that you know and loathe. Be careful when drawing cards.
- Play this scenario if: You want to dip your toe into the NM Ringmaker cycle, you want a proper battle against Dunlendings without too many distractions, you enjoy walking the tight-rope of having enough cards in your hand to do something with your resources while not getting torn to shreds by the enemies.
- Solo or multiplayer: Bring a friend along for this quest, but not too many. In higher player counts, you will find that you have too many locations in the staging area providing passive effects to the game. In true solo however, you can become overwhelmed by the number of enemies coming at you, especially in the later stages when the Time keyword adds more of them.
New Rules
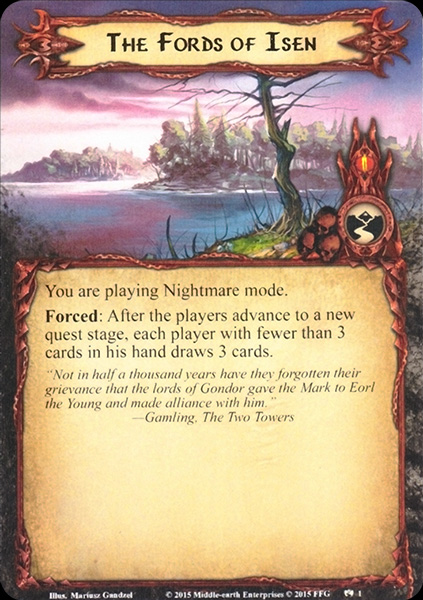
There is just a small additional rule in the Nightmare version of this quest, which will only trigger twice during the entire game. This will force each player who has fewer than 3 cards in their hand to draw back up to 3 cards whenever the players advance to the next stage of the quest. Note that this does not trigger when clearing side-quests, since that’s not counting as advancing to a new quest stage. This additional card draw does not also trigger either of the Condition attachments that might have been stuck to the previous quest card. Those have left play before this Forced effect triggers, so that helps a little.
The forced card draw is always difficult to deal with, and will be very situational depending on the board state and number of engaged enemies. The easiest case is where all players have 3 or more cards in hand when they advance, so that nobody needs to draw any additional cards. However, this does limit players in their ability to hit certain enemies and will boost the stats and abilities of any enemy in play. If players do need to draw cards, try to anticipate what the effects will be. You know that you are going to be drawing cards during the coming turn when you decide to advance the quest, so it’s best to kill the Dunland Berserker engaged with you before he makes an additional attack.
All in all, this is a pretty minor effect, and can be forgotten about if players travel to Fords of Isen before they advance the quest. That location will add up to 5 cards to each player’s hand, so they will always have more than 3 in hand when the quest is beaten. Add to this the various ways in which the game tries to stop you from dumping cards from your hand, and you might not see this rule come into play at all during your game.
New Setup
There is no new setup mentioned on the Nightmare rules card, but there is a slight change compared to the normal version of this quest. As a part of setup, players are instructed to choose one different Dunland enemy each and add it to the staging area. With the most popular first pick removed from the game (Dunland Prowler) and new Nightmare enemies added, there might be a different choice for you compared to the regular format of this quest.
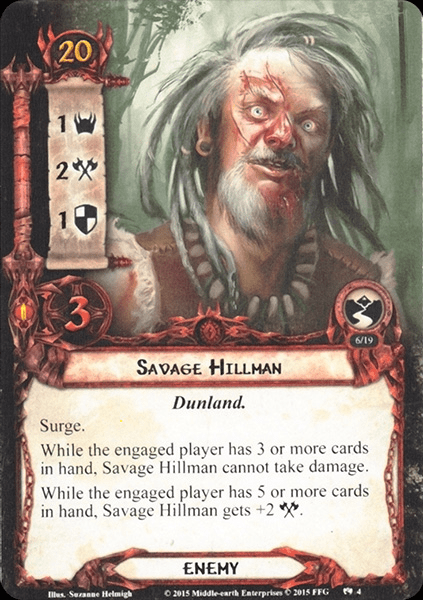
The new Savage Hillman is an interesting choice. You remove a card from the deck that would otherwise surge, and he only adds one threat to the staging area. Do be careful though, as with 20 engagement cost, he will be engaging you early. And if you have more than 3 cards left in your hand, you can’t deal damage to him. For round 1, you are likely to have plenty of cards left, so if you cannot deal with his attack, go for other options.
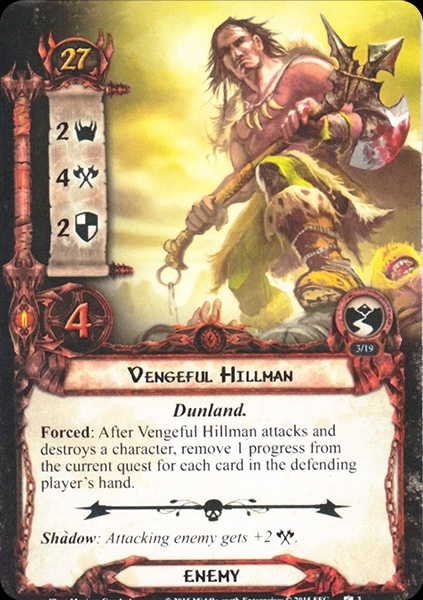
The Vengeful Hillman is also a decent option, since there won’t be much progress to remove this early in the game. Some decks can also avoid engaging this enemy in the early game until they have a solid defence against him. Just don’t choose him if you are planning to chump.
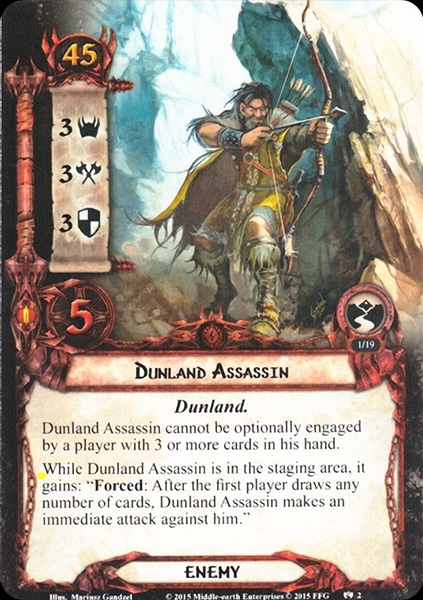
Dunland Assassin is a pretty horrible choice. Players cannot make optional engagements against this enemy for a while, and the constant attacks against the first player is not an ideal way to start the quest. It’s better to keep him in the encounter deck until later in the game.
After each player has selected a different enemy and added them to the staging area, make sure the Islet is in the staging area with Grima attached to it. You are then ready to start the game.
Cards Removed
The following enemies and locations are removed from the encounter deck to make space for the new Nightmare cards. The list is not very long, so the total size of the encounter deck will grow by 9 cards compared to the normal version of this quest.
- 3x Dunland Prowler (I’m sorry Wilson, but you are too easy of an enemy for NM quest)
- 2x Dunlending Bandit (Making place for more NM enemies)
- 1x Dunland Berserker (Making place for more NM enemies, though some copies remain in the deck)
- 2x Gap of Rohan (2 copies remain in the deck, so that you don’t have to see a permanent +1 attack increase to all enemies)
- 2x The King’s Road (Relatively easy location during the mid-to-late game. Asfaloth sends its regards)
The Quest
There is not a lot different from the regular version of the quest. Players anticipating a bunch of weird interactions with the Time keyword can rejoice in learning that it is not the main focus of this quest. That makes this scenario a good gateway for the NM Ringmaker cycle, as you really only have to focus on the Dunland enemies and the number of cards in your hand.
It will be important to play as many cards from your hand as possible, though it will be made more difficult by all the passive effects from locations. These will prevent you from discarding cards from your hand, playing more than 1 event per round, and gaining more resources to play the more expensive cards in your hand. Getting a grip on the locations in higher player counts will be important, but it also comes down to a bit of preparation. Don’t go in with a Noldor deck if there are 3 copies of a location that shuts down your entire synergy that you might not get to travel to. Keeping your deck low-cost, with limited card draw will help against the main threats from this Nightmare version. The encounter deck will make up for the limited card draw, and you do always have Grima available (once you rescue him) to draw an extra card if you are desperate.
At stage 1, I would suggest going to the Islet on turn 1 so that you don’t have a staging area full of enemies that get +1 threat from the location being active. Once you clear it and rescue Grima, you will have a few turns to clear the staging area a bit and get your boardstate going. Remember the Time keyword on this quest stage. You HAVE to clear it within 5 turns (or fewer if time counters are removed) or you will lose the game. If you are also getting the Condition attachments on this stage, you can take it as a sign to swiftly move on to stage 2.
Remember that every player gets to refill their hand when transitioning to the next stage up to 3 cards. This might trigger certain effects on enemies, and it will also make it more difficult to get below 3 cards for the next engagement/combat phases, where the number of cards in your hand will matter to certain enemies. Stages 2 and 3 are relatively similar: Try to stay alive against all those Dunlendings, and make enough progress to clear the stages quickly. Keeping a low handsize will help, so play cards whenever you can or find ways to discard cards if no locations prevent that.
At the end of stage 3, you will be forced to clear the board of all enemies in play. In order to do this, you will likely need to have fewer than 3 cards in your hand in order to clear the Savage Hillman. There will be ways around this, with effects like Fierce Defense, outright discarding enemies. You can also try to send the Hillman back to the staging area with heroes like Fastred and kill it from there with some Rohan tricks. It will also pay off to use any effects that will reduce the number of encounter cards you reveal per turn at the end of the game. This way, you reduce the chances of revealing an enemy that will take a while to kill, prolonging the game and perhaps even triggering the Time keyword again. Once 16 progress is on the final stage and there are no enemies in play, the players win the game.
The Encounter deck
Global
- The new encounter deck is 41 cards thick, which is more than the original quest. This does help to dilute the Nightmare cards a little to about 1 in 2.
- Shadow chances are 51.2%. Many of these will focus on the number of cards in your hand before determining if something bad happens.
- Average threat per card revealed is 1.5 threat/card. In reality, this will be slightly higher due to various buffs to threat on Western Shore and Dunland Tribesman.
- 7 cards in the encounter deck will surge, which is quite a lot. On top of that, Ill Tidings will surge if the first player has 5 or more cards in hand after Ill Tidings has been drawn to hand.
- There is no Doomed in the deck, but various cards will increase your threat during the game. Most of the time, this will scale to the number of cards in your hand.
- The same is true for Archery. The keyword does not exist in this quest, but there are numerous ways to receive direct damage on your characters.
- Immunity
- Down from the Hills cannot be cancelled if any player has 5 or more cards in their hand.
- Dunland Assassin cannot be optionally engaged by a player with 3 or more cards in their hand.
- Savage Hillman cannot take damage while the engaged player has 3 or more cards in their hand.
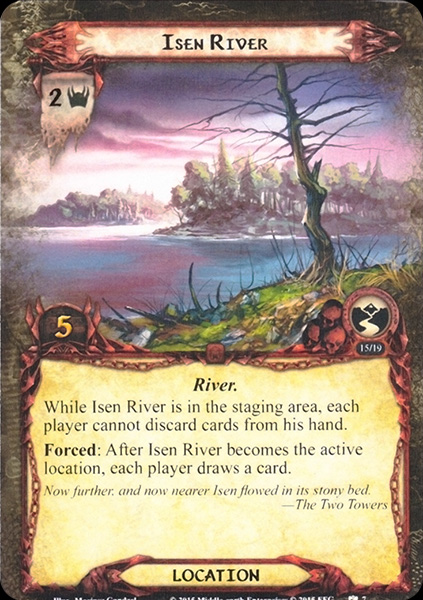
- Players cannot discard cards from hand while Isen River is in the staging area.
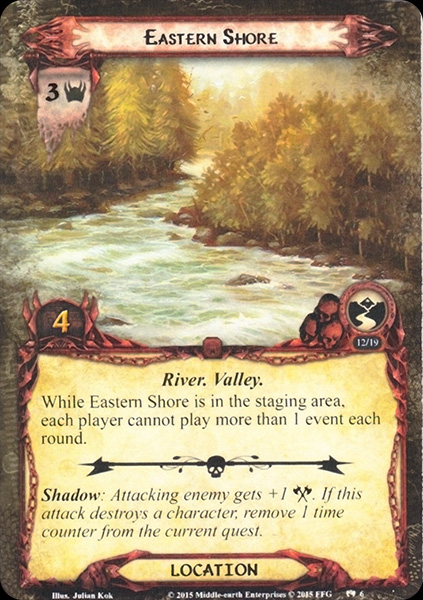
- Players cannot play more than 1 event per round while Eastern Shore is in the staging area.
- Players cannot gain resources from card effects while Fords of Isen is in the staging area.
This overview does not take into account that 1 enemy per player is put into the staging area at the start of the game. The Islet and Grima are not counted in these stats. Having so many enemies in the deck on top of 7-9 surging cards means that combat will be inevitable for this quest. Players need to get their characters down within the first 2 rounds to deal with enemies engaging from the staging area.
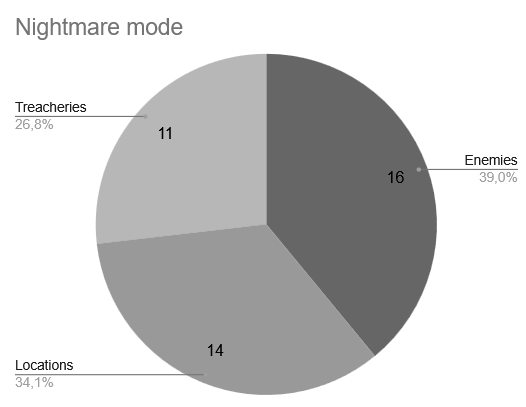
Enemies
The enemies are really the focus of this quest, as you have to fight off wave after wave of Dunlendings. A lot of the easier ones have been swapped for new Nightmare enemies that will grow in strength as your handsize increases. They require balancing of the number of cards in your hand and when to draw cards.
- Dunland Assassin: The first new enemy for this Nightmare deck stands at a distance and tries to punish you for drawing cards. With 45 engagement cost and the passive ability to prevent optional engagements by players with 3 or more cards in hand, you are unlikely to fight this enemy for a while. This is most frustrating during the third stage, when you need to have killed all enemies in play in order to win. While this enemy sits in the staging area, it will keep a close eye on the first player. Whenever they draw any number of cards, the Assassin will make an immediate attack against them. With 3 attack, this is worth defending with a proper defender or you might risk losing characters to an unfortunate shadow effect. However, this attack that the Assassin makes can also be the key to their downfall. If you punish their attack with Grimbeorn the Old or a combination of Spear of the Citadel/Gondorian Spearman, you can start to chip away at their pool of hitpoints. Dunedain decks will also have options to engage this enemy with Tactics Aragorn. This allows you to draw him in close and finally get rid of him, without having to go down to 2 or fewer cards in your hand. I would suggest engaging this enemy whenever you can, as his attacks against the first player only trigger when he is sitting in the staging area. It’s a much easier enemy to have engaged with you.
- Vengeful Hillman: This is a much tougher enemy to get engaged with you, but sadly, the lower engagement cost will mean you are going to have to face this foe at some point, perhaps earlier than you’d like. The stats are ok for a Nightmare enemy, with its 4 attack being the most notable stat. You are going to need a decent defender to take care of this enemy, as you cannot chump his attacks. That would trigger the Forced effect of the Hillman. Whenever a character dies due to an attack made by this enemy, you will need to remove 1 progress from the main quest per card in your hand. This will then prolong the quest, and you will have to make more progress in order to clear the stage or beat the game. This is a rather rare effect to trigger, as his 4 attack won’t kill much by itself. There are some shadow effects that will increase his attack, including the shadow on Vengeful Hillman itself. But if you can prioritize this enemy during your defence and chump other attacks instead, you can mostly ignore his textbox. Killing him is also not difficult at all. 2 defence and 4 hitpoints is pretty tame for a Nightmare enemy, but this quest focuses more in overwhelming you with enemies than giving you a few big enemies to fight against. This Hillman is good fodder to distract your defenders with.
- Savage Hillman: Real case of “Crazy Eyes” with this one. You just know he is going to pummel you over and over again, and you’ll be glad to finally be rid of him when you get around to attacking him. This is made more difficult by his passive effects. If the engaged player has three or more cards in hand, the Savage Hillman cannot take damage (even from other players’ Ranged attacks or from traps/events). To make it worse, the Savage Hillman will double his attack stat to 4 when the engaged player has 5 or more cards in hand. He does only attack once per turn, but getting several of these engaged with you while you cannot reduce the number of cards in your hand is pretty brutal. Forest Snare or Entangling Nets can buy you some time to focus on other enemies first. Upon reveal, the Savage Hillman will surge, and he contributes 1 threat to the staging area. He won’t stay up there for long thanks to his 20 engagement cost. The 2 attack is manageable, but once you have 5 cards in hand and he attacks for 4, it becomes far more difficult to find a proper defender. 1 defence and 3 hitpoints is pretty mild for a Nightmare enemy, so once you have fewer than 3 cards in hand, he should die pretty easily.
Locations
Three new locations with each three copies will mean that you will be seeing these throughout your playthrough. They each come with a decent number of quest points and passive effects that will last as long as the location sits in the staging area.
- Western Shore: This first location really lives or dies based on how many cards are in the hand of the first player. Luckily, it is not the player with the most cards in hand, so the threat this location poses is quite flexible between turns (in multiplayer games that is…). For each card in the hand of the first player, the Western Shore gets +1 threat. While it is in the staging area, it also provides a -1 engagement cost buff to each enemy in play per card that the first player has in hand. This can be easy to forget, but it can also help you to bring down the Dunland Assassin a bit earlier. The effect of this location does not stack, so if you have multiple copies in the staging area, you would only really get rid of the threat of this location when you travel to it. It’s not a bad choice if the first player has a lot of cards in hand, as this can save you a lot of threat in the staging area. It’s especially useful to travel here if you know that the person who would be the first player next turn is going to have a lot of cards in hand. The shadow effect on this card also deserves special mention, as it can lead to some undefended attacks if you have 5 or more cards in hand, so try to stay below that number.
- Eastern Shore: The Eastern Shore is a much more stable card than its western counterpart. It does not change with the number of cards in your hand, but simply provides a passive effect to the game. Players are limited to playing 1 event per player each round. This is done for two reasons. The first is to limit the control that players have over the scenario. Silvan decks are hurt quite a lot by this, as they tend to play a lot more events per round than just one. But the main reason behind this passive is that players could easily drop the number of cards in their hand outside of the planning phase by playing some (free) events. This then sets them up nicely during the combat phase and can compensate for any cards they had to draw through encounter card effects. Players are still allowed to play one event per round, but that’s it. This requires some careful planning on whether or not you want to use one event in the quest phase, if that means you are not able to play any during the combat phase. The location does not have a travel cost, so players can opt to travel here if there is just one copy of Eastern Shore in the staging area. If there are multiple copies, try to clear some from the staging area in order to play as many events as you want again.
- Howard Shore: Wait no, wrong shore.
- Isen River: Noldor players beware! This location will shut down your deck right away. With this passive effect, players cannot discard cards from their hand. You would normally do this to fuel abilities, mostly in the Noldor archetype, but also for Spirit Eowyn‘s ability or Mirror of Galadriel, for example. That’s no longer possible. This does “help” heroes like Erestor and Cirdan for keeping all the cards you’ve drawn during the resource phase, but it results in you having a lot of cards in your hand that you might not be able to play. Effects like hero Arwen, To The Sea, To The Sea, and Imladris Caregiver are also made impossible as long as this location is in the staging area. Players could opt to travel here, though they will each need to draw one card once the Isen River becomes the active location. This, in turn, can trigger enemies or boost their abilities during the engagement/combat phases. 2 threat isn’t terrible to leave in the staging area, and if you are not bringing any effects that discard cards from your hand, then leaving it in the staging area is probably fine. You can focus on other locations and either forget about this one or leave it to location control decks to slowly chip away at.
Treachery
There is only 1 new treachery added to the encounter deck for Nightmare mode, but none of the original treacheries have been removed. This means that you can still have some condition attachments on the main quest, and drawing treachery cards into your hand as a standard hand-size increase.
- Brutal Assault: Only two copies of this will be in the encounter deck, but it will be enough to make you fear it coming at you at the worst time. The effect is rather simple, but in combination with all the combat happening, you really can’t afford taking a lot of direct damage. Because that is what this treachery will dish out. Each player must assign X damage among characters they control, where X is the number of cards in their hand. Usually, this will deal 3-5 damage to characters, but luckily you can assign this damage to allies as well. As long as you have sufficient healing, you should be ok. The real danger comes with the timing on this card. If you just started the game and don’t have that many characters in play yet, then your heroes will take a beating before the combat phase has even begun. Remember that you can also select Grima to take some of the punishment, just don’t kill him. This card also gets some bonus points for the gruesome Nightmare artwork, with that hand being properly severed at the wrist.

Tips and Tricks
- Bring some condition removal to this quest. There are two different condition attachments that can attach to the current quest card and will harm players whenever they draw cards. Alternatively, you can time it so that you face a side-quest at the time these conditions appear, and then clear the quest immediately afterwards. But since that is going to cost you time-counters, I would suggest you to at least bring a Power of Orthanc or two.
- With so many locations providing passive effects to enemies or restricting the way you play, it can be hard to decide on where to travel. I would suggest going to the location that is giving you the most grief, and which only has one copy in the staging area. For the rest, I would urge you to bring Northern Trackers to clear a lot of locations from the staging area. An Eryn Galen Settler can also be very useful to get rid of additional copies of locations in the staging area.
- Be careful when drawing cards. Even when there are no enemies that are immediately punishing you for drawing a card, you might not be able to play that card in time before you are hit with an enemy that interacts with the number of cards in your hand. The many passive effects in play may also prevent optional discards, playing several events at once, or limiting the number of resources you can gain to play your entire hand in the planning phase.
- Get your defenders going as soon as you can. Setup will give you an enemy per player, and given the number of enemies in the encounter deck, it won’t be long before you are engaging some of these. Having attachments on a hero to boost defence is great for the bigger ones, but also try to set up some allies that can take a hit.
- There are a bunch of nasty shadow effects in this quest, ranging from additional attacks to forced undefended attacks. Having access to shadow cancellation will help a lot. Hasty Stroke is nice, though with Eastern Shore limiting your events per round, it might not be the most reliable option. Balin is more flexible as long as you give him enough resources.
Playthroughs
Luckily, the NM Ringmaker scenarios are a bit older, so there has been more time for members of the community to take on this quest in OCTGN or on DragnCards. A list of playthroughs can be found below.
- True solo, with Erestor???: https://www.youtube.com/watch?v=K6V4XrM9BBk
- True solo, Boromir deck: https://www.youtube.com/watch?v=xrwlKh8BUdU
- Two players, side-quests and traps: https://www.youtube.com/watch?v=6_7refnVFKU
- Two handed: https://www.youtube.com/watch?v=65XPjvLEjRA
- True solo, Outlands: https://www.youtube.com/watch?v=C2GDYjlbshQ
That’s the first of nine scenarios done for this cycle! I won’t be doing all of these in order, as the next one, To Catch An Orc, is pretty brutal and I would need more time for it. Instead, I will go for the scenarios that I like the most first. I just wanted to start off the cycle with Fords of Isen because I tend to play this quest quite often and because the Nightmare version is also still doable. For next month, I will see if I want to do Into Fangorn or if I will skip ahead to some of the Nightmare Adventure Packs. Hope this series will inspire more people to play these scenarios in Nightmare mode!
