
Hello, everyone. Maedhros100 here. I have wanted to write on this game for a long time, and I judged that it would be better to help out an established blog than to start my own this late in the game’s life cycle. Now that our beloved evergreen game is officially dead (what an oxymoronic statement, I know), I figured this was a great opportunity to cover some of my favorite uncovered content: A Long-extended Party.
Whenever I describe this game to other people (which is rarely), I talk about ALeP as semi-official content. It is in no way endorsed by FFG, but the quality control and playtesting that go into it are completely amazing, and they give it the feel of an official product. For those who have not encountered ALeP before, please check them out on their website: https://alongextendedparty.com/. As a Revised Content + MB Print Alt Arts player, ALeP gives me the feel of someone following along with the game on its normal release cycle.
Just as a brief heads-up, when discussing ALeP quests, I will often discuss ALeP player cards as if they were part of the official card pool. Since I am discussing the quests, why not talk about the player cards that were tested against them?
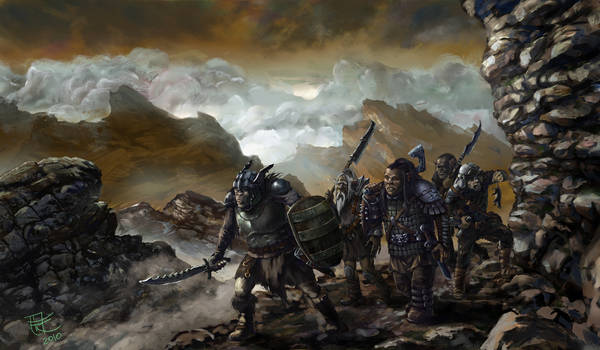
The Horse Lord’s Ire takes place after a vicious battle at the Erelas Beacon. Our heroes are guiding Queen Morwen Steelsheen to Erelas, where they can seek aid from the Riders that dwell there. However, they encounter a group of horse-thieves, led by the warchief Thruk, who may desire these noble beasts as more than steeds…
The Horse Lord’s Ire
- Found in: ALeP: The Children of Eorl Deluxe
- Official Difficulty: 7
- Community Difficulty: 7.7
- Encounter Sets: The Horse Lord’s Ire, Orc-host, Rohan Lands
- Quest Cards: 3 quest cards
- Play if: You want to play a quest that relies on fighting over a few objectives, you want a quest that gets progressively harder as you pass through quest stages, you want a final quest stage that feels like an all-out battle.
- What is different about this quest?: Three Mount objectives that the encounter deck tries to keep hold of, enemies that get stronger or weaker based on whether the players or the encounter deck control the Mount objectives, an objective that attempts to force your advance through quest stages.
- Solo or multiplayer?: I personally find this quest to be more manageable in solo or two-player games. The number of Mount objectives does not scale, but with a higher player count you will see more of the punishing effects that make you choose between losing a Mount or doing something horrible. And you only have so many Mount objectives. If you have strong decks, though, the final quest stage can be an amazing moment in a four-player game.
- Can I bring side-quests to this quest?: You can, and I would recommend doing so. Stages 1 and 2 both have a requirement of needing to control a certain amount of Mount objectives to advance and have relatively small progress thresholds. Also, the number of Mount objectives you control will place extra progress on the main quest due to the Stolen Steeds objective. Finally, the ultimate stage requires no progress, and the staging step of the quest phase is skipped. On that stage, there is nothing to prevent you from questing with the exact amount needed to defeat a side quest.
- What to look out for: Encounter card effects that punish you if you decide to hold onto a Mount, an objective that could make you advance to the next quest stage before you are ready, a great increase in difficulty at the final quest stage.
The Quest
Setup

The setup portion of this quest is not terrible. Stolen Steeds gets added to the staging area, and Thruk, Felarof, and the Orc-host encounter set are set aside, out of play. The first player then reveals both Flinthoof and Brightmane, causing them to be guarded by an enemy and a location, respectively. Then, each other player discards until a location or enemy is discarded and adds it to the staging area. This is a little bit different from the standard “Reveal 1 encounter card per player” as it gives you an additional card, but it prevents from any opening treacheries. After this is completed, flip the quest card to side 1B and begin the game.
Quest Card 1: Thieves and Coursers
The only text on quest card 1B states that “This stage cannot be defeated unless the players control 2 Mount objectives.” This is, in my opinion, the most important stage of this quest, and your time here will determine the outcome of the rest of your game. While this may sound excessive, I am not overexaggerating. The quest card does not have any punishing effects, and its one block of text helps you, enabling you to turtle on this stage indefinitely. Well, indefinitely is not the right word, because uncontrolled Mount objectives will drive your threat up. Thus, as with any turtling strategy, threat reduction is crucial here.
While at stage 1B, take advantage of the plentiful vast locations that the encounter deck will spit out at you. They will help to absorb the extra progress from Stolen Steeds, and they will buy you more time to build up a board state. However, while having a vast location in the active location slot will neuter the Forced effects on other vast locations, many shadow effects will get nastier. Shadow cancellation is key here to limiting the damage to your board state.
If you have threat reduction (or even if you don’t), consider letting go of Mount objectives from time to time to soften the blow of certain enemies. This will also prolong the time you have on stage 1B to set up your board state. When your group controls both Mount objectives in play, and you have 6 progress on stage 1B, you will advance to stage 2 (obviously). Remember, this can occur due to the Forced effect on Stolen Steeds, and that can throw a few more encounter cards in play for the next round.
The Vast keyword
Vast is a keyword featured on many locations throughout this scenario, and then later in the cycle. Vast locations generally have low threat, high quest points, Forced effects that trigger when the active location is not vast, and shadow effects that trigger when the active location is vast. Each location with the Vast keyword is considered to be vast and has the additional text: 1) Travel: Each player must exhaust a Mount attachment or a hero they control. and 2) Response: After placing progress on this location from questing successfully (even if this location is explored), place an additional progress on any vast location for each Mount attachment the players control.
Knowing how to deal with vast locations is a key facet of this quest. Generally, I find the shadow effects easier to deal with because of the wealth of shadow cancellation that is available to us in this game. However, there are a few effects that will force you to travel away from a vast location, leaving you vulnerable to Forced effects that will obviously be more plentiful in multiplayer.
The Mounts

Let’s take a few moments to dwell on the three Mount objectives that are so intrinsic to this quest. Fair warning: they are all restricted, so if you are playing solo, do not pack too many important restricted attachments in your deck. First up is Flinthoof. When he is revealed, he will become guarded by an enemy. This means you can claim him quicker than his friend Brightmane, but enemies generally prove more annoying to deal with. Plus, the enemy guarding Flinthoof gets an additional point of attack, making it more likely to leave you with wounds that you might carry through the rest of the quest. Once you have claimed him, however, Flinthoof becomes a valuable asset to your heroes. Not only does he grant an extra point of attack and help to satisfy the Travel requirements of vast locations, but he also allows you to deal 1 point of direct damage every combat phase (provided you exhaust him). This can help with enemies that cannot take damage unless being attacked by a certain amount of characters (*cough* Orc Battalion *cough*) and is just generally useful. Finally, as a claimed objective, he will place 1 progress on the main quest at the end of the round due to Stolen Steeds.

Next up is Brightmane. When she is revealed, she will become guarded by a location. Locations are generally more tame in this encounter deck, especially if you can reliably travel to a vast location. However, unless you bring heavy location control, you will not be able to free Brightmane until the second round. The extra threat she grants to the card guarding her is not too hard to overcome, even in the early game. Later in the game, it becomes even less important as many of the abilities that steal Mount objectives attach them to enemies engaged with you. Once you claim Brightmane, she helps you quite a bit. Her extra willpower is nice, and she can also be used to satisfy the Travel effect on vast locations. However, the real gem is in her ability: to scry the top card during the quest phase. This can allow you to see what card you will reveal, or, if triggered after staging, the first shadow card for the upcoming combat phase. Since the vast locations have some of the worst shadow effects in this quest, discarding a location in that second use case can be quite helpful. Finally, she (like Flinthoof) will place 1 progress on the main quest at the end of the round.

Finally, there is the mightiest of the King’s steeds: Felaróf, scion of the horse of Eorl. This objective will not enter play until stage 2. When he does, he will be guarded by the fearsome warchief Thruk. He will turn any enemy into a formidable foe, giving it two extra shadow cards. Once you rescue him, however, he will allow you to discard a shadow card from play during the combat phase. While you do not get to wait to see which shadow card would be the worst, cards like Dark Knowledge and Eldahir that allow you to peek at shadow cards shine here. Finally, like the two Mount objectives before him, he will place 1 progress on the main quest at the end of the round.
Quest Card 2: The King’s Stallion

When stage 2A is revealed, if it is the combat phase, the combat phase ends. Then, after shuffling the encounter discard pile into the encounter deck, the first player adds Thruk to the staging area, guarding Felaróf. Each other player discards cards from the encounter deck until an enemy is discarded and puts it into play engaged with them. This is interesting, because if it does indeed end the combat phase, the first player for the following round will have to deal with the enemy that he discarded and engaged, and deal with Thruk and Felaróf. Stage 2B merely says that you must have 8 progress and control all 3 Mount objectives to advance, and that Thruk cannot take damage unless there are at least 4 progress tokens on the main quest.
If you prepared well at stage 1, you should be equipped to handle the new influx of enemies. Thruk hits for 5, boosted by 3 total shadow cards each attack. This includes instances in which he is granted an additional attack. As soon as you can, quest hard and place 4+ progress on the quest and destroy Thruk. After Thruk is gone and you have claimed Felaróf, feel free to take some time and build up your board state before questing through to stage 3. Vast locations can help out here, and your threat should rise at a constant rate if you can hold onto the Mount objectives. However, if you quested hard in order to be able to damage Thruk, you may not have this luxury. Once you have all 3 Mount objectives and the 8 progress required, you will advance to stage 3.
Quest Card 3: The Sweeping Tide

Buckle your seatbelts – er, saddle belts – because things are about to get crazy. This quest has a very Journey-Along-the-Anduin-esque final stage, except that it improves on that mechanic. When this stage is revealed, if it is the combat phase, end the combat phase. This will prevent you from getting a jump on the new reinforcements the Orcs have just received. Then, shuffle the encounter discard pile into the encounter deck. Speaking of reinforcements: remember Thruk, that big bad Orc you just killed? He gets added back to the staging area. Remember that Orc-host encounter set that you set aside at the beginning of the game? Each player chooses 2 (not 1. 2!) of those enemies and puts them into play engaged with them. One of those enemies must be that Orc Battalion I mentioned earlier. When you flip the stage, you will discover that stage 3B is an all-out battle (no, there is no Battle keyword). As I alluded to earlier, the players skip the staging step, and if the encounter deck is ever empty, it gets reshuffled. Lucky for us, this means that the Orc-host will never run out of shadow cards. Yippee. It also contains a Forced effect stating that when an enemy makes an attack, it gets an additional shadow card. Finally, this quest delivers its win condition: if there are no enemies in play, the players win the game. However, it adds on one last stipulation: if a Mount objective is attached to an enemy, the players lose the game.

This last line really complicates things. All those horrible effects that make you choose between an awful effect or losing a Mount? You’re going to have to take the awful effect (including but not limited to: discarding the defending character after an attack, dealing with extra shadow cards, causing an enemy to make two attacks each combat phase). And that Orc Battalion? It CANNOT TAKE (combat) DAMAGE unless being attacked by at least 3 characters. If you plan on doing your attacking with a Gondorian Fire Boromir, your chances of victory just got much slimmer. If that first line of text plus its formidable stat line was not enough, when characters are declared as attackers against Orc Battalion, they take 1 damage.
Be careful to watch your threat on this last stage, as cards like Servant of the Eye and Black Land Scouts will drive up your threat even more than this quest already has. Other than that, there is not much else to say here. Just fight and kill enemies until you cannot kill any more. Once you have done this, you have your victory. The heroes have driven off the invading Orcs, saved the King’s horses, and made their way to Aldburg, where a sinister plot is developing.
The Encounter Deck
Global
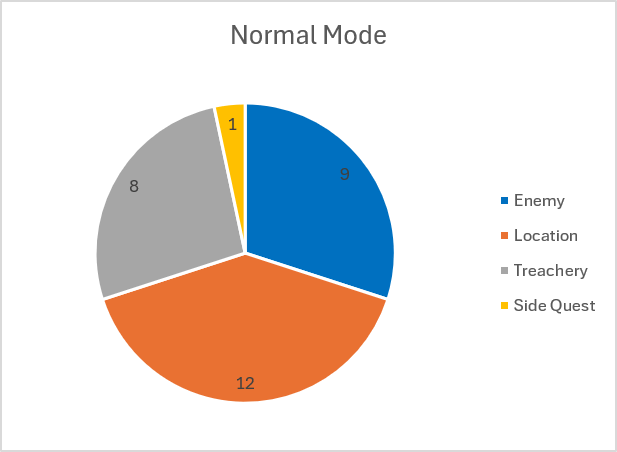
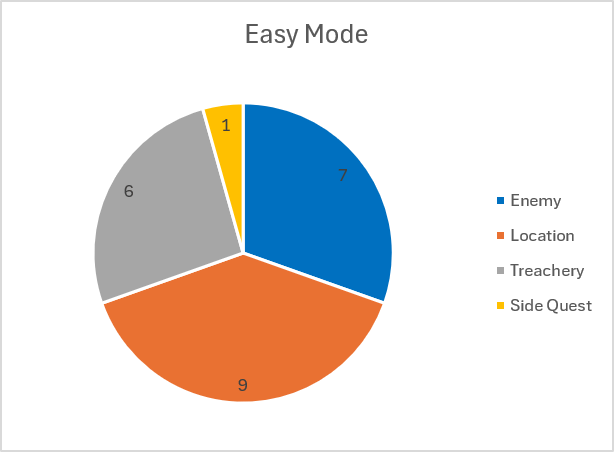
- The encounter deck is slightly smaller than normal, because of the set-aside Orc-host encounter set. It contains 30 encounter cards in Normal mode, and 23 in Easy mode. This does not include Stolen Steeds, Thruk, the Orc-host encounter set, or any Mount objective.
- Shadow chances are very high, at 70% in Normal mode and 74% in Easy mode.
- The average threat on cards revealed from the encounter deck is about 1.4 in both Normal mode and Easy mode. This does not include the threat on Bridle-biter, which will always engage a player and contribute no threat to the staging area. This also does not include the boosted threat on Spoiled Pasture, which gains threat as the players gain control of Mount objectives.
- Surge is fairly common in this encounter deck, being present on 5 cards in Normal mode. Also, 6 cards gain surge if their effects do not fire. These numbers are reduced to 3 and 5 in Easy mode, respectively.
- Doomed is very rare in this encounter deck, present on only two cards (Wild Country) in Normal mode. This goes down to only 1 in Easy mode. However, many cards in this encounter deck will attempt to drive your threat up, so threat reduction is still crucial.
- Archery is also only present on two cards (Saddle-slasher). The only other encounter card that deals direct damage is the Orc Battalion.
- Immunity
- The Green Sea makes all vast locations immune to player card effects.
- Orc Battalion cannot take combat damage while being attacked by fewer than 3 characters.
- Thruk is immune to player card effects and engages the first player.
- Horse Thieves’ Hovel and Horse Lords’ Lodge force you to travel to a non-vast location.
- While at stage 2B, Thruk cannot take damage unless there are at least 4 progress tokens on the main quest.
Objective
I already discussed the Mount objectives in great detail above, so I will only cover Stolen Steeds here. This is the card that defines the quest’s main mechanic. It prevents Mount objectives from being discarded or leaving play, because that would kind of break the quest. It also forces a player to claim a Mount objective if it is free of encounter cards. This is important because ANY player can claim it, not just the first player. This allows you to distribute these objectives to whichever player is best equipped to handle Bridle-biters, or whoever has a restricted slot available.
The last line of text is a long Forced effect that will trigger at the end of every round, which places 1 progress on the main quest for each Mount objective the players control. Then, each player raises their threat by 1 for each Mount objective the players do not control. This will attempt to force you to grab Mount objectives as soon as possible. Once you control them, this objective will push you to complete the main quest. Due to the large quest point threshold of the many vast locations in the encounter deck, I have rarely found this effect to be a hindrance. However, it is definitely something to keep in mind.
Enemies
Do you like to kill Orcs? Well, then I have a quest for you! Each enemy in this encounter deck has the Orc trait, and many of them will attempt to raise your threat, forcing you to engage more enemies, which raises your threat. This may eventually spell your doom, so it is wise not to let these enemies hang around!
- Saddle-slasher: This is the first of a handful of alliterative horse-themed enemies. Saddle-slasher has 30 engagement cost, 2 threat, X attack, X defense, and X hit points, where X is 2, plus 1 for each Mount objective the players control. It also has Archery X, so it will be up to Archery 5 at the end of the game. This is a prime example of an ALeP scaling card: it gets stronger as the game goes on. When Saddle-slasher comes out, kill it as soon as possible (though 5 defense and 5 hit points can prove formidable). Having some direct damage around could ease the burden needed to destroy this enemy.
- Rein-ripper: With an engagement cost of 24, Rein-ripper will likely engage you during the round that it enters play. With its 3/3/3/4 stat line, it is no weak enemy. The most dangerous facet about this enemy is that when it attacks, it is dealt two additional shadow cards unless you attach a Mount objective you control to Rein-ripper. This is Felaróf on a normal enemy! What’s worse is that it can stack with Felaróf, granting a whopping 4 extra shadow cards. A word of advice: if you control Felaróf, do not attach him to Rein-ripper to cancel its Forced effect! Shadow cancellation is key here, or even cards that blank text boxes, such as Revealed in Wrath or Man of the Mountain. A good old Forest Snare is not too shabby here as well. Remember that you cannot cancel that Forced effect by attaching a Mount objective while at stage 3, because that would cause you to lose the game.
- Bridle-biter: This card gets the award for the most annoying enemy in the encounter deck. If not for Recreant Rider, it might have gotten the award for the entire deluxe and cycle! Its 20 engagement cost is mostly irrelevant, and its 2/2/2/3 stat line is rather weak. However, when it is revealed, it immediately engages the player who controls the most Mount objectives. This will always be someone, because 0 can be the most. Right now, you might be saying to yourself, that doesn’t seem so bad. At least it doesn’t contribute its threat, right? WRONG! It has SURGE, so it will replace itself! Most of the time, one of these guys comes off the encounter deck, and you will feel like you want to punch a hole in the wall (unless you have a Dúnedain deck). Besides staying engaged with it, direct damage cards such as Goblin-cleaver work quite well on this small Orc. However, a little part of you dies every time you shuffle the encounter discard pile into the encounter deck and know that 3 Bridle-biters are going back in.
- Pommel-pouncer: Pommel-pouncer sports 40 engagement cost and a 3/4/2/5 stat line. The 40 engagement cost might tempt you to leave this enemy in the staging area for a time. However, while it is in the staging area without a Mount attached, it takes control of a Mount objective when a player would gain control of it. While this ability is irrelevant at stage 3, it can certainly make stages 1 and 2 more annoying. Although it attacks for 4, it is one of the weaker enemies in the encounter deck and can even be beneficial if you are attempting to turtle (at the cost of an extra threat, of course). Also, it is one of the few cards that has no shadow effect, making it nice to have in the encounter deck at stage 3.
- Servant of the Eye: Servant of the Eye is part of the Orc-host encounter set, so it will not appear at stages 1 or 2, and it might not even appear at stage 3. At first glance, it is a rather weak enemy, with 24 engagement cost and a 2/3/2/3 stat line. However, it has Doomed 1, and whenever it attacks you, you must raise your threat by 1. You do not want to let these things stick around. Servant of the Eye can really drive your threat up, and, coupled with other threat-raising effects in this quest, it can pose a large problem for you. Direct damage or Feint-like effects are potent ways of dealing with this enemy before it attacks you. Keep in mind that its Doomed will not trigger if you put it into play at stage 3.
- Black Land Scouts: This enemy is also part of the Orc-host encounter set. Like Servant of the Eye, you will only see it at stage 3, and you might not always see it. Its 40 engagement cost and 1 threat will tempt you to leave it in the staging area. Its other stats are equally as weak: 2 attack, 1 defense, and 5 hit points. However, at the beginning of the combat phase, either raise each player’s threat by 1 or deal 4 damage among characters in play. This is effectively Doomed 1 or Archery 4. Engage this Orc and kill it as soon as possible. Threat can really be an issue in this quest, and there may come a point where you are unable to have everyone take an extra threat. Archery 4 is nothing to sneeze at, especially in lower player counts. Elfhelm is a strong counter for this ability.
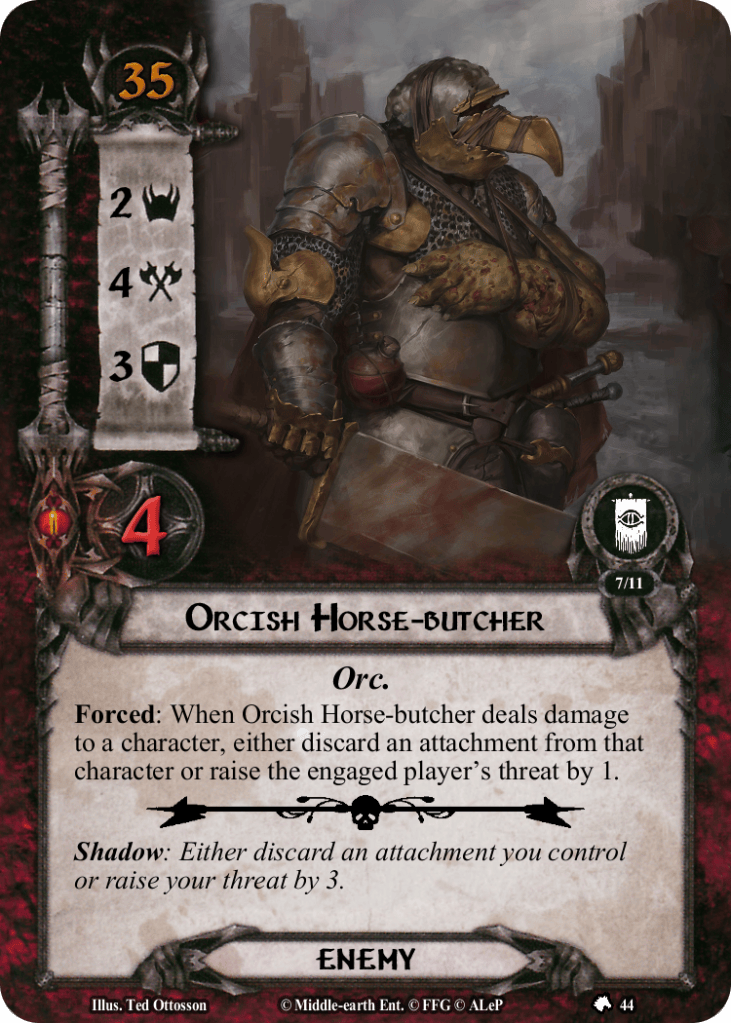
- Orcish Horse-butcher: This is the final non-unique enemy from the Orc-host encounter set. It has 35 engagement cost and a 2/4/3/4 stat line. Also, when it deals damage to a character, you must either discard an attachment from that character or raise the engaged player’s threat by 1. This ability is rather easy to mitigate: bring a dedicated defender. If you can deal with its relatively solid attack and defense, this is one of the easier enemies in the quest because its ability is much more conditional. Cards that recycle cards from your discard pile, such as Reforged or Relic of Nargothrond, are good counters for this enemy as well. Shout out to Ted Ottoson for an amazing piece of art. Look at that giant butcher’s knife!
- Orc Battalion: Here it is: the strongest enemy in the quest. With 37 engagement cost, you usually will not have to deal with Orc Battalion as soon as it comes out. However, stage 3 makes you put it into play engaged with you. It has a formidable stat line of 3/7/3/7, and it cannot take combat damage while being attacked by fewer than 3 characters. Also, when a character is declared as an attacker against Orc Battalion, that character takes 1 damage. Once again, direct damage is a good solution, especially if you do not have the characters to spare to attack it. This may be a strange thing to say about the strongest enemy of a quest, but try to leave this enemy for last. It is important to maintain control of your threat, so take care of the other Orc-host enemies that will drive your threat up while chumping this enemy or cancelling its attacks (or even defending it with a strong defender). One great strategy for this enemy is to return it to the staging area with effects like Fastred or Terrible to Behold. Its threat is nothing to worry about since the staging step is skipped, and there you can freely direct damage it into oblivion without having to worry about that fearsome 7 attack.
Locations
This quest takes us through the vast fields of Rohan, which all have crazy numbers of quest points. A healthy supply of Mount attachments or just some solid questing power can help avoid getting bogged down in the large open fields.
- Spoiled Pasture: At the beginning of the game, Spoiled Pasture is no problem. It only has 3 quest points, and its threat is equal to 2 plus 2 for each Mount objective the players control. However, this can skyrocket as the game goes on, eventually resulting in an 8-threat location. If that was not enough, it also raises your threat by 1 whenever you lose control of a Mount objective. The worst part of this card, however, is that it does not have the Vast keyword. This means that if you travel here, the Forced effects on each vast location in the staging area will fire, causing you to deal damage, raise threat, exhaust allies, or discard cards from your hand. This becomes more of a problem in multiplayer. Thror’s Key is a good solution for this location. Then, you can leave it in the staging area at 0 threat for the rest of the game. Otherwise, you will have to judge whether you can quest over it or whether you have to deal with a turn of Vast Forced effects.
- Horse Thieves’ Hovel: This unique 3 threat, 3 quest point location seems to be nothing of import. “3 threat?” you might ask. “What’s stopping me from just leaving this in the staging area and placing progress on it there with my handy Northern Tracker?” The answer, my friend, is the first line of text that forces the players to travel to a non-vast location. Finally, after it is explored, if there are fewer than 1 per player enemies in play, discard encounter cards until an enemy is discarded and add it to the staging area. Like Spoiled Pasture, this is another location that is trying to keep you away from the vast locations. Luckily, it has Victory 2, so once you explore it, you do not have to deal with it again. There is not much to do about this one: Thror’s Key would work, or you could South Away it back to the staging area. However, at some point you will likely have to suck it up and travel here, dealing with all the Vast Forced effects.
- Horse Lord’s Lodge: This is a very similar location to the above. However, it has two extra quest points and spits out a location from the encounter deck instead of an enemy if there are fewer than 1 per player locations. It also forces you to travel to a non-vast location, and it has Victory 2. Everything I said about the Horse Thieves’ Hovel goes for the Horse Lord’s Lodge.
- Wild Country: Vast locations. They are just so… Vast. Sorry for that. Wild Country has 1 threat and 6 quest points, with Doomed 1 and, of course, Vast. Its Forced effect states that if the active location is not vast at the end of the travel phase, each player must deal 1 damage to a character they control. Traveling to 1 threat locations is always annoying, so if there is another vast location in play, I will generally travel there. The damage is slightly bothersome, but there are not that many direct damage effects in this scenario, so it can be suffered from time to time. Note that its shadow effect forces you to deal 1 damage to the defending character if the active location is vast, so I would leave my Defender of Rammas in the binder for this quest.
- Endless Grasslands: Endless Grasslands has 2 threat and 6 quest points. Its Forced effect makes you exhaust an ally if the active location is not vast at the end of the travel phase. The shadow effect grants the enemy an additional attack if the active location is vast. There is not much else to say about this that I haven’t already said for the other vast location. The exhaust is slightly more painful than the damage, but it will completely whiff against Three Hunters decks. I generally travel here since it has higher threat, but if you can handle the exhaustion, it might be better to prioritize other vast locations in case you need to make a non-vast location active.
- Windworn Villages: Windworn Villages has 3 threat and 6 quest points. Its Forced effect makes you discard a card from your hand, and its shadow effect discards an attachment from the defending character (the standard vast triggers apply to those effects). Its 3 threat generally makes it a priority for me, but if you can quest over it and have lots of card draw or a Noldor deck that tries to have no cards in hand, feel free to leave it as I often find its Forced effect to be the lamest of the vast locations in this quest. However, be cognizant of how many cards you have in your hand, because you might find that you have to discard a key card at a key moment.
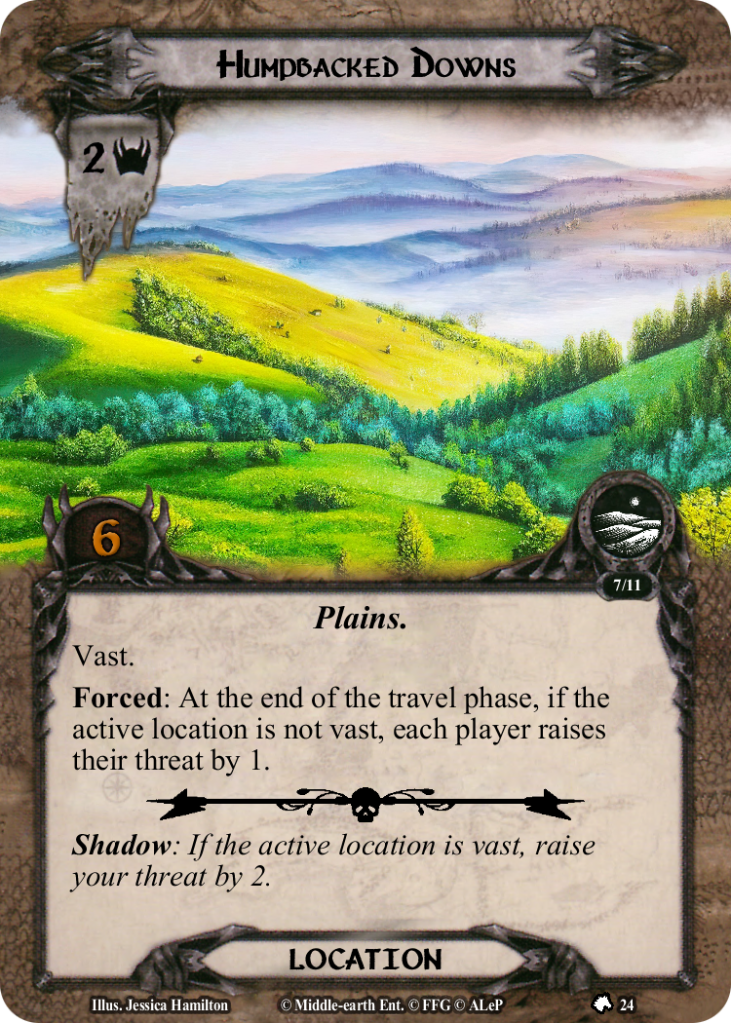
- Humpbacked Downs: Humpbacked Downs has 2 threat and 6 quest points. Its Forced effect makes you raise your threat by 1, and its shadow effect raises your threat by 2 (the standard vast triggers apply to those effects). This location tends to have the most powerful Forced effect, especially in this quest, which tries to raise your threat a lot. If possible, prioritize traveling to this location to get its Forced effect out of the staging area.
Treacheries
This quest only has a few treacheries, but they can be problematic if revealed at the wrong moment.
- Thirst for Horse Blood: This is, in my opinion, the most annoying treachery in the encounter deck, especially in a four-player game. It forces each player who controls a Mount objective to attach a Mount objective that player controls to the highest engagement cost enemy without a Mount objective, or reveal an encounter card. In four-player, this could amount to triple surge (especially on the third stage, since you cannot lose Mount objectives). If you are bringing A Test of Will, this is the card to use it on.
- Overburdened: Overburdened forces each player who controls two or more attachments to discard one (two if that player controls more than five attachments). If no attachments are discarded, this card gains surge! The shadow effect forces you to discard a random card from your hand. It’s important to note that Mount objectives cannot be discarded or leave play due to Stolen Steeds, so this card will not cause an instant loss on stage 3. However, those Mounts will still count as attachments, so the more you control, the more likely you will have to discard an attachment. A good remedy for this card is to play a deck with few attachments, but cancellation or recursion can help you as well.
- Crimson Banner: Remember how annoying the enemy attachments in the Vengeance of Mordor cycle were? While Crimson Banner might not be as annoying as those, it is more threat punishment, causing each player to raise their threat by 1 for each Orc enemy in play at the end of the round. Upon reveal, it will attach to the non-unique Orc enemy in play with the highest engagement cost. Oh, and it surges. If possible, target the enemy that Crimson Banner is attached to, because it can amount to a lot of threat, especially in a multiplayer setting.
- Ride Through the Night: A breath of fresh air in a quest full of annoying effects, Ride Through the Night exhausts all restricted attachments the players control. While this will exhaust the Mount objectives, there are very few other restricted attachments that require exhausting. This will impact some of your Mount objectives, as well as any events that need you to exhaust a Weapon. If no attachments are exhausted, this card will surge, but that will rarely happen because of the presence of Mount objectives. All in all, not a terribly bad treachery.
Side Quests
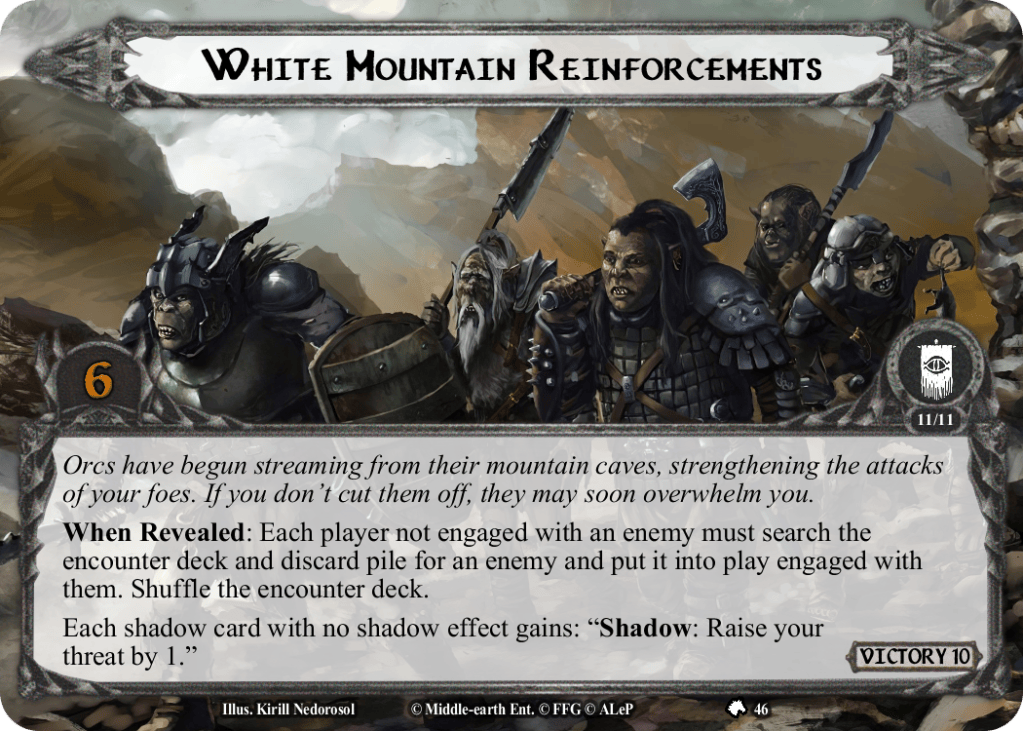
- White Mountain Reinforcements: At least it doesn’t surge. In all seriousness, this side quest will make each player not engaged with an enemy search for an enemy and put it into play engaged with them. Then, each shadow card without an effect makes you raise your threat by 1. In a quest that punishes your threat, this side quest can be lethal if left in play for too long. Prioritize clearing this side quest. Its 6 quest points are not that big of a deal, but any side quest takes longer in a world where vast locations exist. On stages 1 and 2, when you are trying to stall, this side quest gives you a way to avoid progressing. Something interesting to note is that you can cancel this card’s When Revealed effect if the extra enemies were overwhelming, although the side quest remains in play.
- The Green Sea: Once again, this side quest does not surge. However, it grants each vast location +3 quest points, makes each vast location immune to player card effects, and, at the beginning of the travel phase, if there are no vast locations in the staging area, you must discard cards until a vast location is discarded and add it to the staging area. This will ensure that you never run out of vast locations to travel to, and it can be quite annoying if you only had a boosted Spoiled Pasture in the staging area. It is also important to note that this can help stall you at stages 1 and 2 while you build up your board state as I mentioned earlier. The 6 quest points would generally not be much of a problem, but since it is boosting vast locations, it can be really hard to place progress on this side quest. Sometimes, I find myself going entire games with it in the staging area.
Tips and Tricks
- Threat reduction is key. Many cards in this encounter deck contain some sort of threat punishment, mostly in increments of 1. To avoid this death by a thousand cuts, I would recommend Elfhelm. He is a champion in this quest, especially against White Mountain Reinforcements. Galadriel is also a strong choice because she can be triggered every round. If you do play Elfhelm, I would recommend keeping track of how often his ability fires on a separate sheet of paper. I’d be interested to hear your thoughts in the comments.
- Have one of two things: hero readying or Mount attachments. These help you to fulfill the travel requirements of vast locations without having to use your beautiful Mount objectives the quest gives you, allowing you to use those for scrying, direct damage, and shadow discarding. Mounts that don’t exhaust to trigger are great in this quest, such as Snowmane. Beware that many of these Mounts are restricted, so Ride Through the Night will exhaust them.
- Stall on stages 1 and 2. This will be easier on stage 1, because you will have fewer Mount objectives, but it can be done at either stage. Player side quests are great for this, because they help you set up your board state while not progressing the main quest. The more you set up your board at these stages, the better chance you will have at stage 3.
- Have a way to deal with Orc Battalion. Whether this is heavy direct damage (like Gandalf) or attacking characters with more than 1 hit point, you need to be able to deal with this beast of an enemy that you will see at stage 3. In multiplayer, this is slightly easier because of the ranged keyword, but it can still be done in solo. Though because of this, Forth, the Three Hunters! decks might not have much success against this quest.
- Leave Test of Will in the binder for this quest. This can be a controversial take, but I don’t believe that any of the treacheries in this quest are strong enough to warrant Test of Will. Instead, focus on combat capabilities, because when you get to stage 3, the staging step is skipped for the rest of the game. So while Test of Will is still a very good card, it merely clogs up your deck in this one.
- Direct damage is always a good idea in this quest. Many enemies have 4 or fewer hit points (and are all Orcs). These can be easily taken care of by Thalin and Goblin-cleaver. Gondorian Spearman and Spear of the Citadel also deserve a shout when coupled with Thalin for taking care of the smaller enemies. Bigger direct damage effects such as Gandalf can also help take care of Orc Battalion, thus neutering its strongest abilities (the damage restriction and the direct damage it deals).
- Play Tactics. This really summarizes my last three-ish bullet points, for many direct damage effects are found in Tactics, questing power is not as important in this quest, and that final stage spits out a lot of enemies (which Tactics is good at dealing with).
- While I recommend leaving Test of Will behind, I would not venture across Rohan without shadow cancellation, because you will often have a vast location, allowing shadow effects on vast locations to fire. Bree-land Protector is extremely good here, because she is very repeatable shadow cancellation. A Burning Brand is never bad, and Armored Destrier is also good, though not as good as the previous two. This shadow cancellation will provide a strong security blanket in this quest.
Playthroughs
There have not been a lot of playthroughs posted concerning ALeP quests, but I was able to find two full playthroughs on Youtube.
- Colin from One Stop Co-op Shop, solo playthrough: https://www.youtube.com/watch?v=EuhwHqKvwaM
- Chad from Cardboard of the Rings, solo playthrough: https://www.youtube.com/watch?v=FbU8pt-9E30
So that is the end of my article on The Horse Lord’s Ire. This one is definitely the hardest quest in the Children of Eorl deluxe box, but it is quite well-designed, keeping the players on the edge of their seats for the entire game. Shout out to John Leo for a great quest design, and to all the ALeP team, especially those who have less obvious roles, such as the people who work on graphic design or on the flavor text. The community would not be as vibrant as it is today without you.
I plan to tackle the Oaths of the Rohirrim cycle in the coming months. Life has been really busy lately, but it is starting to return to normal, where I can pursue projects like this. I hope you all enjoyed this article, and I will see you soon in Aldburg, where the game is already afoot…

