Moving on to the next quest in the NM Grey Havens pack, we leave our ships behind and investigate the island of Numenor. This quest comes with double-sided locations so that you do not know which location is which based on the front of the location. Since Nightmare cards have a different layout with dark red borders, the designers had to replace all the regular copies of Lost Island with new Nightmare copies, which is why this set is slightly larger than usual. It also means that a lot of the locations will be the regular locations with only the Nightmare layout and color scheme, but the location effects remain the same. A bit confusing at first, but it is an important change for this quest’s guessing game.
I find the regular version of the quest quite forgettable, in large part because Temple of the Deceived does the “Lost Island” mechanic a little better. This quest tries to improve upon it by making Stage 2 take a little longer and adding in some new locations to make combat more difficult. Since a large part of the Nightmare deck had to replace existing locations, there are not as many new cards in here as you would find in other Nightmare scenarios. Let’s see if that impacts our game a little bit!
- Nightmare The Fate of Númenor
- New Rules
- New Setup
- The Quest
- The Encounter Deck
- Tips and Tricks
- Playthroughs
Nightmare The Fate of Númenor
- Found in: The Grey Havens Nightmare set, quest 2
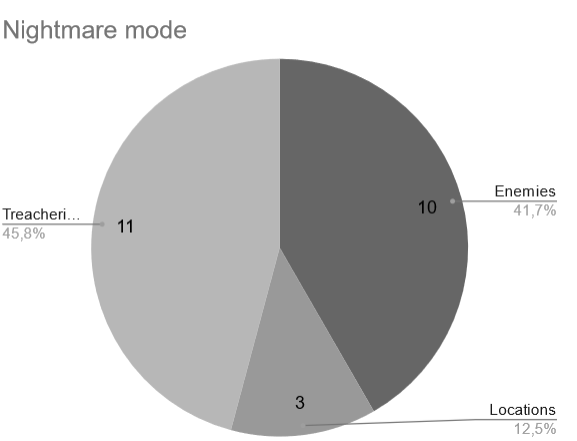
- Size: 21 Nightmare cards, of which 7 are cards from the regular version of the quest with Nightmare printing, but identical art and effects.
- Increase in Difficulty: Yes, but not as much as other quests. The added length makes it more difficult as you have a higher chance of threating out or losing characters to consistent direct damage.
- Fixed Loopholes: Stage 2B can no longer be cleared in a single round. Players will now need to have at least 3 double-sided locations in the victory display before they can travel to the Shrine to Morgoth. This will make the stage take a lot longer than before when correctly guessing could mean a quick end to the game.
While players can still flip locations when they become active and then push them back into the staging area to make Stage 2 less of a guessing game, it is now punished by the fact that non-Uncharted locations cannot gain progress while in the staging area. Combine this with some high-threat locations and dangerous passive effects, and you’d be wise to leave the locations as Lost Island. - New Mechanics Introduced: None, but there are some additional double-sided locations and more focus on the cost of your cards on the top or bottom of your deck. This is in line with the Drowned Dead encounter set.
- Play this scenario if: You enjoy not knowing where you are going to end up during the travel phase, you want a shorter game of Temple of the Deceived but are up for a challenge.
- Solo or multiplayer?: These guessing games are always more fun with more players. It will also help that you can focus more on location control in multiplayer so that you have a better idea what each double-sided location is going to be.
- What to look out for: Enemy abilities depend on the cost of the cards in your deck. Double-sided locations make it difficult to predict where you’ll end up without proper scyring/location control, this quest will take longer than the regular version, losing Calphon will mean an automatic loss.
New Rules
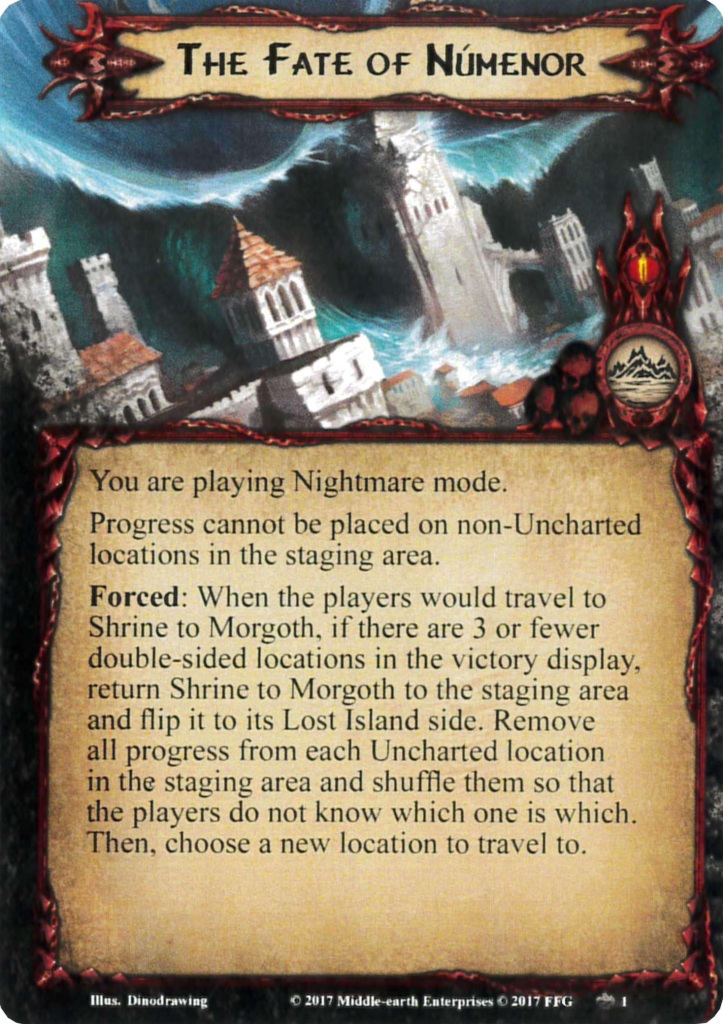
There are two new rules for this quest that need to be taken into account. The first rule is especially important and easily missed. This simply states that progress cannot be placed on non-Uncharted locations. This mostly protects Overgrown Steps, as it is the only location in the encounter deck. But this rule will also apply to any double-sided location that gets flipped over in the staging area by Calphon’s Folly. Lastly, it will also apply to any location that gets pushed back into the staging area from the active location slot. This can happen due to player card effects such as The Hidden Way or West Road Traveller. This is mostly to protect the quest from being exploited, as players can no longer permanently flip double-sided locations by traveling there and then switching it out for a new Lost Island location to find out where the Shrine to Morgoth is. While this strategy is still possible, it gets punished by new locations with a lot more threat than their other side. Not being able to place any progress on these flipped locations is also bad news, as it means you will have to travel here to get it out of the staging area, or use some niche cards like Heirs of Earendil.
The other new rule for the Nightmare version of this quest has a bigger impact on your game. During the second stage, a new Forced effect is introduced that will trigger whenever the players travel to Shrine to Morgoth. If they have not yet collected 4 double-sided locations in the victory display, the Shrine gets flipped back to its Lost Island side and returned to the staging area. All progress is then removed from locations in the staging area, and the locations are shuffled so that you don’t know where the Shrine is. Luckily, you do get to decide where to travel to next so that you do not lose out on a travel phase this turn.
This rule is meant to make the game take a little longer, as players would previously either scry the right location, or get lucky on their first try. This is no longer an option, and players could spend more than 5 turns at the second stage of this quest. There are ways to make this go faster, as long as you are able to put some double-sided locations into the Victory Display during Stage 1. Leave No Trace will help with that, cutting back the number of rounds by 3. Else, you will be stuck with this quest for a little while longer, which can lead to a loss by the encounter deck wearing you down over time or players threating out.
New Setup
The setup for this quest remains mostly identical to the regular version of the quest. One difference is that the Uncharted deck will have all Lost Island locations with the Nightmare color scheme. Any copies of Lost Island that do not have the Nightmarish red border around them should be removed from the game ahead of time. Also, ensure that the new Shrine to Morgoth is set aside and out of play at the start of the game. This will only be added during Stage 2. The first player still takes control of Calphon, and the staging area is filled with 2-3 copies of Lost Island from the Uncharted deck. This is based on the number of players in the game and remains unchanged. Players can then start the quest as normal. This means that the first few rounds of the game could feel like the regular version of the quest, though this will change in the second half.
Cards removed
The following cards are removed from the standard encounter deck to make way for the Nightmare encounter cards. Important to note is that all double-sided locations of the base set are replaced with identical versions in Nightmare format, hence why the list is a little longer than usual.

- 2x Forbidden Coast (Beneficial location)
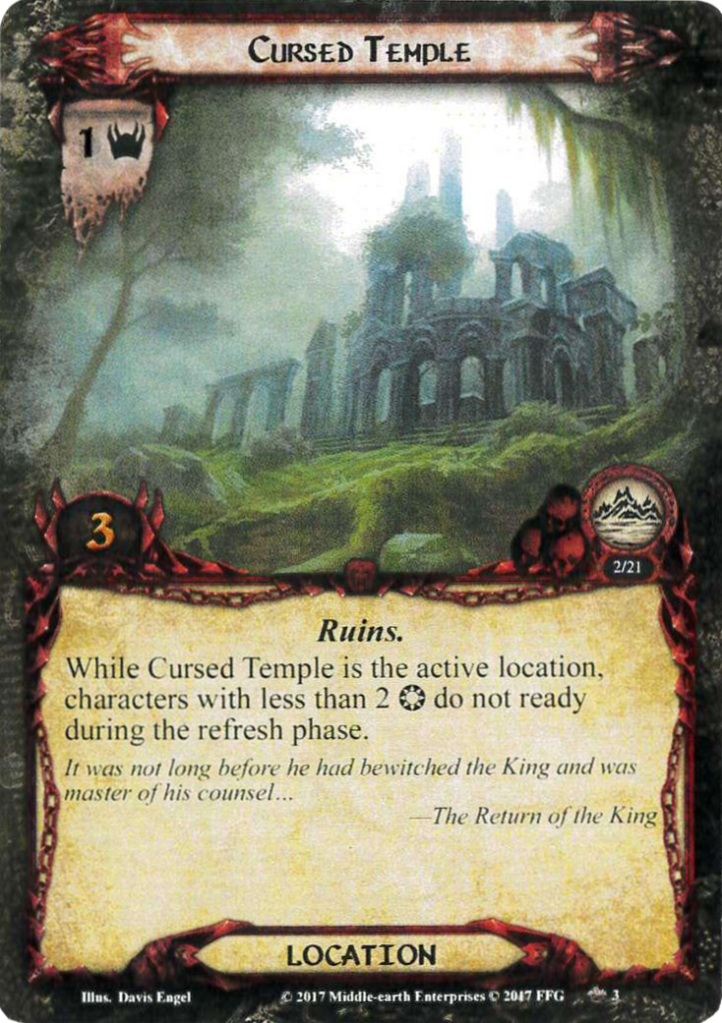
- 2x Cursed Temple (Replaced with NM format, only one copy remains)
- 2x Flooded Ruins (Replaced with NM format, only one copy remains)
- 2x Drowned Graves (Replaced with NM format)
- 2x Lush Jungle (Replaced with NM format)
- 1x Shrine to Morgoth (Replaced with NM format)
- 3x Steep Plateau (Beneficial location)
- 3x Aimless Wondering (A way to reveal Uncharted locations)
- 1x Mysterious Fog (Make place for new treacheries)
- 1x Servant of the Deceiver (Make place for new enemies)
- 1x Lingering Malevolence (Make place for new treacheries)
- 1x Drowned Dead (Make place for new enemies)
The Quest
With an unchanged start to the game, you will find that the early game will play a lot like the regular version of this quest. You will start with a couple of Uncharted locations in the staging area, and are incentivized to travel every turn. In order to not travel blindly, you should prioritize placing progress on locations and then go to the locations that you can best deal with early on.

The main quest cannot receive progress from questing successfully directly, but will instead receive progress whenever a location is explored, equal to its printed quest points. Because of the new rule protecting non-Uncharted locations, you will find that most of your progress will come from clearing the active location. It is thus a smart move to go to whatever location has the most printed quest points if you’ve peeked at the location’s other side ahead of time.
Since the main quest cannot have any progress from questing successfully, there isn’t much of a point to overquest by too much. Sure, you still have to overcome the threat in the staging area, but without too many high-threat cards in the deck, you can often get exactly enough progress to clear the location. Any spilt over progress could be aimed at player side-quests though, if you brought any. This is a great quest for side-quests since the main quest will eventually clear itself without having to have been the active quest card. I would usually also recommend cards like Explorer’s Almanac, but Uncharted locations cannot have attachments, and non-Uncharted locations cannot get more progress, so alas. You could still use Ride Them Down since progress would still go on the active location first, and you could weaponize excess progress as direct damage against enemies. It is a costly event but could reduce the number of enemies in the staging area.

Once the players have cleared 20 progress worth of locations, they may advance to Stage 2A, where the bigger changes of the Nightmare version become apparent. Players add 2 more copies of Lost Island to the staging area, as well as the Shrine to Morgoth location that was set aside at the beginning of the game. The addition of these three locations will make the threat in the staging area significantly increase, especially if you have copies of Overgrown Steps in play as well. Since the players are instructed to mix up the locations and remove any progress from each Uncharted location as well, they will have no idea where to go next. That is as intended, but there will now also be some punishment if you happen to travel to the Shrine to Morgoth. This was already explained in the New Rules section, but boils down to players having to reset the staging area if they happen to reach the Shrine ahead of schedule. There was no punishment for this in the Normal version, which meant that players could get lucky and end up at the Shrine during the first Travel phase after advancing to Stage 2. This would make for a shorter game and a pretty easy time.
That has changed now. Players will need to have at least 4 double-sided locations in the victory display before they are allowed to have Shrine to Morgoth as the active location. Remember that flipping to the Shrine ahead of time won’t trigger its Forced effect, as it is not the active location yet, so that’s nice. Still, it pays to scry your locations ahead of time and decide where you should go to based on that info. Clearing other locations first will help to get them into the victory display, thanks to the rule on the main quest card. This helps to narrow down the options as you go along. Still, it helps if you have cleared some of the double-sided locations during stage one and managed to get them into the victory display with the help of Leave No Trace. This greatly reduces the time you need to spend at stage 2.
Since this game will take longer than your traditional run of Fate of Numenor, you will feel the effects of the long game at this stage as well. Threat will be higher, resources will start piling up, and players with effective draw engines will find themselves struggling to play more cards. Keep this in mind during your deckbuilding, and perhaps include a Will of the West if you find yourself draining your deck halfway through the game. Players will also start to notice that their characters are hurting from the various direct damage effects in the game, and from defending enemy attacks. You will need a lot of healing in order to make it to the end, but it is not impossible to go without, as long as you are canceling the right cards.
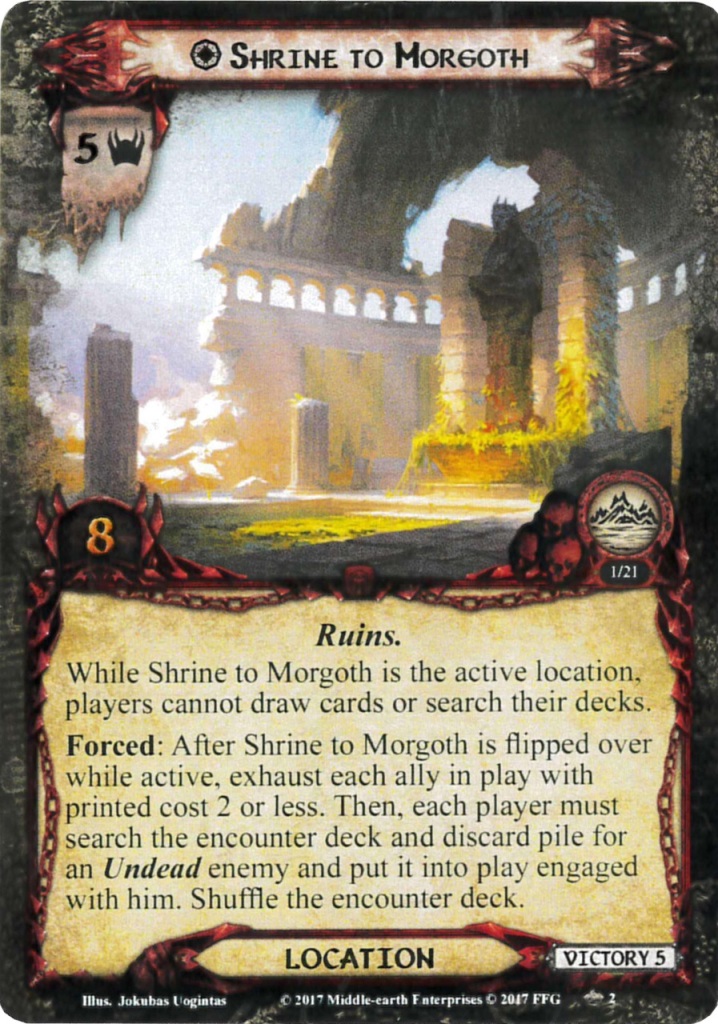
Once players have finally obtained 4 double-sided locations in the victory display, they are allowed to keep the Shrine to Morgoth as the active location. Hopefully, at this point, you have already scried the location from the staging area ahead of time, so that the game doesn’t have to take much longer. Once the Shrine becomes the active location, it will now trigger all its abilities, preventing the players from searching their deck and drawing cards. Players will also have to find an Undead enemy and put it into play, engaged with them. You get to select this enemy, so I would suggest avoiding the new Nightmare enemy. You will now need just one more turn to make the 8 progress required to clear the location, winning you the game. Survival against enemies should now be a lower priority, as long as your questers survive. The good thing is that most of the Uncharted locations will now be out of the encounter deck, so you won’t need to overcome that much threat anymore. It really peaks once you arrive at stage 2 but gradually gets easier from there.
The Encounter Deck
Global
- Since almost all locations are in the Uncharted deck, the encounter deck is only 24 cards thick.
- Shadow chances are relatively low at 33%. Most effects will deal with the costs of cards on the bottom of your deck.
- Average threat on cards in the encounter deck is 1.33 threat/card. This does not include any treachery that flips over a random Uncharted location.
- Only 2 cards will surge.
- Doomed 2 is present on the two copies of the Ruins of Ages Past treachery. While there is no focus on active threat increase, the quest does take long enough that the extra threat at the end of each turn is worth keeping an eye on.
- Immunity
- All Uncharted locations are immune to player card attachments.
- While Shrine to Morgoth is the active location, players cannot draw cards or search their decks.
- While Forsaken City is in play, all Undead enemies gain immunity to player card effects.
- While you are engaged with Soulless Cadaver, your deck cannot be searched.
- Non-Uncharted locations cannot gain any progress while they are in the staging area.
Note that the majority of locations will come from the Uncharted deck, so the low volume of locations in the encounter deck makes sense. The low threat from the encounter cards is also compensated with some threat-increasing cards, especially for locations. This can mean a single encounter card has a larger impact on the threat in the staging area, but it is difficult to put a number on that.
Enemies
Only one new enemy is added to the encounter deck, and with only 2 copies of them, you might not encounter them too often. Be glad if you don’t since this is quite a tough enemy to overcome.
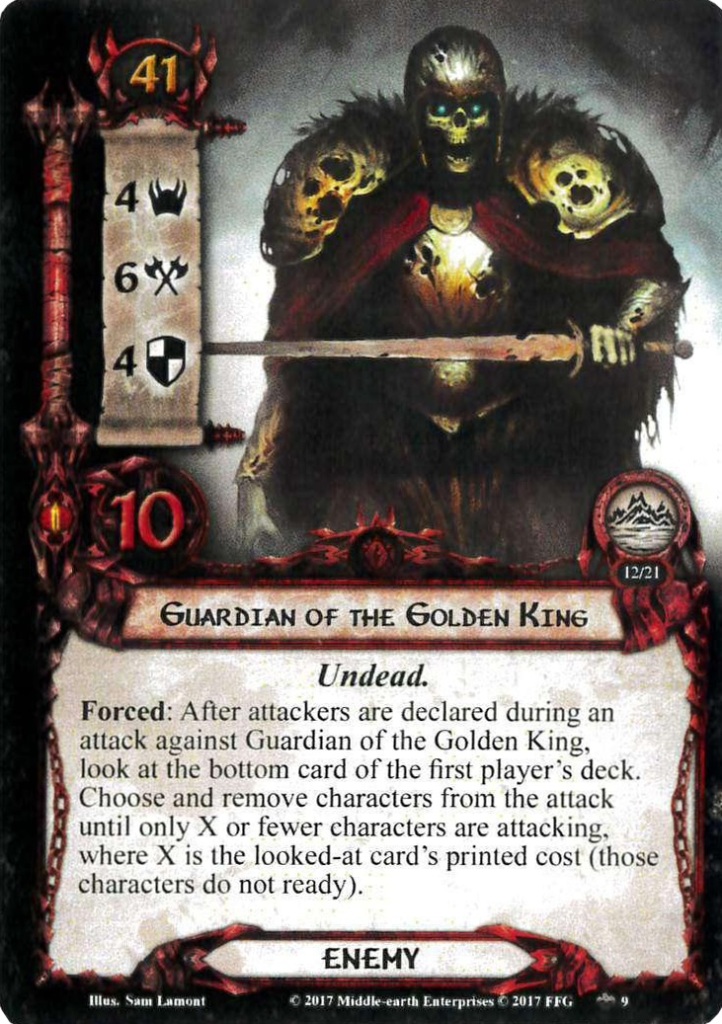
- Guardian of the Golden King: That’s a badass name and some badass artwork, not gonna lie. This enemy is quite big for a quest like this, but I suppose this is still a Nightmare scenario, so big enemies are going to be the norm. Considering this is the only new enemy you will face, it better be a challenge. With 4 threat and 41 engagement cost, the Guardian is going to stay in the staging area for a while, absorbing progress that would have otherwise gone to the active location and thus, the main quest. This should motivate you to engage this guy early, but the 6 attack stat will scare off a lot of players. These stats are usually expected on Trolls, but with the boost this enemy can receive from the new locations, it could end up hitting even harder! On top of the pretty serious stats and occasional immunity to player card effects in combination with Forsaken City, the Guardian also has a Forced effect. This triggers whenever an attack is declared against him. When this happens, the first player (even if they are not the one participating in the attack) must look at the bottom card of their deck. You must then remove characters from the attack until there are as many attackers remaining as the cost of the card at the bottom of the deck. Any removed characters do not ready. This can be a tricky effect, though the first player does have a lot of control over this card. They can use Calphon‘s ability to swap the bottom card of their deck with a card from their hand before the attack is declared. Since the card is also not discarded by this effect, you could remember what card is on the bottom in case you are attacking multiple copies of this enemy or declaring two attacks in the same round (through Quick Strike or something). Since getting through 4 defence and 10 hitpoints isn’t an easy thing, it would be beneficial to have a high-cost card on the bottom of the first player’s deck. This also works well against most of the other encounter cards in the deck. Alternatively, you can also have a single super-attacker be able to kill this enemy with only a little help. That way, you could even deal enough damage if the bottom card costs 2 or 3. 0-cost cards are going to be tricky though, since you won’t be able to declare any attacker. Your only hope would then lie in direct damage or discard abilities from your deck. Slap a Poisoned Stakes on this enemy, and you’d never have to deal with the Forced effect ever!
Locations
While many of the locations in this encounter deck will be familiar to anyone who has played this quest in Normal mode, there will be two additional surprises when you are flipping over Uncharted locations. On top of that, there is a new location in the encounter deck designed to keep you distracted.
- Desecrated Grounds: This is the first of two new double-sided locations. The Lost Island side will act as it normally would, so you cannot know for certain that this location lurks underneath. With 5 threat and a nasty passive effect, this is not an ideal target for Calphon’s Folly, though you have very little control over that treachery. Whenever you flip this location to the Desecrated Grounds side (either by treachery or when traveling to it, but not using the Action on Lost Island), each exhausted character will take 1 damage. Getting hit with a direct damage effect halfway through the round isn’t ideal, so if you know that this will be your active location ahead of time by scrying, try to have as many characters ready before you travel. Once flipped over, the Desecrated Grounds will also provide a +1 threat and +1 attack buff to all Undead enemies. Because of this passive, you will want to clear this location as soon as possible from the active slot. Note that this passive also remains in play when the location is flipped over in the staging area, and it can stack with other copies of itself. Clearing the Grounds will reward you with 5 progress on Stage 1B, getting you 25% of the way there.
- Forsaken City: This new double-sided location might be the worst of the bunch, and it will synergize well with the Desecrated Grounds if both are flipped over at the same time. Whenever Forsaken City is flipped over, each engaged Undead enemy will make an immediate attack. Don’t bother canceling any of these attacks since Undead enemies are now also immune to player card effects thanks to the passive on this location. This prevents players from canceling attacks or choosing any Undead enemy as a target with player card abilities and events. Having 6 threats won’t usually matter since you will likely travel here as soon as you can. However, getting only 4 progress tokens from this location to the main quest is a little bit disappointing as a reward for clearing it. At least the enemies won’t be immune to effects anymore. I could see players trying to blank the textbox on this location, but do realize that you will need to get rid of this location anyway since 6 threat is going to cut into your progress made each turn. If Overgrown Steps is not in play, you could also attempt to clear it in the staging area. Making 4 progress wouldn’t be difficult with the right cards, like the Evening Star or Mirkwood Explorer.
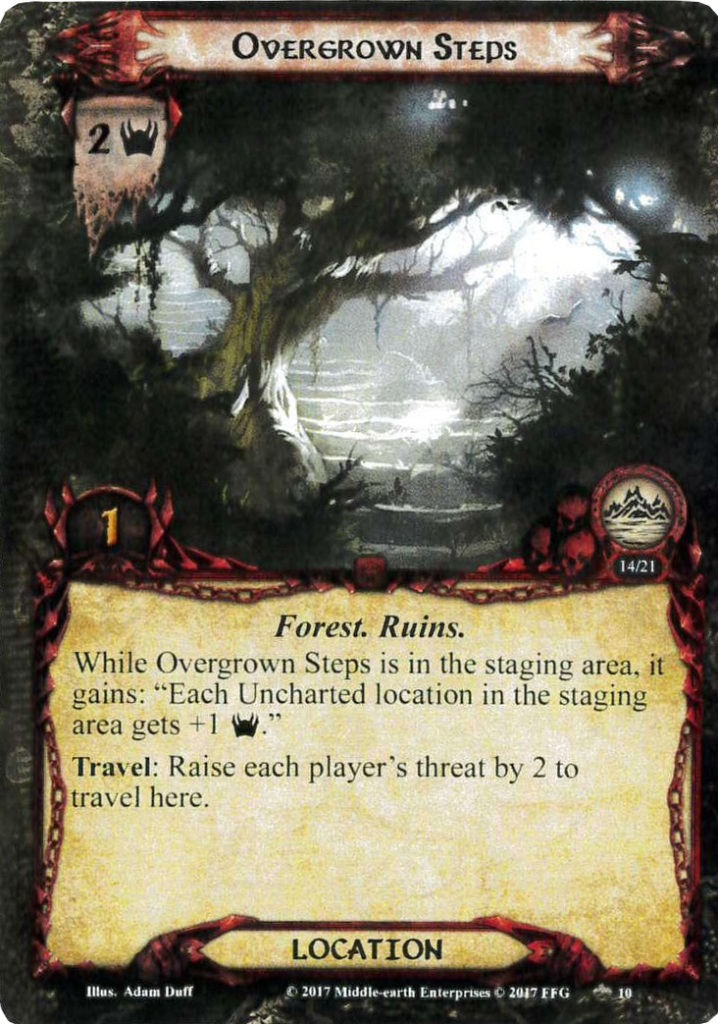
- Overgrown Steps: While this location might look easy to clear in the staging area, it will be protected at all times from the Nightmare Rules card, which will protect it from any progress-placing effect since it is not an Uncharted location. This is also the only location that will be revealed from the encounter deck. This means that the location is meant to dissuade players from going to the Uncharted locations in the hope of finding the Shrine to Morgoth and instead waste a round here. It does this by inflicting a nasty passive effect onto the Uncharted locations in the staging area that will boost their threat by 1. There are only 2 copies of this location in the encounter deck, but that could lead to doubling the threat of all Uncharted locations in play, hindering your progress massively. Players could try to travel here, which will come at the cost of raising your threat by 2. That’s not really a punishment early on, though with this quest taking a bit longer, you might end up wanting to keep your threat low. Instead, you could use effects that swap this location out for something in the active location slot to bypass the travel cost. Ideally, you want to clear this location in the staging area though, or not have to worry about it anymore so that you can make progress on Uncharted locations instead. You can do this with a Thror’s Key on the first copy of this location, blanking its text box. You can also use effects like Heirs of Earendil to straight-up discard this location. As it is only protected from progress-placing effects, there is plenty to interact with this location to make it less of a nuisance.
Treacheries
Two new treacheries will hinder your way across the island; one to delay your progress, and one to damage the characters that are making all the progress. It’s not a great set of treacheries to face, but it’s also not game-ending.
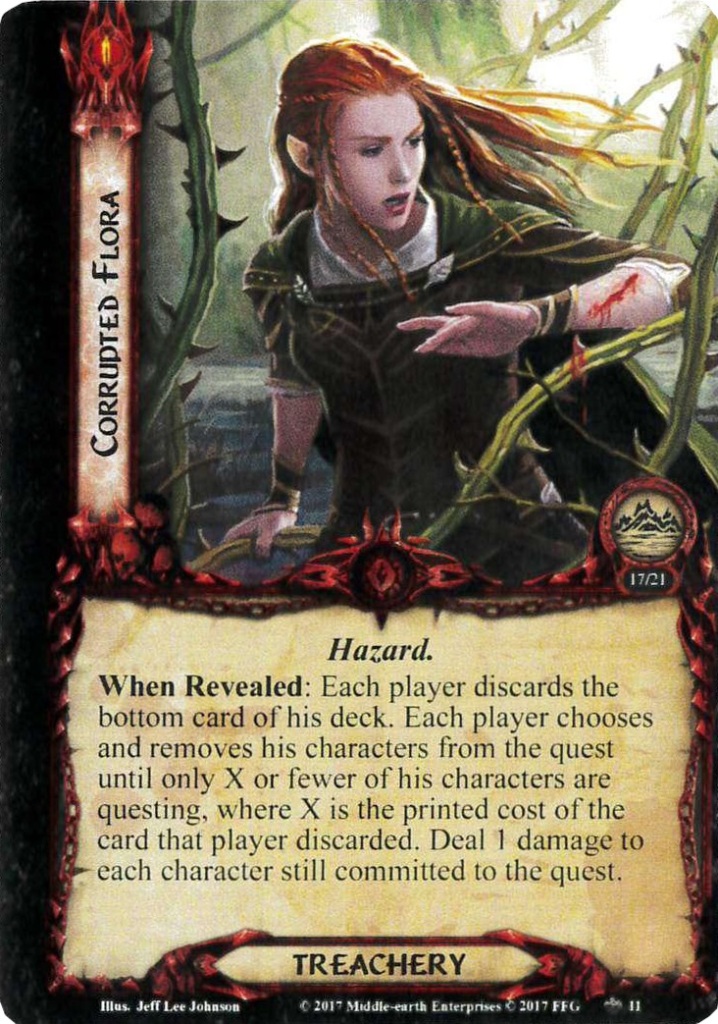
- Corrupted Flora: Some nasty artwork on this one, but it matches the brutal effect this treachery can have on your progress for a turn. When it is revealed, each player must discard the bottom card of their deck. This decides how many characters they are allowed to have committed to the quest. This is done on a per-player basis, not a group total. Players will have to remove characters from the quest until they have sent as many characters as the cost of the card they just discarded. So it will pay to have a high-cost card on the bottom of your deck, as you would be able to continue to send the majority of your questers. However, any character that was removed from the quest won’t ready, which is a pity. They got off easy, though, since any character that is still committed after the main body of the treachery’s text has to take one point of damage. This might not be much, but you have to take it into consideration when removing characters from the quest. Any character that would die from this damage can be removed from the quest if you want to, saving them from death. It’s a tricky treachery for sure, but not one that has lasting effects outside of some more direct damage on your characters.
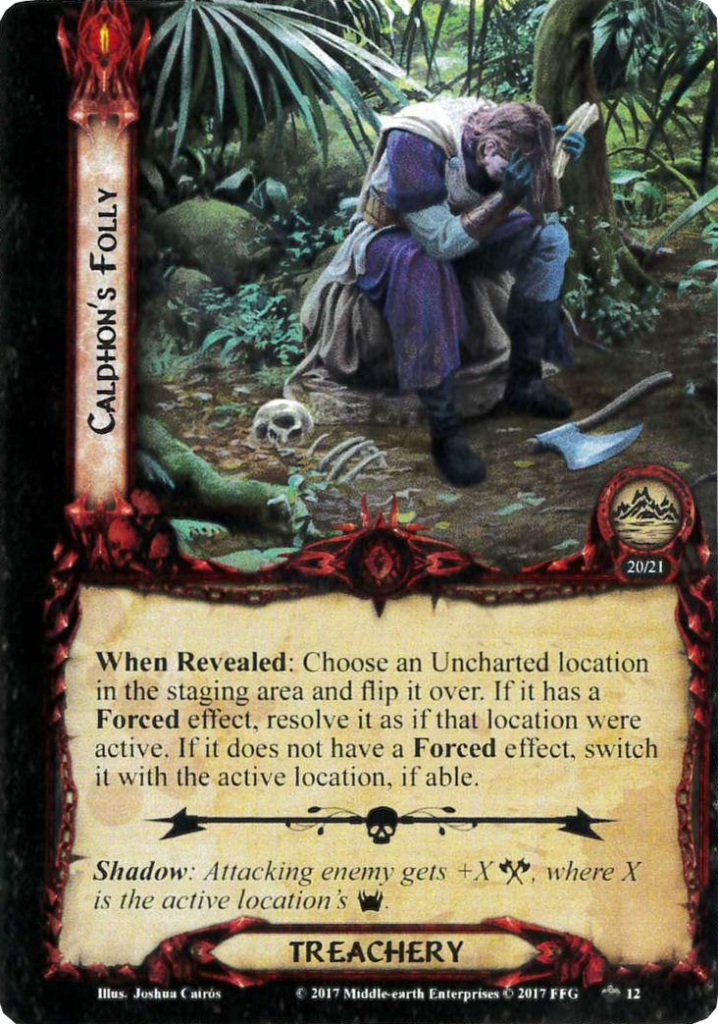
- Calphon’s Folly: Our second new treachery will have some more long-term effects for your game. When it is revealed, you may choose an Uncharted location in the staging area to flip over. If it has a Forced effect, you must resolve that as if the location had just become active. This can lead to dealing direct damage to characters, enemies making additional attacks, or more enemies entering play. Either way, it’s not a good time. To make things worse the location will stay flipped on this new side, not going back to its Lost Island side. With the two new double-sided locations in this deck, you are now facing nasty passive effects that will boost the enemies in play. You will likely have to travel here next in order to get rid of the higher threat from this one location and possibly the passive as well. On the bright side, this effect can also hit Shrine to Morgoth. That gets rid of any uncertainty of where that location is hiding so that you can travel there as soon as you have the right amount of locations in the victory display. Should the location you flip over not have a Forced effect, this treachery will move the location to the active slot, returning any active location at the time to the staging area. The same problem still occurs with a nasty passive or more threat in the staging area. On the bright side, these locations don’t trigger their Forced effect again when you travel to them since they are already flipped. This is definitely a treachery worth cancelling since having this happen often can allow passive effects to stack on top of each other, making for a difficult time facing enemies!
Tips and Tricks
- Keep note of which locations you have peeked at in the staging area with some sort of markers. While there are effects that force you to shuffle the locations up, you can avoid looking at the same location twice between those times.
- Placing progress on locations in the staging area is going to be vital to beating Stage 2 before you’ve gone through the entire Uncharted deck. Northern Trackers are ideal for this quest, as they can explore all the locations at the same time. More focused progress-placing cards like Asfaloth will help you to eliminate locations ahead of time, perhaps filling out the victory display while you search for the temple. Remember that you cannot place progress on non-Uncharted locations.
- Having a way to ensure a high-cost card is on the bottom of your deck will be vital to avoid most of the dangerous effects in this encounter deck. There is almost no way to guarantee this, since effects like Drowned Dead can put cards back on the bottom of your deck. Calphon and Dunedain Pipe will be useful tools to keep control of the bottom of your deck.
- Be careful with exhausting Calphon in this quest. There are plenty of direct damage effects that could target him, and losing him means you lose the quest. Luckily, you can heal him up, as he is not immune to player card effects.
- Remember that this can turn out to be a pretty long quest, especially if you are not clearing locations each turn. Bring ways to recycle your deck or things to fund with any extra resources you might accumulate as the game goes on.
Playthroughs
Sadly, there is only one playthrough that I could find of this quest. If you know of any others, feel free to link them to me, and I’ll add them to the list!
- True solo: https://www.youtube.com/watch?v=Qb1jnAZtURM
With this quest covered, we will move on to the hardest quest in the set, Raid on the Grey Havens. I don’t believe I’ve covered the regular version of the quest myself, so writing the NM article is going to be a challenge and is going to take a while. In the meantime, we hope to kick off the NM Ringmaker cycle as well. Add to that the constant flow of QotW articles and various other articles, and you’ll have plenty of content going into this summer!
