Those of us that have read the Akallabéth know of the Downfall of Númenor after the last king tried to set foot on the shores of Valinor. This was all because of the deceit of Sauron and the misguided teachings of the Númenorians. The game’s developers have taken a bit of liberty with the lore suggesting that the peak of the island has not been submerged, making for a good location for this scenario. During the scenario, you try to uncover a hidden temple to Morgoth in the dense jungle. Having double-sided locations makes for an intersting mechanic that involves luck and a fair bit of location control. The scenario makes for a fun middle chapter in the Grey Havens box, before the party returns to Mithlond.
The Fate of Númenor
- Found in: Grey Havens Deluxe box, scenario 2
- Official difficulty: 5
- Community difficulty: 4.2
- Encounter sets: Ruins of Numenor, The Fate of Numenor, Drowned Dead
- Quest cards: 2
- Play if: You want a location focused scenario with a separate deck. You want a quest where a little bit of luck is involved. You missed the Undead enemies from the previous cycle and are hungry for more.
- What is different about this quest?: Separate location deck, double sided location so you don’t know what is what, Undead enemies living on cards costing 2 or less.
- Solo or multiplayer?: This quest scales pretty well with the number of players, so any number is fine. In multiplayer you might end up with more Uncharted locations, making the second stage last longer. But if your decks are questing well, it doesn’t really matter with how many players you go up against this quest. Try an even number though, as that benefits you most with the setup.
- Can I run side-quests for this scenario?: You can, and I would actually advise you to do so. The main quest is explored through exploring the active locations so side-quests can absorb the rest of the progress you would make. Since the quest is so friendly to side-quests, there aren’t really any side-quests that are essential. I will however say that Exploring Secret Ways should be ignored, since the active location will never be the same as those in the staging area.
- What to look out for: Undead enemies with a synergy of cheap cards and cards at the bottom of the deck, location lock, the quest can drag on for a while.
The Quest
Setup
The setup of this scenario will have the players remove the unique Shrine to Morgoth location from the game and set it aside. If you can’t find the location, try flipping over some copies of Lost Island, it should be there somewhere. There, you just experienced what this quest is all about, but let’s go into a bit more detail.
After the unique location has been removed from play, the players make an uncharted deck consisting out of all double sided locations. Note that the Steep Plateau is not double-sided, and remains in the encounter deck. The Uncharted deck will consist of these locations with their Lost Island side face up. Then, the first player adds the top 2 copies of the Uncharted deck to the staging area or the top 3 if there are 3 or 4 players in the game. Remember to keep the locations with the Lost Island side face up, you don’t get to see the other side without exploring. After the locations have been added to the staging area, the first player takes control of the Calphon objective ally and begins the first round.
Quest stage 1: Explore the Island – 20 quest points
The B-side of this quest is a little different from the usual quest card and reminds me a little of stage 1B of Across the Ettenmoors. During this stage, the players cannot place progress on the main quest through normal means. Instead, after any location is explored, the players add an equal number of progress tokens on the main stage as there are printed quest points on that location. I will stress the printed part there, so that players with Elf-stone don’t make too much progress, and players with Woodmen’s Path don’t have to explore 20 locations. This new way of making progress will mean that players have to travel whenever they can in order to be able to make progress during the next turn. Note that the quest card doesn’t say the active location, meaning that players will be able to clear Steep Plateau in the staging area and make 3 progress on the main quest. This does not count for the Lost Island locations, as they are special.

Since the players are unable to make progress on the main quest themselves, they can focus their spilt over progress on side-quests of their choice. This makes Fate of Numenor one of the better quests to play with your side-quest deck, as you can explore both it and the main quest at the same time. With some good willpower in your deck, and provided you have enough side-quests in your hand, you could potentially clear one per turn. This sets you up nicely against the scenario. Some solid options would be Keep Watch, as the enemies in this scenario are all non-unique and can boast a hefty defence value. Rally the West is also good to overcome the location lock that you are about to face. All in all, there are some good options that players can take advantage of while going through this first stage.
However, if this was all the quest card read, then players would soon find themselves without locations to travel to. That is where the final Forced effect on the quest card comes in. This instructs players to add a new copy of Lost Island to the staging area when players travel to an Uncharted location. This means that in the early game, the players will always have 2 copies of Lost Island in the staging area (3 if 3 or 4 players). There are effects that will add copies to the staging area, so the number of Uncharted locations will never go down, but can go up. This is where most players end up getting location locked. Try to prioritize getting willpower on the table as soon as you can during this stage. The enemies may pose a bit of a threat, but can be dealt with by one deck, while the rest focuses on questing successfully
With 20 quest points on the quest cards, the players will likely need to clear around 4 to 5 locations in order to advance. After the final location is explored, the progress is poured over to the quest card and the players immediately advance to the next stage.
Quest stage 2: A Fateful Discovery
You have done a fair bit of exploring during this quest already, but it just kicked the location lock into next gear while also making this a kind of Memory game. When the players arrive at this stage, they add 2 additional copies of Lost Island to the staging area plus the Shrine to Morgoth location with the Lost Island side face-up. Adding 3 locations to the staging area like that is going to require a lot of willpower to overcome, both in game and mentally. After adding those 3 locations, the players must remove all progress from Lost Island locations in play and shuffle the locations around so that they don’t know which one has the Shrine of Morgoth on the other side. You are now facing 5-8 locations in the staging area, with one of them being your ticket out.
With no quest points on the other side of the quest card, you will be free to continue exploring side-quests at this stage. The only way you can complete this stage is to get the Shrine to Morgoth in the victory display. But as you do not know which of the Lost Islands has the Shrine on the other side, you will have to start flipping them over and taking guesses which location is the right one.
At this point, the number of locations can start to go down again, as no Uncharted locations get added through the quest effect of the previous quest card. They can still be added through treacheries, but there is a finite number of them. This is because each time a double-sided location is explored, it doesn’t get shuffled back into the Uncharted deck, but instead gets added to the Victory Display. This will eventually leave you with the Shrine to Morgoth as an active location.

Once players do happen to find and travel to the Shrine to Morgoth, they can no longer draw cards or search their decks. This means that the cards on the table and in your hand will be all you have for the end game (or the discard pile if you go with Noldor or Stand and Fight). This is a passive ability on the location which cannot be blanked, so people will be stuck with their hands until the scenario is over. The Forced effect on the location forces players to exhaust every ally in play with a cost of 2 or less. Then, each player must find an Undead enemy in the encounter deck or discard pile and put it into play engaged with them. Since killing the enemies is not required, I tend to take the Throngs of Unfaithful for this effect, as they are the easiest enemies to deal with. Be sure to have a high cost ally or a hero ready to defend the attack.
After the combat phase, the round will end and you will likely go into the final round. This is where it all comes down to questing through the active location. The Shrine takes up 8 points of progress, but with all the location control cards that you should have in play by now, this shouldn’t be a big problem, especially in multiplayer. In true solo, you can get stuck here if you cannot muster enough willpower, so try to bring boosting effects like Faramir, the Free Peoples, Lords of the Eldar or Untroubled by Darkness if you have the deck for it. This big boost in willpower will see you clear the location. Once the Shrine to Morgoth has been added to the Victory Display, the players immediately win the game.
The trick with this part of the quest is that you need to find the actual Shrine itself. The best thing you can do, is to travel each turn while also using location control on the locations in the staging area. Remember that with 4 points of progress, you get to see the other side of the Lost Island locations. This makes Northern Tracker very powerful once the second stage has begun. In multiplayer, you will want to have at least 1 person trying to discover the Shrine in the staging area, in order to prevent having to guess randomly which location ends up being the Shrine.
After the players have added the Shrine to the victory display, they win the game and advance to the final quest in the Deluxe box. They return to Mithlond, only to find it engulfed in the flames of war. Next time: Raid on the Grey Havens.
The Encounter deck
Global
- The encounter deck itself is relatively thin, with only 24 cards in normal mode, and 17 in easy mode.

- The chances of revealing a shadow card are 50% in Normal mode, and 52% in Easy mode, which is pretty low compared to other quests.
- Keeping with the lower stats than usual, the average threat revealed per card averages in around 1 threat/card, though treacheries will bring in locations with more than 0 threat of course.
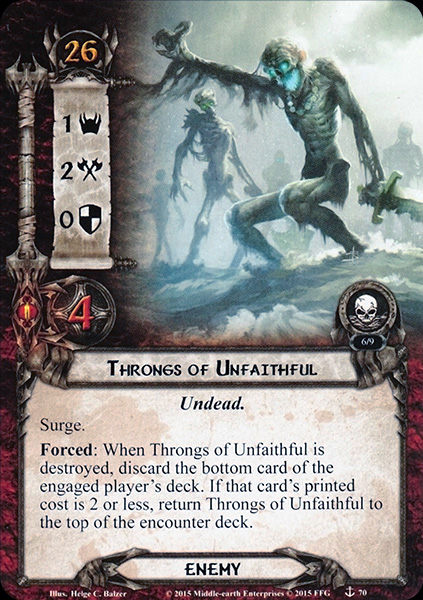
- Surge is not a common keyword, with only the Throngs of Unfaithful adding 2 cards in total to the encounter deck with the Surge keyword
- Doomed 2 is the only Doomed in the encounter deck, being printed on 2 cards. However, Aimless Wandering can also raise the threat of players by 2 if they so choose to.
- Immunity
- Lost Island cannot have player card attachments
The statistics above do not include the locations from the Uncharted deck, which consists only out of locations. This explains the lack of locations in the actual encounter deck, making it easier for the players to guess cards for Wingfoot or Minas Tirith Lampwright. The size of the Uncharted deck remains the same across both modes and will replenish itself during stage 1.
Objective
Calphon is the objective ally in this scenario and tags along for the ride. He will always be under the control of the first player and has some uses, albeit nothing impressive. To start off, a stat line of 1/0/1/3 means that Calphon will usually add his willpower to the quest, as you won’t be attacking with him, and defending is also a poor choice considering the players lose the game if Calphon leaves play. However, having the Gondor trait helps Calphon a little, as he will benefit from the Gondor synergy if the players run any. Visionary Leadership will likely be your best option in order to get some more uses out of Calphon. This doubles his willpower, which can be handy to overcome the locations in the staging area.

Besides his stats, Calphon has a unique ability that requires you to exhaust him. If you do so, you (the first player) get to look at the bottom card of your deck. You may then choose to swap out that card with a card in your hand. Think of this like a reverse Wizard Pipe, where you get to see the bottom card instead of the top card. Replacing the card on the bottom of your deck with one in your hand can be a useful trick to get rid of duplicate unique cards in your hand, and it extends your access to your deck a little. However, the main reason that this action is on Calphon is that the enemies in this scenario will interact with the bottom card of your deck. If that card has a cost of 2 or less, it usually means bad things are going to happen. So if you do happen to have a 3 cost card that you don’t have a use for, you can swap it with the bottom card of your deck and be sure that the next treachery will hit for less.
I personally don’t tend to use this ability often, but it has its uses if you are looking for a specific card. Try it out sometimes, but know that you can always use Calphon for his willpower if you don’t want the bottom card of your deck.
Enemies
When Numenor was destroyed, the men that were faithful to the king (and therefor Sauron) were cursed by the Valar. This curse is portrayed as the inhabitants of the island being cursed undead. These enemies will try to hinder your progress through the jungle, stealing your cheaper cards and putting them on the bottom of your deck

- Servant of the Deceiver: Being the only scenario-specific enemy in the encounter deck, the Servant also has the highest combined stats of all the enemies in the encounter deck. Having 3 threat means that it will be helpful to engage this enemy in order to remove threat from the staging area, but his 35 engagement cost means that you can keep him up there in the beginning of the quest if you are not ready for him. When you do decide to engage the Servant (or he passes an engagement check), the person who engaged it must look at the top card of their deck. If that card has a printed cost of 2 or lower, the Servant gets a +2 to his attack stat until the end of the round. This can be troublesome, as a lot of shadow effects can further boost the attack value of the Servant, making him a real pain if you don’t have a solid defender for him. In most cases, Beregond will have no problem dealing with this enemy, but chump blocking can also be a viable strategy against this enemy. Killing the Servant will take some effort, as he has a very beefy 4 defence before you get to his 3 hitpoints. Direct Damage will do great against this enemy, as 3 hitpoints isn’t all that much. Defend with a character wielding a Spear of the Citadel, and then exhaust the spear with Goblin-cleaver, and the Servant is dead. There are several copies of this enemy though, so getting rid of the one engaged with you can be highly advised. If you are able to scry the top card of your deck through Wizard Pipe or Imladris Stargazer, then you will be able to put a higher cost card on top of your deck, making the Servant’s ability go to waste. Since the card isn’t discarded from your deck, you could even engage multiple Servants at once, without any of them getting the attack boost.
- Drowned Dead: Where the Servant of the Deceiver could be chump blocked, this enemy punishes you for it. The Drowned Dead has a more offence style stat line compared to the Servant, and hits you hard for 4. This attack will need to be blocked by either a hero or by a solid defending ally like Jubayr. This is because the Drowned Dead will place any ally it destroys on the bottom of your deck. The idea behind this is that chump blockers tend to be cheap, so you end up with a cheap card on the bottom of your deck. While you can bring that ally back to your hand eventually, it will set up some potential shadow cards for the encounter deck that can be devastating. Attacking the Drowned Dead back will take a combined attack from several characters, but shouldn’t be impossible. Like the Servant, the Drowned Dead is vulnerable to direct damage, in case you don’t want to deal with the 3 points of defence.
- Soulless Cadaver: Having the highest engagement cost of any enemy in the encounter deck, the Soulless Cadaver will become one of your biggest problems if you don’t deal with it in the staging area. While in the staging area, the Cadaver has 3 threat, which is reason enough to try and kill it through Hands Upon the Bow or Haldir. The real pain starts when the Cadaver engages a player. That player can no longer search their deck for cards (no scrying or Calphon). This can be bad if you were counting on replacing the bottom card of your deck, but it is nothing compared to the Forced effect on the enemy. This forces the engaged player to put all cards in their hand of a cost 2 or less on the bottom of their deck. As the majority of cards in the game have a cost of 2 or less, you will likely throw away most of your hand. Fortunately, the cards don’t go into your discard pile, but go to the bottom of your deck. This way you can reclaim them eventually if you draw through your deck, or regain access to replacing the bottom card of your deck with one in your hand through Calphon. The Soulless Cadaver is usually the perfect target for a Sneak Attack Gandalf, but should it engage you, you will have to stomach the 3 attack and have your characters bond together in order to take the Cadaver down.
- Throngs of the Unfaithful: Finally, we have the swarmy style enemy, which in this case are the Throngs of the Unfaithful. The Throngs are the only card in this encounter deck that surge, and will engage players a lot sooner than other enemies. With very low stats, the Throngs wouldn’t be a problem to destroy, were it not for their ability. This ability activates when you destroy the Throngs, and makes you discard the bottom card of the engaged player’s deck. If that card costs 2 resources or less, the Throngs go back on top of the encounter deck instead of going to the discard pile. There are numerous ways around this ability, with the first being that you have an expensive card on the bottom of your deck. However, you don’t always get to know what that card is, so you may have to implement other tactics to deal with this enemy. You can for instance try to kill this enemy while it is still in the staging area. That way, there is no engaged player for the effect to interact with. Another popular method is to keep the Throngs engaged with you. Use Outmatched or Forest Snare to no longer have to deal with the enemy and keep his surge out of the encounter deck. Lastly, the forced effect only triggers when the Throngs are destroyed, meaning that Straight Shot works wonders, as it straight up discards the enemy. The Throngs can be annoying, but it is not the biggest problem in this scenario.
Locations
This scenario is unique, since most the locations in this scenario are double sided. One of the sides is the same for all locations, with the other side being revealed when the location becomes active. This makes it difficult to know where the Shrine is, and will require some exploration.
- Lost Island: This will be the side of the locations that you’ll be staring at for the majority of the game. The Lost Island is the “front” of most locations in this scenario, with the exception of the Steep Plateau. The location has a pretty standard 2 threat but no quest points. This means that it is impossible to explore the location in the staging area. This in turn will lead to this location sitting in the staging area until you decide to travel to it. However, while in the staging area, the Lost Island can still receive progress from player card effects. While you won’t be clearing the location with it, you can trigger the action at the bottom of the card once you have 4 points of progress on it. You can remove 4 progress tokens in order to look at the other side of the Lost Island card. This is valuable information during the second stage of the quest, as you want to find the Shrine to Morgoth, which also has a Lost Island side. This type of exploration can also allow the players during the first stage to decide where to travel next, as the flip side of these locations can vary between a semi-useful location, to some that punish you for being active. After travelling to a Lost Island, you must flip it over to the facedown side. As such, there is no way to make progress on Lost Island while it is active. Another thing to note is that progress on Lost Island does not carry over to the location on the other side. All progress is removed when flipping the card.
- Shrine to Morgoth: I have already talked about this location in length during the scenario analysis, as this is the location you will want to track down during stage 2. When you finally travel to it, you will be forced to work with the cards in your hand and on the table, and will have to exhaust the rest of your allies with a cost of 2 or lower. This means that if you know you are travelling to the Shrine, you might want to have some defenders around if you are already engaged with an enemy. You will get another enemy through the Forced effect on the location, though you get to choose the one you want. In higher player counts, there might even be a case where all enemies are already in play, as there aren’t that many enemies in the encounter deck to begin with. The printed threat of 5 on this location is something you don’t really need to worry about, as it won’t be counted towards the threat in the staging area. Ghan-buri-Ghan will benefit greatly from it, but that is about it. Once players have cleared this unique location, it gets added to the victory display and they win the game.
- Lush Jungle: Being one of two locations that are exclusive to this scenario, you won’t be seeing the Lush Jungle in any future scenarios using the Uncharted keyword. And a good thing too, as this location can be pretty nasty for your board, especially when it comes to attacking. When the Lush Jungle gets flipped over from its Lost Island side, it gets returned to the staging area immediately. This is bad for multiple reasons. First, you want to be exploring locations for stage 1, that’s how you advance the quest. This location sets you back a turn and you won’t be making progress next turn. Second, the Lush Jungle will give each character -1 attack, plus all characters lose the Ranged keyword. While the Ranged keyword isn’t that important in solo games, it sure is in higher player counts where players are defending and attacking each other’s enemies. And let’s not forget that the -1 attack will screw with your math a lot. Finally, it will also contribute its 4 threat to the staging area next turn, on top of the 2 threat from the new Lost Island you added when travelling to the location. This location has a pretty big impact on the round, so you will want it out of the staging area if possible. Luckily, the location does give you the option to keep it active and prevent it from returning to the staging area, but at a cost. Each player will have to exhaust each ready hero to keep the location in the active location slot. This is a big investment, but the pain it will cause you to not keep this one active is high. I personally feel that it is worth exhausting your heroes in the majority of cases, and let your allies do combat if there is any. A way around this location involves Thror’s Map, where you return the location to the staging area, and then travel to it with the Map while still in the Travel phase.
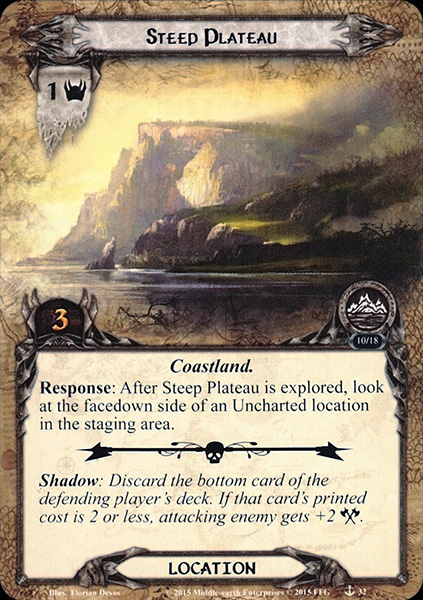
- Steep Plateau: This is one of the weirder cards in the encounter deck, because it is actually a location in the encounter deck! Where all other locations are from the Uncharted deck and have a flipside to them, the Steep Plateau is the only location that can be found in the encounter deck. On top of that, this location is a beneficial one as well, having just 1 threat and a helpful response. When players explore the Steep Plateau, they get to look at the facedown side of any Uncharted location in the staging area. This serves as another way to locate the Shrine to Morgoth during stage 2. If you reveal this location, I will advise keeping it in the staging area and saving it for stage 2. There are 3 copies of this location in the encounter deck, so you can explore one during stage 1 if you feel that you are getting location locked, but your best bet will be to explore it after you transition to stage 2. Remember that you don’t even have to travel to the Steep Plateau in order to trigger the response. Even if you clear it in the staging area, you get to look at an Uncharted location in the staging area. This can then influence your travel destination during the next phase.
- Forbidden Coast: As menacing as the title of this location sounds, it is actually not at all a bad one to flip over. The Forbidden Coast has 1 threat and 6 quest points, making it quite a slog to get through. While this can be troublesome in solo, adding more players alleviates the problem of not having enough willpower. Another great card to use here is Woodmen’s Path, as it cuts down the quest points to 1. When this location gets flipped over, each player may draw a card, this is optional, but you generally will want a free card. Then, each player must put one of the cards in their hand at the bottom of their deck. Since you can pick your card, you can also pick whether or not it has a cost of 2 or less (provided you have the cards in hand). This can allow you to plan for any enemies that may be engaged with you and would trigger off of the bottom card’s cost. In the end, this location will be great to find early, as the 6 quest points mean that you can go through stage 1 a lot faster than if you had to explore 2 locations with each 3 quest points.
- Drowned Graves: At a 2/2 threat/quest point ratio, this is one of the weakest locations in the scenario based on stats. If it ever finds its way into the staging area, it can be explored through a myriad of location control cards. However, to get to this location, you have to flip it over from its Lost Island side. When doing so, the Forced ability on the location triggers. This makes the players discard X+2 cards from the top of the encounter deck, where X is the number of players in the game. Then, each player selects one Undead enemy and adds it to the staging area. This effect can whiff if you don’t discard any enemies this way, but at most it can fetch one per player if you are unlucky. The enemies will be added to the staging area and will make engagement checks right before the combat phase, so players need to be ready for them. Careful scrying of both the encounter deck and the location (so you know it is a Drowned Graves) can allow players to avoid the majority of the Undead horde. However, if you know that this location is in the staging area, consider going to a different Lost Island, as there is no real benefit to be gained by travelling here. It doesn’t contribute a lot to stage 1, and if you are at stage 2 and know where the Drowned Graves are, it is best to search for the Shrine elsewhere.
- Cursed Temple: This location will become much more important during the Temple of the Deceived quest, where this is a location you will want to find. However, in this scenario, the Cursed Temple will act as a buffer against players with characters with a willpower of less than 2. As long as the Cursed Temple is the active location, these characters do not ready during the refresh phase. This kind of reminds me of the Redhorn Gate, where low-willpower characters were punished as well. Global buffs like Dain Ironfoot, Visionary Leadership, and Sword that was Broken will help to boost the willpower of your characters so that they don’t fall victim to this location. Unfortunately, there is no action window in which you can use Faramir to boost your other characters so that they will be ready for the refresh phase. But you will be able to play events that ready allies should you ever find yourself low on some combat characters (that generally lack in willpower).
- Flooded Ruins: In terms of threat and location lock, this may be your biggest obstacle. When this location is flipped over and becomes the active location, it will contribute its threat to the staging area while it is active. Combine this with the 2 threat of the new Lost Island you added for travelling here, and you are looking at a cool +5 threat. This can be a troublesome location, as it takes a while to clear as well, having 5 quest points. However, if you and your fellowship can muster enough willpower to overcome the threat in the staging area, you will go through this location with ease. It will also add a nice 5 progress points to the first quest card during stage 1, making it a good location if you want to advance that stage quickly.

Treacheries
It is not wise to just wonder into a jungle that was cursed by the Valar. And with the Undead crawling all around you, it is easy to lose your way and get lost in the jungle.
- Curse of the Downfallen: Much like previous scenarios, this one also has a treachery that deals damage to your characters. However, this time it is not based on whether or not they are exhausted or committed to the quest, but instead on their cost. If this treachery comes up and you have allies with a cost of 2 or less, you need to deal one damage to each of them. Should any ally be destroyed through this effect, then they get sent to the bottom of your deck instead of the discard pile. This is both good and bad. Good because you get a chance to get your allies back if you draw into them. But bad as you will now have several cards on the bottom of your deck with a cost of 2 or less. This in turn activates a bunch of treacheries, enemies, and mostly shadow effects. Either you cancel this treachery, or build around having a lot of high cost allies in play. Dwarves, Dunedain, and Harad archetypes fit this bill rather well.
- Aimless Wandering: This treachery is the reason why you will want to overquest every turn, even if you are not going up against a side-quest. Aimless Wandering will force the players to remove at least X willpower from the quest by removing characters from the quest. X must be equal to the number of Uncharted locations in the staging area, which can go up towards 6 or 7 willpower in the later stages of the game. All in all, this treachery isn’t too bad if you can quest hard enough. There is even a beneficial option on this treachery where the first player may decide to raise each player’s threat by 2 in order to look at the other side of an Uncharted location in the staging area. This is a good way to try and find the Shrine quicker, and can at least narrow down your search for the next travel phase. Don’t trigger this ability during stage 1, as it won’t be useful to you there.
- Ruins of Ages Past: Out of all the treacheries in this quest, I feel that this is the one you will want to save your cancellation events for. Ruins of Ages Past will start your location lock if you reveal this treachery a lot during your playthrough. When it gets revealed, it first raises the threat of each player by 2. This isn’t too bad in most cases, as this quest doesn’t focus that much on raising your threat often (unless you quest unsuccessfully). What is worse is the When Revealed effect. You will have to add an additional copy of Lost Island from the Uncharted deck to the staging area. Then, all progress on locations in the staging area gets removed, and the locations are mixed so that players don’t know which location is which. This treachery is meant to throw you off course when you found out which Lost Island has the Shrine on the other side. This resets the field and even adds a new location, which makes the search even more difficult. Cancellation is highly advised, as adding more locations to the staging area isn’t a good thing to do. While there are just 2 copies of this treachery in the encounter deck, remember that the encounter deck isn’t that thick, so you will likely reset it at some point. This treachery is a little easier with an even number of players, as they had an easier start of the game thanks to setup.
- Lingering Malevolence: This is a nasty treachery that can cost you your entire hand worth of cards if you plan poorly for it. When revealed, the first player only must discard the bottom card of their deck. Then, they must discard each card in their hand with a cost higher than the discarded card. Cards of equal cost or lower can remain in hand (remember that X counts as 0 for this purpose in case you discard Stand and Fight). With careful planning and making use of Calphon, this treachery can be nullified by either discarding a high costed card from the bottom of your deck that you don’t need, or by having no other cards in your hand anyway. The treachery can be nasty, especially during the early game when you need the cards in your hand to build up, though a simple cancellation event can get rid of the card if needed.
- Mysterious Fog: A basic choice treachery that forces the players to either each exhaust a character, or all Lost Island locations in the staging area get a +1 to their threat. While the +1 doesn’t seem that bad in the early game, during stage 2 this can quickly add 6 or more threat. If you can handle the extra threat, then go with that. If each player can exhaust a character, then that tends to be the better option so that you can make more progress on the active location and a potential side-quest. Remember that Calphon can be exhausted for this purpose if needed. If any player does not have a ready character to exhaust to this effect, the threat option goes into effect instead, so be prepared for this treachery if you are gathering a bunch of Lost Islands in play.

Tips and Tricks
- In order to get more use out of Calphon, consider running a Gondor themed deck with Leadership Boromir and Visionary Leadership. Use For Gondor! as well to get some decent stats on him if you want a free ally.
- Dwarven Pipe is quite useful in this scenario if you happen to discard an expensive card through any means. Move it to the bottom of your deck to be more certain that treacheries and enemies hit less hard.
- If you want to blitz through the first stage, try running several copies of Woodmen’s Path. This lowers the progress required to clear a location to 1, but the main quest card will still get the printed number of quest points worth of progress. Travelling multiple times per round and placing progress on the locations while they are active will see you advance to stage 2 more quickly. If that is a good thing is up for discussion.
- If you can get out a few Mirkwood Explorers during stage 1, you will be able to trigger their ability during stage 2, making for a good way of knowing where the Shrine to Morgoth actually is. You can combine this with other progress placing cards if you have a lot of locations in the staging area at that point.
- Use something like tokens to note which locations you have peeked at the other side. That way, you can deduct where to travel next. While there are treacheries that force you to mix the locations up, they don’t appear that frequently, meaning that tokens will prevent you from looking at the same location twice, wasting precious progress.
- This is one of the few scenarios where Outlands can struggle due to their allies costing 1 or 2 resources. This makes it hard to survive encounter cards like Shrine to Morgoth and Curse of the Downfallen when they are in play. You will also be stacking your deck with cheap cards, which makes the enemies a lot more deadly.
- You will be better off having some of the higher cost unique allies in play. Harad decks are far better equipped against this quest thanks to their allies being costed 5 resources. Dunedain decks aren’t cheap either, having a bunch of 3 cost allies which helps against the scenario’s treacheries and enemies. After you have built your deck, look at the cost curve, it should be on the higher end if you want an easier time. Be sure to add some resource acceleration to your deck in order to pay for all the cards as well.
- Consider running some global willpower boost effects. Not only will this help questing through the locations and allow you to avoid location lock, but you also spare your characters from remaining exhausted due to Cursed Temple. Have the majority of your characters have a willpower of 2 or greater to avoid this.
Playthroughs
With the quest not being that popular with players, the only real playthroughs I could find are those from progression players. If more videos come out, I will add them to the list.
- 3 players, progression decks: https://www.youtube.com/watch?v=1mYwbrMhj6A
- 2 handed, progression style: https://www.youtube.com/watch?v=F-xOCKfQmyM
- Modern decks: https://www.youtube.com/watch?v=j0Hv_kzBP6c
- 3 players, progression decks: https://www.youtube.com/watch?v=-wYju2s1HbY
This concludes the middle chapter in the Grey Havens box. With the key now recovered, the players go back to the Havens. There they will have to battle for the survival of their fleet during The Raid on the Grey Havens. While this quest is the next one chronologically, the blog will skip ahead a little to the cycle, as Raid of the Grey Havens requires a bit more time to cover. So I will be bringing your the Drowned Ruins next time.

I love these write-ups, but one critique is they are really written for an audience that has a mature card pool. Players experiencing it progression style or with the revised core won’t have access to many of the suggested cards. Notwithstanding, there are many solid tips here and these articles are a herculean effort and solid resource. Thanks.
LikeLike
I know. Many of these articles are a few years old, so it is hard to write them with just the reprinted cardpool in mind. I just went for the easiest option, which is a complete cardpool, without fan-made stuff. This does make the articles less friendly to newer players when it comes to specific cards, but the generic tips should help a little. Watching playthroughs in progression style will also help, since those cardpools are far more on par with what newer players own.
LikeLiked by 1 person