My previous storage solution article has been one of thé most popular articles ever on this blog. Since then, more than a year has passed, and while I have updated sections here and there, my solutions have changed too much to keep updating an old article. So instead, I present this third installment of my method of storing all the cards and other items for this game. This will include things that were fan-made, such as deckboxes, playmats, tokens, etc. But even for those with a less-than-complete collection, I’m sure this article will still help you to find a system of storage that works for this game. For any other solutions, please check out the Storage Hub, where over 10 other players share their solutions.
I have designed this storage solution to be modular in use, so that you don’t have to bring your entire collection with you to a night of gaming. This article will tackle the following aspects of that solution:

- Player decks
- Sleeves
- Deck storage
- Player card Storage
- Binders
- Baggins and Fellowship cards
- Encounter cards
- Cycles
- Saga’s
- Print on Demand scenarios
- Nightmare scenarios
- Rules inserts
- Dice, Tokens, Trackers
- Official tokens
- Custom tokens
- Dice
- Threat Trackers
- Playmats
- Official Playmats
- Custom Playmats
- Playmat Storage
- Product boxes
- Deluxe/Saga Expansions
- Adventure/Nightmare Packs
- Storage on the Go
- Playthrough logs
- Collection logs
- Miscellaneous
Player decks
This is probably the most important thing to have as a player of this game. Sure, you can borrow decks from other players, but having your own decks really marks your entry into this game. This chapter deals with the various ways I sleeve and store my decks for safety while I’m in my own gameroom, or bringing the decks with me to a store or convention.
As many of you might now, I tend to have a lot of decks ready to go at the same time using the same collection. The strategy behind this style of deckbuilding has already been explained in this article or on this episode of Cardboard of the Rings. As I use quite a lot of cards outside of my binders at the same time, I need to tell them apart. This is where my sleeve “collection” comes in.
Sleeves

I sleeve my player decks in order to tell them apart should they ever get mixed inside a bag or all over the floor. For this, I have 18 different types of sleeves in different colours. These cover nearly the entire spectrum, so I can easily tell my mono-Tactics (red) deck apart from my Radagast-Eagles (brown) deck. Not all sleeves are used for player decks though. The FFG One Ring sleeves are used for my hero cards. The heroes are first sleeved with an inner sleeve before being placed inside of the One Ring sleeve. I do this since the FFG sleeves don’t shuffle that well in my experience. The other sleeves not used for decks are the transparant standard sized ones. I use these for the quest cards and objective cards in scenarios. These never have to go into the encounter deck, and can therefor use a larger sleeve to tell them apart.
The rest of the sleeves are all standard sized Ultra Pro Matte sleeves with 50/51 in a pack. This offers a lot of variety in colours to choose from. The only exception are the silver sleeves. These are Dragonshield standard sized sleeves that come in a pack of 100. I use half of these to sleeve my Magali alt art heroes with (Thanks to Beorn for printing those) and the other half can be used for a standard deck.

Besides sleeves, I also own a collection of alternative card backs that I won as a raffle price in the 2018 Con of the Rings event. These were made as promotional cards for the digital card game (or adventure card game I suppose) and the artist was selling them at the event. I have a fair collection of these and use them as the backs of my heroes as well. Especially my official alt art heroes have a cardback to make them even more special. I am still missing a few of these for a complete collection and I hope FFI or FFG will one day release these as sleeves, as it would work perfectly for this game.
Deck Storage
Sleeved as the decks may be, they still need to be stored somewhere so you can easily bring them with you. While there are plenty of solutions out there that will work well for you, including storing your decks in a Core Set box, I have found that pushing 14 decks at the same time requires some seriously big deckboxes. Luckily, the Ultimate Guard Superhive fits the bill. This massive deckbox stores all my decks, but also fits several playmats, threat trackers, and has a compartment for dice.
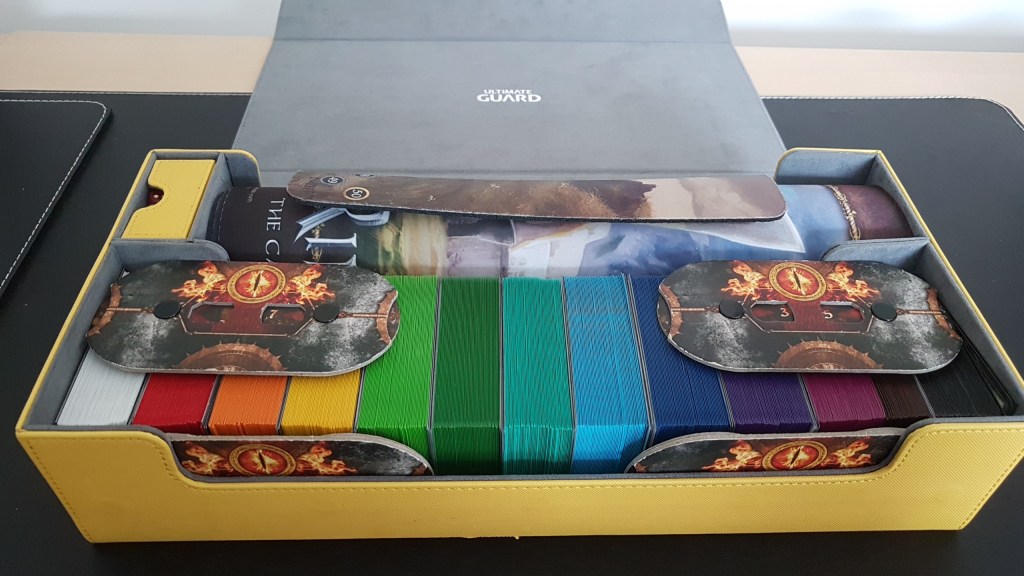
While the deckbox is large, it can be carried around with my backpack in case I really have to. But usually it stays at home where I can easily pick a deck out of it and have everything the player might need in one box.

Player card Storage
Not all player cards are used in my decks, though 12 decks does mean that a large portion of the cards are kept in the UG Superhive. Besides those 600+ cards (12×50 plus heroes), there are some cards that need a place to stay while they are not being used. This is where the next part of the storage system comes into play.
Binders
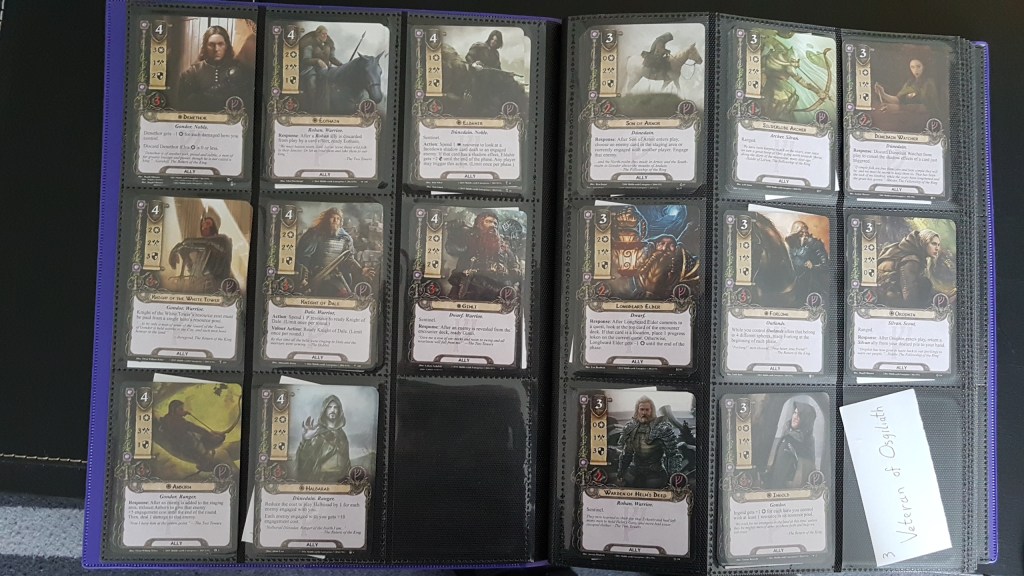
I use 5 Ultra-Pro pro-binders to store the rest of the card pool while they are not being used. The cards are divided by sphere, with one binder per sphere and one black binder for Neutral cards and heroes. Yes, I keep my heroes in a different binder, which makes it easier for me to flip through all the heroes quickly without having to take out all binders.
Inside the binders, the player cards are organized by type (ally, event, attachment, side-quest) first. This allows me to quickly go to a section of the binder if I want to find a certain event quickly. The cards are then organized based on their cost, ranging from 6 to 0, with X being after 0. This creates an easy structure for you to find any 3-cost ally on the same page. Cards are then structured based on their chronological cycle, with all saga’s ending up behind the regular releases. The cycle symbol of each card help with this, and their serial number helps to find out what card came first. This leaves you with a complete order of cards that can now be put in the binders.

With the exception of the Neutral cards, all player cards are stacked on top one another in the binders, filling out one pocket per title of player card. The cards are not sleeved at this point, as they will be sleeved whenever they go into a deck. Should I have any alternative art versions of the player card, then those go on top. Examples of this are my Brosie Cotton cards going on top of the regular Rosie cards. To make sure that I remember what card goes where in the binder, I have created little hand-written notes with the card’s title and cost to keep track of what card should be in that spot in the binder. This was a long task, but helps a lot to place any player cards in the binders when I deconstruct decks.
The Neutral cards are far fewer in number, and can therefore be placed in an entire row of the binder. This helps me keep track of how many copies of the card I have left in the binder, without having to check the pockets. If you don’t have a full collection of player cards yet, I would advise doing this for your other binders as well, though you will find that you eventually will run out of space and will have to compact the cards on each page to a single title card in each pocket instead of each row.

For the heroes, I store them all at the front of the black binder. The first page is dedicated to the official alt art cards I own, where they are kept in order of release if they are not in a deck. The other hero cards are organized in roughly the same manner as the other player cards. First by sphere (Leadership, Tactics, Spirit, Lore, Neutral), and then by threat cost. There are several heroes with the same threat cost though, so I then organize them chronologically like I do with my other player cards. This puts all of the heroes in a specific order. Again, I keep all heroes of the same name (and the same sphere) in a single pocket. Once you start getting a second Core Set, you will find that you will have some duplicate heroes you can stack underneath each other. I was also gifted a set of 50 Magali alt art heroes by Beorn, which are placed on top of the other hero cards in the same pocket.
For a full video of me flipping through the binders, please check out this link: https://www.dropbox.com/s/kp7dopgnllch587/Binders%20up%20to%20Land%20of%20Sorrow.mp4?dl=0 This includes all cards up to the latest Deluxe, and will be updated once all of the player cards for the cycle have been released.
Baggins and Fellowship cards
The two spheres that aren’t in the binders anymore are the Baggins and Fellowship sphers. These spheres are only used for the Saga campaigns, and cannot be used for other scenarios. As such, they got removed from my black binder when I ran out of space.

The Baggins sphere cards are few in number. The 2 copies of Bilbo, his 2 event cards, and a couple of Treasure cards didn’t take up more than a page in my binder. However, I thought it would make more sense if the cards were instead added to the box that contains the scenarios, as that makes it a complete package.

The Fellowship sphere has quite a few more cards than the Baggins sphere and couldn’t fit inside the same two boxes as the scenarios. Instead I received a pair of wooden boxes at Con of the Rings 2019 as that convention’s swag. These are the perfect size for all of the cards of the Fellowship sphere, combined with all of the Boons and Burdens you can earn along the way. This small wooden box is kept inside the same box I keep my Nightmare scenarios in, but that is just to keep those cards from falling over. Once I have enough Nightmare scenarios to keep them standing up on their own, I will move the wooden box out of the Arkhive and place it next to the Saga scenarios.
Encounter card Storage
With all of the player cards sorted out, we come to the largest set of cards in your collection: Encounter cards. Most of these are still in the same storage solution as last time, but I will go over them again. One thing that all the encounter cards have in common though, is that they are all sleeved with slim-fit inner sleeves. While these sleeves are technically meant to double sleeve your cards, it works fine for my purposes. They shuffle well enough, have very little extra plastic, and are cheap. And you really need cheap sleeves when sleeving 9 cycles and 8 Saga expansions worth of encounter cards. You can also go for standard size sleeves, but you will find that the thickness of those sleeves can hinder with your storage solution. Another option would be to not sleeve your encounter cards at all, which is up to you. As for quest cards, I use standard sized transparant sleeves to make the quest cards stand out a little more. These sleeves are somewhat larger and thicker than the inner sleeves, making it easy for me to find the quest cards and preventing them from getting shuffled into a deck.
Cycles
When you start expanding your collection past the Core Set, you will likely first start with picking up some Deluxes and the corresponding Adventure Packs. After all, these give you the most player cards and some amazing scenarios to play without having to jump right into a campaign. When collecting the standard cycles, I discovered that I wanted a storage solution that could be broken up per cycle, so that I had everything I need to play a scenario in one box, while keeping the box format small and light. There are those that got a giant Hobby Lobby box full of encounter cards, and it looks lovely, but that wasn’t a solution for me. Instead, I went with a more modular design, with one deckbox per cycle.
The deckboxes I settled on were the Ultimate Guard Flip ‘n Tray 200+ boxes. These keep a complete cycle of standard encounter cards (sleeved) with little room to spare. This makes it so that there is little wasted space, but also means that you will have to look into more boxes if you want to add Nightmare packs to the collection as well. If you want Nightmare cards added to the standard scenarios, you will likely have to upgrade to Arkhive-sized deckboxes.
The Flip ‘n Tray boxes are made up out of 3 compartments. For all of the cycles, these compartments are filled with the encounter cards, which are sorted by their encounter set, and are labelled with a handwritten note stretching over the top of the encounter set so that they can be identified when in the box. I have never had these boxes open by themselves, and you can shake the boxes around without anything happening. The first compartment fits all of the quest cards of the entire cycle. After that, the cycle’s encounter sets are placed behind, which are the cards used throughout the cycle to pad out the size of the encounter deck. The three scenarios of the Deluxe will also fit in the first compartment. In case of the first cycle, the Hunt for Gollum will also fit in here, as there were just 4 encounter sets in the Core Set.

In all other cases, the encounter cards of the first AP are stored in the dice tray. When laying flat, the sleeved encounter cards fit into this compartment without any issue. It is not meant for this, but allows me to fit the entire cycle without having to remove sleeves. I use the title card I made to lift the entire deck out of the compartment when I need to (which isn’t always the case, the first AP isn’t played a lot in my experience, with the exception of Stormcaller and Steward’s Fear).
The third and final compartment fits the remaining 5 APs of encounter cards all sleeved up. Since the size of these decks is pretty consistent around the 29-32 cards, they will always fit in the box. This allowed me to buy the boxes before owning all of the encounter cards, assured that they would all fit inside of the box.
The one exception to this rule is the Ered Mithrin cycle. This cycle reïntroduced some of the Core Set cards in the first 2 scenarios. This meant a sudden increase of 5 encounter sets for the cycle. To resolve this, I had to use one of the wooden Con of the Rings 2019 deckboxes to fit these cards in, and to keep them with the Ered Mithrin encounter sets should I ever need to play those scenarios again. This encounter deckbox is small enough to carry around in my backpack should I ever bring my Ered Mithrin cycle somewhere. But you can also borrow the encounter cards from your first cycle if you want. I just had duplicates of these encounter cards since I own 2 Core Sets. The extra deckbox is kept inside of my Arkhive that stores Nightmare cards. Should I ever expand the NM collection, then it can just sit on top of my bookcase without any trouble.
The Flip ‘n Tray boxes are all of a different colour, which helps me to quickly know what cycle is in which box. The colours are defined as such:
- Green: Shadows of Mirkwood cycle (Forests, pretty obvious)
- Black: Dwarrowdelf cycle (Moria directly translates to “Black Pit”)
- White: Against the Shadow cycle (White is one of Gondor’s chief colours)
- Purple: Ringmaker cycle (more ambiguous, but purple was a Noldor colour)
- Red: Angmar Awakened cycle (Some of the bloodiest cards in this cycle)
- Petrol: Dream-chaser cycle (Water is blue, box is blue)
- Sand: Haradrim cycle (“I don’t like sand, it gets everywhere on your Mumak”)
- Grey: Ered Mithrin cycle (The Grey Mountains should have a Grey box)
- Amber: Vengeance of Mordor cycle (Resembling the golden armor of Rhun)

With 9 cycles, the boxes neatly stack up in my bookcase as a 3×3 block of deckboxes, which is nice and compact on the top shelf. The solution isn’t the cheapest, but this protects my encounter cards from bending or getting lost on the road. The solution is compact and light enough that you can just bring a single deckbox to a gamenight. Since the trays on the inside are interchangable, you can also swap them out to bring specific scenarios from different cycles if you want.
Saga’s

The Saga expansions called for a different solution than the regular cycles. These had too many cards to use a Flip n Tray box for. So instead, I got 4 transparant Dragonshield boxes to store the Saga’s in. The first box fits the entire Hobbit Saga, including all of the Nightmare scenarios as well. This box contains the quest cards of the Saga first, then the entire Baggins sphere is next, followed by the first scenario. After each scenario, the corresponding Nightmare scenario is placed behind it. All different encounter sets are separated by standard plastic dividers that you can buy in bulk. I don’t use these dividers for the regular cycle scenarios, since those have enough space in their box to not get mixed up. Each and every scenario is again labelled at the top with a piece of paper that displays the name of the scenario.

The same is used with the next two boxes, which include the entire Lord of the Rings Saga campaign. These boxes are so full with the standard encounter sets for the saga that no Nightmare packs could fit in these boxes. But containing all of the Saga scenarios and the two POD scenarios that can be slotted into the campaign in just 2 boxes is incrediably compact to my standards. Since I had to fit all of the cards in these boxes, I had to leave out the Fellowship sphere player cards. These are instead kept inside of a Con of the Rings 2019 wooden player card box. The scenarios are all sleeved and are separated with standard plastic dividers on top of a little piece of paper denoting the title of the scenario, as all other quests have as well. Should I ever get the Nightmare versions of these quests, then they have to find a new box. The Dragonshield boxes split the scenarios as such: Box 1 contains all of the quest cards, and the scenarios up to Breaking of the Fellowship (including the Old Forest and Fog on the Barrow-Downs scenarios. Box 2 contains the encounter cards for the four other Saga boxes, with one Saga box per compartment. It is a tight fit, but it works!
Print on Demand scenarios

Every year, FFG develops the Print on Demand scenarios that include a neat twist to the standard LOTR LCG formula. Whether it is epic multiplayer, or a game of Clue, these scenarios come with a lot of cards that need to be stored. Since these packs come with no player cards (unless you pick them up at the event they are promoted at, in which case you get the alt art hero), the developers had enough space to fill the pack with encounter cards. For these scenarios, I use my fourth Dragonshield transparant deckbox, though that proves to be insufficient now that I am close to having all of the POD scenarios. The box holds all POD scenarios I own (I am missing Massing at Osgiliath), except for the 2018 encounter sets for The Woodland Realm and the Wizard’s Quest. These create-your-own-encounter-deck style quests have a lot more encounter cards than the other quests, and are therefor thicker. So for the two sets I cannot fit in the standard box, I keep them in an UG sidewinder 100+. This just barely fits the (sleeved) encounter cards of both sets, giving me a complete, self-contained box for when I want to build an encounter deck with those cards.
All cards are sleeved as normal, with standard dividers being used to separate them. Again, nametags are used so that I know what scenario is what when looking at the top of the box. Once I own the Fellowship 2020 kit (yes, there will not be any 2019 kit…), I will likely dedicate another sidewinder to those kits. This leaves enough space in my Dragonshield box for Massing at Osgiliath, after which the box will feature a complete collection of POD quests (hopefully there will be a GenCon 2020 quest to include in there as well).
Nightmare scenarios
I don’t own all of the Nightmare scenarios. In fact, I own about a cycle and a half of them, plus the entire Hobbit saga worth of Nightmares. Because the Flip n Tray boxes won’t hold a complete set of Nightmare scenarios as well as the standard encounter cards, I had to find a different solution. This came in the form of an old Arkhive of mine that served as deck storage before I had my Superhive. This Arkhive holds a lot of cards, allowing me to store all of my Nightmare scenarios in there without any problem.

In fact, I own so few Nightmare scenarios that I had to fill out the rest of the Arkhive with the deckboxes I got at Con of the Rings, which fit perfectly in the Arkhive while still allowing it to close. I also added a smaller deckbox in there that holds my spare sleeves, so that now all the Nightmare cards are standing upright on their own. The Arkhive itself has received a visual upgrade in the form of my Vision of the Palantir 2019 patches, all 7 of which are placed on the sides of the box. This makes it easy to find should it ever get lost in a pile of similar deckboxes, and provides a nicer look than just a basic grey deckbox.
The Nightmare cards themselves are sleeved using the same sleeves as the encounter cards. This was done so that you cannot tell the difference between the cards when they are shuffled into a single encounter deck. The sleeves work fine and don’t add that much thickness to the individual cards, allowing me to store them without too much trouble.
Rules Inserts

The rules inserts that come with every expansion are used a lot when you first play through a scenario. Once you learn the mechanics, you may no longer need these sheets, so you’ll need a solution for them. If you are saving the original packaging of your expansion boxes, then you can store the rules in the boxes and store them by cycle that way. This is a free solution, although it does mean that you won’t have the sheets available quickly. Instead, I got 2 A4 folders with transparant sleeves inside that store the rulesheets well. I fit 2 sheets in every sleeve, which means that I will have to remove some when I need to look at the back of the sheets. But other than that, it is an elegant solution and fills the shelf with my player card binders. These folders can be bought in your local bookstore or printshop, and while they won’t hold all of the sheets in one folder (mine don’t in any case), they are easy to pull out and read either the rules or the narrative from.
Dice, Tokens, and Trackers
This game forces you to keep track of a lot of things. This is where you will need tokens and trackers for, just so you don’t have to remember the damage on that one enemy, or how many resources your hero has left in his pool. The game gives you these tokens and trackers with the Core Set, but many people will want a storage solution for these after a while. They might also want to upgrade to new tokens that look nicer than the cardboard tokens and trackers given at the start of your collection.
Official tokens
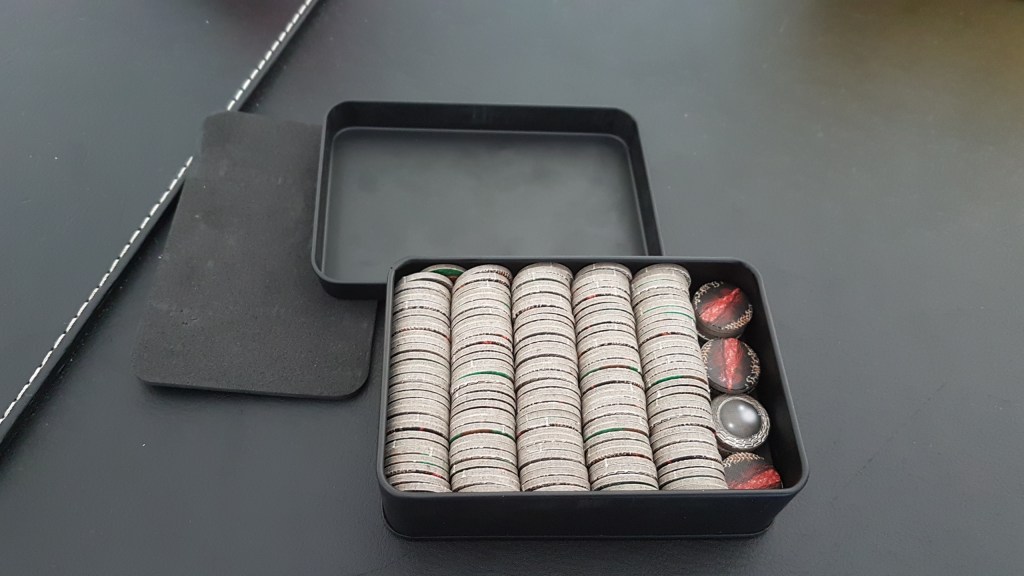
I no longer use the official tokens, but I have used them for a long time in the earlier days of the game. However, I found them to be too small and too easily moved if the table was bumped. On top of this, having only ways to signal a “1-off” for resources, damage, and progress meant stacking towers of these tokens on top of your cards if a boss enemy had a lot of hitpoints (Balrog) or a location/quest card had a lot of quest points for your progress tokens (Stage 2 of Siege of Annuminas). Because of this, my tokens retired after a few years of use and got replaced with other tokens and dice. In the meantime, the tokens are being stored in a metal box together with all of the other extra stuff for the game that I don’t immediately need. Should I ever decide to sell my collection, it would be best to have the original tokens as well. Luckily, the box holds all of them nicely, giving me a compact solution for these tokens.
Custom tokens
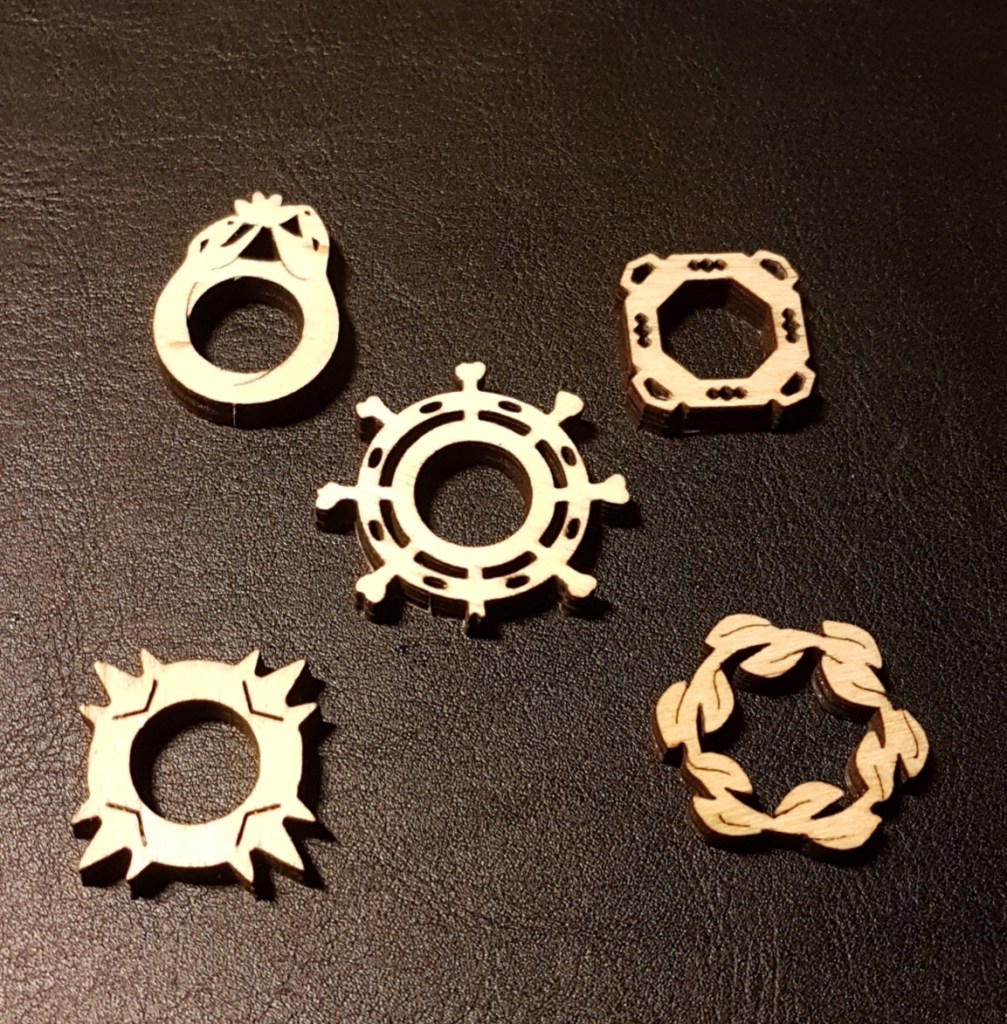
Folks in the community are very keen on creating their own tokens for this game in order to make the game feel more immersive than with the standard tokens. There are the tokens made by Team Covenant, which are pretty cool if you have the money for them. You can also create your own, like I did for the Vision of the Palantir 2018 loot. You will need a laser cutter near you to actually do this though. I kept a few of these tokens for myself and will continue to use them for signalling a boosted stat, as well as a neat first player token that I made out of this rare coconut material. Other community outlets like Cardboard of the Rings and Card Talk have also created custom first player tokens that are great to bring to the table. They have a better feel than the original hexagon that comes with the Core Set.

Another set of tokens that I use was a part of the Con of the Rings 2018 swag. They handed out token boxes with a full set of custom wooden tokens stained blue, red, and green. These now replace my cardboard tokens. They are easier to use than the standard tokens, as they have a flip side with a higher value. 2 for damage, 3 for resources, and 5 for progress. This makes the stack of tokens on your cards far lower, and reduces the total number of tokens you will need. All of these tokens are kept in the custom token bank that came with it. They also added some wooden pillars in the set, which can be used for various means in your game. I for instance use them to mark where I am during a game of Temple of the Deceived.
I also use tokens from other games from time to time. For resources, I like to use metal coins, and the realistic ones from Scythe are worth bringing to the table. These also feature a 3-value coin, but also a 5, 10, and 20 value coin in case you really need it (you often don’t). Since I don’t play Scythe very often, it is good to see the coins hit the table some more. I also sometimes use test-subjects from the Portal boardgame as Villager tokens for Encounter at Amon Din. These are far more “human” than standard resource icons, and give a bit more feel to the game. Though I suppose the cake tokens in the game are worth more than test-subjects, so I should actually be using those. I also got some zombie tokens at one point. While they don’t see the table that often, I use them to denote what cards are Reanimated Dead during the Dread Realm scenario.
Dice
While tokens are nice, they are not really compact enough to bring to each game. You can haul your token bank everywhere, but you may end up breaking or losing tokens you are somewhat attached to. Dice offer another way you can keep track of your resources and progress, and is something I use for the majority of my games. Standard d6 dice are perfect for keeping track of resources (purple/blue dice), since you usually don’t pass 6 resources per hero. I also use smaller d6 dice for keeping track of damage on characters and enemies (red dice) and progress on locations and quest cards (green dice). Various other dice can be used to keep track of things, such as the number of Dwarf characters you control, number of unique characters you control for the Fellowship contract, or you can use MtG life counters to act as damage on boss enemies like Smaug or the Balrog. The fact that you can easily store dice in deckbox trays or in a leather pouch, makes it easy to carry them around. They can also be used for plenty of other games, so having a large dice collection will come in handy.

Threat trackers
The Core Set gives you 2 threat trackers to start with. Since I have 2 Core Sets (old edition) I have 4 of these trackers, which is enough for a 4 player game. These trackers are still being used by me to keep track of high numbers, such as my usual threat, but also threat elimination level in quests like Trouble in Tharbad. I store all 4 of these threat trackers in my Superhive, where they fit between the wall and the decks. This makes it so I have the ability to give anyone a deck, playmat, and a threat tracker to join a game with.
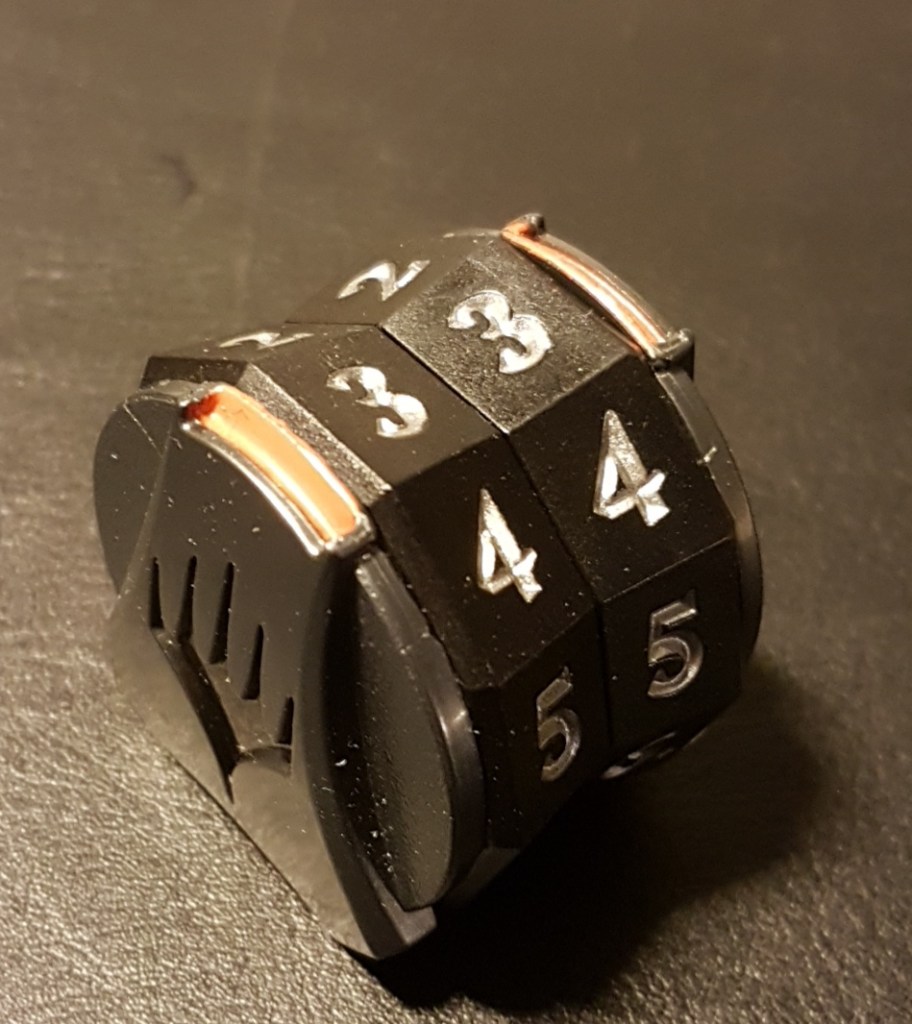
This is not all the threat trackers I have though. With use, these cardboard trackers will start to scratch up and get damaged. You might want to find a replacement solution for this. I settled on a MtG spindown tracker which is very compact and allows me to easily adjust threat. It doesn’t take as much table space as an official tracker, which is good for when I don’t have enough table space available (Temple of the Deceived with an Outlands deck can do this to you). The tracker was bought from a local store, but I have seen these for sale online as well. There are also various other trackers you can use for this, but keep in mind that you have a place to store them with. Smaller threat trackers like the new edition Core Set ones, or those from Cardboard of the Rings are easy to bring with you as they can fit inside many standard deckboxes, allowing you to bring them in the same box as your player deck to a night of gaming.
Playmats
Playmats are a wonderful thing to have for this game. Not only do you protect the cards from any filth on your table, but you also have a surface that makes it easier to pick cards up from. On top of that, the mats made for this game feature some stunning artwork for you to look at up close while the Gandalf player is taking forever with their turn. There are official mats made for the game’s events, but there have also been some fan-made playmats that are found in the community as well. The storage of these mats is identical in my case, as I do own a fair few of them already.

Official playmats
Each year for the Fellowship events, FFG releases an official playmat that is a part of the Fellowship kit along with the scenario and that year’s alt art hero card. While the more recent mats are easy to find on Ebay if you have missed the events, the older ones are very hard to get. Back in the early days of the game, there were no Fellowship events, and they came together with Nightmare packs. The Khazad-Dum mat was the very first one, and nearly impossible to find these days without paying in kidneys. I have a complete collection of the official playmats, with the exception of the Khazad-Dum one and the one with Hands Upon the Bow. That one is also very tricky to get a hold off. If anyone has those for sale without costing an arm and a leg, let me know :)!
I also don’t own any of the playmats that are available via stores for general purchase. There are several of these, some of which feature the same art as the Fellowship mats. They only miss the bottom border (not seen in the picture above), which makes them cheaper to the community. These mats are great for newer players to pick up if they are looking for a playmat that features art from this game. But for me, I own enough mats already, so I’m not looking to spend $20 on more mats that I won’t be playing with.
Custom playmats
There are also plenty of custom playmats on the market with even more amazing artwork from the Lord of the Rings and the Hobbit. Whether it is a piece of art used in the game but is not stretched to fit a playmat, or if it is an entirely new piece of art, there is something unique to bringing your own playmat to conventions. There are several sites online where you can order your own playmat, so look into that if you are interested.
The custom playmats I have are a part of the Cardboard of the Rings Patreon swag. At the end of their First Age, they gave out playmats of three heroes fighting the Hill Troll at the Anduin. This regular sized playmat is slightly thicker than the official mats, making it a little bit more difficult to store. But with stunning artwork and a cool setpiece, the mat sees enough play during my playthroughs.
For the 2019 Cardboard of the Rings Patreon swag, they gave away longer, thinner playmats with custom art of the Scouring of the Shire. This mat comes with a row of numbers across the bottom where you can keep track of threat in the staging area, but also archery, willpower, and many more things. The mat also came with 4 unique wooden rings that you can use as trackers. This saves a lot of math, which is a welcome change for times when math is hard to do. At Con of the Rings, there was also a fifth wooden ring token that was given out, which references the Angmar Awakened cycle and the Dream-chaser cycle. This token can also be used for the mat, or to keep track of your heading when sailing without rotating the compass.
Playmat Storage
With 9 different playmats in my collection, it can be difficult to store them all. I could use them in everyday life as placemats, but that would risk staining them. Instead, I have several boxes that are meant to store playmats. The Superhive I use for my decks and threat trackers can also store several playmats in a dedicated row. This stores 3 playmats as well as the encounter mat from COTR. It would fit 4 playmats, making it a completely self-contained box for 4 players to play the game, if you would bring more dice.
Besides the Superhive, I also have an UG matcase. This is a smaller box in which you can store 3 regular playmats when tightly rolled together. It is less spacious than the Superhive, but is easy to carry if you only need a few extra playmats to bring with you. The matcase also has an extra compartment for dice, which is where I keep more special dice that don’t go into the regular pouch.

This leaves me with 2 mats that currently do not have a box to protect them with. For now, a rubber bad will do, but for the long term I might get another matcase for these playmats. That allows me to neatly store all of the precious mats so that they can be used for game nights. These two extra mats can also serve as mousepads for my computer in the meantime.
Product Boxes
The original boxes that come with the game can take up quite some space if you are going to go with a full collection. The packaging can be used to create storage solutions with, as many new players will use their Core Set (Old edition) as their first storage solution. But once your collection grows with several cycles and Saga expansions worth of content, you have to find a place for the empty boxes. You can of course throw them away, which is a fair solution, but there is so much more that can be done with it. The artwork on these boxes is amazing and deserves to be displayed and not end up in a landfill.
Deluxe/Saga Expansions
These larger boxes are going to be quite bulky in storage. Several members of the community throw these boxes away or send them to other members of the community who turn them into storage boxes for their encounter cards with the help of some inserts. I take a different approach and put these boxes on display in my game room. The benefit of living alone is that I can decorate the guest room however I please, and that means that anyone who is staying over gets to experience my wall of Deluxe/Saga boxes. This creates some conversation the next morning as well, though it usually ends up with the question of how much money was involved, which I tend to avoid (I don’t need to be confronted by those numbers).

Since there are 8 Deluxe boxes and 8 Saga boxes, I can stack them on top of each other so that the majority of the artwork is displayed. I place them slightly diagonal to have a better support for the top row of boxes. This leaves me with a case full of games, with LOTR LCG acting as a crown.
Adventure/Nightmare Packs

The smaller packs are more difficult to properly store. While there have been people in the past who have created wallpaper out of the art of these boxes, I do not have the dedication to do that. It also becomes quite messy if I were to store the boxes next to the Deluxe boxes (see thumbnail). So I put them all behind a door in the same gaming Kallax unit. There the heap of plastic containers can remain until I need to sell my collection, in which case I will still have the original packaging. Since I have several cycles in the old, cardboard packaging, I can’t really think of another way to have all of the packaging stored in a neat fashion, so this will have to do.
The Nightmare packs nearly double the amount of plastic shells that I would have to store. These I do throw out, but I keep the cardboard cards that are in front and behind the Nightmare cards in the pack. These I store in a single plastic package container and keep them with my Adventure packs.
Storage on the Go
One of the things that changed since the last storage solution article of mine has been that my collection goes outdoors more often. I have found some more local people to play with and have gone to more events in the US as well. For this, I really needed a reliable way to carry my collection with me. Since many of my deckboxes are from Ultimate Guard, it was only logical to look at a solution offered by them as well. That leads me to the Ammonite backpack from Ultimate Guard, which allows me to store a fair few deckboxes in there, alongside my laptop, a binder, and many other things I might need on the go.

While the backpack isn’t the cheapest solution, it is a lot cheaper than having to replace your entire collection since your cards were tumbled around or got wet. Still, there are cheaper solutions out there for people with less money to spend on bags. This one suits me well, since I can store a mat case alongside several smaller deckboxes and an Arkhive in there, which was my loadout for Con of the Rings 2019. There are several other configurations that you can use, making it very flexible in use. The backpack is sturdy enough to survive a fall, and can only be opened when off of your back, meaning that no-one can steal your precious decks from behind.
The backpack isn’t perfect though, and you really gotta know what you’re buying into. The lack of a pouch for a waterbottle is one of the things I would like to see in a next version of this backpack. But the backpack survived a convention and I had plenty of stuff for both flights and the con itself, so take from that what you will.
Playthrough Logs
I and many other players log our playthroughs as we win or lose a game. While some may use online tools for this, I went with a physical notepad for logging my wins and losses. In this notebook I log the date, quest, mode (Easy, Normal, Nightmare etc), number of players (if more than one, I also log the name of the other players), whether I won or lost, final threat, and the hero line-up that I used. At the end of the year, this allows me to put all of this data into a spreadsheet, and see some interesting statistics of my year with LOTR LCG. Things like Win-rate, what quests I ended up playing, what my favourite hero was, and what my average threat was when a game came to an end, is all noted and compared to other years. This is all done for personal reasons, but I like how I can review the entire year by going over my playthroughs this way.
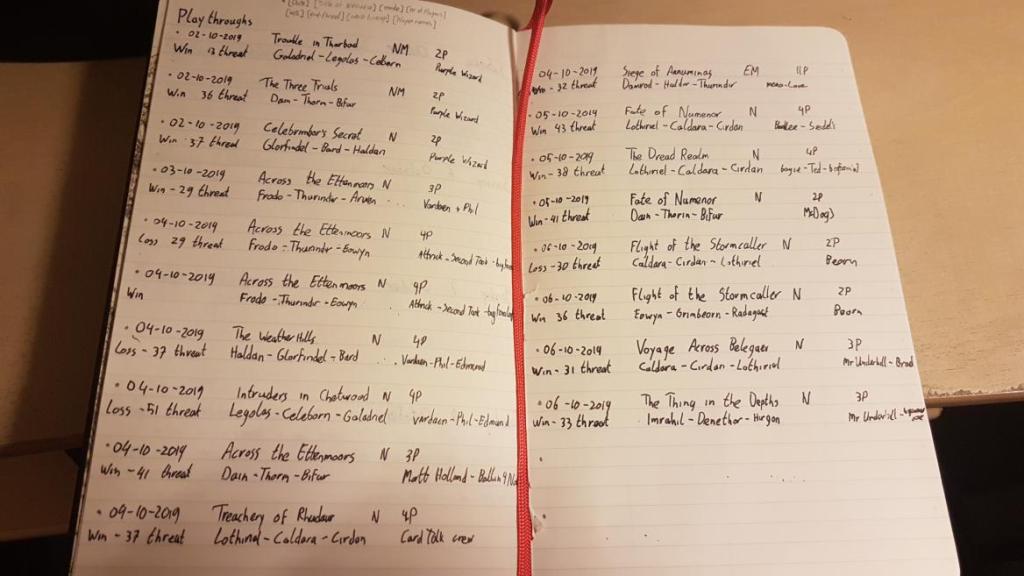
For the notebook, I started with a small A6 Moleskine notebook, but have switched to a black, hardcover notebook to log my plays. I will also log them in other notebooks when I am on the go, but will duplicate the playthroughs in the black notebook at the end. It also usually comes with a photo of the final boardstate, which I tend to frequently upload to Discord or Twitter. I would encourage everyone to keep track of your playthroughs this way, as it can reveal a lot about how you play this game (favourite spheres, favourite quests, etc).
Collection logs
The game as a whole contains a lot of expansions. So many in fact, that it can be difficult to keep track of what you own and what you are still missing. Especially with infrequent reprints of the game, you will want to know what parts you already have, and what you still need to complete your collection. For this, I made a document where I can track all the official expansions, including the alt art heroes, the official playmats, the Print on Demand scenarios, and Nightmare scenarios. Colour-coding the bubbles gives me a clear overview of the pieces I’m missing.

I would encourage people to create their own version of this for their own collection, which is why this version isn’t publically available. In case you want to adopt this one, there is a blank copy to be found in the Patreon-exclusive folder where more graphics like this are stored. By supporting the blog, you gain access to this folder and a lot more goodies, all the while supporting us here!
Miscellaneous
Other than everything I have talked about in this article, I also have a few items that are currently not used for anything other than decoration. These items are still game-related, so I thought I might as well mention them here.
The first is the Cardboard of the Rings 2018 swag, which was the wooden box containing 3 cardboard deckboxes. The back of these boxes have a 3-panel artwork of the Conflict at the Carrock. While the deckboxes are great, I am not using them at the moment. As I mentioned before, I have more than 3 decks built at the same time, meaning that I would have to divide the decks between different boxes. My Superhive works fine, so I am not using the boxes right now. Instead, I have the art displayed on the top of my bookcase, making for a great piece of art to look at.

Speaking of art, I also won an artprint of the Mithlond Sea-Watcher during a raffle of Con of the Rings 2019. I intend to frame this piece and hang it up on the wall, but for now it will remain on top of the bookcase as well in its protective plastic.
I also have a Pokemon TCG deckbox that is being used for my storage of extra sleeves. I bring this box with me to conventions just to have enough sleeves with me to sleeve any new cards I might receive. Having a dedicated box for this helps out a lot. It also fills up my Nightmare Arkhive, keeping everything neatly stacked against each other until I expand my Nightmare collection.
And there you have it, a full article on my methods on storing the various parts of this game. I must say that this article feels like the definitive version, although some changes might be made in the future as my collection continues to expand. Especially when it comes to Nightmare scenarios and the Collector’s Edition, I find that my storage solution isn’t yet ready for them just yet. Should I ever get more than my boxes can handle, I might consider expanding my solutions and updating the article accordingly.
In the meantime, I hope you have enjoyed this article and have learned something new when it comes to storing the game. I am always interested in other people’s storage solutions, so feel free to contact me with your solutions, and I will see if I can put them up on the Storage Hub. If you have any questions, be sure to post them in the comments below or reach out to me over any platform you can find me at.

Would love to get a list of what goes into what pocket for your binders.
I have everything released to date (except nightmare stuff) and want to set up the Sphere binders, but only add the cards as I play through the packs.
Knowing where to leave the spaces in the 9 card pages (as I haven’t opened all the packs yet) would really help me set it up once and for all.
Happy to make a Patreon donation to support you and the site.
LikeLike
I currently have updated my binders with placeholders for the final two packs that should be released soon, so everything is in optimal order right now. I have changed my layout slightly, to better fit the back end of my binders. Instead of 3 copies of a card in one pocket, most of the events and all attachments are now in one row per title, so that I can easily see what cards are currently in the decks. Didn’t have enough space for the allies as well, but I optimized their layout since the last video as well.
I plan on making another flip-through video once I receive Land of Sorrow and Fortress of Nurn, as I plan to take apart my decks and put everything in the binder at that point before crafting new decks. I will update it here once I do.
If I were to make a video of it right now the pages wouldn’t be as complete. Depending on when the packs come out, I expect to have a video shortly after the release of Fortress of Nurn.
And Patreon support is always welcome. I am still figuring out when to make this year’s loot, but signing up now will qualify you to receive some.
LikeLike
Update on this, I have added a new link to a video of me flicking through the binders now that I have made space for all cards including Fortress of Nurn. I also optimized the way I stored the cards to leave as little space in the binder as possible: https://www.dropbox.com/s/kp7dopgnllch587/Binders%20up%20to%20Land%20of%20Sorrow.mp4?dl=0
LikeLike