Ok, ok, so maybe those garbage bags weren’t the perfect solution. A ‘quick’ update then on me going back to my usual storage
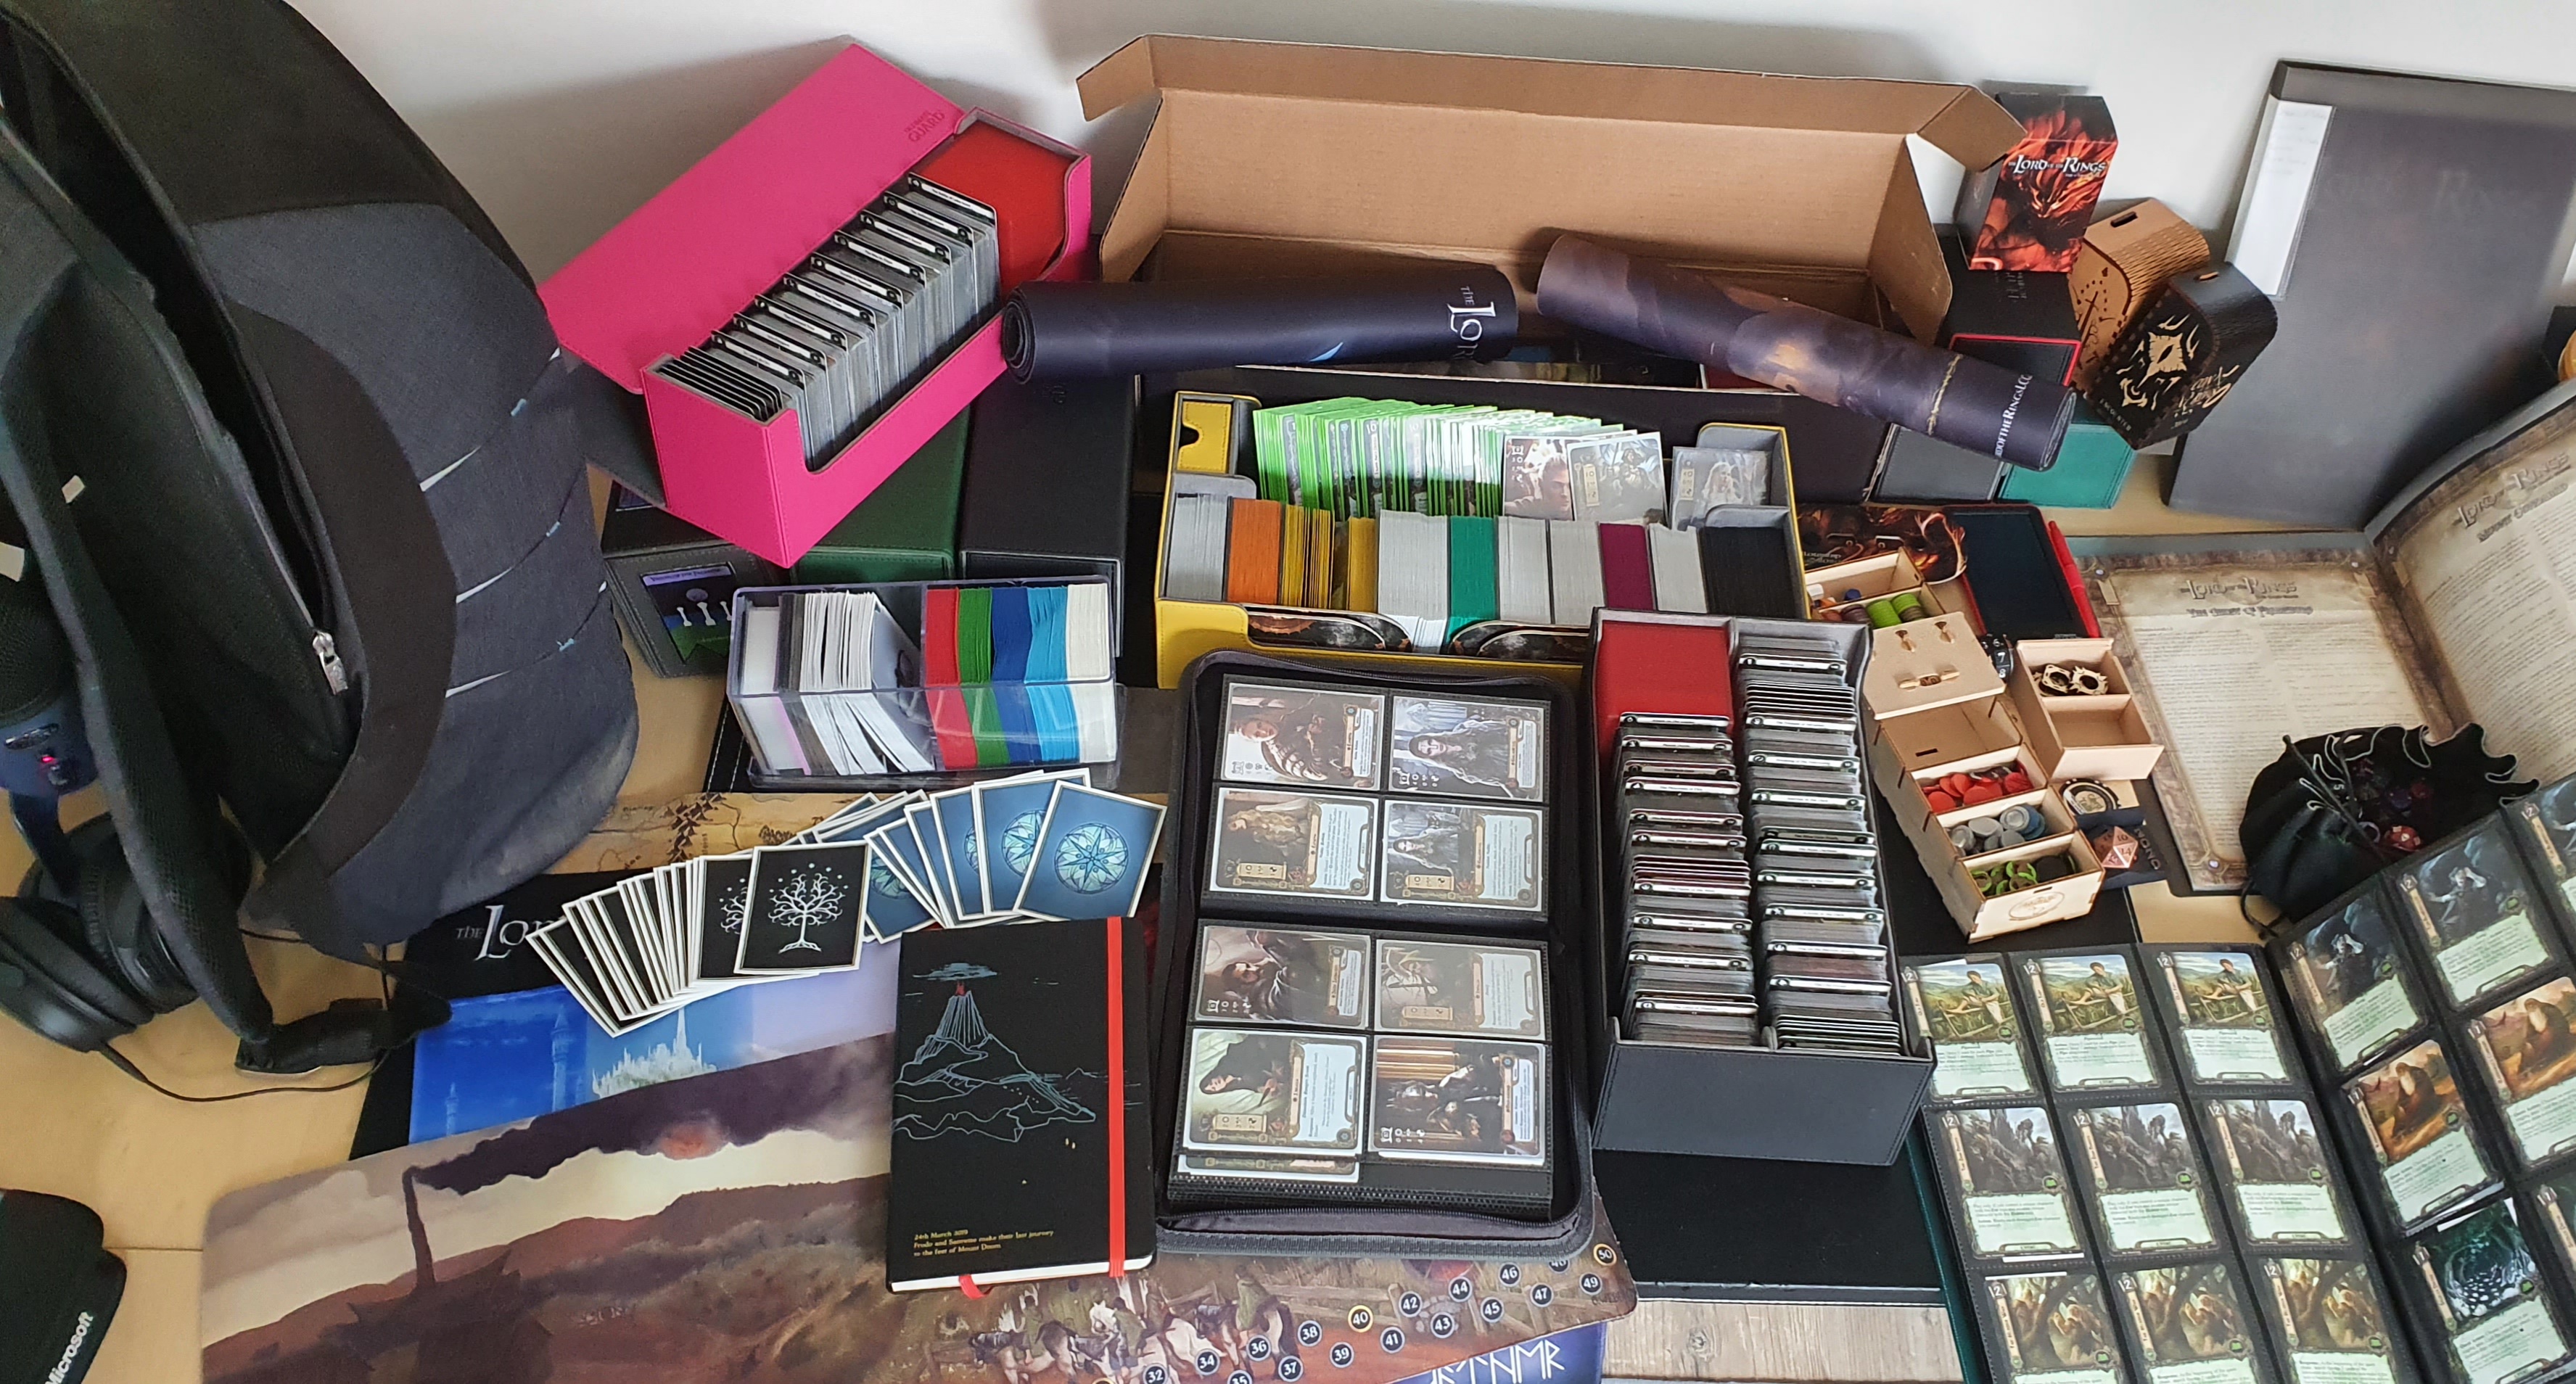
About 1.5 years have passed since my latest update to the storage solutions. Last time I got back from Con of the Rings with a lot of stuff, this time I have just spent 1.5 years collecting and improving a lot of stuff. There are plenty of similarities with the previous solutions, so it’s not a total overhaul. However, I collected many Nightmare packs since then and an additional cycle, more PODs, and a lot of other stuff. So this update will hopefully be informative for completionists like me looking to store their cards per cycle, go with binders for their cards, and are willing to spend quite some money on storage.
New this time will also be a summary before I start in earnest, which will also link to all the items that I use, as long as I can find links to them. This should hopefully help to copy my solution or a similar one. Note that this does not include any gifted items to me for my support to other creators. This is applicable to the Staging Area playmat and progress tracker from Cardboard of the Rings. If you have any questions about the solutions I use, feel free to go to the comments, and I’ll be sure to answer those questions quickly.
Summary
- Encounter cards
- Boxes: Ultimate Guard Arkhive 400+/800+
- Sleeves
- Quest cards/Rules cards: Ultra Pro Pro-Matte transparant sleeves
- Encounter cards: Ultimate Guard Precise Fit sleeves
- Dividers: Tesseract Games
- Original packaging: IKEA 2×4 Kallax unit
- Player decks
- Box: Ultimate Guard Superhive 550+
- Sleeves
- Heroes: FFG One Ring sleeves that are no longer in print
- Alt art heroes: Dragon Shield Matte Silver sleeves
- Decks: Ultra Pro Pro-Matte sleeves in various colours
- Custom Art Sleeves: Dragon Shield creator
- Other player cards
- Binders
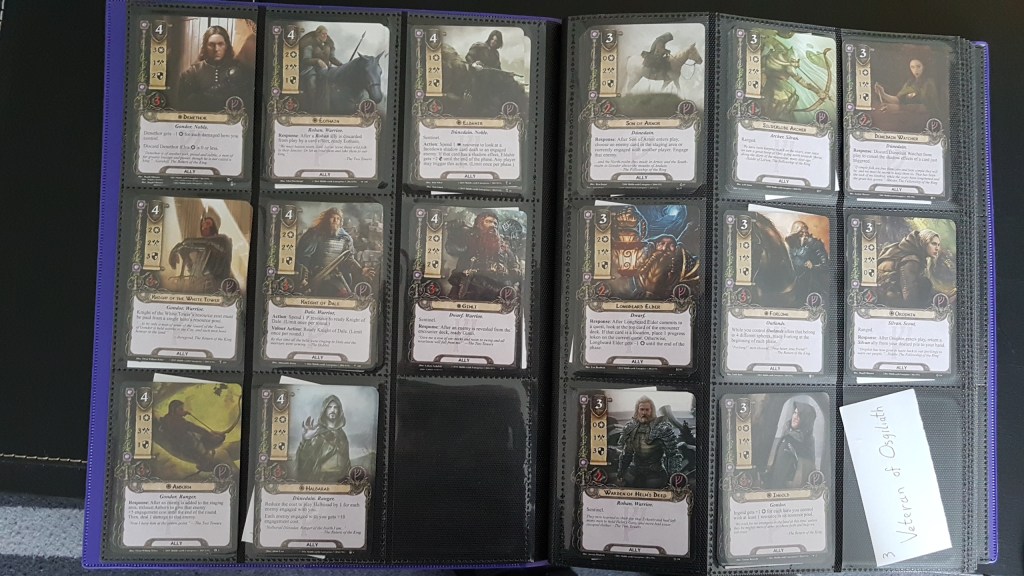
- Heroes: Ultimate Guard Zipfolio 160 – 8 Pocket
- Spheres: Ultra Pro Pro-binder
- Binders
- Rules inserts: No link, but you can use other folders to hold them
- Tokens and trackers
- Token bank: Broken Token Long Bits Box (Con of the Rings printed)
- 3D printed tokens: See this article
- Wooden tokens: Custom made for Con of the Rings, so not available anymore
- Threat tracker: MtG rotation life counter. Available through various portals, but here’s Amazon.
- Dice: Various dice I’ve collected over the years, find some polysets or life-counters at your FLGS
- Playmats
- Official playmats: From Fellowship events and the community. You can sometimes find some on Ebay
- Unofficial playmats: I made mine with Inked Gaming, no idea what COTR used.
- Playmat storage: Fellowship 2020 box, but also Ultimate Guard Mat Cases
- Playmat display: Ultra Pro Toploader
- Storage on the go: Ultimate Guard Ammonite backpack
- Playthrough logs: Moleskine LOTR book, no longer in print I believe, but you can find some on Ebay
- Collection log: Made myself in Google Drawings, blank version is available to Patreon supporters.
- Miscellaneous
Encounter card storage
Cycles/PODs
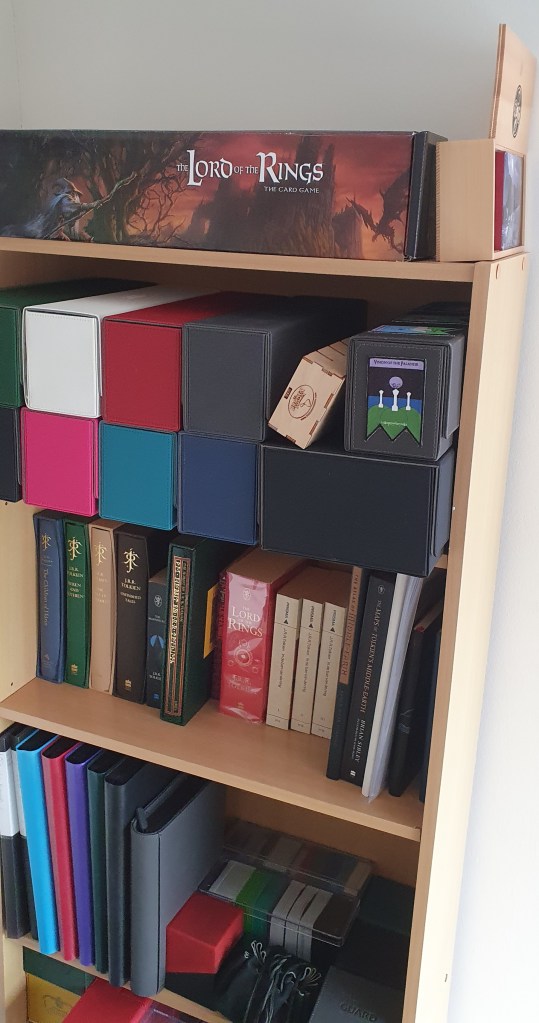
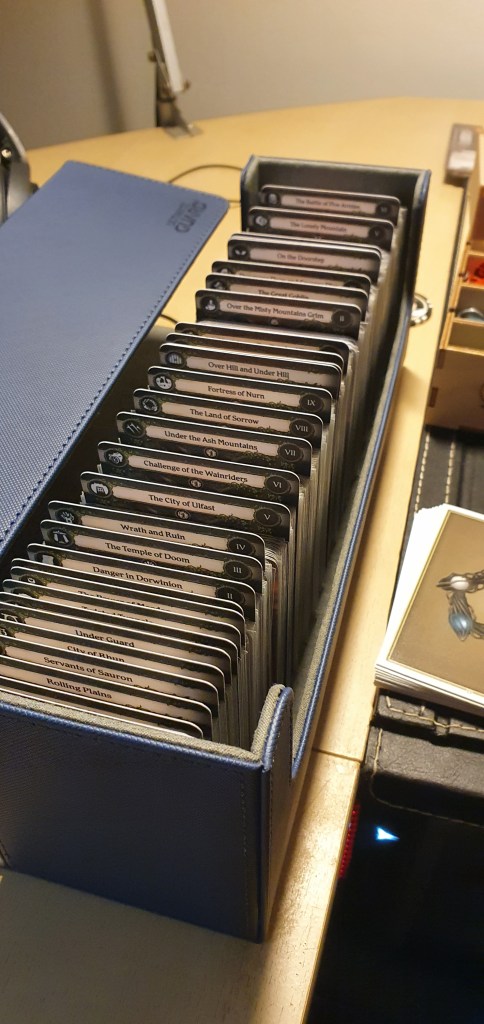
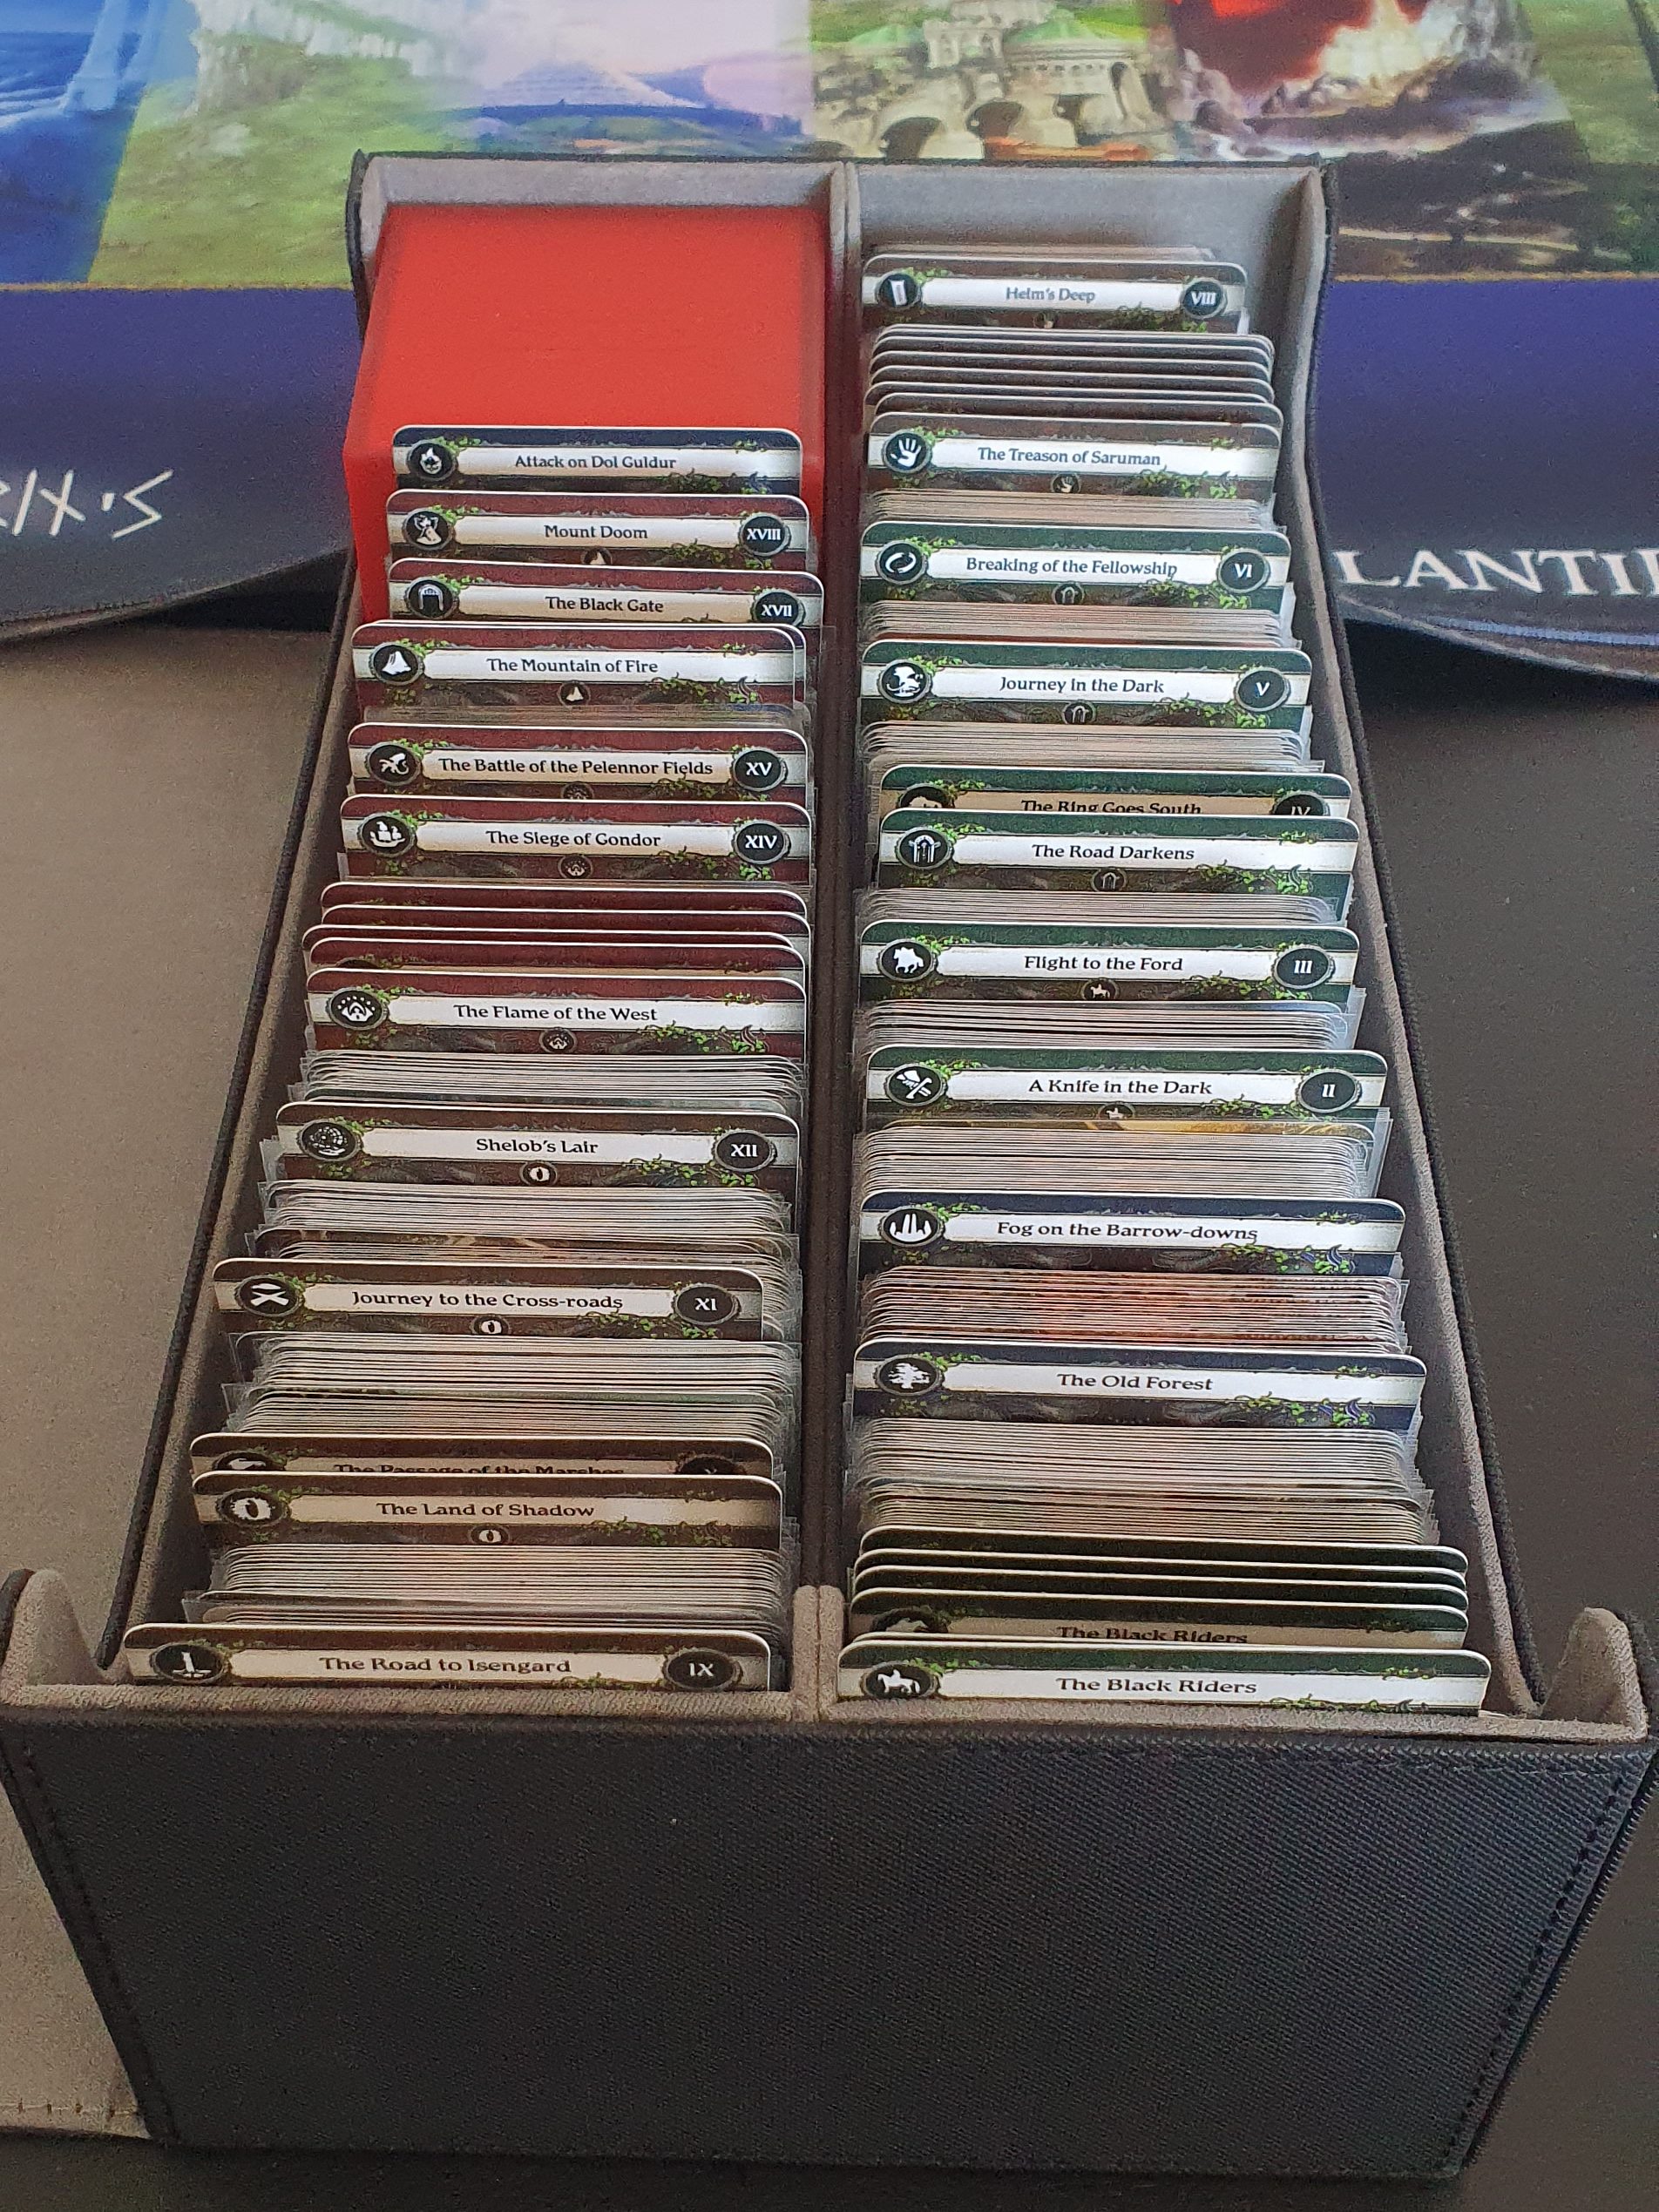
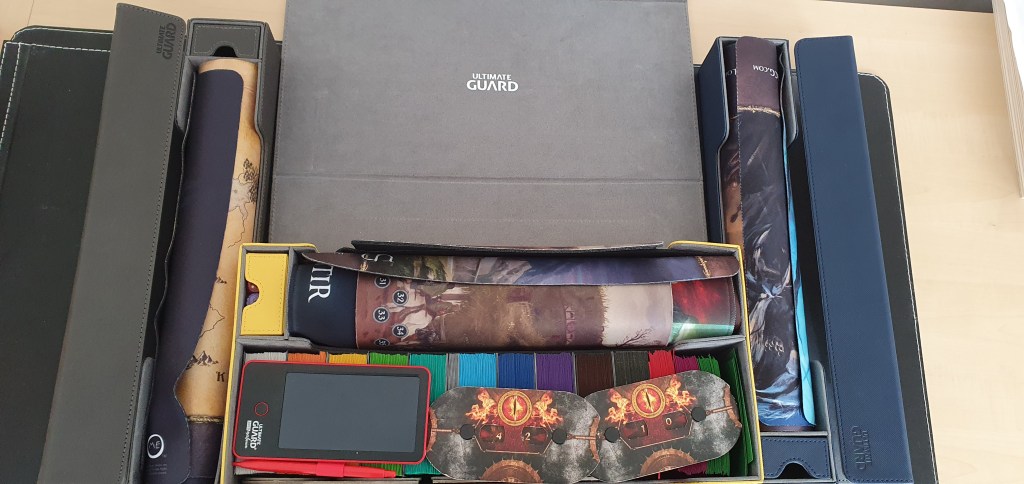
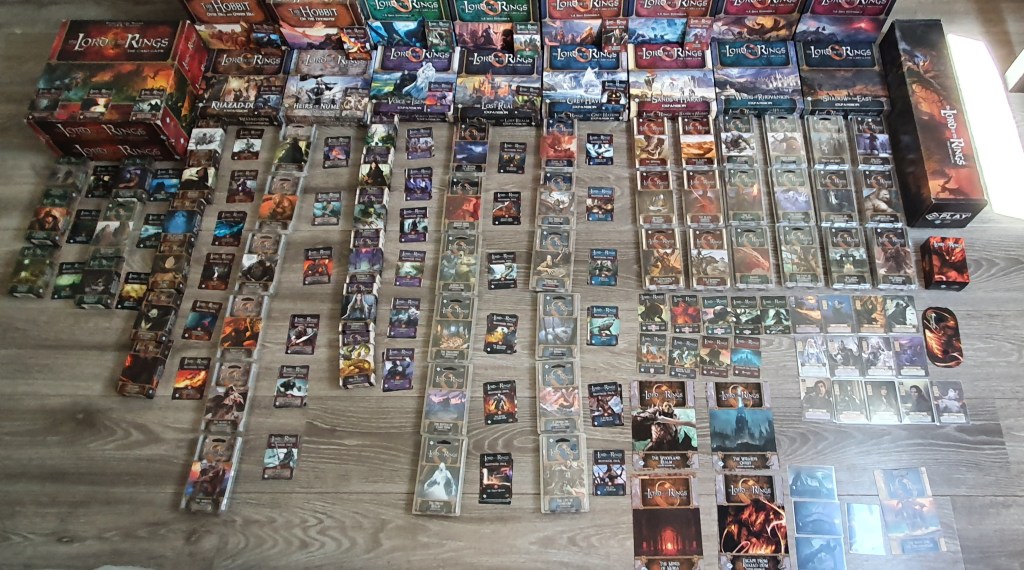
I was using Ultimate Guard Flip ‘n Tray boxes to store my cycles in the previous solution. I had one spare Arkhive for my POD expansions, but that was it. Since then, I have been purchasing a lot more Nightmare cards and came to the conclusion that the old boxes were too small to store a complete cycle (sleeved cards) with the corresponding Nightmare decks. And after I bought new dividers to replace my handwritten notes, I found that the dividers were too tall for the Flip ‘n Trays. So I pulled the trigger, bought 8 Arkhive 400+ boxes in different colors, and spent a day putting my collection into the larger boxes. These Arkhives now hold one cycle with room to spare for a complete NM set of the same cycle. Even better, there is still some space left in the Arkhives after that. You could use this space to store smaller deck boxes (Sidewinders or Boulders, for example) or use it to store your rule sheets for that cycle to have everything in one place. Since I already have a solution for my sheets, I opted to include some matching Print on Demand scenarios in the boxes. The following PODs are stored with the following cycles:

- Green Arkhive: Shadows of Mirkwood cycle + NM + Wizard’s Quest + The Woodland Realm
- Black Arkhive: Dwarrowdelf cycle + NM + Escape from Khazad-Dum + Mines of Moria
- White Arkhive: Against the Shadow cycle+ NM + Massing at Osgiliath + Stone of Erech
- Pink Arkhive: Ringmaker cycle + NM + The Battle of Lake-town
- Red Arkhive: Angmar Awakened cycle + NM + Siege of Annuminas + Murder at the Prancing Pony
- Petrol Arkhive: Dreamchaser cycle + NM + Ruins of Belegost + Hunt for the Dreadnaught
- Grey Arkhive: Haradrim cycle + Ered Mithrin cycle
- Blue Arkhive: Vengeance of Mordor cycle + The Hobbit Saga + NM Hobbit Saga
As you probably noticed, I had to improvise a little with the final 2 boxes as those quests do not come with Nightmare cards. I was able to store both the Haradrim and Ered Mithrin cycle in the same box, but since there is an odd number of cycles, I didn’t have anything for the final box with the Vengeance of Mordor cycle. So I took the Hobbit Saga and the corresponding Nightmare packs, and those fitted, albeit with a tight squeeze. I could not put the Battle of Lake-town POD in the same box, so that’s the only one a little out of place in the Ringmaker cycle. For those of you wondering about the Old Forest, Fog on the Barrow-downs, and Attack on Dol Guldur PODs, those are stored with my Saga collection, which I will come back to.
Before I cover the sagas, I do want to explain the extra peripherals I have in these boxes and the way I store the cards in them. I use the Tessaract Games vertical dividers, which label the quest’s sequence, name, and icon in a piece above the cards. The corresponding quest comes after that. The quest cards come first, which are sleeved in standard size transparent sleeves so that they are a little bit larger and easier to pick out from the rest of the cards. The other encounter cards are sleeved in transparent inner sleeves (or precise-fit, whatever you want to call it). The only exception to this is some miss-cut NM Shadows of Mirkwood cards that are too large for these sleeves. After the divider and the quest cards, the regular encounter cards come first, and then the NM rules card (again sleeved in a standard-sized sleeve) acts as a barrier between the normal and NM cards of a scenario. After the rules card, any additional quest cards are placed, followed by the NM decks before moving on to the next scenario, starting again with a divider.
Saga’s

When puzzling with the new Arkhives, I found out that the boxes were too small to hold the complete LOTR saga plus the corresponding NM and POD expansions. And since I did want to have at least all of the LOTR saga in one place, I had to get a bigger box. Luckily, Ultimate Guard has a double-sized Arkhive 800+ box that allows you to store 2 rows of cards vertically. This was more than enough space for my Saga collection and even had to put some tension on the second row with a deck box to prevent it from falling over. If we even get Return of the King NM quest, those will replace the deck box, so at least there is room to grow.
I do not store my Fellowship or Baggins sphere cards in these boxes, but I do have my Treasures and Boons/Burdens in the boxes. These cards are stored per expansion after the divider of that expansion. This way, you do not have a large blob of Boons in one place, but you can easily pick them up if you are going for a non-campaign mode version of the quest.
Campaign cards are stored in the same way as the Nightmare rules cards and are placed before the quest cards of that scenario. Campaign mode is, of course, optional, but I have the space for these cards, so why not add them to the box? While the same can be said for the Fellowship and Baggins player cards, I like to keep my player cards in a binder, which is where they will remain for now.
Player decks
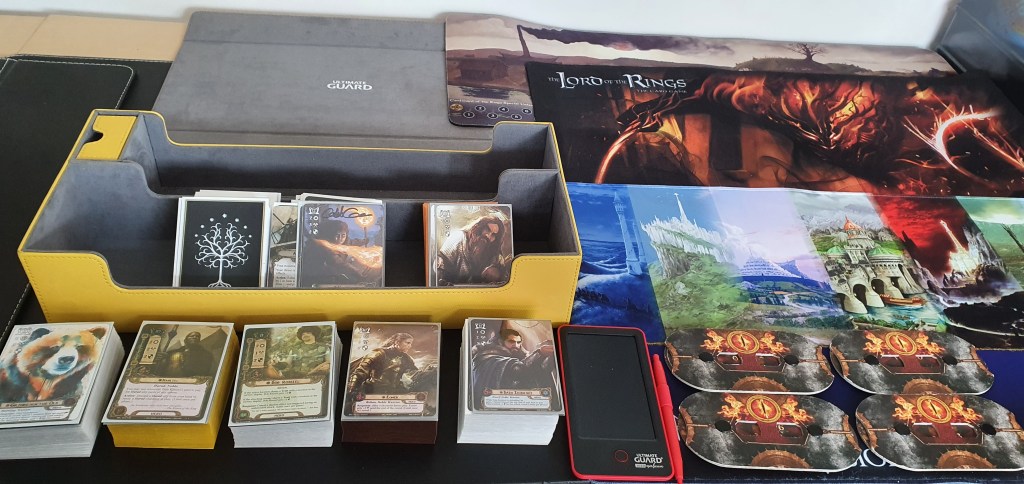
For my player decks, I continue to use my Superhive 550+ from the previous solution. This stores more than enough decks for me while also keeping some tokens, playmats, threat trackers, and a small notepad inside. It really is all I need if other people are bringing the scenarios. The box holds up to 3-4 mats, depending on the material and on how tightly you roll them. The box also holds up to 550 sleeved cards, which translates to a max of 11 decks. In reality, you will find that you tend to go for a max of 10 decks, as your heroes might need some extra space. You can also use that space for a bigger deck with the Perilous Voyage deck or the Loot deck from the Burglar’s Turn contract.
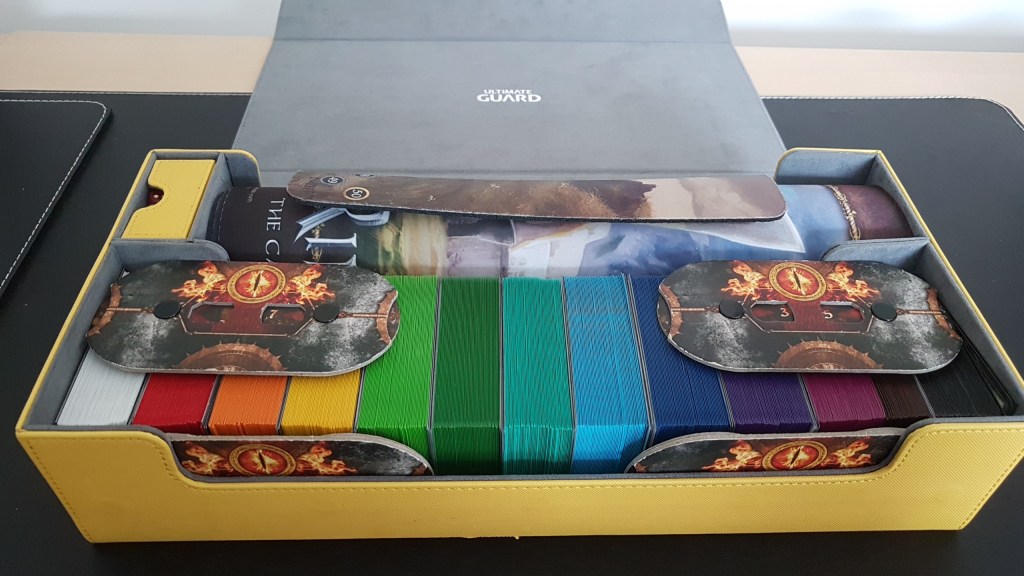
The player decks themselves are sleeved with unique sleeves per deck. This allows me to identify which card belongs to which deck quickly and helps a lot should the box ever tip over and spill the contents everywhere. Each deck is separated with either the hero cards in slightly larger sleeves (FFG “standard size” compared to the “standard size” of Ultra Pro) or by plastic dividers that you can just buy in bulk. If you want to go really fancy, try to find some dividers with a space where you can write down the name of the deck. I tend to remember the decks with the colour of their sleeve.
The Superhive also has a slot for playmats. Here I store 2 of my regular playmats (I tend to rotate which ones I use) and my staging area playmat from Cardboard of the Rings. If I really wanted to, I could fit another playmat on the roll, and it would still fit in the box, but it would be a tight squeeze. The card slot of the Superhive also has enough space to hold 4 threat trackers on the side, for which I still use my regular threat trackers that came with my (older) Core Sets. I generally use a different tracker for my threat, but in case you need to keep track of something else, you have some spare trackers. This setup also allows for an easy multiplayer game right out of the box.
The other items in the box include a digital Life Pad from Ultimate Guard. This is a small etch-and-sketch notepad on which you can record some stats if you need to write them down. This is really useful in case you have heroes or allies like the Guardian of Esgaroth, who have a ton of buffs on them. While you could load up the cards with tokens, a small notepad like this is easier. The token tray in the box holds some of my metal dice. I don’t generally use them in the game, as I tend to have a dice bag available when playing at home. But when you are playing somewhere else, a spare polyset of dice can come in handy every now and then.
Player card storage
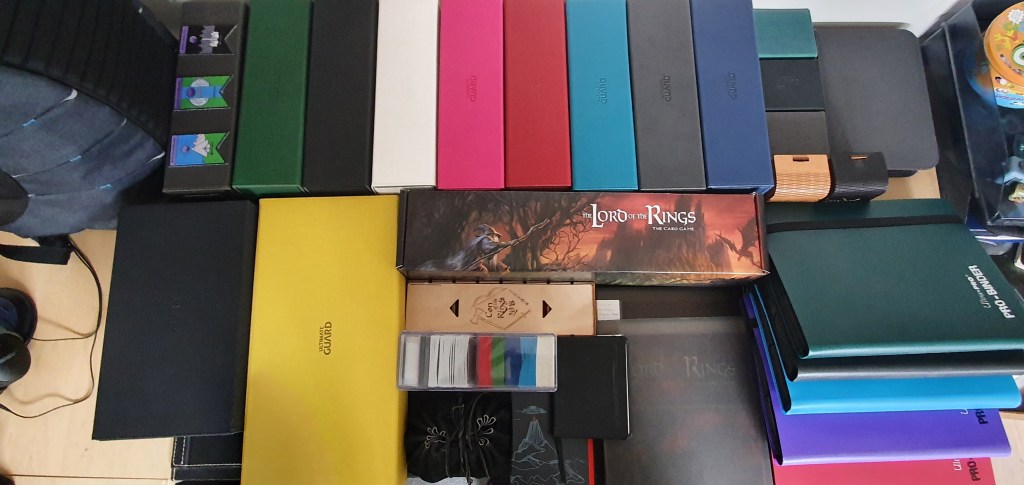
While I pride myself on being able to make 12+ decks at the same time, this still does not include every card in the card pool. Some cards are still left out, and some just never leave storage because why would you ever run The End Comes? For all of these cards, I have a selection of 6 binders to keep the cards in.
Heroes
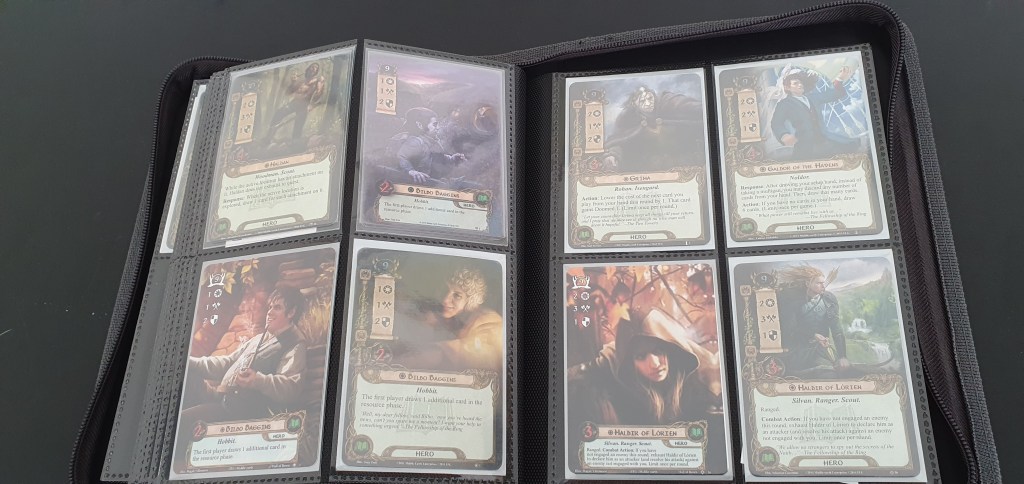
There are over 100 heroes in the game at the moment. With many people making their own alt art cards or finding some alt arts of past conventions, you will quickly approach 120 cards that you can choose from for your heroes. In order to store all of these cards, I bought an Ultimate Guard 4-pocket Zipfolio, which has enough slots for all your heroes, with some room to spare in case you have extra heroes. The heroes in my binder are stored by sphere (Leadership, Tactics, Spirit, Lore, Neutral) and then by threat cost. After that, I tried my best to store them in chronological order, which I will be doing for the other binders as well. In the 2020 Fellowship kit, there were some dividers included. Since I still had some space inside the binder, I included the dividers in the binder as well and placed them in front of each sphere. While this video might be outdated slightly, it does go over the contents of the entire binder with all hero slots filled in.
Neutral
The Neutral binder is a black Ultra Pro Pro-binder that has 9 pockets per page. Since there are far fewer Neutral cards compared to the spheres in this game, I had a lot of spare room in this binder. That’s why this binder also includes the Contracts, Fellowship Sphere, and Baggins Sphere. But even with all of those cards in the binder, I still had pages left open. So I took all the “title cards” for the Print on Demand and Nightmare decks and tucked them into the binder as well. This gives you a nice overview of the packs you already own and displays the artwork as well, which sometimes isn’t found in some of the encounter cards. Since there are 9 POD scenarios with cards small enough to fit in the pocket (not counting Dreadnaught and the Custom Encounter deck scenarios), it makes for a nice page of all the older PODs. It’s a shame that the Nightmare packs for Deluxe boxes were bundled into one pack of 3 quests after the Core Set. Otherwise, I could have dedicated one page per cycle of Nightmares in the binder. But now I just put them in order, filling out the final parts of the binder. The binder also includes the full-art cards given out as a pre-order bonus. I only own the Escape from Khazad-Dum set, but in case I find more of them, I will be displaying them in this binder too!

As for the Neutral player cards, they are stored in rows of three. I had enough space in the binder, so no cards are doubled up. Instead, one row in the binder is dedicated to each card by title. Only for cards that I have more than 3 copies of (ally Gandalf) do I have to double up on. The organisation of the player cards is first by type (side-quest | ally | event | attachment) and then by descending cost. The three Neutral no-cost allies (Ranger of the North, Eagle of the North, and Tom Bombadil) all fit nicely on a single page together. For an overview of this binder, see this video. I do have to disclose that I have changed the layout since recording this video, so I might have to re-upload it someday soon to also show off the Nightmare art cards.
Spheres
The four main spheres of the game are each stored in a separate binder with the sphere’s colour. Each of the binders is an Ultra Pro Pro-binder, exactly the same as for the Neutral cards. I found these to be a durable yet cheap solution for storing in binders, and while you lack the capacity of a D-ring folder and the ability to add/remove pages at your will, I never lacked space with these binders.
Each binder starts with one of my own wooden cards, displaying the card back for the sphere. It’s just a basic touch, but I prefer putting it in my binder over throwing the card out. I do not use the Fellowship 2020 dividers like with my heroes because otherwise, I would have to restructure my entire binder for that. Now, each binder starts with the allies, sorted high cost to low, and then in chronological order, with saga cards after the cycle cards. These allies in all four binders are stacked on top of one another to save space. The Binders do not have enough space to hold each card by name per row. That’s why the allies are stacked in the same pocket. The events are stored after the allies, and from here, you can start to dedicate one row per card by title again, as I did with the Neutral binder. Attachments are next in line, and on the final page of each binder are the side-quests. For a full overview of these binders, you can check this video, which holds a complete card pool until the end of Vengeance of Mordor.
One last thing that I should explain with these binders is that I use handwritten notes to mark where each card goes in the binder; these help keep things in order when a large part of my binder has been put into decks. These are just basic strips of paper, but I suppose that you could improve them by making stickers or print a copy of the artwork as a placeholder. That’s too much work for me, but I am glad I took the time years ago to make placeholders for my binders. This way, I can easily put everything back into the binder without messing up the order of the cards.
Sleeves
Player cards

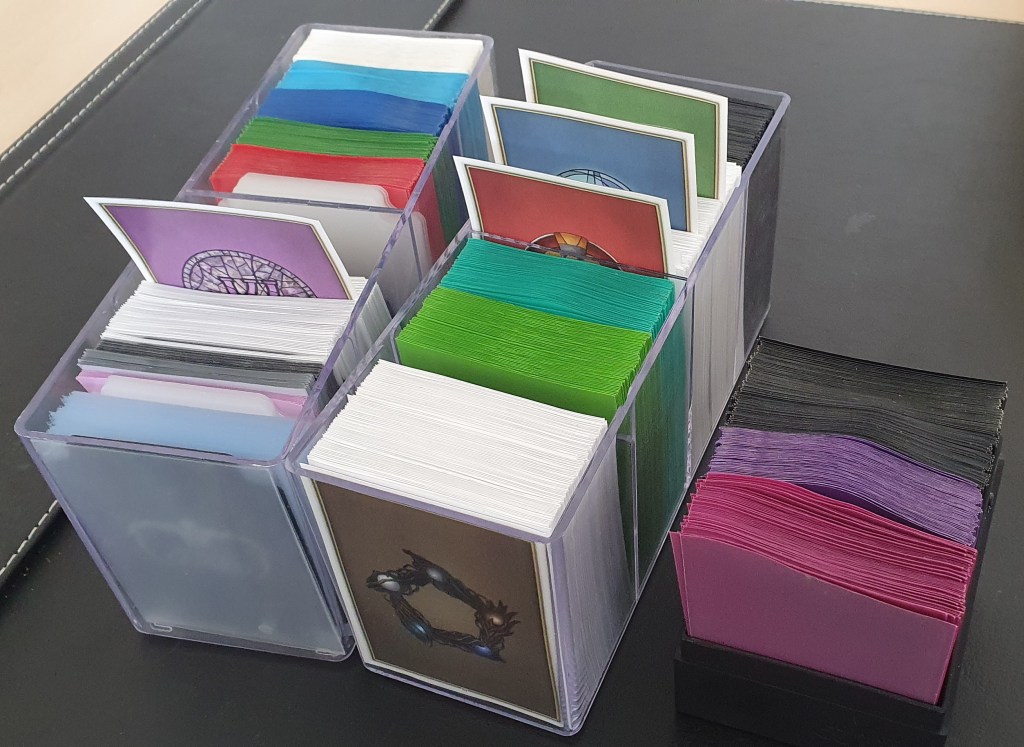
One part of my collection that I am known for is the wide variety of coloured sleeves that I use. Many will remember the wheel of colours that I made in the previous article, which I pasted into this article as well. These sleeves are used for my player decks so I can easily tell them apart. Should my Superhive with 12+ decks ever spill over the floor, then I can easily identify which cards belong in the same deck. Colour coding your deck is a real delight but can also take some time to do if you frequently take your decks apart and build new ones. My player cards are only sleeved with these deck-specific sleeves, so no inner sleeves are used on them. This means that the cards in the binder are not sleeved, as that would greatly increase the thickness and weight of the binders. So when decks are taken apart, all cards have to be removed from their sleeves, and the sleeves themselves are then stored in any spare deck box I might have. I am currently using some transparent boxes that previously held my Saga collection until I switched to the Arkhive 800+.
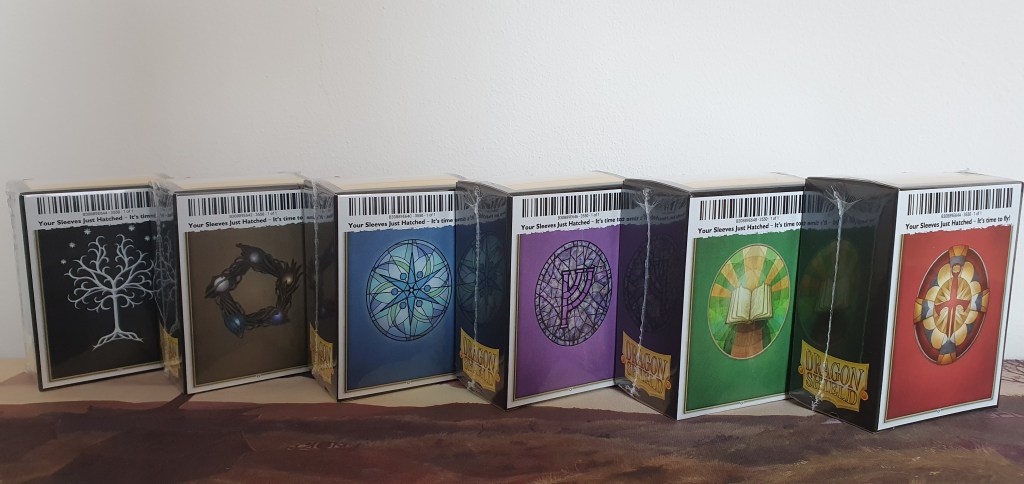
The coloured sleeves are usually Ultra Pro Matte sleeves, but since a few months ago, I have been using some new sleeves. These new sleeves are made by Dragon Shield and have custom-made backs. I ordered 6 sets of these sleeves back in February, and they turned out great! I have one set per sphere, and then one set with the White Tree of Gondor, and one with the rods of the five wizards. The artwork was made by Emily Dillhunt for the LOTR ACG (digital card game), where the artwork was designed for card backs in the game. This meant that the aspect ratio and quality worked perfectly, and I love the detail on these custom sleeves. Each set is quite pricy, though, about €25 per 110 sleeves. So if you are going to copy this, try to limit yourself to just a few sets, and don’t sleeve your entire collection with it. A note with these custom sleeves, though: You cannot escape a white border around the artwork, which ruins my rainbow aesthetic a bit. The sleeves are also slightly larger than the Ultra Pro sleeves, on par with the old FFG sleeves.
Heroes are an exception when it comes to sleeving player cards. These cards are more valuable to me and see a lot of play. Because of this, they are double-sleeved. They are first sleeved with an Ultimate Guard inner sleeve and then with an FFG One Ring sleeve. I got these One Ring sleeves back in the day when they weren’t so rare as they are now. I have a few spares but tend to just use them for my heroes and some select other cards (like the Shadow in the East One Ring player card, which seems fitting). Smeagol is the only exception to this rule, as he is double-sided. For this, I just use a regular transparent sleeve. Unofficial alt art heroes are sleeved in a silver Dragon Shield sleeve, as I won’t have enough One Ring sleeves for each hero otherwise.
Encounter cards
Encounter cards don’t need expensive sleeves, as long as they shuffle nicely and don’t add so much extra thickness to each card. Many people use penny-sleeves, but I have found that those still have a lot of extra plastic to the sides. So I went with a slightly more expensive solution: Ultimate Guard inner sleeves. These perfectly fit each encounter card (though some early print NM cards are a very tight fit) and don’t have any extra plastic surrounding it. These sleeves will be a bit more expensive than penny-sleeves, but if you spread out your purchase of sleeves over the course of 5 years, it’s not that much. My advise to beginning players is to start sleeving your encounter cards early on, so you don’t have that much to catch up on. With every 2 or 3 expansions you buy, you can purchase a set of sleeves, and you won’t really feel the increased price that much. You will notice a significant increase in sleeve quality though, with better shuffling and fewer production errors than cheaper sleeves.
Quest cards and certain objective cards (like Ships) are stored in slightly larger sleeves to make them stand out from the regular encounter cards. These cards are stored in Ultra Pro regular size transparant sleeves. These are a bit larger than inner sleeves, so you can tell the cards apart more easily. These standard size transparant sleeves are also used in some other cases, like with contracts.
Rules inserts

The rules inserts that come with every expansion are used a lot when you first play through a scenario. Once you learn the mechanics, you may no longer need these sheets, so you’ll need a solution for them. If you are saving your expansion boxes’ original packaging, you can store the rules in the boxes and store them by cycle that way. This is a free solution, although it does mean that you won’t have the sheets available quickly. Instead, I got 2 A4 folders with transparent sleeves inside that store the rule sheets well. I fit 2 sheets in every sleeve, which means that I will have to remove some when I need to look at the back of the sheets. But other than that, it is an elegant solution and fills the shelf with my player card binders. You can buy these folders in your local bookstore or print shop, and while they won’t hold all of the sheets in one folder (mine don’t in any case), they are easy to pull out and read either the rules or the narrative from.
These haven’t really changed since the last update, but I do need to balance them out someday because the second folder is only half-filled with rules, while the other is full. I also keep some other things in these folders, like fan mail that I received over the years and the POD artwork for the larger packs (Custom scenarios and the Hunt for the Dreadnaught).
Tokens and Trackers
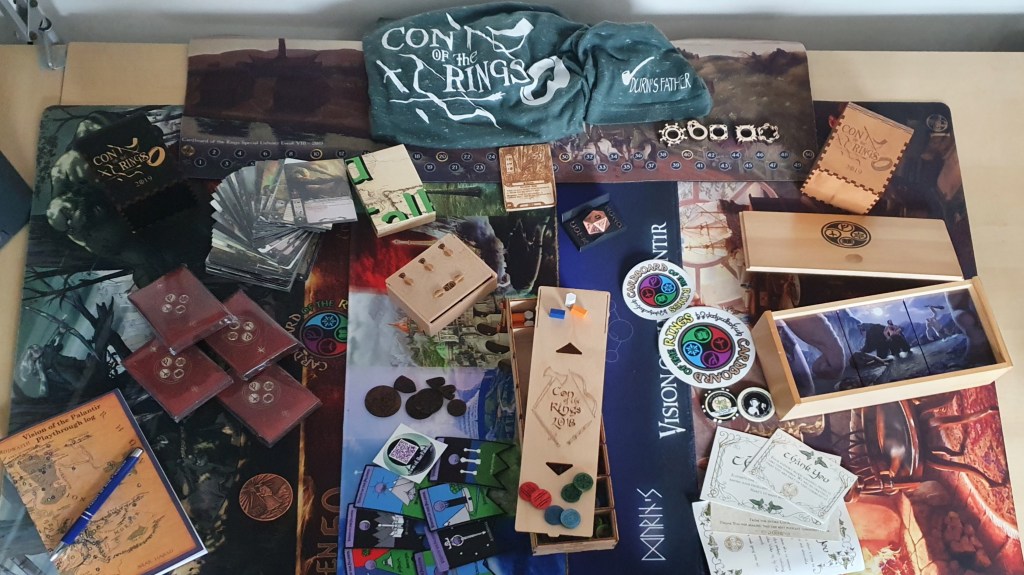
In this game, you will need to keep track of a lot of things. How much threat is there in the staging area? How many resources do my heroes have? What stat boosts does this Dale ally have with all of these attachments on him? While you can use easy tokens in OCTGN to keep track of this digitally, in real life, you will need some tokens and trackers. Luckily, years of collecting has helped me with this. I have a token bank from Con of the Rings 2018 (though it is just a Broken Token deck box with custom engraving).
Resources, progress, and damage
These tokens come with the base game and have served me well for a few years. However, many people will want to upgrade their cardboard tokens after a time, and I found two good alternatives. The first came with my token box. These include wooden tokens for resources, progress, and damage. They are hand-stained with blue, green, and red dyes, which contrast nicely with the laser engraving on them. The wooden tokens are double-sided, allowing for less clutter on your cards when you have, for instance, Steward of Gondor attached to a hero. Resource tokens are either worth 1 or 3 resources, depending on what side the token is facing. Damage is either worth 1 or 2, and progress 1 or 5. These tokens were handed out during Con of the Rings 2018 and are not available for purchase. However, they can easily be made yourself if you have a laser engraver.
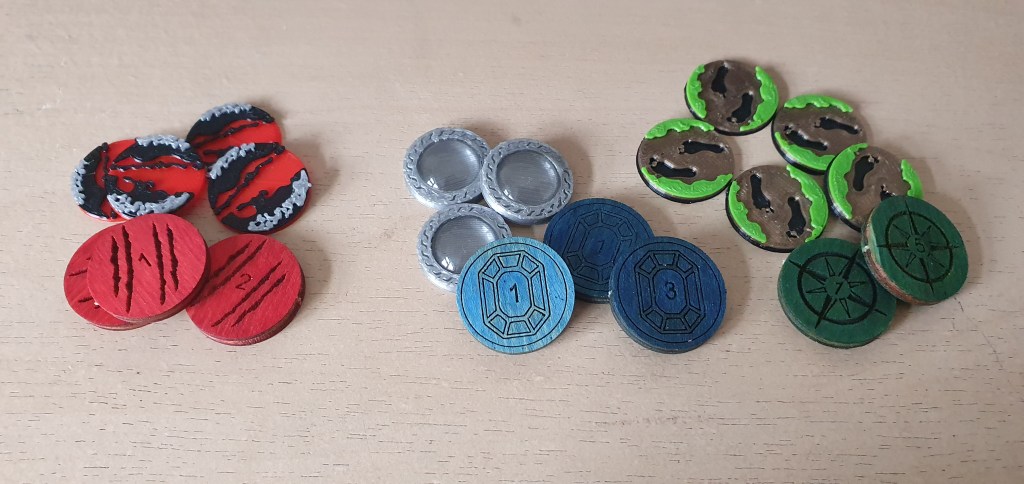
The second type of tokens that I use are the 3D printed tokens that were sent to me to promote last year. The promotional article can be found here, where I go into depth about the visuals and the quality of the tokens. These tokens are not double-sided but are a lot more detailed and nicer than the wooden tokens. I use these 3D printed ones the most until I have too much clutter on a single card.
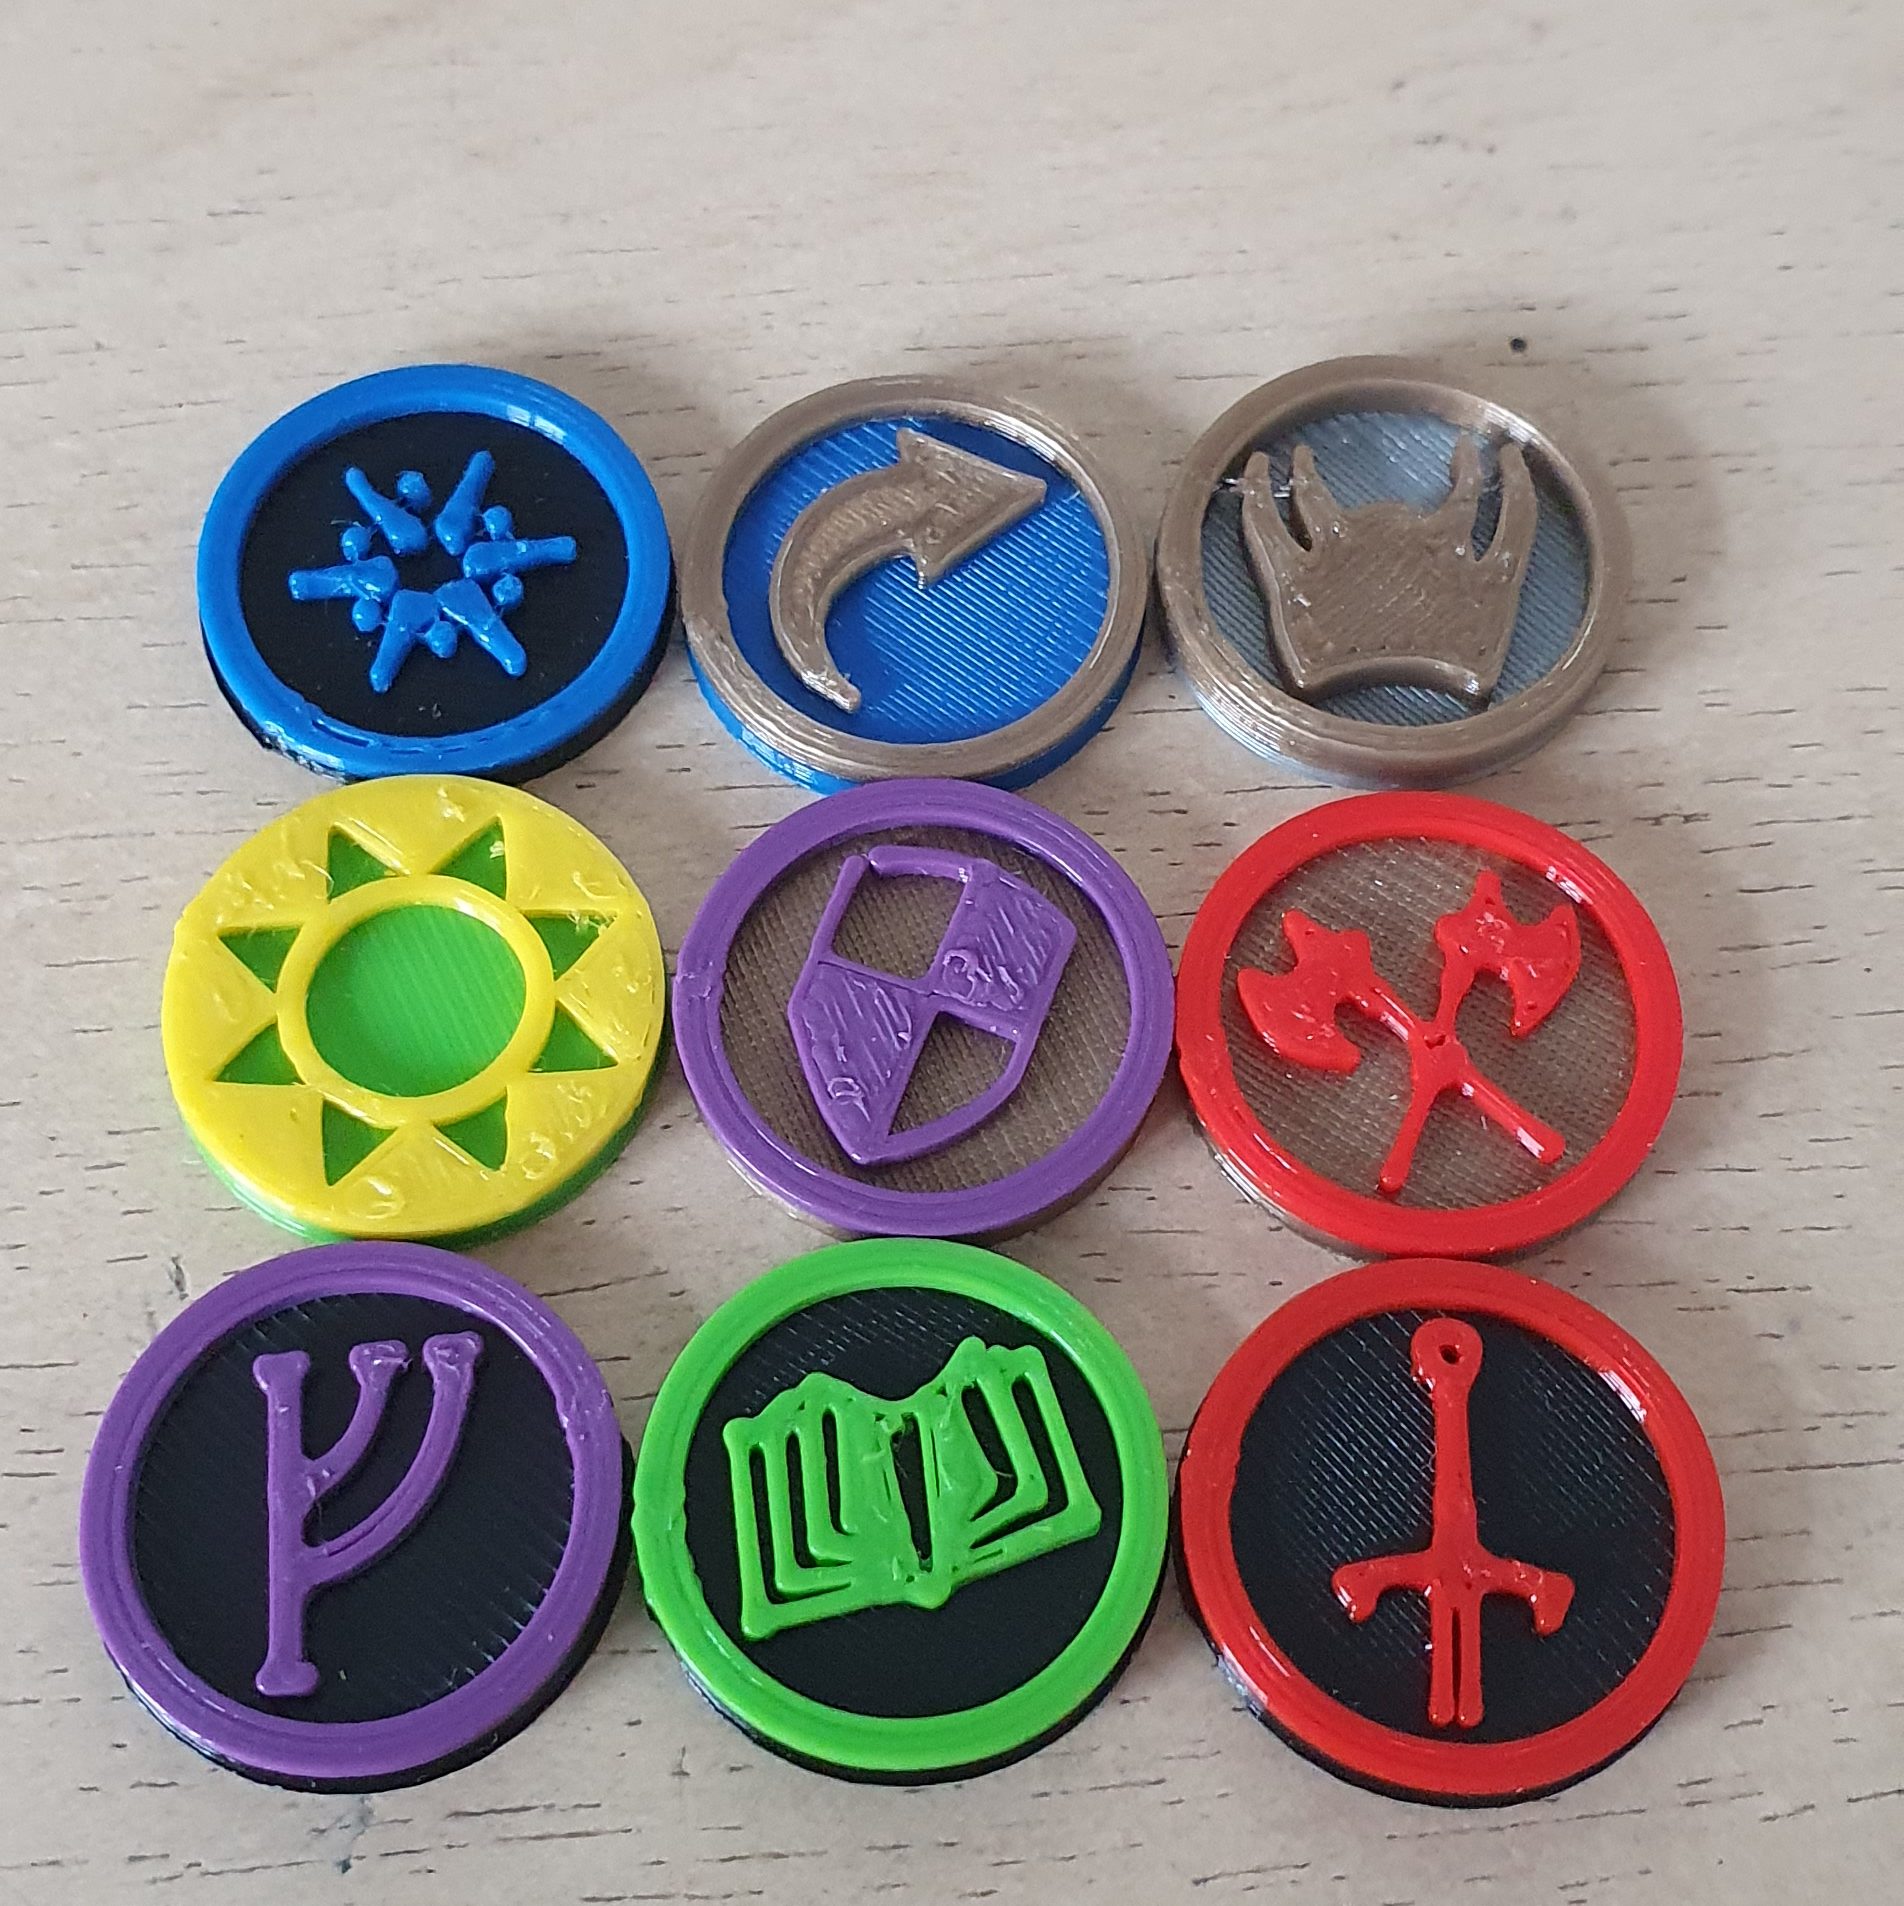
Stat boosts
While the 2018 VotP Loot tokens were a nice idea, I don’t end up using them much these days. Instead, I have been using the stat boost tokens given to me for the promo article listed above. These stat boosts include willpower, defence, attack, and threat, but sadly no hitpoint buffs. These tokens see a lot of play in my games because it is so easy to calculate buffs on certain heroes this way. I might give the stat boost tokens made from coconut husk board another shot someday, as I am still working with the same company. So if we ever have extra panels left over, I might just cut some with my new lasers.
Staging area trackers
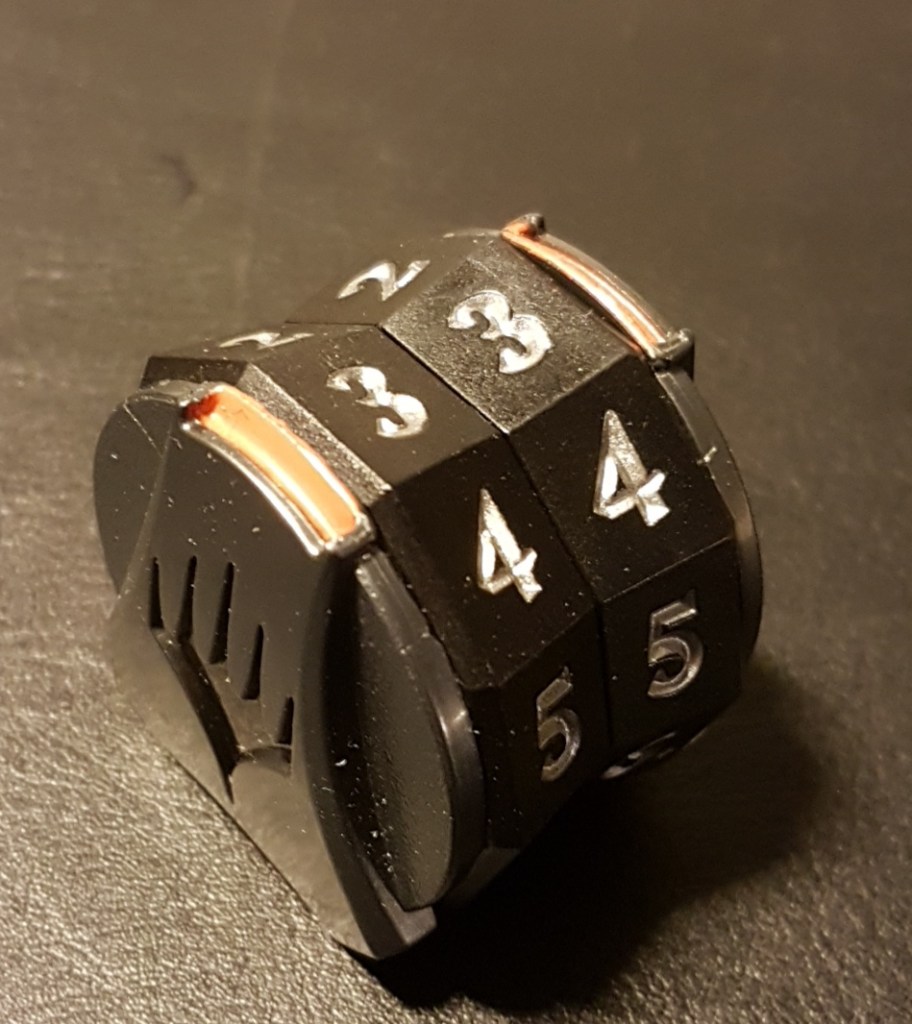
To keep track of progress on quest cards and threat in the staging area, I use the two solutions that Cardboard of the Rings has provided over the years. The first is from their 2020 swag, which is a small stand to put your quest cards on. There is a space there for a large D20 that they also provided. This D20 is made of metal and spins down from 20 to 1 like a MtG life counter does. I use these two items to hold the current main quest card and track the first 20 points of progress. This is usually enough, but any of my other tokens and trackers can help in case I need more than 20 progress.
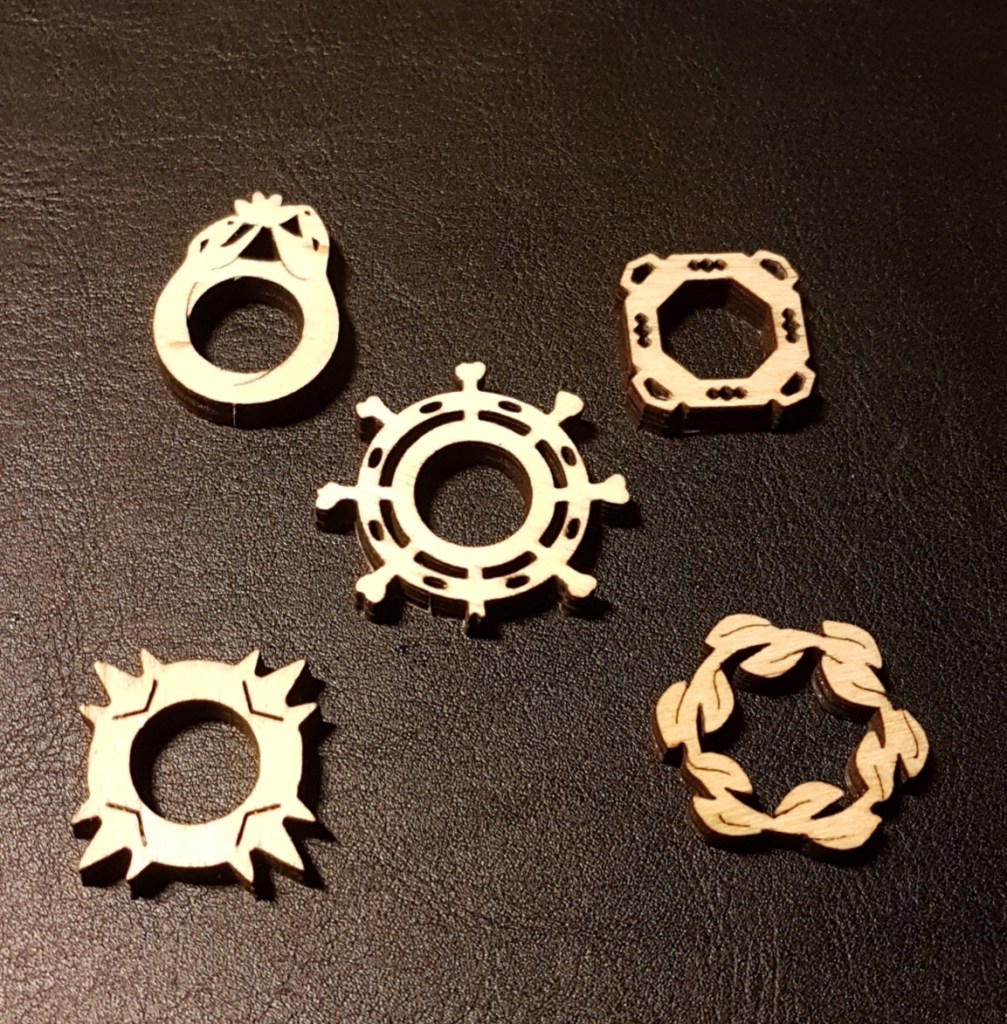
The second useful item provided by the COTR crew is their 2019 staging area playmat. This comes with 5 wooden rings and a long list of numbers up to 50. The rings can be placed on top of the numbers to show how much willpower you are committing, as well as how much threat is in the staging area. The extra rings can also be used for other things, like counting rounds during Helm’s Deep.
Both these items are not for sale but require that you are subscribed to the COTR Patreon 6 months before the swag is handed out. For more info on this and the other loot supplied by other creators, see this article.
Threat trackers
The Core Set gives you 2 threat trackers to start with. Since I have 2 Core Sets (old edition), I have 4 of these trackers, which is enough for a 4 player game. I am still using these trackers to keep track of high numbers, such as my usual threat, but also threat elimination level in quests like Trouble in Tharbad. I store all 4 of these threat trackers in my Superhive, where they fit between the wall and the decks. So when anyone wants to join a game, I can easily give them a deck, playmat, and a threat tracker, and they are ready to play.
Thanks to FFG stepping up their game with more loot in their fellowship kits, I also have a Balrog threat tracker from the 2020 Fellowship kit. I store this one in my Dwarrowdelf Arkhive, and generally use it whenever I need to keep track of some extra stats. Some thematic uses include measuring the threat of the Nameless Fear during Flight from Moria and tracking the damage on Durin’s Bane during Shadow and Flame and Escape from Khazad-Dum.
This is not all the threat trackers I have, though. These cardboard trackers will start to scratch up and get damaged with use. You might want to find a replacement solution for this. I settled on an MtG spindown tracker, which is very compact and allows me to adjust threat easily. It doesn’t take as much table space as an official tracker, which is good for when I don’t have enough table space available (Temple of the Deceived with an Outlands deck can do this to you). The tracker was bought from a local store, but I have seen these for sale online as well. There are also various other trackers you can use for this, but keep in mind you need a place to store them. Smaller threat trackers like the new edition Core Set ones or those from Cardboard of the Rings are easy to bring with you as they can fit inside many standard deck boxes. This allows you to bring them in the same box as your player deck to a night of gaming.
Extra tokens and trackers
Besides all of the tokens and trackers mentioned, I have a few that I use less often. These include the sphere-specific 3D printed tokens from the promo article, as well as the exhaust tokens. I don’t usually use these, though I suppose I could use the sphere tokens to signal when a hero has access to multiple spheres. The exhaustion tokens only ever get used if my heroes are stacked with attachments, and I cannot easily rotate them. It’s nice to have a backup, but these tokens are kept in the box most of the time.
While I do most of my physical games true solo, I do own 2 custom First Player tokens. The first was made by myself for the 2018 swag, and the other was given to me by the CardTalk crew during the 2019 Con of the Rings convention. This second token is a lot heavier, giving it a nice feel when you need to pass it to the next player. However, the tokens just do not get used much.
Other extra tokens only get used in specific situations. The wooden tokens from Con of the Rings 2018 get used during Temple of the Deceived to mark where I have gone so far. Portal boardgame tokens (test subjects) get used during Encounter at Amon Din for Villager tokens. I also still have my Scythe coins in case I really get a resource generation engine going and need more resource tokens somehow.
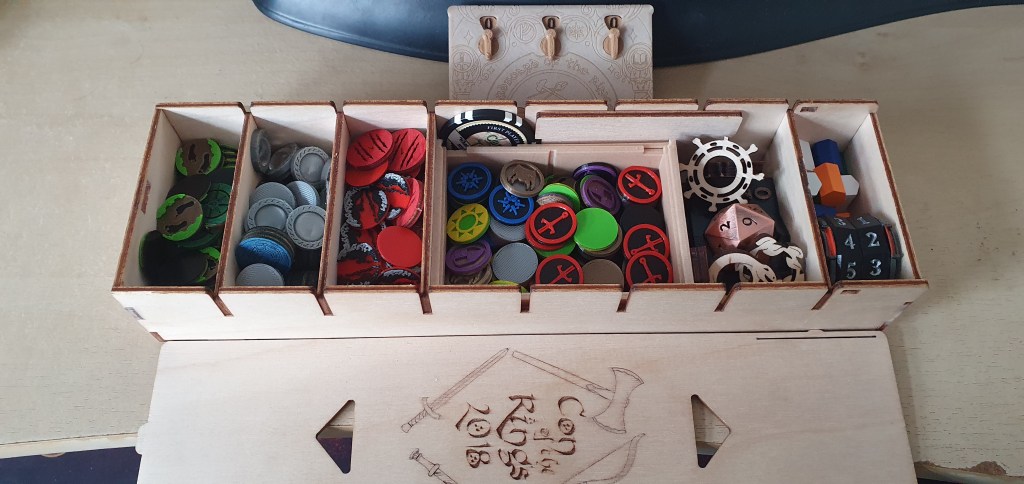
The only other tracker that I own but do not use is the Cardboard of the Rings 2020 tracker. This comes with 5 wheels to keep track of your resources and threat, but I prefer other methods of keep track of things. I still use the box to store the staging area mat rings, as well as the metal D20 and quest card stand that was also a part of their swag that year.
In case I ever need more tokens, I always have my general dice bag. This only hits the table in higher player games if people forgot their tokens. This bag is mostly used for other games. They are a selection of metal, plastic, and gemstone dice, with faces varying from D2 to D60. The sizes also vary. I have used red, green, and purple dice in the past to keep track of damage, progress, and resources, but I like the dedicated tokens now.

Playmats
The next item to look at are the various playmats I own. These mats are often used for my games, though over the years, I have collected quite a few more than I can possibly use by myself. The current collection includes 12 regular-sized playmats and 1 elongated playmat. All of these are LOTR LCG themed, so I’m not including any generic playmats in this article. This includes all 10 of the official playmats that were released during events of the game. This is a pretty rare collection, as some of the earlier mats are very difficult to come by these days.

The bulk of these playmats are from the yearly events held for this game in the past. The oldest one I have (Heirs of Numenor) dates back to the final Game Night event in 2014. Since then, I have collected all of the regular playmats that released each year, up to the 2020 Balrog mat. This is one of the rarer ones due to the weird decision by FFG OP to include 1 playmat per 4 player kit. Regardless, I am very happy with the collection so far, owning all of the event playmats.
FFG has also released regular playmats for general purchase a few years ago, but I do not own any of those. If I did, it would be 6 additional playmats to collect, and I feel that I already have enough. Some of these even have similar artwork as some Fellowship mats, so that’s not worth it to me. The Over Hill and Under Hill mat is unique enough that I might be interested if it was sold at a fair price.
There are also 3 playmats in my collection that aren’t a part of the official game. The first is the playmat that I made for the higher-tier Patreon subscribers back in 2019. This mat features a panorama of all 7 locations where the Palantiri were held. I made one especially for me, with my screen name on it, so that it is truly unique. The 7 mats I made for my patrons have all been distributed since then. These mats are a lot higher quality than the official FFG ones and were made by me placing an order at Inked Gaming. I also selected the stitched edges, which helps a lot in improving durability.
The other two mats that I own are the End of the First Age playmat from Cardboard of the Rings and the Staging Area mat from them as well. The staging area mat sees frequent use thanks to its tracker. The End of the First Age mat is used as a mouse pad these days, so I can still enjoy the artwork when I’m not using the mat for games. With so many mats in your collection, you have to find creative uses like this to enjoy the mats. You can also swap out your main mats every now and then for a fresh set to enjoy the background of your games some more.
Playmat storage
Having so many playmats obviously requires some storage as well. For this, I use various boxes. The mats that I use most often are being stored in the Superhive along with my decks. This holds 2-3 mats on top of the staging area mat from COTR. The rest of the mats are stored in Ultra Pro Mat cases. I have 2 of these, and each of them hold 3 mats rolled up together, along with a tray for dice and tokens. The trays are empty since I don’t generally travel with these cases.
Thanks to the 2020 Fellowship kit, I also own a larger cardboard box with the Core Set art. This box can also hold all playmats if I roll them up in sets of 2. This makes for an easier solution than the mat cases, but since I already bought the mat cases before I got this larger box, I might as well use them both. It’s not like I can easily sell the extra boxes I have. It also provides me with some extra space in case I ever manage to find more playmats.
Playmat display
But it is a bit of a shame to keep such wonderful playmats in boxes when their art should be displayed on walls! So I bought 10 Ultra Pro mat sleeves for this purpose. These plastic sleeves allow you to store the mats flat, which prevents bends in the mat. The playmats fit nicely in these sleeves, though the rubber backs do provide some friction when you try to move them. The sleeve allows you to tape, glue, or drill the playmats to the wall, without damaging the precious playmats. I used double-sided tape on mine, and hung 10 mats in my home office, where I tend to play the most games.
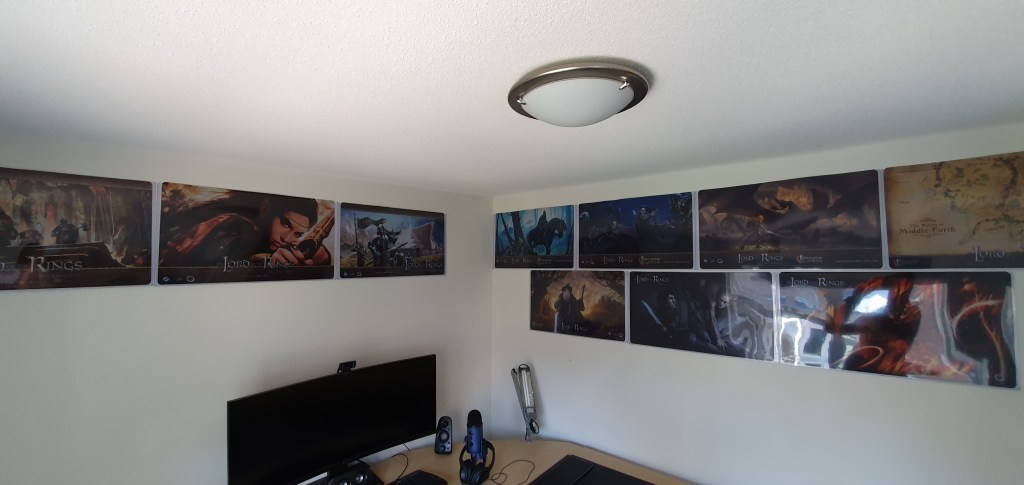
The sleeves display the mat very well, and the sleeve provides some protection from UV damage to the mats. The mats can also be removed from the sleeve with ease, which is an advantage over putting the mats in a picture frame (if you can find one that fits in the first place). While I don’t expect to expand my playmat collection, I could easily frame more playmats on my walls, as the sleeves aren’t that expensive (about €7 a piece, a lot cheaper than a frame would cost you).
Storage on the go
Since the last update of my storage article, I haven’t really transported my collection anywhere, thanks to the ongoing pandemic. I haven’t switched from my Ammonite backpack, but I have used the backpack some more in other ways when not carrying game-related items. Hopefully, I get to use this backpack again when conventions start again.
Since many of my deck boxes are from Ultimate Guard, it was only logical to look at a solution offered by them as well. That leads me to the Ammonite backpack from Ultimate Guard. This allows me to store a fair few deck boxes in there, alongside my laptop, a binder, and many other things I might need on the go.

While the backpack isn’t the cheapest solution, it is a lot cheaper than having to replace your entire collection since your cards were tumbled around or got wet. Still, there are cheaper solutions out there for people with less money to spend on bags. This one suits me well since I can store a mat case alongside several smaller deck boxes and an Arkhive in there, which was my loadout for Con of the Rings 2019. There are several other configurations that you can use, making it very flexible in use. The backpack is sturdy enough to survive a fall and can only be opened when off of your back, meaning that no one can steal your precious decks from behind.
The backpack isn’t perfect, though, and you really have to know what you’re buying into. The lack of a pouch for a water bottle is one of the things I would like to see in the next version of this backpack. But the backpack survived a convention, and I had plenty of stuff for both flights and the Con itself, so take from that what you will.
Product Boxes
The original boxes that come with the game can take up quite some space if you are going to go with a complete collection. The packaging can be used to create storage solutions, as many new players will use their Core Set (Old edition) as their first storage solution. But once your collection grows with several cycles and Saga expansions worth of content, you have to find a place for the empty boxes. You can, of course, throw them away, which is a fair solution, but there is so much more that can be done with them. The artwork on these boxes is amazing and deserves to be displayed and not end up in a landfill.
Deluxe/Saga Expansions
These larger boxes are going to be quite bulky in storage. Several members of the community throw these boxes away or send them to other members of the community who turn them into storage boxes for their encounter cards with the help of some inserts. I take a different approach and put these boxes on display in my game room. The benefit of living alone is that I can decorate the guest room however I please. That means that anyone who is staying over gets to experience my wall of Deluxe/Saga boxes. This creates some conversation the next morning as well. However, it usually ends up with the question of how much money was involved, which I tend to avoid (I don’t need to be confronted by those numbers).

Since there are 8 Deluxe boxes and 8 Saga boxes, I can stack them on top of each other so that the majority of the artwork is displayed. I place them slightly diagonal to have a better support for the top row of boxes. This leaves me with a case full of games, with LOTR LCG acting as a crown.

Adventure Packs
The smaller packs are more difficult to store properly. While there are people in the past who have created wallpaper out of the art of these boxes, I do not have the dedication to do that. It also becomes quite messy if I were to store the boxes next to the Deluxe boxes. So I put them all behind a door in the same gaming Kallax unit. There, the heap of plastic containers can remain until I need to sell my collection, in which case I will still have the original packaging. Since I have several cycles in the old cardboard packaging, I can’t really think of another way to have all of the packaging stored in a neat fashion, so this will have to do. Note that the Nightmare cards in the picture are now being stored in a binder instead of the cupboard.
Playthrough logs
Many other players and I log our playthroughs as we win or lose a game. While some may use online tools for this, I went with a physical notepad for logging my wins and losses. In this notebook, I log the date, quest, mode (Easy, Normal, Nightmare, etc.), the number of players (if more than one, I also log the name of the other players), whether I won or lost, final threat, and the hero line-up I used. At the end of the year, this allows me to put all of this data into a spreadsheet and see some interesting statistics of my year with LOTR LCG. Things like Win-rate, what quests I ended up playing, who my favourite hero was, and what my average threat was when a game came to an end is all noted and compared to other years. This is all done for personal reasons, but I like how I can review the entire year by going over my playthroughs this way.
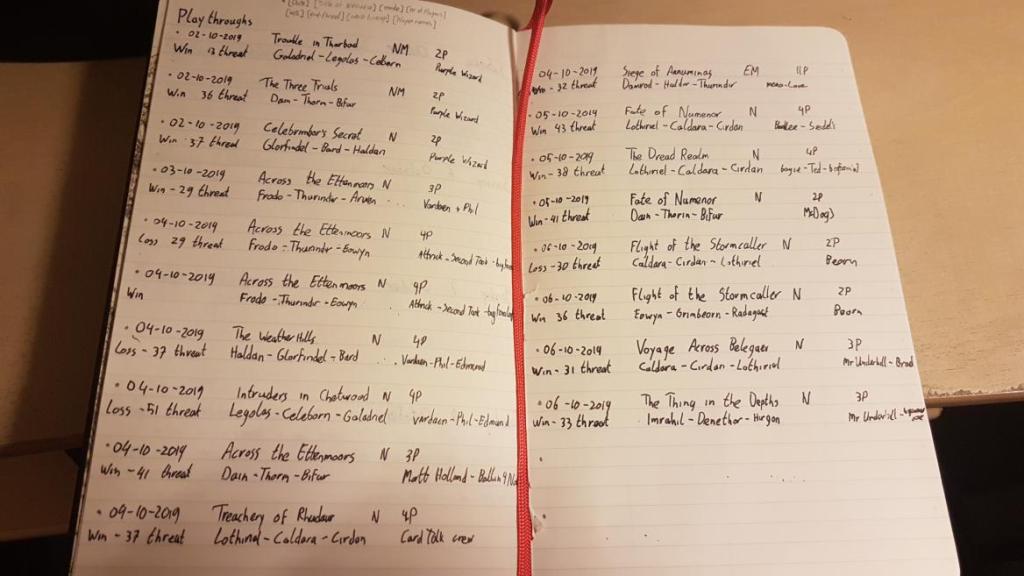
For the notebook, I started with a small A5 Moleskine notebook but have switched to a black, hardcover notebook to log my plays. I will also log them in other notebooks when I am on the go but will duplicate the playthroughs in the black notebook at the end. It also usually comes with a photo of the final board state, which I tend to upload to Discord or Twitter frequently. I would encourage everyone to keep track of their playthroughs this way, as it can reveal a lot about how you play this game (favorite spheres, favorite quests, etc.).
For the 2021 Vision of the Palantir loot, I am busy making a notebook like this for everyone interested in tracking their playthroughs. This notebook will be featured in an update to this article and will likely get its own article down the line. People who are interested in receiving the notebook should pledge to the Patreon site of the blog or attend the same conventions as me. I might do a second run of these notebooks eventually, but they likely won’t be available for regular purchase.
Collection logs
The game as a whole contains a lot of expansions. So many, in fact, that it can be difficult to keep track of what you own and what you are still missing. Especially with infrequent reprints of the game, you will want to know what parts you already have and what you still need to complete your collection. For this, I made a document where I can track all the official expansions. It includes the alt art heroes, the official playmats, pre-order art cards, the Print on Demand scenarios, and Nightmare scenarios. Colour-coding the bubbles gives me a clear overview of the pieces I’m missing.
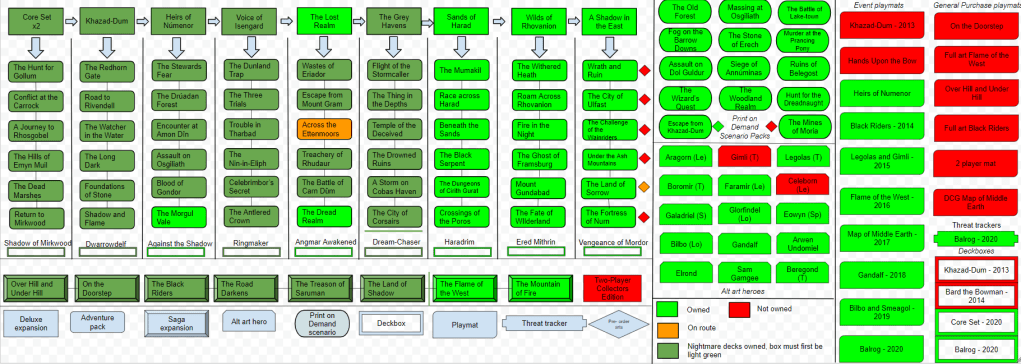
I would encourage people to create their own version of this for their collection, which is why this version isn’t publicly available. In case you want to adopt this one, there is a blank copy to be found in the Patreon-exclusive folder where more graphics like this are stored. By supporting the blog, you gain access to this folder and a lot more goodies, all the while supporting us here! A collection log like this will also be included in the 2021 notebook for people who like to cross out boxes whenever they complete a part of their collection.
Miscellaneous
Not everything I own has been explained in the article so far. Perhaps because the items are rarely used, or I couldn’t find the correct paragraph for them. So I lumped them into this category in case you want some explanation about them.
Additional deckboxes
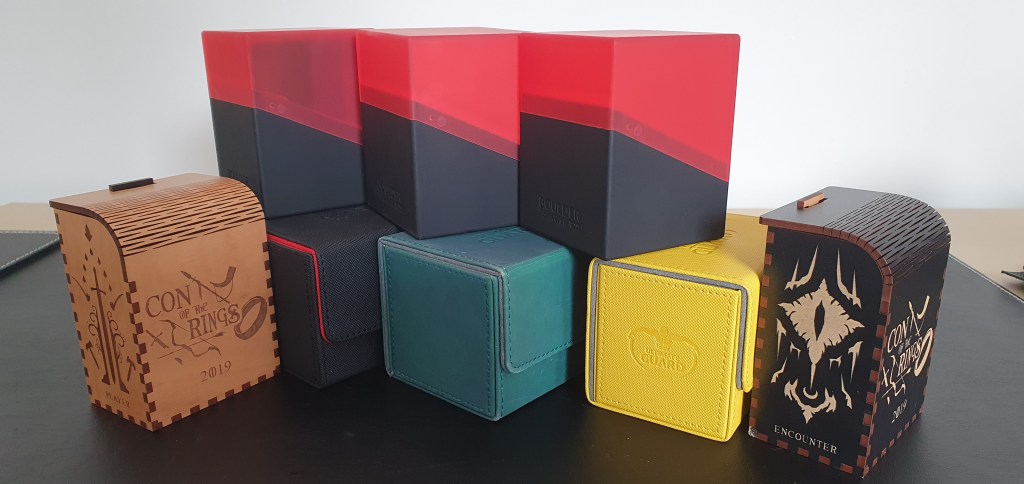
Aside from all the deck boxes I have mentioned so far in the article, I do have a few extras. These are either used for other games or for small-scale storage in case I ever bring just a single deck somewhere. The first two boxes that deserve mention are the wooden deck boxes handed out at Con of the Rings 2019. These boxes are engraved with custom art for the convention for both the players and the encounter deck. The deck boxes also come with a wooden lid to keep it all shut. From what I remember, the boxes were ordered off of Etsy, so if you are interested, you might be able to find them there.
Other deck boxes include several Ultimate Guard Side-winders in both the 80 and 100 card variety. These easily hold decks for easy transportation. I have also used them to hold POD quests like the custom encounter deck scenarios. Now, they are sitting empty on my shelves, but I can always reuse them in case I ever bring my decks somewhere again. I also have several Boulder deck boxes that I used to store my Nightmare decks. But since I moved to Arkhive storage, these deck boxes have been sitting empty for now. They can be repurposed for other games or store my sleeves. Perhaps I will even use some of these boxes to store some fan-made scenarios.
Art prints
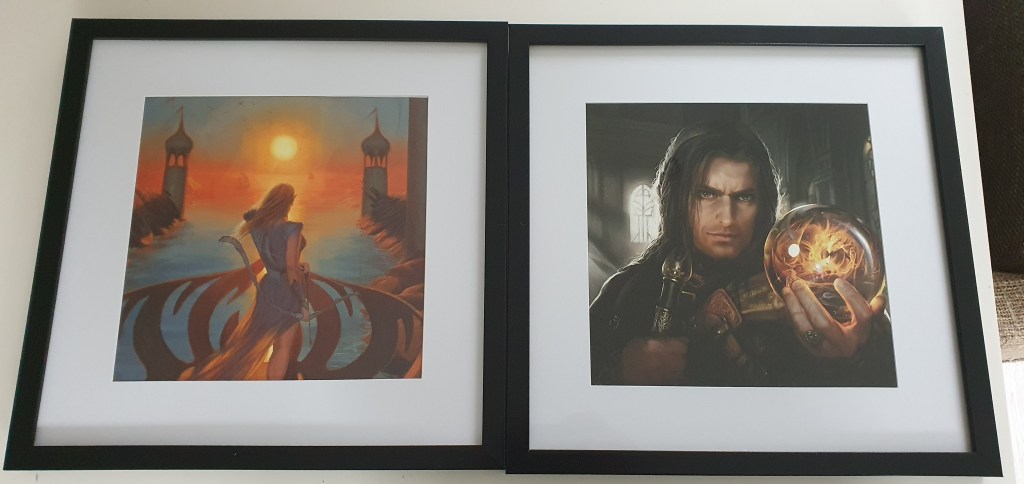
The art for this game is fantastic, and many of the pieces deserve to be framed on your walls. Sadly, there is just too much art (or too little wall) to capture everything. Still, I would encourage people to buy some art prints by their favorite artists, get a matching frame, and hang it on your wall. Sometimes you can also attend raffles during conventions or during give-aways by community outlets to win some art prints. They really tie the room together and make for great ice-breakers with your guests to try and bring them into the game.
I currently have 2 art prints. The first is the Gaining Strength art by Magali Villeneuve. This one I bought myself from her site. I really like the detail in this one and felt that I had to own at least 1 print with a Palantir on it. The second print I own is the Mithlond Sea-Watcher by Owen Weber. I won this print during Con of the Rings 2019. I framed the art when I got home and am now displaying it over my kitchen table. I do still have a lot of room on my walls to hang up more art over the years.
(This is only game-related art. I do also have several Middle Earth maps on other walls)
And that’s it! The fourth iteration of my collection has been covered. With the hiatus of the game slowing down official content, I don’t think that I will be updating the collection for a while. However, I might dip my toe into collecting some fan-made scenarios like the AleP project. These additions to the collection will be stored in a separate deck box for sure, so the cards don’t mingle with the rest. But I think the style of storing those scenarios will closely resemble the storage solution described in this article. So I hope that I do not have to make a fifth version of my storage solutions, but I will keep you updated in case anything changes.
If this article inspired you to look more closely at your own collection, I hope I have given you some good pointers to what I recommend for storage. If you already have a solid storage solution and you would like to post it on the storage hub, then you are more than welcome to reach out to me, and we can arrange something. This may not be the optimal way to store your collection, and many different approaches to storage exist. I would like to cover as many of them as possible, so feel free to share your solutions with me, and I’ll hammer it into an article!
And finally, if you have any questions after reading this article about my storage solution, let me know. I can always make additions to the article or answer any questions that you might have.

I find it really unfortunate that the Hunt for the Dreadnaught gave us such a giant card! It messes up storage for encounter decks!
LikeLike