Deadmen’s Dike is the quest that I remember as my first really big stumbling block in the game. I started this game with the Ringmaker Cycle and first Saga boxes in addition to the core set, and while they have some difficult scenarios, you can tech for them and have some powerful player cards available. However, I then bought The Lost Realm, which raises the difficulty of the game significantly. With a limited card pool that misses some power cards from earlier cycles, I lost countless times against this quest in solo and multiplayer, until my brother and I finally won a 2-player game with some lucky Encounter card draws. I don’t remember revisiting this quest since then, and so it will be fun to see how it works out with the full card pool now available.
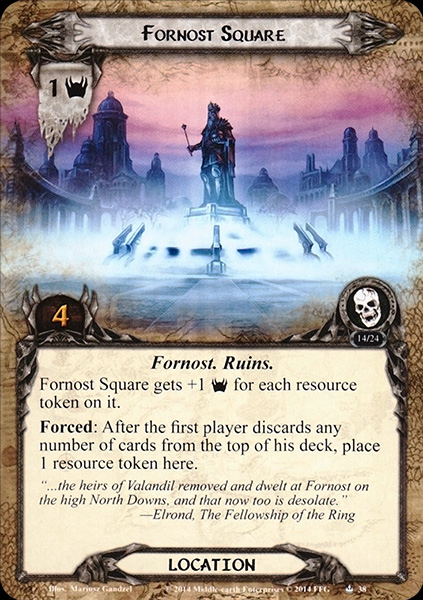
I think one of the things that makes this quest so hard is that you can lose in many different ways. The most common one is probably getting swarmed by enemies. You start with an engaged one, so if you reveal another one you have to face two on turn one. Even if you manage to somehow defend and kill them, there are many effects that will simply return then from the discard pile. But you can’t just focus on combat either, with a Fornost Square with rising threat starting in the staging area you might end up location locked if you don’t clear it quickly. And then there is the timer of your deck running out of cards that will make you lose the game.
Initial Deckbuilding
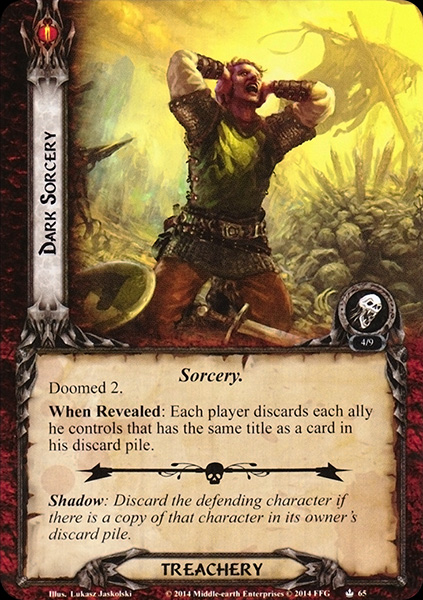
I first tried to use a Dunedain Deck to defeat this quest, the theory being that I will keep the enemies simply engaged with me as they return anyway if I kill them. I started with Halbarad/Amarthiul/Idraen to have Spirit access for Will of the West to reshuffle my discard pile, but I just ended up with too many engaged enemies and not enough willpower. I then switched to Halbarad/Damrod/Loragorn so I would be able to Forest Snare the initial enemy on turn one. While this strategy worked to get a handle on the early game, I encountered another problem: Dark Sorcery, that discards your allies if theres a copy in the discard pile. Dunedain Decks rely heavily on a couple of Non-Unique allies, so if this shows up at the wrong time it ruins my whole board state, or could discard a defending Guardian of Arnor as a shadow. In this series I try to prepare for the worst possible things the encounter deck could throw at me, but I felt that this could ruin pretty much every deck if draw it at the wrong time … unless I build a deck that doesn’t rely on allies.
And with that came the idea to me: What about building a Forth, the Three Hunters Deck with no allies? That doesn’t only counter Dark sorcery, but also weakens the initially engaged Baleful Shade, as well as Terror of the North and Unnatural Fog. But with only three character facing these hordes of enemies, I realized I would need readying, and so I was immediately drawn to the twin brothers Elladan and Elrohir. And who could better back them up then their sister Arwen, who can give them more resources, handle questing and give access too Will of the West? From that point, I very quickly ended up with a decklist:
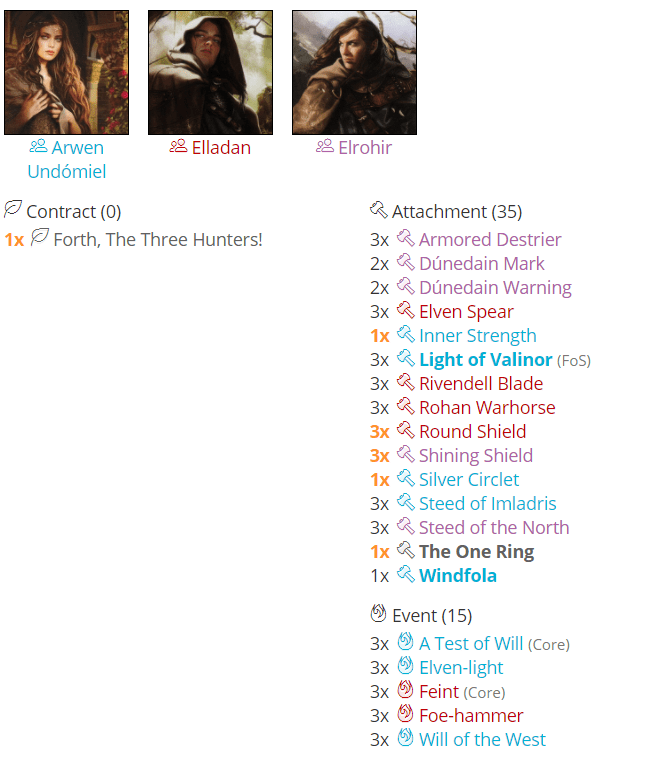
The Three Hunters deck are never that hard to build, because you wanna fill the deck mainly up with restricted attachments. In this case, this means Weapons and Armor for stat boosting and Mounts for readying on the twins, while Arwen has in the Spirit attachments some questing toys. Especially useful are the Steeds of the North, because they allow to have the Twins use their boosted willpower and still be ready for combat. We also run the One Ring (this quest isn’t too punishing on threat and it’s a restricted attachment to start with) on Elrohir to give him acces to Inner Strength. With 4 defense and Shadow cancellation he can defend pretty much everything in this quest except Thaurdir. The Events are mainly here too draw into those attachments without Lore access, and Elven Light combos not only with Arwen, but also Elven Spear and the encounter deck can even help us getting it in the discard pile.
First playthroughs
The first run with this deck was pretty impressive. I was able to flip the contract turn two and quest with Arwen and Elladan for ten, while Elrohir keeps defending the initial enemy. Turn 3 I reveal a Dead Lord who brings out another enemy but the twins can defend and kill all of them. I turtle on stage 1 to build my heroes fully up and save some resources before I move. On stage two I have 17 willpower, Elrohir can basically defend everything for 5 defense and Elladan swings for 8 with a Rivendell Blade and an Elven spear because I have enough resources on Arwen to cycle two Elven Lights per round. I win in two more turns.
Motivated by this result I start my second attempt, and it goes horribly different. I can’t find any card draw and therefore am not able to flip the contract for 6 rounds at which point I’m hopelessly location locked.
Adjustments

At this point I realized that if I’m winning by that much if I flip the contract and lose if I can’t I should probably just focus on flipping it as consistent as posibble. However, the only way I can see make this deck more consistent is by including card draw from Lore. Therefore, I swap one of my heroes without changing the deck too much, like I already did at the Weather Hills. This time, I drop Arwen for Beravor. While this will mean that I loose some willpower and readying, as well as my Will of the Wests, I have a much more consistent early game by flipping the contract fast enough. I switch the Spirit restricted attachments for Lore ones that can go on Beravor in form of Ranger Spear and Legacy Blade, Light of Valinor for Wingfoot and the spirit Events for the Lore drawing staples Daeron’s Runes, Deep Knowledge and Heed the Dream. I also took out Inner stregth for The Ring of power, that allowed me to draw with Beravor and still use her stats on turn 1.
It’s nice bonus that deck still stays thematic, switching from Elrond’s Children to their company with the Dunedain Rangers. I will name it The Hunters on the Dike and it can be found on RingsDB.
During my three next runs with deck I’m always able too flip the contract turn one, so that plan worked out. But I felt the loss of some readying and Beravor having to exhaust, what meant I had to quest with Elladan in the early game and end up with more engaged enemies. In two games I was still able too win, even tough my questing and attacking numbers weren’t as high as with the previous version and it took a bit a longer. One time I even had too sacrifice Beravor because Elrohir couldn’t take Thaurdirs hit, but the twins were able to avenge her immediately.
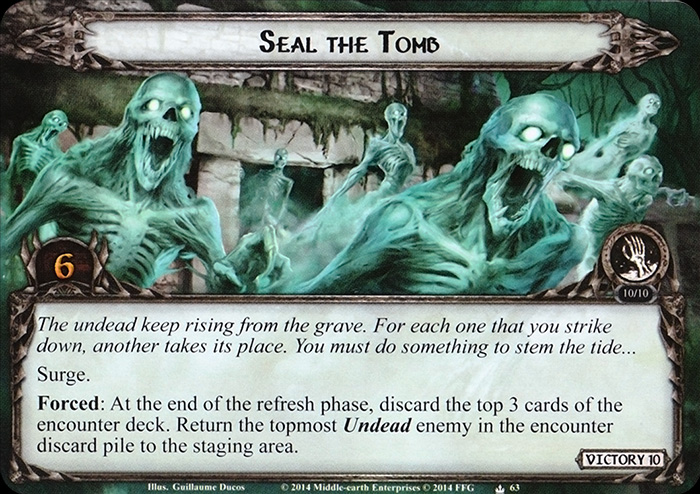
I also lost one game, but this comes mainly down to bad encounter card luck, namely drawing Seal the Tomb turn one. This forced me too deal with this sidequest because I can’t afford too pull back an enemy every round. While I managed too clear it, the time for that lost me the game in the end. While at my other games I ended around 40 threat, this time I threated out because the extra rounds I quested against Seal the tomb brought me up to 45, defeat if you’re using the power of The One Ring. However I have played nine games against this quest at this point, so I’m happy with the result.
Conclusion
Considering general deckbuilding, I think this is a good point to talk about “winning more”. In this game you often reach a board state where you are better set up than the encounter deck and are very likely too win. The contracts push this even further, but it also happens with “normal” decks when you get a certain amount of allies/attachments in play while you keep the staging area under control. If you’re not playing for score, it’s not important how far ahead you can get on the encounter deck, but how fast you get to that point. When building a deck, you should include cards that help you to get to that point quickly (like card draw or efficient early game cards), even if they are less useful in the late game. This is easier if you build for a specific quest, because there often is a certain amount of quest/combat power required to defeat it, and the rest would be just “winning more”. Playtesting can help you find that point.
That’s it for the Lost Realm. I have always liked this box for it’s difficulty (it might still be the hardest Deluxe), but it was great returning too it with a full card pool and new tools like contracts available. I look forward to play the scenarios of the Angmar Awakened cycle the have a similar difficulty. However, this has probably to wait til next year because I have other life stuff going on over the holidays. Stay healthy, have a Merry (and Pippin) Christmas and a happy new Year!


Starting from the Core Set I have followed in progression and have made it Deadmans Dike. I try to base my decks on the cards the new cycle is trying to present. In the Lost Realm I have found this difficult. Chetwood and Weather Hills were fairly easy quest with 2p, but had a hard time getting through with 1p. After a few playthroughs with the Dike I wonder if I can build a deck that will get me through going one player using only cards to date, or getting to unthematic to my taste such as Dwarf deck and such. Take Care!
LikeLiked by 1 person
Yeah, Lost Realm is definetely a hard box to tackle progression style, especially with thematic decks. The thing is that the Dunedain archetype is also more of a multiplayer thing, in solo you can really get screwed if you reveal to many locations and no enemies to feed your engine. Also you kinda need some scenario packs from the cycle to build a really good Dunedain deck, maybe you can try it using cards from the whole cycle (kind of a soft progression style) if you want to win with a thematic deck.
LikeLiked by 1 person