The Fortress of Nurn was a monumental release, for several reasons. When I received the pack I poured myself a glass of whisky and sat down at my desk to savor this last package, like Bilbo at Bag End, thinking about this wonderful game and all the fond memories it had provided me with over the years. With this pack, the adventure pack as we know it was sailing towards the West, never to return. It featured the return of Nate French who was brought on board to provide the players with a challenge for the ages, as a proper send-off. And it was the first and only scenario to receive a 10 out of 10 difficulty rating.
What makes a scenario difficult? When looking at scenarios that players consider difficult, a couple of themes emerge. Scenarios can require tempo, throwing strong enemies at you that you need to deal with fast. It can put a tight clock on the scenario, requiring you to hit the ground running. Or it can limit your board state like in Escape from Dol Guldur, where one of your heroes are taken away. One of the main ways to counter difficult scenarios is through using tempo decks. Use Vilya to play 5 cost allies for free each turn, and gain massive resource advantage. Pop Caldara with Jubayr and Glorfindel in the discard pile, getting 10 resources worth of allies for the cost of one hero. Your deck becomes your main asset, your swiss army knife that you use to dissect what the quest throws at you.
In Fortress of Nurn, Nate French took a provocative approach to this counter and asked what would happen if the scenario took away the player’s decks. You begin this scenario with five cards in your deck and have to earn back the rest of your cards. It is a devilishly clever twist on the game, and a tough challenge for players to solve. Read on if you want our solution to this milestone of the game.
The Fortress of Nurn
- Found in: The Vengeance of Mordor Cycle, Adventure Pack 6
- Official Difficulty: 10
- Community Difficulty: 8.6
- Encounter Sets: Under Guard, Ulchor’s Guard, The Power of Mordor, Fortress of Nurn
- Quest cards: 2 + 4 side quests
- Play if: You like challenging quests. You want the unique experience of having to free your deck. You like the Power of Mordor deck and the challenges it brings. You want to face Thane Ulchor in an epic showdown.
- What is different about this quest?: 80% of your deck is locked away at the beginning of this quest and you have to free it!
- Solo or multiplayer?: It is a hard quest, no matter what. Each player begins the game with an enemy in play, so you have to bring a deck that is ready for that.
- Can I run side-quests for this scenario?: You will have to work very hard to keep pace with the encounter deck. Even if you manage a stable board presence, the Power of Mordor deck will keep you on your toes and cause a lot of pressure on your threat. I would leave the side quests at home with a nice cup of tea.
- What to look out for: Running out of steam before you clear the first side quest. Getting overrun by enemies or location locked. Threating out due to sneaky encounter deck tricks.
The Quest
Setup

The game starts with an interesting condition, saying that your deck size cannot exceed 50 cards (so no Perilous Voyage deck for you!). Then you prepare the Power of Mordor deck by shuffling all the cards from that encounter set together. Then each player searches the encounter deck for 1 copy of Ulchor’s Guard, an enemy with an engagement cost of 25, 2 threat, 4 attack, 1 defense and 5 hit points. They also have an ability saying when Thane Ulchor is engaged with a player, Ulchor’s Guard engages that player, but this is not relevant until stage 2 and can be ignored for now. However, the presence of the guards means that you must be able to fight right out of the gate and take a significant attack on turn 1.

Next, Thane Ulchor himself is added to the staging area. 0 engagement cost, X threat where X is the number of Castle side quests in the victory display plus one, an attack strength of 6(!), 4 defense and 12 hit points. Thane Ulchor is also immune to player card effects, and after he attacks, you reveal the top card of the encounter deck. As we will see in a moment, he is mostly just lurking there for now as he cannot leave the staging area, and will just contribute a bit of threat and the occasional disruptive attack triggered by Ulchor’s Rage (which will then trigger an additional encounter card. Bring out your cancels).
After Ulchor is added, you then add the four Storm the Castle side quests to the staging area. This is done with the Storm the Castle side faceup, so you do not know which is which. Then you place a card face-up from the Power of Mordor deck underneath each Storm the Castle side quest. Then each player places 8 cards from their deck underneath each Storm the Castle side quest, and under the Quest deck. This means that your deck will now have 4 cards left, once you begin the first resource phase. You are now ready to begin the final battle against Thane Ulchor, the man who betrayed you way back during the Heirs of Numenor days. But he will not get away this time!
Quest Stage 1: Assault on Dol Rhugar (3 progress)

Once quest card 1A is flipped to 1B, several effects become active. As mentioned above, Thane Ulchor cannot leave the staging area. The second is that once 3 progress is placed on this stage, it cannot be chosen as the current quest stage during the questing phase. In other words, you have to play side quests or go for the Storm the Castle side quests, once 3 progress has been placed here. Finally, the stage cannot advance until three Castle side quests in the victory display. Hence, your real goal is to complete three of the four Storm the Castle quests so you can bring down Ulchor.
Once your first planning phase is over, and your deck is hopefully running at top speed, you know have two important tasks ahead of you. Firstly, you need to come up with a plan for how you’ll deal with your Ulchor’s Guard, and secondly, you need to decide as a group which Power of Mordor card you want to enter play first. Granted, first round you don’t have to choose one, but once you put 3 progress on Stage 1B, you have no choice but to start working away on your side quests.

It might seem like an enticing option to stay at Stage 1B for as long as possible and set up your board state, but I found that to be a bit of a trap in my solo playthroughs. You should bring a power deck to this quest, because the encounter deck and the Power of Mordor cards really push you to the limit. If you rely on your deck to build an early advantage, like using Vilya, it is disastrous to run out of cards in your deck. Better to push on, and hopefully free your first 8 cards as quickly as you can.

Ulchor’s Guard and Ulchor himself are your main obstacles towards early progress. Ulchor adds only a single threat, but the threat of treachery-caused attacks are an ever-looming menace. Ulchor’s Guard needs to be dealt with swiftly, and that can be a problem if you start drawing enemies on the first staging. You need to deal 6 damage to each guard, which usually takes a few heroes and/or allies. If you run Tactics Eowyn, it might even be worth triggering her once pr. game ability to ensure that the Guard won’t linger and cause you trouble. Chump blocking might seem enticing but think long and hard about it before you do it. You only have a limited number of cards from the beginning of the game, so every ally lost might cause you to run out of cards if you are stalling. In solo, I generally found that it was worth it to try to clear the first castle side quest as quickly as possible. Led to a lot of scoops but this seems to be inevitable in this quest.
Once you feel like you are ready to face the first of the side quests, you must pick one as the active quest, causing it to flip. This will reveal what side quest you got, and cause the face-up Power of Mordor card to become active. As the quest-Mordor card combination is random, you do not know what you’ll get. You will therefore base your pick on the Mordor card, and it is therefore worthwhile going through each one in turn to help you pick the best possible course of action.

The Armies of Mordor is a card I usually do not mind picking as my first Power of Mordor target, at least in true solo. The Armies of Mordor has a forced ability, stating that after a non-unique enemy engages a player, that enemy cannot take damage for the remainder of the round. This is obviously a setback, because it will stall your ability to clear enemies, and makes it plausible that you will get overrun by enemies. However, if you have a strong defender with shadow cancellation, like Jubayr or a hero equipping a Burning Brand, combat will have fewer surprises for you, and you can better manage having enemies around. If you run traps, this effect is also of less consequence, as you do not need to worry too much about enemies staying around. If you can manage enemies and avoid the encounter deck running wild, this is a decent pick.

Another option I like to pick early in the game is Khamul The Easterling. I know this sounds crazy, but please hear me out. He is a massive enemy with an engagement cost of 49, 4 threat, 6 attack, 4 defense and 9 hit points. He is immune to player card effects and engages the first player. Furthermore, only the engaged player can declare attackers and defenders against him. This can be a major hurdle in multiplayer, and there Khamul is likely something you want to avoid. But in solo you might have build a board state early on, using either Caldara tricks, or tactics Eowyn so you can deal a load of damage to him, and basically take him out in one shot. If you can manage that, it’s one Power of Mordor card out of your hair. Think about whether you can handle him, and take the shot if you think you can do it.
Covered in Darkness is one that I don’t want to see too early, but one I don’t mind triggering. Covered in Darkness has Doomed 5 and nerfs threat reduction signficantly by stating that each player’s threat cannot be reduced by more than 1 each round by player card effects. This is the kind of effect that isn’t a problem until threat spirals out of control, and someone is about to doom out. It is particularly bad if it combos with another Power of Mordor card that we’ll look at in a second. I usually don’t mind it too much, because the power decks I usually bring to this quest can handle their threat. I try to keep it as 2nd or 3rd target if I can, which should give me the chance to play an Elrond’s Counsel to make significant drops in my threat to cushion the Doomed 5 blow. Furthermore, this board state doesn’t really change your board state drastically. It might cause you to engage an enemy you would have otherwise avoided because of the threat increase, but for this quest you’ll likely have brought a power deck and be ready to take on enemies. We all know the danger of leaving enemies for too long… If your deck relies heavily on low threat, it might be a good idea to avoid it.

Tower of Barad-Dur is a card I try to avoid for as long as I can. A 5 threat location without progress values that you cannot travel to is a steep tax on your progression. You’ll waste 5 willpower for the remainder of the game. A strong Noldor or Gondor deck might be able to quest over it, but I found it to be a severe obstacle. Furthermore, each players threat elimination level is reduced by 5. Combined with the effect from Covered in Darkness, and the lure to run The One Ring in your deck for the power it provides, you are in serious risk of stalling and threating out. The 5 threat will delay your progress and make location lock an ever present threat. I’ll advice you to pass a long way around that tower.
Finally we have Under the Watchful Eye, another card I try to avoid if I can, at the very least in the early game. When it is revealed, each player with more than five cards in hand discards until they have 5. Then it introduces a Forced effect stating that after a player draws any number of cards, they raises their threat by 1. This is brutal on multiple levels. First of all it combos with Tower of Barad-Dur and Covered in Darkness, creating a situation where your threat rises, your elimination level is lower and you cannot reduce your threat. Furthermore, card draw is a major way to gain tempo, so punishing you for that, especially if you run a setup with high-threat heroes, can take you out. In the best world, either this one or Barad-Dur is the card that remains in the power of Mordor deck, so that the other one can be safely ignored. I try to avoid this one if I can, unless I feel confident about my board state. If you don’t need to draw a bunch of cards and your threat is managed, this can be tolerated.
The most important thing is to make a plan once you see what cards are available under the scenarios, pick one that you want to avoid, and start working through the other three one by one. I beat this solo with a Vilya deck, and my dream order was 1. Armies of Mordor, 2. Covered in Darkness, 3. Khamul with Under the Watchful Eye remaining in the Power of Mordor deck. Your preference might differ. You cannot really know which Storm the Castle side quest you will get, but it is still useful to go through them and discuss how you need to handle each one of them.

When a Storm the Castle quest is selected as the current quest, the power of Mordor card underneath it is revealed, and the quest is flipped over. The flipped-over quest card will then be the current quest until the end of the phase. When the side quests are cleared, all the player cards underneath them are shuffled into their owner’s deck, and each player then draws one card. The first Storm the Castle quest is Lethal Counterattack. It requires 10 progress to clear and when revealed, it deals 1 damage to each character in play. I’m pleased when I see this early on, before I have too many allies on the table, and before my heroes have taken too much occasional damage from blocking attacks. But since you do not know what order you’ll get the side quests in, you cannot really pick one or the other strategically. It is worth keeping in mind that this quest exists if you play a deck with vulnerable allies like hobbits or Rohan. Also, remember this effect before you block an attack with a hero that leaves them with one hit point left. Ten progress is a steep cost, but since you do not get any enemies or locations from this, I do not mind it too much.
Next, we have Castle Garrison. This one has the potential to be very, very bad, especially when revealed early on. It only requires 6 progress to clear, making it the easiest in terms of willpower required to advance. However, when revealed the players must discard cards until X enemies have been discarded, where X is the number of players in the game. Each enemy discarded is then added to the staging area. One reason I found this so hard to deal with is because I tend to pick The Armies of Mordor as my first target, and this makes it very inconvenient to deal with enemies. Furthermore, the severity of the revelation effect depends heavily on what enemy you draw. Guard Dogs can be dealt with rather quickly, though they do ping you for a damage point. A Mordor Olog-Hai can cause an instant scoop. When you draw multiple enemies in multiplayer, the risk of getting an Olog-Hai or Easterling Mercenary is quite likely, so you’ll have to be ready to deal with them. And if you haven’t cleared your Ulchor’s Guards yet, the risk of being overrun is definitely present. The silver lining is that if you can clear the enemies then you only have to place six progress, and you can blast through and liberate your cards. If you survive to that point you are in a very good place.
No Quarter is my second favorite quest for an early reveal. It requires 12 progress to clear, which can be a challenge, especially if you are getting location locked. When No quarter is revealed, each player randomly discards four cards from under the quest, and discards each card in hand and each card they control that shares a title with one of their discarded cards. Most times, I found this to whiff, but of course you will be unlucky from time to time. As this one doesn’t add anything to the staging area, it makes it easier to gain momentum and build a solid board state. From time to time you will get shafted by this. As a counter to this deck, I built a fellowship contract deck that featured several single copies of high-cost allies, meaning that I rarely had to worry about getting my allies in play sniped. A second (minor) disadvantage to this stage is that you’ll only get 6 cards back, because 4 of them were discarded. However, I rarely found that a problem, because every card back in the deck is like gasoline in the engine – it propels you forward from the initial stall this quest imposes on you.

Finally, we have Stronghold of Mordor. It requires 8 progress to clear, and is similar to Castle Garrison when revealed, except that you add locations instead of enemies. Particularly in multiplayer, you risk location locking yourself quite severely. The encounter deck contains several high threat locations, so in four-player, you could easily add 12 or more threat from this effect. And if you have the Tower of Barad-Dur in play… It could be game over right there. In solo I find this one quite ok. The extra location can slow you down significantly, because you need to quest over it and clear it to make progress. It really depends on how the staging area (and your general board state) looks like when you get there. Another hidden danger of Stronghold and Garrison is the discard from the encounter deck effect if you have already dealt with Khamul the Easterling. He does not have a victory point value, which means that he goes to the encounter discard pile when killed. This means that the discard effects accelerate an encounter deck reshuffle, meaning that you risk seeing him again, especially at higher player costs. This is worth keeping in mind, if the encounter deck is running low, and you still have the option to go to a stage where the Nazgul is.

Once you have picked your stage, power through with all the tricks you have. Do not be afraid to play willpower boosters like Lords of the Eldar or Astonishing Speed. Especially for the first quest, you WILL need to liberate the cards underneath the quests in order to build a resilient board state that can prevail. I found that the first side quest really is the crucial point. If you can deal with the guard quickly, go to a side quest that doesn’t punish you too much, and clear it in a few rounds, you can start to rebuild from your initial setback. But be aware that a strong enemy or an unlucky shadow card draw can ruin everything for you. Expect to scoop several times, until you receive a setup that looks like you can actually go through it. You will need every advantage you can get in stage 2.
Quest Stage 2: The Final Confrontation (12 progress)


If you have made it to stage 2A you are already in a good place. You have dealt with 3 side quests, revealed 3 Power of Mordor cards, and liberated a substantial part of your deck. It is now time to confront Thane Ulchor at the seat of his power. However, he will not go down without a fight. When The Final Confrontation is revealed, the final Power of Mordor card is revealed, which will either hamper your threat reduction, lower your elimination threshold and add a high-threat location, make enemies more difficult to deal with, cause you to discard a bunch of cards and ramp up your threat, or put a boss-level enemy into play. However, you know what you’ll face because the other four cards will be face-up on the table. You can therefore prepare your board state for effect. If you know you will lose your ability to lower your threat, play a Gandalf or Galadhrim’s Greeting before advancing. If you know Khamul is coming out to play, be sure to keep a blocker or a chump around before making the final quest push. Make sure that you take advantage of that knowledge. Next, the encounter discard pile is shuffled into the encounter deck. As mentioned above, this can be a big problem if Khamul is shuffled into the encounter deck. However, it is very, VERY satisfying when he is dealt as a shadow card. Finally, Thane Ulchor makes an attack against each player in player order. As he hits for 6, you need a plan to deal with these attacks even without shadow card boosts. This also means that you should keep your blocker ready before advancing, so the attack doesn’t end up going undefended. As usual, it makes your life so much easier if you have a hero with 6 defense or a way to recur chump blockers, such as Guthwine with Westfold Horse-breeder. You will need to take a few attacks from him, so this is an investment that will pay off greatly. Furthermore, each attack from him reveals an encounter deck, meaning that these attacks might reveal a bunch of new enemies or locations. The risk of being overrun is very real. Therefore, it is a good idea to keep a few allies behind to take attacks if necessary. Once encounter cards are resolved, the quest is flipped to 2B; you get the instructions for how to make the final push. Firstly, encounter cards cannot be canceled, which can be brutal. No cancelation takes away a very powerful tool for players to control the encounter deck, but for this final battle, the gloves are off. Finally, the number of damage on Thane Ulchor cannot exceed the number of progress tokens on stage 2B. Hence, you need to place 12 progress there to take him out. Once Ulchor is defeated, the players win the game. Ideally, you need to make one giant quest push in the phase after stage 2B is revealed. The quest has no limitations on how much progress can be placed in one go, which is a usual method to slow down players in boss fights. If you have willpower boosters like Lord of the Eldar, Astonishing speed, or Untroubled by Darkness, now is the time to use them. Global readying effects are also insanely valuable here. Untroubled by Darkness followed by a Lure of Moria to ready your dwarf army can make short work of Ulchor, as can pumped up Gondor Allies that are readied with Strength of Arms. Realistically you might need a few rounds to deal with Ulchor. Keep in mind that once you advance, he will come down to a player from the staging area, and stay there, so you need to think tactically about who will engage him in multiplayer. Keep on questing and clearing the staging area, and keep adding damage to him. Once you place the 12th damage point, Ulchor goes down, and you win the game. Congratulations!
The Encounter Deck
Global
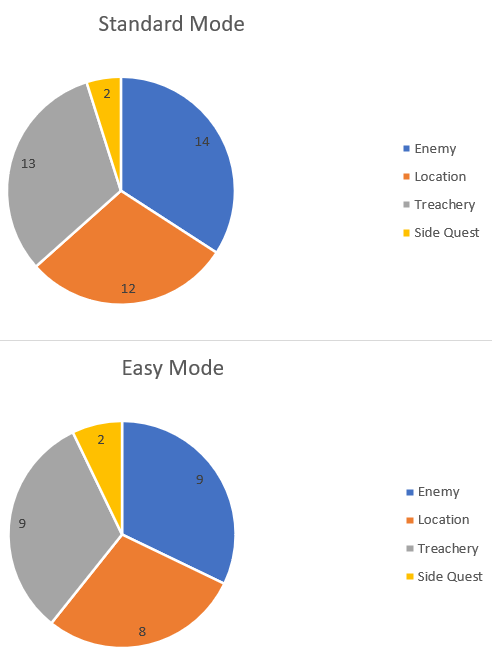
- The Encounter Deck consists of 41 cards in Normal mode and 28 cards in Easy Mode.
- Of those 25 cards contains shadow effects in normal, and 16 cards in Easy mode. This is a 61% risk of shadow effects on normal and 57% in Easy, making shadow cards a recurring threat in this scenario-
- The average threat on cards revealed are 1.46 in Normal mode, and 1.36 in Easy mode. This ranges from 0 threat treacheries and side-quests, to 4 threat locations and enemies.
- Four cards in Normal and two cards in Easy contain the surge keyword, though other cards can surge if certain conditions cause them to whiff.
- Immunity
- While players are at Stage 1B, Thane Ulchor cannot leave the staging area.
- Thane Ulchor and Khamul the Easterling are both immune to player card effects.
- The Tower of Barad-Dur location is also immune to player card effects.
- The easterling attachment Fanaticism grants Immune to player card effects on the attached enemy.
- When the Guard tower is in the staging area, players cannot draw cards or gain resources from player card effects.
- When Catacombs is in the staging area, enemies in the staging area cannot take damage.
- When Side street is in the staging area, progress cannot be placed on other locations in the staging area.

Enemies
- We already talked briefly about Ulchor’s Guard, which has an engagement cost of 25, 2 threat, 4 attack, 1 defense, and 5 hit points. The low engagement cost means that unless you run fewer than three heroes or hobbits, you will likely have to deal with them when they appear. While Thane Ulchor is engaged with a player, Ulchor’s Guard engages that player, so during stage 2B they will try to swarm whoever is engaged with Ulchor. The 4 attack should not be underestimated and requires a dedicated blocker or a chump blocker to bring you out of the danger zone – a +2 attack bonus can cost you a hero if you try to block with a 2 defense hero. They also require six attack power to take down in one swoop, which is not trivial in the early game. And you have to face one in the early game, so you need to prioritize attack power for that or have a clear strategy for how you’ll handle it. The encounter deck contains 4 copies (3 on easy), which makes their appearance on the table quite likely. In a four-player game, you will not see them until the first encounter deck reshuffle, giving you a moment of respite. As a shadow card, they grant +2 defense to the attacking enemy until the end of the phase. This is a surprisingly annoying effect that can really mess up your math. Suddenly you will lack the attack power to take down an enemy, and you’ll have to wait for one more turn, with the risk of being overrun. However, this effect is rarely severe enough to require shadow cancellation.
- The Soldier of Nurn is a slightly less hard-hitting grunt, with an engagement cost of 28, 2 threat, 3 attack, 1 defense, and 4 hit points. After the soldier attacks, you place one card facedown under a Castle Side Quest. This effect can be annoying, but since it’s not a random card, you are in control of it. Often you might have a spare unique and expensive ally you cannot play or an event you keep in hand just in case, and those can be placed under a Castle Side Quest you planned on taking anyway. They require 5 attack to take down, which is often manageable. Hence, I’m not too worried to see this enemy unless I’m already getting overrun. They grant a +1 attack bonus as a shadow card, which I’m usually well-equipped to handle. If I run a dedicated defender, +1 might mean a single point of damage or two, which my defender should be capable of handling. If I run a chump blocker, they would die anyway. However, the shadow effect does punish chump blocking because if the attack destroys a character, you must place one card facedown under a Castle Side quest, mimicking the attack ability of the soldier. The deck contains 3 copies regardless of difficulty.
- The Easterling Mercenary has an engagement cost of 32, meaning that you can avoid him in the early phase of the game, depending on your starting threat. With 3 threat, 4 attack, 2 defense, and 3 hit points, he can be taken down quite easily, but he packs a mean punch. When he is revealed, you must either reveal an additional encounter card or progress cannot be placed on the current quest this phase. Unless I’m trying to make a major push, I almost always go for the latter option in true solo and spent a turn fighting him and hopefully clearing the active location through questing. It can be problematic if someone is about to threat out, but that is a corner case. You must, of course, take your board state into consideration when you make your decision. The encounter deck contains two copies on standard and one copy on easy, making him a rarer occurrence than the soldier and the Guard. As a shadow card, he grants the attacking enemy +1 attack for each Castle side quest in the victory display. This can be catastrophic in stage 2, and can cause the loss of a hero if you are unlucky. This effect, I would consider spending my shadow cancellation on.

- The Mordor Olog-Hai is the troll of the quest because, of course, they need to have a troll. 34 engagement cost does grant you some wiggle room early in the quest, but with 4 threat this one will be a nuisance until you are ready to deal with it. Four is hard to quest over repeatedly. With 6 attack, 3 defense, and 9 hit points, it has the usual troll stat line and requires significant effort to take down. The troll cannot have attachments, so no Forest Snare shenanigans. After it attacks and destroys a character you control, you must exhaust a character you control, which drains your ability to muster enough attack power to take it down. It will likely be the center of attention for a couple of rounds if it appears. It can be disastrous if it is revealed right after you need to take on the Nazgul or Thane Ulchor. The encounter deck contains two copies, so it is not a given that you will see it. On easy mode, that is reduced to a single copy. As a shadow effect, it grants +2 attack, which can be problematic, but often I’m happy to see it because that means one fewer in the encounter deck.
- Finally, in the enemy department, we have the Guard Dogs. Sorry, all of you who lamented over sacrificing Loyal Hound; you cannot pet this doggo and have to deal with it Old Yeller style. 12 engagement means that the dog is eager to play. 1 threat is, 2 attack, 1 defense, and 2 hit points means that it is not much of a nuisance in terms of staging or combat and is probably the only enemy in the deck that you can risk taking an undefended attack from unless you are running Gloin trick decks. The guard dog does surge so that it will bring additional trouble along. When you engage it, it deals one point of damage to a character you control, which can be a problem once damage starts accumulating if you don’t have enough healing or chumps to spread the damage out on. Otherwise, I’m usually fine with seeing this enemy. The encounter deck contains 3 copies on standard and 1 on easy. As a shadow effect, you will put Guard Dog into play engaged with you so that you will see this enemy one way or another. Cancel it if you are getting overrun, or let one of your attackers deal with it swiftly.

Locations
A common theme for the locations in this quest is that they try to stall you and prevent you from gaining an advantage over the encounter deck through the most efficient usual routes. This doesn’t tend to be a too big problem at lower player counts, but in four-player games, locations tend to accumulate, and these effects cannot be ignored because you cannot clear the locations as fast as they appear.
- The first location in the deck is Side Street, a 3 threat location requiring 3 progress to clear. While Side Street is in the staging area, progress cannot be placed on other locations in the staging area. It’s a classic counter to Asfaloth strategies that back in the day would nuke away locations from the staging area, making it much easier to circumvent nasty travel effects. It has a Travel effect that replaces itself in the staging area, forcing you to discard cards until a location is discarded and add that location to the staging area. Travel to this one can therefore be a bit of a trap – it’s a fairly benign location, but you are not really making any progress towards clearing the staging area by traveling there. As this one only requires 3 progress to clear, Asfaloth-like effects are a fairly good way to deal with it, especially at lower player counts, where the chances of seeing both copies are lower (as multiple copies will protect each other from Asfaloth). The deck contains two copies at standard and one copy on easy mode. This card has no shadow effect.
- Catacombs is a 4 threat 4 progress location that counters another common strategy in the game, namely the strategy of dealing damage to enemies in the staging area. While Catacombs is in the staging area, enemies in the staging area cannot take damage, protecting them from G-slaps and other damage effects. To travel there is a bit of a gamble. Each player discards an encounter card, and if that card is an enemy, the player puts that card into play engaged with them. This can lead to some nasty escalations where a player discards the troll or even the Nazgul if the deck has reshuffled. A good time to travel there is when you kept some characters back because you expected a fight but ended up not getting one because of the particular side quest you revealed or the other encounter cards that came up this round. Then you might want to “roll the dice” and see if you get an enemy. If you pack scrying effects like Henamarth Riversong or similar, you might even know what’s on top of the deck, giving you a fair assessment of the risk. Or you might have seen the troll drop as shadow cards already. The encounter deck contains two copies at standard and a single copy on easy. The card has no shadow effects.

- Fortress Walls is a location that you want to clear as soon as it appears unless you are running some kind of obscene resource acceleration or cheating allies into play through other means than paying for them. 3 threat, 6(!) progress, and a static effect saying that while Fortress Walls is in the staging area, the cost to play each ally increases by 1. It can be pretty brutal in the early stages of the game because it has a hefty threat cost, it stalls your ally play if you leave it, and it drains your progress like a sponge if you travel there, preventing you from liberating the cards underneath the side quests. To travel there, each player has to place 1 card under a castle side quest, which isn’t terrible, given how the other locations add enemies or new locations. Generally, you will just place a duplicate or a redundant ally underneath the side quest you planned to go to next and then forget about it. It is the kind of location where you might just have to suck it up and get it cleared if you can. Add location control cards if able to help clear it, or play allies through Vilya or Caldara, so you do not really care about the added resource cost, and blast through it once your board state is capable. The encounter deck contains two copies at standard and one on easy mode, and the card has no shadow effect.
- Guard Tower tries to halt resource acceleration and excessive card draw. With 2 threat and 4 progress to clear, it is tempting to leave it in the staging area. However, while Guard Tower is in the staging area, players cannot gain resources or draw cards from player card effects. This can be devastating to decks that rely on Steward of Gondor or generating an obscene amount of resources through Gloin. If you rely on these to gain tempo, it is a threat you need to deal with. To travel there, each player exhausts a character they control, which requires some coordination and timing to prevent players from accidentally taking an undefended attack or waiting for another round until they can take down an enemy. The encounter deck contains three copies, which makes an appearance likely. It has no shadow effect.
- Finally, we have the Plaza of Nurn, a location with X threat, where X is one more than the number of Castle side quests in the victory display and requires 5 progress to clear. The scaling threat cost is usually not a very big deal, as, by the time this one hits 4 threat, your board should be well-equipped to handle it and simply quest over it. It has few adverse effects in the early game, and you can actually clear it without adding new cards to the staging area. To travel there, each player assigns X damage to characters they control, which can be a problem, especially at higher player counts. On rare occasions, this will mean that you cannot travel there, but if that is the case, you might have bigger problems than this location in the staging area. Otherwise, I do not mind seeing it, though traveling there is, of course, that you need to make based on your board state. The encounter deck contains three copies on standard and two in easy mode, making its appearance fairly frequent. As for the other locations, no shadow effect.

Treacheries
As always, our analysis of treacheries focuses on what treachery you should save your cancellations for and whether the encounter deck has some nasty surprises you need to look out for in particular.
- The first treachery of the quest is Under Guard. When this card is revealed, you resolve the travel effect of the active location. As we saw above, several locations have travel effects that can stall you, so this can be quite bad, depending on the general board state. Catacombs or Side Street might have provided you with additional locations or enemies, and having to eat that a second time can cause you to become overrun. Plaza of Nurn might wipe a bunch of your allies because your preferred soaks cannot take any more damage. In the later stage of the game, this effect might be less severe. If you draw this card while there is no active location, you discard cards from the encounter deck until a location is discarded and add that location to the staging area. Usually, this is okay unless you are getting location locked. It might even benefit you if the discard ends up milling a bunch of trolls out of the deck. It can backfire if you are about to reshuffle Khamul back into the encounter deck once the effect is resolved… As a shadow card, this is also pretty rough, as it punishes the use of chump blockers. If the attack destroys a character (a likely scenario with Thane Ulchor, trolls, and the Nazgul as likely candidates), you must resolve the travel effect of the active location. And as we just discussed above, this might mean more locations, more enemies, more damage, or just prevent you from placing progress due to location lock. This is a good target for shadow cancellation. The encounter deck contains three copies on standard, and two copies on easy mode, making its presence a likely event.
- Ulchor’s Rage causes Thane Ulchor to make an immediate attack against the first player. This can be an absolute disaster, as Ulchor attacks for six, requiring either a dedicated, buffed blocker or a chump, and because an additional encounter card will follow the attack because of Ulchor’s Forced effect. This could result in more enemies, or even a second attack from Ulchor if you are really unlucky (or poor at shuffling). Ulchor “stealing” a blocker for a round might be really inconvenient and force you to sacrifice an ally as a chump blocker in the combat phase if you need to take additional attacks. It is also really inconvenient if you lose allies that you need for combat strength to take care of enemies staying around because of The Armies of Mordor. This is a card that I’m happy to cancel unless I’m well in control of the board. If Ulchor cannot attack for some reason, the card will gain surge. Though I am not sure there’s a situation in this quest where that could happen. As a shadow card, it deals 1 damage to the defending character, which can be a disaster if you use 1 hit point blockers like Defender of Ramas. In that case, you will have to take an undefended attack instead. It can also be problematic if the enemies have started to deal damage here and there to a dedicated defender and might provide the final damage to take them out. Therefore, it is worth keeping cancelation in mind if your defenders start taking heavy damage. The encounter deck contains three copies on standard and one copy on easy.
- Fanaticism is an Easterling attachment that attaches to the Easterling enemy with the lowest defense without having a copy of Fanaticism. While attached, it grants +1 threat, +1 attack, +1 defense, and immune to player card effects. If Fanaticism has no valid target, it gains surge. This card can be a bit of a mixed experience, but often I have found that it really isn’t too bad. Immune to player card effects can be a problem if you rely on Old Gaffer to prevent enemies from attacking. If you take attacks the normal way, this attachment will either buff Ulchor’s Guard or Easterling Mercenary to 5 attack. If you use chumps, this will not matter at all. But if you use a strong defender, like Spirit Dain or Beregond with toys, you will have to build them to take attacks from enemies with 6+ attack power, in which case the slight buff won’t matter. You might run into situations where the extra defense keeps you from killing enemies, but that is mostly of concern in the early game. This is usually not something I spend cancellation on. The encounter deck contains two copies, regardless of difficulty. The card has no shadow effect, providing a freebie in that regard.
- Determined Defense is a treachery that tries to stall you by ramping up threat. When revealed, you add 2 threat to the staging area until the end of the phase, plus 2 additional threat per Castle Sidequest in the victory display. This can cause the threat to increase quite dramatically, especially once you have cleared the first two side quests if your board isn’t 100% setup yet. In the early game, this is a blessing. 2 threat is the equivalent of a small enemy or an easy location that doesn’t require traveling or combat. If I can get this early, I will be very, very happy. As you start clearing the side quests, it becomes more of a nuisance, as it stalls you and keeps you from placing progress by eating it all away. In the final stage of the game, it can capsize your threat if you just try to break even to hold back characters for the combat phase. With the extra threat and/or lowered threat elimination level, a chunk of threat from a disastrous quest phase might be enough to push one of the players over the edge. However, for this quest, you will likely have brought a power deck, and once your deck is running, it should be capable of blasting through the final stages of the game. If that is the case, an extra 8 threat might be of limited consequence. As a shadow card, you exhaust a character you control, which might cost you a blocker or keep you from killing an enemy because of insufficient attack power. Whether this qualifies for cancellation really depends on the specific situation. The encounter deck contains three copies, and I hope to see each and every one during questing.
- Finally, we have The Dark Lord’s Reach, a card with amazing artwork that leads my thoughts towards the old classical Necromancer’s Reach. The similarity is not coincidental, as Dark Lord’s reach also deals 1 damage to each exhausted character but also forces you to discard an attachment from each character damaged by this effect. This is an interesting effect, as it seems to be a counter to the very powerful Dale strategy of throwing attachments on allies. Occasionally, it will snipe important attachments from characters that rely heavily on signature cards, like Saruman’s staff or Vilya. Normally this card might cause you to slow down and save Vilya effects for post-combat. However, I do not recommend that in this quest. The tempo loss is too much of a setback. If you run Silvan, this might outright clear your board, so depending on your build, this could be worth a cancellation. It will also make you very susceptible to future losses from Plaza of Nurn‘s travel effect. As a shadow effect, you must discard an attachment from a character you control, which can be very bad, unless you have an attachment or two that you don’t really mind tossing to this. If this would take away something important, by all means, cancel it. You need every advantage you can get. The encounter deck contains two copies on standard and a single copy on easy mode.

Side Quests
- The encounter deck contains two side quests. The first is The Dungeons of Dol Rhugar. This side quest requires four progress to clear, making it a potential target for clearing in a single quest phase. The card has surge and tries to slow you down by stating that while it is in play, no more than four progress can be placed on the current quest each round. This is potentially quite problematic because if you only place four progress per turn, you will have a hard time maintaining tempo and preventing someone from threating out. It offers a carrot in that if you clear it, the first player gets to pick a Castle Side Quest, and subsequently, each player looks at their cards underneath it, picks one, and adds it to their hand. For that reason, it is worth it to spend one turn clearing this side quest. The only time I wouldn’t do it is if I’m trying to clear the very first Castle Sidequest. In that case, it is better soldiering on and trying to liberate the cards underneath before you deal with this one.
- The second side quest is Unwelcome Travelers. It requires 5 progress to clear and does not have surge, which can be a nice moment of respite. While the side quest is in play, locations get +1 threat. This is not too much of a problem in solo, but at four-player, this can contribute significantly to location lock. And if you are location locked, it is really hard to clear this side quest, creating a bit of a vicious circle. Additionally, it is a tough side quest because if you select it as the current quest, the first player must discard cards from the top of the encounter deck until an enemy is discarded and put that enemy into play engaged with them. Therefore, you should only select it as the current quest if you are absolutely sure you can clear it and handle the enemy it spits out. Otherwise, I have often left it in the staging area if I don’t have too many locations, taking the extra threat as it comes. It is a card I am very happy to see as a shadow card, or even in play if I play decks with high willpower.

Tips and tricks
- Do not be afraid to scoop. This is an incredibly difficult quest, and you need a bit of luck to make it past the first Castle Sidequest. If you play solo, this will require multiple attempts. Success will depend on your opening hand, what remains in your deck, what you draw during questing, and what Castle Side Quest you get as your first one. These are all things you have very little control over, and you have to accept that your chances will be highly dependent on luck.
- Find a way to generate tempo. Your deck will run out of cards after a few rounds if you cannot manage to clear a castle side quest. You need a lot of quest power, a plan on how you want to deal with Ulchor’s Guards, and a road map for the order in which you want to take the Power of Mordor cards. Plan accordingly, and think about how you will establish a board state that can weather that initial barrage from the guards and your deck running out of cards.
- Think long and hard before you chump block in the early stages of the game. Your deck is a limited resource, so every ally dumped in the discard pile is an ally you might not be capable of easily replacing. Think about whether you can recur allies through effects like Guthwine or reap benefits from them through effects like Eagles of the Misty Mountains.
- Do not be ashamed to bring a power deck. If there ever was an occasion for bringing out your filthy Vilya deck or your Steward of Gondor, this is certainly the one!
- Have a plan for how to deal with Ulchor’s attacks. If you cannot recur chump blockers or do not have a 6+ defender, he will chip away at your board state. In the final stage of the game, you will quite likely have a few enemies to deal with because Ulchor is hard to take down in one swoop, and each attack from him brings along extra encounter cards. If you get to stage 2, you deserve to make it all the way! Prepare for the final battle.
- You know what card will be revealed once you advance to stage 2A, even though the card is technically not revealed. However, once the four cards have been dealt during setup, there will only be a single card left in the Power of Mordor deck. As you prepare to advance to stage 2, keep that in mind, so you do not get blindsided by Khamul or the Tower of Barad-Dur. You know what’s coming, so plan for it.
- If you cannot beat this quest for the life of you, here is a link to the deck I used to beat it, just for inspiration.
- In his playthrough (see below), Chad from Cardboard of the rings talks a lot about the timing of setup rules and how this quest essentially shuts down all player cards that have setup effects. This is because player setup effects trigger AFTER quest setup effects. This means that heroes like Thurindir and Messenger of the King only get to search the remaining four cards you have in your deck. For that reason, these cards are not great fits for this quest.
Playthroughs
The only playthrough I could find came from Cardboard of the Rings, where Chad took on the quest. Chad spends the first 13 minutes talking about the quest, so this is well worth taking a look at if you struggle.
This concludes one of the major milestones for the blog that was set in place 4 years ago. Not only does this article conclude the Vengeance of Mordor cycle, it also rounds out all the cycle’s quests that we have (that are officially released by FFG). From here, the blog will look to update some older articles with tips and tricks from the renewed card pool. We will also continue our efforts with the Saga expansions and the POD scenarios, to make sure that every released scenario for the game has a dedicated article on this site. This will also include the Nightmare articles (thank Eru there is no Nightmare version for this quest).
Once the official content has been concluded, our eyes will turn to fan-created content. There have already been several projects started that make new content for the game, so it seems fair to give those a dedicated article as well. There is no telling when we will start on these quests though, as a lot of things still have to be concluded with official content. We may even get new or revised content for the game by FFG, which will deserve articles or updates to older articles as well.

3 thoughts on “The Fortress of Nurn”