“Gollum looked at them. A strange expression passed over his lean, hungry face. The gleam faded from his eyes, and they went dim and grey, old and tired. A spasm of pain seemed to twist him, and he turned away, peering back up towards the pass, shaking his head as if engaged in some interior debate. Then he came back, and slowly putting out a trembling hand, very cautiously he touched Frodo’s knee–but almost the touch was a caress. For a fleeting moment, could one of the sleepers have seen him, they would have thought that they beheld a weary old hobbit, shrunken by the years that had carried him far beyond his time, beyond friends and kin, and the fields and streams of youth, an old starved pitiable thing.”
– The Two Towers, The Stairs of Cirith Ungol
The passage above is another of my favorites from The Two Towers. It is so heart-breaking just how close Smeagol comes to some sort of redemption, but how Sam’s suspicion drives him away. In the section that follows, Sam is startled by Smeagol and rudely asks why he is sneaking around. He fails to see the weary, tormented old Hobbit in front of him, trying to show a gesture of affection, but sees a monster. It seems like Gollum there decides that if a monster is what he sees, then a monster is what he gets. And the chance of redemption is lost. Truly a marvelous scene in a marvelous book. However, Gollum plays second violin in this scenario. If Sam thought Gollum was a monster, he hasn’t seen nothing yet…
Shelob’s Lair
- Found in The Land of Shadow Saga Expansion, scenario 3
- Official Difficulty: –
- Community Difficulty: 7.6
- Encounter sets: Shelob’s Lair, The Great Spider, Gollum, Morgul Nâzgul
- Quest cards: 3
- Play if: You like big boss enemies that stick around. You like playing with Gollum. You enjoy puzzle scenarios that require some thinking to complete. You enjoy discarding attachments for some weird reason.
- What is different about this quest?: You have a boss enemy that is indestructible but not immune to player card effects. You have Gollum – a double-sided ally/enemy. A lot of hand and attachment hate. You have a quest in three clear acts – intro (where the boss is not even there), build-up, and final confrontation.
- Solo or Multiplayer?: In solo, there is a lot of pressure on you to take attacks from Shelob and from dealing damage to her. Therefore, I believe this is slightly more manageable in multiplayer. In solo, you are also limited by the “one attack at each enemy pr. combat round.” If Shelob builds a ton of resource tokens, it can take a lot of time to chip them away before you can deal the real damage.
- Can I bring Side Quests for this scenario?: You can for the first quest card. However, during cards 2B and 3B, you are racing towards a final confrontation with Shelob, and stalling can be detrimental. Hence, it is generally difficult to run side quests in the latter half of the scenario.
The Quest
Setup
You start by setting The Cleft of Cirith Ungol, Shelob, and the entire The Great Spider encounter set aside, out of play. We will cover these when they make their entrance on the stage. The Great Spider encounter set is all associated with Shelob, so there is no reason to have them in play yet.

Sméagol returns and is put into play under the first player’s control. Sméagol is a double-sided objective ally with 2 willpower, 2 attack, 2 defense, and 5 hit points. He is immune to non-fellowship player card effects, and the first player gains control of him. Beefy ally! Be careful of letting him soak too much, though. If Sméagol is destroyed, the players lose the game! Unfortunately, he also has the following Forced effect: “if the player’s quest unsuccessfully, flip Sméagol to his Gollum side.” As Gollum, he has 2 threat, 2 attack, 2 defense, 5 hit points, and an engagement cost of 30. He is still immune to non-fellowship player card effects, and he now engages the first player. When Gollum engages the first player during the refresh phase, he makes an immediate attack, so this can be very inconvenient to deal with. If you are a true solo player, you are in luck – it is explicitly stated in the rules that in solo, there is no new engagement, and this attack does not happen. When you defeat him, he flips back to his Sméagol side, exhausted. You have successfully tamed him… For now…
Remember you are playing a Saga quest – so the first player must also take control of one of the versions of Frodo from the Fellowship sphere and attach The One Ring to him. I always prefer Black Riders Frodo. But as we will see, it can be pretty dangerous to actually use the Ring in this scenario.

Next, you make the Morgul Vale the active location. The Vale has 4 threat, requires 2 progress to clear, and is immune to player card effects. It also has a Forced effect: After Morgul Vale is explored, search the encounter deck and discard pile for a Morgul Wraith and add it to the staging area. Shuffle the encounter deck. Then, the first player must either exhaust The One Ring or discard 1 random card from each player’s hand. We will return to the implications of this in a second. It has 4 victory points, taking it out of the game when you explore it.
Finally, you add Sméagol’s Secret Way to the staging area. It has 2 threat, 2 progress, is immune to player card effects, and has a travel cost, requiring you to either exhaust Sméagol or discard 1 random card from each player’s hand. After Sméagol’s Secret Way is explored, each player either exhausts a character they control or discards 1 random card from their hand. It has 2 victory points.
If you play Saga mode, you must also remove Burdens with the Helm’s Deep and The Road to Isengard symbols from each player’s deck and attach A Heavy Burden to the Ring-bearer. This condition has the permanent keyword and states that at the end of the Planning Phase, each player must either raise their threat by 1 or exhaust the Ring-bearer. This actually means that Frodo is much less available in this scenario than you would think. If you really want to take advantage of him, you either need to keep everybody’s threat really low or pack some readying, such as Unexpected Courage or Fast Hitch.
Give the encounter deck a good shuffle, and we are ready to proceed to our first quest card…
The Stairs of Cirith Ungol (- Quest Points)

The first thing you will notice is that progress cannot be placed on locations with the Underground trait. That is all of the locations in the encounter deck, so you are on a clock here – stay for too long, and you will have a lot of locations in the staging area that you can do nothing about. Mind you that you can still travel to them if you want – though that would be a very silly thing to do! The goal of this stage is to clear Smeagol’s Secret Way. If that location is in the Victory display at the end of the quest phase, you advance. You also have a response here – once Smeagol’s secret way is explored, each player can discard three random cards to discard each Nazgul enemy in the staging area! It is a steep price to pay, but it helps you against those nasty Morgul Wraiths. An offer most tempting…

I admire this particular stage because it is a clever, wicked piece of design. Your task is simple on paper – clear two locations and get on with it. And you better do it before you get location locked. So is the strategy to just rush through them so that you can get on with the quest? Remember the Forced effect on the Morgul Vale. You start with the Morgul Vale as the active location – it only needs two progress to clear it, and once you do, it brings out a Morgul Wraith and forces you to either exhaust the One Ring (making the Morgul Wraith very angry!) or discard one random card from each players hand. I always, ALWAYS go for the discard. But this also sets high demands for your cost curve. You will very likely clear this location on turn one, and if you have to wait until turn 2 to play your key attachment, there is a chance it will get discarded. Your deck needs more or less to be functioning from turn 1. There are too many random discards to rely on a big hand. The Morgul Wraith hits hard – 5 attack, and it takes 13 damage to kill it in one go. This can be achieved with Tactics Eowyn, but even if you bring her, you might think about saving her mega attack for later. The presence of the Wraith and the fact that you will see at least one in the early stage of the game also means that using the Ring is extremely dangerous. We hates them! is a treachery where you often will end up exhausting the Ring, and if you run Black Riders Frodo, it can also be very tempting to cancel encounter cards – but having the Morgul Wraith engage you and making it Immune to player card effects is often deadly.

So if I don’t want to deal with the Wraith right away, is the strategy then to stumble and fail questing for the first few rounds deliberately? That would be a good strategy in a lot of other scenarios, but remember you have Smeagol along for the ride. And if you fail at questing, Smeagol flips to Gollum and starts attacking you. So now you have an extra enemy that you need to deal with. For this reason, you generally do not want to fail at questing if you can avoid it. While Gollum’s attacks are rarely dangerous (2 attack plus shadow), it can be more deadly with “We hates them!” as this grants him +3 attack. He also requires 7 attack to be put in his place, which is not insignificant. So stalling can be taxing on your resources, as you suddenly have to deal with this pest.
In true solo, you can use various Scrying tricks to peek ahead and see what the encounter deck has in stock. That way, you can ensure that you only quest for 1 or 0 progress, stalling the encounter deck, giving you one more turn to play cards from your hand and build a board presence. Far-sighted makes this work for any player count and is a good strategy to know what happens turn 1. It is a good idea to stall if you can. As we will see in a moment, stage 2 requires you to be ready to keep a steady pace towards the end-game. Take all the time in stage 1 you can get.
Once the Vale is cleared, the Wraith comes out, and you likely discarded a card. One way to deal with the Wraith is to engage it and have a dedicated defender who can take the attacks for multiple turns and then chip away at its health. This is a workable strategy, and it plays into the general strategy of the scenario. You need a dedicated defender later, so if your defender is ready, you can handle the Wraith like this. But keep in mind that some shadow cards grant additional attacks. This can cost you a hero. It is also taxing on your resources – you need to dedicate a lot of your bodies on the board to chip away at its enormous health pool.

Another strategy is to leave it in the staging area and trigger the response once you clear Smeagol’s Secret Way. Discarding 3 cards is a steep cost – ideally, these should be cards that are non-essential to your setup, and you should have some way to refill your hand later. I found Lindir and Elven-Light to be good for this purpose. Keep in mind that each player must discard 3 cards for this to work – I was unsure if the clause was fulfilled if each player at least discarded something, but asking around gave me the following answer: this is a “do X to get Y” effect. Hence, X must be fulfilled for Y to happen. So you need to keep some cards in hand if you want to take this option. No matter what, I do not recommend advancing if you have no way to deal with the Wraith. You do not want it to be around in the next phase of the quest. Take it down, one way or the other.
But before we even can trigger this effect, we need to clear Smeagol’s Secret Way. I might wait a round or two to go there once I clear the Vale. This is mainly because I want to be set up before I advance. As mentioned in the setup section, to travel to the hidden way, you must either exhaust Smeagol or discard a random card from each player’s hand. I almost always go for exhausting Smeagol. Once it is the active location, it will likely be cleared on the very next round. There, you will get the joy of a Forced effect, stating that once Smeagol’s hidden way is explored, each player must either exhaust a character they control or discard a random card from their hand. Again, I always go for exhausting. Of course, certain things can cause a change of plans – if you revealed a bunch of enemies, this might be too dangerous or simply not possible if you need them to defend or attack. But given that you likely want to discard 3 cards to remove one or two wraiths… You want to keep cards in hand. So always avoid discarding if you can. At the end of the quest phase, after the Secret Way is cleared, you advance to stage 2A…
Stage 2 – The Spider’s Pass (16 quest points)


Once you have advanced, the clock starts ticking for this scenario. Sure, you could stall for a long time if your defender is strong enough, but as we will see shortly, this is risky. Firstly, you add Shelob to the staging area. Shelob has an engagement cost of 50, adds 4 threat, attacks for 4, has 4 defense and 8 health. She cannot have attachments, is indestructible, and gets +1 threat for each resource on her. Importantly, she is NOT immune to player card effects! She also has a Forced effect: At the beginning of the quest phase, you must either place a resource on Shelob or she attacks the first player. So she will be your problem from the beginning of the next round. You also shuffle the Great Spider encounter set into the deck together with the discard pile, meaning that the Wraiths are now in the encounter deck again. Unsurprisingly, the Great Spider encounter set consists (mostly) of cards interacting with Shelob in one way or another. It also contains some nasty shadow cards that you need to be aware of. We will go through each one in turn further down.
In stage 2B, Shelob cannot leave the staging area, and Smeagol cannot attack or defend (but still quest and exhaust for travel costs). Furthermore, each player cannot play or put into play more than one ally per turn. I tend to forget that easily! Hence, this stage rewards decks that do not rely too much on ally swarms (like Three Hunters) or decks that need to be setup but then run without too much ally play (like Fellowship decks). It also makes it an inefficient strategy to chump block Shelob’s attacks – as you, in theory, then only can replace your dead blocker next turn, but nothing else in turn of allies.

This was already a lot of clauses, but the stage has one final clause for you: The players can, at a maximum place 4 progress here per round. So you need to stay here for at least four turns. And each turn, you potentially have to take one or more attacks from Shelob! On a surface level, the easy fix is to just add resources to her instead of taking attacks and just add allies/attachments to increase your willpower accordingly. After all, at this stage, the resources don’t really do much… But don’t be fooled! You will sincerely regret adding resources when you advance to the next stage. It is much better to bring a dedicated defender, preferably with some readying, and let that character handle Shelob.
You need to keep a good pace throughout this stage and clear locations as they come along. Especially if Shelob starts accumulating resources, threat can get quite high if you start experiencing location lock. Preferably you want to quest, so you add 4 progress each turn. It is not the end of the world if you end up staying for 4 or 5 rounds, but each round is another risk of Shelob hitting a bad shadow card streak, toppling you over. Make sure you play your ally each turn if you can. You want to be ready to make the final push once the stage advance. And don’t bother damaging Shelob with effects like Gandalf – in the end, it won’t matter. If you know the story, you know what awaits you when you advance – Gollum’s little plan comes to fruition, and he tries to take his Precious for himself. In this case, it means that when you advance, you should be ready to deal with Gollum attacking you (and deal with any enemies that might appear in the staging area). This means you must be able to survive a >2 damage attack and deal 7 damage to him in the combat round. Especially in multiplayer, he will be a nuisance. Deal with him swiftly.
Stage 3 – Gollum’s Betrayal (8 quest points)

The Cleft of Cirith Ungol is added to the staging area. Smeagol is flipped to Gollum, and all damage is healed from Shelob. Next, each player places a resource token on Shelob.

When Gollum is defeated, he is added to the victory display instead of flipping him back. So no more Smeagol for you in this campaign. You win when you place 8 progress, and both Gollum and Shelob are in the victory display. Notice that Shelob is no longer bound to the staging area – she can be engaged now by the player who has the best-dedicated defender or the largest attacking force to deal her massive loads of damage. However, there are a few caveats to that. First of all, Shelob gains a protective effect from the quest card: While Shelob has at least 1 resource on her, she gains: “Forced: When Shelob is dealt any amount of damage, cancel that damage and discard 1 resource from Shelob instead. You can see now why you should avoid placing resources on her if you can: Each resource basically grants Shelob a Feint, so in true solo, you must chip away at her resource pool one at a time. Indirect damage effects like the good old Sneak attack + Gandalf can be pretty effective here to remove them easily. In true solo, she will have at least two resources once you finally face her in combat (1 for the quest card, 1 for the Cleft, which we will discuss in a moment). In multiplayer, characters with Ranged are really nifty – they can declare attacks at her and take away her resources. You need to be prepared to take multiple combat rounds where you just chip them away until you are ready to deal her damage. At that point, activate your tactics Eowyn, or unleash your ally swarm: Strike her hard and take her down. After that, she won’t go away due to indestructibility, but you can add resources to her to your heart’s desire.
So how do we remove Indestructible from Shelob, then? By exploring The Cleft of Cirith Ungol. The Cleft has 4 threat and requires 4 progress to clear, and is Immune to player card effects. It has a Travel cost, requiring you to place 1 resource on Shelob to travel here. It has a victory point score, so it is added to the victory display once it is explored. However, while The Cleft of Cirith Ungol is in the victory display, Shelob gets +2 Attack, loses the Indestructible keyword, and gains: “Shelob engages the first player.” So once you explore it, it is on! So the plan is simple: Clear The Cleft and smack the spider!

With both the Cleft and Shelob in the staging area, that is at least 9 threat without any other locations or enemies. That can be quite hefty to quest over and place your 8 progress. Usually, in true solo, I will engage Shelob right away, so I can start clearing resources or deal some damage. It is likely that Shelob will get a resource or two from encounter/shadow cards, so expect to be able to tank her for a while. They can also grant her additional attacks, so equip your defender with some readying. My favorite (and thematic) approach is Sam Gamgee with a Hobbit cloak, Fast Hitch, and a Rosie Cotton bonus. I also like to add the Staff of Lebethron to minimize the risk of nasty shadow cards. I will try to get the 8 progress as fast as I can and potentially clear locations from the staging area as well – that way, I can quest at a bare minimum and keep my allies and heroes available for fighting. Once that is done, and you have cleared all the resources, I hit Shelob hard and fast, so I can place the 8 damage needed to take her down. Then I will clear The Cleft so she does not get the attack bonus. When the Cleft is explored, she loses Indestructible and collapses. Congratulations! You have now walked into the Land of Mordor!
The Keen eyed Tooks amongst you are surely creasing your brows, thinking, “hold your horses, pal! Surely it cannot work like that? Can you just postpone traveling to the Cleft until the very end?” to that I say, “yes, my good sir/madam, you certainly can!”. In the Nightmare version of this quest, they made an extra rule to deliberately sabotage this tactic, stating that you cannot travel to locations other than the Cleft if it is in the staging area. So there you have it. It works!
If you play Saga, you add A Heavy Burden to your campaign pool. What a fabulous prize for all your effort…
The Encounter Deck
Global

- The encounter deck consists of 27 cards at the game’s beginning before the 10 card Great Spider Encounter set is shuffled into the encounter deck. On easy mode, the encounter set starts at 20 cards and increases with 6 cards from the Great Spider Encounter set.
- 14 cards have shadow effects prior to the Great Spider set being added, bringing the risk of shadow effects to 51% (45% on easy mode with 9 cards). After the great spider set is shuffled in, 8 cards with shadow effects get shuffled in, increasing the risk of shadow effects to 59%. On easy mode, 5 cards with shadow effects get added, taking the risk to 50%.
- Average threat is 2.04 per card on Normal and 1.72 on Easy once the Great Spider is added. Before that, it is 1.95 on Normal and 1.86 on Easy.
- Surge is present on 5 cards on Normal and 3 cards on Easy (We hates them! and Lurking Malice)
- Peril is present on 10 cards on Normal and 7 cards on Easy (both Orc enemies and Lurking Malice)
- Immunity:
- Morgul Vale, Smeagol’s Secret Way and Cleft of Cirith Ungol are immune to player card effects.
- Shelob cannot have attachments.
The initial encounter deck is small and skewed a little towards revealing more locations than other card types. This changes when the Great Spider set is added since that adds 10 (normal) or 6 (easy) treacheries to the mix. The heavy focus on treacheries in the second half of the quest makes cancellation a necessity for your player deck.
Enemies
- The encounter deck is a little different from normal in that it is very light on enemies. First of these is the Morgul Orc. 1 threat, 3 attack, 2 defense, and 3 health means it goes down rather easily. It has an engagement cost of 35, which is quite generous for an enemy of this strength – it will mean that if you get this in one of the first rounds, you may likely make a choice on whether to engage it. When revealed, you must either discard 1 random card from your hand or reveal an additional encounter card – and as we previously discussed, in the first stage of the game, cards can be a valued resource. So I tend to hold on to it and take the pseudo-surge on the chin. Sometimes that backfires spectacularly – often, it will turn into a location or a treachery. The shadow effect punishes you from chump blocking, as it forces you to discard a random card from your hand if the attack destroys a character. Usually not super relevant for me, as I usually play this with a dedicated defender character. The encounter deck contains 4 copies (3 on easy).
- The little Morgul Orc also has a slightly larger cousin: The Cirith Ungol Orc. 2 threat, 4 attack, 2 defense, and 5 health is a crucial stat tweak that has a lot of punch – going from 3 to 4 attack takes it out of range from more casual defenders, and 7 attack to kill it means that if can be harder to take it down in one go in true solo. 5 health means it cannot be Gandalf bombed. One thing that is nice is that it has an engagement cost of 40. That means it can left in the staging area until you feel like you are ready to deal with it. It only adds 2 threat, which, most of the time, is manageable to quest over. When revealed, you must either discard 1 random card from each player’s hand or it makes an immediate attack against you. What I choose depends on what stage of the game we are in. If I am in the first stage, I will usually go for the attack. At the later stages, once Shelob is out, I will just toss a card and be done with it – I am set up by then. It has no shadow effect, which means I am happy to see it during the combat phase. The encounter deck contains 3 copies (2 on easy).
- Lastly, we have the big one – the mini-boss – the Morgul Wraith. Perhaps my favorite shadow card, as it has no effect and, after the attack, will go to the discard pile. But during stage 1b of the quest, you will see one once you explore the Morgul Vale. 4 threat, 5 attack, 4 defense, and 9 health is no joke and requires a dedicated defender or a poor chump blocker. With an engagement cost of 45, you pretty much choose when/if you want it to come down. However, while The One Ring is exhausted, Morgul Wraith gets -30 engagement cost and gains: “Immune to player card effects.” So if you exhaust The Ring, things can get very dangerous very fast. The encounter deck has a few ways to trick you, such as combining We hates them! into a Wraith (as We hates them! often will cause you to exhaust the Ring). The presence of this enemy means that I think long and hard before I exhaust the Ring – often, I will only do it if the revealed card would cost me the game. It is a gamble and something you need to keep in mind. Of course, you can snipe them away with a lucky Eagle of the North or a Great Hunt. Or you can engage it an stun lock it with the thematic Gaffer Gamgee trick and direct all your firepower against it. The encounter deck contains 2 copies and 1 copy in easy. It feels incredibly good when you manage to discard both, using the effect on stage 1B.

Locations
- The first location in our encounter set is Deep Dark Passage. With 2 threat it is not adding much to the staging area, but as it requires 5 progress to clear, it can halt you quite a bit in the second stage of the game. While Deep Dark Passage is in the staging area, it gains: “Forced: When any amount of progress would be placed on a location in the staging area, reduce that amount by 1.” This is basely anti-Asfaloth/location control tech – it does not want you to simply snipe locations away. It also has a Travel effect: you must exhaust Smeagol to travel here. This basically means that you can only travel there in stage 2B, as progress cannot be placed here in stage 1B (it is an underground location), and you do not have Smeagol in stage 3. However, it is still quite the softball, and one I am not too sorry to see during questing. The encounter deck contains 3 copies, and it has no shadow effect.
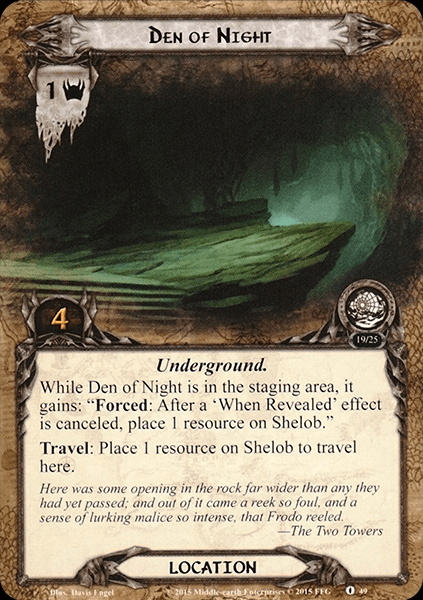
- Next is Den of Night. With 1 threat and 4 progress to clear it, this is a location I almost always leave in the staging area. It is Underground, so no progress here during stage 1! However, the main reason for this is because of its travel cost: you must place one resource on Shelob to travel here. And what did we say about placing resources on Shelob? Not even once! While Den of Night is in the staging area, it gains: “Forced: After a ‘When Revealed’ effect is canceled, place 1 resource on Shelob.”. Hence, leaving it does hamper your ability to Test of Will. But I will say it is a small price to pay for 1 threat in the staging area. It is another card I am pleased to see during the quest phase. It has no shadow effect, and the encounter deck has 3 copies.
- The Under-Way is another softball, in my humble opinion: 2 threat, 3 quest points, and Underground. While The Under-way is in the staging area, each Orc enemy gets -5 engagement cost and gains: “Forced: After this enemy engages a player, deal it a shadow card.” So this is most problematic if revealed during stage 1. The low progress cost means this is one I often will travel to – especially because it has no travel cost. Of course, it can cause situations where you suddenly have to engage an orc enemy you did not count on, but since you most likely brought a deck built for combat to handle Shelob, you will likely be fine. And if you are disciplined about clearing out the active locations, then you can just travel to it straight away and avoid the forced effect. The shadow effect is much, much worse: Deal the attacking enemy 2 additional shadow cards. This can be disastrous if dealt to Shelob. Cancel if you can. The encounter deck contains two copies (one on easy).
- Next, we have the Spider’s Lair. 3 threat and 4 progress, with something as rare as a benevolent effect when it is explored, causing you to remove 1 resource from Shelob! However, it also has a Forced effect: After The Spider’s Lair becomes the active location, Shelob makes an attack against the first player. I am often well-equipped to handle attacks from Shelob, but taking extra attacks always comes with risk – especially if I have burned my shadow cancelation for the round on the Quest Phase attack. However, 3 threat is enough that I will likely want to clear it. It is a good one to keep in the staging area until the very end, so it can help you chip away at those resources on Shelob. Keep in mind that the attack is not a Travel cost but triggers whenever it becomes active – so no location swap shenanigans for you! If you haven’t seen any Deep dark passages yet, it can be a good target for progress placing tricks! This location has no shadow effect, and the encounter deck contains 2 copies.
- Lastly, we have a bonus location, which is only added after the Great Spider encounter set is shuffled in. This is the Blocked tunnel. 3 threat and 9 progress would make it tempting to leave it in the staging area. However, you are not so lucky: When it is revealed, you must make Blocked Tunnel the active location, returning any previous active location to the staging area. This means that in addition to clearing this, you must also pay travel costs again, which can be pretty bad for locations like Spider’s Lair (which, granted, has a pseudo-travel effect). However, there is a thematic home run here: as an action, you can exhaust a character with a Weapon attachment to place 3 progress on Blocked Tunnel. And any player may trigger this effect. In Saga, you will likely have Sting, and this location may cause you to consider a weapon or two. However, it is a major stall, effectively making the quest threshold much longer. This also means that you might need a few turns to clear it, increasing the risk of location lock. Proceed with caution, and consider a cancelation if you can, and you haven’t seen any Dens of Night. This is a location I am happy to avoid, and it makes it dangerous to include tech like The Hidden Way. As a shadow card, I am happy to see it, as it has no effect. The encounter deck contains two copies.
Treacheries
- The first treachery that begins play in the encounter deck is Exhalation of Decay. When revealed, each player discards 1 random card from their hand and 1 non-objective attachment that player controls. This can be pretty rough early in the game, but later when I have drawn aggressively to find my key pieces, I usually have a card to spare. It can be particularly troublesome if you are hoping to trigger the effect on agenda 1B to discard all the Nazgul – then you might suddenly be short of cards! Of course, it is also problematic if it takes away a key attachment. But often, I will have an attachment in play where I have a doublet in my hand or one that is replaceable later. Cancel it if it breaks your flow completely; otherwise, I recommend you take it on the chin. As a shadow card, you must discard an attachment you control – not necessarily from the defending character, mind you! Again, not what I save my shadow cancellation for. The encounter deck contains two copies.
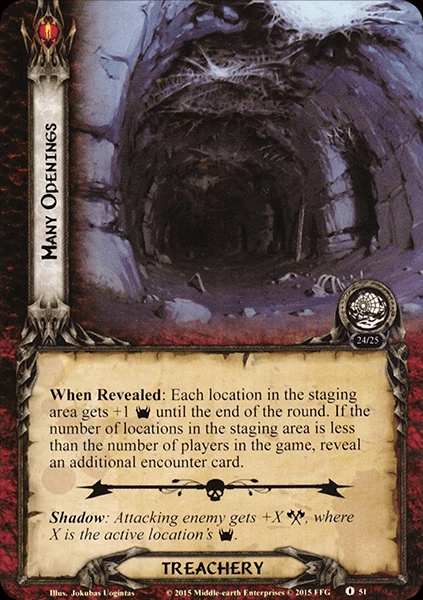
- Many openings is in my opinion quite a soft ball and a good reason to keep a location or two in the staging area. When revealed, each location in the staging area gets +1 threat until the end of the round. If the number of locations in the staging area is less than the number of players in the game, reveal an additional encounter card. So it has pseudo-surge if you have few locations there. But I would make the argument that at higher player counts, locations tend to accumulate. So this will often not be a problem. Of course it can be inconvenient if it impairs your progression in stage 2. But then again, if a couple of extra threat points break you, you were on shaky ground in the first place. As a shadow card it is much more dangerous: attacking enemy gets +X attack, where X is the threat of the active location. This can be very dangerous on Shelob! So I definetely prefer it in the quest phase. The encounter deck contains 2 copies, 1 on easy.
- Call of the Ring makes a return: When revealed, the first player must choose: either search the encounter deck, discard pile, and victory display for a Nazgul enemy and add it to the staging area, or exhaust The One Ring and reveal the top card of the encounter deck. The latter can be quite a gamble if you are unlucky and draw a nazgul – then you may be in for a world of hurt. Keep an eye on how many nazguls are in the discard pile when you make this decision. I will usually go for the gamble anyway. Though this may cause the occasional scoop in solo. The shadow effect is another rough one: attacking enemy makes an additional attack after this one. Again, on Shelob this can be devastating, and a good reason why your defender should have some sort of shadow cancellation or readying available. The encounter deck contains two copies, one on easy.
- We hates them! is not what our editor screams at us when we exceed our deadlines, but a treachery that either causes Sméagol to flip to Gollum, or causes Gollum to make an immediate attack. The first player can spend 1 fellowship resource and exhaust The One Ring to cancel this effect. This card has Surge, so you can have a situation where you exhaust the ring and draw into a nazgul. This is often game over, or at the very least, a serious setback. However, getting Gollum back in line is also draining of resources, and I usually prefer to take the gamle and exhaust the ring. Just know that it might cost you the game! As a shadow card it is not too bad: attacking enemy gets +1 attack or +3 if attacking enemy is Gollum. This can be bad if you use Frodo for blocking (which I occasionally has done, due to Gollum’s low attack). But on Shelob, an extra point of damage is rarely the end of the world. I save my cancellation for something else. The encounter deck contains 2 copies, 1 on easy.
From here, we proceed to the treacheries from the Great Spider Encounter set.
- First of these is Shelob’s Poison. This treachery is a condition attachment, and when revealed you attach it to a hero you control and exhaust that hero. It gains the text: “Limit 1 per hero. Treat attached hero’s text box as blank, except for Traits. Attached hero cannot ready.” So essentially it takes a hero out of your lineup. I often end up putting it on Frodo in solo, as it is rarely the end of the world to have him unavailable. However, this card is the reason you must pack condition attachment removal like Power of Orthanc or Miner of the Iron Hills. You cannot even bypass it by drawing into it as a shadow card: the shadow effect states that if attacking enemy is Shelob, you resolve the “when revealed” effect. So pack that condition attachment removal! The encounter deck contains 2 copies, 1 on easy.
- Lurking Malice is the main reason why you equip your defender with readying effects. When revealed you must either place a resource on Shelob or she makes an immediate attack. I will often take the attack, though there are situations where I will take the resource: At the end, where Shelob is damaged, but I have yet to clear the Cleft. Or if there is no resource on her, and I am about to clear a Spider’s Lair, which immediately would remove it again. It is a decent thing to spend a test of will on. Attacks from Shelob tend to escalate so better to nip it in the bud. The shadow effect of this card is absolutely brutal: If attacking enemy is Shelob, place 1 resource on her. Then, she gets +1 attack for each resource on her. It sets you back form victory and causes her to make a potentially huge attack (especially in multiplayer). This is one you want to cancel. And the encounter deck contains 3 copies (2 on easy) so you are likely to see it.
- The final card of the set Rage and Hunger is another candidate for Test of Will. Shelob gets +2 attack until the end of the phase, and make one attack against each player. this can easily turn into a blood bath. I have already stated it many times: You need a good defender with readying. As a shadow card, if attacking creature is Shelob, she makes an additional attack after this one. Chain attacks are always a good thing to cancel. You will not regret it. This is another card that comes in 3 copies (2 on easy) so you have a high chance of seeing it. You will rarely be happy that you do.

Tips and Tricks
- Readying effects for your defender are really important. Many shadow cards and encounter cards can cause Shelob to attack again, so be prepared. Shadow cancellation can help mitigate this risk.
- Bring condition attachment removal. While Shelob’s poison is only present in two copies, it will resolve whether you see it as an encounter card or a shadow card (unless you straight up cancel it). if you can’t remove it, it removes one of your heroes from the rest of the game.
- Remember that Shelob is not immune to player card effects! This means she is open to weird stun lock combinations and direct damage effect. Take advantage of this, you need all the help you can get! Especially direct damage can be a boon against resources on Shelob.
- At lower player counts, encounter deck scrying can be a tremendous advantage to stall your advancement towards stage 2. If you can navigate that razor’s edge of not really questing but not fail either, then you are in a good place for setup.
- Consider leaving that ally swarm deck in the box. Remember you can only play one ally pr turn in stage 2!
- Say it with me: Don’t! Place! resources! on! Shelob! (if it can be avoided)
- Given Shelob’s high engagement cost, Staff of Lebethron is a great solution for her shadow cards.
- This is a scenario that can heavily punish you for using the Ring. You are coming closer to the enemy’s land. Act accordingly.
- Even though you ideally want to stall early in the game, once you hit stage 2, it’s pedal to the metal. Better questing too much than too little – an untimely Gollum appearance can really ruin your day. And once Shelob starts attacking, it’s a race against time.
Playthroughs
- Cardboard of the rings have several playthroughs. The thematic campaign, Chad’s campaign attempt one and two,
- one-stop coop-shop also did a playthrough. This one has thumbnails for every single round of the game, so you can jump easily between the early and late game, and get a feeling for approximate time required for each phase.
- Warden of Arnor also did two videos for their Line Unbroken series(video 1) and video 2
- LOTR LCG solo did a progression video. It is only one year old! The community is alive and well, folks!
- Cardtalk has a Bond of Friendship Hobbit deck video. A popular and somewhat thematic approach to the quest!
- If you prefer plays with real cards, Carl Swanson (there and back again) did this video and this video
Our heroes have now vanquished the Great Spider and entered Mordor! Final leg of their journey awaits. But we must leave our brave friends for now, and turn our gaze to the West. Something is stirring underground…

2 thoughts on “Shelob’s Lair”