With the first two custom scenario kits focusing on the forest of Mirkwood and reusing art from (mostly) the first cycle, the location was pretty much milked for all that it’s worth. So when GenCon 2019 and that year’s Fellowship event needed a location for their custom scenario kits, the second cycle of the game was used. The two kits, The Mines of Moria and Escape from Khazad-Dum bring the players back to Moria, reusing a lot of artwork from the second cycle and the other times that we have ventured through the deep darks of Khazad-Dum. With the Balrog, Nameless Things, the Watcher, and plenty of other nasty critters living deep underground, these two expansions offer brand new challenges to field against your opponents.
In this article, I will only be discussing the encounter cards, synergies, and quest cards from the Mines of Moria set. The encounter sets will again be compatible with the ones from Escape from Khazad-Dum, but not the quest cards. For those looking to bring a complete encounter deck to a convention to challenge their opponents, I would suggest using both sets to mix and match encounter cards, but remember that quest cards cannot be mixed. If you are going head-to-head against another player, you can take on a Mirkwood quest while they tackle a Moria quest. They are designed to take roughly as many rounds to clear.
The Mines of Moria
- Found in: The Mines of Moria Custom Scenario Kit (GenCon 2019)
- Compatible with: Escape from Khazad-Dum
- Encounter decks: 70 cards divided in 14 packs of 5 (sets 1-14 in this kit).
- Quest cards: 7. Stage 1 is mandatory, but stages 2 and 3 can be selected from 3 different cards.
Synergies
We have swapped our setting from the forest of Mirkwood and the Anduin River to the high peaks of the Misty Mountains and the many underground caverns there. Because of the change in setting and with new enemies, there will be many different synergies that you can incorporate into your encounter decks. Some of the more generic ones (increase threat, deal direct damage, etc.) will still be here, but you can now focus on Nameless enemies or hordes of Goblins. The following synergies are present in the 14 encounter decks that can be found in this kit. These can be handpicked from the different sets for a tricky encounter deck, though I would suggest you invest in at least 2 synergies to keep your opponents on their toes.

- No Shadow effect, Location Lock
- Spider synergy, Counter canceling, Threat Boost
- Spider synergy
- Enemy buff, Location lock, Threat boost
- Location lock, direct damage
- Spider synergy, Location lock
- Spider synergy, Location lock, direct damage/threat raise
- Spider synergy, Location lock, Threat boost
- Threat raise, Threat boost
- Counter canceling, Threat raise
- Goblin synergy, Threat Boost
- Goblin synergy, counter healing, direct damage
- Goblin synergy
- Goblin synergy
Of course, some encounter sets try some generic strategy that I won’t cover here. Location lock has been described several times, and I think we all know by now what to do to make a location lock encounter deck work. Other strategies should also go without further explanation, like raising your opponent’s threat or dealing direct damage to their characters. These synergies are nice to include as secondary or tertiary synergies for your encounter deck, aside from some of the unique synergies that these encounter sets have to offer.
Spider synergy

Just the fact that we have left Mirkwood does not mean that we won’t encounter any spiders here in Moria. There are a few sets that will bring out these 8-legged horrors and will try to limit or reduce the progress you make during your turn. That’s because one of the techniques that these spiders use to slow you down is by removing progress from the main quest or limiting the amount of progress you can make in one turn. Cards like Spider Broodling will remove 2 progress each time they engage (or if an attack with them as a shadow card destroys a character). In order to repeat this removal of progress, Deep-Dweller‘s When Revealed effect and the shadow effect on Web-spinner and Hive Guardian will return the attacking enemy to the staging area. This can cause you to have to engage enemies again, triggering their “When Engaged” effects again. This can also synergize well with other enemies, especially some from the Escape from Khazad-Dum set.
Aside from removing progress, the Spiders also got a fresh new 3-cost enemy to lead the charge. The Brood-mother is a pretty big spider enemy that is immune to non-combat damage and player card attachments. As long as this enemy is in the staging area, no more than 5 progress can be placed on a stage each round (not counting any active location). While there is nothing stopping players in the late game from killing this spider quickly, the many shadow effects that can push the Brood Mother back to the staging area can be bothersome. And in the early game, this enemy will be too big to handle on top of any other enemies that might be in play.
All of these spiders staying in the staging area and refusing to die also makes the Grabbed by Spiders treachery quite nasty. Players will have to remove characters from the quest equal to the number of Spiders in play. If several have been returned to the staging area through any means, then this treachery could just end up reducing total willpower by a significant amount. And if Spider Burrow is in play, any spiders that are still engaged will be more difficult to kill, thanks to an increased defense.
Counters: With so many enemies returning to the staging area, you will either need to take care of these Spiders before they attack or kill them in the staging area. They don’t have a lot of hitpoints (except the Brood Mother), so direct damage can work against the majority of spiders. You can also use effects like Quick Strike to kill enemies before they attack you or cancel their shadow effect if you are afraid to have to send them back to the staging area. While engaged, the spiders aren’t the worst to have to defend; you just have to make sure that they don’t swarm you. Kill as many as you can so that an unexpected Deep-Dweller doesn’t send them back to the staging area.
Goblin synergy
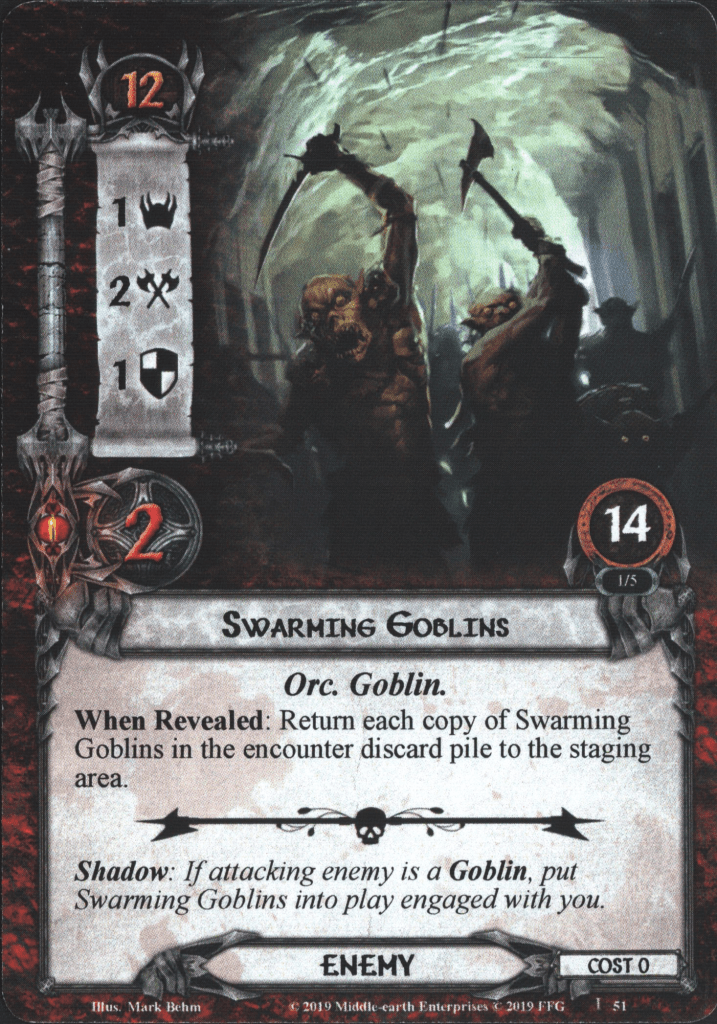
While there are certainly more Goblins to include in your encounter deck if you mix it with the Escape from Khazad-Dum set, there is a nice selection to include in this pack alone. It comes with a unique 3-cost enemy (Goblin Warlord), a location that boosts the attack on each Goblin (Goblin Tunnels), and a host of small Goblin enemies that can engage everyone and try to get even more enemies out. This can be seen with the When Revealed effects on the Goblin Sneak, which fetches an additional 0-cost Goblin, and with the Swarming Goblins that will pull out every copy of themselves that is in the encounter discard pile.
The strength of the Goblins really comes in numbers, not in their hitpoints or attack stat (not counting Goblin Tunnels). The Goblin Archer, for instance, will deal damage at the end of each encounter phase equal to the number of enemies that are in play. This can really deal a lot of damage to your opponents when they just had to bring out more enemies due to engaging Goblins. Another nasty combo to include is with the Massing in the Deep, and They Are Coming treacheries. These will bring out even more enemies and will cause them to make additional attacks. This is all hoping that your opponents do not kill all of your Goblins, which can be a concern, considering their lack of high defence or large hitpoint pools.
Counters: Goblins are weak but can find strength in numbers. As long as you have enough defenders, you should be able to defend the wave of enemies and then counterattack. Dunedain decks will also have an advantage here since they will be engaged with a lot of weak enemies. Do try to kill them, though, as there are several effects that can return enemies to the staging area or force additional attacks. If you have to reengage these enemies, they might bring their friends back from the discard pile.
Threat Boost
No, I do not mean raising the threat of your opponents but instead boosting the threat of any enemy and/or location currently in the staging area. This combos very well with location lock and methods to return enemies to the staging area. There are also treacheries that add threat to the staging area themselves, which can sometimes end up being much more threat than the players anticipated. Dark and Dreadful will, for instance, discard a random card from each player’s hand. The threat in the staging area is then raised by the total cost of cards discarded this way. Not only can they get unlucky and discard a 5-cost card this way, but it also prevents your opponents from playing that card the next round. Lurking Malice does a similar thing with resources, causing players to have to delay paying for high-cost cards and having to endure +1 threat for each resource they just had to discard.
There are various ways that cards currently in the staging area also get additional threat that might last longer than a single round. Ancient Guardroom will grow in threat as the opponents play more events, and Many Pillared Hall will gain more threat the more copies of it are in the staging area. Combine this all with Spider enemies returning to the staging area and Signs of Conflict adding +1 threat to all cards in the staging area, and your opponents will need a ton of willpower to get through the quest this round. This can delay their progress, allowing you to get ahead. Of course, this is all an ideal situation, but even one of these cards sitting in the staging area can delay your opponents for long enough. It can also make it pretty entertaining for you as the builder of the encounter deck to see them have to discard all their resources that they were planning to use for something big.
Counters: It can be difficult to anticipate when the threat in the staging area will explode. But with scrying, you can see the effects coming and adjust your willpower accordingly. Even then, being able to cancel certain treacheries will be important since it could make the difference between advancing and staying at the current stage for another turn. Bring enough willpower to every quest, and hope that the encounter deck doesn’t reveal several copies of similar cards this round.
Counters

When going through the cards, I noticed a lot of encounter cards shut down a particular aspect that a deck can have. An example is Darkened Stairway, which punishes players for canceling When Revealed effects. Other locations can shut down healing or location control, rendering some cards in your opponent’s decks useless for a while. This is a difficult synergy to include in your encounter deck and will more often be used as the final few cards of your deck to round it out. If you know your opponent’s deck beforehand, you can easily swap some cards around to include some counters to their strategies. For instance, a deck that runs Council of the Wise will have a hard time against the Ancient Guardroom, which gets extra threat every time an event is played.
The issue with these cards is that if your opponents aren’t running that particular strategy that you hope to counter, then the included cards are next to worthless. Perhaps a shadow effect might still be useful. You can also filter your encounter deck a bit every time that the players advance to the next stage. Still, you might end up in situations where the opponents will see it as a “free” encounter card or a location they leave up in the staging area for the rest of the game. However, if you include all of the cards that counter player card mechanics, you could end up in a situation where players aren’t allowed to do anything anymore, which can be a shortcut to them stalling out and losing the game.
Counters: Counters to counters, how deep does this rabbit hole go? In all fairness, you could run into some cards that prevent your decks from doing things like placing progress on locations in the staging area or reducing your threat. Remember that there are probably not that many cards in the deck that do this, so if you manage to get rid of that particular card that counters your strategy, you should probably be fine for a few more rounds. Alternatively, you can also try to put those cards in the victory display so that you never see them again.
Quest cards
Now that the different synergies in these encounter sets have been discussed, it is time to look into the different quest cards that you can put the players through. Remember that it is important to select your encounter sets at the same time that you select your quest cards since they can work with each other as well. A quest card that forces players to take on more enemies works pretty well with Goblin enemies that continue to swarm as well! The format for quest cards is the same for the two Mirkwood quests, so stage 1 cannot be chosen. Instead, you are given a selection of 3 different stages 2B and 3B to pair with each other and make your scenario. We’ll go through all the details in this section of the article so that you can make the best selection with the encounter deck you want to make.
Quest card 1: To the West-Door – 5 quest points

The setup for this quest is surprisingly beneficial for the players. They get to add a resource to the resource pool of each hero they control. This imitates Easy mode but helps to get the decks rolling a lot faster than they normally would. And they are going to need that quick start since the second part of setup is not as beneficial. The players are instructed to add The Watcher to the staging area. This version does not appear as menacing as other iterations we’ve seen in the past, but remember that The Watcher will get +2 threat and +4 hitpoints per player. That can add to a lot of threat in the staging area early on, and quite a tanky enemy that needs to be killed before players can advance to stage 2.
To add to the misery, the Watcher is immune to player card effects and cannot be optionally engaged. The engagement cost of 50 will also keep it in the staging area. The way that the players can start to kill the Watcher can be found on the other side of the quest card. Side 1B requires that the players make 5 progress before they can interact with The Watcher. Once 5 or more progress is on the quest, The Watcher is considered to be engaged with each player and will attack them in turn order during the combat phase. A shadow card will be dealt for each attack. The Watcher will have to be defeated before the players can advance to the next stage.

So the first goal at this stage will be to make at least 5 progress. This can be achieved on turn 1 since The Watcher will be all there is in the staging area going into the first quest stage. Once 5 progress is made, the players will have to take the Watcher’s attacks, but he only hits for 4 attack strength. This means that some decks might want to stall at this stage and go to a player side-quest first. This can also be done after 5 progress is placed on the quest if it is taking a little while longer to kill The Watcher. The thing is, the players can only interact with The Watcher while there is 5 progress on the main quest. If the encounter deck happens to include ways to reduce the amount of progress on the quest card, The Watcher suddenly isn’t engaged anymore, and players will have to spend more time at this stage before they can advance. If you are playing this quest competitively, then that delay can give the other team an early lead. So it is advised to get at least two turns worth of progress on the main quest in order to prevent cards like Cobwebbed Cavern from removing enough progress that the Watcher submerges again.
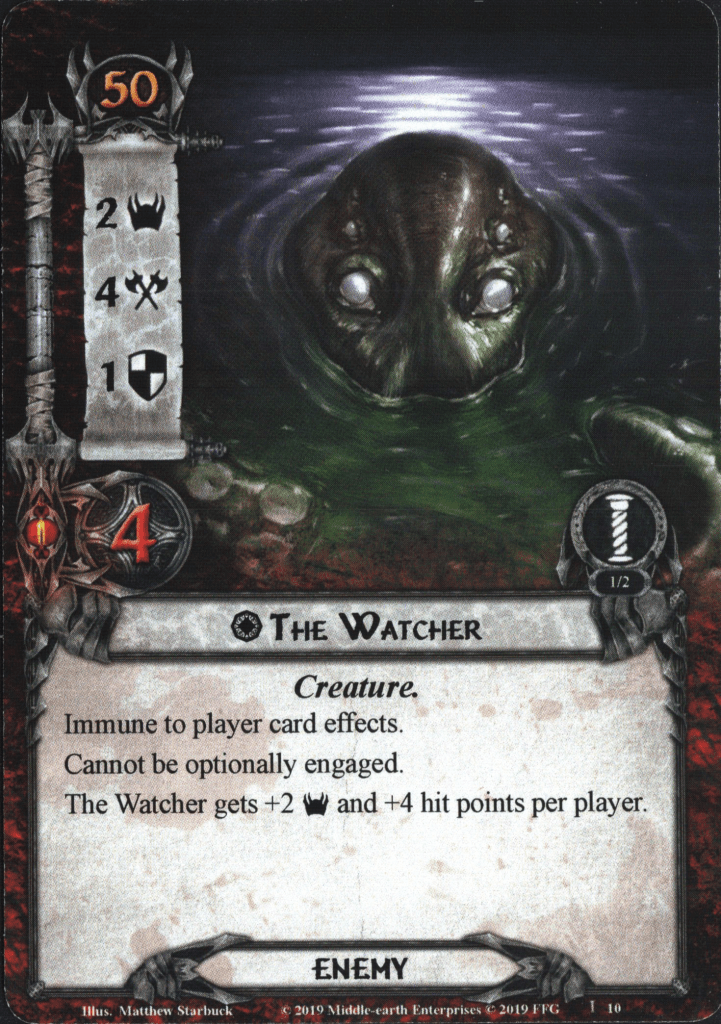
Once you are certain you have enough progress to start the fight with The Watcher, be ready for his attacks. He only hits for 4, but that attack in combination with the enemies you are revealing, might cause some serious issues. There are various enemies in the encounter deck that can cause serious problems if engaged early. A solid defender with readying on them is a must for the early game, even if it is just for defending The Watcher. Dealing damage back to The Watcher is relatively easy if you can focus him instead of other enemies. He only has 1 defence, but quite a big pool of hitpoints. That means that it might take a while to kill him, but every point of damage that you deal is one step closer to advancing the quest.
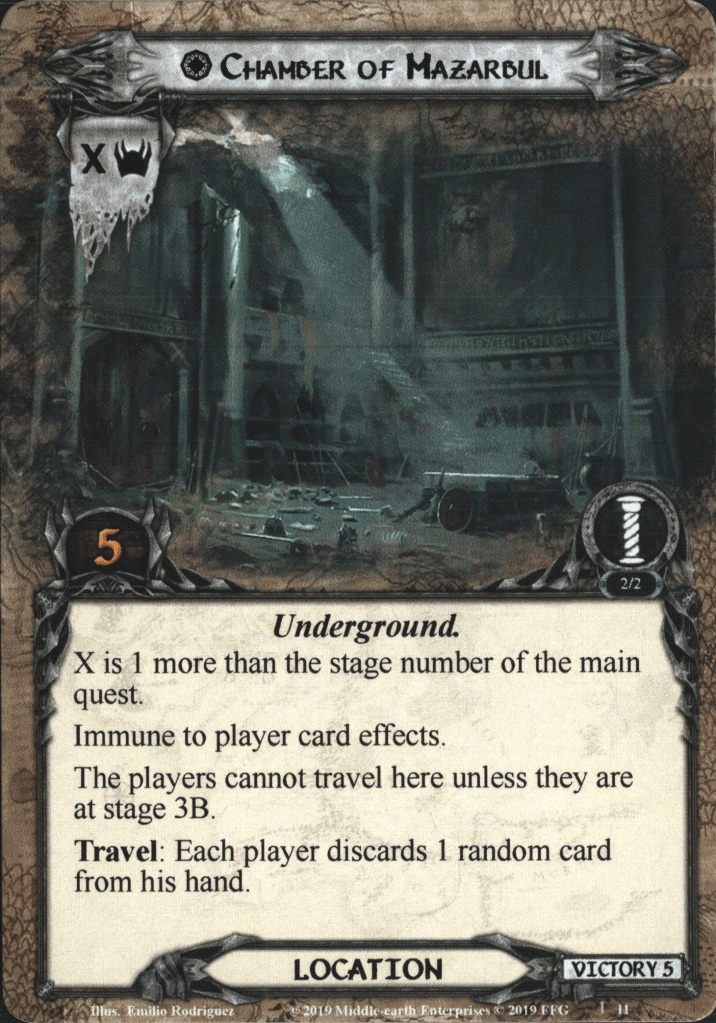
Once The Watcher has damage equal to its hitpoints (remember that he gets +4 hitpoints per player, including the first player), flip him over to the Chamber of Mazarbul. That location will stay in the staging area until the final stage, adding to the threat but otherwise not doing much. Once The Watcher is defeated, the players advance to stage 2A.
Quest card 2A: Journey in the Black Pit
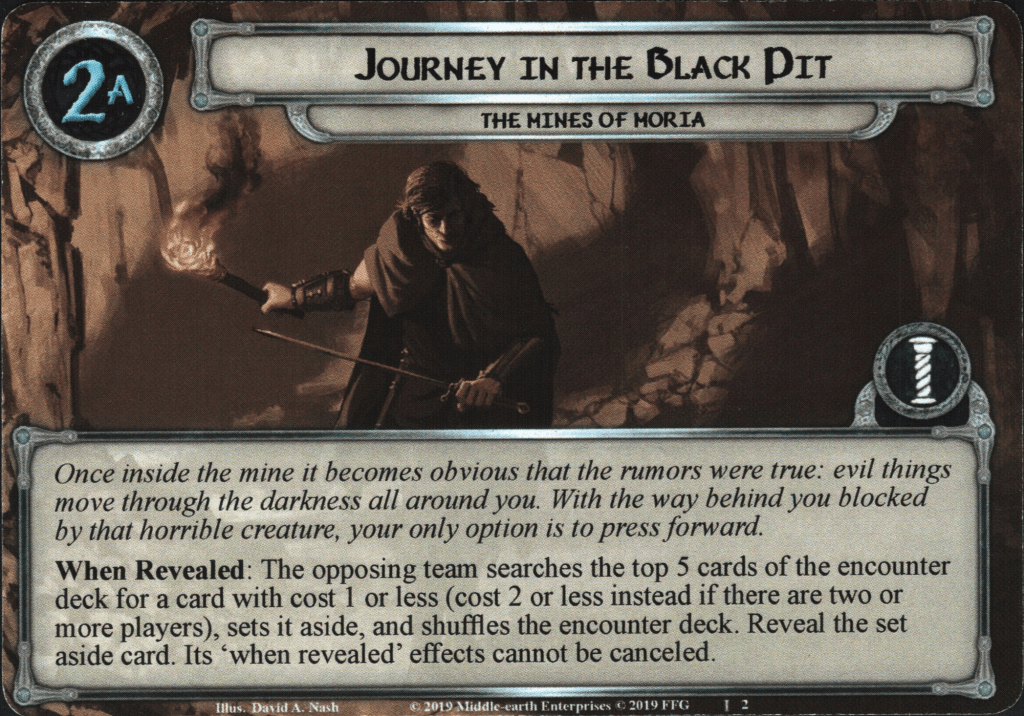
As always, stage 2A is the same for all three possible paths through the quest and is relatively generic. The opposing team selects one card of cost 1 or less (2 or less with 2 or more players) from the top 5 cards of the encounter deck and puts it aside. The rest of the encounter deck is then shuffled. The set-aside card is revealed, and any When Revealed effects cannot be canceled on that card. This protects it from cancellation effects and lets you know that the card you have selected will have its effect go off. Because the card has to come from the top 5 of the encounter deck, you will have a small selection to make before revealing the card. It also means that the best card to reveal at this point might not be among those 5 cards. In that case, just hit your opponents the hardest with what they struggle with at the moment. If they barely beat the Watcher and are pretty beaten up, you could go for a Goblin enemy that brings out even more enemies. Otherwise, you could also go for a location to add to the staging area that will further promote location lock. Remember that at this point, the card you pick from the top 5 has to still meet the cost requirement set by the encounter deck, so you cannot pick a 2 or 3-costed card (yet).
Some good options at this stage are:

- Shadow of Fear: shuts down a hero’s abilities, leaving them a lot less useful to the players.
- Deep Dweller: Returns all Spiders to the staging area, setting up new “When engaged” effects and boosting the threat in the staging area.
- Ancient Guardroom: Requires the players to travel here early, placing a 5 progress barrier between them and the main quest.
- Denizen of the Deep: If there is a good target for this, then you get to boost it and make it immune to player card effects
- Sudden Pitfall: Players have to discard 1 ally, which could be costly
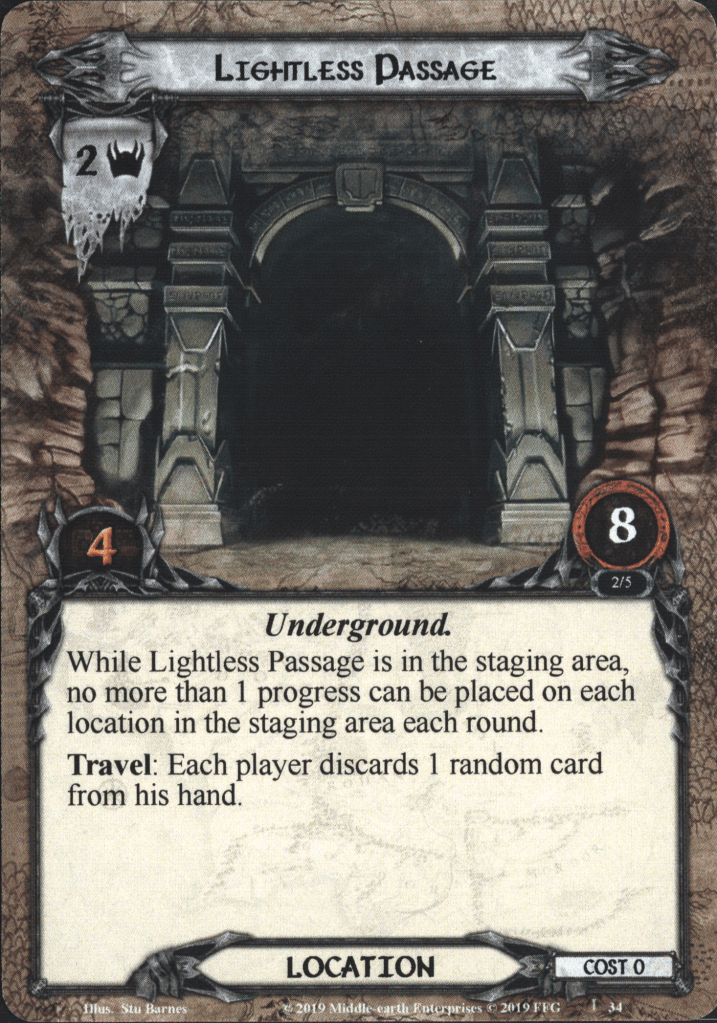
- Lightless Passage: In case players are investing in location control; this can shut that down (for a time)
- Hidden Threat: Actually lets you find a 2-cost card and surprise the players with the next time they quest successfully. It’s a bit of a gamble, though.
- Crumbling Ruin: If the players spammed a lot of allies, this is the card to punish them with. It would be great if they took a while to set up.
- Goblin Sneak: Gets you 2 enemies to increase the enemy spam
- They are Coming!: Finds 2 0-cost enemies out of the entire deck, making it easier to find some smaller enemies to add to the spam
- Massing in the Deep: If the players prioritized the Watcher over other engaged enemies, then this is the card to remind them that a lot of small attacks can hurt as much as one big one.
- Swarming Goblins: If there are already 2 copies in the discard pile, then this one card turns into 3 small enemies to annoy the players with.
Once the selected card has resolved all of its effects, the players get to flip over their quest card and see at which stage they end up at.
Quest card 2B: A Presence in the Dark – 20 quest points

The first side B that you can select for your quest deck is pretty interesting. It doesn’t focus on a single aspect of the encounter deck but instead allows it to be far more consistent. At the beginning of each staging step, the opposing team gets to look at the top 2 cards of the encounter deck. One of the cards is placed on the bottom, while the other is placed back on top of the deck. This allows the opposing team to filter the encounter deck a little bit, ensuring that the most problematic cards stay on top. If the players are facing a location lock, for example, you might want to discard a treachery that is on top of the deck and make sure that they draw another location. Since most games in this format are 2v2, you will end up with a mystery card for the second player, but at least you got to filter the deck a little.
This quest card helps to get your synergies going, but it is not actively hurting the players aside from setting up better combos for the encounter deck. No additional cards are revealed, and since this is a Forced effect, you must put one of the cards on the bottom. So if you happen to have 2 extremely brutal cards on top of the deck that otherwise would have been revealed back-to-back, now one of them has to go on the bottom of the deck.
Aside from this forced scrying effect for the opposing team, the players at this stage will just have to resolve the stage as if it were blank. That means clearing the 20 quest points as soon as they can and trying to keep an empty staging area. I would advise traveling each turn if possible since the opposing team could try and filter the encounter deck for more locations. But take this time to recover from your fight with the Watcher, and set up for the fight to come.
Quest card 2B: The Long Dark of Moria – 20 quest points

The second option for stage 2 only has a When Revealed effect that goes off when the stage is flipped over. On top of the card that the players had to pick for stage 2A, the opposing team now searches the encounter deck and discard pile for a different 0-cost location per player and adds them to the staging area. Note that these locations are not revealed, so some effects won’t trigger. The locations also have to be different so as to not set up a couple of high-threat copies of Many-Pillared Hall. The options (if they made the cut for the encounter deck) are:
- Many-Pillared Hall: Good option if there are other copies in play already (can be combined with picking one from stage 2A).
- Abandoned Mines: Progress cannot be placed on this location while it is in the staging area, so players would be forced to travel here. It is not that big of a deal, though, since it only required 2 progress to explore. The shadow effect would be more worthwhile keeping in the encounter deck.
- Cobwebbed Cavern: is a pretty vanilla location with a Travel cost that will slow the players down. They also cannot travel here while there is no progress on the quest.
- Lightless Passage: Good option, as it will prevent the players from clearing locations quickly while they are in the staging area. Since you just added a couple, it will be good to shut that effect down.
- Dwarven Forge: A big location that will slow the players down but rewards them with a bit of card draw.
- Narrow Fissure: Solid choice, as it will prevent characters from healing and has to deal damage to heroes in order to advance. A good option in a deck with a lot of direct damage already and against decks like Hobbits and Grey Wanderer.
- Plundered Armoury: Not a good choice since the When Revealed won’t go off. It’s also a pretty easy location to explore.
Once the locations are added to the staging area, the quest card resolves as normal. The players just have to power through the 20 quest points in order to advance to stage 3A. This might be made difficult by the additional locations that were just added to the staging area, especially if they somehow get a boost in threat from certain treacheries. For the players at this stage, it will be important to prioritize willpower over combat abilities, and it will also be advised to travel to a location as soon as you can. Maintaining a clean board state will help with the transition to the final stage.
Quest card 2B: Narrow Paths – 20 quest points
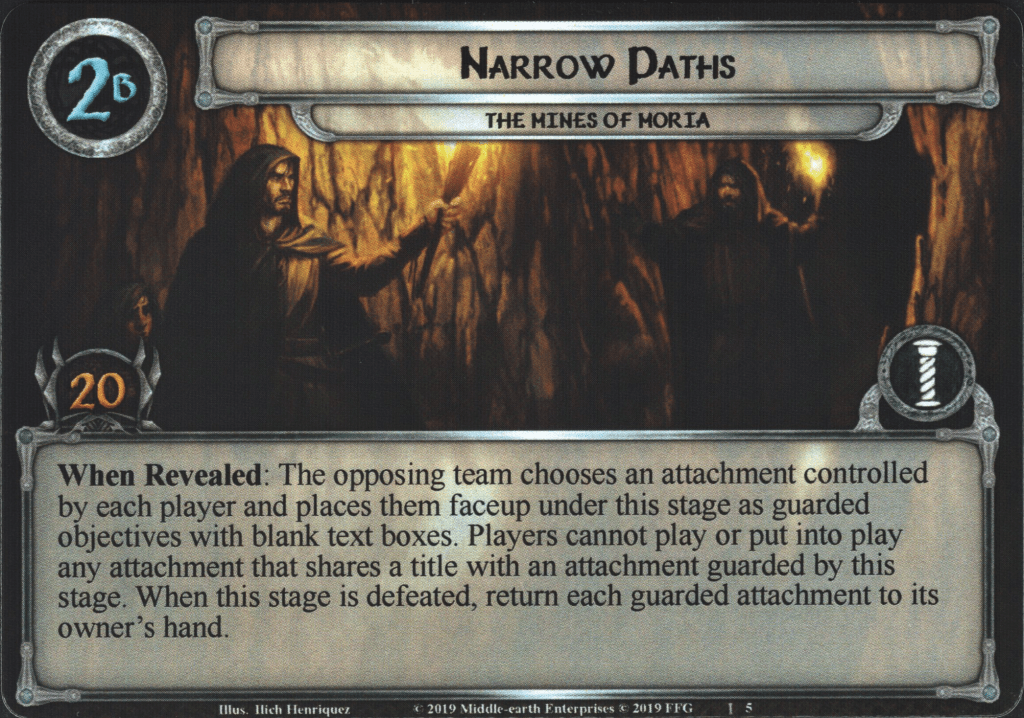
The third option for the second quest stage hits the players with their attachments. When this stage is revealed, the opposing team gets to select one attachment per player and places them face up under the stage so that they are visible to all. These attachments are now considered Guarded, and the players are not allowed to play or put into play any attachment that shares the same name as a guarded attachment. Only by defeating this stage will the attachments be returned, but only to their owner’s hand. That means that if a high-cost attachment is selected, it has to be paid for again if you want to play it during stage 3.

The ideal targets for this stage are attachments that are essential to how a deck functions. This can vary depending on the deck that is being played, as they might hinge on different attachments. For a Dale deck, taking away King of Dale will hurt the players in spamming allies, and for Gondor decks, you can take away Steward of Gondor to reduce the rate at which the players gain their resources. If you are facing one of the Elven Rings of Power (Nenya, Narya, Vilya), it is often a good idea to select that one. Another good target is any attachment that boosts the willpower of the players. Sword that was Broken and Visionary Leadership will greatly reduce the amount of willpower that the players can send, and they won’t be able to play it again until after they advance. If you want to be extra cruel, go for an attachment with the Guarded (X) keyword (if players are brave enough to bring those to such a quest). Not only does this take away their hard-earned attachment, but if they want to play it again, they will have to reveal yet another encounter card.
But this stage also has a few negatives. Not all decks rely so heavily on an attachment to get going. While it might slow them down a bit, they might have alternatives that they can easily use. This is especially the case for armor and weapon attachments. Some decks also don’t include any attachments, or haven’t gotten around to playing them yet during stage 1. If they expected this stage, they might have waited until after the When Revealed effect went off to then play the attachment and don’t risk losing it. This is why it is important to keep your encounter deck and quest deck a secret when going into these games.
Outside of stealing an attachment per player and putting it back into their hand after the stage is done, the stage doesn’t do much else. It requires 20 progress, just like the others, and does nothing special during the 2-4 rounds that it will likely take to beat this stage. It is probably the weakest stage of them all, but against the right deck, it can massively slow down the players.
Quest card 3A: Search for the Chamber

With the relatively easy stage 2B over, all routes end up at the same stage 3A. This comes with a repetition of the 2A When Revealed effect, only this time, the cost of the card is increased by one. If the players are playing with 2 people or more, then you get to select any card you want from the top 5 of the encounter deck. It is still a shame that you are not allowed to pick any card from the deck, but that was probably done so that players don’t have to face the same 3-cost location/enemy over and over again. All cards that I mentioned during stage 2A are solid, including any and all 2 or 3-cost cards. Those tend to be brutal enough that revealing them is going to get an audible groan from the players.
Remember that no When Revealed effect can be cancelled on any cards that were revealed for this stage. Once those effects have resolved, the players advance to the other side of the quest card to find out at which stage 3B they ended up at.
Quest card 3B: Drums in the Deep – 10 quest points

This is the quest card that focuses the most on combat and will punish players hard for not having enough defenders. When the players arrive at this stage, the When Revealed will let the opposing team find any 2 enemies from the deck and discard pile to add to the staging area. They are not revealed, but there is no cost requirement for any of those enemies. So you can pick 2 3-cost enemies on top of another enemy that you got for stage 3A. This can make for a horrible combat phase in the coming few rounds.

To rub salt into those soon-to-be wounds, the enemies in play cannot take damage while the Chamber of Mazarbul is in the staging area. Enemies can still be discarded through the Great Hunt, Hunting Party, and Fierce Defense but cannot take damage from combat or player card effects. In order to be able to kill the enemies, you have to clear the Chamber of Mazarbul that has been sitting in the staging area during all of stage 2. The immunity to damage for enemies vanishes as soon as the Chamber becomes the active location, and the travel cost is low enough that players will likely travel here as soon as they arrive at this stage. This does mean that other locations with passive abilities will stay in the staging area. Spider Burrow and Goblin Tunnels are two of those locations that will continue to buff the enemies while the players are busy exploring the Chamber of Mazarbul.
Once the players have traveled to the Chamber and are busy exploring it, it becomes time to look at the win condition of this stage. In order to win, the players need 10 progress on the main quest, and no enemies can be in play. Because enemies cannot take damage while the Chamber is in the staging area, it also becomes a sort-of requirement to clear the Chamber, though there are ways to leave it as the active location once 10 progress is placed on the main quest and then kill all enemies before clearing the Chamber. But it will be easier to explore it quickly and then deal with the enemies. The 10 progress is the least of your worries, though it does mean that you have to continue to quest hard, especially if Spider enemies continue to steal progress from you.
Killing all the enemies can be tough, especially against an enemy-heavy encounter deck that you are likely facing. There are several ways for new enemies to enter play, including shadow effects. Some enemies might even stay in the staging area for a long time, preventing you from completing the game. Attacks into the staging area will be advised, especially since that means you can clear the stage in the quest phase if you kill any enemy that was revealed during the staging step. This might mean you win before the other team.
Once no enemies are in play and 10 progress is placed on the main quest, you have completed the scenario. Now compare the number of rounds it took and when you beat the quest in the round sequence to see whether or not you won from your opponents.
Quest card 3B: The Fate of Balin – 20 quest points

The next option for stage 3B is a bit more ambiguous and can fit any encounter deck. The players are either slowed down a lot or are forced to take on additional encounter cards each round. You do not get to control what encounter card gets revealed, but the additional card does allow for more combos from the encounter deck. This is especially useful if you included a lot of cards that increase the threat of cards in the staging area. The stage really ramps up the pressure on the players, but it is relatively easy for a willpower-focused deck to get through (depending on the encounter cards that get revealed).
If the players choose not to get the additional encounter card during the staging step, then no more than 5 progress can be placed each round. This means that the stage can only be beaten in 4 rounds, putting a massive delay on the players, during which the other team can clear their final quest card. Limiting the progress that players can make is also annoying when combined with the Spider synergy of stealing progress. Especially the Web-spinner is annoying at this stage since this enemy further reduces the amount of progress you can make, or it surges.
This stage requires the most progress from any stage 3 for this quest and also requires that the players explore the Chamber of Mazarbul. There is no real benefit in exploring this location, but if you are taking things slow, then there is no pressure to explore this location, except for the constant 4 threat that it provides. Once the location is cleared and the final point of progress is made, the players have beaten the scenario.
Quest card 3B: Continuing Eastward – 15 quest points


The final option for stage 3 focuses a lot on location lock. If you built a deck with a lot of locations boosting each other, this is definitely the stage to pick. As a passive ability, each location gains +1 threat to reduce the progress players are making and 3 quest points to dissuade players from using location control. This bonus disappears when the location becomes active. However, there is a forced effect that triggers each time the active location is explored. Players are instructed to reveal the top card of the encounter deck. This additional card makes traveling much more difficult to sell players on. They might just suffer through the increasing location lock and try to get the 15 progress done.
However, it is a requirement that the Chamber of Mazarbul is explored. This location will now be 5 threat, so it is a good destination during the round you arrive at this stage. The travel cost isn’t huge, and you get to make a lot more progress because of it. However, it will replace itself when it is explored with the top card of the encounter deck, but that is something you are going to have to accept. Not all the cards can hurt you after quest resolution, especially since some of the treacheries will simply whiff. The increase in quest points only really matters when the players are invested in placing progress on locations in the staging area, but some cards like Lightless Passage and Abandoned Mines already restrict that.
Once the Chamber of Mazarbul has been cleared, the focus will just be on pumping out as much willpower as possible. This makes this stage one of the more reliable ones to beat with a willpower-heavy deck within 2-3 turns. If you have enough willpower, you can also forsake the travel phase since the quest point buffer it creates, and the additional encounter card you get for exploring the location probably isn’t worth the 3-5 threat sitting in the staging area. This is a dangerous statement to make, though, and some locations will definitely be worth traveling to if it means getting rid of the passive ability. When the 15th progress token is placed on the stage, the players have beaten the quest!
Next month will see the completion of the Escape from Khazad-Dum Custom Scenario Kit and, with it, the completion of all scenario kits. These kits helped to add a lot of replayability in a small package but were discontinued when the game went into hiatus in 2020. We did get The Hunt for the Dreadnaught in 2020, but that was a more traditional quest. Against the Shadow or any future cycles never got a set of scenario kits as the first two cycles did. It would also have been more difficult to make since those cycles started to get more of a focus on the story linking certain scenarios together, making it more difficult to plant another two quests in the region while reusing the same encounter cards. So after I have completed the last Scenario Kit, I will go back to the Nightmare analyses since there is plenty more to do with those.

3 thoughts on “The Mines of Moria”