Having completed the NM Angmar Awakened cycle, we will focus our efforts on the Dreamchaser cycle. With the first quest, Voyage Across Belegaer, it was always the intent of the designers to ease the players into the new mechanics, getting to learn how to work with Ship objectives/enemies and the Sailing keyword. For the Nightmare version of the quest, the gloves have come off, and the penalty for losing sailing quests is increased. You are going to find that this quest takes a lot longer to complete and is less forgiving to players who spam allies. Still, there is enjoyment to be found in this version of the quest, and it still serves as a good introduction to the Nightmare quests this cycle has to offer. Bonus points to the developers for making this quest based around Calphon’s dreams, so now we get to relive his nightmares!
Nightmare Voyage Across Belegaer
- Found in: The Grey Havens Nightmare set, quest 1
- Size: 13 encounter cards, 2 quest cards, 3 corsair cards
- Increase in Difficulty: Yes, there is an increased risk of losing your Sailing quests, and you will be punished more severely for being off-course. There are also two new quest cards that get added to the deck, making the quest feel a lot longer. There are also different requirements to passing those stages, so you cannot force your way through with just willpower.
- Fixed Loopholes: Players can no longer forgo the Sailing quest and see all the stages. There is one new stage that will require them to be on-course in order to advance.
- New Mechanics Introduced: Two new quest cards are added. A special treachery will only do nasty things if it is revealed during the Sailing test. More focus on forcing your off-course.
- Play this scenario if: You enjoyed the sailing mechanic but found the first scenario of the cycle too easy. You want to feel what it is like to be off-course, having the sea and Corsair Fleet hound your every step. You wish the regular version was a little longer to get your deck fully up and running.
- Solo or multiplayer?: It is always difficult to recommend a player count for these sailing scenarios. On the one hand, having multiple people helps to shift the burden of having to sail to different people so that one person isn’t always sailing. However, more players means more Nightmare cards being revealed and being stuck in play at the same time. With so many effects forcing you off-course, you might end up stuck at the worst heading at the end of the quest phase, even if you sailed successfully. The sweet spot for this quest is probably 2 players so that you can alternate who sails every turn.
- What to look out for: Being off-course makes this quest a lot harder. New Corsair enemies make it more difficult to use your ships. New locations get harder the further you are off course. Two new stages make the quest longer, dragging out your possible victory. You will have to send a lot of characters to the Sailing quest. A lot of ally hate and direct damage, especially from treacheries.
New Rules
There are no new rules on the card when you start out, so once setup is done, you can set it aside and not mind it anymore.
New Setup
While the rules card does not specify it, the setup for this quest is slightly different from the normal version. You have two new main quest cards, which will get shuffled in with the other four from the regular version. This shuffled quest deck then gets stage 3A on the bottom, with the 6 copies of 2A on top. You will be forced to get through these stages before you are able to win the quest at 3A. Luckily, like the regular version, you do not have to go through all six quest stages if you can sail successfully. The new Lost at Sea quest even allows you to avoid two other stages if you manage to beat it. But with a bigger focus on the sailing mechanic and heavier punishments for being off-course, there is a chance that you might see more of these stages than you’d like. If possible, I would suggest skipping the Nightmare stages, but due to the randomness of the quest deck, that’s not always possible.
Aside from the thicker quest deck, the rest of the setup remains unchanged. Players pick their ships, start at stage 1A, and will have a Scouting Ship and Rolling Seas in the staging area to begin with. Since the start of the game is unchanged from the regular version of the quest, you get a brief moment to set up before the Nightmare cards start making life difficult.
Cards removed
The following cards were removed from the base encounter deck and Corsair deck to make space for the new cards. Some replace cards one-to-one, while others simply increase the quest’s difficulty. Many of the cards will still have copies remaining, as it is required for setting up specific quest stages.
- 2x Southron Sailor (Very easy enemy that gets replaced with the Brash Corsair)
- 1x Starlit Sea (Threat really isn’t a focus of this quest, so other locations take its place)
- 1x Fog Bank (Could end up being a beneficial location, so one copy is removed)
- 2x Calm Waters (Beneficial location)
- 2x Thrown Off Course (Removing the progress has often been the preferred choice, so it is replaced by different treacheries)
- 1x Scouting Ship (Easy Ship enemy that gets replaced with Sahir’s Pursuer)
The Quest

The quest mostly plays as you are used to, with no additional rules or setup to really keep in mind. This makes the initial few rounds the easiest due to the lack of Nightmare cards in play. During this time, you will have the best chance to stay on course and hopefully beat stage 1B before you drift off course. This allows you to at least bypass one stage 2 quest card. This is not a given, however, and the first few rounds can prove rather difficult. If you travel to the Rolling Seas on round 1, you will likely have to deal with the Scouting Ship as well, and that’s hoping you didn’t reveal more ships during the quest phase. With the Boarding keyword sending over additional enemies, you really should anticipate how well you can handle multiple enemies at once. This is where fellow players can come in useful, with Ranged and Sentinel support to lighten the load from one player.
Since you will want the first sailing test to be successful, you are going to have to decide, before the quest begins, who can churn out the most allies on turn 1, thus sending the most characters to the test. While you only need one passing symbol, you can never be too sure about how many characters you have to send to the test. This will become more difficult at later stages, where locations and quest cards can steal away your first passing symbol, and you might end up being further off-course than you’d like.
Throughout the quest, it will be important to stay on course. Not only can you dodge enemies more easily that way, but locations will be less harmful, and you will have options for treacheries to shift your heading slightly off course to avoid dangerous effects. Staying on course also helps when passing the stages, as you get to look at the top 2 (or even 3) quest stages and select which one you’d want to go to. While it might sound boring, I would argue that you should do your best to avoid the new quest stages. They are quite brutal and will delay you a great deal on your way to the endgame. If you are off-course when passing the stages, you simply have to go to the next one in the pile, which can cause you to have to see 6 different stage 2As before arriving at stage 3. This is going to take a long time, during which you will be battered from all sides by Corsairs and the weather. If you have enough threat reduction and healing, you might survive seeing all stages, but this is a quest that wears you down over time before stage 3 sends out some of the biggest enemies for you to deal with.
For the final stage, you will have to pick out the enemy ship with the highest threat, which should still be the Light Cruiser. However, if all copies are in play and you don’t fancy taking the Corsair Warship (I don’t blame you), you will have to deal with the new Sahir’s Pursuer enemy. Keep this in mind since the ship will force you off course unless you engage it. The win conditions for the quest also remain the same. Either kill all enemies or make enough progress on the quest to beat it. Note that you can only make progress on the stage when you are on course. With the encounter deck constantly forcing you off-course, it might be a better decision to destroy all Ship enemies instead. Corsair enemies don’t count; you simply have to destroy the ships in order to win!
With the general overview of this quest done, we will now dive into the two new quest cards that you can encounter during your voyage. If possible, try to avoid these stages, as they are meant to slow you down significantly.
Quest card 2A: Lost at Sea – No Quest Points

If you have been avoiding being off-course throughout this NM quest, your luck has just run out. When arriving at this stage, you simply have to put yourself in the worst heading. If you already were at the worst heading, you don’t have to do anything, but you’ll need to be ready to start sailing successfully at this point. While at the worst heading, you will be facing the worst that the encounter deck can throw at you. This means being forced to go to Waterspout when faced with the option to travel, not being able to cancel certain treacheries, and having to exhaust all your allies for Dreams of Numenor. This can be a brutal situation to be in, but there is a simple solution to the issue: Sail!
This is made a bit harder by side B of the quest card, which will cancel the first ship’s wheel symbol you see each time you do a sailing test. This does not stack with Rough Waters, which does the same thing, as they both target the same card. Still, this means you will need a total of 4 ship’s wheel symbols in the same test in order to get out of this quest card. That’s a lot to ask for when you are also facing Raging Squall that can kill your allies, but the only solution to this stage is to sail hard. Wait until the right player is the first player so that they can send however many characters to the test. Also, make sure to bring the Dreamchaser for this unless a Brash Corsair is engaged with the controlling player and you cannot afford the additional attack. The Dreamchaser is a really powerful tool against this stage, though, so maybe just tank the attack.
Once on course, you are not through this stage yet. You have to endure the rest of the quest phase before the quest card looks at your heading to see if you can leave or not. If you hit a treachery that forces you off-course, then you are going to be stuck at this stage for another round. Only if the quest phase has concluded and you are still on-course, will you beat this stage. Since you put so much effort into finding your way, you are rewarded by looking to the top 3 quest cards in the quest deck instead of the usual 2. This allows you to bypass two stages, bringing you closer to the end of the game!
Quest card 2A: Corsair Confrontation – No Quest Points
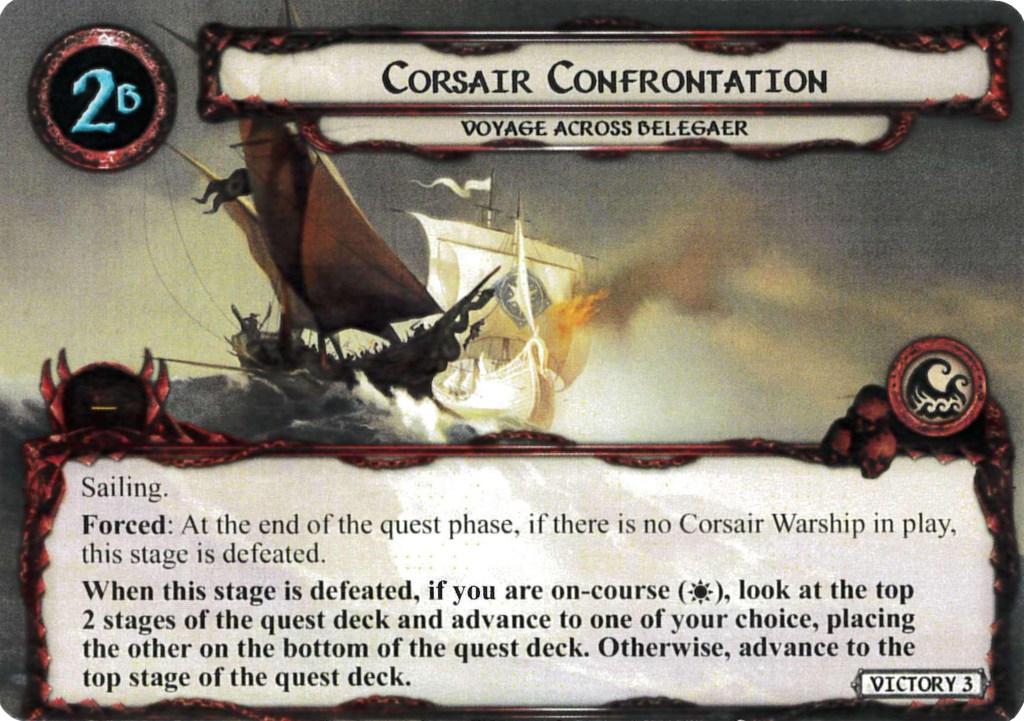
Honestly, this is a worse version of the Calphon’s Divination stage. When you arrive at this stage, you are forced to find a copy of Corsair Warship from the encounter deck, discard pile, or even the Victory Display if there are no other copies in the deck. If both copies are in play, you don’t have to find anything; you are in a bad enough position.
The goal of this stage is to break free of these top-tier enemies and ensure you have no more Corsair Warships in play. With some luck, you only have to defeat one of them, but if the other copy turns up before you have cleared the quest card, you cannot advance. The check for this is at the end of the quest phase, so you could get pretty unlucky if you just defeated one copy, and now the second comes out to play.
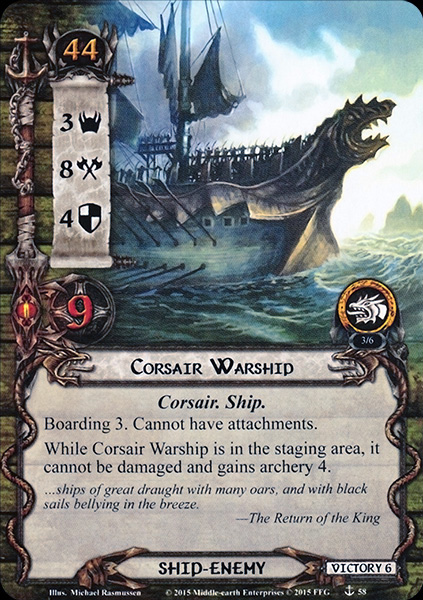
The Corsair Warships are tough enemies to deal with, dealing a lot of damage and taking a lot of attack power to bring down. Leaving them in the staging area also doesn’t work, as they’ll gain Archery and immunity to damage. However, you can still use card effects to get them out of play. The quest card doesn’t specify that you have to defeat the ships; they just don’t have to be in play anymore at the end of a quest phase. This opens the door to The Great Hunt, Hunting Party, or Eagle of the North to straight-up discard the Corsair Warship. They are not unique and thus not immune to these effects, helping you avoid their high Boarding value and having to deal with the enormous stats. If you opt for traditional combat, be ready to take on this ship and three Corsair enemies that it brings with it. Dunedain decks should be better suited for this, but you should also be able to rely on other players to support you with Ranged and Sentinel. It’s tough, but your reward will be that the ships are in the victory display by the end of this stage. This allows you to avoid them for the rest of the game.
Once no Corsair Warships are in play, wait until the end of the quest phase. If no new ones show up, you may check your heading to see if you are forced to the next stage or given the option between the next two stages, skipping one of them. This follows the regular rules as on the Normal quest cards.
The Encounter Deck
Global

- The encounter deck contains 33 cards at the beginning of the game.
- Shadow chances are relatively low, at 54.5%. Most of these effects will only happen if you are defending with a Ship objective or if you are off-course.
- Average threat on cards revealed from the encounter deck is 1.67 threat/card. A big chunk of cards has no threat (treacheries), but with Shattered Sea being 4 threat at best, there is a wide range of threat you can reveal each round.
- There are a total of 15 sailing symbols in the encounter deck. Take this into consideration whenever you perform a Sailing test, as some of the symbols might be in play already or in the discard pile. 45% of cards will have this symbol in a full encounter deck.
- Raging Squall is the only card with surge on it. Since it does nothing when revealed normally, you can be certain you reveal only as many cards as there are players each turn.
- There is no Doomed on any of the encounter cards, nor is there any active effect that raises your threat. This makes Doomed player cards viable for the quest but at the risk of engaging more ships.
- Immunity
- All ship enemies are immune to attachments.
- Corsair Warship cannot be damaged while it is in the staging area.
- While Fog Bank is the active location, Ship enemies cannot make engagement checks, cannot be attacked, and cannot attack.
- Winds of Wrath cannot be canceled if you are at the worst heading.
Remember that while the enemy distribution might seem low, each engaged Ship enemy will bring out additional cards from the Corsair deck with their Boarding keyword. These stats did not include the location and enemy used for setup, as they won’t be shuffled in until the entire encounter deck has been emptied at some point. This takes away one of the ship’s wheel icons on the Rolling Seas.
Enemies
The new encounter deck and Corsair deck both get one new addition to their ranks. These mostly replace weaker enemies from the Normal version and will prove to be tougher foes during the more combat-orientated quest stages.
- Brash Corsair: We get a new Corsair enemy added to the Corsair deck to replace the rather easy Southron Sailor. This new enemy does not interact much with resources, unlike other Corsair enemies, making it a good enemy to get for the Light Cruiser. However, the Brash Corsair does have stats that cannot be ignored so easily. While engagement cost might not matter for this quest, the low value of 16 will put Hobbit decks at a disadvantage. The high defence of 4 will also prevent much damage from being dealt, though he does only have 3 hitpoints. This makes the Brash Corsair a good target for direct damage-dealing effects. A prime choice would be the Spear of the Citadel on a defender since this enemy will be attacking often. Whenever the engaged player exhausts their Ship objective (to sail, defend attacks, pay a travel cost, whatever), the Brash Corsair will make an immediate attack. The attack does only hit for 3 (+ a shadow card), so it can be defended by most heroes and dedicated defender allies. However, adding this attack to a situation in which you are swarmed by enemies, potentially from a high Boarding keyword or the Boarding Party treachery, can be trouble. Canceling the additional attacks can be worth it, though it might be better used to cancel attacks made by Ship enemies. Instead, try bursting this enemy with direct damage or slap a trap card on them like Forest Snare or Outmatched. Taking 7 attack to kill is a lot, and you should probably be spending that attack power on other enemies with more threatening abilities.
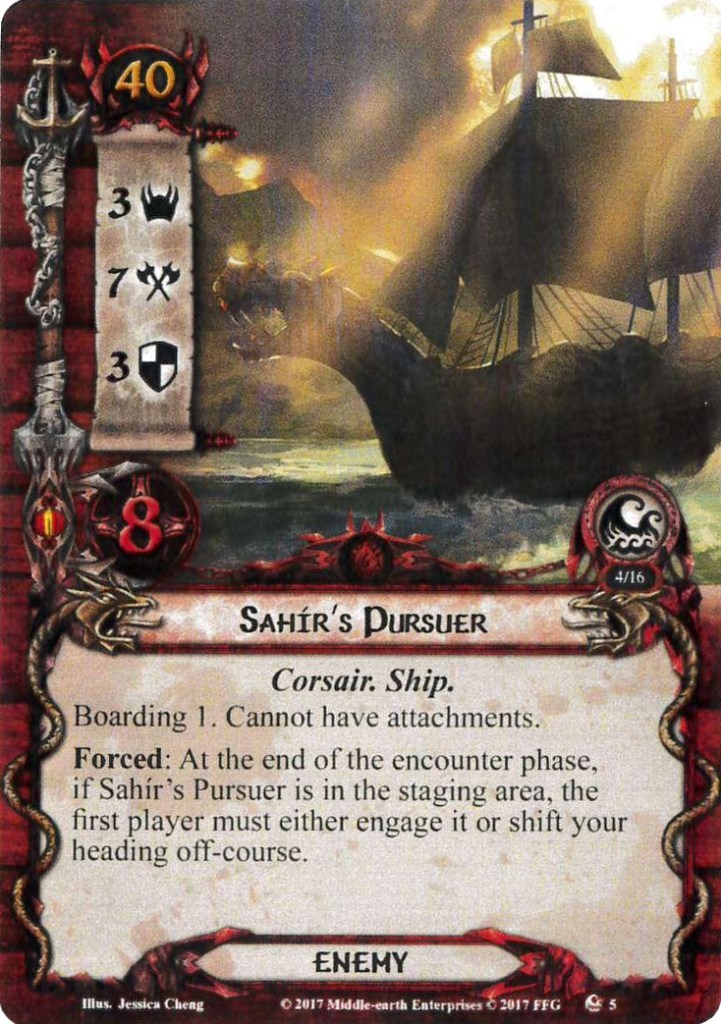
- Sahir’s Pursuer: We don’t technically know who Sahir is at this point, so if you are playing a blind NM campaign, don’t worry about him for now. Instead, this ship does boast some impressive stats, including an attack value of 7. This puts it just slightly behind the Corsair Warship, but with no Victory Points, you might end up encountering this ship more often. 3 threat and an engagement cost of 40 would mean you could keep it in the staging area for a while. However, the Forced effect on this enemy prevents that choice from being so easy. At the end of the encounter phase, the first player must choose to either engage the Pursuer from the staging area or shift the heading off-course. Shifting the heading this late in the round might not be so bad, though it will mean that you have to sail a little harder next turn. Engaging the ship brings down an additional Corsair enemy thanks to Boarding 1. The Pursuer is comparable in stats to the Light Cruiser and, once engaged, won’t do much to hinder you any further. The constant attacks of 7 attack strength will be problematic if you don’t deal with this ship, though. I would advise canceling the attacks with Feint or something. Otherwise, you will suffer unnecessary damage to your ships, which cannot be healed in this long quest. It’s better to deal with this ship quickly, tearing through the 8 hitpoints once you get through the 3 defence. In reality, this should likely take a turn or two but is not as intensive as the Corsair Warships would be.
Locations
While the sea was relatively calm in the base version of the game, it seems that the weather has turned for the worst. The seas are much more choppy and will take you far longer to traverse than in the base version. Both do help during the sailing test, which is nice.
- Open Waters: This is sort of a counterpart to Fog Bank, where the seas are now so open that you are more at the mercy of enemy ships than before. While the Open Waters are in the staging area, all ship enemies gain 1 threat and their engagement cost decreases by 5 points. This can seriously mess up your engagement plans for that turn unless you have a Hobbit player to counter the decrease in engagement cost. If you don’t, then I would advise taking on any ships that you can, just in order to get the increased threat out of the staging area. This is certainly a worse card in higher player counts since in lower player counts, you can get lucky and not have any enemies for a while. That would mean that this location does little more than add its two points of threat to the staging area total. If you are looking to travel to this location, one player must exhaust a Ship objective they control in order to travel here. Keep in mind that your ships are also needed for combat and that exhausting your ship will cause any engaged Brash Corsairs to make an attack against you. But if you are light on enemies by chance, this is a great destination. Clearing it from the staging area will be rough, and there are better targets for your progress-placing effects, in my opinion.
- Shattered Sea: This location is fairly simple but can be the final nail in your coffin to Davy Jones if you hit it at the wrong time. While the base stats of 4 threat and 4 quest points is to be expected in Nightmare mode, that is the base-case scenario! The further you stray off-course, the worse this location becomes. This can result in a 10/10 location (and that’s not me rating it 10 out of 10, unfortunately). Revealing 10 threat on a single encounter card without a good way to clear it quickly is brutal. Fortunately, this location can be targeted by player card effects, and there are some ways to cut through this location, hopefully sending it back to the encounter deck during the next reshuffle to get that Sailing icon. One way is to neuter the location with a Thror’s Key. This blanks the textbox, keeping this location at 4 threat for the rest of the game. Not ideal, but it could be worth knocking it down 6 threat if you happen to be at Lost at Sea. Other options include Heirs of Earendil to discard it from the staging area at the cost of threat, travelling and having Ghan-buri-Ghan quest for 10 willpower, or slapping an Explorer’s Almanac on this location while you are at a quest that doesn’t require progress to be beaten. There are certainly options here, but I hope you only encounter this card during your Sailing tests.

Treacheries
Calphon’s dreams truly are Nightmares in this version of the quest, where the new treacheries will end up being pretty harmful to your allies.
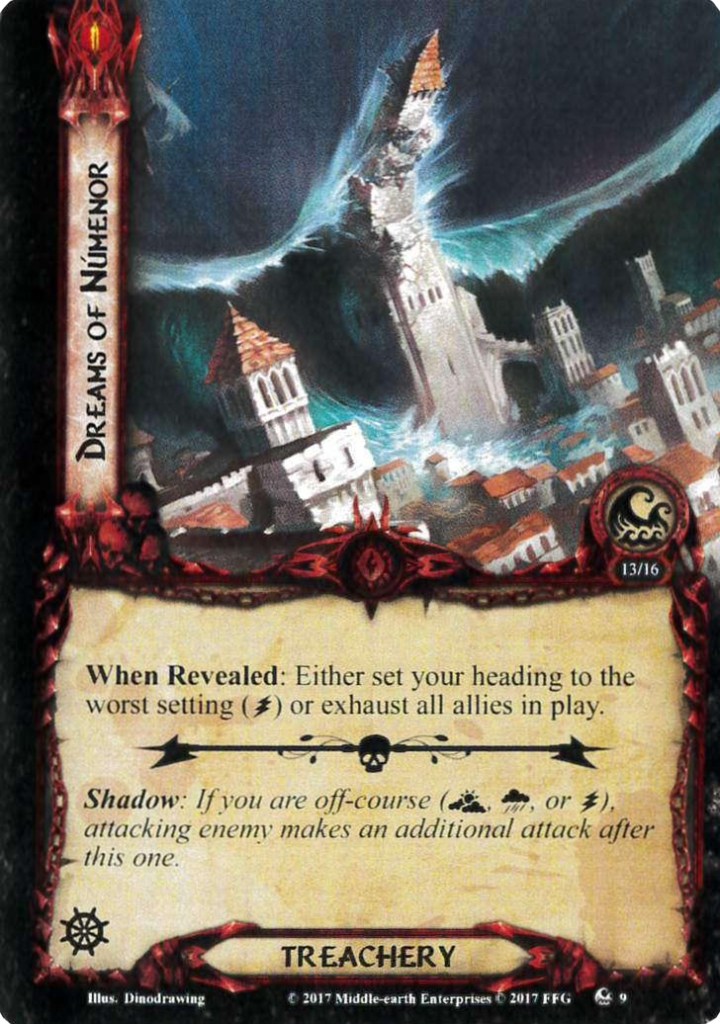
- Dreams of Numenor: You’ve gotta love the art piece on this, as there is not much to love about the treachery itself. I can never get enough Downfall artwork. Great job! On to the card, which I which was as nice as the art, but sadly, the Dreams of Numenor are nightmares in this version. When this card is revealed, the players must either shift their heading to the worst setting or exhaust all allies they control. If there are no ready allies in play, then you have to go to the worst heading, and if you are already there, you are forced to exhaust all your allies. If you are unlucky enough to hit both copies, then I’m afraid that there is no end to this nightmare, and you have to do both options. Still, there are ways to counter this effect. I would personally go for the exhausting-all-allies part, especially if this is the last card you’ve seen during this quest phase, and you are sure that there are no Sudden Storms coming down. You can also try to cancel this treachery, there is nothing to stop you from that. Alternatively, you can keep cards around that will ready all characters (or all allies) such as Strength of Arms, Need Drives Them, Grim Resolve, and The Free Peoples. This is easier than having your heading at the worst setting, which will make the Shattered Sea much worse and will be a difficult position to get out of next turn. Cancel this if possible, or try to shuffle the encounter deck if you are scrying this card. The ship’s wheel icon on it is quite useful.
- Rogue Wave

Somehow I can’t get this meme out of my head whenever I see that artwork of the guy yelling because of the wave. Hope I’m not the only one. When this treachery is revealed, each player is given a choice. They must either exhaust their ship objective (triggering any Brash Corsairs engaged with them to attack) or they must deal 4 damage among characters they control if you are on course. Being off-course is punished by 2 additional damage on your characters. Personally, I would take the damage and spread it out over characters who are not likely to be dealt any more damage until I can heal again. Exhausting your ship is only really an option if you are sure you don’t need the ship for combat that turn, for instance, if your threat is low enough, there is a Fog Bank to travel to, or there are no enemies in play, and this was the final encounter card. This treachery is one of the reasons why you need to bring healing for this quest, as the continuous, direct damage will stack up quickly, and you need to protect your sailing allies from our next treachery!
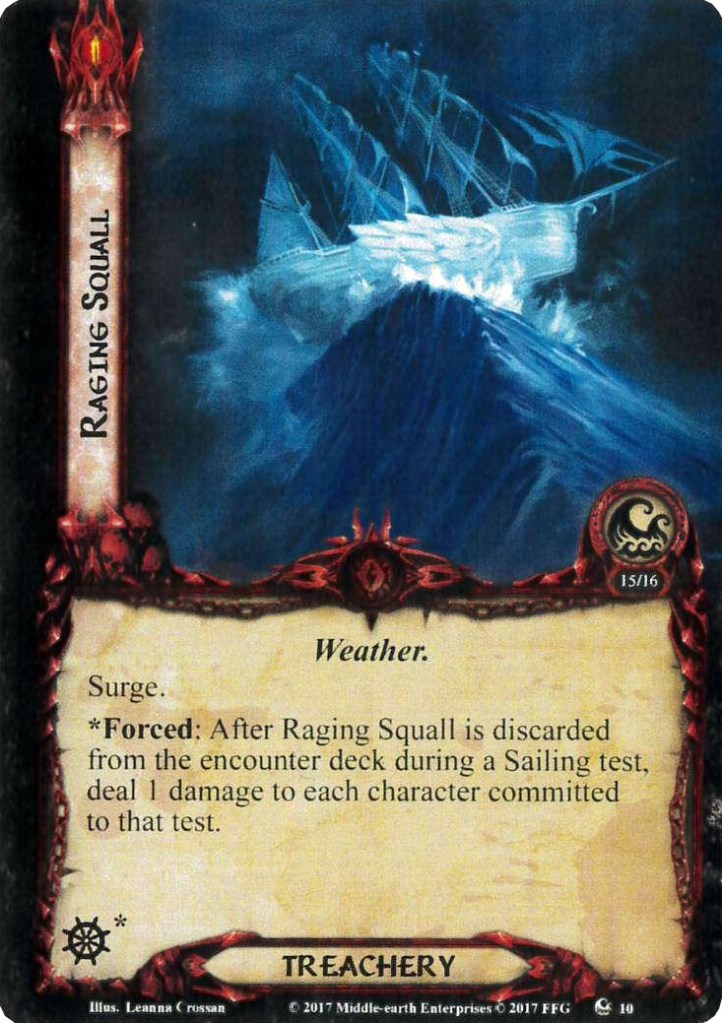
- Raging Squall: This is a weird little treachery that will only affect you whenever you encounter it during the sailing test. If you reveal it during the regular quest phase, it will just replace itself, surging into another card. You can forget the rest of the card exists in that case. If you have a Minas Tirith Lampwright, you could even avoid revealing any additional cards during that quest phase, but that’s a risk. The real problem comes when you hit this during the sailing test. It will count as a pass, having a ship’s wheel icon, after all. However, you should note the asterisk next to it. This will trigger the Forced effect on Raging Squall, dealing 1 point of damage to every character committed to the sailing test. This is often fine against ships like the Dreamchaser, but chances are that you were sailing with some small allies, especially in the early game. This will kill those allies, though it does not change the number of cards that will be revealed. It will impact your potential to sail next turn, making this treachery especially brutal in lower player counts. This treachery can also stack if several copies are revealed at once, dealing serious damage to stronger allies or even heroes. Never sail with a character with 1 hitpoint remaining, as you might end up losing them. Ships will also wear down over time, considering this is a pretty long quest. You are also unable to cancel this card since the treachery itself is not revealed.

Tips and Tricks
- This more difficult version takes off the Sailing-test-training wheels, so you really have to be ready to sail successfully each turn. This is especially true since so many effects will shift your heading to the worst setting or will block sailing symbols. The Dreamchaser should always be sailing, and a host of allies (with more than 1 hitpoint) should help out!
- With the first player being preoccupied with Sailing, other players will need to help out with willpower and combat. Always bring some Ranged and Sentinel to deal with Corsair enemies across the board. This helps to alleviate the pain of the Boarding keyword whenever someone engages a ship enemy.
- Avoid the new stages if possible. They might look interesting as they are new, but remember that these are Nightmare stages. They are much more difficult than the others, and simply questing hard won’t get you through them.
- If you are struggling to hit the ground running for this quest in the first few rounds, try running some Doomed cards. This can help to bring out more allies (Horns! Horns! Horns!) or give you more options to play allies quicker (Legacy of Numenor+Deep Knowledge). While there is no active punishment for having high threat, do realize that this quest can take a long time. So, threat reduction will be required if you bring cards like this.
- Bring healing. There are a ton of little effects from the weather that will wear your characters down over time. The constant direct damage can even kill your heroes if you aren’t careful. Waters of Nimrodel are a good choice due to their effectiveness and reduced cost because of Doomed, but an army of Wardens of Healing under Elrond‘s healing buff is also going to get you far.
- When given the option to shift your heading off-course, try to avoid it and either cancel the choice, or go for the other option. Getting off-course is a death sentence at multiple points in this quest, and will force you to move slower through the stages.
- Bring enough treachery cancellation. The encounter deck is full of nasty treacheries that either deal damage or take you off-course, so having Eleanor or Test of Will is going to help a lot.
- Scry the top card of the encounter deck before sailing if you are only off by 1 symbol. You can use cards like Lore Denethor, Far-sighted, or Henamarth Riversong for this. If the top card has a sailing icon, you only have to send 1 character to the test, freeing up the Dreamchaser and other allies to help in the quest or further in the turn. Far-sighted can even let you scry deeper in the deck without reshuffling it, helping out if you are further off-course.
Playthroughs
I was only able to find a single scenario playthrough online of this quest in Nightmare mode. I think this is due to the quest being relatively new (NM Dream-chaser is the most recent NM cycle), so not a ton of channels have picked this up when they were streaming often.
- True solo, Outlands deck: https://www.youtube.com/watch?v=3wRyKLvDVUU
With that, my efforts towards completing the NM Dream-chaser cycle have begun! It will be a while before the cycle is complete, but we will be taking these whenever we can. Fortunately, some of the quests have already been covered in the past, so we can skip these. Upon completing this cycle, I’ll have to look towards other parts of the collection to work on, so I am fine staying on the high seas for a while. I hope you’ll play along as we sail towards Numenor and to Umbar!
