“For morning came, morning and a wind from the sea; and darkness was removed, and the hosts of Mordor wailed, and terror took them, and they fled, and died, and the hooves of wrath overtook them. And then all the host of Rohan burst into song, and they sang as they slew, for the joy of battle was on them, and the sound of their singing that was fair and terrible came even to the City.”
– The Return of the King, The Ride of the Rohirrim
I don’t think it is an understatement to say that the Battle of the Pelennor Fields is one of the most epic sequences in Lord of the Rings. The final time the forces of darkness are on the offensive, where the Free Folk of the West makes their final stand against the Shadow. How can the weight of this battle be properly represented in a card game originally designed to track a small band of heroes traveling through the forests of Mirkwood? I had high expectations for this quest when it was first released, and I was ecstatic to see the designers deliver it. The calm before the storm, the overwhelming force of the shadow, the tide turning in the Heroes’ favor, the Witch-King’s arrival… It is ALL there and all done to perfection. But like the Battle in the book, this scenario can be daunting. Fear not, dear reader. We are here to guide you.
The Battle of the Pelennor Fields
- Found in The Flame of the West Saga Expansion, Scenario 3
- Official Difficulty: –
- Community Difficulty: 8
- Encounter sets: The Battle of the Pelennor Fields
- Quest cards: 5
- Play if: You want to experience the most epic battle of Lord of the Rings. You want to fight Nazgul that do not care to hide. You want to hold out against a foe that keeps on coming.
- What is different about this quest?: You get a few rounds to get setup before the enemies start showing. Your allies get caught on the battlefield, with the chance of you rescuing them. You have the ebb and flow of battle where the enemies will come at you, then give you the chance to strike back, and then keep on coming.
- Solo or Multiplayer?: The quest is difficult for both counts. In multiplayer, you get several strong enemies (the wraiths on wings), so there are a lot of strong enemies to take care of there. Multiplayer also increases the risk of seeing several of the mini-bosses the encounter deck contains. In solo, a string of these can also cause an instant scoop, so none of the options are a picnic.
- Can I bring Side Quests for this scenario?: In theory, but it will be hard to pull off in a meaningful way. Several of the stages will barely allow you to overcome the threat of the enemies in the staging area, so you will have a hard time placing progress on the agenda.
The Quest
Setup

If you play this in standalone, you begin setup the same way as for other Saga scenarios, with the first player taking control of the Flame of the West version of Aragorn. With 2 willpower, 3 attack, 2 defense, and 5 hp, he is a strong flex hero who can help out wherever you need him. If he has an artifact attached, he gains Sentinel and does not exhaust to quest, meaning that he can be useful for multiple phases and defend for another player in a tight spot. The first player will gain control of him, and if he dies, it is game over. In Saga mode, things will change a bit – but let’s get back to Saga mode later.

We begin by setting Minas Tirith, Grond, The Witch-king, and each Wraith on Wings aside. Then you find a copy of Pelennor Field and make it the active location. Pelennor Field is a 2-threat, 4-progress location that prevents location control by canceling the ability to place progress on locations in the staging area when an enemy is there. After a good ol’ encounter deck shuffle, the players get a duo of thematic boons: The Esquire of Rohan and the Esquire of Gondor. The players get to attach them to two different heroes. The Rohan version gives the Rohan trait and grants +1 attack when attacking with another Rohan character. The Gondor version mirrors it, only with Gondor instead and with willpower instead of attack. How useful these will end up obviously depends on the decks used by your group – but if you play thematic and/or with the heroes from the box, you should not have a hard time fulfilling these conditions. If the attached heroes survive and you play Saga, you get to keep them, so consider that when you assign them.
This is all the setup you do for now – the forces of shadow are moving… Now it’s just time to wait…

That is unless you are playing Saga mode, of course. Then you have some additional setup to do! Firstly, you need your campaign log. Remember those Harad enemies that passed us by during Journey to the Cross-roads? Time for a happy reunion! You need to find them and put them aside, out of play. Trust me – they will come back later. Then, you take Aragorn and attach two artifacts to him – Andúril (a restricted weapon that gives +1 to each stat and can be exhausted to attack an enemy you just defended against) and Banner of Elendil, an attachment that gives +1 willpower to each other character you control when Aragorn quests, and +1 attack to each other character you control when Aragorn attacks. But you don’t get to play with your new toys just yet – you then set Aragorn aside out of play. Then you search your collection for the Corsair Fleet from the Siege of Gondor. This time, it enters play with the Battle of Pelennor Fields side up, meaning it has X resources, where X is the number of rounds you played in the Siege of Gondor. At the beginning of the quest phase, you remove 1 resource. And once all of them are gone, you get control of Aragorn and his shiny toys.
With this trip down Saga memory lane over and done, we are ready to begin the battle… To arms!
Quest Card 1: The Garrison of Gondor (2 progress)

The first quest card of the game comes with only 2 progress, so you would think it would be very easy to clear. But the card comes with a bit of a surprise: You skip the quest AND combat phase! At the end of the planning phase, you place one progress here, meaning that you get two planning phases before the show begins for real. So now is the time to get the Vilya combo going or dump strong allies in the discard pile so you can pop Caldara. Once that second progress drops, you have to keep up or fall. So get some cards on the table. One important thing to note is that if your deck relies on a specific ally to work, now is the time to play it. Quest card 2 does some weird things with allies, and if you have the ally on the table, it is protected from this effect. So if you have a choice to make, go for the important ally. After the second planning phase, you advance.
Quest Card 2: Retreat from Osgilliath (X Progress)

When you advance, each player adds one Wraith on Wings to the staging area and reveals an encounter card. Wraith on Wings is a nasty enemy – the Nazgul are clearly done holding back. 6 attack, 4 defence and 12 hit points puts it well within boss territory. 45 engagement cost means that it will linger in the staging area for some time until you are ready to face it. And with 0 threat, this should not be a problem – until you start reading the text on the card. At the beginning of the quest phase, you place 1 resource on Wraith on Wings to a maximum of 5 resources – Wraith on Wings gets +1 threat and -1 engagement cost for each resource on it. So the prospect of you being forced to engage one of these grows as the game progresses – and it will add progressively more threat as time goes on – and you get one per player! Fun times, right? Like previous Nazgul incarnations, it cannot have non-Morgul attachments, so no Forest Snare tricks. The Keen-eyed Tooks among you may also have noticed that the Wraith has a Setup effect, meaning that it will show its ugly face again later in the campaign; as I said – fun times! There is also a treachery in the deck that decreases their engagement cost, so you may be in for a surprise on Wings if your threat is high enough and you are unlucky… but more on that below!

With the Wraith on the board, it is time to determine the value of X so we know how much progress we need in order to advance. This is done by a sequence where each player, starting with the first, discards cards from the top of their deck until they discard an ally that is not in play. The discarded ally is put into play in the staging area and its text box is treated as if it is blank until the end of the phase.
Now we flip the quest card and see that X is the total cost of allies in the staging area – so this value can be anywhere from 4 to 20 in 4-player. Allies in the staging area are under no player’s control, are immune to player card effects, and are treated as if their text boxes were blank. I interpret this to mean traits included, so no boosting to your Outlands deck or 5-Dwarves-in-play build. So now we know how much progress we need to advance – but the quest card has one final curve ball to throw at us – a Forced effect: At the end of the round, you must assign damage to allies in the staging area equal to the number of enemies in play. So, with the wraiths in play already, this is at least 1 per player each round.
This Forced effect may puzzle you. Essentially, this means that if you do nothing and leave the Wraiths there, they will kill off the allies, bringing X to 0 over time and causing an automatic advance. But if you got this far, you know the game well enough to be suspicious – this must surely mean that we want to avoid the next phase of the quest for as long as we can. And as we will see further down, this is certainly the case. The next stage is a relentless onslaught, so you want to avoid going there for as long as you possibly can until you are 100% certain you can brace for impact. So how can we do this?
- Play big allies. Even with the two freebie rounds in stage 1, your board state will likely be incomplete to a steady stream of enemies. If you have resource acceleration like Steward of Gondor, put it to good use. If you use Vilya to cheat allies into play, make sure you can get them out every turn. Play A Very Good Tale if you have it. Build up a solid board state so you can easily take on whatever the encounter deck throws at you. Things are about to get tough.
- Deal with the Wraith(s) if you can. This is certainly easier said than done, particularly in multiplayer. But the wraiths are a problem, and they won’t go away. It is likely that you are not set up to deal with the brutal attack from the Wraith and will have to rely on chump blockers – but if you can deal with it, it is well worth the sacrifice. While it is a thematic miss of dimensions, if I play Tactics Eowyn, I will likely trigger her ability at this stage so I can have more breathing room. There are other tricks you can utilize as well – Sneak Attacking Beorn and triggering his attack ability is a tale as old as time. Another option is Flame of Anor with a high-cost card cleverly placed with Wizard Pipe. You can even take them down without damage, as they are not unique and not immune to player card effects. The Great Hunt is a prime silver bullet if you have the hero line-up to support it. If you can get an Eagle of the North in the encounter deck, it can swoop in and kick the Nazgul of the winged beast – this, of course, gets much easier if you play with the “ALEP” card Guided by Fate that allows you to shuffle the Eagle into the top five rather than the entire encounter deck. But no matter what, the Eagle is a great addition – you will see a ton of encounter cards, and there are few things better than to watch an eagle take down a mumak… But we are getting ahead of ourselves. Hopefully, you can encounter mumaks here. I hope for you that you don’t. I am going to mention the Mumaks a LOT going forward.
- Stall for time – especially in Saga mode. Every round spent here is Aragorn getting closer to you. Every round that you can spend is a chance to prepare yourself and build a board state that can kick the encounter deck in the teeth. Use it to your full advantage. Quest conservatively. In lower player counts, scry so you can place the minimum amount of progress you can, using tricks like Henamarth Riversong. If you have expensive or important allies in the staging area here, do what you can to keep them alive, as all allies that survive will benefit you later.
- Especially at lower player counts, be prepared to throw in the towel and scoop. If you get several of the big enemies, you won’t really stand a chance. If the encounter deck keeps giving you Mumaks and the Black Serpent, it is unlikely you will succeed. And you just have to accept that this is a possible outcome.
Otherwise, build up a board state so you are ready to fight, (hopefully) deal with the Wraiths, and stall for as long as you can. If you leave enemies in the staging area, they will chip away at your ally’s health, bringing you closer to advancing on the encounter deck’s terms. But if you manage to stabilize the situation and build a strong force, you may be in control and be the one who decides when to advance. And that is when things will get really intense…
Quest Card 3: The White City Besieged (4 progress)

Once you decide to advance, or the enemies in the staging area make the choice for you, there is once more some setup to do. If you have any allies remaining in the staging area, you take control of them and exhaust them. The first player then adds Minas Tirith, Grond, and The Witch-king (captain side face-up) to the staging area. Each other player searches the encounter deck and discard pile for a different enemy and adds it to the staging area, and shuffles the encounter deck. My recommendation for enemies would be Mordor Orc, Orc of the Eye, and Morgul Captain, in that order – each of them has either Surge or a “when revealed” effect that is bypassed by being added and each of them does not take too much damage to kill.

Minas Tirith is an objective with 30 hit points, plus 10 extra per player. It is the main objective that you need to defend at this stage. It has a Forced effect stating that At the end of the round, deal 1 damage to Minas Tirith for each enemy in the staging area. If Minas Tirith has no hit points remaining, the players lose the game. If the Wraiths are still around, they will ping at the White City each round. The Witch-King (who we will get to in a moment) also contributes. And especially at higher player counts, you will see a lot of enemies from the encounter deck. Add to that you have several enemies that chip away at your health, and these hit points will crumble before your eyes. That is why it is so important to try to clear out the staging area before advancing.


The task of defending the City is also made worse by Grond – an X-threat location that requires 3 progress to clear. X is the number of resource tokens on Grond. It is immune to player card effects, and at the beginning of the quest phase, you place 1 resource on Grond and then deal X damage to Minas Tirith. As you can see, Grond is a problem that gets worse for each round that you ignore it. You can actually travel there from the get-go, the travel cost is that the Witch-king makes an immediate attack against each player, in turn, order. This has the potential to hurt a lot. Remember, as it is immune to player card effects, you cannot bypass the travel cost, and you cannot place progress through shenanigans. You have to go there and clear it the old-fashioned way.

Lastly, we have the Witch-king, our old friend from Weathertop. 50 engagement cost, the Number of the Beast statline (6 threat, 6 attack, and 6 defense), and 14 hit points make him a formidable foe. He is immune to player card effects and cannot be optionally engaged or dealt damage. The cherry on this sundae of misery is his Forced effect: At the beginning of the quest phase, discard cards from the encounter deck until an enemy is discarded. Add the discarded enemy to the staging area. The only silver lining here is that you bypass any “when revealed” effects or Surge triggers. But we are really looking for silver linings here. And 6 threat is no joke either. You are in for a rough ride.
We flip the quest card and see that this card gets +4 progress required for each player in the game. You also cannot travel to Pelennor locations – you will have to clear those through alternative means or just quest over them. We are not in Pelennor anymore. We also have a shiny new keyword that is only used for this particular quest – Assault. Assault means that progress cannot be placed on that stage by player card effects or by questing successfully (though progress can still be placed on the active location as usual, just not on the quest card). Additionally, when the players quest unsuccessfully, instead of raising their threat, players must deal damage to Minas Tirith by the difference between threat in the staging area and total willpower. Importantly, this damage is only calculated once for the group, not per player. And believe me, this will be relevant for you.

How do you place progress on the stage if you cannot quest? The quest card got you covered: When an enemy is destroyed, place progress on this stage equal to that enemy’s total threat. Progress is placed on the active location first, as usual. So you have to get going on killing some enemies!
So now that we have all the pieces in play, we can look at the various effects triggering and what we can do about it. The various effects trigger in the following order:
- Beginning of the quest phase: The Witch-king triggers, adding an enemy.
- Add a resource to Grond and deal damage to Minas Tirith equal to the amount of resources on it.
- Questing with willpower as normal, though you do not place progress on the quest for questing succesfully. If you quest unsuccesfully, you add damage to Minas Tirith equal to the amount you failed by.
- Combat as normal.
- End of the round, you deal damage to Minas Tirith equal to the number of enemies in the staging area (minimum 1 from the Witch-King).
You now rinse and repeat until the White City falls and you lose, or you have killed enough 4 threat worth of enemies, +4 per player. If everything has gone to plan, I will advance with a staging area containing a minimum of enemies and no Wraith on Wings – I find that if I haven’t dealt with the Wraiths at this stage, there is simply too much pressure from the encounter deck to do it later. I also try to travel to Grond as soon as I can – ideally at the first Travel phase, but this is, of course, dependent on how well I and my fellow players are setup to deal with a house call from the Witch King. If this requires one or more players to sacrifice a chump blocker, so be it – it is worth it to get Grond out of the way. But if you can see that this will kill off a hero or an important combo piece, try to build towards a situation where you can travel without setting yourself back too much. Remember, in addition to the automatic damage, Grond will keep adding threat, meaning that total threat will increase automatically, potentially adding extra damage after unsuccessful questing. And you will face the attack from the Witch-King at some point.
Between the Wraith and the Witch-King, and the Mumaks in the encounter deck, it is of uttermost importance to have a defender with readying at the table that can take a 6+ attack reliably. Beregond with a Gondorian Shield or Spirit Dain are both tried and true classics, as is a buffed-up Eagle of the Misty Mountain. Readying can be achieved with unexpected courage for heroes or Radagast’s staff for the Eagles. Don’t rely too strongly on chump blockers unless you can reliably recur them and replay them cheaply, as some Rohan decks do – otherwise, you will just be treading water and not strengthen your position.

The most important thing here is to keep clearing enemies as they appear. And you likely need to bring a combat deck, as willpower-based questing is basically nullified at this stage. The encounter deck contains some strong enemies as well, with War Mumak and the Black Serpent being examples of enemies that will likely stick around for a few rounds. It is easy to get overrun at this stage of the game, so be prepared for some hard combat and tearful scoops – as we will see in the encounter deck analysis, several other cards can play nasty tricks and take out your heroes. And consider including the classic Mumak-killer combo, Rivendell Blade, and Straight Shot.
Otherwise, this phase is about enduring and removing enemies as they appear. “Luckily,” the Witch-king ensures a steady stream of foes – keep taking them out and keep building up your board state. Keep damage to the White City to an absolute minimum, and when faced with choices, consider taking the option that harms you rather than Minas Tirith. Nothing is worse than having to scoop because the city falls as you are about to win… this also means that you cannot neglect questing too much, or Minas Tirith will fall to shambles quickly. Remember, you have multiple cards (at a bare minimum, the Witch-king plus the enemy, he adds), and you cannot travel to Pelennor locations. Threat can get quite high. So have a questing strategy in mind.
Once you have defeated enough enemies (typically 2+2 per player, plus whatever you need for locations) you advance, and the tide starts to turn…
Quest Card 4: Rohan has come! (- Quest Points)
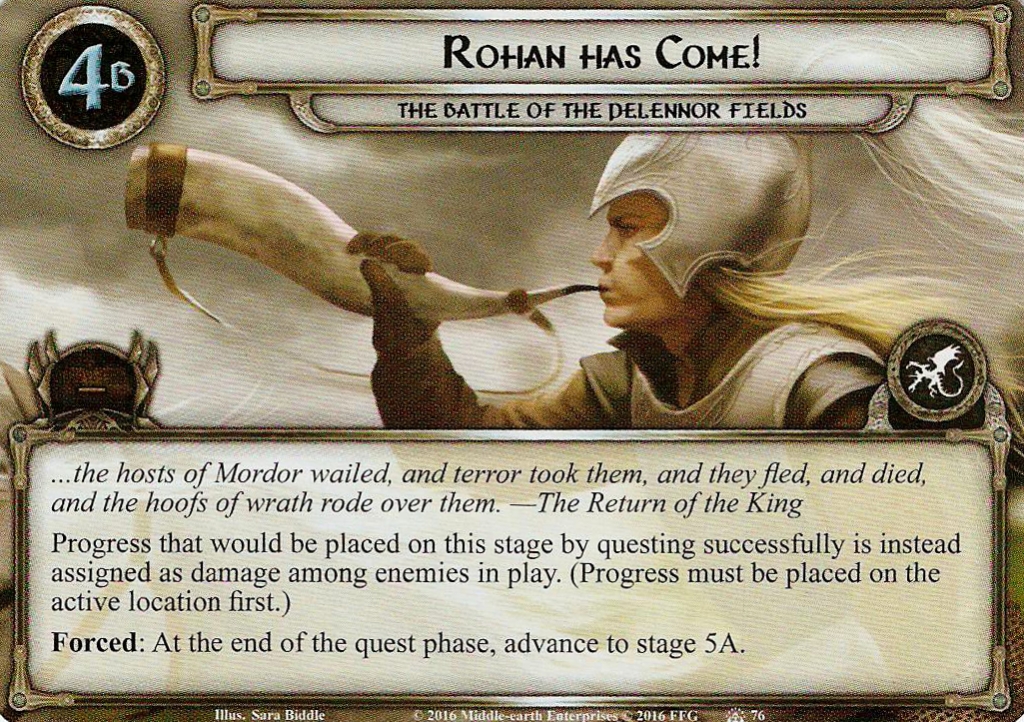
If you made it this far, first of all congratulations – now you are getting ready for the final showdown! First of all, the Witch-King is set aside, which greatly lessens the threat burden of the staging area. Secondly, each player searches the top 10 cards of their deck for an ally that matches the sphere of a hero they control and puts it into play under their control. Now it’s time to fish out that big ally that either died during stage 3, or that never bothered to show up. Be sure to include one in your deck that counts! Then we progress to stage 4B proper – this stage does not have a threshold for advancing. Instead, you advance automatically at the end of the next quest phase. Progress is not placed on this stage as normal – instead, progress is placed as damage on enemies in play. This is your chance to do a big push and clear out remaining enemies in play, unless these are Mumaks that just showed up that can only take 3 damage per round. But if you still have Wraiths on Wings lingering around, this is your chance to clear them without engaging them. It is tempting to go all out here, but hold a blocker and some attackers back – there will still be a combat phase, and stage 5A brings additional problems to the table. Otherwise, just try to clear as much as you can, and enjoy that the tide has turned!
Quest Card 5: Fighting in the Fields (20 progress)

The first thing we do is return the Witch-King to the field – only this time he has the Sorcerer side face-up. In this version, we can actually attack and damage him, but the flip side is also true – he will now engage the first player at the start of the encounter phase and make an additional attack. This means that you have to survive at least two attacks from him. Yikes. However, only the engaged player can declare attacks against the Witch-King, so you cannot get any help from afar – the way I interpret this is that other players cannot use Ranged to add damage. If you disagree with this interpretation, please let us know in the comments below! But it doesn’t end there. You also have to search the encounter deck for a Fell Beast and attach it to the Witch-King, granting him even more attack power and returning him to the staging area at the end of combat. Just as you thought your day could not get any worse. And each other player gets a regular encounter card because this is not Lego-land – no one promised you an easy time! After a good ol’ encounter deck shuffle, we are ready to proceed to stage 5B – the final showdown – unless you play campaign. If you play campaign, you also add all the Harad enemies from Journey to the Crossroads that was placed under the Black Gate to the staging area. It is mumak time! Like I said – no one said it would be easy.

At this point, especially in Saga, we likely have a big group of enemies in the staging area. This is why it is also important to control your threat so you can keep some of the enemies at bay. If one player is dangling on the edge of threat elimination, the Harad enemies will come down hard and fast, stomping them out. It is much more manageable if you can control what comes down.
After flipping the quest card, we first notice that the Witch-King and his attachments are immune to player card effects. Then we notice a Forced effect, punishing you for chump blocking, stating that after a character is destroyed following an attack, you must deal 1 damage to Minas Tirith. With the Witch-king attacking twice pr. round, this is something that will very likely trigger. Finally, it is stated that the stage cannot be defeated unless Aragorn is in play and The Witch-king is in the victory display. If the players defeat this stage, they win the game.

My priority for this phase is to defeat the Witch-King as fast as possible – he adds a substantial amount of threat to the staging area, which, combined with the Harad enemies in Saga, means that even if you cleared the staging area of enemies in 4B, you will have a lot of threat to deal with. At this point you should have a board state that allows you to quest over everything, but the Witch-King will swoop in every round and make two attacks at at least 7 (with the potential for additional shadow card damage and additional attacks). Even with a dedicated defender with readying, this can get very dangerous very fast and eat away at your board state. In the ideal world, you have enough firepower to engage, survive the two attacks, and take him down – if you play Eowyn and haven’t used her ability, now is clearly the time for a theme win. Other tricks can include a buffed up Eagle of the Misty Mountains – at this stage in the game, it can be very, VERY strong, and if you bring tricks to ready it, like Radagast’s Staff, it can take care of much combat for you. In multi-player, things can get more tricky, particularly if your decks are specialized towards questing and combat – timing when the Witch-King comes down to the player that can handle him can be difficult, and you may have to tread water for a few rounds and endure his attacks. Luckily he can still be blocked by characters with Sentinel, unlike the restriction on attacking. So if you have a strong defender on the table (and you likely do, if you made it this far), then this defender can hopefully take care of him. unless the defender is pinned down by Harad enemies… This is also why threat management is so crucial – enemies can appear quickly and overwhelm you, especially if the Witch-King chips your allies away.

Lastly, Minas Tirith may be in very bad shape, and the combination of chump blocker punishment and encounter card effects makes it a very real opportunity that you can lose due to Minas Tirith falling. Therefore, try to take the Witch-King down as soon as you can. Once he falls, it is all about the questing, and with 6 threat gone, you should be able to place the 20 progress fairly quickly. Don’t waste time traveling to locations, quest hard for the finishing line. Once the 20th progress is placed and the Witch-King is gone, you can breathe a sigh of relief – you did it… unless you play Saga mode and Aragorn is not in play! If you are still waiting for him, you may have a hard time ahead of you. But most players who made it this far will have Aragorn in play by now. So, I think it is safe to say congratulations! Now, the final confrontation with Mordor awaits…
If you play Saga, you get to add 1 Wraith on Wings to the campaign pool per player. Doesn’t winning feel good? You do get a reward – if Esquire of Rohan and/or Gondor are still in play, you add these to the campaign pool and note which hero they belong to. We will visit Aragorn one final time when the Black Gate Opens. But for now, let’s take a look at the Encounter Deck.
The Encounter Deck
Global
- The Encounter deck is thick and consists of 39 cards on Normal mode, and 33 cards on Easy mode (not counting cards set aside at the beginning of play).
- Average threat is 1.77 on Normal and 1.63 on easy.
- 58 % of cards have Shadow effects on Normal (23 cards) and 64 % of cards have shadow effects on Easy mode, meaning that shadow effects are often present.
- Doomed is present on Dread and Despair (2 copies) and Shadow of Mordor (2 on Normal/1 on easy).
- Surge is present on Mordor Orc (5 copies on normal, 4 on Easy), and Fell Beast (2 copies on Normal, 1 on easy).
- Peril is present on Orc of the Eye (3 copies) Morgul Captain (2 on normal, 1 on easy).
- Archery is present on Orc of the Eye, War Mûmak (2 copies on normal, 1 on easy), and is present on Siege Tower (3 on Normal, 2 on easy) when it is in the Staging Area.
Enemies
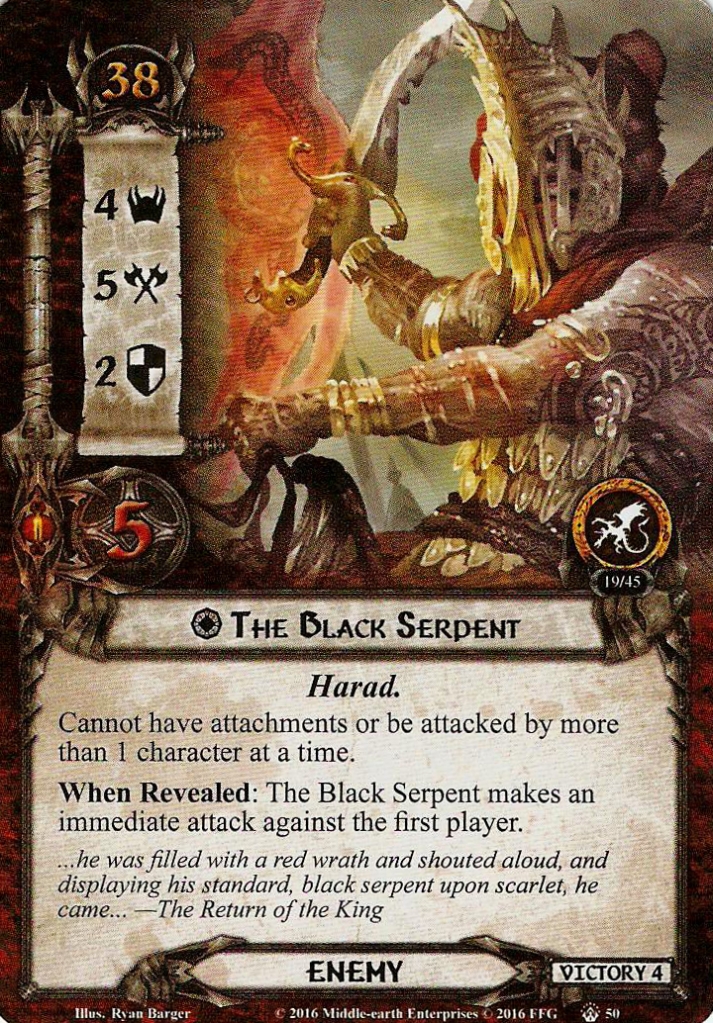
The first enemy of the encounter deck is a unique mini-boss that we previously met during the Harad cycle when we stole his clothing – The Black Serpent. He has an engagement cost of 38, 4 threat, 5 attack, 2 defense and 5 hit points. The combination means that you can take him out with 7 damage, which means it is doable – however, he cannot have attachments and can only be attacked by one character at a time, which means you have to take him out in single combat. The way I interpret this is that other players can attack him with a single Ranged character, but it will have to be death by a thousand cuts rather than one big alpha strike unless you have an attacker with a lot of weapons and bonuses, or plays obscene attackers like the Erebor Battle Master or a pumped up Outlands horde. He also has an annoying When Revealed effect, causing him to make an immediate attack. Overall, he is potentially a very difficult enemy to face, especially during the onslaught of 3B. I am happy to see him as a shadow card because he has no shadow effect. Keep in mind that he is not immune to player card effects, so all tricks besides attachments go! The encounter deck contains one copy on normal and zero on easy. He has Victory 4.
Next, we have the source of my nightmares – the War Mûmak. Engagement cost of 46 means that it will linger around for a long time. But there are several reasons why this is bad. One is the fact that it has Archery 2, meaning that it will hand out damage to your already troubled defenders. Additionally, it has terrifying stats – 4 threat, 6 attack, 2 defense and 9 hit points – and it has the normal Mûmak armor first introduced in Heirs of Numenor, where it cannot have attachments and cannot take more than 3 damage each round. So you WILL see it for at least three rounds. This card is one of the reasons why you need someone who can reliably take a 6 attack. And the encounter deck contains two copies on normal – TWO! On easy, you only have one, but that can still mean you have to scoop if it shows up – it can royally mess up your defense plan, especially if Wraiths on Wings or the Witch-king are in play and attacking. As previously mentioned, you have the classic Mumak-killer combo, Rivendell Blade and Straight Shot, that can be used to great effect here. Likewise, the same tricks that you build in to take down the Wraiths on Wings can serve as a nice strategy to handle Mûmaks – the Eagles of the North or the Great Hunt, or any other effect that discards enemies from the staging area. I breathe a sigh of relief every time I see these as a shadow card because they have no shadow effect and because it is now out of the encounter deck. They have Victory 4, so if you clear them, they are gone for good.
Southron Champion is an enemy I’m usually not too afraid of unless Minas Tirith is getting close to dying. Engagement cost of 34, 2 threat, 4 attack, 2 defense and 4 hit points means that he is not exactly easy, and can significantly damage many heroes, but he is also someone you can take down without too much trouble. After the Champion is dealt a shadow card with no shadow effect, you must either deal 3 damage to Minas Tirith or it makes an additional attack. Which one you take depends solely on your board state and the state of Minas Tirith. As we saw above, you actually have quite a few shadow cards with effects, so most often, you will have a shadow effect. However, as we will see, some of these are nasty, so be careful what you wish for. Most of the time, I will take the damage to Minas Tirith and be done with it. But I also like to live life dangerously… The encounter deck contains two copies on both difficulties, and as a shadow card, he pings Minas Tirith for 1, which is rarely the end of the world, unless it suddenly is! I assume many tears have been cried over games where this effect is the final point of damage…

Morgul Captain is another mid-tier enemy with an engagement cost of 35, 3 threat, 3 attack, 1 defense and 4 hit points. His stats make him on the weak side, but his When Revealed effect (which has Peril) can cause things to escalate: When revealed, put the topmost Orc enemy in the discard pile into play engaged with you. Usually this will be one of the tiny orcs we will discuss in a minute, but this can be bad enough if you are tied down by Mûmaks and Black Serpents. Its attack is not too severe, and it can be quite easily killed unless the additional enemy ties down all your attackers. It can, therefore, be a sneaky enemy that suddenly causes your board state to slide. The deck contains 2 copies on normal and 1 on easy. As a shadow card, it can be quite harsh and punishes chump blockers: If the attack destroys a character, return the attacking enemy to the staging area. Needless to say, this is bad when it happens to Wraiths or Mûmaks. This is a shadow card you could consider cancelling.
Next, we move to the Orc of the Eye. 40 engagement cost, 2 threat, 3 attack, 1 defense, and 3 hit points makes this an easy enemy to kill, and it rarely hits hard enough to cause you trouble. It has Archery 1, which can be annoying, and a Peril When Revealed effect: Either deal 2 damage to a hero you control or deal 2 damage to Minas Tirith. I will most often go to the damage to my hero if I can afford it. Otherwise, it may be wise to ping Minas Tirith, but as we have seen, this can easily go out of control. This is an enemy I am happy to see in stage 3B once the Witch-King starts adding enemies. The encounter deck contains 3 copies regardless of difficulty level as a shadow card attacking enemy gets +1 attack or +2 if they have the Mordor trait, which is all of the Orc enemies. This can be a bad one if it starts pumping The Witch-King or Mûmaks, so beware of this one if your Defender is close to death.

Lastly, we have the Mordor Orc, and trust me, you will see this one more than once. This is the enemy that gets thrown at Minas Tirith like a wave, costs be damned. 30 engagement cost, 1 threat, 2 attack, 1 defense, and 2 hit points make for a small enemy that is rare to see at this point in the game’s life – this is the kind of enemy we used to see during the days of the Dwarrowdelf cycle. However, this little guy has Surge, and undefended damage must be dealt to Minas Tirith, so he packs some punch. It is a tempting prospect to just let them chip away until it suddenly blows up in your face. And it bears mentioning that the encounter deck contains five copies (four on easy), so you WILL see it. It is easy to hit a surge train with multiple enemies. Because of Surge, I like seeing this as my “Witch-King enemy” in stage 3B. Once you get to the defense, they really start swarming because of the shadow effect: If Minas Tirith is in play, engage Mordor Orc and deal it a shadow card. So suddenly, you have an extra attack to handle. These enemies are not hard to kill but can cause some surprise character deaths or take away resources you needed to kill larger enemies. They can be more of a nuisance than you would think.
Locations

With so many enemies and so much fighting, getting a location at the right time from the encounter deck can be the literal difference between victory and defeat. But as we will see, even the locations have teeth in this scenario (though not literally). One such location is the Gate of Gondor, a 5 threat location that takes 3 progress to clear. It is immune to player card effects, which is a giveaway that this location is almost a mini-boss. While Gate of Gondor is the active location, each enemy in play gets -30 engagement cost, so you either take the 5 threat on the chin or get stomped by enemies. Early game, this is bad because of the Wraiths. Late game, potentially the Mûmaks. And it removes the option to selectively engage enemies because they will all come down hellbent on your destruction. It does have a Forced effect that you potentially can use to reset engagement – When Gate of Gondor is explored, you return each engaged enemy to the staging area. It only really solves the problem it created itself, so the victory is rather pyric. The only good thing to say about it is that it has no shadow effect and only comes in a single copy, regardless of difficulty. It has Victory 5, so if you clear it, it won’t come back.
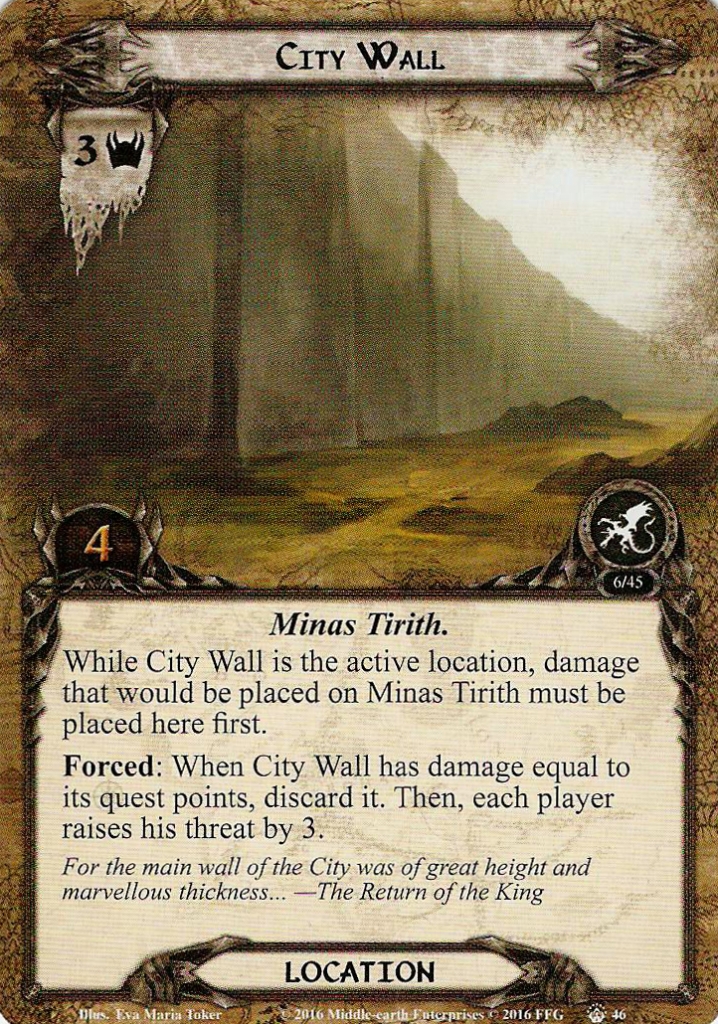
Next, we have the City Wall, a 3-threat location that requires 4-progress to clear. While City Wall is the active location, damage that would be placed on Minas Tirith must be placed at the city wall first, so it acts as a potential distraction. However, when City Walls has damage equal to its quest points, it is discarded, and each player then raises their threat by 3. Depending on what deck you play, this may either be a get-out-of-jail-free card or a disaster that causes you to engage enemies you were trying to avoid or even threat you out. More often than not, it can be a moment of respite for Minas Tirith that can save you a game. It has no shadow effect and comes in three copies regardless of difficulty.

Pelennor Field is a 2 threat location that takes 4 progress to clear. It is a location I am often happy to see from the encounter deck, especially at lower player counts, where location lock is less of an issue. 2 threat is easy to quest over, and more often than not, I will leave it in the staging area for a while. It has anti-location control tech, as while at least one enemy is in the staging area (which is more or less all the time because of the Witch-King), progress cannot be placed on locations in the staging area. But as I said, this is probably one of the easiest encounter cards you can get in this quest. It comes in four copies regardless of difficulty. As a shadow card, it grants +1 attack, or +2 if the attacker has the Harad trait, so it can make Mûmak attacks quite dangerous. It has the Pelennor Trait, meaning that you cannot go there during 3B.
Our second location with the Pelennor trait (and therefore unavailable during 3B) is the Fire-filled trench. 2 threat and 3 progress make this a location in the milder end. It does come with an anti-cancellation Forced effect: When a player plays an event that would cancel the effects of a treachery card just revealed from the encounter deck, cancel the effects of that event. Then, discard Fire-filled Trench. So when this one is around, A test of will removes this location instead of canceling a treachery. For that reason, this is probably one you want to clear rather than simply questing over it. Of course, this depends on how many of your cancels you have already burned and whether you have specific treacheries you fear. This location can make Stage 3B very dangerous. It has no shadow effect and comes in three copies, but only two copies on easy.

Lastly, we have the Siege Tower, a peculiar location that comes with a punch. 3 threat and 3 progress to clear it makes it a mid-tier location that you can clear relatively easy if you manage to travel there. While it is in the staging area, it gets Archery 3, so it is a problem you should deal with sooner rather than later. To clear it can be deadly: After Siege Tower becomes the active location, shuffle the encounter discard pile into the encounter deck and discard cards from the top until an enemy is discarded. Add the discarded enemy to the staging area. This may mean that the tower could hide a Mûmak! That is an amusing mental image. This is bad for two reasons – while it may give you a small orc, this can also carry worse things – and it recycles the discard pile. So, if you were lucky and tossed the Gates of Gondor and two mûmaks as shadow cards, they can come back to haunt you. This location is the reason why you may want to bring location control and get Pelennor Field out of the way so you can use it. It has no shadow effect and comes in three copies on normal and two on easy.
Treacheries

The first treachery is The Rammas is Breached. When revealed, Each player searches the encounter deck and discard pile for an enemy, puts it into play engaged with them, and shuffle the encounter deck. Unless you are being overrun and all you resources are locked down, this should not call for cancelation. Pull out the Mordor Orcs, and you will be fine. The deck contains two copies on normal, and one on easy. As a shadow card, you must either assign 3 damage to Minas Tirith or take an additional attack. Unless the city is close to falling, I go for the damage.
Next, we have the Fell Beast, a card we already touched upon that makes terrifying enemies even worse. It has Surge (boo!) and attaches to a Nazgul enemy (limit 1 per enemy). It grants +1 threat, +1 attack, and +1 defense, and -10 engagement cost, making Nazgul enemies much more prone to come down. Additionally, it bounces the enemy back to the staging area at the end of the round, so they are ready to contribute their abnormally high treat to the next quest phase. This is a terrible card and well worth your cancels. The deck has two copies and one on easy. I am happy to see it as a shadow card because it has no shadow effect.
Black Dart is the reason why you need to bring condition attachment removal. When revealed, you remove a hero you control from the quest and attach Black Dart to that hero (Limit 1 per hero). It now counts as a condition attachment with the text: “Forced: At the end of the round, deal 1 damage to attached hero”. So unless you have a way to remove it or to heal your hero each round, your hero will die. So, either cancel it or bring ways to remove it. Power of Orthanc is a tried and true favorite for the task. As a shadow card, it can be tricky because if the attack damaged a hero, you attach Black Dart to the hero. So, make sure your defender is well-suited to handle the attacks. Luckily, shadow cards do not tend to stack in this scenario. The deck contains two copies on Normal and one on Easy.
Spells of Ruin is another card you probably want to cancel unless you run Silvans or another deck type that means your questers do not exhaust when they quest: You either deal 1 damage to each exhausted character or deal 5 damage to Minas Tirith. This can wipe the board of all players, so tread carefully here with what you choose. 5 damage is a lot, but often, you will have to take this option if you want to have a chance to win. As a shadow, the attacker gets +1 attack, and if they destroy a character, deal 2 damage to Minas Tirith. This is another reason to avoid chump blockers. The deck contains two copies, regardless of difficulty.
Dread and Despair is a card with Doomed 1 and Peril that takes a jab at your board state and tries to make you fumble your questing by potentially adding a big threat boost to the staging area. When revealed, you must discard an ally you control, and then you add +1 threat to the staging area for each ally in your discard pile. This treachery makes it quite difficult to play a Mining deck because you will be severely punished. This is also a delayed-blast chump blocker punishment, as decks that rely on this strategy will take a big hit. On the other hand, if you recur your allies like Rohan can do, or keep allies out of the discard pile like Eagles of the Misty Mountain does, then this is more of less a whiff. It can lead to a rather large threat increase (or damage on Minas Tirith in stage 3B), and in those cases, I would consider canceling it. But it is by no means a given. The encounter deck contains two copies at both difficulties. As a shadow card, you discard a non-objective attachment you control.

Lastly, we have Shadow of Mordor, a treachery with Doomed 1. When revealed, each player deals 1 damage to a hero they control. Until the end of the round, you treat the printed text box of each damaged character as if it were blank, except for Traits. So, this can be a huge setback to decks like Outlands, which relies on synergy between cards and card effects. Whether you cancel this depends on how badly this effect leaves you, which will vary a lot from deck to deck. This is a good reason to avoid spreading out damage too much, which can be an issue due to Archery effects. The encounter deck contains two copies on Normal, and one on Easy, and the card has no shadow effects.
Tips and Tricks
- Hit the ground running! You get two planning phases before the show starts. Now is the time for A Very Good Tale shenanigans and Steward of Gondor. You can give yourself a headstart by playing Leadership Denethor, so you have a few more resources when you begin play. With a little effort, he can also be turned into a very good defender.
- Remember that you get Esquire of Gondor in play, which opens up Gondor-restricted cards to decks that normally do not have them. You can put a Gondorian Shield on spirit Dain for greater effect, and suddenly, you have a strong defender that can take a swing from the Witch-King and live to tell the tale. Or you can use Wealth of Gondor to accelerate resources in the early game.
- Include some large allies in your deck to serve as your tribute during stage 2B. Stage 2B is your opportunity to stall for time to await the arrival of Aragorn, deal with the Wraiths on Wings, and build a board state that can withstand the assault on stage 3B.
- I am a broken record at this point but I have a strategy for dealing with the Wraiths on Wings. You need a strong attacker AND a strong defender. Do not be afraid to use cheap tricks like The Great Hunt to get a Wraith out of the way. If you can get an Eagle of the North to fire, it is incredibly satisfying.
- Rivendell Blade and Straight Shot is the perfect Mûmak killer.
- It is tempting to go all out on questing once Rohan shows up in stage 4B, but be careful – the Witch-King shows up right after, ready for combat. Hold your defender back, and be ready for combat.
- Equip your super-defender with readying tricks – there are several enemies that swing more than ones, and chump blocking can be dangerous here.
- In Saga, it is vital to manage your threat, so you don’t have all the Harad enemies coming down in stage 5B together with the Witch-King.
- Be prepared to scoop and scoop in solo. You need a little bit of luck here too avoid the hardest enemies in the early stages of the game.
Playthroughs
- The original Cardboard of the Rings crew did a playthrough with Beorn. Expect a lot of pre-errate Boromir shenanigans. They also did a follow-up video
- COTR Chad also did a playhtrough in his Thematic Saga Series, that has a companion thematic deck building guide
- LOTRLCG did a progression series playthrough, playing an outlands deck
- One-stop Co-op shop also did a playthrough with a fun twist in the end… This is also a video with real cards!
- Card Talk also did a live-stream playthrough
- Carl Swanson also did a playthrough in his There and Back Again series – a two-handed solo video, with real cards
With hard work and a little luck, the White City will still be standing, and you will have done your part to save the Free people! Well done! But now we must turn our gaze East. In the land of Mordor, something stirs…

Thank you for posting me in the play throughs
LikeLike