Shoutout to Birdman137 for taking on this Nightmare quest and making the ultimate sacrifice of doing the Nightmare Nin-in-Eilph scenario overview next. Your efforts are appreciated! -Durin’s Father
When Daan asked if anyone would be willing to help review the Nightmare quests for the Ringmaker cycle, I knew I wanted to help out. I’ve done in-depth write-ups for other games and know how much work they are, so I decided to chip in and help share the load. When pondering which quest I was interested in covering, I wanted to do something I could give a thorough treatment to, which meant playing it with many different decks and at varying player counts (I’m not afraid to go in 4-handed by myself). Some of the harder quests would make that difficult with the amount of specific deckbuilding and unique tech that would be required (hello NM Nin-in-Eilph). Plus, I don’t possess the fortitude to get repeatedly kicked in the teeth by a quest. In the end, I settled on Trouble in Tharbad. Going into it, I had never played any of the NM Ringmaker quests. I don’t own any of the NM packs for this cycle, so I fired up Dragncards and got to work.
Tharbad is a town located in Southern Eriador where the Old South Road crosses the River Gwathló (or the Greyflood). An old Númenórian settlement from the second age, Tharbad was originally an important trade center. Initially, because it could be accessed by ship from the Sea via the river Gwathló, and later due to the bridge that was built over the river along the North-South road. As Eriador fell into decline throughout the Third Age, so did Tharbad. It was ravaged by the Great Plague, the bridge fell into ruin, and the town was eventually deserted long before the War of the Ring. In this quest, the town has been reinhabited by freelancers and highwaymen.
The heroes travel to Tharbad seeking the Dwarf, Nalir, in an attempt to purchase a map from him that would reveal the location of Celebrimbor’s secret forge. The Dwarf has already sold the map to Bellach but has yet to deliver it. Despite this detail, the heroes persuade Nalir (with gold) to give them the map instead. Just as Nalir is about to hand over the map, Bellach bursts onto the scene with a band of Orcs…
Nightmare Trouble in Tharbad
- Found in: Trouble in Tharbad Nightmare
- Size: 19 new encounter cards and one nightmare rules card.
- Increase in difficulty: Yes, but it is still very manageable. The enemies get a little meaner. There are more ways your threat can be increased and your threat elimination level decreased. A slow-starting deck will no longer cut it.
- Fixed loopholes: The locations that add time counters or prevent time counters from being removed have been taken out so you can’t stall. You are also forced to deal with Bellach at the end of the game now.
- New mechanics introduced: None. This quest leans into the already unique mechanics introduced in the non-nightmare version.
- Play this scenario if: You want a manageable NM quest experience. A wide variety of strategies can be employed giving you flexibility in what deck(s) you bring.
- Solo or multiplayer: Any player count is fine. This quest is probably easiest in solo where the encounter deck is less likely to combo on you, but even at 4-players it is still an enjoyable experience.
New Setup/Rules
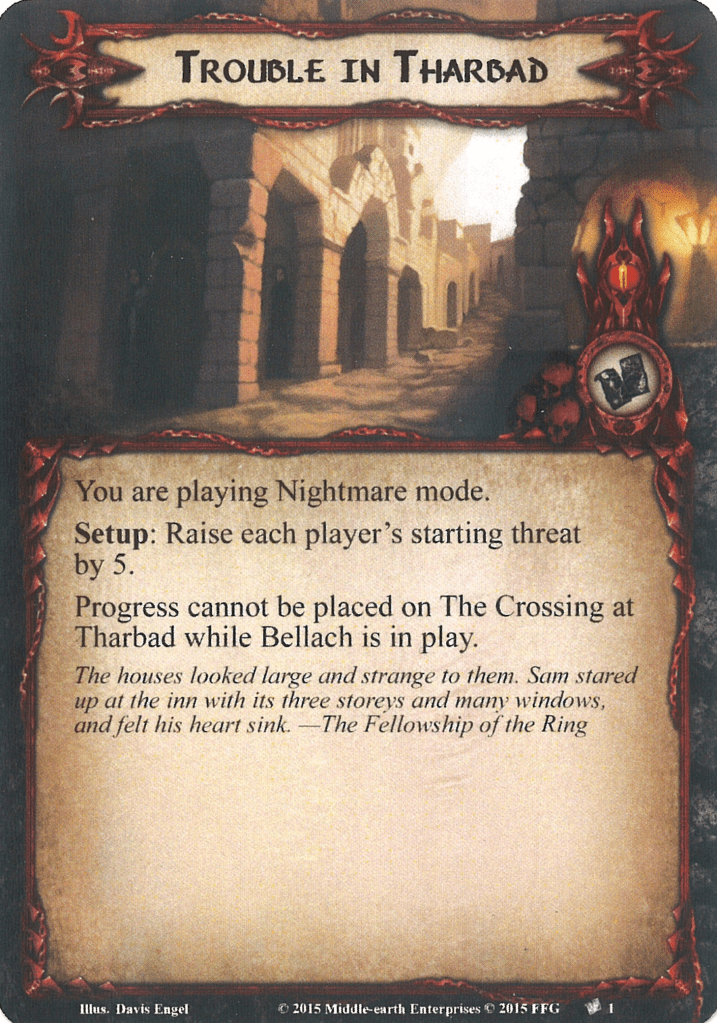
There is one new setup instruction and one new rule in the nightmare quest. The new setup effect raises each player’s starting threat by 5. At first, this may not seem like a big deal, as the whole point of this quest is to lower your threat down to 0 by the effect on quest card 1B. However, it is just enough of an increase that the encounter deck can catch up, and you can easily threat out if you are not questing well from the start. Many of my losses would not have been losses without this increase, as I was just turning the corner with questing and about to start making big chunks of progress when my threat elimination level suddenly dropped below my current threat.
The new rule prevents progress from being placed on The Crossing at Tharbad (which must be explored to win) while Bellach is in play. This one has less of an impact, I think. Whereas in non-NM, you could leave Bellach in staging and quest out the next quest phase, now you need to engage and defeat Bellach before questing out the next quest phase. Late in the game, you should have enough of a board state to defeat Bellach quickly.
Cards Removed
The following 10 cards are removed from the encounter deck to make space for the 19 new Nightmare cards.
- 1x Orc Hunter (there are still some left in the NM deck )
- 2x Orc Skirmisher (there are still some left in the NM deck)
- 2x Tharbad Hideout (counteracts one of the main mechanics in this quest)
- 2x Hidden Alleyway (counteracts one of the main mechanics in this quest)
- 1x Decrepit Rooftops (there are still some left in the NM deck)
- 2x Orc Hunting Party (doesn’t really synergize with the mechanics of the quest and is a bit of a softball)
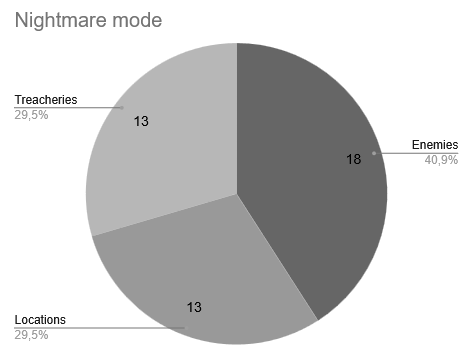
Here is a breakdown of the card changes by type:
- Enemies: remove 3, add 8 (net +5)
- Locations: remove 5, add 6 (net +1)
- Treacheries: remove 2, add 5 (net +3)
The quest gets a little more enemy-heavy than it was before and locations are a little harder to come by.
The Quest
This quest takes the main hook of the standard version and cranks it up a bit. Effects that remove time counters (or give you the option to avoid some other bad effect), increase your threat, or reduce your threat elimination level are all featured more prominently than before.
To begin with, you will raise your threat by 5 during setup. This immediately puts the encounter deck a little closer to forcing you to threat out (this is always how I ended up losing). Additionally, each player will put a Spy from Mordor enemy in staging. Each time this enemy attacks, it will remove a time counter from the quest. Each time the time counters run out on stage 1 (Time 4), your threat elimination level is reduced by 10. To prevent your threat elimination level from dropping too fast, it is a good idea to leave as many Spy from Mordor enemies in staging as possible or have Feint, Feigned Voices, or other means of preventing enemy attacks ready. Spy from Mordor has an engagement cost of 40, so even with a fairly high starting threat, you should be able to avoid them should you wish.

The strategy at the start of the game I had the most success with was to quest as hard as possible, so you can start reducing your threat from the effect on 1B as quickly as possible. With all the effects that remove time counters, it is not uncommon to see 2 or 3 of them removed in a round. If you don’t start lowering your threat in the first two rounds (and you have to clear The Empty Mug first), then the encounter deck is likely to catch up with you. I played a few decks that didn’t quest the strongest from the start and was able to beat the normal version of the quest, but ended up threating out around round 3 or 4 in nightmare. The addition of the Blood Hound enemy in nightmare to go along with Conspicuous Lot from the standard quest means that you could see some large unexpected threat increases, along with your threat elimination level dropping fast. All this to say, bring decks that quest strong from the start.
Combat is not a priority in this quest, but being able to avoid enemies piling up in staging can help you quest better. In general, I would recommend engaging and killing what you can when it is convenient. Spy from Mordor is the exception. I wouldn’t engage this enemy unless you were forced to or could prevent it from attacking. The Forced effect of removing a time counter every time it attacks is brutal. If there is an enemy you can’t deal with in 1 turn, it is usually possible to leave them in staging until you can. You have fairly good control over when enemies engage since your threat should be steadily dropping to 0 throughout the game. Streets of Tharbad and Cornered can both lower the engagement cost of enemies, though, so beware. The nightmare version of the quest adds some additional low-engagement-cost enemies to the deck in the Orc Skirmisher (20) and Blood Hound (0), but most of the enemies still have an engagement cost of 30 or more.
Three of the enemies, Orc Seeker, Orc Hunter, and Orc Skirmisher, and three of the treacheries, Waylaid by Agents, Constant Tail, and Cornered, all have effects that give you the option of removing a time counter or doing some other bad thing. I thought these effects were one of the most interesting parts of this quest since I had to make a genuine decision most of the time and felt like I had some agency in how the quest played out (no cancel or die cards). At various points in the quest and under different circumstances, there are good reasons to pick either option. In general, I tried to avoid removing time counters, but if I couldn’t handle an additional attack early on from Orc Seeker, or wanted to avoid the pseudo-surge on Orc Hunter, I often removed the time counter. As long as you are questing strong enough, you can weather having to remove some additional time counters, provided you don’t tarry too long on stage 2.
Once your threat reaches 0, the quest advances to stage 2. Bellach, The Crossing at Tharbad, and 1 enemy per player are added to the staging area. That’s a lot of enemies, but your threat is also at 0 now, so you shouldn’t get swarmed right away. The win condition is on The Crossing at Tharbad, but progress can’t be placed on it if Bellach is in play (per the new nightmare rules). Engaging and defeating Bellach in the round you advance to Stage 2 is the goal. This should be manageable since it is later in the game and you likely have a fairly well built-up board state and not too many other enemies to deal with. After Bellach is defeated, you are free to YOLO quest the next round to try and put the required progress on The Crossing at Tharbad. A bad treachery or Bellach popping back out (he gets shuffled into the deck instead of going to the discard after he is defeated) are the only things that could foil your plans.
One thing about the standard quest I didn’t like was that it felt almost impossible to lose on stage 2. The quest just wasn’t able to ramp your threat up quickly enough, and there was typically enough buffer to your threat elimination level. Nightmare has somewhat fixed that. With all the added threat-raising effects, if you spend more than a round or two at stage 2, you are now going to be in danger of threating out. I think this is a good change that keeps the quest tense the whole time.
The Encounter deck
Global
- The new encounter deck has 49 cards, but it is effectively 45 cards. One is Nalir, two start out of play, and one is the starting active location that ends up in the victory display.
- Shadow chances are 46%. Many of these will either remove time counters or increase your threat.
- Average threat per card revealed is 1.73. In reality, this will be slightly higher due to various buffs to staging area threat from Decrepit Rooftops and Ruins of the Second Age.
- Surge: 5 cards in the encounter deck have surge. On top of that, Conspicuous Lot will surge if any player’s threat is 20 or less, Get That Dwarf! will surge if there are no enemies in staging, Dark Pathway will add surge to the first treachery without surge while it is the active location, and Orc Hunter either essentially surges or makes you remove a time counter from the quest.
- Doomed: Waylaid by Agents gains Doomed if any player’s threat is 20 or less. There are plenty of cards that will raise your threat though.
- Archery: None. Two enemies give you the option to do direct damage instead of removing time counters when they are engaged.
- Immunity: Progress cannot be placed on Streets of Tharbad while it is in the staging area.
Enemies
- Blood Hound: This enemy is easy to deal with in combat, but it will cause your threat to make large jumps, which can end your game. The engagement effect of raising your threat by 5 usually can’t be avoided since Blood Hound has an engagement cost of 0. Fortunately, you can decide who engages the Hound and send it to whoever can handle the threat. The shadow effect, however, is brutal! A 10 threat increase that you likely didn’t see coming can pretty easily push you past your threat threshold. This card alone is probably worth including shadow cancellation for.
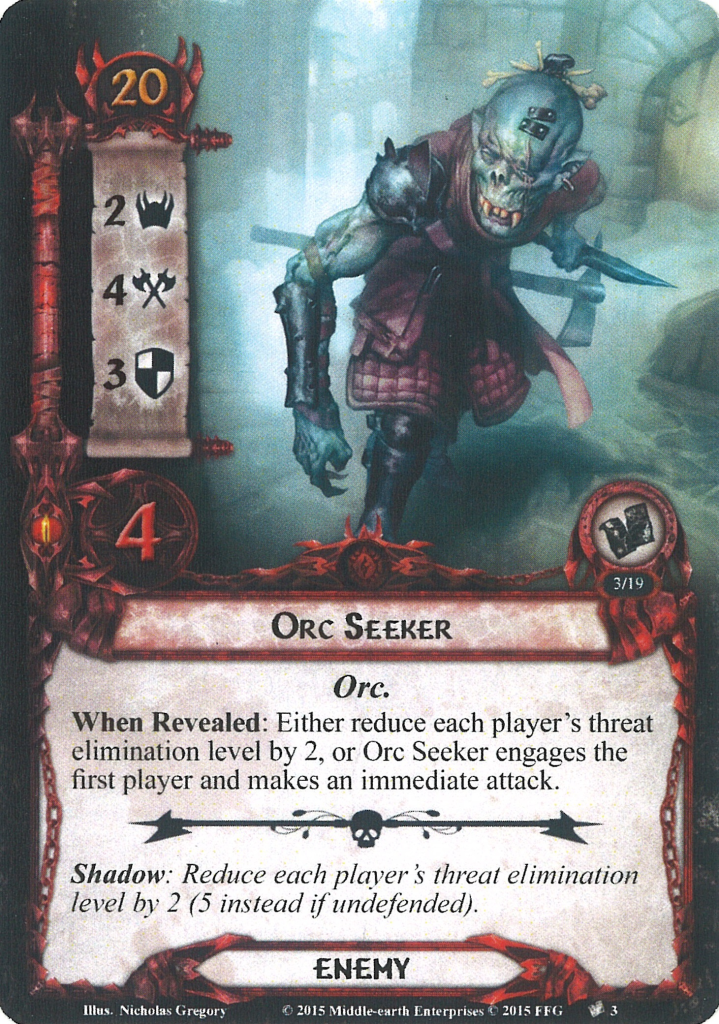
- Orc Seeker: This enemy essentially replaces a few of the medium-strength enemies that were removed from this set, but shifts the mechanics from removing time counters to lowering your threat elimination level. Both the when revealed and the shadow effect on Orc Seeker can reduce each player’s threat elimination level by 2, so you’ll get hit by it one way or another. When Orc Seeker is revealed, each player will either have to reduce their threat elimination level by 2 or it will engage the first player and make an immediate attack. Early on in the game, before you are set up and able to handle unexpected attacks, you will often want to reduce your threat elimination level. Two threat doesn’t seem like a lot, but with three copies in the deck, hitting you when they are revealed and when they pop up as shadows, it can add up over the course of the game. Later on in the game, if you are able to handle the additional attack, you will probably want to choose that option. The shadow effect also ramps up to raising each player’s threat elimination level by 5 if the attack is undefended, so you will want to make sure you are declaring defenders.
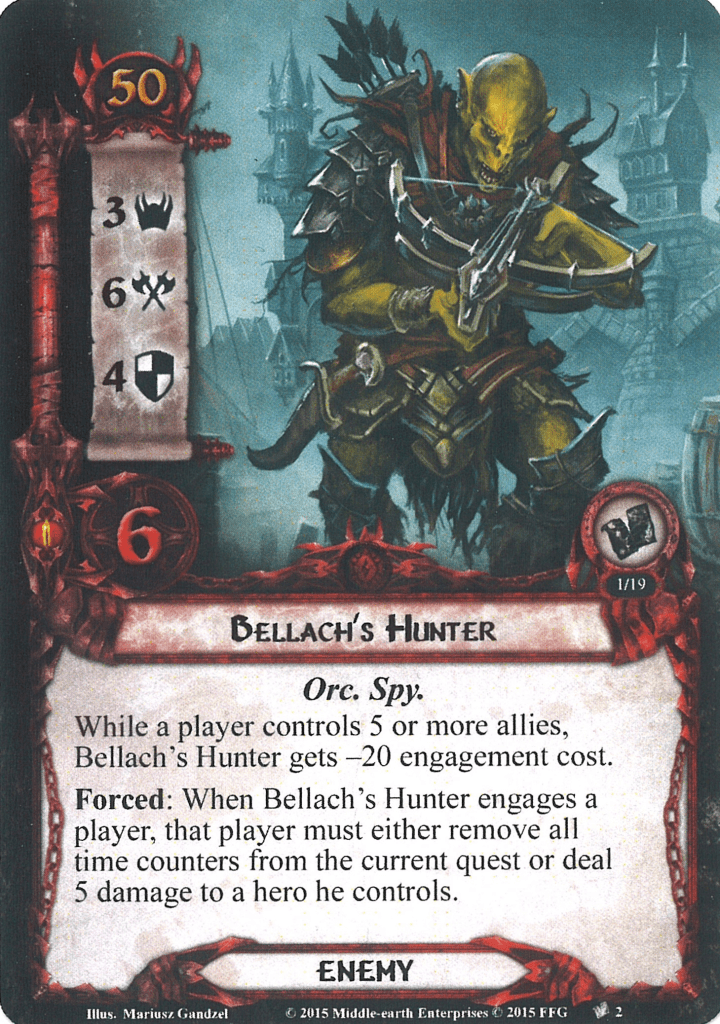
- Bellach’s Hunter: This guy can be a problem. With 6 attack, it is the strongest enemy in the quest, making even Bellach seem tame. On top of that, you will have to choose one of two pretty nasty options when engaging it. At 50 engagement cost, you can easily avoid this guy early in the game. Once you start building up a board state, his engagement cost drops down to 30. This isn’t usually a big deal since by the time you are building up a board state, your threat is approaching 0. The real danger is if this guy is in staging when Get That Dwarf! comes out and you have to unexpectedly defend him. I definitely lost a hero or two that way. To avoid the surprise attack, you can always engage Bellach’s Hunter. When you do that, you will either need to remove all time counters from the quest (ouch!), or deal 5 damage to a hero (also ouch!). Unless you have a hero with boosted hit points, you will likely be choosing the first option. Which means if you are on stage 1, your threat elimination level is dropping by 10. I usually tried to engage this guy when there was only 1 time counter left on the quest to minimize the impact of engaging him. Once Bellach’s Hunter is engaged, you will need to muster 10 attack to take him out or continue to defend him. This enemy is a great target for a Forest Snare if you happen to be running traps. Just hope you don’t reveal Constant Tail, which would send him back to staging…
Locations
- City of Spies: This card has the potential to raise your threat by a lot. It was the one location I prioritized travelling to every time I saw it. If City of Spies is left in staging, each player will have to raise their threat by 1 for each character they commit to the quest. This is less of a problem for a Three Hunters deck, but would be absolutely brutal for a swarm deck. If you are unlucky enough to reveal two of these at a time, you will have to suffer the threat raise the next round unless you bring some strong location control or other location tech. One way to counteract this effect is to with Spirit Elfhelm ally.
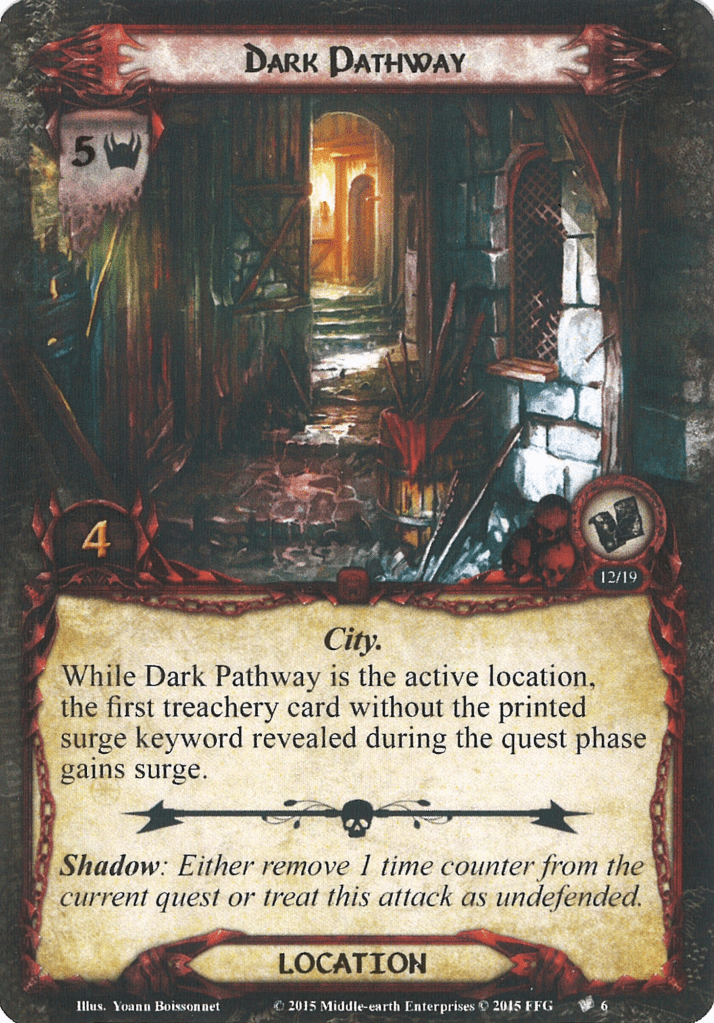
- Dark Pathway: At 5 threat, this is the highest threat card in the encounter deck by 2. With 5 threat and only 4 quest points, this one is usually a no-brainer to travel to unless there is a copy of City of Spies also in staging. When Dark Pathway is the active location, the first treachery without the printed surge keyword will gain surge. To avoid additional surges, you will want to clear this one as quickly as possible. The shadow effect on Dark Pathway is probably the more impactful effect on the card. Either remove a time counter or treat the attack as undefended. If you happen to get this on a Blood Hound or Orc Hound attack, it’s likely not a big deal to take it undefended. If the enemy has more attack, you might be looking at removing a time counter.
Treacheries
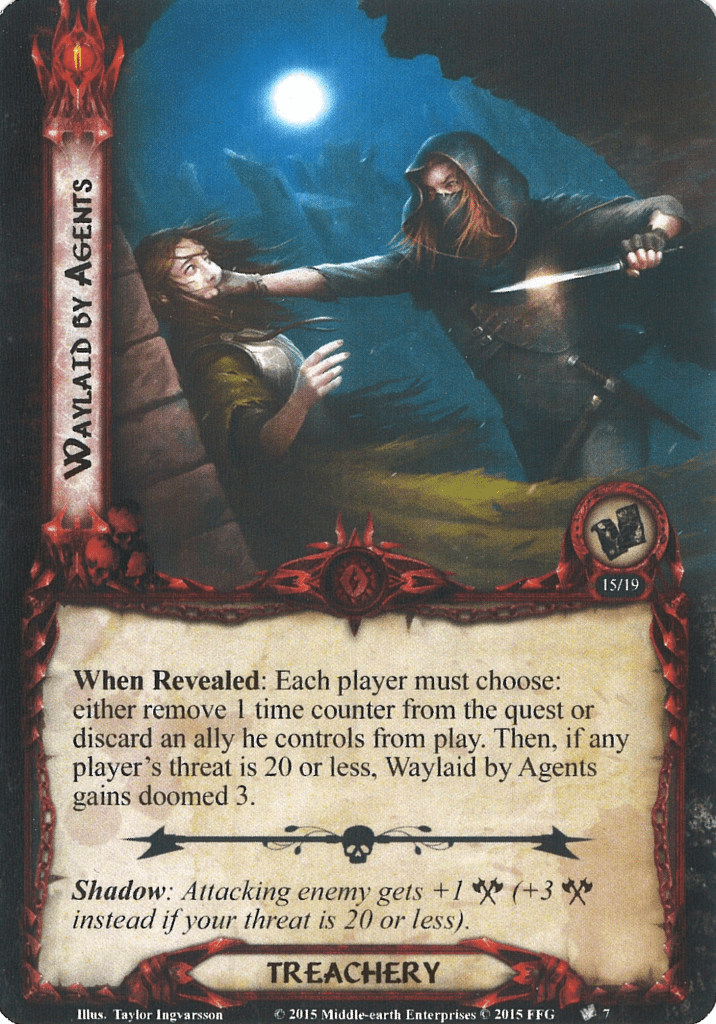
- Waylaid by Agents: This treachery adds back in some “remove a time counter from the quest or do a bad thing” effects that we lost on the enemies that were removed for nightmare. In this case, each player has the choice of removing a time counter from the quest or discarding an ally they control from play. Let’s hope you have an Ioreth, or other cheap ally in play, you can discard and don’t only have that first-turn Treebeard you just played. As the cherry on top, if any player’s threat is 20 or less, this card gains doomed 3. The standard shadow effect of giving the attacking enemy +1 attack is not bad. The conditional shadow effect of giving the attacking enemy +3 attack if the defending player’s threat is 20 or less can be a hero killer. This is another good target for shadow cancellation.
- Tharbad Patrol: When this card is revealed, the players attach it to a non-unique location in staging, and it becomes a condition attachment with the forced effect: “After the players travel to attached location, each player must discard the top 2 cards from the encounter deck and engage each enemy he discarded in this way.” With the encounter deck being enemy-heavy and including some bad “when you engage this enemy” effects, this is a Forced effect I’d rather not have trigger. Accidentally engaging a Bellach’s Hunter at the wrong time could be very detrimental. If you don’t have location control, I’d recommend attaching this to a location you don’t intend to travel to anyway, such as Seedy Inn or Decrepit Rooftops, and just leaving it there all game.
Tips and Tricks
- You want to be questing strong from the start to lower your threat as quickly as possible. If you can’t start making progress by turn 2, the encounter deck is probably going to catch you.
- To deal with the Spy from Mordor enemies, cards that prevent enemy attacks such as Feint, Feigned Voices, Thicket of Spears, etc. can help keep you from losing too many time counters early on when you are trying to get your footing against the quest.
- Defeating enemies in staging can be a great way to avoid the engagement effects on some of the enemies. You could go the leadership Eomer/Dunhere route to attack into the staging area, or The Great Hunt/Hunting Party route to straight discard enemies from staging.
- The treacheries are mostly manageable since you can often remove a time counter if the other effect is too detrimental. However, the shadow effects are not as forgiving. You will probably want to pack some form of shadow cancellation as there are a few that can wreck your game. Erkenbrand is my favorite option, but a few copies of Hasty Stroke would also do the job.
- Have a plan for defending 4 and 5 attack enemies frequently. There are quite a few of them in this quest. There are not too many attack boosting shadows, so you could probably make up for defense with hit-points + healing if needed.
- Leave the side-quests at home. You won’t have time for them.
Playthroughs
A few playthroughs can be found of this quest, which are linked below.
- 2-handed: https://www.youtube.com/watch?v=X7lmMhjjad4
- True solo: https://www.youtube.com/watch?v=fv3Px3fdTiQ
With the Trouble in Tharbad completed, Birdman will continue with Nin-in-Eilph. I myself will be working on Into Fangorn, so get ready for a steady stream of NM Ringmaker content over the summer. I also have another article in the works to help players introduce newer players to the game based on a real-world example. I hope to post that soon as well.
