
“There are some folk in Bree who are not to be trusted.”
Strider, The Fellowship of the Ring
You are going to find out that fellow Aragorn is right telling you, not to trust anyone in Bree. This unique Print on Demand scenario is all about (of course) a mysterious murder taking place in our favourite inn, the “Prancing Pony”. It was there that our Hobbit friends found Aragorn in the first Lord of the Rings book, Fellowship of the Ring.
The general idea of this quest is for you and your friends to be Middle Earth detectives and collect clues in order to find out who murdered a mysterious man at the Prancing Pony. You have to find out the killer among 5 suspects, and which is his Hideout among another 5 locations. Playing this quest will remind you a lot the Cluedo board game because some time, in mid-game, you would be asked to make an accusation of who made the murder and which is his hideout. Finding them both correctly will keep you going on the quest unaffected. Guessing wrong, will give you some hard time. More about the accusation rules and it’s effects will be discussed further in the quest analysis
Murder at the Prancing Pony
- Found in: Murder at the Prancing Pony print on demand scenario. Part of the 2015 Fellowship event.
- Official Difficulty: N/A
- Community Difficulty: 7.7
- Encounter Sets: Murder at the Prancing Pony, Investigation.
- Quest Cards: 3
- Play if: You want a board game-ish (like Cluedo) quest with lots of unique cards. You want to test a location control deck which might have some combat action too, and you seek a scenario with pretty high replayability, you are at a convention and need a scenario to play with some other players.
- What is special about this quest?: Investigation mechanic, encounter cards which give you a couple of choises.
- Solo or multiplayer?: Solo is doable but 2-player game is the key to pass this quest. Adding more players might give you hard time because the majority of the encounter deck contains locations. So revealing 3 or 4 (plus 1-4 extra from the forced effect of 1B quest card and extra X locations from the 2B quest card, which X is the number of players in the game) might quickly lead you to a location lock in just few turns. Adding in more players will force you to have plenty of location control for this quest.
- Can I bring Side-quests?: I wouldn’t recommend that. You need to pass 1B quite fast and the limit of 4 progress per round might slow you down. If you really want to bring a Side-quest you should definitely play it after passing 1B. But still questing unsuccessfully will trigger the forced effect of 2B so side-quests won’t save you from that. Further analysis coming to quest card section.
- What to watch out for: Location lock, threat rising rapidly and some hard to kill enemies who might attack you for 4/5+ attack, if it happens to have over 34 threat.
The Quest
Setup
Quest card 1A setup instructs the players to search the encounter deck for the 5 Suspect enemies and the 5 Hideout locations, then randomly select 1 Suspect and 1 Hideout without looking at them and set them aside out of play in facedown position. Next, you are instructed to build the Investigation deck, which means you need to take the 4 remaining Suspects and Hideouts plus each copy (2 copies) of Taken By Surprise without looking at them. Shuffle them together to form the Investigation deck and then place it next to the quest deck. Furthermore, you make the Prancing Pony the active location and add 1 Ramshackle Manor to the staging area. Then, shuffle the encounter deck.
The players are not are not allowed to look at cards in the Investigation deck except when resolving the Investigation keyword or instructed by a card effect.
Investigation keyword is a new keyword introduced in this POD scenario that represents the heroes’ efforts to solve the crime. When an active location with “Investigate X” keyword is explored, the first player shuffles the Investigation deck and looks at the top X cards. Then, they place those cards back on top of the Investigation deck in the same order.
For every Suspect and/or Hideout players dig out this way, they can erase it from the Investigation list. In that way, when the players are called to make an accusation, might have ended up to the true assassin and his hideout.
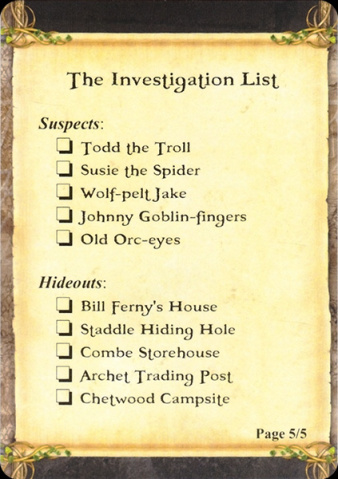
Quick tip: Because nobody wants to write over the single Investigation list coming with the pack, a nice touch for keeping track of the Suspects and Hideouts is to magnify the list and print it in order to place tokens at the empty boxes when you get a clue. Another solution is to write numbers from 1-5 instead of full names of the cards, on a piece of paper. If you are a dice guy (like me) you can use dice, pointing again from 1 through 5 for every Suspect or Hideout.
So, before even the game starts you have 2 locations in game, one active and one on the staging area. Surprisingly the Prancing Pony location is one of the rare locations which actually rewards players when it’s explored. Further analysis coming at Locations section.
Quest card 1: Investigating the Crime – 12 quest points.
You already have arrived in Bree and you heard about someone breaking into Prancing Pony, killing a guest and made off with his belongings. Now, Barliman Butterbur begs you to find the killer before the trail grows cold.
Side 1B limits the players to add maximum of 4 progress tokens every round on this quest card which means a minimum of 3 turns to be spend here. Also, it forces them to make their first decision on this quest by choosing at the beginning of each quest phase if they want to raise their threat by 2 or want to reveal an additional encounter card this phase. Each player make his own decision, thinking about which effect suits best to his deck style.
Be prepared to spend few turns on this stage as you need to be ready for what coming next. Try to get as many clues as you can about the Suspect and the Hideout before you proceed to stage 2A. Always you should keep an eye on location lock and try to keep it under control clearing as many locations as you can before you pass this stage. I would recommend to choose to raise your threat by 2 each quest phase, unless you have really high starting threat or you play a secrecy deck.
Quest card 2: Running out of time
You are actually really close to revealing the true murderer and his hideout. When you see the 2A quest card you are instructed to shuffle the encounter discard pile into the encounter deck and discard cards from the encounter deck until X locations are discarded. X is the number of players in the game. Add each location discarded that way to the staging area (Oohh, perfect, just what everyone wants in a 4-player game !).
Now you are really seeing what I meant about location lock. In addition to the extra threat that will appear on your staging area, the forced effects at the stage 2B state that if you quest unsuccessfully must choose 1 random card from the investigation deck and remove it from the game, of course without looking at it. So now every time you fail to the quest, clues are starting to “fade out” as time passes and you start losing information from your investigation deck. On the other hand, if you quest successfully, after placing progress on this stage, the first player must choose either reveal an encounter card in order to stay at this stage or make an accusation and advance to stage 3A. Making an accusation means that the first player must name a Suspect and a Hideout. Then, he reveals the facedown, out of play, Suspect and Hideout and adds them to the staging area. If the named cards are both matching the out of play cards, the players made a correct accusation and proceed to stage 3A without penalty. If the accusation is wrong it seems that your heroes might be in trouble. You should search the Investigation deck for each just named card and add it to the staging area, if it isn’t already there, then every player should raise their threat by 3. In that way, quest punishes the players for accusing the wrong Suspect or the wrong Hideout. So, you don’t only have to deal with the real killer but also every other falsely accused Suspect or Hideout.
Note: When the players are in stage 2B the Investigate keyword on the active location triggers before the second forced effect of the 2B, which refers about questing successfully!
Quest card 3: Apprehending the Killer

Now that the murderer and his secret hideout are revealed it’s time to face them in order to win this scenario. Specifically, when 3A is revealed, each player except the first one searches the encounter deck and discard pile for 1 Brigand enemy and adds it to the staging area. Then the encounter deck should be shuffled. While on stage 3B, players should ignore Invastigate keyword when an active location is explored and at the beggining of every encounter phase each Suspect enemy in play engages the first player. While at least 1 Hideout location is in play Suspect enemies cannot take damage. Then, if there are no Suspect enemies in play, the players win the game.
Seems obvious that your first mission here is to clear the hideout location. To do so, you need to commit a great amount of willpower, especially in 3 or 4 player game, where more and more encounter cards will open every round. Later, we will discuss about your deck-building options which fit the most about passing this unique and quite tricky quest. All in all, this POD scenario is deeply narrative, with a great amount of unique cards, and surprisingly can offer you around 25 different combinations of Suspects and Hideouts with extremely good looking artwork.
The Encounter deck
Global


- The encounter deck is made up of 50 cards in Normal mode, and 40 cards in Easy mode.
- The chance of a shadow effect is 47% for Normal mode and drops to 41% in Easy mode. Most of the shadow effects focus on raising your thrait, additional attacks and buff enemy attack. But there are some other intresting shadow effects that we are going to cover later.
- Average threat on cards revealed is 2 threat/card for both Normal and easy mode. Likely, with only 2 cards having the Surge keyword this high threat per card ratio won’t get even worse.
- Surge is printed only on Hired Muscle trechery which has 2 copies in the encounter deck. No surge will be trigger by any effect.
- Doomed can be triggered only by the effect of a single enemy, the notorious Bill Ferny who can give doomed 1 to the first trechery revealed from the encounter deck each round. This encounter deck will punish you so much with threat raising effects that there is no need to bring along Doomed keywords to give you hard time.
- All Hideout locations are immune to player card effects. Moreover, if Bill Ferny’s House is in the victory display, each Suspect and each shadow card dealt to each Suspect becomes immune to player card effects too.
The statistics doesn’t count the Investigation deck (Suspects, Hideouts and Taken by Surprise) cards, while calculating threat and shadow card effect chances. Also Prancing Pony location wasn’t taken into account cause it’ll never end up in the encounter deck.
Enemies
The enemies introduced in this quest are Bree scumbags. Orcs or other kind of non-human enemies doesn’t fit to the story. Taking into account their human nature, most of the enemies are kinda strong with average of 3.3 attack power per enemy (excluding Suspects) with potential 3.8 attack power per enemy if happens to have 35 or higher threat. Moreover, these enemies are quite tough to kill, requiring around 7/8 attack power to throw them out of play. Without further ado, let’s take a look on our enemy cards.

- Bill Ferny : Is a single copy enemy and also the only unique non-suspect enemy. He’s definately an enemy you don’t want to see in early game. His 42 engagement cost combined with his threat of 3 and the no optional engagement restriction, makes him the last enemy you want to reveal. If all of this wasn’t enough, while he is in play, the first trechery revealed every round gains doomed 1 and its effect cannot be canceled. So you might think “I would be glad to see him as a shadow”, NOPE! His shadow effect makes you decide between raising your threat by 4 or this attack will be undefended.
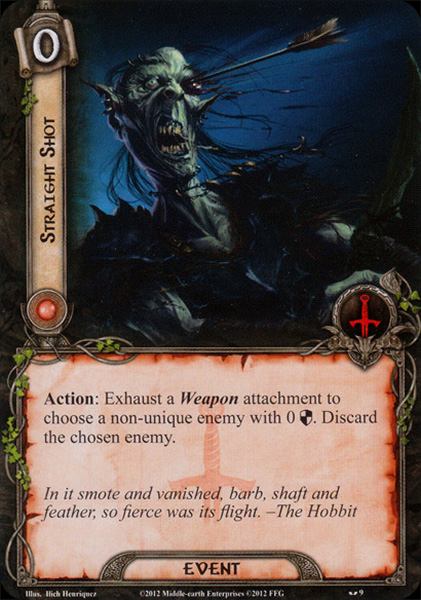
The bright side is, that you can manage to engage him with some player card effects and when you defeat him it won’t be problem anymore. He is discarded to the victory display for 3 points. The key cards to achieve that, are, tactics Aragorn who is generally a great choice of a Hero for this quest. Not only nerfs the defense of enemies by 1, but also has a pretty solid 3 point attack and of course a handful of cards which can make him a beast. When he participates in an attack that kills an enemy you are permitted to engage an enemy, not engaged with you. Another option is Mablung, but you have to play him while Bill is in play. If you do so, you can choose Bill Ferny, raise his engagement cost by 5 and engage it. Another ally who can do the trick is Son of Arnor from the core set. In advance, a couple events that can help are, The Hammer-Stroke and Tireless Hunters. You should be careful not to use The Hammer-Stroke while there are more enemies to the staging area than you can handle, so this card demands some good counting. Finally, there is another ally who can do the work but i wouldn’t personally use him that much for his effect. That ally is Westfold Outrider. It is unpleasant that you have to discard him in order to just engage an enemy that it’s not engaged with you. - Bree-land Informant: Bree-land Informant is a much softer enemy to deal with, comparing with Bill Ferny. Of course he has a threat of 3 but he attacks for only 2 and his effect might be intresting to you. When he makes an attack against you, he is giving you the chance to raise your threat by 1 and spend a resource from any sphere to peek at the bottom card of the investigation deck and then discard Bree-land Informant. I would suggest to use his effect only if you are in a hurry to find more clues. Killing him would be really easy because if we suppose you have along Aragorn, Bree-land’s defend would be reduced to 0 meaning a single attack from Aragorn or even a Straight Shot would do the work. All in all, Bree-land Informant is an enemy you want to get out of the staging area as soon as possible.
- Lawless Ruffian: Whenever I reveal this enemy I know there gonna be a chump block, especially when my threat is over 34. In that case, he’s going to attack with 5 and if I’m unlucky enough his shadow might be a Greenway Footpad and his final attack would reach 7! That’s a lot for a man of Bree. An equally nasty shadow card you might get to Lawless Ruffian is a second Lawless Ruffian. In that case you are going to take another attack from him so you might find handy to bring Feint along. When comes your turn to attack him, a couple attachments might be handy if you want to one shot him with a single attacker. a couple of great examples are Rivendell Blade which combined with Aragorn’s -1 defense effect might reduce enemies defense to an impressive -3 and as a result almost all non-unique enemies in the encounter deck are free targets for Straight Shot. In order to achieve this combo you have to pay the price to declare an attacker with the Rivendell Blade in order to trigger it’s -2 defense effect.

- Greenway Footpad: Greenway Footpad is another enemy who might give you hard time. He comes with a basic 4 points attack and a nasty when revealed effect which forces you to choose either raise each player’s threat by 2 or he will make an immediate attack against the first player. If you are into a 3 or 4 player game or you just raised 2 threat from 1B quest card effect then you probably want to take this immediate attack. Otherwise raising threat will save you an extra attack from this dangerous enemy. Don’t forget that his low engagement cost will lead him to eventually engage you and make a second attack (if you had the immediate attack), plus dealing him Lawless Ruffian as a shadow card gonna bring you face to face with a third attack from a single 4 attack enemy in a single round! So you need to deal with him as soon as possible. Moreover, his 4 hp makes him a great target for Gandalf the Grey.
This enemy has a really annoying shadow effect which gives +1 attack to the attacking enemy (or +2 if your threat is 35 or higher). The fact that there are 4 of these enemies in the encounter deck, raises the chance of buffing enemies’ attack. - Chetwood Outlaw: Before we proceed to the Suspect enemies, the last Bree bastard we are going to meet is Chetwood Outlaw. Unless you see him in late game, you are not want to optionally engage him as if doing so will raise your threat by 4. Remember, location and threat control are the key to this quest. So, the same principles apply here as at Bill Ferny. You must find ways to bypass optional engagement and, in my opinion, a great card to achieve that is, again, Mablung who not only allows you to engage an enemy but also gives you the option to return him to the staging area, if you feel like you can’t handle him yet. In addition to that, you have a low cost (2) lore ally with 2 willpower and a potential chump blocker when it’s necessary. Another option for bypassing optional engagement, is Dúnedain Hunter who is a free ally (and admit it, we all love free cards) and the only thing you have to do is to search the top 5 cards of the encounter deck for a non-unique enemy and put him into play engaged with you. If no enemy enters play by this effect you have to discard Dúnedain Hunter . Always keep in mind ways to not optionally engage this enemy as his 4 threat will give you hard time progressing, especially in solo play. As for combat, Chetwood Outlaw has pretty high stats with 4 attack, 3 defense and 5 hp, so killing him won’t be trivial. This enemy gives a fine use to Black Arrow equipped to Legolas who can attack with 3+5 and one shot our Outlaw. If you consider to bring Legolas to this quest, don’t leave behind some good old Blade(s) of Gondolin along with Arod for extra progress, or a couple of Rohan Warhorses. In that way, killing enemies will give you a decent amount of progress and hopefully clear most active locations.
Suspects
We proceed with Suspects. You are called to find who is the murderer between them, and trust me, that won’t be an easy task. First of all, every Suspect enemy cannot have attachments so you might consider leaving your traps home (unless you want a copy of Entangling Nets for the above enemies). Then, you should keep in mind that every one of them is a boss fight for you and if you are lucky and well prepared won’t be more than one to fight with.
– Of course, just change up a few things so it’s not obvious.
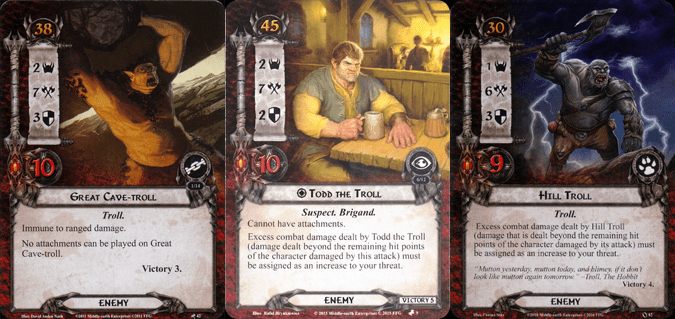
- Todd the Troll: Now, this guy doesn’t have a random name. His amazing 2/7/2/10 stats are almost the same with Great Cave-Troll’s 2/7/3/10 stats from Khazad-dûm. They also share the no attachments restriction. Furthermore, Todd’s effect raising your threat for every excess combat damage dealt by him is copied by Core set’s Hill Troll. The first thing you might note is his attack of 7 which probably can give you hard time if you try to chump block him. The reason is, he potentially, can increase your threat by a lot. A card that might get things better is Lore Aragorn. Although, you should be very careful of when to trigger his effect. If your starting threat is low and you doing great job progressing, you can trigger his ability around 35 threat. Otherwise, it’s essential to trigger his effect as life saver before reaching the 50 threat elimination level.
Todd’s 10 hp combined with 2 defense will be hard to one shot. In that case you need to have a kinda strong defender otherwise you’ll raise your threat pretty quick. Beregond with Gondorian Shield would be a great combination. If you are in need for more Spirit resources, Spirit Beregond and Blood of Númenor will do the work. Also, Aragorn is a nice choice with Blood of Númenor.
The good news are, Todd has only 2 threat and 45 engagement cost, so he might stay in the staging area for a while till you get ready for his attacks.

- Susie the Spider: Ohh this card reminds me how thematic and gorgeous are the artworks in this quest. There is so much detail in the illustration of every single card. Anyway, Susie the Spider is another candidate. Her threat increases with every Brigand enemy in play. Starting counting, always she’ll have at least 1 threat from her trait and if we suppose your accusation about her is correct she will get +1 for every other Brigand enemy that will be opened by 3A When Revealed effect. All in all, you have to expect from her (1+number of players in game+Brigand enemies in play before you add her in the staging area) threat which maybe lead you engage her sooner than you think. As all Suspects, she can’t have any attachments and on top of that she can’t take any damage while there is at least 1 Brigand enemy in play. That’s pretty harsh, cause if you leave Susie in the staging area she might lead you, eventually, to quest unsuccessfully. But if you choose to engage her, you won’t be able to damage her until all Brigands are gone from play. So, every time, you have to deal with her 5 point attack. Of course, Feint would be an option here, but for how long? you must move fast and assassin every Brigand (especially in 4 player game) as soon as possible. Another option while she is in the staging area is Radagast’s Cunning, next turn engage and Feint her. In that way you’ll save 2 turns which will be enough to clear the enemies.
- Wolf-Pelt Jake: When Jake attacks and destroys an ally, he is returning to the staging area. Taking into account his attack of 5 you might find hard to defend with a Hero, except by having the tanky Beregond, or a costly ally. Such allies, who can handle his attack without dying, are Gildor Inglorion, Giant Bear, Eagles of the Misty Mountains, Treebeard or of course our Gray friend. Moreover, you should always have in mind how many Greenway Footpads are in the encounter discard pile, as you don’t want to see any of them as a shadow here. That’s why you shouldn’t forget to include some copies of Hasty Stroke in your deck. Although, when time comes to take care of Jake, there is a really quick way to do so. All you need is tactics Éowyn and Quick Strike, in that way Jake won’t have time to attack and go back to the staging area. Although, you need to lookout about your threat cause in order Éowyn to use her +9 attack ability it is necessary to raise your threat by 3.
- Johnny Goblin-Fingers: Our next “Usual” Suspect, is a nasty one. Johnny Goblin-Fingers is a 3 threat enemy with the ability to makes you randomly discard a random card from your hand and raise your threat by the printed cost of the discarded card, every time he attacks you. I seem to come to a conclusion that Feint might be an auto include in your deck for this quest. Furthermore, it is possible to make the same combo here as you did with Wolf-Pelt Jake, using Éowyn’s effect along with Quick Strike and incapacitate Johnny in one turn without even attacking you! Also Éowyn is a great Hero for this scenario with 6 (+3) threat cost, plus, she would be handy for questing too. If at any time you conclude that Johnny is the murderer, you should try to get rid of the high cost cards from your hand before making the accusations and he is added to the staging area, or at least before he attacks.

- Old Orc-Eyes: The Final Suspect we are going to discuss is Old Orc-Eyes, an enemy not so harsh as the others, but quite hard to kill. He has a relatively low attack of 4, but if the shadow card you deal him doesn’t have a shadow effect he will make an additional attack. This time you don’t have to deal him another shadow. A great defender for that guy (except of course Beregond) is Defender of Rammas. If you won’t be really unlucky, hopefully Greenway Footpad won’t end up as a shadow. As a result you won’t have any problem defending with Rammas defender. After all the attacks, if you still have characters standing, it might be tricky to defeat Old Orc-Eyes in one round cause he requires 3+9 attack damage to visit victory display. A combined attack is a one way solution, so be ready to have lot of characters in play when you fight that guy. A combination of Éowyn’s 1+9 attack and Legolas’s 3 (+5 from a Black arrow) or 3 (-2 enemy defense from Rivendell Blade) will do the work in zero time.
Again, Feint is a great option here, as it can stop Orc-Eyes from attacking probably 2 times. In that way he won’t resolve his attack and as a result, his Forced effect won’t trigger.
Locations
This quest will try to location lock you a few times, so you should be ready for some nasty locations. Some of them should be a priority for you to clear, others not so much. In this section, we are going to discuss everything you need to know about the locations of this quest. We will see the easiest and most efficient ways to clear them and how you can prepare your deck for them.
As the setup instructs, you start the game with an active location (of course the Prancing Pony, where the murder took place) and another location in the staging area with the name Ramshackle Manor. Seems the game tries to pass you a massage before even begin!

- The Prancing Pony: This location is the first active location in this quest. When you pass it, you won’t have to return there, as Prancing Pony inn would be in victory display. First thing we notice in this card is the absence of Investigate keyword. Don’t worry though, because as you explore Prancing Pony the first player choose either to look at the top 2 cards of the Investigation deck, or each player draw 2 cards. As I see, there is only one choice for me. You definitely want to catch every opportunity to sneak a peek in the Investigation deck. Now , I believe this location is key for a lot of things. Not only is a pretty easy location to clear with just 2 quest points, but also while is active, Treacheries such as Smoke and Mirrors and Deadly Accusations will have the minimum possible impact to the game. Another reason I believe Prancing Pony is a “key” card, is the fact that it goes to the victory display when it is explored. Now, you might wonder how come this to be important? It gives you the choice to bring along Rossiel. The fact that all locations (except Hideouts) share the same trait, makes Rossiel to commit to the quest for 4, when there is an active location (and the most times will be). Now you might think a little be further and make a good use of her other ability too. If you manage to place a Brigand enemy to the victory display, she could also defend Brigand enemies for a great 4 points defense. This can be achieved with None Return, which for 1 cost can throw a non-unique enemy to the victory display, along with None Return itself. Of course only when this enemy has been killed. When this is done, Rossiel will defend with 4 to all enemies, except suspects and Bree enemies. Although, if you managed to kill Bill Ferny she can defend for 4 to the other Bree enemy of the quest, the sneaky Bree-land Informant. All in all, you can end up with a hero of just 8 threat cost and a potential of 4 willpower and 4 defense! If I convinced you to try her as your Hero, you can take along Lore Aragorn aka Strider who can make your game really thematic, but also provide you a huge threat reduction!


- Ramshackle Manor: This is a location you might want to clear relatively often as it prevents players for lowering their threat for more than 1. There are 4 copies in the encounter deck, and one of them is in the staging area at the beginning of the game. This location’s effect is the reason why you don’t want it to be in play, especially, when you trigger Strider’s effect. Although the 2 threat of this card won’t be such a problem to leave it be in the staging area for a few rounds. The cost you have to pay to travel to this spooky Manor is to raise your threat by 1, which seems logical, having in mind that might be haunted! We come to this conclusion by Manor’s quote:
In one of the windows he caught a glimpse of a shallow face with sly, slanting eyes; but it vanished at once.
The Fellowship of the Ring
Always you can interpret this quote like someone is secretly spy on your Heroes but in my opinion thinking the manor as a haunted house gives to the quest another flavor.
- Dark Alley: This is another Bree location with high threat value of 4. When this card is in the staging area, enemies in the staging area cannot take damage. This effect, plus the 4 threat makes Dark Alley a location that you want to travel as soon as it is revealed from the encounter deck. The cost you need to pay in order to travel there is, to shuffle the encounter discard pile into the encounter deck, and then discard cards from the encounter deck until an enemy is discarded. Then put that enemy to the staging area. So, traveling to the Dark Alley will cause an enemy to appear, and if your threat is high enough you must be ready for combat. In the bright side, for only 3 progress to this location you can see 3 cards from the Investigation deck and be a little bit closer to discover the true murderer and his secret hideout.
- Market Square: Now here is a nasty location. While this card is in the staging area, and you try to put any amount of progress to any location to the staging area, you have to raise your threat by 1. To make matter worse, this ability can stack with other copies of Market Square. So, if you put, for example, progress to all locations to the staging area by committing Northern tracker to the quest you raise your threat by the number of locations in the staging area times the copies of Market Square locations in the staging area. You always must count how much threat you’ll raise, and consider if it worth it. To travel to Market Square, each player should pay a resource. If your deck, focuses on putting progress on locations in the staging area, you should travel to Market Square as soon as you can. Keeping your threat low in this quest is essential, and again bringing Aragorn along might untie your hands. Finally, when you explore the Market your reward will be to look at 2 cards from the Investigation deck, as the Investigate 2 keyword commands.
- Old Warehouse: This is a location I’m happy to see at the staging step. Despite the 3 threat value, this a great location to travel and explore. It only has Investigate 1, which means you can only see one card from the Investigation deck. But when you explore it, the first player can choose either see another 2 cards from the Investigation deck (so potentially this card can get Investigate 3) or reduce each player’s threat by 3. I don’t prefer to choose the second option, unless most of the players are near elimination level. The only drawback of this location is the Travel effect that makes you reveal the top card of the encounter deck. In conclusion, you should travel to this location with the first chance. Although, Old Warehouse shouldn’t be your first call, cause there are locations such as Dark Alley or Market Square which is more urgent to travel there first.
- Village Stable: The last non-hideout location is Village Stable. I don’t see a reason to travel to this location despite it’s threat of 3. Traveling to Village Stable will make every player to discard a card, at random, from his/her hand. Exploring it triggers a Response effect which reads: after triggering the Investigate keyword on Village Stable, if the looked at card is a Suspect or a Hideout, add Village Stable to the Victory display to add that card to the staging area. I don’t see a reason to trigger this Response as it will cause you more harm than good. In other words, if you don’t have a problem with the current total threat at the staging area you can leave Village Stable there for some rounds.
Hideouts
Hideouts are locations you will see only into the Investigation deck. When you are on stage 3B you aren’t allowed to do damage to a Suspect unless at least 1 Hideout location is in play. Also, all Hideout locations have an effect that triggers while they are in the Victory display as you can’t, potentially, win the game without triggering it. Furthermore, all Hideout locations are Immune to player card effects, so exploring them, without traveling, or placing progress there with Legolas, is forbidden. Another common characteristic among Hideout locations is that all of them have 5 threat points and 5 quest points to be explored. Finally, all Hideouts have a Travel effect that instruct players to search the encounter deck and encounter discard pile for a specific Enemy and add him to the staging area.

- Bill Ferny’s House: Is the first Hideout in our list. The Travel effect of Bill Ferny’s House is to bring house’s owner into play. You are instructed to search the encounter deck, the encounter discard pile and the victory display for Bill Ferny and place him to the staging area. Then, shuffle the encounter deck. The Victory display effect of Bill Ferny’s House is, each Suspect and each shadow card dealt to a suspect to become immune to player card effects. That’s a harsh effect while there are some shadow cards you don’t want to see on certain suspects. But also, you become unable to use Feint and other effects that damage enemy Suspects (such as Gandalf’s effect), which means you are going to kill the Suspect(s) only by combat damage.
- Staddle Hiding Hole: In order to travel to this Hideout location you need to search for Greenway Footpad and place him to the staging area. Moreover, when this location is discarded to victory display and while it is there, any player not engaged with a Suspect cannot declare attackers against that Suspect, which means you have to forget the Ranged keyword for the remaining of the quest.
- Combe Storehouse: While this Hideout is in the Victory display every Suspect gains the Forced effect to immediately attack a player who engages him. This effect might be a nasty combination with Todd the Troll as he will do 2 attacks per round (except if you play solo), so keep your Feints ready. In order to travel to Combe Storehouse you need to search for a Lawless Ruffian and add him to the staging area.
- Archet Trading Post: This is the Hideout I wish to see at stage 3. It’s the most innocent Hideout and the reason is both its Victory display effect and the Travel effect. To begin with, the Travel effect makes you to search and add Bree-land Informant to the staging area. He is the weakest of the enemies, so I’m always happy seeing him. The other reason of making this Hideout the easiest one it’s the Victory display effect. That effect instructs the players not to place over 5 damage to a Suspect enemy every round. Which means Éowyn might be unable to one shot them, but you probably be just fine if you wait another round to kill the Suspect.

- Chetwood Campsite: The last Hideout is Chetwood Campsite. We should take a minute to admire the amazing artwork of this card. That was a great work from the illustrator Michael Rasmussen. The lighting, the colors and the details are astounding here. Back in our analysis, Chetwood Campsite’s travel effect will add (of course) Chetwood Outlaw to the staging area who is one of the toughest enemies in this scenario. Moreover, when you explore Campsite and place it to the victory display every Suspect enemy receives a great buff of +1 threat, attack and defense. This effect, might not be so harsh on minor suspects such as Johnny Goblin-fingers or Old Orc-eyes but it can make a difference if it is combined with Todd the Troll or Susie the Spider .
Treacheries
In this scenario you are going to face 5 different Treachery cards. One of those treacheries can be find only into the Investigation deck and seek to reveal more enemies from the encounter deck. The other 4, focus on raising your threat level, or the threat level on the staging area, or buff the enemies.

- Taken by Surprise: This treachery is shuffled into the Investigation deck. If players happen to look at it when looking for any number of cards from the Investigation deck they’ll have to shuffle the encounter discard pile into the encounter deck and then discard cards from the encounter deck until an enemy is discarded. Then you should put the discarded enemy into play, engaged with the first player. After that, you can remove Taken by Surprise from the game. Unfortunately, you can’t you A Test of Will to cancel the effect of this card, as Taken by Surprise isn’t revealed from the encounter deck but from the Investigation deck. Also, it doesn’t have a “When Revealed” effect but a “Forced” effect which is another reason you can’t use A Test of Will here. The Forced effect to a Treachery is kinda weird to see but if you consider that you are instructed to look at the card and don’t reveal it, it all make sense. So, always you should have ready at least one defender every time you are going to look cards from the Investigation deck. Only when both copies of Taken by Surprise are out of play you should feel safer.
- Hired Muscle: This is the only card with surge in the game. When it is revealed you must attach Hired Muscle to one Brigand enemy to the staging area. Then, that enemy gains +1 threat, attack and defense and when this enemy is killed you must look at the bottom card of the Investigation deck. First of all, the effect of this card reminds us the Chetwood Campsite effect but thankfully includes a reward if you manage to kill the attached enemy. A great tip for that card and generally for this quest is to engage enemies as soon as they appear to the staging area and don’t leave them stay there for many rounds. If you do so, not only this Treachery will get no effect to the game (except by the surge) but also you will have the minimum threat on staging area which is always great when playing a location control quest. On the other hand, if that card happens to get attached on an enemy you can always discard it with Miner of the Iron Hills but if you can manage to kill him at the same round, that won’t be necessary. Also, if you have A Test of Will in your hand, you should probably keep it for worse Treacheries.
- Smoke and Mirrors: This Treachery can give a huge boost to the total threat in the staging area. When it is revealed the players must discard X+1 cards from the encounter deck, where X is the Investigate value on the active location, and add the total threat of the discarded cards to the total threat of the cards in the staging area. If you are lucky enough, you will have The Prancing Pony as active location so only 1 card it’s going to be discarded. The same happens if you have no active location. On the other hand, if you have Dark Alley, Market Square or Ramshackle Manor as active location 3 or 4 cards will contribute there threat, which in solo game might be disastrous. Always, have an eye to the Investigate value of the active location and keep a copy of A Test of Will in hand, in case of having to discard 3 or 4 cards for this Treachery. Additionally, if happen to see Smoke and Mirrors as a shadow card you should discard an attachment you control. This shadow effect isn’t so harsh, but it can be really annoying if you have only essential attachments in game.
- Rising Body Count: When this Treachery is revealed you must either raise each player’s threat by 2 or you shuffle Rising Body Count into the Investigation deck. Revealing this card means only thing to me, I shuffle it right away into the Investigation deck. There is no need to raise each players threat by 2 in this quest, especially if you have an option to do otherwise. In case of dealing this card as a shadow card, the shadow effect will give you the same dilemma as the when revealed effect but only if the attacking enemy destroys the defending character in this attack.

- Deadly Accusation: The final card we are going to discuss is Deadly Accusation. This card is about raising your threat by X+1 which X is the value of the Investigate keyword of the active location. You probably must cancel this effect if the active location has a high value Investigate keyword such as 2 or 3, cause this will lead you to raise 3 or 4 threat. Once again, remember to keep your threat as low as possible. A lot of cards in this encounter deck will focus on raising your threat and you should definitely not do their favor. If you deal Deadly Accusation as a shadow card the attacking enemy will get +X attack, where X is again the Investigate value of the active location. So, in both cases (either as a shadow or as a regular revealed card from the encounter deck) Deadly Accusation must always get cancelled if there are high Investigate value active locations. Hopefully there are only 2 copies of this annoying Treachery in the encounter deck so hopefully you won’t see it a lot.
Tips and Tricks
In this final section I’m going to sum up all the tips and suggestions I gave you at the above article. I’ll also include more card and tactical suggestions that you’ll find useful for passing this unique quest.
- Some Heroes you might find useful for this quest are Lore and Tactics Aragorn, with the Lore one be my favorite among them. Not only he can give you a huge decrease of your threat, but also he offers a great thematic flavor to your play. His only drawback in my opinion is that you can’t use his effect while Ramshackle Manor is in the staging area, so you need to have in mind when you want to use his effect and have that location explored by then.
- Another great card you can use as a Hero is Rossiel who with the help of None Return and by exploring The Prancing Pony location can get +2 Willpower for all the locations (except Hideouts) and +2 defense for most of the Enemies. To give her a more tacky attitude you can include a copy of Cloak of Lórien to give her a permanent +1 defense for every attack. Unfortunately, this quest hasn’t any forest locations so Rossiel want get +2 from Cloak of Lórien.
- This quest requires a huge amount of willpower and progress placing effects in order to avoid location lock. Some more good Hero choices are: Tactics Éowyn who not only has 4 willpower but also can give a single huge attack when needed, plus she has really low starting threat. Tactics Legolas would be a nice choice too, he can help you pass active locations really fast, especially if you include copies of Blade of Gondolin and his mount Arod. Great thought is to bring over a Golden Belt, in order to equip 2 Blades of Gondolin along with a Rivendell Blade. In that case if you manage to kill an enemy in Combat phase and explore the active location, you can potentially minimize the effect of Smoke and Mirrors or Deadly Accusation in case they reveal at the next staging step. Speaking of Tactics Heroes, a great defender you will find useful here is Tactics Beregond. If you equip to him a copy of Gondorian Shield, which he can have for free, he can be an amazing defender for this quest. An optional attachment that you might like to bring along with Beregond is Spear of the Citadel, but I don’t find it really necessary to include it in your deck.
- A final Hero suggestion from me, is to bring along Spirit Glorfindel. Not only he has one of the lowest threat costs in the game, but also can commit for 3 without exhausting (and as a result he won’t raise your threat) if you attach him his favorite attachment which is of course the Light of Valinor. Another reason Glorfindel is a great choice for this quest is that you can equip to him his mount Asfaloth. In that way, you can place 2 progress every round to any location you like and besides you really need some location control cards. Furthermore, it won’t harm to have a copy of Unexpected Courage with you for any purpose.
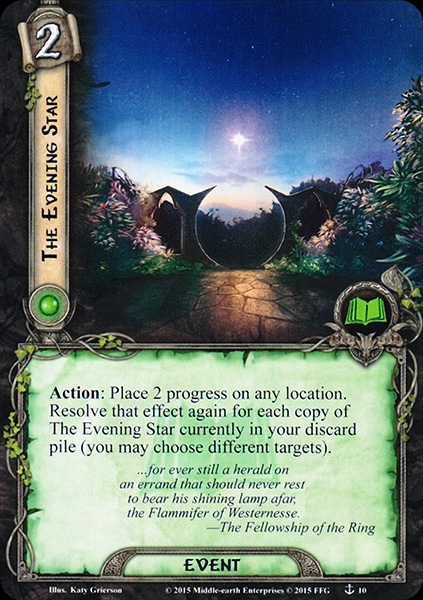
- Speaking of location control cards, some auto include ones when I play this quest is of course my favorite Evening Star. Including 3 copies of this beast in your deck might save you from location lock. If you have a copy of Market Square at the staging area and you don’t feel so comfortable placing progress, you can always bring Explorer’s Almanac in order to keep placing “staging” progress without a problem.
- Feint is another auto include event in my deck for this scenario. The more copies you have the more attacks you can block, especially from some nasty Suspects.
- A general tip for the quest is to balance your time between stage 1 and 2. You should try to get as many clues as you can on stage 1 but try not to spend a lot of rounds cause it’ll lead you to raise your threat really fast or you might get location locked too soon. On the other hand, you shouldn’t spend much time, either, on stage 2. While you are there in order to gain another round to collect more clues you have to reveal additional cards from the encounter deck. So finding a balance point between those stages is crucial.
- An ally you should definitely include in your deck is Mablung. He can save you from optional engage Bill Ferny or Chetwood Outlaw when you are low on threat. He also might be useful if you are on high threat and you are engaged with a lot of enemies you can’t handle. The only drawback of Mablung is his uniqueness. So be careful to get him into play the right moment. Another option here is Tireless Hunters event with which you can engage an enemy no engaged with you when you are in Combat phase. That mean choosing the right action window might prevent the enemy you engage from attacking you.
- When you try this quest in 3 or 4 player mode you will find out that an enormous amount of locations will open up to the staging area. In that case it is possible that multiple copies of Ramshackle Manor and Market Square will be at the staging area the same time. In order to deal progress to locations in the staging area without raising threat or lowering your threat without any consequences a useful card is Thrór’s Key. This attachment should be in play in order to attach it to a location as it is revealed from the encounter deck, so be ready to bring it into play as soon as it gets to your hand. Additionally, Thrór’s Key, can work as a decoy to the shadow effect of Smoke and Mirrors so you don’t have to discard an essential attachment.
- A great location control Ally which can be really handy is Mirkwood Explorer. You can always commit him to the quest for 2 willpower and every time you quest successfully, he gather a progress resource. So when it is necessary to immediately explore a location you can use his progress tokens to do so. Unfortunately you can’t use his ability against Hideout locations, as they are immune to player card effects.
Playthroughs
- 4-Player game ft. Matt & Caleb https://www.youtube.com/watch?v=hk6xX0O1VeA
- 2-Handed progression playthrough https://www.youtube.com/watch?v=xuK6zLmZoTc
My personal 2-player synergy decks for playing Murder at the Prancing Pony:
https://ringsdb.com/fellowship/view/8838/murderattheprancingpony
Thank you for reading my article about one of my favorite quest in LOTR LCG. I’m relatively new player (I’m playing the game about a year now) and I’m in love with how thematic can get and how unique it’s quests are. For me, LOTR LCG is a complete card game, and the fact that you can enjoy playing solo is a factor that made me dive into the game so fast and spend so many hours searching on it.
Finally, I’m waiting your opinion and your tips in the comments. Also, if you like my article give it a like, and your feedback is always welcome to make me better writing here.
Special thanks to Durin’s_Father for his assistance in this article.

I feel like the staging area can get out of hand. Basing this on that 4 Player game I saw, with Matt and Caleb Grace. I’m assuming solo it still piles up.
LikeLike
Yeah you can get location lock kinda easy but you can’t compare the number of cards in the staging area between a 2 player and a 4 player game. The best in my opinion is to determine responsibilities, like a player must do great questing (and maybe healing?) the other deals with the attacks, etc.
LikeLike
Reading through the “Forced” keyword online in the rules reference, it mentions “A forced effect must be in play and active at the time its trigger occurs in order to resolve its effect.”
The issue is the “in play” which means the Active location in addition to the staging area. Wouldn’t this change how you played the game?
LikeLike