It has been over 4 years since my first article on this quest. Back then, I was still trying out different styles and formats for my articles. I revised the Core Set scenarios back in 2020, and I now want to dedicate some time to revising all 6 AP scenarios from the Shadows of Mirkwood cycle. I feel that these articles are a bit outdated and do not match the in-depth style of some more recent articles. I will also expand on the article by reviewing every card in the pack (even if I have to repeat myself if the encounter set was mentioned before), and I will look at Shadow effects as well. More details on other questions that you might have about the quest before going in will also be answered. I will not be doing these articles back-to-back, but I will mix them in with some Nightmare scenario reviews and other content as we get along.
The Hunt for Gollum is often the first Adventure Pack that players buy after their Core Set. It was the first one ever released and starts off the first cycle of the game. In more recent times, the Dark of Mirkwood Scenario pack is now a good bridge from the Core Set to the cycle, but new players will likely face this quest early on in their collection. The Hunt for Gollum is a relatively tame quest, with a few mechanics that are new to players (chiefly the objectives having to be found in the encounter deck). The quest can also be pretty punishing, with some nasty treacheries and the real threat of location lock, thanks to some unbalanced cards that you may encounter in this quest. Overall, it’s a decent quest in the cycle, but it does not stand out so much as others. Let’s take a look at the quest and what strategies you can use to stand a good chance at beating it.
The Hunt for Gollum
- Found in: The Hunt for Gollum Adventure Pack, Shadows of Mirkwood cycle, pack 1
- Official difficulty: 4
- Community difficulty: 4.1
- Encounter sets: Journey along the Anduin, Sauron’s Reach, the Hunt for Gollum
- Quest cards: 3
- Play if: you want to feel nostalgic about playing the first AP ever, play if you haven’t beaten it (in a while).
- What is different about this quest?: Objectives, resetting quest cards, enemies scale with the number of Clues.
- Solo or Multiplayer?: I will recommend playing this Solo, or with as few players as possible. This will have you reveal fewer clues and makes stage 3 a lot easier.
- Can I run Side Quests for this scenario?: Yes, if you are passing through these stages faster than you are revealing clues, it is a good idea to explore some side quests instead of resetting the quest deck over and over again.
- Can I bring Guarded (X) cards?: You can, though I would suggest going for the enemy-specific ones. There are a bunch of weak enemies in this encounter set that will allow you to claim Sting and Durin’s Axe easily. There is a real risk of attachments getting stuck underneath locations in this quest, and that will only lead to more location lock. So be careful when you play any other Guarded cards. You also run the risk of discarding Clue cards with this, which can delay your progress if you haven’t seen any objectives up to that point.
- Player cards to avoid: There is nothing preventing you from playing certain cards here.
- Optimal Starting threat: Start below 30, so that if Eastern Crows come out, they don’t engage you right away. This gives you some time to set up your combat characters for the two Goblin enemies in the deck. Also, make sure you stay below 34 threat for a while, as the Hunters from Mordor will engage at that point. 35+ threat will also activate the abilities on Treacherous Fog and Evil Storm, so make sure you have threat reduction to keep below that threshold.
- Traits to add to the Victory Display: Goblin, Orc, Creature, Mordor, Riverland, Marshland, Forest. (The treacheries with traits don’t really need to go to the Victory Display because of their traits, it doesn’t do anything for Rossiel or other cards).
- What to look out for: Location lock, shadow effects removing allies from play, high threat on The Old Ford, Hunters from Mordor hitting hard if a lot of clues are in play.
- Any changes from the original cards?: There are no errata for any encounter cards in this quest. Play as written.
The Quest
Setup

The setup for this quest is not as complicated as previous quests. Each player reveals the top card of the encounter deck and adds it to the staging area. Keep in mind that triggers like surge and Doomed still go off during setup. The only really punishing card that you can reveal during setup is Old Wives’ Tales. Since none of your heroes have resources at this point (the first resource phase hasn’t kicked in yet), you will have to exhaust all of your heroes (except for Leadership Denethor). This is usually enough to scoop before the quest has started properly. Having readying effects that you can play from your hand or from heroes’ abilities is recommended to counter this. Think of Cram and Tactics Boromir to have at least a few characters ready. The other way to get past this is to accept you are playing this quest in sleazy mode. To those of you who are unfamiliar with this, sleazy mode has the same number of cards in the encounter decks, but your heroes start off the game with an additional resource during setup. This is the resource you will lose due to Old Wives’ Tales. Besides this treachery, there are not many terrible cards you can reveal. You will probably encounter some locations, hopefully, a clue objective, and maybe an enemy.
Quest card 1: The Hunt Begins – 8 quest points
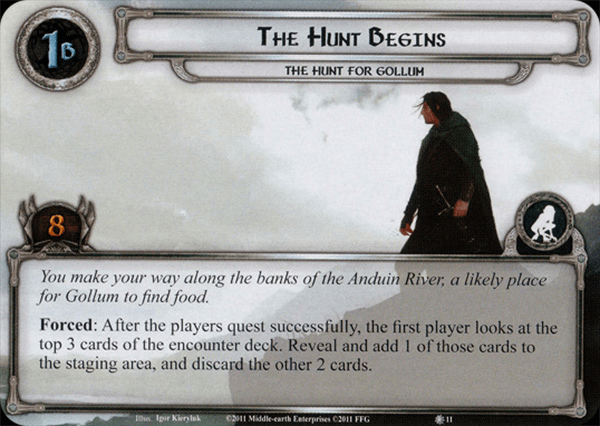
On this first stage, it will be the goal for all players to get their boardstate set up and start taking care of any encounter cards already in play. If setup revealed several locations, then make sure that you start traveling to them as soon as you have the option. This is more urgent in higher player counts, but the fewer locations are in play, the easier the quest phase will be, and the more progress players can place on the main quest. Side-quests are also good to explore this early on, as there is no punishment for stalling a few turns at the beginning of this quest. You might end up finding more Clue objectives this way, as you spend more time at stage 1. Scout Ahead can be very useful early on to scry deep into the encounter deck and perhaps line up an objective with an easy encounter card to guard it.
Stage 1B is not completely without game text. In fact, the Forced ability on this quest card (and the one on stage 2B) is often forgotten since it happens outside of the usual time frame of the quest. For stage 1B, the players have to look at the top 3 cards of the encounter deck once they quest successfully. This can be against the main quest or any side-quest, so it is likely to happen each round (unless you are really struggling to get started and have not made progress so far). From the three encounter cards you look at, 2 may be discarded, but 1 has to be revealed and added to the staging area. This will trigger any keyword (Surge, Doomed) and any “When Revealed” effects. So selecting a treachery might not always be your best bet. What card you select will depend on your current situation and what cards are your options. If you did not reveal an enemy this round and there is an easy Goblin enemy in the top 3 cards, then it is a simple choice. You can also select a location if you have nowhere else to travel to. The Old Ford is a good choice at this point, assuming you can travel to it immediately. Other cards like Evil Storm and Treacherous Fog won’t be doing much this early in the game.
Players can also find Clue objectives this way, which will allow them to move a little faster through the quest since they can now commit characters for the final stage. But this early in the quest, there is no need to rush these objectives, especially in lower player counts. The deck will thin itself soon enough, and if you already own an objective, I wouldn’t suggest taking a second one yourself. Taking a Clue objective is also a risk because you cannot control what card will be guarding the objective since the other cards you are looking at will be discarded.
The stage requires 8 progress, which can be obtained at your own pace. It is rare to take longer than 3 turns to advance this stage, but if you are exploring side-quests, then this is the stage to do that at. Once the final point of progress is made, all players advance to stage 2.
Quest card 2: A New Terror Abroad – 10 quest points

There is no text (aside from story) on stage 2A, so the players flip to stage 2B immediately. There is no trigger at this point that reveals more encounter cards or does something else. The transition between the stages is very easy. Stage 2B will be where the players spend the majority of the game hunting Clues and preparing to make a final push to stage 3B and towards the end of the game.
The Forced effect on this quest card is worded slightly differently and will trigger at the beginning of each quest phase. That means that this happens before the players are even able to commit characters to the quest. This time, you look at only the top 2 cards of the encounter deck, and you will reveal and add one to the staging area. This gives you less of a choice on what card you are adding to the staging area, but you can still avoid some cards like Pursued by Shadow, which will be a pain to reveal when none of your characters are committed to the quest yet. You now also have to deal with the added threat of the added location or enemy, which is something you did not have to worry about during stage 1. All of this makes stage 2 more difficult than stage 1, though there are still plenty of easy cards to reveal for this effect if you are lucky. Especially in multiplayer, the added encounter card should not matter too much.
The quest stage requires 10 progress to complete, but I would suggest taking it slow until you have found at least 1 Clue objective. There is no point in advancing the quest if there are no Clues attached to any of your heroes yet. You can stall a little while longer by exploring side-quests, traveling to locations with a lot of quest points, or keeping some characters back from questing until you find an objective and have claimed it. Use this time to clear as many encounter cards from play as possible to make your final push a little easier. Once the 10th point of progress is made on the main quest, the players will advance to stage 3, regardless of the number of Clues they own.
Quest card 3: On the Trail – 8 quest points

Again, stage 3A has nothing but flavor text, so we skip ahead to stage 3B. This informs the players that they may only commit characters to the quest if one of their heroes controls a Clue objective. If a player does not control an objective, they may not send their characters to the quest but can still use willpower boosting effects like Nenya and Leadership ally Faramir on other players to help out. Should no player control any objective, then no character could be committed to the quest. To prevent this from happening, the quest would simply reset to stage 2B, requiring that the players again make 10 progress there before returning to stage 3B, hopefully, this time with some more Clue objectives.
There are no cards added to the staging area aside from the usual staging step in the quest phase, so the pressure at this stage is a little lower. With just 8 progress required, it is a common practice to quest with all characters in order to make as much progress as possible, potentially clearing the quest stage in one turn. But be careful; cards like False Lead can remove a Clue objective from a hero. While you are still committed to the quest at that point and still count your willpower, the game could reset to stage 2B if that was the last Clue objective still attached to a character. Other cards like Hunters from Mordor and Old Ford can also be dangerous, as they will have a lot of threat at this point in the quest. But in practice, it is common to win the scenario in one turn after arriving to this stage. This is where your preparations in the previous stages come in useful, and if you have kept a clean staging area, you will find very little threat standing in the way between you and victory.
After the 8th point of progress is placed on the main quest, the players automatically win. Keep in mind that at least 1 Clue objective should be under the control of the players at this point. If that is the case, then the players are victorious and have defeated this scenario. It is not the most difficult scenario out there but will help you to understand more about the mechanics of this game and how to approach a generic quest. The next scenario in the cycle will flip that all on its head!

The Encounter deck
Global
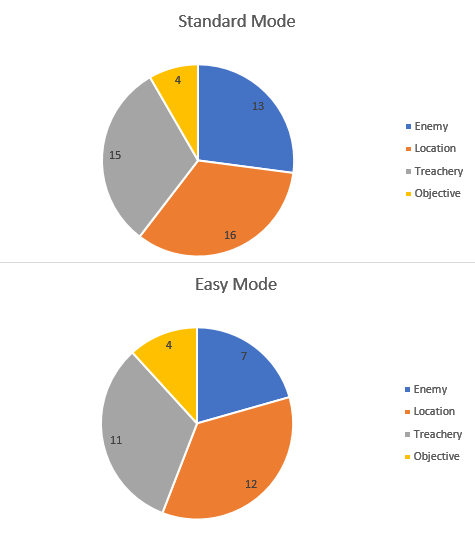
- There are 48 encounter cards that can be revealed in Normal Mode, 34 in Easy mode
- There is a 50/50 chance that your enemy will have a Shadow effect, be on the lookout for that! This holds true for Easy mode as well
- The average threat that you reveal per card is around 1.2 for each mode. However, there are plenty of surges, and some cards gain a threat boost based on the number of allies in play.
- Seven cards have the surge keyword. However, there are a lot of cards that add more cards to the staging area without having surge. Massing at Night is such a card.
- Only Flooding has the Doomed keyword. There are some other effects that will raise your threat, so be sure to have at least some threat reduction.
- Immunity
- While the Eaves of Mirkwood is the active location, encounter card effects cannot be canceled.
Objectives
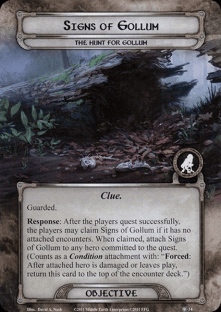
The Signs of Gollum are 4 objective cards that are in the encounter deck. It is the goal of the quest to make sure that you find at least 1 clue. They are not harmful objectives like those found in Escape from Dol Guldur, but they are harder to keep a hold of. The objectives get discarded when the attached hero is damaged or killed. This returns them to the top of the encounter deck. You will probably see them again during the next turn. However, their Guarded Keyword will go off again, so you will have to kill the enemy or explore the location to claim them again.
The clues can only be claimed by heroes that have committed to the quest; keep this in mind when distributing the clues between players. Be sure to put the clue on a hero with preferably more than 3 hitpoints. The Shadow effect of the Hunters from Mordor could kill that hero if the attack goes undefended.
There are a couple of effects that will have people discard the clues. Having them in the discard pile is bad, as you won’t find them again for a long time. Use cards like The End Comes (wait, what?) or Shadow of the Past to return those clues to the encounter deck. This also works if you ever reveal a clue as a shadow card.
Enemies
A lot of enemies make their return from some previous scenarios. The scenario only has 2 new enemies added to the deck, which will be discussed a little more in-depth. With only 13 enemy cards in the deck in Normal mode, don’t be surprised if you go a round or two without seeing any enemies. They are not as common as locations or treacheries in this quest.

- Hunters from Mordor: This enemy is the focus of this scenario, which you can tell by the fact that there are 5 copies of it in the deck, as well as the art being used on the cover of the AP. These enemies are the toughest ones you will face and will get harder as you uncover more Clues. With base stats of 2/2/2/6, they start off stronger than any other enemy in this deck and will take some effort to defeat. Luckily, they have an engagement cost of 34, meaning that you may not have to engage them right away and can build up your defenders and attackers before engaging this enemy. But be careful; keeping these enemies in play for longer will make you run the risk of revealing more clue cards, which boost the stats on these Hunters. For each Clue objective in play (in the staging area, guarded by an encounter card, or controlled by the players), the Hunters from Mordor will get +2 attack and +2 threat. If you were not focusing these enemies in the staging area, they will suddenly add a lot more threat to the total up there, and defending them will be harder with each objective you uncover from the encounter deck. Because of this, it can sometimes be advised not to take a Clue objective through the Forced effect on stages 1B, and 2B. In a worst-case scenario, the Hunters from Mordor can get +8 to their stats if all Clues are in play, making it nearly impossible to defend them without losing a character. Because of this, attack cancelation like Feint might be a good idea against this enemy. Fortunately, the defence on this enemy does not grow with the number of Clues in play, so you still need a total of 8 attack to defeat this enemy. This should be the focus over all other enemies. Shadow: The shadow effect on this enemy is pretty rough, as it can quickly kill heroes and force you to lose Clue objectives. It is an effect that will have to be canceled, or the game will last a while longer. If this card is dealt as a shadow card, then each hero with a Clue card attached will take 1 damage. If the attack was undefended, this gets raised to 3 damage, which is enough to kill a portion of all available heroes in the game, especially the lower threat-cost ones. Because of this shadow effect (and the fact that there are 5 copies in the game), try not to take attacks undefended if you have a Clue card in play. Even if you do not mind the damage, it will still put the objective on top of the encounter deck and can reset the quest from stage 3 to 2B. Cancel this effect with a Hasty Stroke, or prevent the enemy from attacking in the first place.
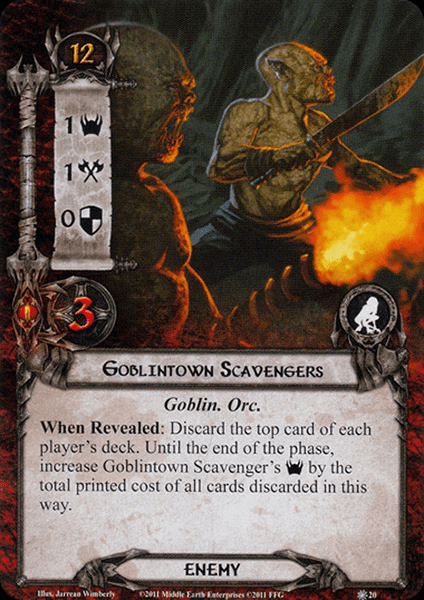
- Goblintown Scavengers: Players who bought the Dark of Mirkwood scenario pack (or Collector’s Edition) will be familiar with this enemy, as it is an exact copy of this one. The Scavengers are a weak Goblin-style enemy whose stand-out feature is the “When Revealed” effect on them. When this enemy is revealed, each player must discard the top card of their deck. The Scavengers will then get +X threat, where X is the combined cost of all discarded cards. During a regular quest phase, this can be pretty tough to deal with, especially in higher player counts, as all players must discard cards to this enemy. However, during setup and stage 1B’s Forced effect, the added threat does not matter. So there is a chance that this one-time effect that makes the enemy sort of a problem is wasted. Regardless, after this, When Revealed effect is over, the enemy does not need a lot of attention to kill. With no defence, you can have any character attack to get rid of the 3 hitpoints here. The single point of attack is also not really a concern, allowing even defenders like Gondorian Spearman to survive if you do not get a shadow effect.
- Eastern Crows: These are about as weak as enemies are ever going to get, but that is not without cause. The Eastern Crows only have 1 threat, 1 attack, and 1 hitpoint, but they do surge into another card and have a nasty recursion effect that keeps putting them back into the encounter deck. If you get this enemy to guard your Guarded X attachment, that’s great! You cannot have a more ideal target. But in most cases, you will end up revealing this enemy and having its surge grab the next card on the pile. An interesting combo with these enemies is that if Thalin is committed to the quest, his 1 point of damage is dealt before the surge on the Crows can trigger. This causes the Crows to die, making it a free encounter card to reveal. As the game text on the Crows isn’t in play at that point, they also don’t get shuffled into the encounter deck. This is a combo that should be exploited by Core Set players as much as possible, as it can save you from some nasty encounter cards that might be harmless as shadow cards. With an engagement cost of 30, it can take a little while in this scenario before the Crows come down, but players can always optionally engage them if they want a quick and easy kill. The Crows aren’t a threat during combat but note that if you take them undefended, some shadow effects become worse, so you are running that risk. The Crows are best defended by heroes like Beorn, who don’t have to exhaust to defend. When the Eastern Crows are defeated, they get shuffled back into the encounter deck. This means that their surge will be added back to the deck, which can be troublesome down the line. In higher player counts, it can be a good strategy just to keep the Crows alive, as they won’t be a big deal to defend but can be dangerous in the encounter deck. Killing them with Legolas or other cards that benefit players from killing enemies (Blade of Gondolin, Foe-Hammer, Proud Hunters) is still beneficial, especially if you have Thalin committed to the quest in the future. Shadow: The shadow effect raises the attack of the enemy by 1 in the early game. Once your threat reaches 35 and higher, the attack raise will be doubled. This can be quite dangerous as the Crows are common in the encounter deck, especially when killed. So make sure you have a little space between your character’s defence and the attack strength of the enemy to make sure this doesn’t accidentally kill your character.
- Misty Mountain Goblins: While slightly stronger than the Goblintown Scavengers, the Goblins aren’t a big threat to your deck. They are slightly annoying to have to deal with constantly, so make sure that you do finish them off quickly. The Goblins have a low engagement cost of 15, making them engage most decks from the start of the game. This means that their 2 threat is often removed quickly from the staging area after they have been revealed. While engaged, the Goblins will attack each round with a strength of 2. Their ability also triggers at this point, which removes 1 progress token from the main quest whenever they attack. Note that while the textbox says “current quest,” it does, in fact, target the main quest when the players have advanced from the quest phase. Even if you went up against a side-quest (but didn’t complete it) this round, the progress is removed from the main quest. This isn’t usually a problem in this quest, as you can delay a little bit on each stage and will advance immediately if all progress is made on the quest card. Thus, it can happen that the Goblins attack when you have just advanced to a new stage, without any progress on it yet. With 1 defence and 3 hitpoints, killing the Goblins shouldn’t be difficult. Shadow: The shadow effect on this enemy is the same effect as when the Goblins attack. The attack causes you to remove one progress from the main quest. Should you have taken the attack undefended, 3 progress is removed instead of 1. This can mean in true solo that you might have to spend another round on the current stage, but it doesn’t mess with the balance of combat stats, so I tend just to accept this shadow effect. You can do a lot worse in this encounter deck.
Locations
Aside from two locations encountered before during your Journey Along the Anduin, the quest comes with 5 new locations, causing the players to run the risk of getting location locked in multiplayer. Location control will be a valuable tool for this quest.
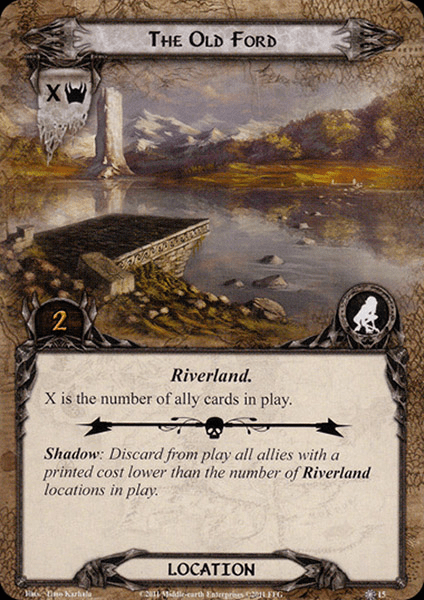
- The Old Ford: An X-threat location is the fear of any swarm deck, and this is the first time we’ve seen one. The Old Ford does not have any travel cost or passive ability; it just tries to waylay the players by having a ton of threat. And that it will, thanks to just 9 words in its text box. The threat on this location is equal to the number of ally cards in play among all players combined. In the early game, this isn’t too bad, and getting this card during setup is pretty nice. But later on in the game, this location can easily hit 20+ threat in a 4-player game. Even in solo, this location can quickly reach 5 threat or more, making it a dangerous card to reveal. On top of that, there are 2 copies of it in the deck, which can cause players to quickly threat out if they are both revealed towards the end of the game. Luckily, there are some solutions to this location. The easiest way to deal with the location is just to accept that you may not make as much progress that round, and you just travel to this location during the travel phase. Without a Travel cost or any other negative effect for having this location active, there is no reason why you should delay traveling here if you have the option. But if you are stuck with a different location in the active slot and have not included cards like West Road Traveller or Strider’s Path, then you need some different cards to help clear this location before it becomes a problem. With only 2 quest points, this location is explored easily with effects like Asfaloth and Evening Star. That way, you can clear it before counting the threat, allowing you to keep all your progress for that round. Alternatively, you can also use Thror’s Key to blank the location’s text box, which means that it no longer has any threat (unspecified X equals 0). This is also a good location to pick for cards like Distant Stars and The Hidden Way, as the location is pretty harmless in the active location slot. Shadow: There is also a chance either copy of the Old Ford appears as a shadow effect. In that case, the effect forces the players to discard all allies from play with a lower cost than the number of Riverland locations in play. So if there are three Riverland locations in play, all allies with a printed cost of 2 or lower must be discarded from all players. This helps in reducing the threat of The Old Ford, but in multiplayer games where location lock can be a possibility, it can occur that this shadow effect wipes out all allies on the table. If there are no Riverland locations in play, then your allies are safe, but this effect can quickly spiral out of control, especially if you are defending with a cheap ally. The effect would cause the attack to go through undefended if the ally is discarded to this effect.
- The Eaves of Mirkwood: Again, this card should look familiar to players who have played the Dark of Mirkwood or the Woodland Realm quests before. The Eaves of Mirkwood is a bit of a filler location that isn’t particularly dangerous but can screw with the players if timed poorly. With just 2 threat and 2 quest points, it is not a very big location and easy to explore. It also does not have the Riverland trait, so it is protected from effects like Flooding or the shadow effect from the Old Ford. The only thing to keep in mind with this location is that while it is active, players can’t cancel any encounter card effects. This means that your Test of Will and Dunedain Lookouts are useless while this location is active. This is only bad if you are going to be trying to blast through stage 3, but otherwise, the treacheries in this quest are not that horrible that they are worth keeping a cancel ready for at all times. Since this location does not have a ton of threat and there is no punishment for leaving it in the staging area, this one does not often become the active location. That makes it a very low-maintenance location that you can just chip away at with location control cards in the staging area.
- River Ninglor: Don’t be fooled; this card on Hall of Beorn looks different than the one in your actual deck. The artwork is from a Conflict at the Carrock location, but at least all the card text is accurate. The River Ninglor is meant to be a progress sink, though in practice, it isn’t too bad. With 2 threat and 4 quest points, the location is pretty average, though it has a passive ability that you should remember. This only triggers while the River Ninglor is the active location. During that time, the location will lose 1 progress at the end of each round and will also remove 1 progress from the main quest at the same time. If you are struggling with making progress, then this location should stay in the staging area for a while, as you won’t be able to afford to lose progress on the active location or the main quest. But if the staging area is empty enough and you can afford to lose a bit of progress at the end of the round, then go for it! There isn’t much strategy to this card; just make sure that you explore it in one turn if it becomes the active location. Otherwise, between the location and the Misty Mountain Goblins, you can start to lose more progress per round than you make during the quest phase. Of course, if the quest card and the location have no progress on them, then the effect does nothing. If you really want to make sure you explore this location quickly, slap a Woodmen’s Path on it to reduce the progress required to clear it from 4 to 1. But I doubt you will really need it. This location has the Riverland trait, though, so clearing it will help prevent allies from being discarded to the shadow effect on The Old Ford.
- The East Bank: The two “Bank” locations in the encounter deck are pretty similar in terms of stats, but they do rank among the worst locations in the deck. Now, I will stress that that is relatively speaking. There will be a lot more locations later on in the game that are much worse than this, but for just this scenario, 3/3 locations are pretty rough to reveal. On top of that, both versions are Riverland locations, which means that Flooding can protect them from being explored slowly in the staging area, and if you accumulate too many copies in the staging area, the shadow effect from The Old Ford will decimate the allies in play. So you should try and explore these locations quickly, perhaps even travel to them. But that is made difficult by the effect of the location. For The East Bank, while it is active, all ally cards will cost 1 additional matching resource to be played. That means that allies become more expensive and that you cannot use resources from other spheres to pay for that increased cost. This can slow down the rate at which you pump out bodies on the table, but since you can time when you go to The East Bank, you can play your allies before traveling and then wait a turn to save up for after you explore The East Bank. If you are delayed, and you cannot explore The East Bank fast enough, then cards like Tighten Our Belts can make sure your heroes get enough resources to pay the increased cost of the allies. You can also play cards that discount your allies or make them require no resource match to play the allies a little easier. This location will slow down your deck’s willpower for a while, but with only 3 progress required, it shouldn’t take too long. Shadow: I really hate the Wargs enemy and the way they return to the staging area all the time. Luckily they aren’t in this deck, but the shadow effect on The East Bank compensates for it. If the defending player does not control at least 1 hero with a Clue card attached, then the attacking enemy is returned to the staging area after the attack is resolved. For most enemies, that hardly matters, as they do not have a lot of threat, though it can be annoying that you are not able to kill them that round. Dunhere could help with that. It is worse if the attacking enemy was a Hunters from Mordor since they will be adding a lot of threat to the staging area next round. It might even have been the reason why you engaged them in the first place. Using cards like Westfold Outrider can allow you to reengage the enemy. The Dunedain trait also has various tricks for this.
- The West Bank: The opposite bank of the river Anduin is in many ways similar to The East Bank. However, when The West Bank is active, it raises the cost of attachments and events by an additional matching resource. The added cost for attachments won’t hurt too much (unless you are playing a Dale deck), but increasing the cost of events is usually a lot worse. This way, your standard 0-cost events now require resources to play, and emergency buttons like Feint and A Test of Will are now more expensive. Unless you are certain that you can survive without attachments and events for a while (or if you are swimming in resources), I would suggest clearing this location in the staging area. Shadow: The shadow effect on The West Bank is pretty brutal, especially in a quest where you may be tempted to take a lot of attacks undefended. If you do not control a hero with a Clue objective attached, then the attacking enemy gets their attack value doubled. Luckily, there aren’t that many hard-hitting enemies in the encounter deck, so without buffs, the worst you can face is a 2 attack turning into a 4. Luckily the shadow effect only takes the base attack value into account; else, the Hunters from Mordor would be hitting very hard, very fast. You can now just imagine they have found an additional Clue for this attack and thus have +2 attack.
- Banks of the Anduin: Out of all locations in the encounter deck, this is the one that you will want to see most of all. The Banks are a 1 threat location that only requires 3 progress to explore. The benefit of this location is that when it is explored, it is put on top of the encounter deck. This ensures that you will see it again next round, instead of a different encounter card that could be worse. Of course, this is only valid for solo playthroughs and not during stage 2, but having the insurance that at least one card is an easy location. The Banks of the Anduin can also come out as a shadow card, in which case you get a free pass as well. It is important to keep track of which enemy gets which shadow card first in this scenario. Exploring the location is not a real priority but if you have no other options, there is no real downside to traveling here. It does have the Riverland trait, so Flooding could remove any progress you make while it is in play.
- Gladden Fields: This is one of the few instances where a non-unique location in the encounter deck has a victory score. The Gladden Fields have 3 for all their stats, including threat, quest points, and victory points. The Fields are a common sight during this quest, but once you explore one copy, it is sent to the victory display. This is a good thing, as it permanently removes a location from the encounter deck. The Fields do not have a travel cost, and combined with their 3 threat; it will be a popular destination during the travel phase. However, the only game text on the location does make it a less appealing location to have active at the end of the round. That is because if the Gladden Fields is the active location at the end of the round, all players must raise their threat by an additional step. This might not seem that much, but as this quest has some clear threat levels that you want to stay under, any time you have to raise your threat is one too many. This makes the Gladden Fields a good target for any effects that clear the location before the end of the round. Regular progress placing cards will do nicely, but if you are really struggling, then Legolas and the Blade of Gondolin will make sure you make enough progress to clear the location by killing enemies. Northern Trackers are also a decent solution to the location, though you will have to stomach the 3 threat for a few rounds if Northern Trackers are all the location control you have. I can also recommend Strength of Will for this location in combination with any other single-progress-placing effect. The good thing is that this location is a Marshland, not a Riverland. That prevents Flooding from removing any progress from this location.

Treacheries
Three new treacheries are added to the scenario to waylay the players by taking away Clue objectives, resources, or progress on cards in play. Add to this the treacheries from Sauron’s Reach, and you will have enough reason to run some cancellation in your deck (if the Eaves of Mirkwood allows for it).

- False Lead: The effect on this treachery is simple but can cause you to have to spend a few more rounds to win the scenario. The later this treachery appears, the worse it will be, though it can also help the players out in the right situation. When the treachery is revealed, the first player chooses a Clue objective in play and shuffles it back into the encounter deck. This can be an objective that has already been claimed by the players and is attached to a hero, or it can be an objective that is sitting in the staging area or is guarded by an encounter card. If you select an objective currently guarded by an encounter card, then the guarding card is not shuffled back, only the objective. It’s nice that the objective gets shuffled back into the encounter deck and is not discarded, as this allows you to find it again in future rounds. Removing a Clue objective from play also allows you to lower the stats on the Hunters from Mordor, allowing you to take care of them before you reveal a new Clue card. The one time that it is bad to reveal this treachery is if the players only have 1 Clue card in play, and they are at stage 3. Shuffling the objective back into the encounter deck at that point will cause the quest to reset to stage 2B, delaying your victory. So when you are making your final push to the finish, make sure that you either have multiple Clues in play to sacrifice to this treachery or have cancellation ready to go.
Should this treachery appear in the early game and there are no Clue cards in play yet, then the treachery simply gains surge. - Flooding: This treachery is meant to slow down any progress you are making towards getting out of location lock. Flooding will remove all progress that you have made on Riverland locations in the staging area and as the active location. This usually targets any accumulated progress from cards like Northern Tracker or Map of Rhovanion, but thankfully does not punish you for having made progress on it. Any progress simply gets removed, and the players can start from scratch. Note that this effect only targets Riverland locations, so Forest and Marshland locations are safe. Quest cards are also not targeted by this effect, making it easy to advance the stage when you planned to. If you are not working with location control cards in your deck, then this treachery can almost always be ignored, though the Doomed 1 and Surge keywords will still trigger. At times, this is an annoying card but not worth canceling unless you are really stuck with Riverland locations and are about to blow them up with some card effect. Shadow: The shadow effect on the treachery is just to trigger the When Revealed effect of the treachery. Again, this doesn’t hurt much if you haven’t been placing progress on locations. You also ignore the surge and Doomed keyword this time.
- Old Wives’ Tales: Out of all the new treacheries introduced in this pack, I think this is the worst one to get, especially during setup. There are no keywords or shadow effects on it, but the When Revealed effect is pretty nasty. Whenever Old Wives’ Tales is revealed, each player must discard 1 resource from each hero’s resource pool. If there are unable to do that, the hero must be exhausted. This feels a lot like Sleeping Sentry in a way but is just a bit milder. Losing a resource on each hero is bad, especially if you were saving up for some big cards next turn or events like Thicket of Spears in the combat phase. You lose all those resources, though your heroes do remain ready. If you have spent all your money already and cannot lose more resources, then you have to exhaust your heroes. This goes on a per-hero basis, looking at each individually. This means that one hero cannot lose 3 resources to prevent the others from exhausting. The good thing is that your questing heroes will likely already be exhausted, so if you spent all their money in advance, there is no punishment. Later on in the game, you are also better equipped against this treachery with readying attachments on your heroes and having allies in play who can carry the combat phase while your heroes are exhausted for the rest of the round. Still, losing resources or action advantage can be a punishing blow to your deck if you were just keeping up pace with the encounter deck. Cancellation is advised (you are going to lose the resource for Test of Will anyways), and otherwise, you need to invest in readying attachments or just keeping 1 resource on your heroes at all times.
- Evil Storm: If you want another reason to keep a low threat during this scenario, then check out this lovely treachery. While players have a threat of 34 or lower, this does nothing; it doesn’t even surge. However, once any player reaches 35 threat or higher, and this treachery triggers, then they will have to deal 1 damage to each character that they control. While this sounds a lot like Necromancer’s Reach, it also does damage to ready characters, meaning that there is no escape for the weaker utility allies or characters that got damaged earlier and are just clinging on to life with 1 hitpoint remaining. The Evil Strom will deal a damage to all, causing potential board wipes in the later stages of the game. Luckily, there aren’t that many other effects in this quest that deal direct damage to your characters. Keeping a low threat is the best remedy against this treachery, allowing you to save your cancellation for other treacheries that aren’t as forgiving. If you reveal this at a low enough threat, you will actually like seeing this treachery, as it does nothing at all.
- Pursued by Shadow: This treachery attempts to push your threat up towards 34-35 so that the nastier cards of this encounter deck can do their thing. When it is revealed, Pursued by Shadow raises each player’s threat by 1 for each character not currently committed to the quest. Don’t mind cards like Late Adventurer or Hobbit Pony; you can’t trigger those right now. This treachery looks at the number of characters you have left and forces you to raise your threat for each one of them. This can be very dangerous if this puts players over 34 threat in the early game, as it means that the Hunters from Mordor will come down earlier than expected. Besides more enemies engaging you, a higher threat can mark you as a target for Evil Storm and Treacherous Fog. Cancellation is possible, but there are also other options to minimize the damage of this treachery. Free to Choose is not a popular event, but it can neutralize this treachery on the spot for you. The only problem is that you should have it in your hand early. It also only lowers your threat and not that of your fellow players. To ensure players reduce their threat again, Galadhrim’s Greeting can provide you with -2 threat after staging at the cost of 3 resources. Double Back is also a great counter to this treachery, as long as you manage to clear it quickly. A cancellation event is also an option if The Eaves of Mirkwood is not the active location, but save it for other treacheries if you can. Shadow: The shadow effect on this card is quite unique, as it requires the defending player to return an exhausted ally to their hand. This can be quite bad if your only exhausted ally is the one defending this attack, as that will cause the attack to become undefended. Make sure you always have an ally to return who is not defending, just to avoid a nasty undefended attack of 6 if you are unlucky. Certain decks like the Silvan, Rohan, and Eagle archetype will love returning an ally to your hand, as that can trigger some interesting synergy in your deck. But if you have the option, return the character you either don’t need or who is easy to bring back into play. Should you have no (unexhausted) allies, the defending player must instead raise their threat by 3. The ally is usually the better of these two, so if you see this shadow coming, exhaust an ally before it triggers to avoid unnecessary threat increases.
- Treacherous Fog: This treachery is a kind of combination of Evil Storm and Driven By Shadow. When it is revealed, it raises the threat of each location in the staging area by 1. This can be bad if you are already in the early stages of location lock, but if you managed to keep a lid on the locations you keep in play, this treachery shouldn’t add more than 3 threat on its own. The stinger comes in the second part of the treachery, where players with a threat of 35 or higher must choose and discard 1 card from their hand. The fact that players get to choose the card they discard makes this treachery hit a little softer, as players can discard copies of unique cards that are already in play if they want to. It would have been worse if the discard was random. The fact that this also only targets players at a threat of 35 or higher makes it quite a tame treachery that doesn’t do a lot compared to the rest. Only if you are really struggling with locations would this be worth canceling, just because it saves you from a ton of threat. But even that threat is temporary, making this a better reveal than yet another location.
- Massing at Night: This treachery is quite interesting, as it is next to non-existent in a true solo game but horrible in a 4 player game. When the treachery is revealed, the players must reveal one encounter card per player. This doubles the number of cards they have to reveal during that quest phase, which can be quite a setback for the players. In solo, however, this treachery only replaces itself. It is essentially surging into the next card, with nothing on the treachery itself that is worth noting. So solo players will love this treachery, while in multiplayer, it will be worth canceling unless the players are in a good enough position to take on extra encounter cards. Shadow: The same rule applies to the shadow effect of this card. In solo, the shadow card just replaces itself. This shadow effect can potentially stack 4 shadow cards under a single enemy in higher player counts. Canceling this shadow can save you from having to roll the dice on the extra shadow cards you could reveal from this. And with plenty of horrible treacheries in this deck that can discard allies, you’d better not risk revealing more shadow cards this way.

Worst cards in the encounter deck
- Enemies
- Locations
- Treacheries
- Massing at Night (in multiplayer)
- Evil Storm (when at 35 threat and higher)
- False Lead (Situational)
- Old Wives’ Tales
- Shadow effects
- Massing at Night (in multiplayer)
- The Old Ford (Situational)
- The West Bank
- Hunters from Mordor (especially undefended)
Tips and Tricks
- Distribute the clues among the players, try and make sure that as many players have a hero with a Clue objective attached. This will allow as many people as possible to commit to the quest.
- In order to make sure that each Clue stays attached to the hero, do not put the clues on your defender. Your questing heroes will be less likely to take damage or be killed. If you do not have a dedicated quester, use your main attacking hero.
- Be careful in bringing swarm decks; The Old Ford can really become a big threat if you don’t clear it directly. If multiple people are bringing swarm decks, the location can quickly rise to 20 threat or higher.
- Location control is quite useful in this quest, but be prepared for Flooding. This will have you waste your progress on locations. Only trigger these effects after Staging or if you are sure you can clear a location.
- Once you start controlling Clue objectives, make sure you defend every attack, even if the enemy only attacks for 1. The shadow effect on the Hunters from Mordor can easily kill a hero if you take the attack undefended.
Playthroughs
With this quest being so early in the collection, there are plenty of playthroughs to be found. Not so many with more updated decks, but if you are just setting out on your adventure, then there are a lot of progression series going through this quest with decks that you can copy and try for yourself!
- True solo: https://www.youtube.com/watch?v=DRI17tHxzI8
- Two player, progression style: https://www.youtube.com/watch?v=B8Hq1LLxWtU
- True solo, only Mirkwood cycle cards: https://www.youtube.com/watch?v=BdPNHrc9XMQ
As mentioned, I am going to do these articles for the next five AP scenarios as well. That should bring the entire Shadows of Mirkwood cycle up to par with the rest of the blog. I have set a goal to have this finished by the end of the year, but work and other projects might take priority over it. At least you will still have the original articles to read before I get to tackle those quests. I will be going over these in order, so Conflict at the Carrock will be next.


can you tell if after playing the basic box missions i should head for gollum hunt or play before the dark mirkwood?
LikeLike
After the Core Set, I would play the two scenarios from the Dark of Mirkwood next. They are a bit better designed and allow you to continue your campaign. You can start the Shadows of Mirkwood cycle afterwards with Hunt for Gollum as the first quest.
LikeLike