I have made it no secret that this is one of my least favorite quests in the game. It punishes players hard for playing cards, having resources, and also not having resources. In multiplayer, the quest can start with 30 points of Archery at the start of the game, and the switch to Siege questing at the end can be pretty awkward if you didn’t build for it. But that’s just a synopsis of my thoughts on the base quest. The Nightmare version is quite unique, as the designers took their time to really change this quest up compared to the normal format. Players start with a set number of resources on their heroes and no longer collect any resources during the resource phase. This gives you a limit on how many resources you can use to pay for cards and fund abilities. Even if you are playing a 0-cost card deck, the quest will drain your resources through the Prowl keyword and the many different effects on encounter cards. This can cause you to run out of money before the end of the quest, at which point certain encounter cards will be very difficult to deal with. The final stage of this quest is also changed now that a new version of Drû-buri-Drû is introduced. If you are looking for a different style of quest and don’t mind a bit more difficult than normal, this one might be worth attempting.
Nightmare The Drúadan Forest
- Found in: The Drúadan Forest Nightmare pack
- Size: 1 new rules card, and 19 new encounter cards.
- Increase in Difficulty: Yes, you are now working with limited resources, and either have to play cheap decks or hold back on swarming the board with cards. This, in turn, does not prepare you well for the amount of Archery that this quest throws at you. The final stage now also takes longer to clear, resulting in the players potentially having no resources left to pay off the Woses.
- Fixed loopholes: Players are no longer able to start spamming resource acceleration each turn, thanks to the Garden of Poisons that starts in the staging area. Stage 3 can no longer be rushed and requires at least 3 turns to convince the Woses that you are not a threat.
- New mechanics introduced: Players no longer gain resources on their heroes during the resource phase, meaning that you have to spend them wisely. Finding the balance between paying for player cards or using the resources for Prowl/encounter effects really shakes up this quest a lot. There is also a new version of Dru-buri-Dru by the end of the quest.
- Play this scenario if: You want to experience this quest at a very different pace. You want to see how nightmare mode can change up not only the difficulty, but also the mechanics of a quest.
- Solo or multiplayer?: Drúadan Forest is a quest best dealt with in lower player counts. This is because there are several effects that scale with the number of heroes in play that do not have resources left. In the late game, you will be stuck with a lot of Archery because of this. 2 player will be optimal, as you can split who loses resources from the Prowl keyword. Solo is possible, though the final stage might demand too much defence from you to win.
- What to look out for: Constantly losing resources over time, tons of archery, location lock with a ton of passives to boost enemies and deny the players healing/resources.
New Rules / Setup
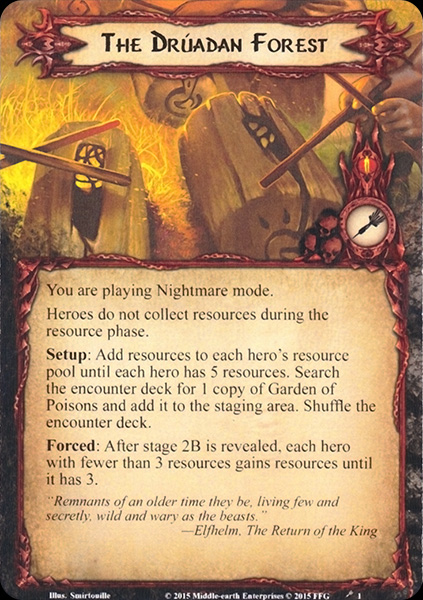
There are two new rules and a bit of extra setup for this quest, but I will add the two segments together since they complement each other really well. The first thing you have to know during this entire quest is that heroes do not receive their usual resources during the resource phase. This is the passive income that you are used to getting, but it is now being taken away. This also includes any resources you would get from Resourceful. That card only increases the number of resources you gain during the resource phase, but since that number will always be 0, Resourceful is a useless card for this quest.
Instead of gaining a resource every round, the players will add resources to their hero’s resource pool during the setup of the game until each hero has 5 resources. This means that Leadership Denethor only gets 2 resources on top of his own setup text. He still starts the game with 5 resources on him, not 7. The only exception to this rule that I would make is if you are playing Slightmare (or Lightmare) mode. These are the fan-made versions of the quests where you keep all the Nightmare cards in the deck but start with an additional resource on each of your heroes. Since that benefit is gone thanks to this setup text, I could imagine players wanting to start with 6 resources on each hero. Discuss with your group on what you think is best.
Of course, starting the game with 15 resources (or 20 if you are playing Bond of Friendship) is really cool, as you could start to play high-cost cards from the get-go. But since you are not replenishing resources during the resource phase, this is all you are going to get until you reach stage 2B. During that time, you must use the resources to not only build up your boardstate but also use them to pay for traveling to certain locations, paying for treacheries, and using them for the Prowl keyword. There are several bad cards in the encounter deck that get worse if you are running out of resources on your heroes, so you will want to keep a few in reserve for that.
The good news is that once you reach stage 2B, each hero will gain resources until they have 3 in their pool. You can use some clever resource smoothing or play some events last-minute in order to gain the most resources from this effect. If a hero already has 3 or more resources by the time the players reach stage 2B, then they gain no extra resources. It becomes a mini-game of making sure you gain the most resources from this effect.

While the heroes no longer gain resources during the resource phase, it does not mean that they cannot use player cards to gain more resources through those effects. Cards like Steward of Gondor, Grey Wanderer contract, Legacy of Numenor, Gloin, etc., are still viable in this game, but not at the start. This is because the setup for this scenario includes adding a Garden of Poisons to the staging area. This location prevents players from gaining resources through player card effects, further limiting the number of resources they have to spend. Luckily, the players can quickly travel here (at the cost of 1 resource) during the first round and clear it soon after in order to start gaining resources from card effects again.
Once each hero has 5 resources, and the one copy of Garden of Poisons is in the staging area, make sure that the new version of Dru-buri-Dru is set out of play. The players may now flip the quest over to stage 1B and reveal 1 encounter card per player.
Cards removed
The following cards are removed from the encounter deck to make way for the new encounter cards. Many of these cards do still have some copies in the deck; they were just cut to make space for the new ones.
- 2x Lost Companion: All copies removed because it could be countered really easily if you just quested with 2 characters.
- 3x Secluded Glade: A relatively vanilla location
- 1x Overgrown Trail: Easy to clear if you are bringing Rangers to the game, a dream with Idraen
- 1x Dru-buri-Dru: Replaced by a Nightmare version who is tougher to defeat
- 1x Drúadan Elite: Making space for the new enemies
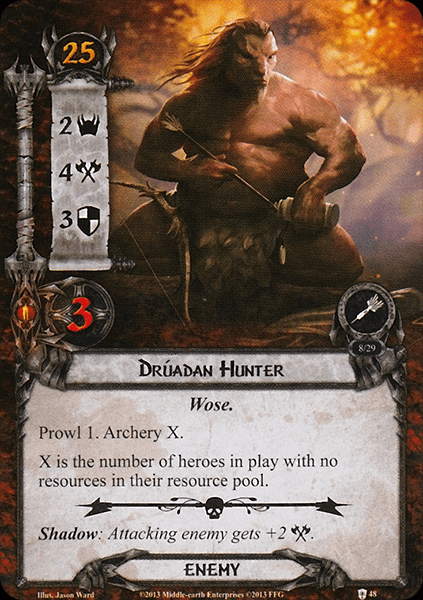
- 1x Drúadan Hunter: Making space for the new enemies
- 1x Stars in Sky: Since each hero starts with 5 resources, this is more of a late-game threat
- 1x Men in the Dark: Making space for more treacheries
The Quest
The quest begins with stage 1B revealing an encounter card per player. At this point, several treacheries won’t hurt too bad, but if you get several enemies or locations into the staging area early, you will have a more difficult time, especially if you reveal another Garden of Poisons, which will prevent you from getting resources from player card effects for a longer time.
Stage 1 will be a balancing act between getting your boardstate on the table and having enough resources left to afford the Prowl keyword and not be left with heroes that do not have resources in their pool. Avoid the higher-costed cards, and invest in some cost reduction effects. If that effect can pay itself back over the course of the following rounds, it will be a good investment. Examples are To the Sea, To the Sea! and O Lorien, but also heroes like Grima and Hirgon. If you can save resources but continue to play cards, you will have a good enough boardstate to last a while. Remember that each hero will gain up to 3 resources when you advance to stage 2B, so there is a bit of a metagame to be played here where you can try to spend all your resources just before advancing so that you get the maximum number of resources at the next stage.
During stage 1, your focus will be to get a hold of the encounter deck and make sure you can quickly outpace it. There will be a lot of surge in the deck, so that may prove difficult, so always travel when you have the option and try to take on as many enemies as you can. This will give you some freedom to commit fewer characters to the quest and prioritize cleaning up the table before advancing the quest. This does not mean that you can turtle during this stage! You are on a bit of a timer here, as the quest will suddenly become a lot more difficult if your heroes no longer have resources in their pool. When that time comes, make the final point of progress on the main quest to advance to stage 2.
There is no real punishment to advancing to this stage, though you will now have to deal all Archery damage to allies and cannot soak it up with heroes if living allies are still in play. This effect attempts to kill your investment of resources, so you really have to move quickly through this stage. That’s easier said than done, considering that this quest has 17 quest points, which is quite a challenge for lower player counts. If you can continue to clean up the staging area during this time in preparation for stage 3, then you will be in a good place to perhaps win this scenario. At the beginning of stage 2, every hero receives resources until they all have 3, but this is the last time you are getting resources until the end of the game (unless you are able to gain them through player card effects). Try not to spend these resources since experience tells me that you will need these to pay for encounter card effects from now until the end of the game. Only if you have a steady income of resources through player card effects can you play more player cards. If you end up without resources, then winning the game won’t be impossible, but it will certainly be very difficult!
Advancing to stage 3 a few things change. First of all, you add the new Dru-buri-Dru to the staging area. He has similar stats to his original version but only 3 hitpoints. This is the crucial part since you cannot beat the quest while Dru-buri-Dru is in play, and he can only take 1 damage per round from any effect. That means that you will have to spend at least 3 rounds at this stage before you can defeat Dru-buri-Dru and beat the stage. This means three rounds of increased stats for all other Wose enemies, which makes them more difficult to defeat.
Another thing that makes them hard to defeat is the fact that this stage has the Battle keyword. That means you quest with defence, leaving your defenders down during combat. Readying effects like Defiant Challenge are great ways to ready characters in order to be able to do double duty. You will definitely need the defenders since the enemies will have more attack strength, and you have likely lost a lot of chump blockers during the previous stage. You can still cancel attacks, though, and this is also a good time to take an undefended attack on a hero with no resources left in the pool.
Attacking back will also be different during this stage. You don’t “fight” the Woses; you have to “convince” them that you are not an enemy. You will be using your willpower (which has no other use at this stage) as if it was attack strength. Instead of damage, you can place progress on enemies in play. Once an enemy has progress equal to its hitpoints, it is discarded, and the progress is placed on the main quest. This is a nice way to make some extra progress so that you do not have to send all of your defenders to the quest at once.

The biggest problem during this stage is that you no longer have resources given to you by the encounter deck. The three resources at the start of stage 2 have run out by now, so you need a way to gain more resources through player card effects if you want to stand a chance at survival. If your heroes no longer have any resources at this point, you will face increased archery values, you can no longer travel to certain locations, and some enemies won’t leave the staging area anymore. And since you are stuck here at least 3 turns, you cannot just soak it up for a turn and then win. You really need to be careful with spending resources and make sure each hero has at least 1 in their pool at all times. This also helps against some shadow effects.
Your priority will be to defeat Dru-buri-Dru, which means dealing 1 progress to him every turn. This requires at least 5 willpower on your characters, so make sure you have that in reserve if he is engaged with you. The other enemies can be defeated if you have willpower left over, but they are not a priority target. If you can defeat them, it will help you towards making 14 progress on the quest card.
Once there is 14 progress on the main quest and Dru-buri-Dru has been defeated (or convinced, whatever), the players win the game. Those that are playing through the cycle in progression mode may think they have an easier time ahead with Encounter at Amon Din. But nothing could be further from the truth. It is probably the one quest with the highest increase in difficulty out of all Nightmare quests. But that is for the next article to discuss.
The Encounter deck
Global
- The Encounter deck has grown a little from the normal version to 43 cards.
- Shadow chances are average, at 56%. Many effects require players to pay resources or return enemies to the staging area.
- Average threat on cards revealed is high, at 1.8 threat/card. This can range to 5 threat locations, not counting some buffs like the Druadan Drummer.
- Surge is very common in this quest, 8 cards will surge by themselves. 4 treacheries will also surge if their effects did not reach their full potential.
- The Doomed keyword does not occur in this quest, and no other effects require that players raise their threat. This means that you could use Doomed player cards to good effect for this quest.
- Archery is very common here, with 8 enemies having the Archery keyword, but Glade of Cleansing and Poison-Darts can increase the Archery value of any enemy. Bring enough healing to prevent losing characters to Archery.
- Immunity
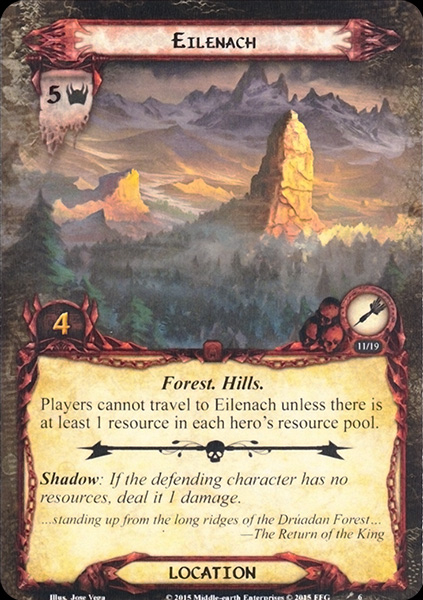
- Players cannot travel to Eilenach if any hero has no resources left in their resource pool
- While Garden of Poisons is in play, heroes cannot gain resources through card effects
- Devil’s Mirk is immune to player card effects and prevents players from healing while it is in play
- Druadan Stalker cannot be optionally engaged unless you pay 2 resources
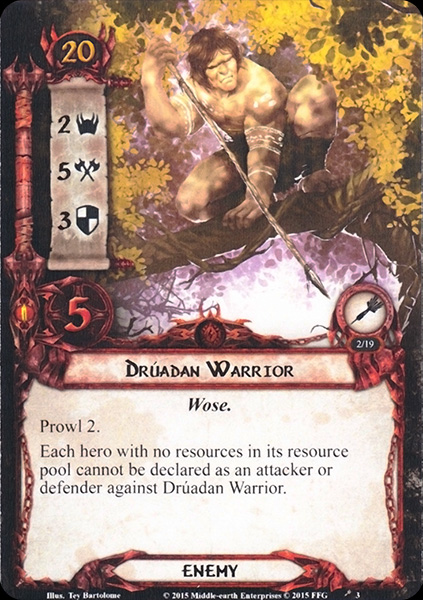
- Druadan Warrior cannot be defended or attacked by heroes with no resources in their pool
- Dru-buri-Dru cannot take more than 1 damage per round
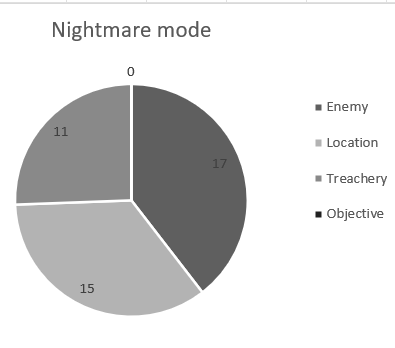
The following statistics do not take Dru-buri-Dru or the initial Garden of Poisons into account. The encounter deck is divided fairly equal, with a slight skew towards enemies in favor of treacheries. But with so much surge in the deck, you will hardly notice the difference. Since there is so much surge in the deck, cards like Lanwyn and the Minas Tirith Lampwright will do well during this quest. The statistics also assumed that Glade of Cleansing has 0 threat, which it usually won’t have. But as this location scales with the amount of Archery in play, it was difficult to set a threat level for it.
Enemies
The Wose enemies are annoying, as they can hit very hard, have a lot of Archery, steal resources, and sometimes have some brutal effects. The new Nightmare enemies all follow the same trend but punish players for not having resources.
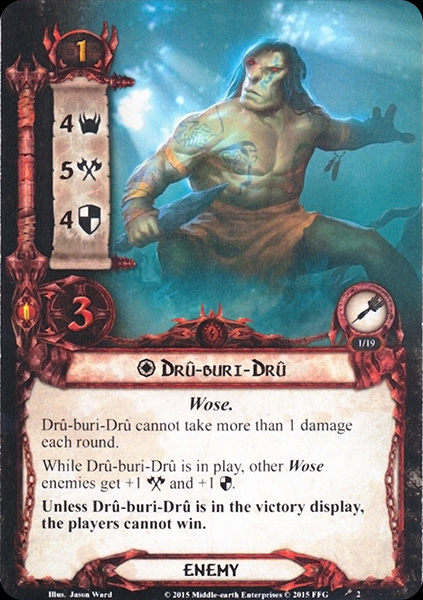
- Drû-buri-Drû: This is the boss enemy from the standard version of the quest, but changed ever so slightly in order to make the final stage of the game more difficult. Dru is set aside, out of play during the beginning of the game and only gets added to the staging area when the players arrive at stage 3. There, he will add 4 threat to the total, but considering that players usually transition here after questing successfully, the threat can be ignored, since Dru will be engaging players right away. This is quite a challenge if you are unprepared and are still engaged with other enemies. Dru-buri-Dru retains his 5 attack strength, which is tough to defend if you haven’t been getting a chance to boost defence on your defenders. And considering that your defenders will be questing at this stage, it will be even more difficult to handle these attacks. Luckily, Dru isn’t immune to player card effects and his attacks can be canceled or his stats can be lowered by means of Beorn’s Rage, though these events will cost you resources you may not have.
But the problem with Dru doesn’t stem from his high attack, for it is matched with some other enemies in the deck. Instead, he has the nasty line of text that says he cannot take more than 1 damage per round. This obviously should read progress, since players aren’t killing enemies at this stage, but the rule’s implications are the same. You are stuck with this enemy for at least 3 turns before you can win the scenario. You will have to defeat Dru in order to win the game, so ignoring him is not a possibility. You need to have 5 willpower dedicated to dealing 1 progress to him every turn for 3 rounds, and on then can you win. This is made even more difficult to survive thanks to Dru boosting the attack and defence of all other Woses in play by 1. This does not target himself, but it can cause problems with all the other Wose enemies engaged with you or with other players. Combine this with the fact that players must quest with defenders and attack with willpower, and you have quite a chaotic final fight on your hands. - Drúadan Warrior: This is your standard “increased stats” nightmare enemy for this quest. Still, the Warrior has a few extra quirks that are worth mentioning. The first is the Prowl 2 keyword, which means that this enemy steals 2 resources as soon as it is revealed. Remember that Prowl must be paid for by heroes, but it can be shared between players during a multiplayer game. The bigger problem comes during the late game when this enemy appears. This 5 attack enemy cannot be defended or attacked by heroes without resources in their pool. It means that you are restricted to just attacking/defending with allies unless you still have a hero or two with resources by the end of the game. This enemy can be very scary at the end of the game because if you no longer have resources or allies, you have to start taking these attacks undefended. And without an option to counter-attack, you are on a timer before this enemy kills all heroes you own. With 3 defence and 5 hitpoints, this is also a relatively strong enemy that requires a lot of attack strength (or willpower) to bring down. Direct damage is a good alternative for this enemy since you do not have to declare an attacker for some of the effects. You can deal reliable damage to this enemy in case you have no resources remaining. Reckless Attack is a free event that can deal the final damage to this enemy to defeat it. Blanking the textbox with Revealed in Wrath is also a good option here. But if you have a couple of strong allies, this enemy becomes easier to deal with.
- Drúadan Stalker: Contrary to some other enemies in the encounter deck is the Druadan Stalker, an enemy with a high engagement cost who is content with sitting in the staging area for the rest of the game. This is amplified by its 4 threat, 3 points of Archery, and an additional cost in case players want to engage this foe. If you are not aiming at a threat of 43 or higher but still want to get rid of this annoying enemy from the staging area, then you must pay 2 resources. These can come from any hero you control and can even be spent by allies like Radagast and Treebeard. This Stalker is a lot less of a threat while engaged, with just 3 attack and requiring 5 attack to kill, which is surprisingly weak for a Nightmare enemy. The three hitpoints also make this enemy a good target for direct damage effects, like Hail of Stones or Gandalf. I also enjoy running Leadership Eomer or Dunhere against this enemy because you can quickly kill it in the staging area without having to play an event or ally. Because of the high engagement cost of this enemy, it will often be the recipient of the Poison-Darts attachment, which gives you all the more reason to kill it in the staging area. Especially during the final stage of this quest, this enemy is worth killing in the staging area, as you will likely no longer have any resources left to optionally engage this enemy.

Locations
The base locations of the quest already boosted archery and prevented players from gaining more resources. The new locations expand on this, preventing travel, preventing healing, boosting enemy defense, and punishing paying for cards. Location control will be crucial in this quest.
- Devil’s Mirk: The first new location does not actually interact with resources at all. Instead, it provides buffs to Wose enemies while active and is a direct counter to the player’s ability to heal when it is in the staging area. This is problematic since there is quite a lot of Archery in this quest, and you would rather heal it off than replace lost characters. But while the Devil’s Mirk is in the staging area, you are out of luck on that front. It is also immune to player card effects, so you cannot blank it or explore it in the staging area. Your only option is to travel here, though that does come at the cost of giving each Wose enemy +2 defence. This makes them a lot harder to kill (or convince at stage 3), though you can still use effects like Tactics Aragorn or Beorn’s Rage to lower enemy defence. If you can suffer one round of enemies not dying as quickly, then you can likely get rid of this location during your next turn, as it only takes 3 progress to clear the Devil’s Mirk. Traveling here also gets rid of 3 threat from the staging area, so that’s useful for making more progress during your next turn. Alternatively, you can just accept that you are not going to be healing for a while and leave it in the staging area. This is risky though, since there is so much Archery in the quest. But damage cancellation still works, so there are alternatives if there are more pressing locations to travel to.
- Eilenach: I enjoy the attention to detail that the designers put into these Nightmare quests since the Eilenach is only mentioned once in the book but is included here for the players to get stuck on. With 5 threat, this is a relatively high-priority destination for the players, though the passive effect can stand in the way of that. The Eilenach can only be traveled to if there is at least one resource in the pool of each hero. Not each player, but each hero! You do not have to spend any resources to go here, but if a hero has none remaining, and you cannot move it over with an Errand-rider or something, then you simply cannot go here. This is an issue during the final stage of the game, where players are likely to run out of resources if they didn’t bring enough resource acceleration. If so, then the only solution is to explore this location in the staging area or swap the active location with Eilenach through effects like West Road Traveller, which technically does not count as traveling. Clearing Eilenach in the staging area is doable since 4 quest points is not impossible to clear if you have included some cards into your deck. Heirs of Earendil would be my choice of card to get rid of this location, as raising your threat in this quest is not really an issue. Other effects like Asfaloth or Evening Star are solid options too. Spirit Aragorn can chip away at this location over time but at the benefit of negating the 5 threat each round. One extra thing to note about this location is that the shadow effect is pretty nasty. You have to deal 1 damage to the defender if they do not have any resources. Not only can this hurt your heroes during the late game, but it will also always hurt your allies. This makes defensive allies like Defender of Rammas and Winged Guardian less attractive options for this quest. Keep a shadow cancel available for this effect!
- Stonewain Valley: This is the road that Theoden took through the Druadan Forest in order to avoid the northern force of Mordor right before the Battle of the Pelennor Fields. This time, however, the Stonewain Valley is less of a shortcut and more of a hindrance. With 1 threat and 6 quest points, it does not seem very threatening, but thanks to its passive ability, this changes quickly. When the Stonewain Valley is in the staging area, it will gain any resources spent by the first player for any reason. This can be them paying for a player card, losing resources to the Prowl keyword, losing them in order to travel to other locations or engaging enemies. In any case, those spent resources are placed on the Stonewain Valley, where it will increase in threat by 1 for each resource on it. Because this location does not lose any resources, it can grow to be a pretty big location in just a round or two. In order to combat this, you could travel to the Valley without really paying any cost. The only downside is that the location has 6 quest points, which will hurt you in the amount of progress you will make on the main quest. This can be changed with Woodmen’s Path (which seems a thematic win, too) to reduce it to 1 quest point. You can also attempt to clear it in the staging area, though this might take some effort. For a more permanent solution, players can use Thror’s Key to blank this location, which will just set its threat at 1 for the rest of the game. You can then ignore the location and leave it in the staging area. If you do want to travel here, but you need a fast way to reduce the threat on this location, I would suggest playing Secret Paths (again, fitting), to reduce the threat to 0 for a turn. You will need an answer for this location quickly, though, as playing such an event will mean the threat next turn is increased (if you are the first player, at least).

Treacheries
The treacheries in the normal encounter deck weren’t something to ignore. But now that the Nightmare deck adds two new treacheries, you really want to start including some cancellation here. Otherwise, you will be facing more Archery, losing resources on your characters, or getting a lot more damage than usual.
- Drums of the Wild Men: This treachery is one worth canceling if you have enough cancels left over. Once it is revealed, each player must trigger the Prowl keyword on each engaged Wose enemy. By the way this is worded, it sounds like other players cannot pay for the Prowl keyword triggered on enemies not engaged with them, so if you were saving your last resources for something, tough luck. After all the Prowl keywords have been resolved, all engaged Wose enemies return to the staging area. This is a problem for two reasons. First, all those enemies will add their threat to the total for this round. This can cause the players to make a lot less progress than expected, resulting in possibly taking an additional round to clear the stage. Second, the players will have to reengage the enemies. Fortunately, the Wose enemies do not have a horrible effect when they engage players, though the Druadan Stalker might require you again to spend 2 resources to engage him (depending on your threat) optionally. This does allow for some reorganization of the enemies, but at the cost of so much progress, it’s probably not what you want. Should this treachery not return any enemies to the staging area, that means that no resources were stolen by the reactivation of the Prowl keyword either. To celebrate this, the encounter deck reveals another encounter card through the surge keyword on the treachery!
- Poison-Darts: We are used to it now that the Vengeance of Mordor cycle really hammered home that enemies can get attachments, but this early in the life of the game, it was pretty rare. The Poison-Darts is a treachery that will attach itself to the highest engagement cost Wose enemy in play. This is likely the Stalker or the Drummer, but it depends on the situation. It can attach to an enemy in the staging area or already engaged with a player. Once attached, the Poison-Darts will serve as a Weapon attachment that grants the enemy +2 attack and Archery 2. If the enemy already has Archery, it is increased by 2. Since this attaches to the highest engagement cost enemy in play, it is likely that you will be shot at with that increased Archery value for a long time. The +2 attack is also annoying but can at least be defended by a solid defender, depending on which enemy gets the darts. The Drummer is actually ideal for this since they do not hit very hard, to begin with. Once the Darts are in play, you should prioritize killing the attached enemy. That will reduce the Archery total by a lot and can help you by getting rid of a heavy-hitting enemy. The one problem with this card that I have is that the “poison” aspect is a bit lost on me. I would have liked it better if this card would instead attach to a hero where you have to either take damage or lose resources at the end of the round. But I suppose giving the Druadan weapons like this is also pretty thematic. Please note that this card will surge into another encounter card. This can result in you getting several copies of this weapon in play during a single round. The attached enemy then really gains priority to be killed as soon as possible.

Tips and Tricks
- Maybe don’t play Leadership Denethor for this quest. He does not get his extra resources during setup, and since heroes cannot gain resources from card effects at the beginning of the game, he basically has a blank textbox. Run some other hero that you can actually benefit from, like his Lore version.
- Cancellation cards are crucial for this quest, even for the cards from the regular encounter deck. Leaves on Tree, Stars in Sky, and Drums of the Wild Men all deserve to be canceled by the players.
- Location control is pretty important in this quest. If you can clear the Garden of Poisons early on, you can start gaining resources again. Other locations are also better to explore in the staging area, especially during the late game when certain locations can no longer be traveled to.
- Since players cannot clear the final stage in less than three rounds, you really need to rush through stage 2 in order to save as many resources to last until the end of the game. If you don’t, you might be left with no resources and still plenty of rounds to go, this time with tougher enemies and treacheries.
- Heroes might no longer receive resources, but allies still can. Treebeard and Radagast can each gain a resource during the resource phase. These resources can then be used to play more allies without it coming out of the pockets of your heroes. This won’t help with Prowl or the majority of the encounter cards in the deck, though you can use the resources on these allies to engage the Drúadan Stalker.
- There isn’t really much punishment for raising your own threat, aside from more enemies engaging you. Because of this, the Doomed player cards might be of interest. Legacy of Numenor is especially useful, as it gives your heroes some extra resources to use. This is also a quest where hero Grima gets to shine!
- As players cannot earn resources at the start of the game through player card effects thanks to the Garden of Poisons (and because that location can pop up at various other points during the quest), it might be wise to consider running cost-reduction over resource acceleration. This will depend a bit on what sort of deck you are running, but it will be better to pay less (or nothing) for cards than to rely on gaining resources through card effects.
- Do not play the Grey Wanderer contract for this quest. You only start with 5 resources but cannot make use of your contract to gain more until you clear the Garden of Poisons. You also cannot rely on your usual solution to resource acceleration: Resourceful. Especially in solo games, you will run out of resources very fast, leading to a quick game-over. And that’s not even mentioning that you have fewer characters early on to deal Archery to.
- Play some heroes with high stats. Because you cannot really spend too many resources on stat-buffing attachments (and since they can be discarded through Leaves on Tree), you will need proper base-stats. Heroes with 4 willpower/attack/defence will be very useful in this quest. You pay for this with higher starting threat, but that is not really an issue since your heroes will be strong enough to take on early enemies.
Playthroughs
The following videos will help you to see how this new version of the quest functions. There aren’t a ton of recent videos on it, but I will continue to update this list if new videos are released. That way, you will know how to beat this scenario by watching other people do it properly.
- 2 player: https://www.youtube.com/watch?v=iNWv5AHdD7U
- 2 handed, progression style: https://www.youtube.com/watch?v=J89b4tYpnSo
- True solo: https://www.youtube.com/watch?v=U1dkj-vMA7A
We are making good progress on the Nightmare Against the Shadow cycle so far. We will definitely be able to finish it before the end of the year, allowing us to move on to different cycles and other projects. I’m rushing this series a little bit so that I can spend some more time on the revised Shadows of Mirkwood quest reviews. Next up will be one of the quests where Nightmare mode increases the difficulty a crazy amount. Encounter at Amon Din will finally be a challenge to complete!

One thought on “Nightmare The Drúadan Forest”