One of the unique draws of Middle Earth is the variety in biomes that it offers, from towering peaks to large marshlands. This cycle brought the game to the far south, where lush jungles and dry deserts set the scene for these quests. Today’s quest deals with the desert of Harad, which can be a brutal crossing for the unprepared. You have escaped Umbar during the previous quest, but now find yourself stranded in the middle of a huge desert with the sun starting to climb after a cold night. This quest introduced the unique temperature mechanic, which not only offers an additional loss condition, but also helps to scale the encounter cards to your progression. This is not a quest you want to stall at, as beating it quickly will make things a lot easier.
Desert Crossing
(careful not to write Dessert Crossing, to which you would bring Bombur)
- Found in: The Sands of Harad Deluxe box, scenario 2
- Official Difficulty: 6
- Community Difficulty: 5.8
- Encounter Sets: Desert Crossing, Desert Creatures, Desert Sands
- Quest cards: 3
- Play if: You are feeling cold and want to play a nice warm quest, you want a quest that forces you to move quickly, you like a scenario that doesn’t throw Orcs or humans at you, you enjoy the temperature mechanic.
- What is different about this quest?: Temperature mechanic that boosts enemies and locations at certain thresholds, “boss fight” with enemies you’ve already seen before.
- Solo or Multiplayer?: This quest can be enjoyed with any number of players, but you will see that the temperature will rise faster with multiple players thanks to revealing more temperature-raising cards per round. More players does mean that your decks can be tuned more specificly to dealing with either enemies, locations, or other mechanics. Try it out with any number of players and you’ll be able to beat the scenario.
- Can I run side-quests in this scenario?: No, I wouldn’t recommend it. This quest forces you to move quickly or suffer the consequences. That means you have little time to complete your own side-quests. For those playing with cards that need a side-quest in the Victory Display, there are 3 side-quests in the encounter deck that you can explore if you want to.
- What to look out for: Rising temperature makes encounter cards tougher, location lock, a lot of direct damage to characters, side-quests can pull you off track, but it may be worth it, all locations have nasty abilities when they become active.
The Quest
Temperature mechanic
Before going into the quest, I wanted to touch on the unique Temperature mechanic first. This scenario has a mechanic that works a bit like a time counter, where the temperature in the desert keeps rising as the quest goes on. It starts out at a coll 10 degrees, but will quickly start to go up. Each quest card will inform you to raise the temperature by 4 at the end of the round, to signal how the sun is continuing to climb. This mechanic is not like the Day/Night cycle of the Wastes of Eriador, where the temperature would go down eventually. No, instead the temperature will keep rising throughout the scenario. This means that eventually your party will be cooked alive, at which point the players lose the game. This occurs when the temperature reaches 60 degrees.

This mechanic uses a heat tracker, for which you can use a threat tracker or a notepad. There are several encounter cards that get worse as the temperature gets higher. For instance, you will be able to deal with Were-worms on turn 1 far easier than at the final stage when the temperature is in the 30’s or 40’s. This mechanic also prevents you from stalling too long, so it will be best to get your boardstate ready as quickly as possible, while making progress on the main quest stages. There will be side-quests that will try to turn you off-course, which will lead to higher temperatures, but it can sometimes be worth it. I personally really like the theme of this temperature mechanic and hope it makes a comeback at some point. It is really fitting of this desert themed quest and can be pretty relatable to those of us using the Celsius scale. You know you are less capable to continue the quest after the temperature passes the 30 degrees. A fun experiment would be to play this quest in a temperature controlled room that matches the heat tracker, perhaps that will be the next Nightmare mode.
Setup
We begin this quest by finding a copy of the Burnt Sands for each player in the game. This sets the threat to 2 threat times the number of players in the game, but that should be easy to overcome. This many locations can lead to an early location lock, but if you manage to add some location control cards, the Burnt Sands won’t be much of a problem. The players create the heat tracker (use a threat tracker or a notepad) and set it at 10 degrees. It is placed next to the quest deck, though I tend to just add it to the staging area where all players can see the tracker. The players then start their first turn of planning.
Quest card 1: The Desert of Harad – 8 quest points
This quest forces you to make a slow start to your quest, as it comes out with a Forced effect targeting your new allies. Whenever an ally enters play, the controlling player must either exhaust it or deal a damage to it. In case of Ents, this means that you should always damage them, as they already enter play exhausted. This is not too bad though, as Ents have enough hitpoints to survive that, plus they get a bonus for being damaged in some cases (Leaflock, Booming Ent, The Dam Bursts). However, this forced effect will leave you shortstaffed for the beginning of the game, using your heroes instead to do the heavy lifting. This will not be the only time such a Forced effect appears in the cycle, as The Crossings of Poros starts with this as well. A good ally to bring into play at this point is the Lindon Navigator, who can still quest if she is exhausted. You still have to ditch a card to her, but at least you have gotten some extra willpower out of her. For other allies, I would suggest exhausting them in this early stage, unless you have a lot of healing in your opening hand. Damaged characters is really something that this encounter deck will focus on, so it is best to keep the damage to a minimum if you have the chance.

The quest card also informs you to raise the temperature by 4 degrees at the end of each round. Since the encounter cards are mostly interested in the first digit of the heat tracker, this means that you have 3 rounds of low temperatures, before passing the 20 degrees, making Were-worms a lot tougher already. However, 3 rounds is the ideal situation. A more realistic timeframe would be 2 rounds, as there are plenty of temperature-raising encounter cards like Scorching Sun and the travel effect on the Burnt Sands. This is just enough to put you up to 20 on the heat tracker at the end of the second round, after which things ramp up a bit more. If you feel like you can take it, then feel free to start travelling to some of the Burnt Sands in the staging area whenever you can. You will want to get rid of most copies before you reach the 40 degrees, after which those locations get a threat increase.
This stage will take some time to complete thanks to the forced effect on the main quest stage. But this is a quest you will want to beat within a few rounds, before the temperature starts to get too high. In order to advance the quest, you must make 8 progress on the main stage. You can go to any encounter side-quest at this stage if they are revealed, since the second stage will be more punishing for stalling. After the 8th token is placed on the main quest, the players advance. Your temperature should be between 10 and 29 at this point in order to have enough time to beat the next 2 stages.
Quest card 2: Under the Merciless Sun -14 quest points
It’s starting to get hot here, so you better be prepared for more nasty encounter cards. When the players advance to this stage, the temperature is raised by 2 degrees, potentially pushing you past the next first digit of the heat tracker. The players then shuffle the encounter discard pile into the encounter deck, and reveal one encounter card per player. There aren’t really any good cards to reveal at this point, but some treacheries that deal with the first digit of the heat tracker will be milder than later in the game. After these cards have been added to the staging area, the players flip this card and go to 2B.

The forced effect when playing allies is gone, meaning that you can spam out allies without dealing them damage or exhausting them. This is the time when you will want to start playing your utility allies with 1 hitpoint in order to get the most use out of them. Instead of the damage being dealt to allies when they enter play, the quest card adds a new Forced effect after the temperature has been raised by 4 at the end of the round. Each player will have to assign damage to characters they control equal to the first digit of the heat tracker. This is a lot like Archery damage, but only after the combat phase, which can leave a lot of characters already bloodied up. Damage cancellation will be important here, so Loyal Hound and Honour Guard are allies you will want to start putting into play. Healing this damage off is also advised, else the Carrion Bird will start to engage you quickly.
You will want to rush this part of the quest, as staying here for long will lead to you losing most characters to heat-related damage. Side-quests should take a backseat at this stage, with the exception of Seek Shade, which will buy you some extra time and will likely lower the damage you will take at the end of the round. Normal temperatures at this point of the quest reach into the 30’s and 40’s, so you will want to quickly find shadow or move on to the final stage.

To beat this stage, all you have to do is to make 14 progress on the main quest card. The threat of being boiled alive at 60 degrees, and thereby losing, is starting to become a reality at this point in the quest, so you have a lot of pressure to keep moving. If you are playing this scenario with 4 players, then you should leave the Were-worms alone for now, or keep them from dying. They will be brought back during the next stage, so it would be best to have them already damaged instead of defeating them, only for them to reappear in the next stage. Try to focus your combat characters on other enemies instead. With the next stage requiring some combat ability, you will want to reduce the number of enemies engaged with you in preparation for this. After the 14th progress token has been placed on this quest, the players advance to the next stage.
Quest card 3: Beasts of Legend – 16 quest points
During your track away from Umbar, you have continued to go east, further into the desert. Now you have reached the nesting grounds of the were-worms, and they do like to be stomped on. When the players reach this stage, they must raise the temperature again by 2. They then each have to find a Were-worm in the encounter deck, discard pile or the victory display. Because of this, it is not a good idea to put Were-worms in the victory display in a multiplayer game. The best case scenario is that all Were-worms are already in play and pretty damaged already from previous attacks. Even if there are already 2 Were-worms in play for a 2 player game, the other 2 have to be added to the staging area as well. The encounter deck is shuffled again, and the quest card is flipped to 3B.

At this final stage, the players will have their chance to beat the quest. However, if the temperature reaches 60 degrees at any point during this stage, the players lose immediately. This means that they should focus on beating this stage as quickly as possible, although that is easier said than done. In order to beat this stage, the players must make 16 progress on the main stage. There must also be no Were-worms left in play. This includes the ones that were revealed when they advanced to this stage, as well as any Were-worms that got revealed from the encounter deck during staging at this phase. Once the players have the required progress and there are no Were-worms in play, they have beaten the quest.
But it isn’t that easy. The Were-worms scale with the temperature, and if you have taken too long to get here, then the worms are pretty tough to beat. Temperatures in the 40’s and 50’s are normal at this stage, making the stats on these enemies insane if you have to take down several at the same time. Direct damage will help a lot in beating this enemies, as their defence can be quite high. This is also the time to use big one-off attacks such as those from Tactics Eowyn and ally Beorn to get rid of these worms so that you can advance.

Another thing to note at this stage is that you no longer have to deal damage equal to the first digit of the temperature tracker anymore. This gives you and your allies a bit of relief after being pummeled with damage for the previous turns. The direct damage ability is replaced by a new quest card ability though. This ability does not directly impact your boardstate though, which is a welcome relief. Instead, the quest card adds the first digit of the heat tracker worth of threat to the staging area. This reduces the amount of progress you can make, but isn’t too bad compared to the previous 2 effects. This is an ability that has to be kept track of though, as it is easy to forget. This is why I suggest placing the heat tracker in the staging area, as it allows you to remember the effect better than when it is off to the side.
The strategy for this part of the quest is to try and take down all Were-worms are quickly as possible, especially if your temperature is still below 50 degrees. Quest hard during the quest phase, as you will immediately win if you have the required progress on the main stage, and have defeated all Were-worms in play. Your victory is bitter-sweet though, as you crawl exhausted away from the worm lair and onto the paved Harad road. There, finally, your strength leaves you and you are left for dead. Travelling Haradrim find you on the road and bring you south to their village, away from the desert and to the edge of the jungle at the end of the known world. There you will discover just how far the influence of Mordor reaches during the Long Arm of Mordor quest which is up next for those playing progression mode.
The Encounter Deck
Global
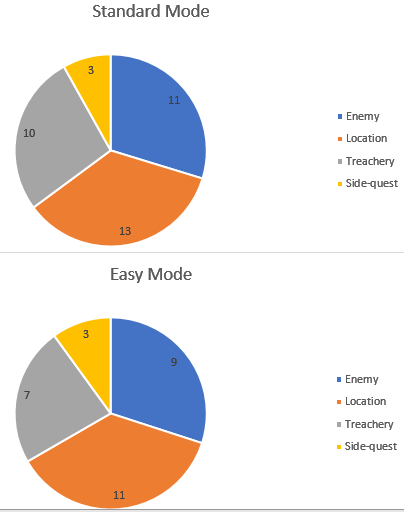
- The encounter deck is of medium thickness, with 37 cards in Normal mode, and 30 in Easy mode
- Shadow effect chances are relatively low, with only 45% of cards having a shadow effect. This is useful when dealing with Sand Vipers.
- Average threat per card revealed is 1.45 in both modes, but this will be increased as the quest goes along thanks to the temperature mechanic.
- Only 3 cards in the encounter deck surge.
- The Doomed keyword is not in this scenario, and threat isn’t something the encounter deck focusses on.
- Archery is also not present in the scenario (Never seen a snake with a bow before). However, this scenario does dish out a lot of direct damage comparable to the Archery keyword, so be careful with that.
- Immunity
- All side-quests bring their own rules to keep in mindWhile Towering Dunes is in the staging area, progress cannot be placed on other locations in the staging area.Players cannot declare defenders against Sand Viper
The average threat of cards revealed was a bit tricky to calculate, since Were-worm and Scorched Hamada are X, I took X = 1 for these calculations and ended up at 1.45. However, if the players manage to reach a temperature of 50 degrees or higher, the average threat of cards revealed goes up to 2.1. Keep an eye on your heat tracker, as it will make these locations nastier.
Enemies
While you may have lost the Haradrim when you fled into the desert, you are far from safe. The creatures lurking above and below the sands will make this journey tough on you and your party.

- Sand Viper: At 4 threat, this enemy is a excellent target for effects like Needful to Know and The Gathering Storm. But it is also a pretty nasty reveal during the staging step. 4 threat will screw over solo players a lot, perhaps causing them to remain at their current active location. This enemy will be denying you a lot of progress, so it will be best to engage it as quickly as possible. Alternatively, you can also play Radagast’s Cunning or other threat recuding cards to reduce the hit you take from the Viper. Despite his 44 engagment cost though, this snake will be engaging you much faster thanks to its ability. Whenever the players travel to a new location, the Viper will engage the first player. It doesn’t matter if this player has defenders ready for this attack, as the Sand Viper cannot be defended by characters. Luckily, it does only have 1 attack, but will get a shadow card that can screw you over. Especially in the late game, shadow cards like Unbearable Heat and Were-worm will cause the Viper to get a deadly boost to its attack. With no ability to defend this attack, you will have to take it undefended, meaning that all damage must be dealt to a hero. This can cause the hero to be near death, or even die from this attack. Because of this, you should always keep a hero healthy, so that they can take a hit from this enemy if needed. Alternatively, White Tower Watchman, Barliman, and Dori can take the damage as well for certain decks, although this will require them being undamaged if Craft Remedy is in play. Attacking the Viper is easy, as it only has 1 point of defence and 3 hitpoints. Some characters will be able to take out the snake with ease, although there are cases where you might not want this to happen. Because of Sand Viper’s high threat, it is a perfect target for Followed. So if you can handle the constant damage, you should definitely consider Followed in your deck here. Forest Snare can also be used in case you don’t want to deal with the constant attack. This will lower the threat in the staging area by 4, and will give you a good target for any Emyn Arnen Rangers.
- Giant Scorpion: It’s the little ones you should actually worry about. The big ones aren’t as poisonous. But that doesn’t take away that this enemy can be tough. Other than a late game Were-worm, this enemy has the most stats out of the other Creature enemies in this encounter set. 3 threat is high enough to cost you some valuable progress when it is revealed, and 33 engament cost means that you will probably be engaging this enemy at some point during the mid-game (or early game if you went with a more expensive hero lineup). The 3 attack on this enemy comes with a catch, whenever a character is damaged by the attack from the Giant Scorpion, that character cannot ready until the end of the round. This includes the refresh phase, meaning that your character will either have to use a readying ability, or has to stay exhausted for the rest of the followin round. This is brutal if it hits your main defender because of a buff in the Scorpion’s attack thanks to a shadow card. You can also chump this attack and not care about the effect on this enemy, since the damaged character was damaged to death. Attacking the Scorpion back will take some effort, as the 4 hitpoints can prevent it from dying to a single character’s attack. But use a Rivendell Blade or two attackers, and you will probably be able to get rid of this creature quickly. This is not an enemy you want to keep around, as that poison attack can leave you shorthanded during the next round.
- Were-worm: These worms are the semi-boss enemies of this scenario, and will scale with the temperature. As it gets warmer, their stats go up. This makes them pretty harmless in the early game, but during the final stage, they’ll likely have all fours or fives for their stats. At an engagement cost of 22, it will be difficult avoiding these worms, which is a problem. You might not want to engage the Were-worms because of their ability which makes it perform an immediate attack against whoever it engages. Luckily, no shadow card is dealt for this attack, making it very predicatble to defend. This will mean however, that whoever is engaging this enemy, will have to be able to defend it twice. While in the early game, the first attack can be left undefended, this becomes a problem during the final stages. Having enough characters in play to reliably defend the Were-worms will make this a lot easier. A neat trick to avoid a strong attack and a big defence on these enemies is to use Revealed in Wrath on the Were-worm. This blanks its textbox, reducing its stats to 0 (since X now has no value). This can make it particularly easy to get rid of the enemy through Straight Shot, or you can just pile on the damage through regular attacks now that you don’t have to worry about a potential 5 defence on this enemy. It also helps to clear the Seek Shade side-quest, as this will drop the Were-worm’s stats by 1. Defeating all worms at the final stage while having enough progress on the stage as well, means that the players win the game. This means that you will definitely be seeing this enemy at some point in your playthrough.
- Carrion Bird: The biggest threat from this enemy is not its stats, as those are quite lacking. Instead, its ability will be the biggest menace during your playthroughs. The Carrion Bird will remain in the staging area for the majority of the early game, as it has 40 engagement cost. However, it will get a engagement cost reduction of 1 for each damaged character in play. With the encounter deck’s love for direct damage, this means that it will be engaging players somewhere during the time they arrive at stage 2 of the quest if they haven’t gotten their healers out in time. The real trouble starts when the Carrion Bird engages you, as its ability will discard a damaged character you control. Note that this can also target heroes, so it is wise to either have no damaged characters at all, or at least have a damaged character that you don’t mind losing (a quester or utility ally like Gleowine for instance). If your heroes are the only damaged characters by the time the birds engage you, you will be forced to ditch one of them with damage. This is a highly thematic enemy that can be annoying if you don’t kill it quickly. By that, I mean killing it in the staging area through Hands Upon the Bow or Haldir. That will save you a character. You can also try to keep all characters healed up, though that will be hard with the amount of damage dished out by the encounter deck. The stats during combat of this enemy aren’t really that important, carry on.

Locations
The desert of Harad is a dangerous place in the middle of the day. The locations start out innocent enough, but you will be seeing a lot of sand during your journey, which will continue to warm up as the day progresses. The locations in this scenario are also nasty for another reason: they each feature an ability when they become the active location. These abilities will try to pursuade you from not travelling, but you definitely should keep going, else you will find yourself locked down with locations.
- Burnt Sands: During setup, one of these locations gets added to the staging area per player, so you are certainly going to be interacting with these locations at some point. There are also 4 copies in total, making them pretty common reveals. In the early game, the Burnt Sands aren’t all that threatening, with only 2 threat and a meagre 3 quest points. However, they will become more dangerous once the temperature starts to climb to 40 and over. The threat of the Burnt Sands will suddenly double, making them much more of a priority to explore in order to keep making progress on the quest. You have the option to travel to the Burnt Sands, although when it becomes the active location, the temperature has to be increased by 2 degrees. This seems harmless enough, but this will mean that (not counting other temperature increasing cards) you will be over 19 degrees by the end of turn 2 instead of turn 3. This in turn boosts the threat of other locations and buffs the Were-worms. Travelling to 2 of these locations will have costed you an entire round worth of temperature from the quest cards. Because of this, only travel here when you need to or when you advance to the next 10’s digit of the heat tracker anyway next round. This location is best left in the staging area and explored easily through location control cards.
- Scorched Hamada: If you have packed Thror’s Key in your deck, this is the location to use it on. The Scorched Hamada plays around with the temperature mechanic as well, since its threat increases with the ten’s digit of the heat tracker. This means the location starts out innocent enough, but will become a pain during later stages. If you can blank the location’s textbox, it will just be a 0 threat location, possibly saving you 5 threat. Travelling to the Hamada also has you interact with the temperature mechanic, since the players as a group must deal damage to characters in play equal to the X value of the location. Pilling this damage onto other damage effects can see a lot of characters dying, though it is less terrible if you have a good set of healers in place. Remember that this damage can be spread across the group, making this card slightly easier to deal with in multiplayer.
- Parched Wadi: The Wadi probably has one of the highest priorities when it comes to travelling here. This is due to the fact that while it is in the staging area, all Creature enemies in play get a +1 to their threat and attack value. This ability stacks with multiple copies of the Parched Wadi, making it very important to get rid of them as quickly as possible. This can be done by blanking the textbox, making it the active location, or exploring it through player card effects. Making 3 progress on this location isn’t too difficult and it will save you 3 threat in the staging area as well (not counting the added threat from any Creature in the staging area at the time. When the Parched Wadi becomes the active location through travelling or encounter cards like Mirage, the encounter discard pile is shuffled into the encounter deck and cards are discarded until a Creature enemy is discarded. That enemy gets added to the staging area. With a bit of luck, this effect will discard plenty of other nasty cards before a Creature is discarded. Be sure to avoid having both of these Wadi’s in the staging area at the same time, as this will boost all enemies in play.
- Towering Dunes: Oh look, more sand! That’s a rare sight here… This location just adds to the location lock you can find yourself in, as it prevents players from making progress on other locations in the staging area. Players can still use cards like Asfaloth to target the Towering Dunes, but other locations will have to be travelled to in order to make any progress on them. With 4 quest points, the Towering Dunes aren’t a big obstacle, but getting several out at the same time can knock out your location control deck for a while. Because of this, it would be a good idea to travel to the Dunes if you have the opportunity. However, this does come at a cost again. Like all other locations, the Dunes has an effect when it becomes the active location. In this case, the effect is rather simple: the players reveal the top card of the encounter deck. This can be either a harmless enemy or treachery, or it can be a worse card than you just travelled to. Because of these chances, I would suggest using a scrying ability like Henemarth Riversong before you travel to the Dunes. If you can handle the next card, then there is little harm to travelling here. Otherwise, it would be best to pick another destination and let the top card be a shadow card during the combat phase.
- Desert Oasis: Amidst all this sand and dangerous creatures, there are 2 locations that can serve as a bit of a relaxation stop. These two Oasis cards will have a beneficial effect when you explore them as the active location, but they are also easily discarded with location control cards if you need to make progress and don’t care much about the healing abilities of the Oasis. The effect on the Oasis is only available if it is the active location, so you will have to first travel here. This comes at the cost of each player exhausting a character. This can be a steep cost if you are locked down with enemies, so be sure to have at least a character ready (or with the ability to ready) for this location. Once the Oasis is active, I would suggest using a player card effect like Strength of Will or Asfaloth to immediately pop the location. Not only will this allow you to make more progress next round, but it also protects you from ditching the location to Mirage. This can be terrible combo if you were expecting the heal, so it will be best to get it out of the way early. It will also help you during the next combat phase and perhaps at the end of the round (at stage 2 at least). Exploring the Oasis will allow the group to heal 4 damage from characters in play. This may not be a lot of healing, but it will at least save some hitpoints for other direct damage dealing effects.

Treacheries
The desert setting brings a lot of dangers with it, from mirages to overheating. Be ready to deal with these treacheries that the encounter deck throws at you, or you might not last very long in this wasteland.
- Mirage: A logical result of wandering in the desert is that you start seeing things that aren’t there. Such mirages can for instance remove a Desert Oasis location, just to reveal more sand. This treachery immediately discards the active location, which will not trigger most location attachments. Attachments like Woodmen’s Clearing and Elf-stone will need the location to be explored, which it isn’t in this case. The shifting sands will now cause all previously discarded locations to appear again, as all cards from the encounter discard pile are shuffled back into the encounter deck. The first player then discards the top card from the encounter deck until a location is discarded and makes that location the active location. The sting here is that each location has its own ability when it becomes the active location, and some you will want to avoid. Even if you get the same location you discarded this way, you have to trigger the forced effect on the location again. This can lead into higher temperatures, more damage on the board, more encounter cards or enemies revealed from the deck, or each player exhausting a character. None are pleasant to trigger, but it will be too late to cancel the treachery when the new location is revealed. If you really want to explore the active location (because of a lot of attachments on it for instance), then Mirage is worth cancelling.
- Unbearable Heat: The next treachery is pretty easy, as it repeats the effect of quest stage 2 but now during the quest phase. When revealed, the players must each deal X damage to their characters, where X is the first digit of the temperature tracker. This treachery is not a big deal in the early stages, but will be salt in your wounds during stages 2 and 3, when you are already busted up. At that point you will have to start dealing 4 or 5 damage among your characters again. There isn’t really much else about this treachery, other than mentioning again that you should be healing your characters as quickly as possible to avoid losing characters to cards like this. The really nasty part of this treachery comes in the form of its shadow effect. This grants the attacking enemy extra attack based on the first digit of the temperature meter. Combine this with a Were-worm, and it will double its attack, which is devastating in the late game. Another nasty combo is with the Sand Viper, who cannot be defended. This means you will have a big undefended attack, which can likely cause a dead hero. Many heroes have died to Hot Vipers this way, so it is best to have some shadow cancellation ready for this effect.
- Scorching Sun: Oh look, it’s a picture of me stepping outside for 5 minutes in the summer… To be fair, the art is pretty nice and perfectly captures the effect of this treachery. The effect on Scorching Sun is simple, but can have big consequences. When it is revealed, the players must increase the temperature by 4 degrees. This is an entire round’s worth of heat that just got added, potentially pushing the temperature into the next first digit of the heat tracker. While not bad enough to cancel in my opinion, it is an annoying treachery to hit in the late game, as it could cause you to lose during your final round. You might also want to consider cancelling this if it does push you into the next first digit of the temperature, saving you a round of questing. To make matters worse, the card surges into another encounter card, because of course it does. There are only 2 copies of this treachery in the encounter deck, which means that you likely won’t have a string of these treacheries surging into another (although knowing this game, this will happen at some point either way.
- Sandstorm: I believe this treachery won the title of “most thematic treachery of this cycle”. And for good reason, as Sandstorm is nasty, but understandable. Sandstorm is a Weather treachery that offers players each a choice. They must either discard all cards from their hand, or assign damage equal to the number of cards in their hand. Noldor players will love this card, as it is a rather easy treachery to deal with in the later stages of the game. For other players, I would still suggest discarding your hand, as this quest will deal damage to your characters through other means, and you really need the hitpoints to survive that. If you happen to have a Test of Will in hand, now is the time to use it though. Discarding it would be a waste, and at least you now save the rest of your cards. The shadow effect of this treachery is nasty as well, focussing more on your attachments than your hand. It is relatively easy in the early game, when not many attachments are out, but in the later stages, this shadow can either deal a lot of damage to your board, or can discard a vital expensive attachment. Dale decks will suffer the most here. As a side-note, it is custom that whenever this treachery hits, the song Sandstorm by Darude must be played, or else the treachery gains Doomed 50. It will be in the next FAQ, just a heads-up.
- Heat Exhaustion: This is a relatively innocent treachery to hit once, but can get annoying quickly thanks to the amount of damage that the encounter deck deals to your characters. This means that you won’t have many hitpoints left to take other effects such as Stage 2B’s ability. When this treachery is revealed, each player must exhaust a character and deal a damage to that character. If the players don’t have ready characters when this is revealed, the treachery whiffs. The exhaustion is pretty thematic, but can be annoying while you don’t have many characters on the table yet. This will either defend an attacker or a defender, both of which you would rather have ready. Ally Glorfindel is a good target for this treachery, and ally Boromir straight up negates this treachery’s exhaustion part, as he readies when he is dealt damage. Have a character like this ready to take on this treachery, and be sure to have healing ready to get rid of the single point of damage.

Side-quests
It is important to stick to your path in the desert. However, this quest has several tangents for you to follow to either avoid a negative effect, or to gain something beneficial at the end of the tangent. Whether it be shade, water, or an antidote to venom, this scenario will try to convince you to stray from your path while the temperature keeps rising.
- Seak Shade: This is the only surging encounter side-quest in the deck, but will be a very important one to explore quickly. Seek Shade will add a rule to the quest where progress will have to be removed from the main quest at the end of the round. The amount of progress removed has to be equal to the first digit of the heat tracker. At the start of a stage, this is not a big issue, but it becomes more of a concern in the later phases when you try to advance the stage or beat the scenario. The progress removed has been quested hard for, as it isn’t easy placing progress in this quest. Removing it is a waste, so you should really consider exploring this side-quest first when you arrive at a new stage. The stage takes 6 progress to clear, which can take up to 2 turns at least. When explored, this stage helps you to beat the heat. It lowers the temperature by 10 degrees, which will buy you some more time and will lower the threat of cards like Scorched Hamada and Were-worm. It will get added to the victory display for 10 points, making you only have to beat it once, like any other side-quest. Since this quest can buy you some time, it is very much worth exploring, especially if you can beat it in one turn.
- Find Water: While the previous cycle had water all-around you, this cycle drops you in the middle of the desert with not a drop of liquid on you (unless you pack Miruvor in your deck). This means you will have to find water somehow in order to keep going. This side-quest makes your search for water even more dire, as it now adds an additional rule to the game that will hurt your boardstate if you don’t explore the side-quest. While the Find Water side-quest is in play, players will not be able to ready any of their characters through player card effects. This includes hero abilities like Boromir and Imrahil, attachments like Armored Destrier and Unexpected Courage, and events like Grim Resolve and Lure of Moria. Each character only gets one action per round, and that’s it. This is not a terrible effect to have lingering in the staging area, as you will likely be spamming out allies during this scenario in order to have more hitpoints on the table. Should you somehow have gone for a deck that builds up heroes with attachments that include readying abilities, then I would advise going to it. In most other cases, the 6 progress tokens are better spent on the main quest. Only if you are questing during stage 3 with already 16 progress on the main stage, would I suggest going to this side-quest, just for the victory points. You also get a somewhat useful effect when this stage is explored, since each player is allowed to ready a hero when the quest is defeated. This means that you can throw a bit more willpower to the quest if you feel that you can place the final points of progress. I will suggest again to leave this side-quest for what it is, and battle on against the main quest, since the temperature will continue to climb, and finding water doesn’t help you that much.
- Craft Remedy: While this side-quest doesn’t help much against the temperature either, it is on a higher priority than Find Water. This is becuase the static effect of Craft Remedy is actually hindering your deck. The response for clearing the side-quest is also very useful, making this a more attractive quest to go up against if you really need to. While Craft Remedy is in the staging area, players must consider the textbox of each damaged character as blank, with the exception of traits. This has huge implications for your boardstate, since both heroes and allies no longer have their abilities or buffs to use. This is especially bad if you have damaged your healers, such as the Imladris Caregiver, as they can now no longer heal others. Luckily, Desert Oasis could get you out of this situation, but it won’t be long before you have to deal damage again. It also has some weird interactions with some characters, like ally Denethor no longer getting his debuff or discard ability. When it comes to cards that actually see play, Beorn and Smeagol can now have attachments and can be targetted by player card effects. All in all, you will want to get rid of this side-quest, as it will turn your characters into much blander copies of themselves. Exploring the side-quest should take about 1-2 turns in order to make 6 progress, depending on the number of players in the game. Exploring this side-quest allows all damaged characters to have their textboxes restored, and will have the added benefit of allowing each player to heal all of their characters with one point. This is doubled by Elrond, making it a possible reset in terms of damage, which will be a welcome sight. If you feel like you can survive a while without textboxes, then I would suggest not going to this side-quest, as the temperature is an ever present danger. But to be realistic, you will be better off exploring this side-quest in order to heal damage and regain your character’s abilities.

Tips and Tricks
- Bring sunscreen when going to the desert. Snakes and scorpions may seem bad, but nothing beats a sunburn.
- Location control will be important to prevent getting locked down with so many dunes and other locations. You can start with 4 locations in the staging area, so it will take a while to travel to those normally and explore them. Instead, use an Explorer’s Almanac, Northern Tracker, or other cards to manage these locations.
- Healing is very important in this quest. There may not be Archery in this quest, but the second quest stage will continue to chip away at your characters’ hitpoints if you stay there too long. Considering that the enemies in this quest also have a synergy towards damaged characters, it will be best to have at least a little bit of healing to keep everyone going. Warden of Healing, Ioreth, and Waters of Nimrodel come highly advised!
- The Long Defeat is also a healing card that will be very important to bring. You can attach it to either the first or second main quest stage, or to a side-quest in play. Exploring that quest card will allow you to heal a lot of damage from among characters in play.
- Don’t forget to raise the temperature each round. This can influence the threat in the staging area or amount of damage you should take. Keep a threat tracker in the staging area to note how high the temperature is at any given moment.
- You can try and keep some Were-worms alive so that the effect on stage 3 can’t bring them all back. Keeping the worms near death until you have the progress you need is a sure way to clear the final stage.
- Another good reason to use progress placing player cards in this scenario is the fact that the locations each have a nasty ability when they become the active location. This cannot be avoided through cancelling a Travel cost, as there is none. Instead, the abilities on these locations trigger when they become the active location. This makes you think twice about travelling, but you should definitely keep travelling in order to prevent location lock. Explorer’s Almanac is a good way to explore multiple locations per round without travelling to them.
- During stage 2, you will be dealing a lot of damage to your characters. Be sure to bring in fresh allies each turn, and have healers ready to get rid of some of the damage that has already been dealt. If you can bring out more hitpoints than damage is dealt each round, you should be fine.
- Rushing to stage 3 will allow you to reduce the amount of damage you take due to stage 2’s ability. This will also mean a lower temperature for you to worry about. However, this will imply that you don’t have many characters on the board yet, and might also have a lot of locations in the staging area. be sure to strike a good balance between stalling and advancing.
- Loyal Hound is a good card to get rid of a lot of damage on the board. The dog can take one point of damage itself from various effects, and later cancel 2 more damage dealt to a hero. This can allow you to avoid dealing damage to other characters for a while.
- You can try to include cards like Waters of Nimrodel in order to heal off all damage on the board when you need to. This can be a big save if you were just about to start discarding characters due to all the direct damage.
- Thror’s Key will be useful to blank textboxes on locations here. This will negate any ability of the locations when they become active, and it can also reduce Scorched Hamada to 0 threat. Leave Thror’s Map in the binder though, as there are no Travel costs here.
Playthroughs
- True solo, Seastan deck, winning in the first planning phase (because of course he does…): https://www.youtube.com/watch?v=MvFPxC0NHV8
- 2 handed, progression style: https://www.youtube.com/watch?v=QK2JJ7F1euM
- 2 players, modern decks: https://www.youtube.com/watch?v=1GlsO9hx3QU
- True solo, modern deck: https://www.youtube.com/watch?v=r2AGAmbu6as
And so ends your long trek through the desert. I personally find this quest really enjoyable and am looking forward to the Nightmare version of this quest, which will probably increase the temperature ramp and damage output even further. I will now go back to the Escape from Umbar quest, and explore that scenario to find out why you had to run through the desert in the first place.

9 thoughts on “Desert Crossing”