Into Ithilien has always been a roadblock for players. For those that are playing progression mode, this was the next biggest challenge after Escape from Dol Guldur. The scenario introduced a bunch of new mechanics, a split path to tread down, and the infamous Mumak enemies that would come back here and there during the cycle. I still do not understand how this quest has a difficulty rating of 4, as I find Cair Andros to be easier than this one. But we are not here to discuss the regular Into Ithilien. That was done already a few years ago. No, we are talking about the Nightmare version today, and that brings even more pain to the table. New Mumaks, more Archery, and a constant swap between Siege and Battle questing. Hang on tight because this is going to be quite the journey!
Nightmare Into Ithilien
- Found in: Heirs of Numenor Nightmare pack, scenario 2
- Size: 19 encounter cards, 1 rules overview
- Quest cards: 4, though you only go through 3 of these. This is unchanged from the original.
- Increase in Difficulty?: The quest was already pretty tough to defeat, so the increase in difficulty associated with Nightmare mode isn’t as big in this quest as with others. Still, more Archery and bigger Mumaks make for a tough game if you attempt this quest.
- Fixed Loopholes?: Players are no longer allowed to let Celador die right away and move onto Siege questing without punishment. This was a common strategy to build for but now comes with the punishment of an extra Mumak Elite entering the staging area.
- New mechanics introduced: The ability to switch between Siege and Battle questing. There is an additional punishment for going to stage 2, and Archery will be nastier with the right locations in play. Other than that, nothing new stands out from this quest. Most of the tricks are just enhanced versions of the original.
- Play this scenario if: You have a deck that does well in Siege and Battle quests; you want to take on massive enemies that take a while to kill. You enjoyed Into Ithilien for its mechanics but want to upgrade its difficulty a little.
- Solo or multiplayer?: There’s an argument to be made for both. In solo, you do not run the risk of losing Celador as much, as fewer characters will leave play. However, you also have to take any Archery by yourself, which can be too much to handle for a single player, especially in the early game when you do not have much healing in play yet. I would suggest 2 players for this quest, though you are welcome to experiment with any number and see what works best for you.
- What to look out for: Potentially 2 copies of Mumak Elite in play, which take at least 4 turns to kill and will wreck the board with archery damage. Archery in itself will be boosted to new heights, increasing direct damage to your characters. Battle and Siege questing alternate, which makes making progress inconsistent and the combat phase brutal. Location lock can become an issue with forced destinations and buffs to Forest locations.
New Rules

Before the players begin the game, the new rules card adds a bit of setup to the game. This will be covered in the next section but boils down to the players removing the two Mumak Elite enemies from the encounter deck. The Forced effect on this rules card will put them back into play over the course of the game. The unavoidable Mumak Elite comes into play during stage 4A when it is added to the staging area. Players cannot get around this enemy since you need to complete stage 4B in order to win the game. This is the stage where the paths that split earlier in the quest converge again.
The avoidable Mumak Elite only comes into play during stage 2A, when the players advance to if they killed Celador during stage 1. This is the worst route already, being a Siege quest and having more Archery from the quest card. However, players used to build for this quest stage and would kill Celador on purpose to advance to this quest. Then they would blitz through stage 2 and win the quest soon after. That’s not so easy anymore, as the Mumak Elite will be added to the staging area, adding its 5 threat and an additional point of Archery for each player in the game. Should the players still try to blitz through this stage, then they arrive at stage 4A, where the unavoidable Mumak Elite is added as well. With 10 threat between the two enemies and constant harassment from the Archery keyword, players will likely lose if they move too fast.
Other than this change in the rules, the rest of the scenario plays out as normal.
New Setup
The new setup for this version of the quest is not that much different from the original one. Players still add Celador to the staging area, where he will be questing alongside the players until stage 2 or 3. Players also make Ithilien Road the active location, and each search for one copy of Southron Company to add to the staging area. The one thing that is different here is that the two copies of Mumak Elite are removed from the initial encounter deck. They are set aside out of play and are only shuffled in via the Forced effect on the rules card. This ensures that you are not revealing these enemies during the game and do not yet have to encounter them on stages 1 and 3.
Cards Removed
The following cards were removed from the base version of the quest in order to make room for the Nightmare cards. Only 13 cards were removed and 17 added to the encounter deck, so it will be a bit thicker than usual.
- 1x Blocking Wargs (4 copies of this horrible treachery was a bit much)
- 2x Watcher in the Wood (Threat is no longer a focus for the quest)
- 3x Secluded Glade (Basic location)
- 3x Forest Bat (Easy enemy to kill with Thalin)
- 3x Southron Mercenaries (Basic Harad enemy replaced by the Haradrim Marksmen)
- 1x Overgrown Trail (Easier location now that you get some Ranger objectives to make progress with)
The Quest

The base scenario remains mostly unchanged from the original scenario, so most of the same tips I gave there will apply to the Nightmare version. Your goal is to advance quickly through stage 1, hopefully getting to stage 3 and building up your board state there. Once you are strong enough, advance to stage 4 and rush to the end before the Mumak Elite gets problematic.
Of course, this is easier said than done, and the constant change between Siege, Battle, and regular questing can throw you for a loop when making progress. You will need a lot of initial attack on your heroes and allies to make the 15 progress on stage 1 before Celador dies. Vassal of the Windlord is a solid ally for this, so it is definitely worth getting Eagles into play early on. Winged Guardian and Defender of Rammas are some cheap allies to help with Siege questing, and I would suggest sending one to the quest in case you run into the Savage Fray treachery. At least you will then still make some progress. High-cost allies with balanced stats in all three departments are ideal, of course, but it will be difficult to get those allies into play early on. You could attempt a Dale deck against this quest so that you can increase stats quickly with cheap attachments.
Your goal on turn 1 will always be to clear the Ithilien Road from the active location slot. You could attempt to swap the location with something else through The Hidden Way, but with 4 threat, the Ithilien Road is just too difficult to keep in the staging area this early on. It is better to ensure making 4+ progress on turn 1 to clear it so that none of the enemies in the staging area have to come down right away (unless your threat is too high).
Once the players have gotten a foothold on the quest, it is time to move quickly to make sure that Celador survives. You can still plan to kill him off and advance to stage 2 instead of 3, but with an added Mumak Elite and a ton of Archery waiting on you there, I really advise against that path. Still, you might not have a choice, so if you find yourself at stage 2, make sure you escape from it quickly. The added 2 points of Archery per player at the stage can be deadly if a copy of Ithilien Overlook is in play. You will want to reduce the Archery total in the game to as low as possible so that you do not start to lose characters to the direct damage each round. This is especially crucial when you consider that Obsidian Arrows will force you to take another round of Archery damage on the same turn.
If you manage to keep Celador alive during stage 1, you are free to move on to stage 3, skipping the horrible stage 2 and halving the number of Mumak Elites you’ll see in your playthrough. Stage 3 isn’t terrible, though you do have to be careful not to get stuck with too many enemies in the staging area. They are not making engagement checks, and you cannot optionally engage them either. That means that the enemies will remain in the staging area while you try and muster enough willpower to make the 12 progress required. You can help yourself by attacking enemies while they are in the staging area. Haldir and Dunhére are good heroes for this stage. Other effects like Charge into Battle, Hands Upon the Bow, and Hail of Stones can also be used to deal damage to enemies in the staging area, making the transition to stage 4 a lot easier. Also, note that you can still force enemies to engage you with cards like Wait no Longer, ally Mablung, Son of Arnor, and Lore ally Faramir. That way, you can still kill enemies and reduce the threat in the staging area. You are likely low on willpower going into this stage, so removing threat will ensure you keep questing successfully. This also keeps Celador alive, who is a useful all-around ally at this point.

Stage 4 is where the pressure reaches a boiling point, and you have to move quickly in order to win the game. You get (another) Mumak Elite in the staging area, which will hinder your progress with its 5 threat. You can use cards like Radagast’s Cunning here to reduce that threat for a turn, which can help a lot in making more progress that turn. If any player has a threat above 37, the quest will turn into a Siege quest, where defense now becomes the way to make progress. It should not be difficult to complete the quest if you planned for this, especially when you came from stage 2 where you were already Siege questing. However, if you want to continue questing with willpower, bring some threat reduction to ensure you can complete the quest before anyone hits 37 threat. This is made more difficult because of the +2 threat that each player has to take at the end of each round. This stacks with the regular +1 threat at the end of the round, so players are on a timer during this stage. The Mumak Elite should not really be a focus at this point unless you have brought something that can delete it quickly. Otherwise, just tank the damage from it, and quest hard to make the 15 progress to win the quest. You do not need to kill the Mumak Elite in order to win, which is a big relief.
The Encounter deck

- The encounter deck in Nightmare mode is made up of 38 cards. This is 4 more than the regular version.
- Shadow chances aren’t anything special. 53% of the cards have a shadow effect. These interact with Harad enemies or deal damage to the player in some way.
- Average threat on cards revealed is 1.7. This is relatively high, thanks to the large portion of cards having 3 or 4 threat. Note that this value will increase during a Siege/Battle quest.
- 5 cards will surge at all times. The two copies of Savage Fray will add to this if the current quest does not have a keyword.
- Doomed is a more rare keyword, only appearing on 4 treacheries. Southron Support will raise threat by 3, while Savage Fray will increase it by 2. Note that stage 4B will also raise your threat at the end of each round.
- Archery is the main keyword in this scenario. Aside from the Archery on stage 2B and the 2 copies of Mumak Elite, 10 cards in the encounter deck will have Archery or will give it to other cards. This varies a lot since the Haradrim Captain can also give Archery to other Harad enemies, and the Marksman only has Archery 2 if the stage has the Battle keyword.
- Immunity
- Both Mûmak Elite and the regular Mûmak cannot have attachments and cannot take more than 3 damage per round.
- Allies cannot be declared as defenders against Haradrim Marksman if the current quest has Siege
The following statistics removed 1 copy of Southron Company and Ithilien Road from the deck since those will start in play anyways. In higher player counts, more copies of the Southron Company will be removed from the deck at setup as well. Both copies of Mumak Elite are also removed from the deck, as well as Celador. Dense Thickets were counted as having 2 threat since they buff themselves. The rest of the stats are taken as if the quest has no keyword, else, the Southron Company and Haradrim Marksman will have increased threat, and the Archery value can also change significantly. The Ithilien Guardian objective allies counted as -2 threat, as they will immediately be committed to the quest when they are revealed.
Enemies
Not surprising, the new enemies in this Nightmare version are all Harad enemies. This makes them eligible to be drawn from the deck by Southron Support. They also interact a lot with the keywords in this quest, so be careful of sudden buffs.
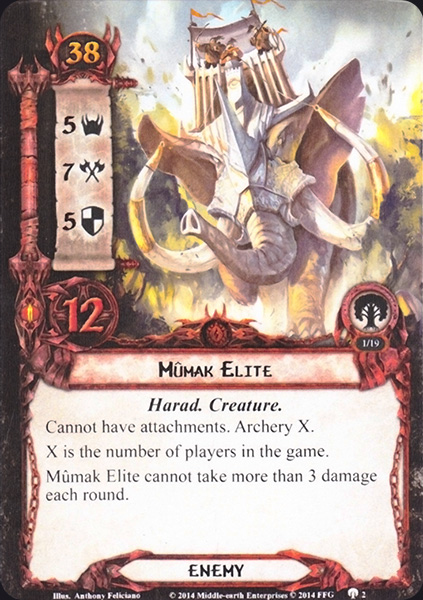
- Mûmak Elite: This new and improved Mûmak enemy is the focus of the quest. It does not start in the encounter deck but only enters play when the players advance to stages 2A and 4A. Because you want to avoid getting these enemies in play, it is advised to avoid stage 2A as much as possible in order to avoid engaging this enemy. The Mumak Elite at stage 4A cannot be avoided, but players will have to move fast in order to beat the game before this enemy becomes a problem. And a problem it will become, as it has 5 threat but only an engagement cost of 38. That means that during the final stage of the game, you will likely raise your threat beyond the engagement cost of this elephant. Engaging this enemy sooner is possible, but you will need a plan in order to defend this enemy for at least 4 rounds. With 7 attack, that will be difficult, especially if you hit a shadow effect that boosts the attack on the Mumak or if it makes an additional attack. Luckily, the Mumak is not immune to player card effects, so you can cancel the attacks it makes with events like Feint. The Mumak is immune to attachments, though, so traps will not work here. Attacking the Mumak back will take a long time, as it can only take 3 damage per round from any effect. Despite this, you still have to dedicate a lot of attack power to this enemy to get it to die, thanks to its 5 defence. With 12 HP, it will take a minimum of 4 rounds to kill this enemy, though I hope you have cleared the final stage before that time comes. The Mumak will also continue to pester you with Archery damage equal to the number of players in the game.
With some more recent expansions, the game has provided the players with a few tools against this enemy that will allow you to discard it without having to waste 4 rounds defending this enemy. You could, for instance, use Revealed in Wrath to blank the textbox, allowing you to deal more than 3 damage per round. While it is unlikely you can one-shot this enemy; you can save some turns before you would kill it. You can also start to chip away at the hitpoints while the Mumak Elite is in the staging area. Rohan attacking into the staging area or effects like Hands Upon the Bow + Black Arrow can do some serious damage before you even engage the Mumak Elite. Alternatively, you can use The Great Hunt or Hunting Party to discard the Mumak Elite from the staging area. That way, you do not have to worry about it anymore. Be careful with when you discard this enemy, though, as you can end up reshuffling it into the encounter deck if it runs out. I’m still surprised that this enemy does not have a single Victory Point. - Haradrim Captain: The next enemy is surprisingly tough and will act as a support-style enemy to all Harad enemies in play. While the Haradrim Captain is in play, all Harad enemies get +1 defence (including Mumaks), and all Harad enemies in the staging area also get +1 Archery. This keyword stacks, so if an enemy already has Archery 2, it now becomes Archery 3. Aside from these global buffs, the Haradrim Captain will add 4 threat to the total in the staging area, and with an engagement cost of 44, it will stay up there for a while. This is bad because that +1 defence and Archery to all Harad enemies makes them even harder to kill. If there are no Mumaks in play, this enemy will be a priority target for any effect that can quickly dispatch an enemy from the staging area. You can also engage this enemy optionally, though the passive buffs will remain active until the Captain is defeated. Playing Revealed in Wrath can blank his textbox for a phase, though you cannot play the event before Archery is dealt. With 4 attack, 3 defence, and 6 hitpoints, the Captain will be a difficult enemy to defeat. The 4 attack is also just the base value, get a nasty shadow effect (like another Captain), and you will be facing a 7 attack! Fortunately, there is no limit to the amount of damage the Captain can take, so you will just have to find a way to attack for 10 (remember that the Captain buffs his own defence) to defeat him. I would suggest doing this during a Siege or regular quest, as you otherwise likely do not have the attack strength to kill him quickly.
- Haradrim Marksman: The final new enemy is a standard Nightmare enemy with high stats and annoying effects. The Haradrim Marksman has base stats of 2/2/2/5 with an engagement cost of 36. You will find yourself engaging this enemy rather soon, though, as he becomes a lot worse when the current quest has a keyword. If the current quest has Battle (stage 1), then the Marksman gets +2 threat and Archery 2. You are not meant to yet be engaged with this enemy, so the developers make him a bigger threat while he is in the staging area. 4 threat and added Archery really sucks, so engaging him at this point might be a good idea. He doesn’t hit hard at all but will take a while to defeat since you are also sending attack strength to quest with.
If the current quest has Siege (stage 2 or stage 4 with a threat higher than 37), then the Haradrim Marksman gets +2 attack instead. And to make sure that you cannot chump this increased attack, allies are not able to be declared as defenders against the Marksman. This is bad news and means that you will require a hero defender who is able to defend this attack. Note that there could be more than 1 Marksman engaged with you and that there are shadow effects that make them attack again. So have some readying ability on your heroes to defend multiple times. This enemy is a lot easier to deal with during stage 3 or stage 4, with a threat under 37. That way, neither part of his textbox is active. If this is the case, then I can see players pulling this enemy for Southron Support if there are no other Southron Companies to take. This is a nasty enemy, but out of the three new enemies introduced, he is for sure the weakest one. Just time your engagements properly with him.

Locations
Ithilien isn’t the nice green forest it used to be. Now it is full of Archery and threat-raising abilities. There’s also a nasty location that forces you out of the forest and into the open, delaying progress elsewhere.

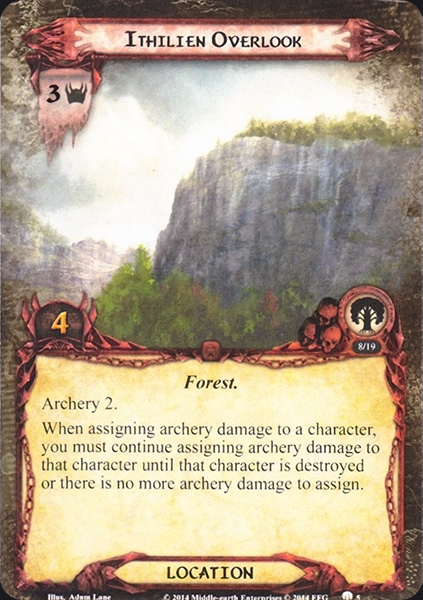
- Ithilien Overlook: We begin with probably the worst of the new locations in the encounter deck. The Ithilien Overlook doesn’t stand out with its 3 threat and 4 quest points, but it starts to get more problematic when you look at the text box. First of all, this location adds 2 Archery to the total. Archery on locations is difficult to get rid of since you will need to dedicate a lot of effort into clearing a location like this if you do not want to wait until you can make it the active location and can clear it the turn after that. And 4 quest points is just enough to survive most progress placing cards for a while. But the Archery isn’t the worst thing on this card, though it does make the next part hurt all the more. While any Ithilien Overlook is in play, Archery damage must be assigned to a single character until that character is destroyed or all Archery damage is dealt out. No longer can players rely on spreading the damage to keep all characters alive; you either start dealing a ton of damage to a single character, or you start killing off allies in order to reduce the total Archery in play. If a character is destroyed because of taking too much damage, but there is still Archery to be dealt out, the players must find a new target and continue to damage it until it is destroyed or all Archery is dealt. 9 times out of 10, allies are going to die because of this, especially once the players advance to stage 2 or have a lot more encounter cards in play. Cards like Obsidian Arrows and Haradrim Captain can greatly increase the amount of damage that needs to be dealt out. Because of this, you must do what you can to get rid of this location as soon as possible. Thror’s Key can blank one copy of the Overlook, Eryn Galen Settler can discard a copy in the staging area if you just cleared another as the active location, and Evening Star can make enough progress to clear the location once one copy is in the discard pile. This is one of the most dangerous cards in the game unless you are keeping a very tight ship and can remove as many Archery cards from the game before the start of the combat phase.
- Cormallen Fields: Be advised this is not a Forest location, so the Dense Thickets do not increase the threat of this location. Instead, the Cormallen Fields can do that themselves when the current quest has the Battle keyword. If that is the case, then the Cormallen Fields go from 3 threat to 5 threat. Players can avoid this at the start of the game by using side-quests without the Battle or Siege keyword as their main quest. This keeps the Fields at a low enough threat so that players can make some progress. But with any 5 threat location, the same advice goes: travel there when you have the option, and no other location is a problem at that point in time. Should the main quest have the Siege keyword (stage 2 and 4 come to mind), then the players have no choice but to travel to this location when they are faced with the option to travel. This prevents the players from not travelling this round if they want to just make as much progress on the main quest as possible. For stage 4 especially, this is a common strategy. The Cormallen Fields will force itself to become the active location, putting a 5 progress barrier between the players and placing progress on the main quest. That is a lot, but it could be worse, so bringing enough defence to the quest can quickly clear this location. Without uniqueness or immunity to anything, the players can also use any tricks that they may have on this location, potentially clearing it in the staging area as well. It is the least troublesome location in the new Nightmare deck, but it can still be annoying at times.
- Dense Thickets: This is a relatively mild location to reveal for a nightmare quest, especially in solo. But in the long term, this one location might cost you a lot of progress, so perhaps don’t discount it at first sight. At 1 threat and 8 quest points, this location is not meant to be your active location at any point in time. There is just too much progress required to clear the location, all for removing just 1 threat out of the staging area. Well, maybe that’s not entirely true. The ability on the Dense Thickets is short, simple, and deadly. Each Forest location in play gets +1 threat. With most (but not all) locations having this trait, you can quickly get a lot more threat in the staging area, especially in higher player counts. This can lead to location lock, which is an unexpected way to lose to this quest. But with 3 copies of this location and the effects stacking on all Forest locations (including themselves), this is a real threat you will have to address; otherwise, you will soon find yourself unable to make progress anymore. There are several tools against this location that can work. The first is Woodmen’s Path. This reduces the quest points on the location to 1 when it becomes active. This makes it a lot easier to clear the location without hindering you too much. You can also use Thror’s Key to blank a copy of this location, allowing you to ignore it until the end of the game. Note that the trait remains on the location, so the two other copies will still boost the Dense Thickets with the Key. The final solution is to try and clear the location in the staging area. This should be done with effects like Northern Tracker, which constantly places progress on the Thickets, chipping away at the 8 quest points. Your more targetted progress placing effects like Asfaloth are better used against other locations, which will have fewer quest points and more difficult effects. Only when you can clear the Thickets in one use of such a targetted progress-placing card should you use it.
The shadow effect on this card should also be mentioned, as it will divert any excess damage dealt to the defender to a Ranger objective in play. This either damages the Ithilien Guardian or Celador. Players may decide for themselves, but I would advise keeping Celador alive as long as possible. This shadow was meant to kill Celador early by the players chumping an attack. This can cause the quest to change dramatically. Later on in the game, this shadow effect is a lot weaker.

Treacheries
Only 2 new treacheries in the deck, but they join the wonderful Blocking Wargs and Southron Support in the encounter deck. Be ready with cancelation, because you are going to need it!
- Savage Fray: This puts you a few points closer to the engagement cost of the Mumak Elite as well as the 37 threat threshold on stage 4 that turns a regular quest into a Siege quest. The real pain comes when you look at the When Revealed effect on this card. If the players are at a stage with a keyword on it (Siege or Battle), then the keyword is swapped from Siege to Battle and vice versa. This can seriously impact the amount of progress you are going to make that turn, and if you are unlucky enough to quest unsuccessfully, remember to damage Celador. Celador himself does not care too much whether the quest has Siege or Battle, but if you are questing with characters who have high stats in either defence or attack, but not the other stat, then you are likely to make far less progress than you anticipated. Also, note that this effect lasts until the end of the round, which changes the effects on Cormallen Fields and Haradrim Marksman. Cancellation is the safest way to avoid questing less than you thought, but you can also use scrying effects like Far-sighted to see this treachery coming. If you do, then you can just prepare to quest for the opposite keyword before you start revealing cards. If the current quest does not have a keyword, then the treachery just surges; you do still get Doomed 2, though.
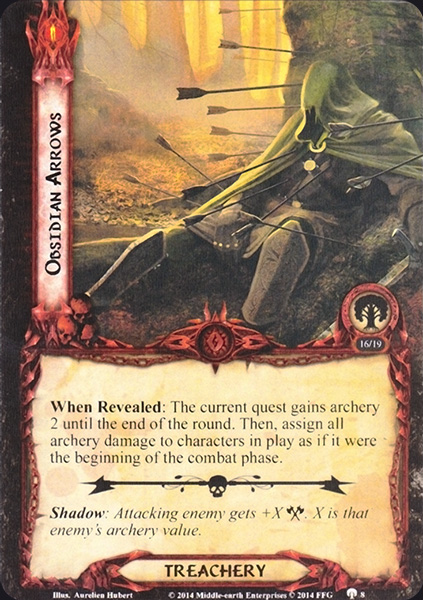
(Also, if you are really lucky, you get both copies back-to-back, which reverses the change back to the original keyword!). - Obsidian Arrows: Players who recently picked up the Dark of Mirkwood expansion may recognise the artwork on this card. Unfortunately, the effect is not the same as the treachery in Dark of Mirkwood since this is still a Nightmare treachery. Instead, the current quest gains Archery 2 until the end of the round. On top of that, the treachery now triggers the Archery keyword as if it was the beginning of the combat phase. That means you will be triggering Archery twice this round, as this effect does not replace the Archery from the combat phase. Time this treachery poorly, and you will be stuck with a lot of direct damage on your characters. Even if you have no other cards on the table with Archery on them, this treachery still does 4 damage on characters in play during this round. Because of this treachery, I would suggest damage cancellation and some strong allies to put the damage on. If Ithilien Overlook is in play, you may have a terrible time, losing a lot of allies, so cancellation is advised for this treachery if you get the option. You avoid a lot of damage that way.

Tips and Tricks
- Keep Celador alive! That way, you advance to stage 3 and avoid having to take on the additional Mumak Elite at stage 2. This will help you build for the quest a little better, and you can hopefully race past the Mumaks on stage 4.
- Mumaks are tough and cannot have attachments. However, you can use effects like The Great Hunt in a mono-Lore deck to discard these big enemies if they remain in the staging area during the combat phase. This removes a massive obstacle in the quest, allowing you to focus on other enemies instead. Hunting Party is a good alternative, though you cannot be sure what you get instead of the enemy you discarded.
- Be careful with what decks you bring to this quest. Since Celador takes damage when characters leave play, Silvan and Rohan decks are not really suitable for the early game. Even using Gandalf or chumping can be done so many times before you are forced to go to stage 2. Only use this if you have no other choice but build around strong characters that stay in play for a while.
- Side-quests actually work well in this scenario, as you can go to a quest card that does not have Siege or Battle on it for a turn. This helps to get around some effects like the threat on Cormallen Fields and Savage Fray. But note that after the quest phase, the game will resume to taking the main quest as the active quest, meaning that any effect looking for Siege or Battle keywords on the active quest will look at the regular quest card, not the side-quest, even if you didn’t clear it this turn. Still, this can allow you to get some boosts for the players early on.
- Bring threat reduction to stay under 37 threat during the game. Not only can you avoid engaging the Mumak Elites like this, but you also prevent stage 4 from gaining the Siege keyword. It is in your best interest not to have the main quest gain a keyword because of the nasty boosts that the enemies will receive.
- Note that while Blocking Wargs can deal damage to characters, it only deals damage to those committed to the quest. That means you are safe to heal damage or use Henamarth Riversong before the staging step. Characters that do not exhaust to quest do still take damage from this treachery though.
- You need to hit the ground running during stage 1 not to get stalled too long at that stage, potentially losing Celador. Use cheap allies with a high attack like Vassal of the Windlord or the Knights of the Swan to quickly make some progress on the stage. Your priority will be to clear the active location on turn 1, otherwise you are in for a rough time.
- Since none of the enemies in the game have a victory score, it might be an idea to use Victory Display shenanigans to get these cards in there. Mumaks or the Haradrim Captain are solid targets for None Return as well. And if you happen to defeat the Mumak Elite at stage 2 and put it in the victory display, you can use the Woodland Sentry to discard the other copy when you arrive at stage 4.
- Effects that can prevent an enemy from engaging you for a round are super useful in this quest. Fresh Tracks, Advance Warning, and Grey Cloak are examples of this. You can use these effects to avoid engaging the Morgul Spider and any Mumak for a turn. That way, you could attack the enemies in the staging area or wait long enough for Morgul Spider’s When Revealed to go to waste.
- Healing is important in this quest, so make sure you bring some. Without Ithilien Overlook in play, you can spread the Archery damage and then use Warden of Healing, for example, to heal the damage off of your characters. Once you reach stage 3, you can also start healing Celador and any other Ranger objective allies. This provides you with some extra action advantage for the second half of the game.
Playthroughs
There are many playthroughs of this scenario to be found online since many players see this quest as a true challenge for their deck. I have added a few different strategies into this selection of videos, so I hope you learn something by watching them.
- True solo: https://www.youtube.com/watch?v=VFXwGz9Fz5Q
- True solo, traps: https://www.youtube.com/watch?v=I35rcEDKKsQ
- Two player, back-to-back normal+Nightmare: https://www.youtube.com/watch?v=LiHDXpoXDL4
- Two player: https://www.youtube.com/watch?v=_yexLBKvWjs
- Two handed, progression style: https://www.youtube.com/watch?v=Kw5ehMrnL4w
- Two handed, Seastan breaking the quest: https://www.youtube.com/watch?v=T3uq0JnEXBk
Well, that was a tough article to write, and I don’t think that the Siege of Cair Andros will have gotten much easier in Nightmare mode either. Still, that’s next on the list, so I will try and find a good strategy against that quest. It is another common roadblock for progression players, and I think the Nightmare version patches some holes in the strategies to clear locations in the staging area. After that quest has been done, we are 1/3 of the way through the cycle though, on pace to complete it at the end of the year!
