And now for something completely different:
That must have been the tagline for this project, as the GenCon and Fellowship kits for 2018 and 2019 stray the most from the original format of the game out of all scenarios out there. It is for that reason that I have waited so long to cover these four quests. It is the closest that the game has come to a competitive mode, inviting players to not only bring their strongest player deck but also try and build a scenario themselves with encounter cards and quest cards. These different mechanics make it difficult for me to do a proper analysis of the quest, but after having played these a few more times these past months, I figured that now was the time to analyze all four quests and their massive encounter decks. There will be a few changes from the standard format, but I will use this article to go over the different synergies you can include before I cover the quest cards you can choose between.
I also will not be covering all encounter cards in this review. There are 70 encounter cards in the pack, and the article would end up being too long if I covered all the different cards. Many of them serve their synergy, so I couldn’t tell a lot about each one. You might also not see each card during your games, so I would rather save myself the effort and time that could be better spent writing on the other custom scenario kits as well. I will mention some encounter cards by name in the article and will try to add images of the worst cards in the deck if they fit the text. I also urge everyone to read the rules sheets now that come with these scenarios to understand how you build your own encounter deck.
The Woodland Realm
- Found in: The Woodland Realm Custom Scenario Kit (Fellowship 2018)
- Compatible with: The Wizard’s Quest
- Encounter decks: 70 cards divided in 14 packs of 5 cards for quick custom encounter deck building
- Quest cards: 7, with a mandatory 3 stages per scenario.
Please take your time now to read the rules that came with the scenario to understand why you are only going to be using 3 of the quest cards and 35 of the encounter cards.
Synergies
When building the encounter deck for this quest, there are two options. You can either pick seven of the fourteen (28 with Wizard’s Quest) encounter sets and have that be your deck. This is a fast way to bring a deck to the table. Separating the encounter sets by number and putting them facedown will allow you to select 7 at random so that you have the option of making a completely different encounter deck going into the quest. This method is nice and easy, plus you’ll be sure to have a deck that meets the requirements set by the rules of having no more than 21 cost worth of encounter cards in the deck and having at least 10 of each card type. If you are cherry-picking the encounter sets, here’s what you need to know about each of them in a nutshell:

- Spider synergy, 3 cost enemy, variance on quest stage (damage)
- Orc synergy, 3 cost enemy, variance of quest stage (threat)
- Exhaustion synergy, 3 cost location
- Spider synergy
- Orc synergy
- Location lock synergy, punishment for lack of shadow effects
- Spider synergy, location lock synergy
- Threat increases, enemy protection, enemy attacks
- Variance on quest stage (threat/defence, treachery), location lock synergy
- Enemy swarm, location lock protection
- Punishment for lack of shadow effects, threat increases
- Punishment for lack of shadow effects, threat increases
- Threat increases, character discard effects
- Orc synergy, location lock synergy, threat increases
Having broken down what set has what synergy, you can combine some matching ones to focus on a particular way for players to lose. Include several sets with the threat increases synergy, and you can attempt to threat out the other players. Combine this with the quest card To the Elvenking’s Hall, which requires progress equal to the highest threat among players, and you can make for a pretty brutal combo. Some of these synergies might require some additional explanation, which I will provide here:
Spider synergy

The Spiders of Mirkwood will be one of the three sorts of enemies you can go for in your custom encounter deck. They appear in sets 1, 4, 7, and 13 but can benefit from having other enemies included as well. The spiders focus a lot on exhausting the opponent’s characters and punishing them for having characters exhausted. Cards like Ungoliant’s Spawn and Enchanted Stream can keep characters exhausted so that your opponents will struggle for action advantage. You can then exploit this lack of action advantage to force opponents to make undefended attacks, withhold Mendor from questing (hindering progress), and not to quest as hard as the opponents otherwise could. This is a very popular synergy to go for since you can combine it with others (like location lock) to make the quest phase pretty brutal.
Counters: While there are ways to prevent characters from readying by player card effects, those cards do tend to be more expensive. So you won’t be able to pick them and have to rely on the luck of the draw to get them going. Opponents could be bringing global readying effects like Lure of Moria to ready their army, after which your spiders might not be able to do as much. Still, you can set up some good combos here to trap players into having exhausted characters and then combine that with treacheries to discard characters. There isn’t really a specific archetype in the game that counters this, but players with enough readying effects won’t have a problem with these enemies.
Orc synergy

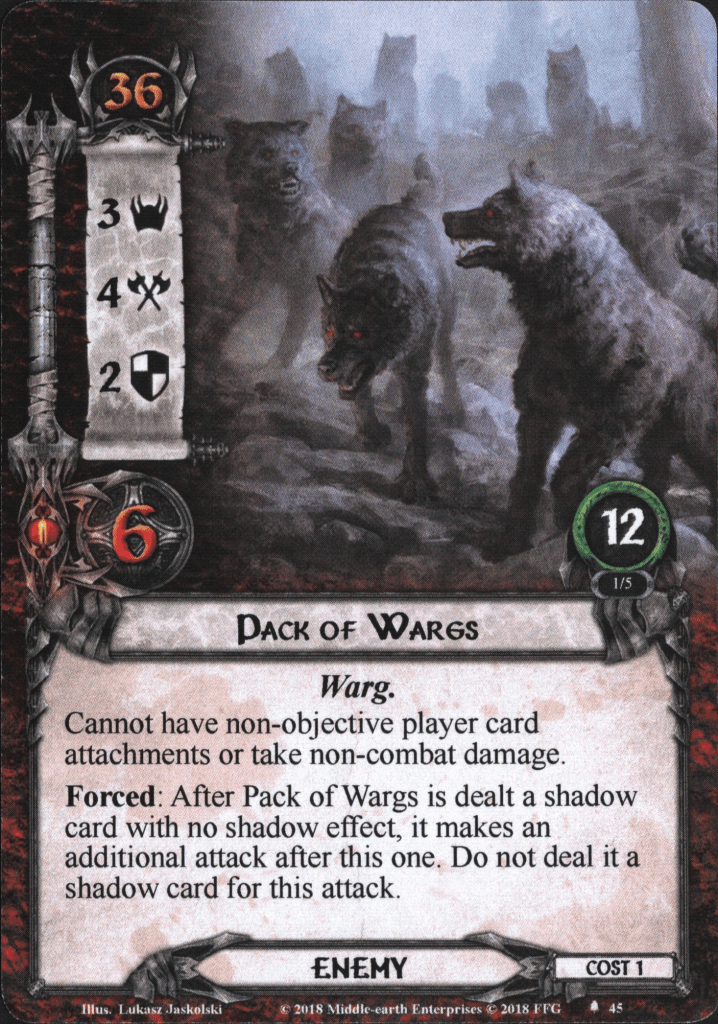
Orcs are the second enemy faction you can choose when building your deck. These are included in sets 2, 5, 8, and 14. Orcs tend to swarm the players by searching the deck for more Orcs or milling the deck for more enemies. This, combined with their relatively low engagement cost, can pose problems in the combat phase, with a lot of enemies engaged all at once. Furthermore, there are several cards in the deck that boost the Orc synergy, like The Goblin’s Caves, which increase the attack of all Orc enemies. Orcs will also benefit from other encounter cards that surge or reveal more encounter cards during a round. The more enemies you have in play, the easier it is for your opponents to be overwhelmed. With so much combat, it can be pretty tempting to combine this with punishing a lack of shadow effects, giving an additional boost to the
Counters: This synergy does well to overwhelm players who are geared more towards questing hard. By spamming out enemies, you prevent one player from taking all enemies in order to save the other player. But the Orcs are vulnerable to direct damage and optional engagements. Dunedain decks are especially capable of dealing with so many smaller enemies at once that the synergy might fall apart.
Punishment for lack of shadow effects
I label Creatures as the third enemy synergy you can go for, as they do actually synergize well in this set. They all focus on punishing your opponents if their shadow card does not have a shadow effect. While this would otherwise be deemed a good thing, it can now trigger additional attacks and enemies returning to the staging area. This synergy is found in packs 6, 11, and 12. It does not include as many cards as other synergies and can thus be added to pad out your encounter deck a little bit more if you are not reaching the 10 required enemies in your deck. If you include this synergy in your encounter deck, you may have to look at the ratio of shadow effects on the cards you included. Try to go for cards that do not have a shadow effect so that you optimize your chances of getting the bonus on your enemies.
Counters: Cards that discard shadow cards, or can cancel enemy attacks, will prevent additional attacks from occurring. These cards are pretty common and can make the Creatures lose a bit of their sting. Then again, not every deck runs these cards, and players will have to save resources until late in the round to use these effects, potentially causing them to lose those resources and be helpless against the extra attacks or returns to staging area.
Location lock synergy

With the enemy synergies out of the way, you can also look at locations to make life difficult for your opponents. Such locations can be found in sets 6, 7, 9, 10, and 14. Various locations in the encounter sets raise their own threat, setting up for a location lock if your opponents end up revealing a ton of them. This works best in a 2v2 game, where your opponents might end up revealing more locations than they can explore in a single turn. Add to this limitations on the amount of progress they can make on locations in the staging area, and your opponents will have a hard time getting through the quest stage. Your goal is to prevent them from clearing the active location and having them fail the quest, thus raising their threat. If your opponents aren’t doing so well with (early) willpower, then these locations can really give them a run for their money. This can be especially costly during stage 2, where there is a cap on how much progress can be placed on the quest at once. If the players fail to make that much progress, they will be stuck at the stage for another turn, potentially giving you another turn to beat their scenario in.
Counters: Location control will break this synergy with ease if left unchecked. You can really feel the frustration that the developers must have had when they realized that Asfaloth and Northern Tracker could nullify many locations. Still, the synergy does come with some protection against this, though you are dependent on getting a lot of locations at once for the lock to really set in. If your opponents get a lot of willpower on the table early, they might simply quest over the threat of all locations.
Variance on quest stage

Several cards in the encounter deck get worse as the quest progresses. These often have a variable threat, quest points, or effect that scales with the quest number of the stage the opponents are at. This may seem harmless at first, but increasing your threat by 3 at the final stage can really push you to the threat elimination level! This synergy sneaks up on the players, being a lot meaner by the end of the game. That does come with a bit of luck, as players might be able to avoid these cards in the late game.
Counters: There aren’t really many things you can do to counter this synergy, as most of it is persistent during the game. But if you are able to face these cards early and can somehow get them in the Victory Display, you won’t have to deal with them at stage 3, when their effects would be worst. You can also use player card effects to blank some effects, but that is more of a temporary solution.
Remember that these sets can be mixed and matched with the cards from the Wizard’s Quest encounter sets. This can make for an encounter deck that is more focused on a particular synergy. You can also play around with the five encounter cards that are free to choose a card type for your encounter deck. Skewing the card type ratio in one way can help to get your combos going more easily. If you are building a deck for location lock, then adding 5 more locations in the deck will help a lot!
Quest cards
There are 7 quest cards in total for this quest, but you pick just three to add to your own encounter deck. This gives you free rein over which stages 2B and 3B you take. The beginning of the quest will always be the same, but you can mix and match the middle and end stages for your custom quest. These target different aspects of the game. You can make sure the quest cards double down on combat or locations, but you can also try to focus on combat on stage 2, to then pull the rug from underneath the opponents at stage 3 when they suddenly have to quest past a wall of locations. Take your time to decide which quest stages will work best against your components in conjunction with your custom encounter deck.
Quest card 1: Captured by Spiders – 10 quest points

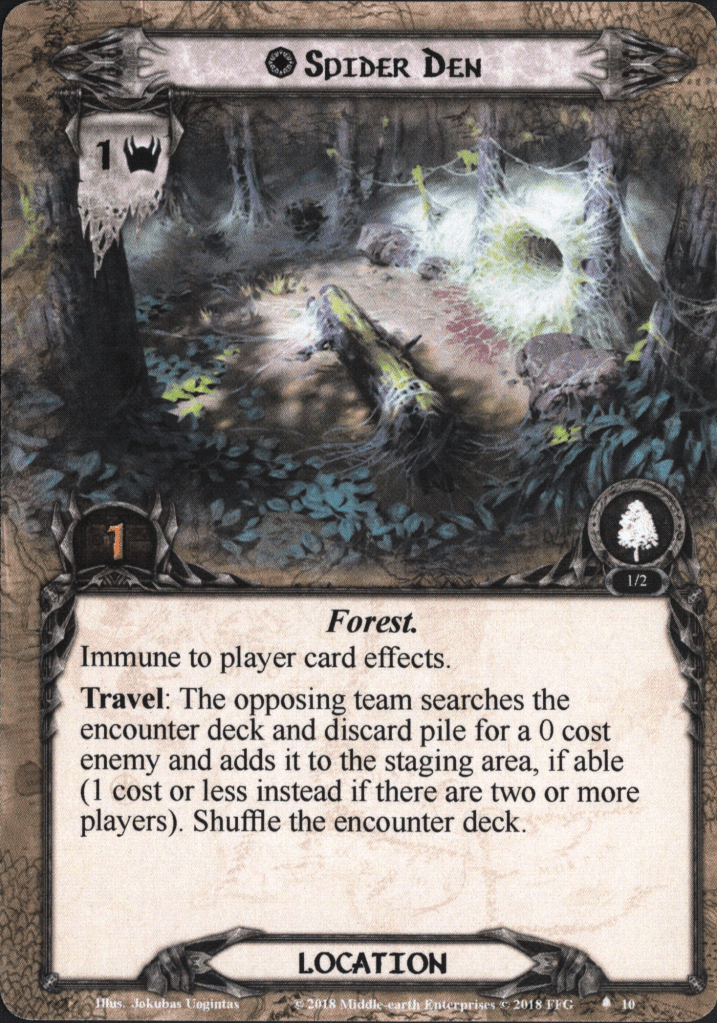
The first quest card is always the same when you are playing The Woodland Realm. This quest sets you up with a location in the staging area that must be explored in order to gain control of Mendor. You then have to spend the rest of the game keeping him safe, as killing Mendor will cause an automatic Game Over. To setup the quest, place Spider Den in the staging area. The opposing team then gets to search for a different 0-cost enemy or 0-cost location per player and add it to the staging area. If there is no opposing team, then you get to pick the cards yourself. To keep things fair, you should pick whatever you think will hinder you most. It is important to note that you get to search the entire deck for these cards, whereas certain other effects will only let the opposing team search the top 5 cards of the encounter deck. All chosen enemies and locations are added to the staging area, and the encounter deck is reshuffled. Remember that the cards are not revealed, so any When Revealed effect on them will not trigger. If you are the opposing team, this is your chance to introduce the players to whatever synergy you have in store for them. Start them out with two early locations to lock them in during setup, or get some low-engagement cost enemies out to force a combat phase on turn one.

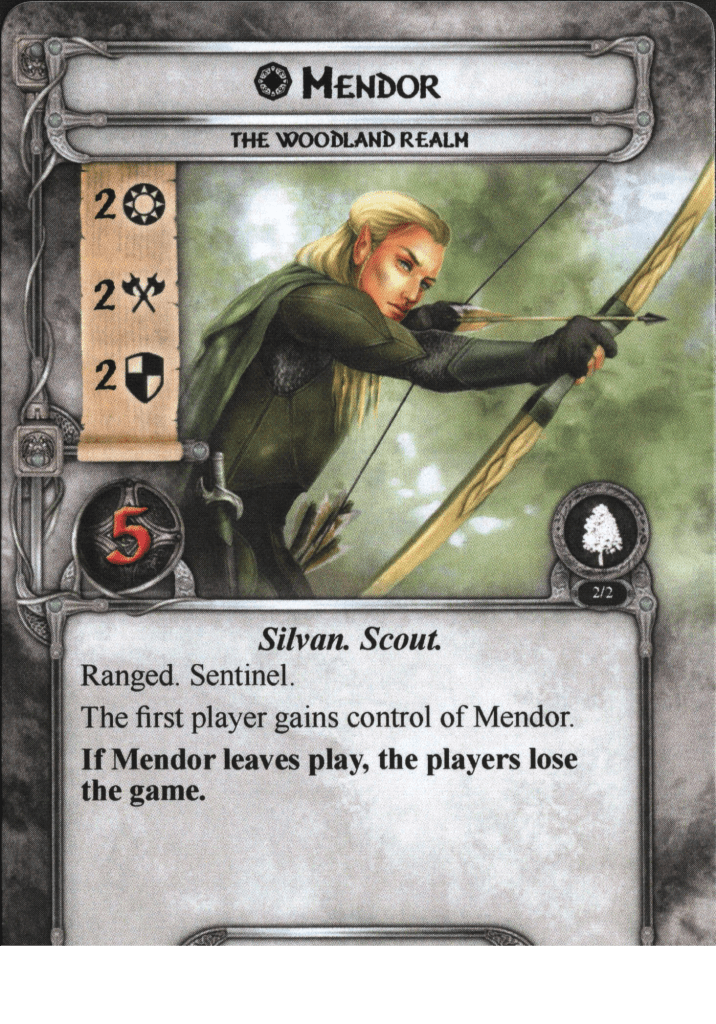
Flipping over to side B, there is no passive effect to keep in mind. Players only need to make 10 progress on this stage and have explored the Spider Den location. Upon exploring the location, it is flipped over to reveal the objective ally Mendor. He will be a very useful ally during the game, giving you an additional ally with both Ranged and Sentinel. Be careful, though; losing Mendor will cause you to lose the game as well.
In order to get Mendor, you have to travel to Spider Den first. This might not be something you want to do on turn 1 since you only remove 1 threat from the staging area, and the travel cost is quite bad. The opposing team gets to search the encounter deck and discard pile for a 0-cost enemy and add it to the staging area. If there are two or more players, the enemy can also be a 1-cost enemy, which tends to be stronger. The enemy is only added to the staging area, so When Revealed, effects don’t trigger again. However, this is a mandatory Travel cost since the location is immune to player card effects, meaning you cannot clear it in the staging area or travel here with effects like West Road Traveller, which would ignore the Travel cost. I would suggest going here on turn 2 since you can take the time to clear the staging area a little and build up your deck. If there are more pressing locations to travel to or you are not ready for another enemy, you are free to wait for a few more turns, during which you can put the 10 progress on the main quest. If you are playing competitively, though, know that you do not have an infinite amount of time to spend on this stage, as your opponents will be racing through their quest as well. Once you’ve cleared the Spider Den and have the 10 progress on the main quest, you are free to move to quest card 2A.
Quest card 2A: A Chosen Path – 20 quest points

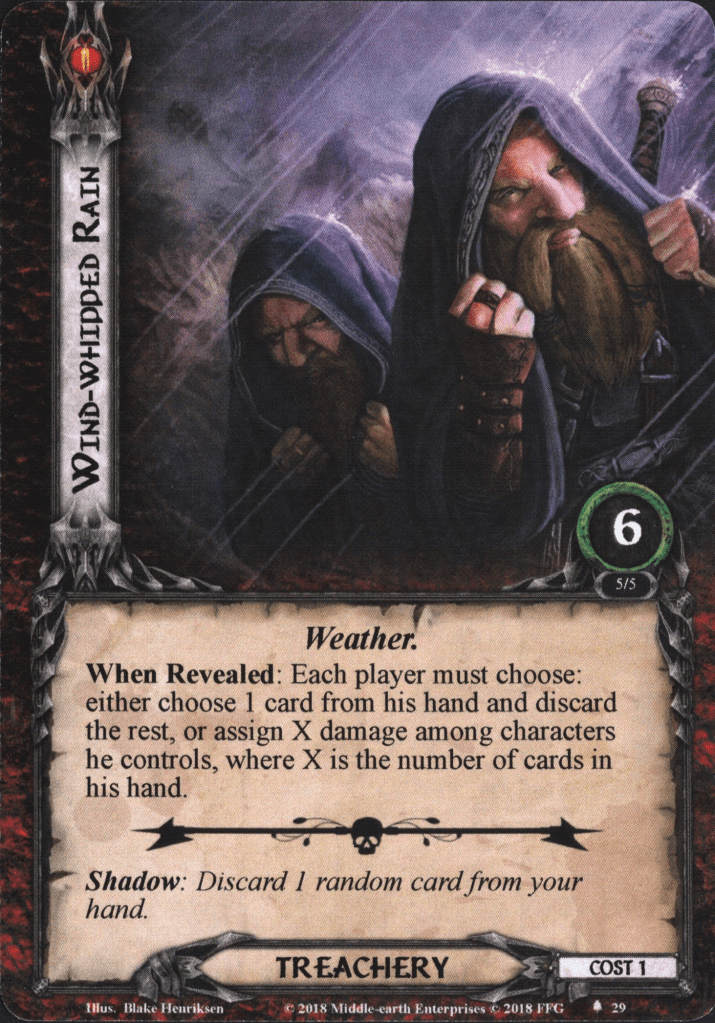
2A is the same text for all three of the quest cards. So you won’t know which quest stage it will be once you arrive here. When any stage 2A is revealed, the opposing team gets to look at the top 5 cards of the encounter deck for a card with a cost of 1 or less (2 or less if there are 2 or more players in the game). That card is set aside, and the other four cards are shuffled back into the encounter deck. Then, the set-aside card is revealed and added to the staging area. Where the When Revealed effect of previous instances of the opposing team choosing the card wouldn’t trigger, it will trigger here! Even worse, players are unable to cancel any When Revealed effects on a card revealed this way. As the opposing team, this allows you to select any treachery in the top 5 cards while knowing that a Test of Will won’t save the players. Of course, what card you reveal depends on the situation and the encounter deck you’ve made. You can get yet another enemy in play if the players are struggling, or you can add more locations to the staging area. It really depends on what you get for your top 5 cards as well. Some good options at this stage are:
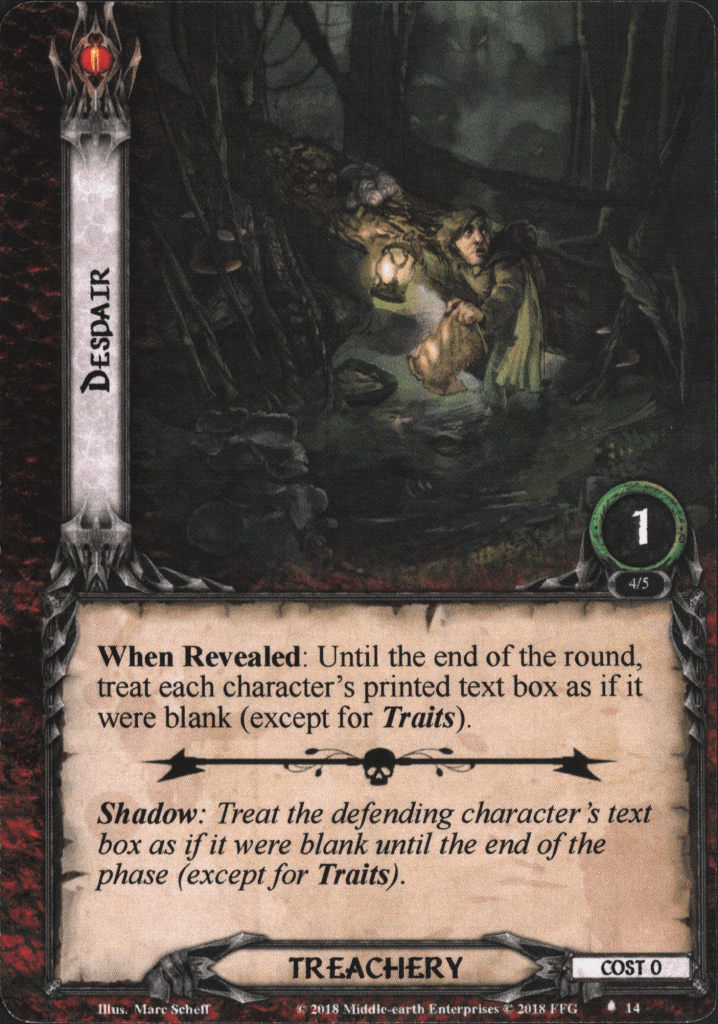
- Despair: blanking textboxes as blank can set up a rough second half of the round
- Exhaustion: players lose action advantage and cannot ready characters by player card effects that round
- Caught in a Web: shuts down one hero (permanently if there aren’t enough resources or Condition removal)
- Wolf Rider: the surge will trigger if there is another Orc enemy in the staging area, potentially adding more cards to the staging area
- Wind-Whipped Rain: punishing hand size if the players are doing well
- Giant Spider: each player has to exhaust a character, and they get a pretty beefy enemy in play
- Mirkwood Patrol: Mess with their engagement step
- Hatred Rekindled: if there are enough enemies engaged, they will all make additional attacks now!
- Massing at Night: one encounter card turns into two 0-cost enemies, great for swarming the players
- Mirkwood Flock: You might hit something big with the surge
- A Frightened Beast: players might have quested hard to get through the stage, so you can punish that now
- Wasted Provisions: if players were saving their resources for something, now they get punished by discarding all resources and raising their threat.
All these options are good, but the cards not mentioned can also work well, depending on the situation. Regardless of the quest stage, once the card is revealed and added to the staging area, the players flip the quest card and arrive at one of three different side 2Bs.
Quest card 2B: Ambushed by Night – 20 quest points

This is the quest card that works best with an enemy-heavy encounter deck. It provides -10 engagement cost to all enemies in the staging area. To make matters worse for the players, it also gives those enemies immunity to optional engagements, and they cannot take damage while in the staging area. This shuts down a few archetypes, like Rohan attacking into the staging area and Dunedain taking all the enemies. This stage works best if you picked an enemy for stage 2A, and the players have been struggling in the combat phase already.

All stage 2Bs have the same Forced effect on them that will restrict the amount of progress they can make on the stage. Players are only able to make 5 progress per round here, meaning that they will have to spend at least 4 rounds here. This can be even more if players are not making the 5 progress each round! Alternatively, you can quest with Mendor in order to place double that amount of progress this turn. This is usually worth exhausting him for. Do note that against certain synergies (Spiders especially), having Mendor quest can be tricky. Always send more characters to the quest with him so that a Wicked Spider does not kill him if he is your only exhausted character that round. Especially at this stage, this can be an issue since there are no optional engagements.
The players will be stuck here for at least 2 turns if they exhaust Mendor both turns and can make the 10 progress on the quest card. With enemies having reduced engagement costs, it is likely that there is less threat in the staging area, making it easier to make progress on this stage. Still, treacheries like Turned Around can be horrible at this stage, delaying the players an additional turn or two. Once 20 progress is placed, advance to stage 3A.
Quest card 2B: Lost in the Dark – 20 quest points
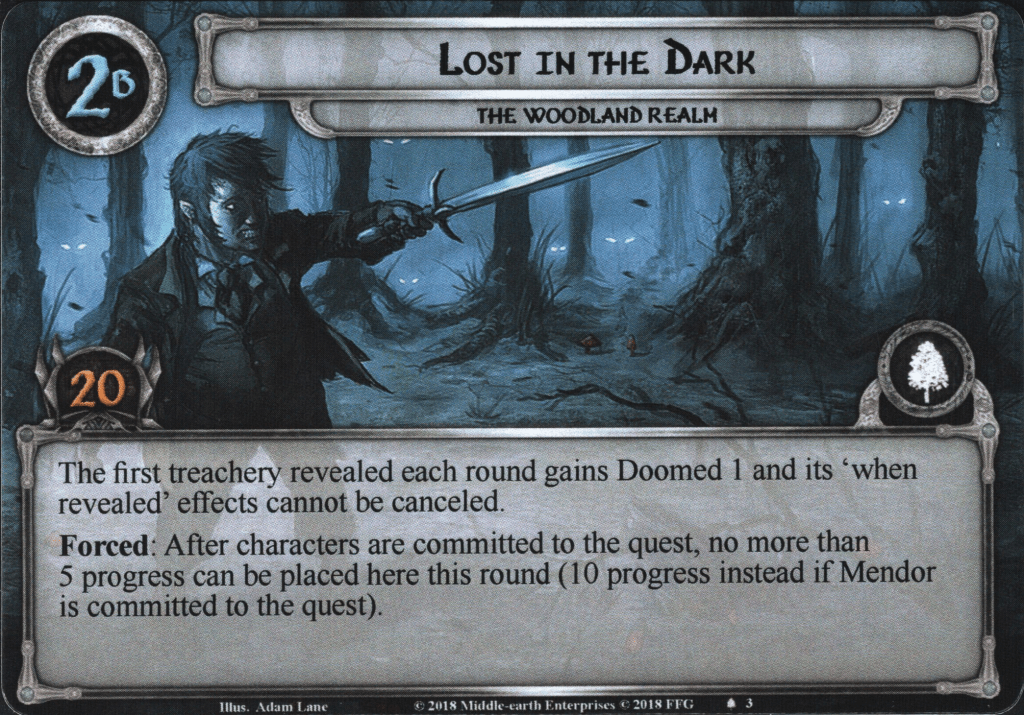
The next option for the second quest stage goes all in on treacheries. When flipped over, the players are informed that the first treachery revealed each round gains Doomed 1, and its “When Revealed” effects cannot be canceled. If you have stacked the deck with treacheries, you can be sure that the players will end up raising their threat a little faster than they normally would, which works well with a certain stage 3B. The inability to cancel When Revealed effects on treacheries is also great as an opponent since A Test of Will is no longer a viable strategy at this stage. Players can still use effects like The Door is Closed, which cancels the entire encounter card, but this does require some setup. Most of the treacheries in the encounter deck will also be single copies, so that might not even work.
In truth, I think this is the weakest of the three quest stages since you usually do not focus on treacheries when building an encounter deck. This also does nothing if the players happen to reveal a bunch of enemies and locations, so you will have to include cards that surge or reveal additional encounter cards. Unfortunately, the Doomed 1 and immunity to cancelation only counts for the first treachery each round, which means that subsequent treacheries can still be canceled and won’t raise threat (outside of their own ability). So you have to find a way to ensure that one treachery is revealed each round.
Again, this quest card requires 20 progress to clear, which will take between 2-4 turns by the players if they manage to make the maximum amount of progress each turn. There certainly are some treacheries that can take away progress from the quest to stall the players a little, though this does come at a tradeoff of having less threat in the staging area, making it easier to make progress. Once 20 progress is placed, the players advance to stage 3A.
Quest card 2B: “Don’t Leave the Path” – 20 quest points

Contrary to the quest card in Passage through Mirkwood, this one does not focus on enemies but on locations. It is easy to get lost in Mirkwood, and with this quest card providing support to locations, it can make a location lock easier to accomplish. During this stage, progress cannot be placed on locations in the staging area. If there is already progress on locations, that can remain, but no new progress is added. This prevents the players from clearing locations in the staging area, though they are still able to place progress on any active location.
And they’ll be sure to have an active location since the quest card forces players to travel if they can. This provides a buffer that absorbs progress from the main quest, making it more difficult to make the required amount of progress each turn. It also forces the players to endure any Travel action that they may have been putting off. They can still cancel any Travel cost with the right cards, but if they don’t have it, they will be forced to pay the price. The players would also be forced to travel to locations like Abandoned Camp and Mirkwood Path, which will add more cards to the staging area when they are explored. This forced travel effect does come at the cost of losing threat in the staging area, but the players were likely going to travel regardless.
The 20 progress on this stage will be tricky to get in just 2 turns, even if you exhaust Mendor for both cases. High-threat in the staging area and a constant buffer in the form of an active location can prevent progress from ending up on the quest card. The tradeoff is that this quest does nothing to make combat more difficult, so if there are not a lot of locations in the staging area already and players weren’t going to make progress on locations in the staging area anyways, this quest card might not be the best choice.
Quest card 3A: On the Trail

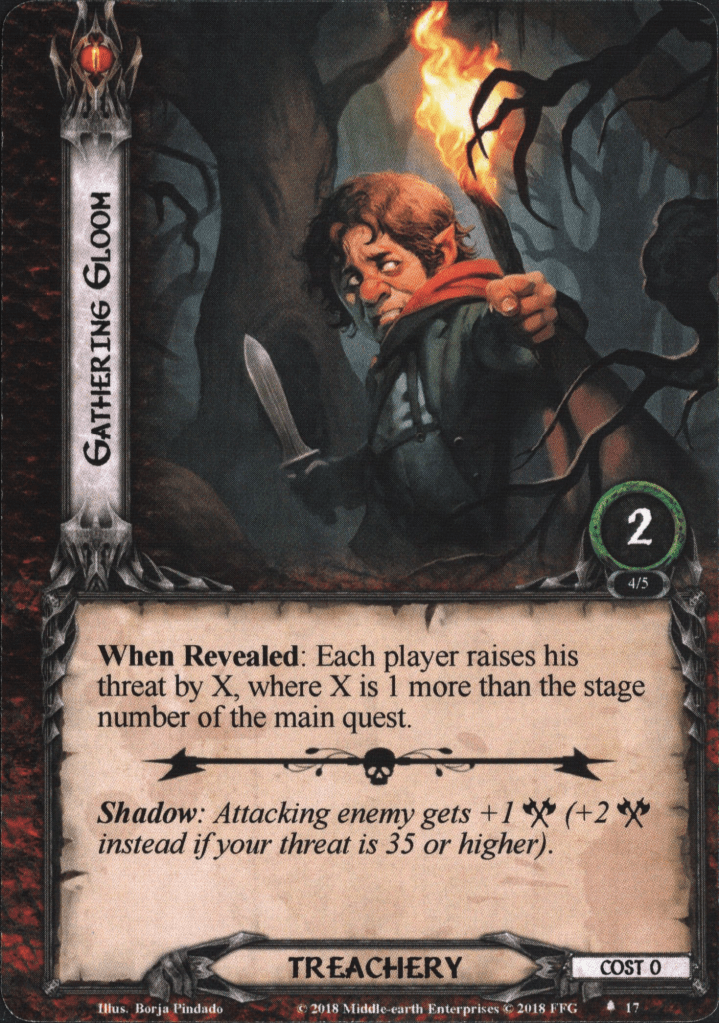
After having cleared any of the stage 2Bs, the players arrive at 3A, which is the same for all three different quest cards. The When Revealed effect on this stage will seem a lot like that of stage 2A, but the difference is that the opposing team gets to select a card with a cost of 2 (3 if there are 2 or more players). This card does have to come from the top 5 cards of the encounter deck, so 3 cost cards might not appear since they are pretty rare. Still, depending on the situation, the card revealed might end up hurting a lot since any of the 5 cards will be able to be revealed, and any “when revealed” effects cannot be canceled. Some good options here are:
- Any of the options from stage 2A’s list.
- Ungoliant’s Spawn: heavy-hitting Spider that prevents readying.
- Forest Grove: now dealing 3 damage and having max stats.
- Chieftain Ufthak: Big Orc enemy that spawns minions.
- Gathering Gloom: +4 threat to each player, can combo well with one of the stages or threat out a player at this stage of the game.
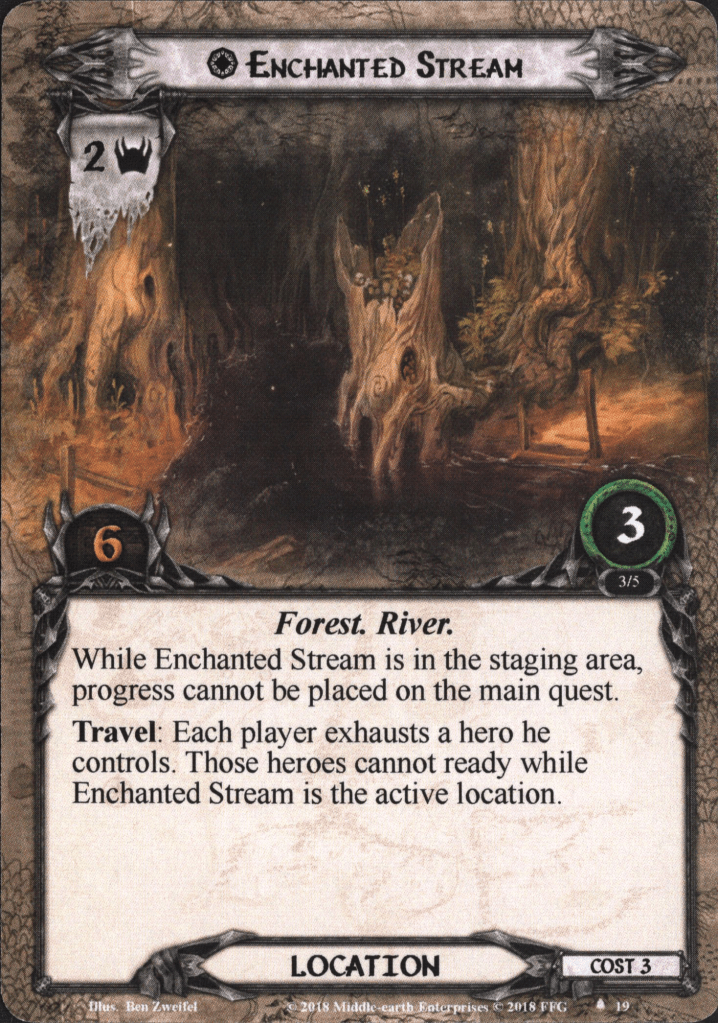
- Enchanted Stream: prevents progress from going onto the main quest and keeps heroes exhausted while active.
- The Spiders’ Ring / The Goblins’ Caves: depending on the enemy archetype you have selected.
- Wild Bear: max stats makes this a pretty tough enemy.
When the card has been added to the staging area, and its effects have been resolved, the players may flip over the quest card to reveal their win condition! Remember to shuffle the encounter deck as well.
Quest card 3B: Escape from Taur-nu-Fuin – 20 quest points
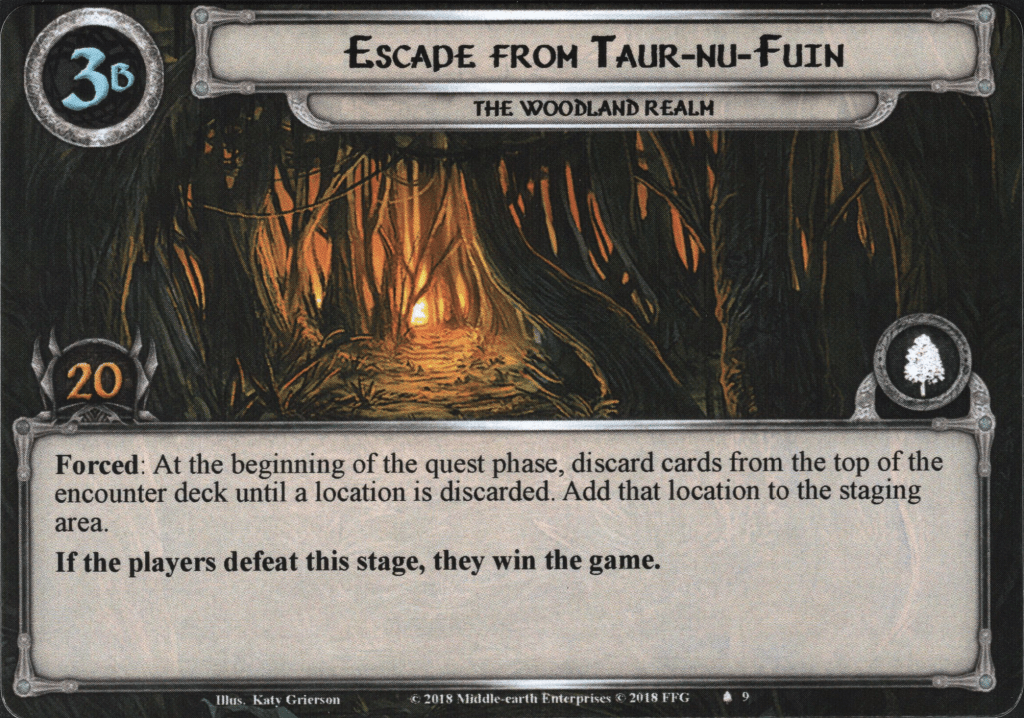
Continuing the trend of locations, this quest stage is geared towards getting more locations in the staging area to bump up the threat there. It has the highest printed quest points out of the three stages, though this can be eclipsed by To the Elvenking’s Halls. The 20 progress could all be placed in one turn, though, since there is no longer a limit on the amount of progress you can place in one turn. But to prevent players from questing too hard, there is a Forced effect that triggers at the beginning of the quest phase.
Before players commit characters to the quest, they are forced to discard cards from the top of the encounter deck until a location is discarded. That location then gets added to the staging area. This is worse in true solo since you will have to overcome twice the number of encounter cards per turn. In higher player counts, this is more manageable, especially if you have a player who has been churning out willpower all game. This Forced effect is sure to hit, though, as it will reset the encounter deck if it is empty. The absolute worst card to hit for this effect is the Enchanted Stream, which prevents progress from being placed on the main quest until the location is explored. Traveling here also comes at a pretty hefty cost of your heroes being constantly exhausted. But aside from this location, there isn’t much stopping you from powering through this quest. Once 20 progress has been made, you automatically win. Because of that, I feel that this is the weaker one of the three stages 3B.
Quest card 3B: The Forest of Great Fear – 15 quest points
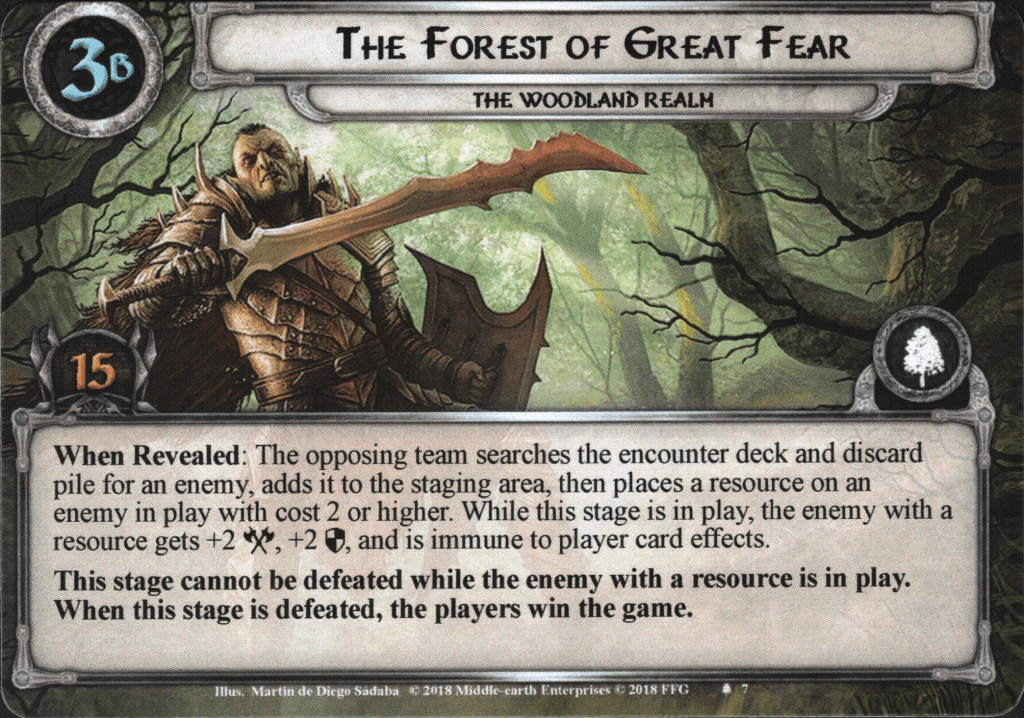

The next stage deals with more combat. When this card is flipped over, the opposing team gets to search the encounter deck and discard pile for an enemy and adds it to the staging area. This enemy can be of any cost, so it is usually the worst one in the deck (unless it is already in play). Combine this with whatever you revealed at 3A, and you will have some difficult encounter cards to overcome at this stage. The opposing team now places a resource token on an enemy with a cost of 2 or more. While the players are at this stage, the enemy with the resource gains +2 attack, +2 defence, and immunity to all player card effects. Because the enemy must be of cost 2 or more, there is only a select range of enemies that can get this resource (when only playing with the Woodland Realm. If you include The Wizard’s Quest, you get some more options). These enemies are:

You likely only have one of these enemies in your deck, so the choice is often pretty simple. The goal of this quest stage is to have 15 progress and to have defeated the enemy with the resource on it. This can be pretty tough since the enemies will have boosted stats and harm you in different ways. Ufthak will bring out more and more Orcs, while Ungoliant’s Spawn has to be engaged early, or players won’t be able to ready their characters. The Beast of Taur-nu-Fuin will slowly damage itself, but the boosted attack stat can lead to some problems. You also want to avoid getting Driven by Shadow on the same enemy, as that will further increase stats by +2. As the opposing team, you will ideally go to this stage with a 2 cost enemy already in play. Then you take the treachery as your card for stage 3A and boost the same enemy with the resource when flipping over the quest.
As the players, you will have to throw everything you have to this boosted enemy. Killing it early on will allow you to make progress on the main quest a little easier. The immunity to player card effects will hurt you, though, but you can use your effects on the other enemies in the deck. Once the boss is dead and 15 progress is on the main quest, you win the game.
Quest card 3B: To the Elvenking’s Halls – X quest points


The final quest card will stall the players for the most time in most games. The quest card has a variable number of quest points, where X is equal to the threat of the player with the highest threat. If you have been focusing on small threat increases during the game with your encounter deck, you might have the players face a quest with over 40 quest points. On top of that, the players might threat out before they get a chance to clear the quest. They also cannot reduce their threat by more than 1 point per round, so there is no way to pull off a few Galadhrim’s Greetings in the same round to drop the threat of the player with the most threat. This is a stage that you do have to build towards, as players will have to have raised their threat high enough for this to matter. If they brought a Secrecy deck with spirit ally Elfhelm, they might just need 25 progress to clear the quest.
But even then, that won’t save them from the Forced effect on this quest card. After the players have quested successfully if 10 or more progress was placed on the quest this phase, the top card of the encounter deck gets revealed. With the right encounter cards, you can force the players to increase their threat, putting them further from their goal. This effect puts the players in a dilemma. On the one hand, they will want to quest as fast as possible; this is a race, after all. But on the other, making more than 10 progress will reveal an additional encounter card that can ruin the game. And going all-in can also put you in a bad spot against certain Spider enemies.
So this quest stage is pretty rough and will either require 1-2 big quest pushes or 3-5 smaller ones, depending on your threat and strategy. My advice is to stomach the extra encounter card and power through the quest, but that depends a lot on the situation. Once the progress on this quest stage equals the threat of the player with the highest threat, you have cleared the quest and won the game!
With this custom scenario kit now handled, I suppose there is nothing stopping me from covering the Wizard’s Quest next! This will come with 14 new encounter sets that can be mixed with these, but more importantly: the quest cards are different! This helps to separate the scenarios a bit more, in my opinion. So I will be back soon with another list of synergies for your own encounter deck! I’ll leave the mixing up to you as a player since that would otherwise have made for an article that is too long.
Also, be sure to let me know what you think of this format and if you want to see something added to articles like this covering the Custom Scenario Kits. I can’t do an encounter deck analysis or tips and tricks section since that would depend on the scenario that was made by/for you. I also wasn’t able to share common decklists using this quest’s encounter cards since there is not really a way to share that easily. You can leave your suggested decklists in the comments below so that players can try their hand at your dec

2 thoughts on “The Woodland Realm”