The time has come to start a second version of this article, now that the original series is coming to a close in the 9th cycle. I noticed that over the 2.5 years since I wrote the original PtM article, many things have changed, including the length of my articles. So in order to properly cover each quest in the same depth as the current quests, I have decided to redo the Shadows of Mirkwood cycle quests with knowledge of the larger card pool, and the experience of 9 cycles worth of analyses. The original article can still be found here.
In this second edition of the series, I will cover all encounter cards, which is something I didn’t do in the first one (at least for the Core Set). I will also add extra segments to the article covering what specific cards to look out for, and whether or not there is a threat level that you should aim for when deckbuilding for this quest. The article will also cover the quest in more detail, though this first quest might be a poor example since not much happens in this one.
Passage through Mirkwood
- Found in: Core Set, scenario 1
- Official Difficulty: 1
- Community Difficulty: 2.3
- Encounter Sets: Passage through Mirkwood, Dol Guldur Orcs, Spiders of Mirkwood
- Quest cards: 3 with 2 different stages 3.
- What is different about this quest?: Not much, this is an introduction quest. The only thing that isn’t normal is a split path towards the end of the quest. This adds to the replayability of the quest, which is already quite high due to its lower difficulty.
- Solo or Multiplayer?: Both work, but this is a quest that you will probably play first in both modes. It is also a quest that you can easily introduce new players to. Multiplayer games tend to take a little longer and will drag out an extra spider during “Don’t Leave the Path”, but this is not that big of a threat.
- Can I run side-quests for this scenario?: Yes, the quest cards don’t take very long to complete and building up can take longer. So it is a good idea to stall a little bit and clear some side-quests. You won’t need any of the benefits, but might as well make use of these cards to lower enemy attack values or increasing willpower on heroes. All stages are good points to go to a side-quest to, though there isn’t really a reason to stall during Beorn’s Path, unless you want to take a little longer to clear the quest.
- Can I bring Guarded (X) cards?: Yes, especially the location ones. The locations in this quest are very friendly compared to other quests, so getting more of them in play can result in you drawing more cards or readying more heroes. If you can also benefit by getting strong attachments on the table, then that is definitely worth it. Not that you will need the extra strength against this quest, but it is a good quest to try out a Guarded deck. The enemy-only cards can also be obtained easily since many of the enemies are easily killed. However, there are one or two nasty enemies like Ungoliant’s Spawn and Hummerhorns that you will want to avoid with this.
- Player cards to avoid: None, you can use any card from your cardpool in this quest.
- Optimal starting threat: There isn’t really any point in staying very low in this quest, as there are many enemies with low engagment costs. But staying below 25 will give you the option to avoid your Forest Spider. Staying below 32 threat will avoid you engaging Ungoliant’s Spawn. 40 threat is another big threshold, since at that level, the Hummerhorns will engage you.
- Traits to add to the Victory Display: Creature, Forest, Orc, Dol Guldur. [Note that you DO NOT add Ungoliant’s Spawn to the Victory Display at stages 1 or 2, since that can lock you in an endless loop at stage 3B.]
- What to look out for?: Quite a lot of direct damage effects that can kill you if you aren’t healing. Hummerhorns should be avoided or killed in the staging area. Ungoliant’s Spawn can be quite a challenge if it is revealed early. Enemies have low engagement costs, meaning you can get swarmed if you are not careful.
- Any changes from the original cards?: Yes, there are a few FAQ and Errata entries for this quest. You can find them here.
The Quest
Setup
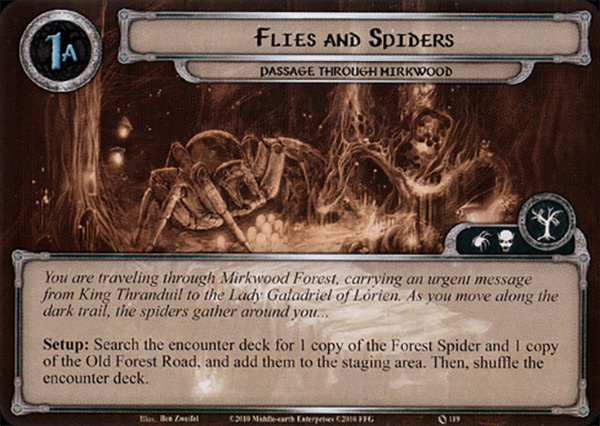
During setup, you are to search the encounter deck for 1 copy of Old Forest Road and 1 copy of Forest Spider and add them to the staging area for a total of 3 threat. The game starts you off with both a location and an enemy, so you will have the option to engage and travel during your first round. The spiders can be difficult to manage if you don’t have a very combat heavy deck. Most early game decks won’t be able to kill the spiders on turn 1, but that is OK. They become milder as you progress. The Old Forest Road is one of the few beneficial locations in the game (don’t get used to that), and will allow you to quest with a defensive or offensive type hero. Important to note here is that the setup does not scale with the number of players. Even in a 4 player game, you just reveal these two cards for setup.
Quest card 1: Flies and Spiders – 8 quest points


The first stage of this quest has no real game text on its quest card. It is meant to introduce players to the game and to learn the way a standard round works, without throwing in extra rules. There is some flavortext on the quest card that you can read, but it won’t have an impact on your game.
The quest stage can be beaten without too many problems, as all you need is 8 progress on this stage to advance. There is also no punishment for advancing the quest, so you don’t have to worry about when to advance. This stage is meant to set up your boardstate so that you are strong enough to either defeat Ungoliant’s Spawn, or quest through the scenario before it shows up.

During the first round, there is usually a pattern in how the round plays out for solo players. You quest with 2 heroes (and perhaps some allies), you reveal an encounter card, you travel to the Old Forest Road to ready one of your heroes that went to the quest, and can now engage the Forest Spider. Defend the Spider with one hero (or an ally) and attack back with your remaning characters for the most damage. This is how quite a few first rounds go, but this can of course change depending on the cards you play and the encounter card you reveal. If you reveal more enemies that will engage you, then the counter attack will be far weaker since you need more characters to deal with defence.
Try and get your board ready during the first few rounds at this stage. Make sure you keep a clean staging area by at least travelling each round (if able) and engaging whatever enemy you can kill. If you need more time to stall, then side-quests can be selected to go up against if you brought any. Double Back is quite a popular side-quest for this scenario, as a lower threat might prevent some lower engagement cost enemies from engaging you. When you have placed your eighth progress token, you immediately advance to stage 2.
Quest card 2: A Fork in the Road – 2 quest points

Again, stage 2 isn’t anything special. There is no real difference between it and stage 1 in terms of game mechanics. The 2 quest points is all that has to be overcome in order to advance the quest. This can easily be done by regular questing during the next quest phase, provided you also clear any active location. Again, take this time to clear the staging area a little. Do note that if you have Ungoliant’s Spawn in play at this time, it will be best to not kill it before you advance. You have a 50/50 chance of having to go find it again and defeat it again. It would be best to get its health down as far as possible, so that if you do get “Don’t Leave the Path” you can quickly kill the Spawn and thus win the game.
Quest card 3A: A Chosen Path
There are 2 quest cards with this name, so you’ll have to choose 1 of the A sides as your next quest card. Depending on that choice, you will either have to fight your way out, or quest your way past the final card. I recommend using a coin toss to decide where to go.
Quest card 3B: “Don’t Leave the Path!” – 0 quest points

This is the path where you will need to have enough attack power to defeat Ungoliant’s Spawn. This can be the fastest route, but decks that rely heavily on willpower might struggle with this part of the quest. When this stage is revealed, each player must search the encounter deck and discard pile for one Spider card and add it to the staging area. My recommendation for this will be to make sure you at least take out Ungoliant’s Spawn through this effect, if she isn’t in play already. Other players have a small selection of enemies to choose from. The difference between Forest Spider and King Spider isn’t that big, but if you can, take out the King Spider from the encounter deck. This allows you to avoid having to trigger the When Revealed effect on it should the game last longer than the next combat phase.
The only requirement for advancing this part of the quest is to find and defeat Ungoliant’s Spawn. If you somehow didn’t take out the Spawn for the quest card’s effect, this can take a while as you go through the encounter deck hoping to find the only copy of that enemy. Should the Spawn show up as a shadow effect, then this does not satisfy the win condition and players will have to wait until the encounter discard pile is reset to the encounter deck, and then hope to reveal it again. Don’t let it get this far and just make sure you have Ungoliant’s Spawn in play from either the previous rounds of staging, or from finding it for the quest card’s effect.
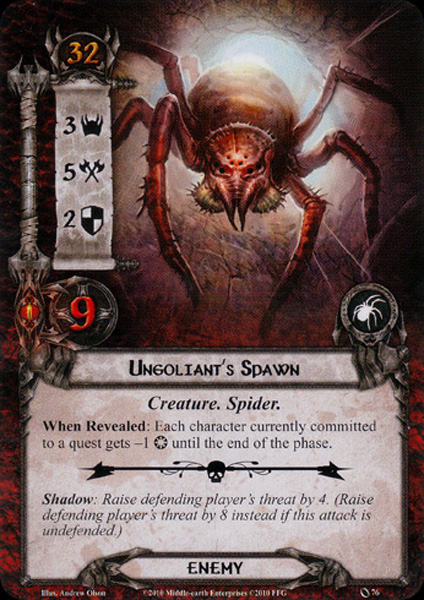
If you had Ungoliant’s Spawn in play for a while before you got to this stage, you should have chipped away at her hitpoints already. This allows you to quickly win if you manage to trigger some direct damage effect like Goblin-cleaver, Hail of Stones, Rain of Arrows, Spear of the Citadel and so on. Defeating it through these player card effects is legal, as the Spawn isn’t immune to player card effects or anything. If you saved up any damaging effects, this is the time to use them. Killing the Spawn before she can make an attack not only saves you from her 5 attack strength, but can also allow you to ignore the attacks that other enemies make if the Spawn is engaged with the first player.
Attacking the Spawn normally will require a maximum of 11 total attack strength to bring her down in one go. Have other players help out with their Ranged characters and send all the characters you have ready to this attack to make sure you kill the Spawn. Calculate the potential damage beforehand though. It might be worth killing other engaged enemies first if you cannot kill the Spawn this round. This should open up more characters next round to attack the Spawn with, since you will need fewer defenders. When the Spawn is defeated, the players immediately win the game and are now ready to advance to the river Anduin for their next challenge.
Quest card 3B: Beorn’s Path – 10 quest points

Unlike “Don’t Leave the Path”, this quest card requires actual progress to be made in order to win, 10 to be exact. There is also a secondary rule in place to make sure players must still face the boss of this scenario if they found it earlier. This quest card cannot be defeated if Ungoliant’s Spawn is in play, meaning that you don’t have to find it and kill it like the other stage 3, but if she is in play at the moment, she must be defeated in order to win. If the players already had Ungoliant’s Spawn in play before advancing to this quest, they should have already dealt some damage to it. This will make it easier to dispose of the enemy, ensuring that a solid push of willpower can get you the win during the next quest phase.

This quest card is easier to complete if the players just advanced the quest during the combat phase from effects like Tactics Legolas and the Blade of Gondolin. This will give them the time to prepare for a big quest push, playing all the willpower they have if able. If you know that Ungoliant’s Spawn is in the encounter discard pile, you don’t have much to worry about for questing all out (except The Necromancer’s Reach punishing you for having characters exhausted). However, if you haven’t encountered the Spawn all game (even as a shadow card), then I would suggest keeping a few characters back. Making 10 progress will still be required, but if you reveal the Spawn during this last staging step, you will likely lose a hero and will be in a poor position during the combat phase.
Usually, a big final questing push will be all it takes to defeat this stage. Be sure to use readying effects before the staging step to make sure your questers will survive a Necromancer’s Reach, especially those with only 1 hitpoint to spare. Note that progress will still have to be placed on any active location first. This means that in some cases, it won’t be worth travelling to a location if you expect to make just enough progress next round. After the tenth point of progress is placed, the players win the game if Ungoliant’s Spawn is not in play. Else, they win after Ungoliant’s Spawn is defeated.
The Encounter deck
Global

- There are 36 encounter cards in Normal mode, 25 in Easy mode
- There is a 36% chance of a Shadow Effect in Normal mode, 48% chance in Easy mode (Who said Easy mode was easier?). Shadow effects rely mostly on increasing attack, discarding attachments, and dealing direct damage.
- The average threat per card revealed is 1.6 (treacheries count as 0 Threat), this roughly equal for the two modes
- Surge is only present on 1 card if the conditions aren’t met
- The Doomed keyword is not present
- No cards are immune to player card effects or other mechanics
These statistics do not count the initial Forest Spider and Old Forest Road that are added to the staging area at the beginning of the game. The biggest threat as you can see from this pie chart is that the encounter deck has more enemies than locations or treacheries, so be sure to have enough characters ready for combat.
Enemies
There are two sorts of enemies in this quest, Creatures and Orcs. This means that you will have to add two enemies to the victory display for Rossiel to get her defence up against all enemies. There is quite a broad spectrum of enemies in this quest, so let’s go over each of them.
- Ungoliant’s Spawn: This is the enemy that you are looking to kill when you get to stage 3. For “Don’t Leave the Path!” you must find and kill the Spawn, while for the other stage, you must make sure it isn’t in play once you make your final point of progress. The Ungoliant’s Spawn is quite a big enemy, and can be considered the final boss of this scenario. When it is revealed, each of your characters that is committed to the quest gets -1 willpower, putting a big damper on your progress that round. You can avoid this by cancelling the When Revealed effect with Eleanor or the Dunedain Lookout. You can also counter this loss in willpower by using Faramir or Free Peoples to boost your willpower again. On top of the When Revealed effect, you also get this lovely spider enemy in play, adding 3 threat to the staging area. But don’t worry, it won’t stay up there for very long. The engagement cost of the Spawn is only 32, meaning that mid-game decks will likely have to engage it earlier than they would like, especially if other enemies were revealed that round. In combat, the Spawn hits very hard for 5, which requires players to have a dedicated defender, or a chump blocker for this enemy. Attacking the Spawn back must be done with caution. Since you do not want to face the Spawn again, the best course of action will be to leave it alive until stage 3 so that you can kill it with ease, and potentially win the scenario that way. Killing it earlier gives you a 50/50 chance of having to find it again, and slog your way through the 9 hitpoints again. With 2 defence on top of this, you will likely either need Ranged support or several turns to bring down the Spawn. Don’t forget that it isn’t immune to anything, so you are more than welcome to use all your tricks on it to deal more damage and prevent it from attacking. Rivendell Blade into Straight Shot is a very cheaky way to defeat the Spawn. Shadow: Ah yes, this boss level enemy has the possibility to show up as a shadow card, and you will wish for some cancellation when you get it. The Spawn will raise the defending player’s threat by 4, but if the attack is undefended, it is increased by 8. This is a massive leap in terms of threat, and will put you closer to the engagement cost of tougher enemies for next round. Cancellation of this shadow effect or threat reduction will save you here. Seeing this enemy as a shadow card also means that you know it is in the discard pile. Should you reach Beorn’s Path without shuffling it back into the deck, it means that you can quest with everyone without risking getting blocked by this spider again.
- Hummerhorns: The Spawn might be considered the boss of this scenario, but the Hummerhorns take the crown when it comes to annoying effects. The enemy has the highest engagement cost of any enemy in this encounter deck at 40, which is a blessing. Whatever it takes, you do not want this enemy to engage you. That is thanks to the effect on the Hummerhorns. Whenever it engages a player, that player must deal 5 damage to a hero they control. This will kill every hero in the cardpool (with the exception of Beorn) without and hitpoint granting attachments. There is also almost no way to avoid this effect if your threat is equal to its engagement cost, except for Revealed in Wrath during the encounter phase. The 5 damage will automatically delete a hero from the game, and although you can revive them through various player cards, it will be an expensive trick to pull off. In combat, the Hummerhorns aren’t as powerful as their effect, only hitting for 2 and needing 3 attack to be defeated. But it will be rare to face these wasps in battle. The best way to deal with them is to either ignore them and keep a low threat, or to kill them in the staging area. Leadership Eomer or Dunhere are great heroes for this, but direct damage effects can also quickly cut through the Hummerhorns’ hitpoints. The good thing about defeating the Hummerhorns is that they have a Victory score. This means that once you defeat them, you no longer have to deal with them again. Shadow: Revealing the Hummerhorns as a shadow effect isn’t much better than engaging it unfortunately. This shadow effect is by far the most brutal in the scenario and a Hasty Stroke should be kept in reserve for this effect in particular. If the Hummerhorns are revealed as a shadow effect, the defending player must deal 1 damage to each character they control. This targets both exhausted and ready characters, and flat out deals 1 damage to every character from that player. If this shadow effect kills the defender (like Defender of Rammas), then the attack is considered undefended. This does not trigger the second part of the shadow effect, which only happens if the attack was undefended to begin with. If that is the case, then the damage is doubled to each character. 2 damage dealt directly to allies will kill the majority of the cheap allies, especially if they were already damaged from treacheries earlier. This effect must be cancelled at all costs, or the player can be considered out of the game for a while as they try to build up again.
- Chieftain Ufthak: This is another single-copy enemy in the encounter deck, and the only other enemy aside from Hummerhorns with a Victory score. Chieftain Ufthak is an enemy that you don’t want to leave around for too long, and you should prioritize him whenever he is engaged with a player. At 35 engagement cost, you have some time to prepare for him, though higher starting threat decks might need to prepare quickly. Ufthak has a well-rounded statline of 2/3/3/6 and he has a special ability that allows him to collect tokens. He gets one resource token from the bank each time he attacks. He then gets +2 attack for each token on him at that moment. This happens before the damage is calculated during the attack, meaning that he will attack for 5 during his first attack, 7 for his next attack, and so on. Save your Feints for this enemy, since he doesn’t get a resource token if he doesn’t attack. Killing him should be a priority before he becomes too big. Use some one-time abilities like Black Arrow and Tactics Eowyn to defeat Ufthak quickly. He will be added to the Victory Display upon his defeat. You should exploit his lack of immunity to player card effects so that you can maximize damage dealt to him, while avoiding his attacks.

- King Spider: We now step away from the biggest and baddest enemies, and look at what else the encounter deck has to offer. First up is another 8-legged monster, the King Spider. This one has a nasty When Revealed effect that exhausts a character when it is revealed from the encounter deck. This can throw your plans out the window if you had exactly enough characters to deal with combat this round. The fact that this targets each player is pretty brutal too. The 20 engagement cost means that this spider will engage early on. During combat it will always hit for 3 attack unlike its Forest counterpart. The King Spider is a little easier to kill though, requiring just 4 attack. This can be done be individual heroes, but can also be easily achieved by a few allies. Shadow: The King Spider has a shadow effect that will mimic its when revealed effect. The defending player must exhaust one character they control. This can ruin your plans to counter attack the enemy, meaning it will remain in play a little while longer. If you took the incoming attack undefended, then you are even more out of luck, as you will have to exhaust 2 characters. This can also be problematic if you revealed this shadow card first in a series of attacks, and now have to exhaust the character you were hoping to defend the other enemy with. Readying effects will be important for this shadow card.
- Dol Guldur Orcs: These are the weakest of the Orc enemies in this scenario, but can still pack a punch if you are not careful. The Orcs have a very low threat, meaning that if you are unlucky, you can get swarmed pretty early by these enemies. They also have a When Revealed effect that is quite annoying, as it will deal 2 damage to a character committed to the quest. The first player gets to select this character, but if that character dies because of the direct damage, their willpower is removed from the total. This makes it quite annoying to reveal this enemy multiple times in quick succession, especially in lower player counts where there aren’t as many characters committed to the quest. With an engagement cost of 10, these enemies will engage nearly all decks right away, except for the early game Grey Wanderer decks. While engaged, the Orcs aren’t that big of a problem, but due to their low engagement cost, you do not get the option to leave them in the staging area. This can cause you to be overwhelmed by lower engagement cost enemies early on, requiring you to dedicate more characters to defence. Killing the Orcs is no problem though. They do not have any defence, meaning that every point of attack you can spare will result in them taking damage. It also means that Straight Shot can discard them immediately. Shadow: The shadow effect on the Orcs is a pretty basic one. The attacking enemy gets +1 attack for this attack. Should players have taken the attack undefended, then the enemy gets +3 attack, which can be deadly for an undefended attack. It even turns enemies like the Black Forest Bats into a 4 attack enemy that you took undefended. The best way to deal with that case is to have Dori, White Tower Watchman or Barliman in play, so you can redirect the damage you would otherwise take on your hero. Cancelling the shadow effect is of course also an option.
- Dol Guldur Beastmaster: The biggest threat of this enemy is that it has quite a lot of hitpoints, making it tough to defeat in the early game. At 5 hitpoints, the Beastmaster can even survive a direct hit from Gandalf‘s damage ability. This means it will be very likely that you are going to have to suffer through at least one of the Beastmaster’s attacks. This can be quite dangerous. Not because the Beastmaster has so much attack, 3 attack is quite standard, but because of the ability on the Beastmaster. When he attacks, he is dealt an additional shadow card. This can be a problem, as you can potentially get 2 shadow effects buffing his attack or doing other nasty things like discarding attachments or raising your threat. To circumvent these shadow cards, you can either focus all your direct damage on the Beastmaster to kill him before he makes an attack. Events like Quick Strike are also a good solution if you can manage to attack for 6 with a single character. Alternatively, you can also make sure that the Beastmaster won’t attack, thereby not triggering either shadow effect. Feint is a great tool for this, but you can also get creative with a Reforged Forest Snare. With 35 engagement cost, you will have some time to prepare for this enemy before it comes down. You are also helped by the fact that the chances of seeing a shadow card on this enemy is relatively low, let alone getting both cards with an effect. But if you are not willing to try your luck, there are several options mentioned earlier that will help you to get around this enemy.
- East Bight Patrol: It is rare to see an enemy with a single digit engagement cost, but the East Bight Patrol only has an engagement cost of 5, meaning that it can ruin the day of Secrecy and/or Hobbit decks if they are unprepared for something with a lower engagement cost than their threat. The East Bight Patrol has a surprisingly high threat of 3. This threat won’t stay in the staging area for very long, as the engagement cost of 5 is very difficult to avoid without using tricks like Rohirrim Scout or Advance Warning. When engaged, the East Bight Patrol attacks for 3 as well, which can be a bit much for decks in the early game, but compared to the other enemies in this encounter deck, you should be able to easily defend it with your characters. The textbox of this enemy is empty, which helps you a lot, as there are no triggers that you have to remember. Killing the East Bight Patrol is really easy, as it only has 2 hitpoints and 1 point of defence. Direct damage will easily take care of this enemy, but even some weaker allies can take care of this one. Shadow: The shadow effect has two parts, one that triggers each time, and one that triggers when the attack is undefended. The first part increases the attack strength of the enemy by 1. This is usually low enough to not matter too much, or deal just one damage. It does mean that defending with nearly dead heroes is quite risky though. Should the attack be undefended, then the shadow will not only increase the attack strength by 1, but will also raise the defending player’s threat by 3. The increased threat won’t matter until the next engagement phase (unless this pushes you above 50), but do be careful that this accelerates the rate at which enemies will engage you.
- Black Forest Bats: Out of all the enemies that you can possibly reveal, this is the weakest of them all. The Black Forest Bats are a Creature enemy, and only have 1 threat. They do have a When Revealed effect, that is worth looking at. However, compared to more recent encounter cards, this effect is quite a joke. Upon revealing this enemy, each player must choose a questing character and remove it from the quest without readying that character. This can hurt in the early game, but in the late game, each player can usually select an ally with 1 willpower to satisfy this effect. With an engagement cost of 15, this enemy will be engaging players in the same round it is revealed. But with 1 attack and 0 defence, it is very easy to get rid of. Direct damage can be quite helpful here, allowing you to focus attack strength on other enemies. With only 1 copy of this enemy in the encounter deck, you don’t have to worry about it too much. Dunedain players will want to keep this enemy alive and engaged with them, as it is a very easy enemy to continuously defend against.
- Forest Spider: There is no enemy as classic as the Forest Spider, which was likely the first ever enemy you faced in the game. A relatively balanced statline means that it will take some effort to take down, as opposed to other enemies that make a return in this quest. The engagement cost of 25 means that it will be engaging many players from the start of the game, and considering that one of these Spiders are in the staging area at the start of the game, it won’t be long until you have to face them. When the Forest Spider engages a player, it gains +1 attack until the end of the round as a sort of ‘surprise attack’ bonus. This still puts it at 3 attack, which can be easily defended by many heroes and even some allies without taking damage. Taking down the spider is something that takes a bit more effort though, as the 4 hitpoints are quite beefy for a Core Set enemy. Still, it shouldn’t be too difficult for a dedicated attacker. You can also choose to keep the Forest Spider engaged with you, so that you can get bonuses if you have a Ranger/Trap/Dunedain style deck. This enemy is relatively harmless at 2 attack in rounds after the one you engaged it in. You will be facing this enemy often, as there are 4 copies of it in the encounter deck, but that shouldn’t be an issue. Shadow: The shadow card on this enemy is pretty annoying, especially since you can reveal it quite often thanks to the 4 copies of this card in the encounter deck. It requires the defending player to discard one attachment they control. This can be attached to any character they control, but the Caught in a Web Condition attachment cannot be selected. My advice is to have disposable attachments in play quickly (especially 0-1 cost attachments) that you can sacrifice for this shadow effect. Do note that if you remove an attachment from a defending character that would increase its defence, that you have to recalculate the damage you would take. Cancellation of this shadow card is understandable, especially in The Burglar’s Turn decks, which don’t have many attachments and have to jump through more hoops to get them in play.

Locations
This is one of the quests where some locations are actually beneficial. It is important to clear these locations quickly though, as situations with location lock can occur in higher player counts. With most locations having the Forest trait, you can get some benefits out of cards like the Cloak of Lorien and Woodland Courier to get more use out of them. With these locations being quite easy to explore, any location control deck will have an easy time against this quest.
- Great Forest Web: Our first location on this list is the Great Forest Web. This location sounds pretty bad, but when you look at the stats, you see that it isn’t too terrible. 2 threat and 2 quest points is pretty average for this quest, and low when comparing it to other scenarios. The biggest problem with the Web is its travel cost. Each player must exhaust a hero in order to travel here. If any player cannot exhaust a hero, then the players aren’t able to travel here and they must instead go somewhere else if able. This location is usually left in the staging area, as it is not worth travelling to. You reduce the threat in the staging area by 2 in exchange for needing 2 more progress next round to clear it. The cost of exhausting a hero per player is usually too high, except if each player either has a way to ready their hero, or doesn’t need their hero for the rest of the round. This can happen if no enemies were revealed that round, in which case the Web can make for a proper destination during the travel phase. It is recommended to just clear the Web in the staging area with the use of player card effects. 2 quest points is easy to overcome with effects like Asfaloth and Evening Star, and even effects that place just 1 progress are already halfway there.
- Mountains of Mirkwood: There is a lot happening with this location, both good and bad. To start with, the Mountains of Mirkwood have 2 threat and 3 quest points. They also have a travel cost that will require you to reveal the top card of the encounter deck to travel there. Should you have no encounter cards left in the encounter deck after the quest phase, then you cannot travel here, since the deck is only reset in the quest phase. It is usually a good trade-off to travel to this location, especially if you haven’t got any enemies in play at that point. You can potentially get an enemy this way and will have something to do during the combat phase. However, if you feel that you are getting overwhelmed by the encounter deck, then it is probably better to travel somewhere else. There is a benefit to defeating this location though. Once the Mountains of Mirkwood have been explored, they allow each player to search the top 5 cards of their deck for any one card and add it to their hand. This helps players to set up more easily, especially if they don’t have scrying or card draw (yet). This is basically a free use of Heed the Dream, which can be great for people looking for specific cards. Note that this benefit triggers when the location is explored, not discarded. This means that cards like Distant Stars won’t trigger it. But it can trigger when players explore the location through player card effects placing progress on it in the staging area. You don’t have to travel to it in order to get the benefit. This location is a case of risk versus reward, and can be quite enjoyable to debate travelling to.
- Necromancer’s Pass: At 3 threat, this location has the highest threat of any location in this encounter deck. And since 3 isn’t that high compared to other scenarios, you get a feeling for the difficulty of these locations (it’s low, very low). The Pass can be cleared in the staging area by just placing 2 points of progress on it. Alternatively, the players can travel to the location if there is no other active location during the travel phase. This will demand that the first player discards 2 cards at random from their hand. If they have 1 or no cards in their hand, the players cannot travel here. I tend to clear the location in the staging area unless I feel that I have a high enough chance to discard some cards from my hand that I don’t mind losing. The location isn’t too much to worry about, and you can generally get away with travelling somewhere else. However, if you are in a situation where location lock is becoming a threat, then travel to the Pass, as it lowers the threat in the staging area the most.
- Enchanted Stream: Out of all locations in the encounter deck, this is the only one for which I would warn not to travel to but instead clear it in the staging area. That is not only because it is quite easy to clear in the staging area, requiring just 2 progress, but also because of the passive rule that is on the Enchanted Stream. While it is the active location, players cannot draw cards. This means that players not only lose the card they get every resource phase, but they also cannot draw from other effects. Card draw events like Deep Knowledge become useless, but even utility allies like Master of the Forge and Bofur cannot draw you specific cards anymore. This stalls your deck’s development unless you have plenty to play from the cards in your hand. Decks that run Erestor (and usually Noldor decks in general) will struggle as they lose most of their hand and cannot draw extra cards. Since this only happens when the Enchanted Stream is the active location, I would suggest leaving it in the staging area, even if it is the only location in the staging area during the travel phase. It is not worth losing your ability to draw cards, unless you can be sure to quest through it before you could draw a card again. With it only having 2 quest points, cards like Legolas and Strength of Will can clear it without costing you too many cards. Blanking the textbox of this card with Thror’s Key can also solve the issue, but only if you really want to. Usually there are enough other options to travel to during the travel phase.
- Old Forest Road: For many, this was the very first location we have ever seen, as it starts in the staging area, making it a great target to travel to during the staging step. This is the best card to reveal during the staging step (with the exception of a whiffing Eyes of the Forest), as the location is just 1 threat, and has a beneficial effect when players travel to the Road. The first player may select one character to ready when the players travel to this location. This can be a hero across the table so that an ability can be used, or so that a player has another character to use in combat. Allies can also be targetted for this effect, if those are a better target for your situation. Allies like Gandalf are great to quest with, but if you can ready them for combat as well, you’ll get a lot more use out of them. There is really no downside to travelling to the Old Forest Road, other than the fact that other locations might have a higher priority to get out of the staging area. But in the early game, or if the players have a good grip on locations, this is a great place to travel to.
- Forest Gate: Another beneficial location when you travel to it. The Forest Gate will allow the first player to draw 2 cards when it becomes the active location. The best time to travel to this location is when the first player is in need for extra cards, but honestly, you can travel to this location whenever you want. Removing 2 threat from the staging area makes this a slightly higher priority location than the Old Forest Road, but if given the choice between this location and Enchanted Stream, this should be an obvious choice. The only way you pay for these two cards, is with the location having 4 quest points. This makes it a buffer for the quest of 4 progress, which is more than the other locations in this quest. But with the quest cards not requiring so much progress to clear, you shouldn’t be worried about the 1 or 2 extra points of progress required to clear this.

Treacheries
As could be seen in the pie chart shown earlier, the encounter deck doesn’t have that many treachery cards in it, especially in Easy mode as many are removed. This makes it less likely that you will have to worry about those effects, but also means that most cards you reveal will stay in the staging area and are not one-time effects.
- Eyes of the Forest: This is a rather rare treachery, considering there is only one copy in the encounter deck in Normal mode, and it is removed in Easy mode. Is it that brutal then? Well, not really. When this treachery is revealed, each player must discard all event cards from their hand. While this is annoying for some players, it will be rare to have a hand full of events that you really want to play. Only decks that run Council of the Wise will really be impacted by this treachery. However, as weird as it may seem, this treachery is worth cancelling with Test of Will. This is because you will be discarding the event card anyway, so you might as well save all others by spending the resource and cancelling this treachery. However, there will also be times where you won’t have any event cards in your hands, meaning that the treachery whiffs. With no surge or other keyword, this treachery doesn’t do that much and is often a free encounter card to reveal during your quest phase. The lack of a shadow effect also makes it have no impact during the combat phase, which is nice. Do note that if you happen to have to resolve this treachery, you cannot play Actions beforehand on your events. This means that you cannot trigger cards like Elrond’s Counsel before you would discard it. Trigger such events before the staging step to make sure that you won’t have to discard them. Responses can still be triggered before the resolution of this treachery, so cancelling the When Revealed effect with A Test of Will is still legal.
- Caught in a Web: Where there are spiders, there are webs, and the webs are sticky. This treachery is the first of many treachery cards that transform into an attachment on one of your characters. When this treachery is revealed, it will attach itself to a hero of the player with the highest threat. If there is a tie, discuss with the other player on who would be the best target. First player makes the final call, but there is usually an optimal target for this treachery. While attached, the Condition attachment will now prevent the hero from readying during the refresh phase unless two resources are paid from that hero’s resource pool. This does not discard the attachment. Also note that you would ready before you gain your resources for the next round, so you would have to have 2 resources in the pool of that hero before you enter the refresh phase. This usually isn’t worth it, and those 2 resources can be put to better use in the form of a Miner of the Iron Hills, who’s purpose it is to discard Condition attachments like this. This will free up your hero and you will still get the Miner’s stats to use. Other options are also available to discard Condition attachments, so be sure to pack some for this quest. There are two copies of this treachery in the encounter deck, which makes it difficult for solo players if both copies hit your heroes. The treachery doesn’t specify if both copies can go on the same hero, but if they can, you would have to spend 4 resources in order to ready. It can often be worth having readying attachments like Unexpected Courage or Heir of Mardil on the hero, so that they can still ready outside of the Refresh phase. Some heroes are also ideal targets, like Tactics Boromir, Gwaihir, Sam, and Leadership Imrahil, who all have built in readying effects.
- Driven by Shadow: There are two scenarios for this treachery. Either it does next to nothing, or it is the worst card you could have revealed, making your location lock a lot worse. When this treachery is revealed, each enemy and location currently in the staging area gets +1 threat. This does effect any encounter cards that were revealed before this treachery, but not those that are added after this treachery. Should there be no locations or enemies in the staging area at the time this treachery is revealed, then it surges into the next encounter card (which also doesn’t get +1 threat). The impact of this card scales with the number of cards in the staging area, and it will be less terrible if you managed to keep it clean. However, in higher player counts, this is not always possible and Driven by Shadow can easily add 5+ threat to the staging area. But in higher player counts you will have sent more willpower to the quest, so it usually balances out. It is often not worth cancelling the treachery, but it is often depending on the situation. There is only one copy of this treachery, so you do not have to worry about it triggering more than once. Shadow: The shadow effect on the treachery can be annoying, as it will discard an attachment from the defending character. If this character has no attachments, the shadow effect does nothing. But you will otherwise lose an attachment, which can cause you to take more damage if you have to discard something that boosted your defence. Should the attack be undefended, then the shadow effect discards all attachments you control. This can be devastating for some decks late in the game, and should serve as a reminder to not take undefended attacks. Note that Caught in a Web can be targetted by the shadow effect if the attached character is defending, but won’t be discarded if the attack is undefended since you do not control the attachment, the encounter deck does.
- The Necromancer’s Reach: This final treachery is probably the most remembered treachery from the Core Set and has been remade in many different formats over the years. But this classic card still invokes an audible grown across the table when it is revealed, followed by: “Can anyone cancel this?”. The When Revealed effect on the Reach is brutal in its simplicity. Each exhausted character gets dealt one damage. They do not have to be committed to the quest but can also be exhausted from triggering their effects before the staging step (Gleowine, Master of the Forge, Bofur) or be exhausted from other effects (Ents that were just played for example). Each exhausted character is dealt one damage, which can destroy lower cost characters with just one (remaining) hitpoint. If these characters were committed to the quest, they no longer contribute their willpower to the quest, and you have to recalculate after the staging step. This effect can lay waste to some decks like Silvans and Hobbits, so it should be cancelled if possible. Getting this card multiple times in the same quest phase is not impossible, as there are 3 copies in the encounter deck in Normal mode. Multiple triggers of this treachery in short succession can often lead to dead heroes and to a reset of the game. Cancellation is important for this one, but another way to avoid having to take so much damage is to ready all your characters before the staging step. Cards like Grim Resolve, Need Drives Them, Free Peoples, and Strength of Arms can ready a lot of characters while keeping them committed to the quest. Healing can also help, provided there is enough time between copies of this treachery to heal everyone.

Worst cards in the encounter deck
A new segment where I cover what enemies are the worst to get when playing this quest. This lists the biggest and baddest enemies and locations, as well as the shadow effects and treacheries that are worth cancelling if you have the option.

- Enemies
- Chieftain Ufthak
- Hummerhorns at 40+ threat
- Locations
- Treacheries
- Shadow cards
- Hummerhorns
- Undefended attacks get massive penalties from Driven by Shadow, Dol Guldur Orcs, Ungoliant’s Spawn, and King Spider.
Tips and Tricks
- Don’t bother with easy mode. Sure, some of the nasty enemies are removed, but you should be able to deal with them if they ever come up. Shadow card effects will be more common, but you might end up revealing Ungoliant’s Spawn earlier.
- Do not put Ungoliant’s Spawn in the Victory Display, I speak from experience. There are plenty of other cards that will be better prices.
- Keep your threat below 40 to avoid the Hummerhorns or raise their engagement cost.
- Be ready to defend a 3 attack Forest Spider on turn 1, you will probably have to engage it early in the game
- If you manage to lose this quest, take note of how you lost. This can be important to see what you will need to look out for in future playthroughs. Get some more willpower to overcome the threat in the staging area for instance. If the same problem keeps popping up, then go back to the deckbuilding part of the game, and tweak some cards to make up for what you lost.
- If you are a new player and going through the quest with all four pre-made decks, don’t expect to win with the red Tactics deck. That one struggles the most for willpower and the only way it can survive is if nothing but enemies appears from the encounter deck, which Legolas can then kill. Try merging Tactics with another sphere for better results.
- Don’t take undefended attacks, as many shadow cards punish you severely for taking undefended attacks by boosting the shadow effect. This can cause you to lose the game if you are not careful.
- If you manage to find Ungoliant’s Spawn early in the scenario, don’t immediately kill it. You will run the risk of having to add it back to the staging area if you get the wrong stage 3. It would be better to keep it at low health before advancing to either stage 3. That way you can quickly defeat it and ensure it won’t pop up again. This will also win you the game in case you went to “Don’t Leave the Path”.
- If you liked this quest, but are looking for more of a challenge, then I will suggest doing the Nightmare version, which actually has some damaging effects. Alternatively, you can also attempt Lost in Mirkwood from the Wilds of Rhovanion Deluxe box. This quest uses many of the same encounter cards as this quest, and will improve upon the split quest stage mechanic that stage 3 has in this quest. Both quests are of moderate difficulty, making them a nice improvement of this easy quest.
Playthrough
As the first quest in many series, there are a ton of playthrough videos to be found featuring this quest. I won’t list them all here, but a quick search will result in many playthroughs with different decks.
- 2 new players with plenty of new player advice: https://www.youtube.com/watch?v=tzEbTgg_Sgw
- Progression style, 2 players: https://www.youtube.com/watch?v=aJ242SoRyVQ
- True solo: https://www.youtube.com/watch?v=z2WeFLEckfA
- 2 player, updated (bad) decks: https://www.youtube.com/watch?v=ssEGmyEX744
- True solo: https://www.youtube.com/watch?v=lM63bvSBDFk
This is the first of a series of second edition articles that I plan to do now that the regular series is coming to an end. I will carry on going through the first cycle to rework the articles and bring them up to date with the current card pool.

9 thoughts on “Passage through Mirkwood”