The cool thing about these custom scenario quests is that they are compatible with each other. Obviously, you cannot mix Moria encounter sets with Mirkwood ones, but having 2 Mirkwood sets opens up far more customization for your encounter deck. This second custom scenario kit was the very first one ever released during GenCon 2018 and supplies encounter sets 15 to 28 of the two Mirkwood sets. It also comes with new quest cards (which cannot be mixed with the Woodland Realm!) and a new double-sided card. In this article, I will go over the synergies contained in these 14 encounter sets, go over the different quest cards you can use, and how to best tackle them if you are facing this scenario. I will not cover any synergy that can happen between The Wizard’s Quest and The Woodland Realm, as that would honestly be worth an article on its own. Instead, I will let you discover those synergies yourself if you ever want to build a very tough encounter deck for anyone.
The Wizard’s Quest
- Found in: The Wizard’s Quest Custom Scenario Kit (GenCon 2018)
- Compatible with: The Woodland Realm
- Encounter decks: 70 cards divided in 14 packs of 5 cards for quick custom encounter deck building
- Quest cards: 7, with a mandatory 3 stages per scenario.
Synergies
When building the encounter deck for this quest, there are two options. You can either pick seven of the fourteen (28 with The Woodland Realm) encounter sets and have that be your deck. This is a fast way to bring a deck to the table. Separating the encounter sets by number and putting them facedown will allow you to select 7 at random so that you have the option of making a completely different encounter deck going into the quest. This method is nice and easy, plus you’ll be sure to have a deck that meets the requirements set by the rules of having no more than 21 cost worth of encounter cards in the deck and having at least 10 of each card type. If you are cherry-picking the encounter sets, here’s what you need to know about each of them in a nutshell:
- 15: 3 cost enemy, Threat increase, Enemies in staging area
- 16: 3 cost enemy, Troll synergy, Location Lock
- 17: 3 cost location, Threat increase, Scaling with quest stage (damage)
- 18: Location Lock, Threat increase, Direct damage
- 19: Warg synergy, Direct damage, Enemies in staging area
- 20: Spider synergy, Enemies in staging area
- 21: Threat increase, Enemies in staging area
- 22: Troll synergy
- 23: Warg synergy, Threat increase, Enemies in staging area
- 24: Direct damage
- 25: Spider synergy, Threat increase
- 26: Spider synergy, Enemies in staging area
- 27: Enemies in staging area, Threat increase
- 28: Warg synergy, Enemies in staging area
Now that you see what synergy each encounter set focuses on, you can combine a few that match to really hammer down on a strategy to beat the opposing team. But don’t just look at the encounter card synergies, as the quest cards themselves are an important selection as well. The right combo of quest card and encounter deck synergy can make a scenario even more difficult if that is what you are aiming for. Here is a rundown of the main synergies included in this scenario kit and what players can do to counter it:
For Spider synergy, Location Lock, and Scaling with quest stage, see The Woodland Realm article.
Troll synergy

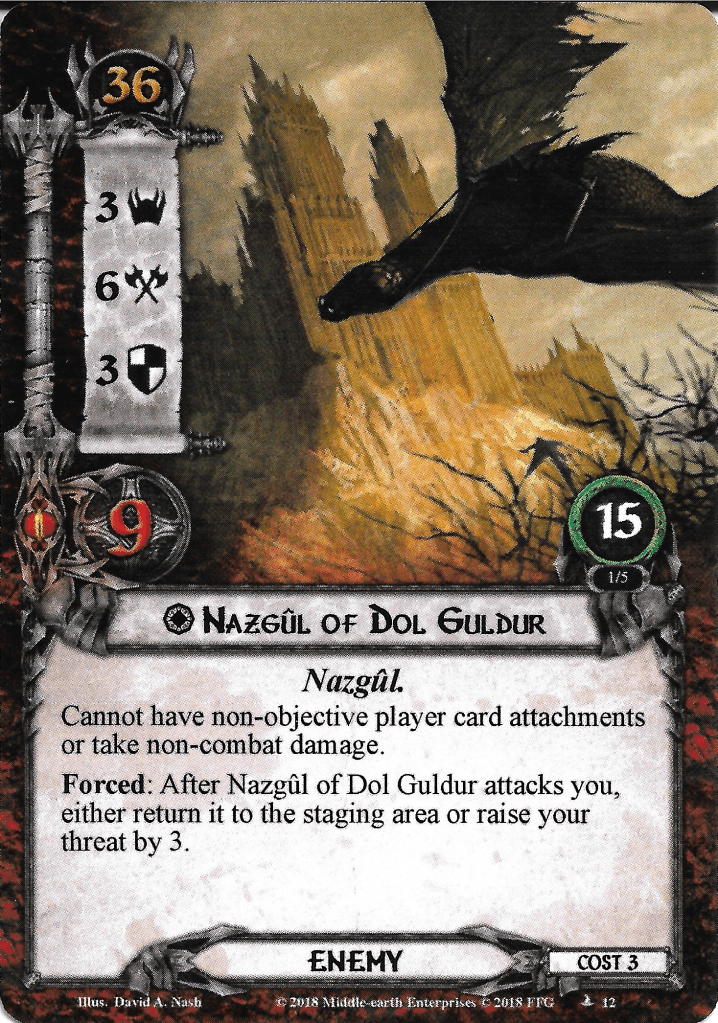
Let’s start with some of the biggest enemies you will encounter in the entire custom scenario kit: the Trolls. In total, there are three Troll enemies that you can include to add some tough enemies to your encounter deck. The fact that this synergy is relatively small allows it to be added to your main focus in case you do not have enough enemies just yet. The synergy is really just 6 cards, making it really easy to add to any encounter deck. The main focus is, of course, the high attack stat and a massive pool of hitpoints. The high attack is paired well with shadow effects that let attacks go through undefended, potentially ending up killing heroes. Trolls are difficult to take down early on, and with the Hill Troll being a 1 cost enemy, you can get one out pretty early. Trolls counter Trap decks particularly well since they cannot have player card attachments. In the late game, they might end up being one-shotted by your opponents, but that is where the Smoking Blood treachery helps you out. This provides an additional layer of protection to your Trolls, allowing them to hang on a little bit longer. And while you would expect the Trolls to be bad enough to get sent to the Victory Display, they do not actually have a Victory score, so you can continue to recycle them from the encounter discard pile or find them with the Troll Cave.
Counters: Troll enemies hit hard and are protected from attachments. But that does not protect them from canceling their attacks! Feint and effects like it can cancel the attacks made by the Trolls, allowing you to survive a bit longer. The large pool of hitpoints is an issue, but luckily the Trolls do not have very high defence. You could also attack with a Rivendell Blade and then discard any Troll with Straight Shot. If you are unable to cancel the attacks made by the Trolls, invest in a solid defender. Depending on the shadow effects, you can also get away with chumping, but don’t do this with the Bane of Amon Lanc; it will cost you cards from your hand.
Warg synergy

We have seen some wargs in The Woodland Realm kit, but not a coherent synergy surrounding them. I lumped them together with the Creature trait there, but here there are enough Wargs and warg-related effects to warrant a synergy of their own. Wargs are not the biggest enemies in the game but can end up attacking several times or gather other Wargs to them pretty quickly. They are also notoriously difficult to kill, as they will hop back into the staging area in many cases if their shadow card had no effect. This makes Wargs a slippery trait to include in your encounter deck and will pair really well with effects that keep enemies in the staging area (more on that later). A really nice combo can be found in pack 19, where the Dol Guldur Beastmaster will fetch his Warg from the encounter deck. These two together can cause real problems as players may end up engaging more enemies than they can defend. The Wargs’ Glade location is another important card to the combo, providing Wargs with the Surge keyword and fetching another Warg when the location is explored. Between the Surge keyword this location provides and the Howling Warg’s When Revealed effect, you can really get a pack together in no time.
Counters: Wargs aren’t that strong, having strength in numbers instead of their individual stats. If you manage to discard shadow cards before they are revealed, you can keep most Wargs engaged with you, allowing you to kill them. Try to keep them out of the staging area when coming across an encounter deck with these enemies. There are likely additional tricks in the encounter deck to punish having enemies up there. You might also want to invest in ways to deal damage to enemies in the staging area so that any escaped Wargs can be dealt with.
Direct damage
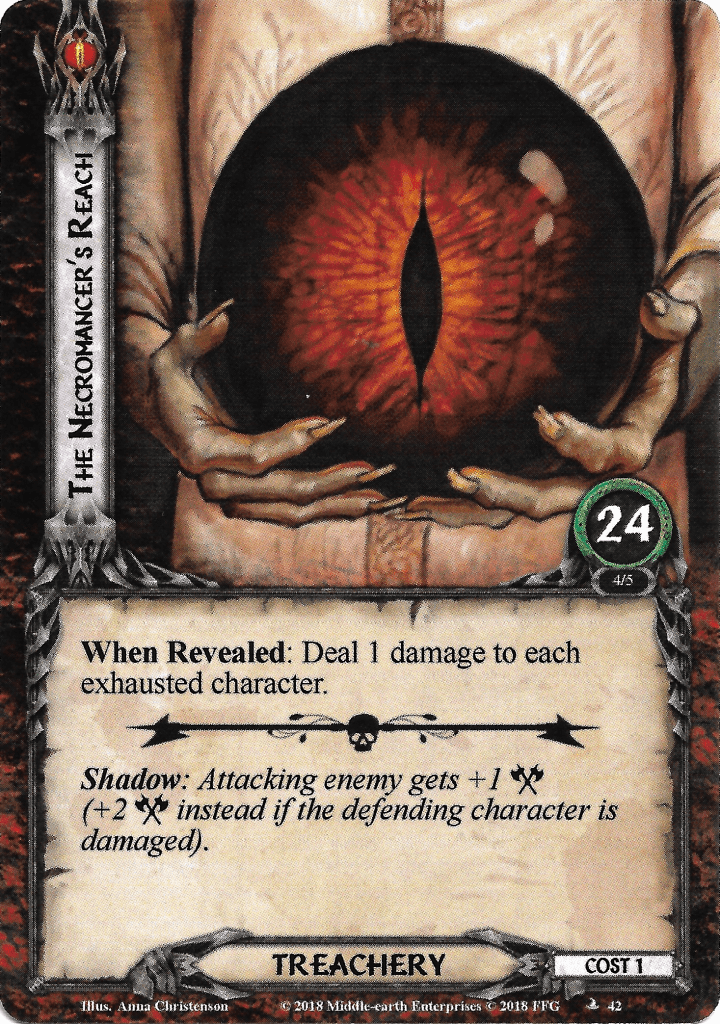
A surprising number of cards in this custom scenario kit will deal damage to your opponent’s characters. Encounter set 24 has it as its primary focus, but there are various other cards that deal a damage when a location is traveled to or an enemy is engaged. The goal of this synergy is to slowly whittle down the hitpoints on your opponent’s heroes. If they have to endure taking constant direct damage each time they quest, they might also be a bit hesitant on committing characters to the quest, in fear of taking damage. This synergy is made up of mostly treacheries like Necromancer’s Reach and Evil Storm, which will slow players down when trying to make progress. If you have ever played Desert Crossing, you know what a pain an encounter deck focused on Direct Damage can be!
Counters: You might have to know the encounter deck beforehand in order to include the right cards to counter this, but if you brought healing in your deck, you should be ok. Get it out as early as you can in order to limit the amount of damage on the table. Swarming allies faster than the encounter deck can damage them is also a smart move so that you always have allies to deal the damage to. Obviously, having powerful healing abilities like Elrond, Self-Preservation, and a flipped Forth, the Three Hunters contract can be useful as well to counter this synergy, but you will have to know that before you start the game. Hobbit decks are going to suffer against this, so they might not be the best call.
Threat increase

It’s simple, yet so effective: increasing the threat of the players. This was also on various cards from The Woodland Realm, so to get the best bang for your buck, use cards from both sets. Like the Direct Damage synergy, the goal is death by a thousand small needles. This time, those needles are small increases in threat whenever players engage enemies, travel to locations, or fail the quest because of a sharp increase in threat of cards in the staging area. Not only will this higher threat mean that the players will eventually reach their threat elimination level of 50 (or 45 if they are unfortunate enough to bring The One Ring), but the increased threat also puts them closer to the engagement cost of certain enemies that would otherwise stay in the staging area. So there is no more hiding from the horde of enemies in the staging area, and players will have to sometimes deal with multiple enemies in the combat phase. This synergy also makes it difficult for players to play their own threat-increasing cards, not just the Doomed cards but also Master attachments and heroes like Tactics Boromir.
Counters: You will have some experience with quests that try to threat you out, and there are also a ton of player cards that can help you to reduce your threat. The most difficult part might be to notice when an encounter deck focuses on threat increase since it is usually just bumps of 1 or 2 threat each time. If you have cards like Double Back, Galadhrim’s Greeting, and Elrond’s Counsel, then you will buy yourself enough time before you threat out. An ideal solution is Spirit Elfhelm, which allows you to lower your threat by 1 whenever you have to raise it for an encounter card effect. He can be quite expensive to bring to the table, though. Alternatives are Galadriel‘s effect and Galadriel’s Handmaidens + Island Amid Perils to drop your threat during the game continuously.
Enemies in staging area

This last synergy is a bit difficult to explain, but I noticed that the encounter cards in this set prefer to have enemies sitting in the staging area. There they can be buffed by Treacherous Fog, be protected from damage by Pitch-dark Thicket, and make attacks at the players with Pursued by Shadow. It helps if the enemies have a high engagement cost since that will mean that the players have to optionally engage them (which they can only do once per round). It also punishes the players with the Shadow Road (dealing damage). Restless Hunters can even return the enemies to the staging area if they are kept engaged for too long, adding a bit to the Warg synergy of running back to the staging area. All these enemies in the staging area could end up adding so much threat to the total that players will no longer make progress and have to focus on killing enemies. This can delay them long enough for the other team to beat their quest.
Counters: This is a difficult synergy to make work, but it can be frustrating if this happens to you and you have no answer for it. The ability to make attacks into the staging area with Hands Upon the Bow, Great Yew Bow, and Dunhere can be important here, as you will likely have enough targets in the staging area. The Great Hunt also works, even when the Pitch-dark Thicket protects the enemies from taking damage. You can also try to increase your threat to the engagement cost of some enemies so that you don’t have to make optional engagements, though this is risky. The Dunedain archetype also allows you to engage more enemies with Halbarad and Tireless Hunters.
Quest cards
The quest is a bit different from The Woodland Realm, and you are given a choice to select quest stages from either that kit or from this kit. However, you cannot mix quest cards from the two kits. So if you are going to play The Wizard’s Quest scenario, you are limited to 3 different stages 2B and 3 different stages 3B. The selection of these cards should really match the synergy of your encounter deck, as some stages focus on the same thing as some encounter cards. You are also welcome to go for something completely different than your encounter deck so that you hit the opponents from different angles. Take your time to get to know the different stages and select the ones you think would work best:
Quest card 1: Radagast’s Request – 10 quest points
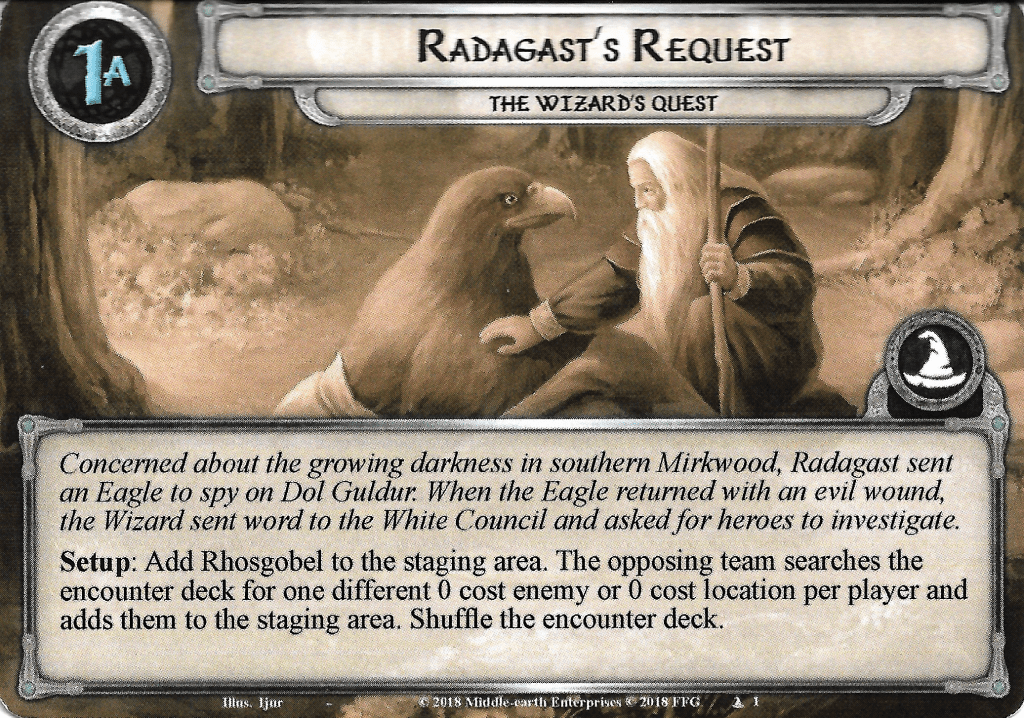

No matter what quest cards you choose, stage 1 is always the same, both side A and B. This sets up the important bits for the scenario and allows the opponents to kick off their synergy. For setup, the Rhosgobel location is added to the staging area. It is immune to player card effects but only adds 1 threat to the total. The single point of progress required to clear it is also not an issue in most cases, making it rather simple to go here. To make things even better, the location comes with a nice response where players may add 1 resource to the resource pool of all their heroes, and each player draws a card. This is super useful in the early game to the players to get set up quickly. There also will not be a lot to prevent the players from going here unless you happen to include a location in the encounter deck that is worth traveling to early as well (like Twilight Hall).
With Rhosgobel in play, the players not playing this quest (the ones that made the encounter deck) get to select one 0-cost enemy or a 0-cost location and add it to the staging area as well. Note that this does not trigger any When Revealed effects! This does allow you to set up certain strategies, like having several Pine Slopes out early to boost their threat. Eastern Crows is also a good pick, as it allows you to get a copy in the discard pile early on if the players happen to kill it.
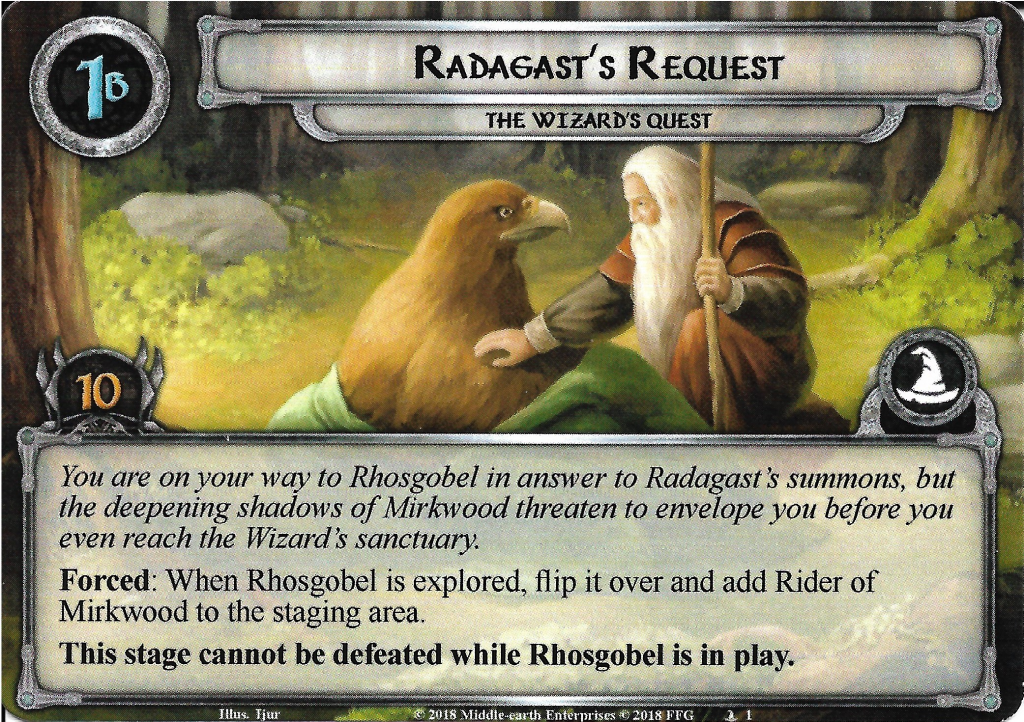
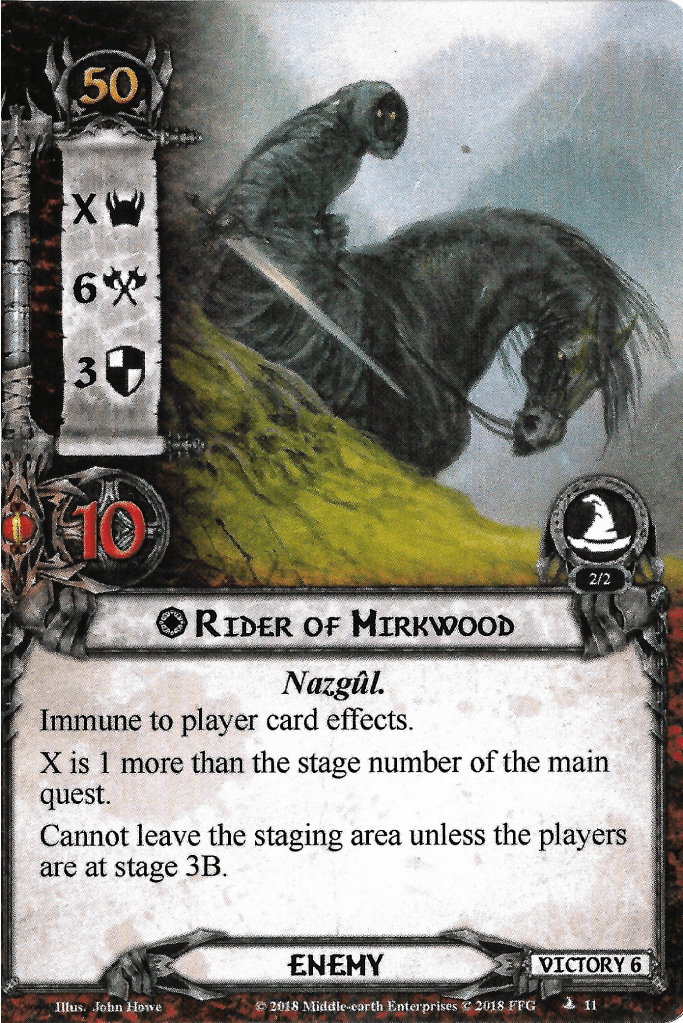
Once flipped over to side 1B, the main goal of this stage is revealed to be just making 10 progress on the stage and having explored Rhosgobel. There is no limit on how many turns this must take, but aim for roughly 2-4 turns during which time you can get established. Clearing Rhosgobel should not take very long, but once the players have actually cleared it, it is flipped over to its other side, revealing the Rider of Mirkwood. This enemy will stay in the staging area for a while until the players reach stage 3. He can make attacks through cards like Pursued by Shadow and will contribute to the “Enemies in the staging area” synergy that was described earlier. For now, he is immune to player card effects and will only add 1 more threat to the staging area as the stage number. Upon clearing stage 1 by having the Rider in play and having 10 progress on the quest, the players advance to stage 2A.
Quest card 2A: Mirkwood Forest
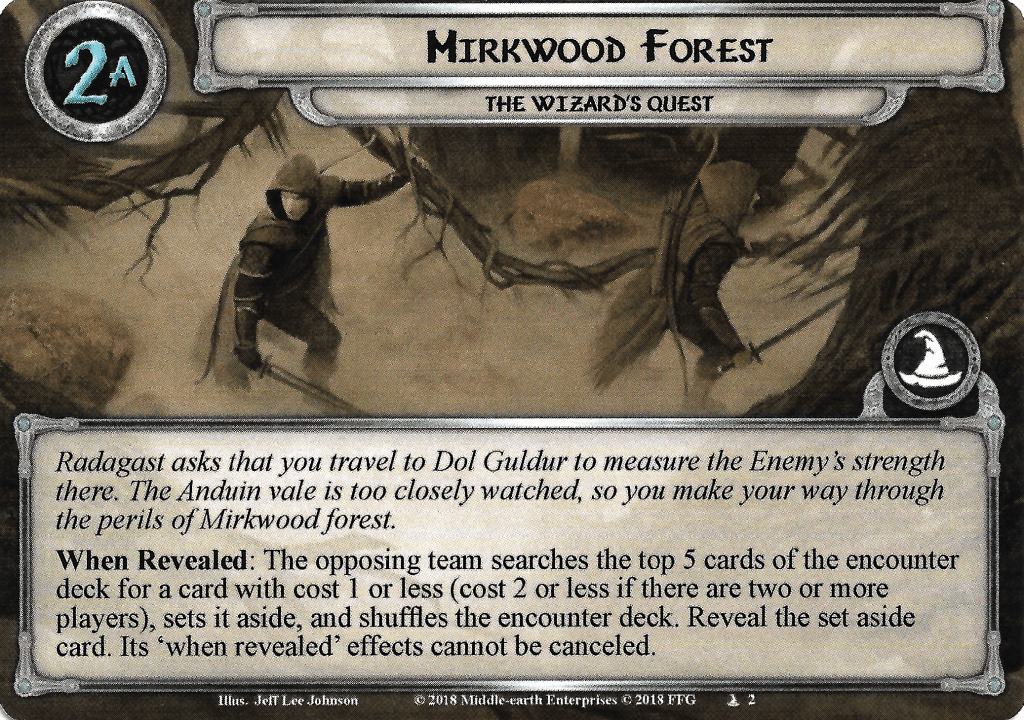
Similar to The Woodland Realm, all stages 2A are identical to each other so that the players have no idea what side B is waiting for them. 2A just informs the opposing team to search the top 5 cards of the encounter deck for a card of cost 1 or less (2 or less if there are 2 or more players) and reveals that card. It is added to the staging area, but its When Revealed effects cannot be canceled. There are some very interesting plays that can be made here, but you have to be lucky enough to find the correct cards in the top 5 of the encounter deck to make it work. Focus some more on your synergy or spring a trap with a treachery that cannot be canceled! Some good options here are:
- Pursued by Shadow, Immediate attack by the Rider of Mirkwood for 6 (or another, even stronger enemy if it is in the staging area).
- Under the Shadow, players will be nerfed to only being able to play 1 card per round during all of stage 2.
- The Sorcerer’s Tower, passive Doomed 1 on all treacheries and an uncancelable treachery when it is explored.
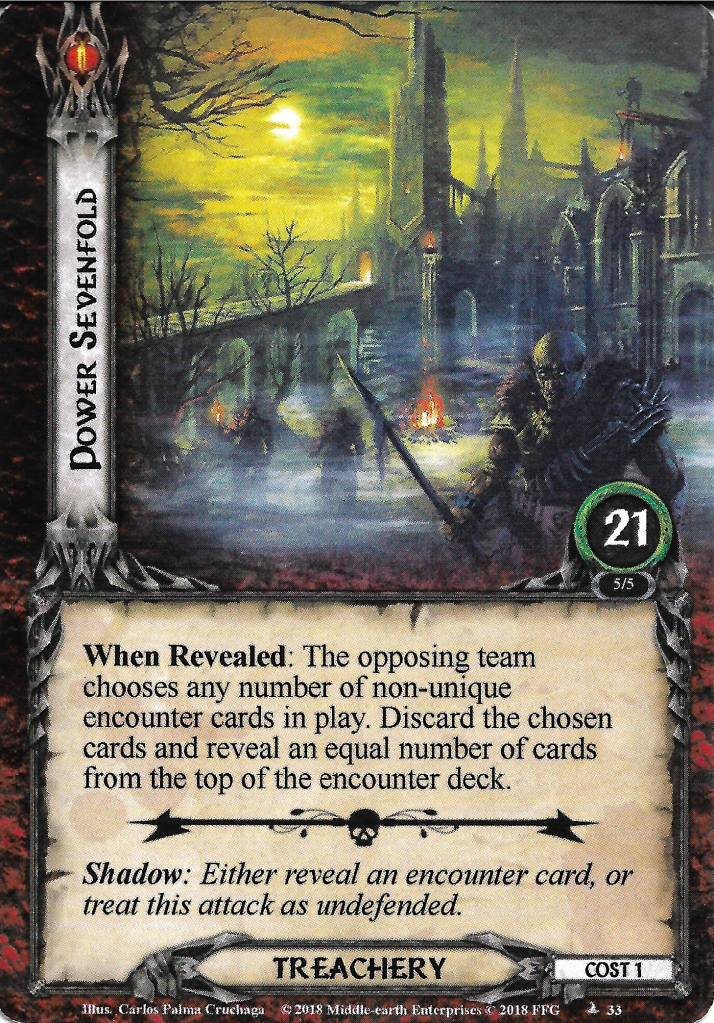
- Power Sevenfold, really change up the staging area with brand-new encounter cards. Great for if the players were placing progress on locations or damage on enemies in the staging area.
- Befouled Equipment, hinder a Three Hunters player from flipping their contract by discarding attachments at the end of each turn.
- Necromancer’s Reach, with players likely having exhausted a fair few characters to get to this stage, dealing damage to all of them can be pretty brutal.
- Nightfall, get this attached to a threat dial early on and watch the opponent struggle with threat throughout the rest of the game.
- Pitch-dark Thicket, protect all enemies in the staging area from taking damage.
- Fastness of Mirkwood, turn one card into two 0-cost locations from the entire encounter deck and discard pile.
- Howling Warg, potentially get 2 Wargs into play!
- Weighed Down is especially useful if players only have heroes or are playing Dale, and they have some combat coming up!
Note that some timing will be important for selecting the card you are going to pick. Some treacheries that influence questing characters or staging area threat might not be super useful at the end of the quest phase. Once the card has been resolved and added to the staging area, the players flip over the quest card to see at what stage they ended up.
Quest card 2B: A New Terror Abroad – 5 quest points
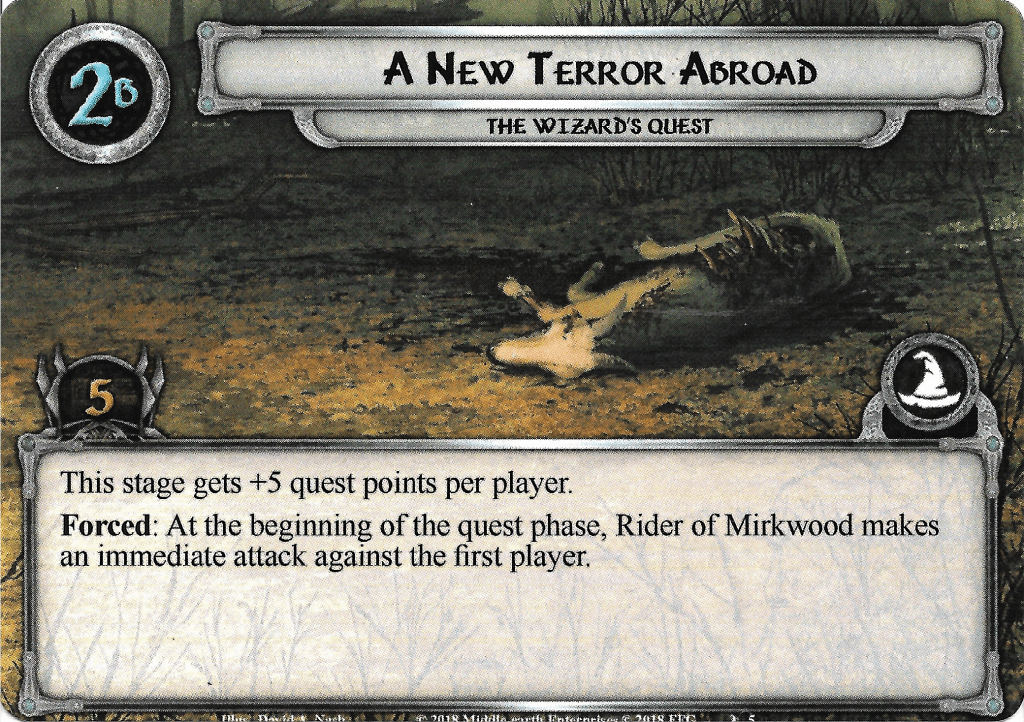
This first potential quest card focuses a lot on the Rider of Mirkwood, which is in the staging area. At the beginning of each quest phase, he makes an immediate attack against the first player from the staging area. There are no tricks to be had here since the Rider is immune to player card effects. That means that you cannot cancel these attacks and will have to be able to handle a constant 6-attack enemy at the start of the quest phase. Remember that some actions, like ally Hama, are only able to be used in the combat phase, meaning that it will not help you in this situation.
Players will have to dedicate their defenders against this attack, preferably one with Sentinel so that you can defend each player when they become the first player. Note that this will cause the defender to be exhausted during the quest phase, which can be dangerous against encounter decks with a focus on direct damage. Having your main defender exhausted early in the round also makes it difficult to take on additional enemies in the combat phase, such as the Trolls, or additional attacks made in the quest phase through When Revealed effects on enemies and treacheries. Players can also opt to chump this constant attack, but watch out for some horrible shadow effects that could make additional attacks, having to return the active location to the staging area or reveal an additional encounter card.
Aside from the attack during each quest phase, there really isn’t much to this stage, aside from the fact that it has +5 quest points per player. This means that with 2 players, you need to make 15 progress in order to beat this stage. But with no secondary objective and no limit to the amount of progress you can place in a turn, you could, in theory, rush this quest stage and be done with it quickly. This does leave you vulnerable to enemy attacks and direct damage effects, but if you have some fail saves set up during stage 1, you should be able to beat this quest stage in one or two turns.
Quest card 2B: A Fork in the Road – 5 quest points

This next quest stage focuses more on locations. After having revealed a card for stage 2A, the opposing team now gets to find a 2-cost or lower location from the entire deck and put it into the staging area. It gains a resource token to mark it as the location that has to be beaten in order to defeat this stage. This resource also provides the location with immunity to player card effects. The players also cannot travel to this location while the main quest has any quest points remaining. So the team at this stage will have to first make 5 progress on the main quest (which is made more difficult by the fact that a big location just got added), after which they are able to travel this the marked location (resolving any travel cost), and then they have to spend at least another turn in order to clear the location. All of this can be done in a minimum of 2 rounds, but with location lock looming over the players, they might have to prioritize going to another location before they go to the marked one. This can delay them long enough for the other team to pull ahead.

Some good targets for the location at this stage are:
- The Sorcerer’s Tower: provides Doomed 1 to all treacheries while it is in the staging area.
- Troll Cave: Players have to deal with a Troll after having traveled here.
- Hunter’s Lookout: Passive threat increase at the end of each round, and an additional attack of at least 6 made when traveling here.
- Forest Stream: Removes progress from the main quest while it is in play, making it more difficult to be allowed to travel here.
- The Warg’s Glade: Wargs gain surge and one is pulled out when the location is explored.
Note that there are also some really good targets for this quest’s effect in The Woodland Realm kit. If you are mixing the encounter sets, consider using some of its 2-cost locations for this quest card.
Quest card 2B: Carried Away – 20 quest points

The final option for the second stage in this quest has the opposing team select an ally from each player to be captured. The allies are placed face-up under the stage as guarded objectives with blank textboxes. While the players are at this stage, they cannot play or put into play allies that share a title with the ones that have been captured. On top of that, this quest card has the most quest points out of any at this stage (except for if you are playing A New Terror Abroad with 4 players).

This stage feels like the one with the least going on. There is no pressure to rescue the allies early since each ally is returned to its owner’s hand after the stage is defeated. Sometimes, the players might not even have allies to place under the stage if they are running an ally-light deck. This will only really hurt players that are running a Fellowship deck since they have to take longer to flip their contract and won’t get their ally back when they do beat this stage. But outside of an OHaUH Gandalf, there aren’t a large number of allies that are that essential to a deck. If you take this stage with a threat-increase encounter deck, you might get lucky with capturing an Elfhelm, which would be a big blow to the players.
Regardless, the quest still takes 20 progress to clear, which is not easy to do. Players might have gotten their questers stolen, so they are forced to take longer in order to beat this quest. 20 quest points is a lot to overcome, especially in lower player counts, so you may end up needing more turns at this stage than you would need at others. That does make this quest stage ideal for stalling the players and forces them to take more turns to increase their threat or deal more damage to them.
Again, there is no secondary objective at this stage, so once 20 progress is placed, the players advance to stage 3A. They do get their captured allies back, which they have to take back to their hand. So if you select some expensive allies, you might end up forcing the players to pay for them again in future turns.
Quest card 3A: The Necromancer’s Tower
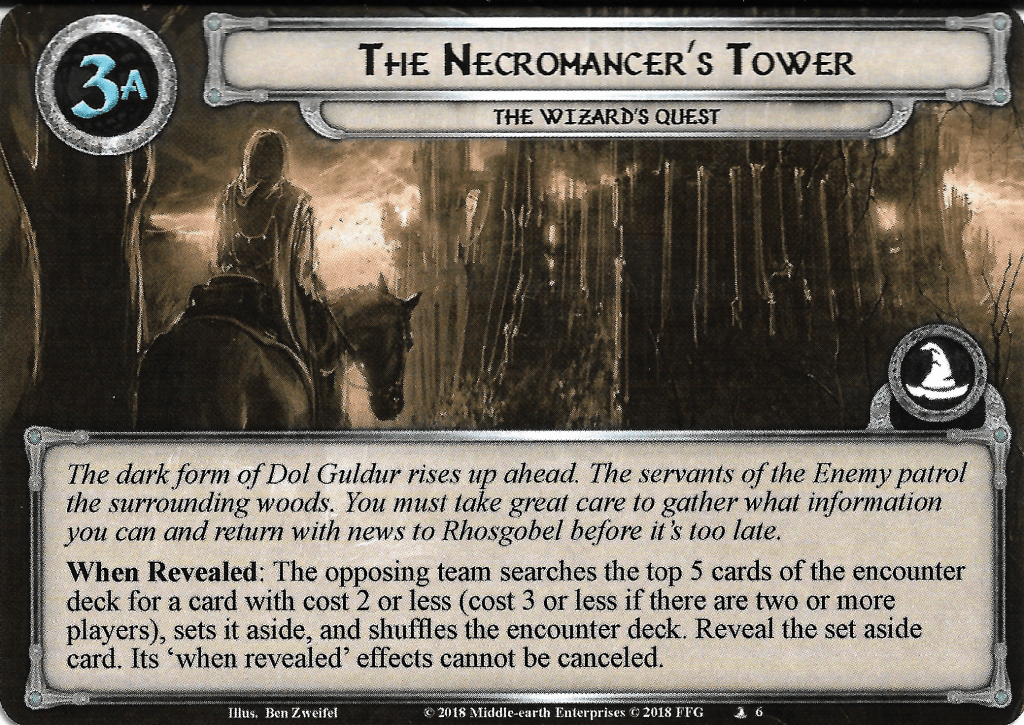
Having made it past stage 2, all roads lead back to a single version of stage 3A. At this stage, the opposing team is allowed to select a card from the top 5 cards of the encounter deck with a cost of 2 or less (3 or less if there are more than 2 players in the game). This will almost always be an important encounter card to their strategy, which cannot be canceled per the rules of this stage. The idea behind this When Revealed effect is essentially the same as at 2A, only with an increased cost for the cards selected. The players will have to hope that there is nothing brutal among the top 5 cards of the encounter deck, or else they might have a bad time. The cards that are optimal to reveal at this stage are the same ones from stage 2A, with just the 3-cost cards added. Twilight Hall will be especially brutal this late in the game since players will likely have a good group of characters together at this point. When the selected card is revealed and has been resolved, the quest card is flipped to side 3B for the conclusion of the scenario.
Quest card 3B: Dungeons of the Necromancer – 15 quest points

This first option has you infiltrate Dol Guldur in order to rescue a prisoner, much like an accelerated version of Escape from Dol Guldur. The encounter discard pile is shuffled back into the encounter deck, and each player discards cards from the top until they discard an enemy. Those enemies are then added (but not revealed) to the staging area. Each player then selects a hero they control and attaches them to the enemy that they just revealed. All tokens are discarded from that hero, but attachments remain on them. If you are running a Grey Wanderer deck, I really hope that you enjoy not being able to pay for any cards going forward since you will have to defeat the enemy to reclaim your hero in order to get their resource production back.

The objective of this stage is to kill the enemy that is guarding each hero, and then reclaim those heroes and make 15 progress on the main quest. The stage cannot be beaten while an enemy guards a hero. Once the enemy is defeated, the owner of that hero gets to reclaim them but must exhaust them. Any attachments travel with the hero and stay in play, so you are not allowed to play other copies of unique attachments that are already on those heroes.
There are some good things for the players at this stage to consider. Usually, you can afford to lose a hero for a little while this late in the game. You will have built up a strong army of allies and can probably deal with the enemy that is coming down. You also get to select the hero you are having guarded; it does not have to be randomly selected. So if your allies are doing good on willpower, have your quester be captured. While this does require you to discard all their resources, it can also discard damage tokens from a hero, healing them. This can be useful if you are out of healing options or got a hero like Beorn that is immune to other healing abilities. This stage also does not take the Rider of Mirkwood into account, though players are now able to optionally engage him in order to remove his 4 threat from the staging area.
This quest only really becomes a problem if the deck is made up of strong enemies, like the 3-cost ones in this set. Beating those will be difficult to do while being down a hero. But you can also get lucky with an Eastern Crows or a weak Warg. You also have to be careful that whatever enemy is guarding your hero does not return to the staging area after it attacks. Shadow effects can play a big role during this phase of the game. While you are fighting off that enemy (or trying to trap it), you can start to chip away at the 15 progress required to beat the scenario. Remember that you must control all heroes again before you can win the game.
Quest card 3B: Return to Rhosgobel – 10 quest points
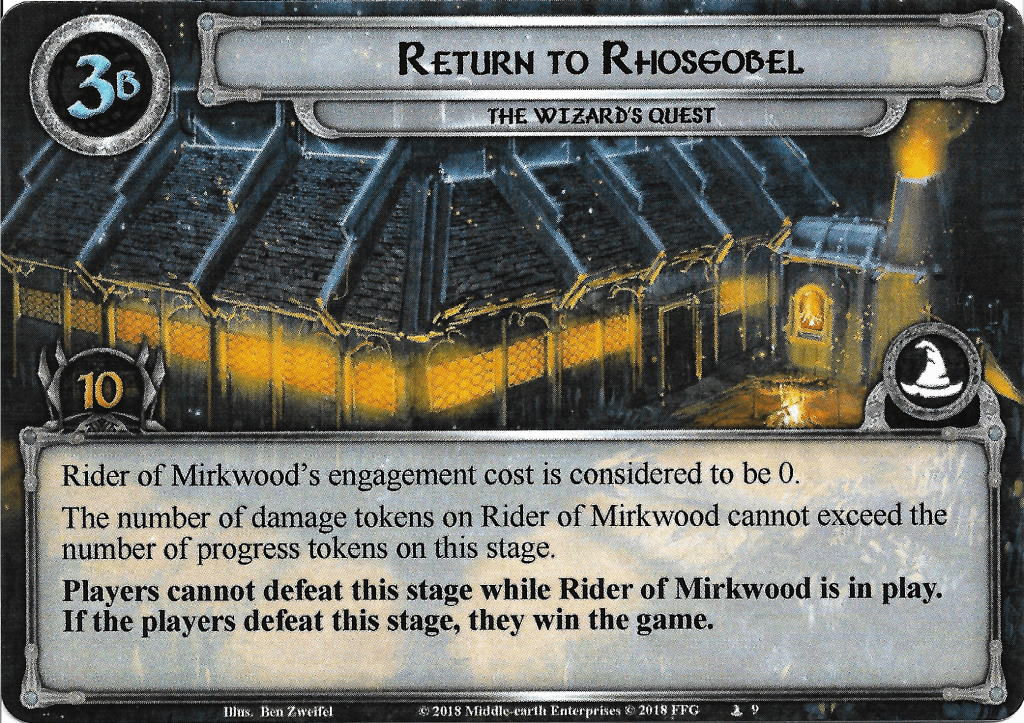
The second option for a quest card 3B is to run back to Radagast. This does require the least amount of progress of all stages but instead forces you to deal with the Rider of Mirkwood. Its engagement cost is reduced to 0, and he gains immunity to more damage than there are progress tokens on the main quest. So you first have to deal with the main quest, placing at least 10 progress on the stage in order to deal enough damage to the Rider in order to kill it. Once the Rider of Mirkwood leaves play, the players win the game.

This stage is made a bit more complex by the fact that you can end up with a location lock or stuff like Forest Stream that removes progress from the main quest. This, in turn, can heal the Rider of Mirkwood, as any damage that exceeds the number of progress tokens is healed off. If the players have had a relatively easy time with enemies so far, and have been fighting off a treachery/location-heavy encounter deck, then this stage can force them to have to deal with a pretty strong enemy. Combine this with several mechanics that can push the Rider of Mirkwood back to the staging area after he attacks, and you might have enough progress to clear the stage but can’t nail down the Nazgul.
If players have been forced to face tougher enemies, like the Hill Trolls, this might not be the best stage to pick. Sure, they need to wait until they have 10 progress to deal enough damage, but they will be well-equipped to tank a 6 attack enemy for a few rounds. It would be better to have this stage come out of the blue than to stack combat on top of an already combat-heavy encounter deck.
Quest card 3B: The Tower of Sorcery – 20 quest points

The final option for selecting what quest you have the players face last is the one with the highest number of quest points. Players are not forced into combat with the Rider of Mirkwood for this stage but could engage him to get rid of his 4 threat in the staging area. That will help to make a lot more progress in future turns. Instead, the quest stage makes things difficult by forcing the players first to commit characters to the quest and then discard cards from the top of the encounter deck until a treachery is discarded. That treachery is then revealed, and all bad things are resolved. This can range from dealing damage to committed characters with Necromancer’s Reach to returning all engaged enemies and stacking the staging area with a lot of threat. If the Sorcerer’s Tower is also in the staging area, you have a guaranteed Doomed 1 as well at the start of each quest phase.

Because of the unpredictability of the treacheries you can include in the encounter deck, I think this might be the worst quest stage to end up at. Sure, you could push hard in order to make 20 progress in a turn or two, but you have to be very careful not to lose your deck to a nasty treachery. Remember that there will be one card per player after that treachery has resolved, making the chance for a double Necromancer’s Reach a lot higher. You also flat-out increase your chances of seeing other nasty treacheries as well. Combine this with a surge-heavy encounter deck, and the players might be overwhelmed by the amount of cards that are revealed at this final stage.
Of course, the players will have some options at this stage to deal with whatever gets thrown at them. The treachery revealed at the start of the staging step can still be canceled, and there are ways to boost your willpower after having committed characters to the quest so that the quest stage can be beaten in a single turn if the players are doing their best. That makes this quest stage a less-than-ideal pick against Spirit decks, who do well on both fronts. Plan ahead and weigh each of the three options against one another in order to find the best path for your opponents.
Between this scenario kit review and the Woodland Realm one, I hope you have a good grasp on how you can build your own custom scenario for the game. This offers a lot of replayability and a great deck to bring to conventions or other get-togethers where LOTR LCG hits the table. You can even make two completely separate encounter decks, providing a different challenge if people are looking for one. I hope this has inspired you to make the most out of these weird products. I will be looking to do the two Moria custom scenario kits soon, so stay tuned!
