Every once in a while, the developers through the normal way of playing out the window and provide the community with an absurd quest. That is the case with this gem of a quest. Escape from Mount Gram is unique, as it not only puts the players at a very lonely starting position but also removes nearly half the deck before you begin. As you begin the quest, you only have 1 hero, but by the end, the entire party tries to escape the mountain together. The quest is highly enjoyable, even for new players, as they are trying to catch up to other players. The quest isn’t too difficult either and can be made even easier with certain tricks during deckbuilding.
Escape from Mount Gram
- Found in: Escape from Mount Gram Adventure pack, Angmar Awakened cycle 2
- Official Difficulty: 5
- Community Difficulty: 3.6
- Encounter sets: Escape from Mount Gram, Angmar Orcs
- Quest cards: 3, but with 4 separate stages 2 for multiplayer games
- Play if: You want an easy, yet thematic quest to bring some novice players to, you want to give your Secrecy deck a try, you want to play a deck with high-cost heroes, but don’t want to pay the full threat cost for them, you like a dungeon escape quest, but don’t fancy escaping Dol Guldur.
- What is different about this quest?: Players are separated from the start of the game, players only start with 1 hero and need to rescue the others, Captured deck and keyword, most decks lose cards that must be found in the dungeon.
- Solo or multiplayer?: I find the scenario enjoyable in any player count, but the game will take longer in multiplayer. This is because players will be at different staging areas, each needing to resolve their own staging step after the other. This can be frustrating for speedrunners of the game but can be a nice way to let new players get a feel of this game in both solo and multiplayer mode. Adding more players will make the final step easier, as more players will mean more willpower to send to the quest.
- Can I run side-quests for this scenario?: You can, they are not captured at the start of the game. However, it will be in the group’s best interest to catch up with each other as quickly as possible so it will be best to avoid side-quests for this one, try to bring them to the next scenario instead.
- What to look out for?: Player separation can leave you vulnerable, enemies will swarm if you are not careful, no access to your complete deck, boss-enemy that can be avoided if wanted, sprint to the finish, a lot of threat raising abilities, slow start with just one hero.
The Quest
Setup
Buckle up, because this quest has a lot of setup before players can advance to the next quest card, which (spoiler alert) has more setup to be resolved before you start the quest properly. Let’s dive in.
The 1A side of the quest informs players to shuffle their starting hands into their deck. This means that players don’t have to take a mulligan and that Galdor of the Havens isn’t the best hero for this scenario, as half of his ability is wasted. After all cards are in their deck, the players separate their deck into a Captured deck and a standard player deck. To make a Captured deck, players will remove from their original deck all Ally cards, all Item attachments, all Mount attachments, and all Artifact attachments. Any other attachments, events and side-quests can stay in their normal player deck. Having these cards in a separate deck really throws some archetypes off. Dale decks don’t have easy access to their Items, Swarm decks are not likely to pump out allies, and Elfhelm will be horseless for the start of the game. After the decks have been separated, the players choose one hero to be their starting hero and flip the others face down in front of them. From these heroes, they must put one aside, out of play, and any other heroes are shuffled into the captured deck (only if your deck has 3 heroes). Then, the set-aside hero is placed on top of the captured deck. This will make it easier to find at least one of your heroes early, while you wait for the other one.

Moving on, your starting hero starts off with 2 additional resources and your starting threat is set on the threat cost of that hero. This will not get raised after you find your other heroes, so it is a great way to start off in Secrecy and to have 3 strong heroes in play. Now looking at the encounter cards, the players will have to set aside the unique Southern Gate location, the unique Jailor Gornáhk enemy and the entire Angmar Orcs encounter set. This means that the encounter deck should only consist out of non-unique Escape from Mount Gram encounter cards. To complete this side of the quest card, the players draw an opening hand of 3 cards to start with and then flip the quest card to 1B.
Quest card 1: Unexpected Rescue
This side of the card is just all flavour text, followed by the instructions that each player makes a separate staging area and advances to a different stage 2A. This is the same as in Foundations of Stone, only this time the separate stages are all the same. The players will have to find each other in the dungeons but are on their own for the first half of the game. This makes it hard for some decks to function well, as they will be relying on just their starting hero for this first round. This requires that hero to quest decently, making some heroes with 0 or 1 willpower poor choices, as you won’t get allies for the first round either.
This part can also be a bit messy on the table, so make sure every player has enough space for their staging area, play area, and their own player cards. Deal each player their own stage 2 card, and advance to those stages. Remember that the first player token will still decide who resolves their staging step first.
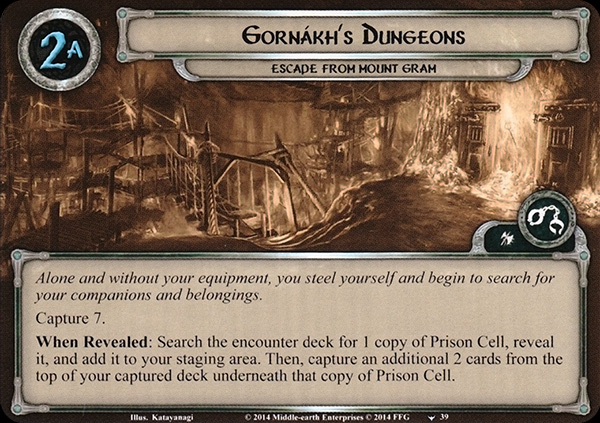
Quest card 2: Gornákh’s Dungeons – 1 copy per player
To start off this separate stage for all players, each player will have to capture the top 7 cards of their deck underneath the quest card. This will include the hero card on top of the captured deck so you will be sure that you will have an additional hero soon. After each player has captured 7 cards (or less if you have less than 7 cards in your Captured deck) underneath the stage, each player must find a copy of Prison Cell, reveal it (triggering the Capture 1 keyword) and add it to their staging area. On top of the one card that has already been captured underneath that location, the players must capture an additional 2 cards from their Captured deck underneath the same location. Then, the players may flip the quest card, and begin their game, finally.
Stage 2B features no printed quest points but reads that the players may rescue a card for each point of progress they make on this quest stage. Note that the quest mentions that this must be done at random, so you are not certain to rescue your second hero right away. I would advise using an 8-sided die or a random number generator to determine what card gets rescued once you have placed progress on the quest card. Remember that progress must first be placed on any active location first before you rescue cards from the quest stage.
After players have rescued all Captured cards from underneath their version of the main quest, they are free to join another player at the beginning of the Travel phase. This means that if you place progress during the Combat phase, you still have to survive on your own for another round of staging until you can join the other players. Joining other players will mean that any cards in the staging areas are combined, and you bring your engaged enemies with you. Having more players at the same stage will require them to keep revealing 1 card per player at that staging area for the staging step, as is normal for this game. After the players have all joined up, and all cards have been rescued from underneath the quest cards, they go as one party to stage 3.
During this stage, you will want to consolidate and build up your board state a lot. You start with barely anything, so finding your other heroes and getting some allies in play will help a lot. In order to do this, you will likely have to use your starting hero for questing during round 1. You have a very low threat at that point, so any enemies don’t have to engage you if they are revealed. It is important to make a lot of progress on the main quest as early as possible, giving you the best chance of finding your heroes. You should also consider travelling to the copy of Prison Cell that was put into play during setup. Travelling here will allow you to rescue one card from underneath the location, and play it straight away. A solid ally would be the ultimate card to get into play for this, other than your third hero potentially.
Note that the Captured keyword will act differently once players are joining each others staging areas. Whenever a group reveals a card that forces them to capture a set amount of cards, each player takes an equal number of cards from the top of their captured deck and place them facedown underneath the encounter card. This effect remains the same for when the players reach stage 3. Also noteworthy is that players cannot interact with each other while in different staging areas. This includes lowering each others threat (Galadriel for example), playing attachments on someone else’s characters, or have them gain buffs from effects like Faramir. All of these things can only happen once the players are at the same staging area as their target.
The encounter deck is designed to make your threat go up fast, so you should try and be ready for combat during round 2-3. The rest of the stage won’t take you much longer than that, provided you can quest hard enough, and don’t get location locked. Be sure to have rescued all your heroes before advancing to stage 3, as it not only gives you action advantage, but also an extra resource per turn, on top of the ability of that hero. Once every player has got a basic board state set up, the players can try to clear the final stages 2, and move on to stage 3.
Quest card 3: Flight from Mount Gram – 16 quest points
This is where your escape has been noticed, and the encounter deck suddenly gets reinforcements. To begin this transition between your sneaky stage 2 and the chaotic stage 3, the players add the set-aside Southern Gate location and the unique Jailor Gornáhk enemy to the staging area. The players then shuffle the Angmar Orcs encounter set into the encounter deck. This will increase the density of enemies in the encounter deck, especially if it was running low on cards when the players transitioned. The players will then have to reveal 1 encounter card each, adding them to the staging area. This will likely mean that the players will have basically 2 rounds of staging in the staging area at that point. This is where the quest reaches its hardest point if you survived the initial few rounds.
For solo games, this part will be especially tricky, as the threat in the staging area just increased by 6 plus the threat of the cards you revealed from the encounter deck before and after questing successfully. To get the threat out of the staging area quickly, you might be inclined to travel to the Southern Gate immediately. This is not possible though, as the B-side of the quest cards informs you that the players may only travel to the location if at least 16 progress is on that quest card. This ensures that players will have to stay at this stage for a while. My advice would be travel to other locations first and let the Gate sit in the staging area for now. With it being immune to player card effects, there is nothing you can really do about it.

In order to win the scenario, the players will have to pass a number of obstacles. The first would be to place 16 points of progress on the main quest. This gets easier with more players, but for a solo player this is not impossible to achieve, it will just take a little longer. After the 16th progress has been placed on the quest, the players are allowed to travel to the Southern Gate. It is advised that they do so when the opportunity arises, as there is no real reason to stall at that point. However, having the Southern Gate as the active location will mean that each Orc enemy gets +2 to their attack stat. Usually, you would avoid the enemies, but as soon as the players travel to the Southern Gate, each player with a threat lower than 35 must raise their threat to 35. Note that this effect cannot be cancelled or mitigated with Free to Choose or Spirit Elfhelm. The 35 threat will put you in range of most enemies in the encounter deck, so be prepared for a fight after you have travelled to the Gate.
This combat phase is do or die, as you will (hopefully) progress through the location next turn. This means that you should be able to engage most enemies and either chump or cancel their attacks. You do not really need to worry about killing the enemies, as long as you keep your questers alive. Your goal will be to advance through the Southern Gate during your next quest phase, thereby winning the game. If you are unable to do so, it might be a better idea to kill some of the enemies if possible, to ease the pain of having so many enemies engaged at the same time. A Thicket of Spears or The Wizard’s Voice will help a lot in keeping you in the game by cancelling multiple attacks if needed. Try to yolo-quest through the location if possible. You have likely removed a lot of threat by travelling to the Southern Gate and engaging the enemies, so you are bound to make at least some progress. Boosting your willpower with hero Eowyn and ally Faramir can be a clutch conclusion to the scenario.
Another card to mention at this stage would be the unique Jailor Gornákh enemy that gets added when the players transition to the third stage of the scenario. While killing him is not a prerequisite to winning the scenario (in non-Nightmare mode at least), he can still be an annoying enemy that makes attacks outside of the regular combat phase. His forced effect reads that the Jailor will make an immediate attack against the player with the highest threat (players pick who he attacks in case of a tie) whenever a card gets captured. This can get annoying quickly, so players might decide to engage the Jailor before travelling to the Southern Gate. He will act like any other enemy, with no immunity to effects like Forest Snare, for which he is a perfect target. The Jailor isn’t immune to player card effects either, so players are free to do any combat tricks they want. The 3 defence on him is easily pierced, and the 8 hitpoints should not be much of a problem for a combat capable deck. Killing Gornakh isn’t required by the game, but it does allow the players to more easily rescue cards after they defeat him. It also helps in your score, as he has 5 victory points.
After the players have successfully explored the Southern Gate, the game immediately ends with a victory for the players. While not the hardest scenario, Mt Gram will be memorable when looked at later. Next in line for the progression players is Across the Ettenmoors, where the enemies are ever so slightly bigger than mere Goblins!
The Encounter deck
Global
We will define two separate encounter decks, as the Angmar Orcs set gets added to the encounter deck halfway through the quest.
Stage 2
- This first encounter deck is really thin, with only 23 cards in Normal mode, and 19 in Easy mode. This is due to the lack of additional encounter sets for this scenario.

- Shadow effects are on 52% of cards in Normal mode, and 47% in Easy mode.
- Average threat per card revealed is very low, ranging about 0.85 threat/card revealed in both modes.
- There are no surge cards in the encounter deck, making this a good quest for Guarded objectives or Dunedain Hunter/Pathfinder
- The Doomed keyword is present on 4 encounter cards. Other than that, the quest features a lot of threat-raising abilities, so you will likely want to avoid bringing your own Doomed cards.
- All non-treachery cards have the Capture keyword and will require you to put the top cards of your Captured deck underneath the encounter card.
- No cards are immune to player card effects.
Stage 3
At this stage, the Angmar Orcs encounter set gets added to the encounter deck, changing the composition of the encounter deck slightly. The changes are noted below.
- The deck increases in size to 33 cards in Normal mode, and 27 in Easy mode

- Shadow effects are slightly more likely, averaging around 55% on cards.
- Average threat per card is increased with the introduction of some higher threat cards to the encounter deck. The average threat per card revealed is now 1 threat/card revealed between both modes.
- Only Southern Gate is immune to player card effects and cannot be travelled to unless the players have 16 progress on the main stage.
Notice how the transition between quest stages will increase the density of enemies in the encounter deck. This makes stage 3 much more of a combat-focused stage than the previous one. The number of side-quests also doubles, making it slightly more likely to encounter one of those at stage 3. This all depends on how many cards already have seen play when the players transitioned. If the encounter deck was nearly empty, the Angmar Orcs set will be dominating the encounter deck for the next few rounds.
Enemies
The enemies in the encounter deck are not terribly strong. They can still pose a problem in the early game if you don’t have your combat heroes rescued yet. At stage 3, the Goblin ranks get a much-needed boost from the Angmar Orcs encounter set, as well as the big boss enemy of this scenario.
- Jailor Gornákh: In contrast to the weak enemies listed below, the Jailor of Mount Gram will offer players a decent challenge.
 You will add Jailor Gornakh to the staging area when you move to stage 3, and there he will sit for probably the rest of the game. His 44 engagement cost will make it unlikely for him to engage unless the players get hit by Sound the Alarm. Even then, Gornakh will avoid players for the majority of the game, until the rescue cards! After any number of cards are rescued from underneath an enemy or location, Gornakh will engage the player with the highest threat, and make an immediate attack. This is troublesome for some players, who can’t deal with a 5 attack enemy potentially attacking multiple times per round. Try to avoid rescuing cards at stage 3 by either keeping enemies alive and not clearing locations or running out of cards in your captured deck so that the keyword doesn’t resolve. Players can also steer Gornakh towards the player best suited for him by either lowering their own threat or making that player raise his threat a lot (Tactics Boromir!). While it is not required that players kill Gornakh in order to win the game, it does make the scenario a lot easier. Note that he is not immune to player card effects or attachments. This frees up Traps and player card effects that can damage the Jailor and get around his decent 3 defence stat. 8 hitpoints will be tough to chew through, But players will be able to unleash their entire arsenal or tricks upon the enemy, making it easy to kill him if you have the tools in hand. Tactics Eowyn is not enough to kill him though, players will have to combine attacking characters to kill the Jailor and add him to the Victory Display.
 - Dungeon Guard: This will likely be the first enemy you encounter during your playthroughs. The Guard is the most common enemy in the game, and has the lowest engagement cost, coming down to fight within a few turns. It is also the weakest enemy in the game and hearkens back to the days of Goblins in the Dwarrowdelf cycle. A mere 3 attack character can wipe out this enemy, and it is also very susceptible to direct damage because of his two hitpoints. The enemy’s ability does him no good, but it does you! First of all, each player at the stage must capture their top card of their captured deck underneath the Dungeon Guard. Then, if the players defeat the Dungeon Guard, they may play one of the rescued cards for free! This is a great way to get more allies into play or more attachments. Try to kill the Dungeon Guard first, since this may give you another ally to attack the other enemies engaged with you. This enemy shouldn’t be a problem during the scenario, as 2 attack can easily be defended (or taken undefended).
- Cruel Torturer: Believe it or not, but this is actually the strongest non-unique enemy in the initial encounter deck. But with stats of 2/3/2/3, you may not be impressed. This is nothing compared to enemies you have faced in recent expansions, and certainly, you wouldn’t label him as the “strongest”. But the scenario needs to take into account that you start off weak, so they throw you a softball. The Torturer is a nasty enemy in his effect though, as any ally that is damaged by his attack will be captured underneath the Torturer. Note that allies killed by this effect will go to their owners discard pile first, and won’t be captured, wouldn’t be a good torturer if his patients die on him. This can cause players to have more captured cards in the late game when they have run out of a Captured deck. Rescuing the ally after killing the goblin will lead to an attack by Gornakh, synergising that way. On top of this effect, the Torturer will also capture the top card of any player at that stage when he enters play. Defending this enemy with heroes should allow you to limit the number of cards underneath the Torturer, who you can avoid in the early game as well. You won’t get at an engagement level of 36 for a while, so feel free to leave him in the staging area for a while. Killing the Torturer is not too difficult, though in the early game you may struggle to get to 5 attack. Beorn is a solid pick in this case, and attacking with multiple characters will allow you to dispatch this enemy rather easily.
- Goblin Tormentor: Finally, this enemy is one that is exclusive to Normal mode. With an average engagement cost of 28, you will be able to avoid the Tormentor for a while in the early game, but you will eventually have to face him. When this enemy gets revealed, each player at that stage will capture their top card underneath the Tormentor. This boosts his ability, on top of any other cards that have captured cards. This ability boosts the Tormentor’s attack value by X, where X is the number of encounter cards with captured cards underneath them. In higher player counts, this can become problematic, as more locations will be in play, leading to more captured cards underneath them, and a higher attack value on this enemy. You could use Revealed in Wrath to blank his text box though, as this would reduce his attack value of X to 0. This makes him far less a threat and makes it easy to defend against him. In terms of killing the Tormentor, he is pretty weak, requiring just 4 attack to kill him. This can easily be done with some heroes, and even with some allies. This enemy is a bit of a glass cannon for the Goblins, potentially hitting hard, but dying really easily.

Locations
The Dungeons of Mount Gram set the scene of this quest. The locations focus mostly on the Captured mechanic and will get easier if you run out of Captured cards. South Gate is the only unique location and must be explored in order to escape.
- Southern Gate: I have already covered this unique location during the quest overview, as clearing this location will be the final thing you do in this scenario. The Southern Gate will enter play when players advance to stage 3 and will contribute its 3 threat to the staging area. It is immune to player card effects and players cannot travel to it until they have 16 progress on the main stage. This means that you can ignore the location until you have obtained all 16 points of progress. However, after you have done that, I would advise players to travel to the Southern Gate when possible, as it will be best to finish the scenario sooner, instead of later. With so many threat raising abilities in the encounter deck, you may threat out before the end. Travelling to the Southern Gate costs nothing, but once it becomes the active location, all players with a lower threat than 35 must raise their threat to 35. This puts each player well in range of the engagement cost of enemies. These enemies will be boosted by the Southern Gate while it is the active location, getting a +2 attack each. With 8 points of progress required to clear the Southern Gate, it will come down to a mad dash to the finish. It is not too difficult to make the 8 progress, especially if you just engaged a lot of enemies. In solo, this location may take you two turns, but if you can handle your engaged enemies, then it is not a big issue. Clearing the Southern Gate will win you the game and grant you an additional 2 victory points.
- Tunnels of Mount Gram: This location gets worse with more players at the same stage and is a location that you’d like to see early. When it is revealed from the encounter deck, the Tunnels capture the top card of your Captured deck. It then gets a threat value equal to the number of cards underneath it. In multiplayer, this can become a 3-4 threat location with ease, and potentially even more if Captives of Gornakh puts more allies underneath the location. With 4 quest points, it is difficult to get out of play through location control cards, but there is one card that neuters the location completely: Thror’s Key. This blanks the location’s text box and sets its X value to 0. This means you can ignore the location for the rest of the game. You can still explore the location if you want your captured cards back, but it is not a must. If you do not have the Key available, try travelling to the location if you can. Provided you have enough willpower, it shouldn’t be too difficult to clear the location, as it has no travel cost.
- Patrol Room: Speaking of travel cost, this is the only location that has one. It also has the highest Capture value, and has the most threat you can reveal during staging right of the bat. The Patrol Room will capture the top 2 cards of every player’s captured deck at that stage. In order to rescue so many cards, the players will have to clear the location, which usually means travelling to it. This forces the players to raise their threat by 3 before you can have Patrol Room as the active location. With so many other effects raising your threat, it is actually better to clear this location in the staging area. Only 2 quest points makes it a great target for Asfaloth, but since he will start in the captured deck (being a Mount), I will point you to the Evening Star. This repeatable location control card will make short work of the locations in this quest, allowing you to rescue more cards and removing a lot of threat from the encounter deck. Besides that, the Patrol Room should be easily explored by players through normal questing, adding a bunch of cards to their hand when they have explored the location.
- Prison Cell: Just like the Dungeon Guard, this location is actually useful to have in play during the early game. Players will start with a Prison Cell in play at the start of the game and will have a bunch of cards underneath it. When this card is revealed normally though, players will have to capture the top card of their deck underneath the Prison Cell. Whenever players travel to the Cell, they may look at the captured cards and play one of them for free, returning the others underneath the Cell. This is useful, as you can get some pretty strong cards without having to pay for them. It is also good since it might grant you an extra ally just before combat, potentially allowing you to attack or defend an enemy. There is really no need for strategy with this location, just travel to it when you can to get the free card. Leaving it in the staging area is also no problem, as the location is only 1 threat anyway.

Treacheries
There are plenty of treacheries to be found, and all feel really thematic. You are escaping a dungeon after being locked up for a while, no wonder you are feeling weak.
- Feeble and Weary: We have seen this kind of treachery before, where you must deal damage to exhausted characters. However, this treachery will damage all exhausted characters, and not just those committed to the quest. The treachery gives you an option though to either deal the damage or to remove all exhausted characters from the quest. While this other option would save your Warden of Healing, for example, it will hurt your willpower enormously. The way to avoid this is to have your characters ready when committed to the quest and then picking the second option on the treachery. This can get complex, but cards like Light of Valinor and Unexpected Courage won’t be in your Captured deck so you can find them easily. For your allies, look for Valiant Determination, or use a readying effect before committing them to the quest if you know this card will be revealed. If the damage doesn’t matter to you, great! Then, this treachery will be an easy card to reveal. There are only 2 copies of this card in the encounter deck, so solo players won’t encounter it too often.
- Interrogation: This treachery plays off of the Captured deck and will be horrible when a hero is on top of the deck. When revealed, Interrogation will discard the top card of every player’s captured deck and forces them to raise their threat by the resource cost of the card just discarded. Should any player not discard a card through this effect because their captured deck is empty, then the treachery also gets Doomed 2 on top of the threat that other players will have to take. Unfortunately, not many cards in your Captured deck will be 0 or X cost, so chances are that you will have to raise your threat by at least something. Playing a cheap deck helps a lot with this. However, note that the discarded card will go straight to the discard pile, meaning that any discarded heroes this way will die. Since heroes don’t cost resources, you won’t have to raise your threat for it though. Should anyone know that their top card is a hero, cancellation will be appreciated.
- Sound the Alarm: Threat really gets bumped up in this quest, but not often through the Doomed keyword. This treachery is an exception though, as it will raise each player’s threat at that stage with 3. On top of this, all Orc enemies at that stage will get -10 engagement cost and an attack boost of 1. This makes the enemies some more of a challenge, especially for early games. If players have no enemies at that stage, they will be forced to search for an enemy and add it to their staging area. There are some good options here, depending on your style. You can probably get away with sneaking past a Cruel Torturer in the early game. You can also just pick a Dungeon Guard and reap the benefits from it once you kill it. This treachery is not really a problem, as it had to be balanced for the early game. It does not even scale with all players, so if there are no enemies in play, and you are playing with 3 friends, you only fish out one enemy.
- Captives of Gornáhk: This treachery is one you hope to see during your first turn, as you won’t have any allies yet. After that, you will likely have to ditch one ally that you just got back and let it be captured by the highest threat card in play. This tends to be a location like Patrol Room or Tunnels of Mount Gram, but it depends on what your game looks like. Regardless, you will have to ditch any ally. You will likely want that ally to be a utility ally or an ally that you can afford to lose. If the ally is already exhausted, that is even better. You can also use allies like Descendant of Thorondor or Meneldor to trigger their effects again. If you really like your ally, then I would consider cancelling this treachery, but often it is not difficult to get the card back.

Side-quests
The new side-quests bring some more urgency to your mission and can force you to go off track in order to prevent bonuses to enemies or to have to raise your threat by a lot. It isn’t a big mechanic of this scenario though, the next scenario in the progression focuses on side-quests a lot more.
- Stop the Executioners!: Did I already mention that this quest is dripping with theme? Well, this side-quest just made it a whole lot juicier. This scenario specific side-quest will capture the top 5 cards of your captured deck and gives you 4 turns to rescue them. This is done by questing against this side-quest before you move on to either your stage 2 or 3. If the players beat the 6 quest points of this side-quest, great! You will rescue all cards underneath the side-quest and add it to the victory display. If time runs out though, you will be forced to discard all captured cards underneath the stage. Then, for each character (hero or ally) that a player discarded this way, they must raise their threat by 3. This can be a huge jump in threat if you are discarding mostly allies through this effect. However, if this card turns up late-game, you might just ignore it and powerquest through the main stage to win. I really love the theme of this side-quest, as it defines what the side-quest should be like. You have the option to rescue your friends, but you can also abandon them and raise your threat. The choice is yours. If you want to tech against this side-quest, don’t bring many allies to your captured deck, and you will be fine.
- Orc Ambush: This side-quest looks familiar, as it was also featured in some of the Lost Realm scenarios. It gets shuffled into the encounter deck after you advance to stage 3 so you won’t encounter it until you have a decent board state. The side-quest will pull out an enemy for each player and put them engaged with them. On top of this, each Orc enemy gets +1 to all their stats, making them more dangerous. Fortunately, this scenario has some weaker Orc enemies that you can pull out of the encounter deck, for who the buffs are less of a problem. Dungeon Guard and Goblin Tormentor are some examples. You can also pick out Angmar Orc if you want, in order to avoid the When Revealed effect. The side-quest itself can require some attention though, especially if you are swarmed with enemies. It is not wise to keep the side-quest in play at the same time that you have travelled to Southern Gate, as that would mean a +3 boost to the attack stat of all enemies. Try to clear the side-quest if you must, 4 progress isn’t too bad, and it allows you to keep some more characters back for combat.

Tips and Tricks
- Obviously, there are great cards to add to your deck that take maximum advantage of the thin player deck and the low starting threat of players. Run some copies of Resourceful to make up for the initial loss of your heroes. Getting 1 or 2 copies of this card out for cheap will help a lot in the late game.
- Note that cards like Skills, Songs, Conditions, and Titles are not removed from your deck at the start of the game. This allows some players to avoid bringing Items, Mounts, and Artifacts all together, and run a thinner Captured deck.
- To get your second and third heroes early, try to minimize the number of cards that get captured at the start of the game. Avoid running many allies, and rely more on Events and Attachments as mentioned above. This will make it easy for you to catch up with other players, and you can also move through stage 2 faster. Having no more cards in your Captured deck will also help against a number of encounter cards.
- Try to have a balanced hero as your initial hero. You will need to rely on this hero for the first few rounds, and don’t want to get stuck with someone who cannot quest you out of your position. A hero with at least 2 willpower is preferred, as you will be able to rescue some cards quickly. Built-in readying effects will help with combat. For good suggestions, look for heroes like Sam, Leadership Aragorn, Beravor, Eowyn, Bard son of Brand etcetera.
- Since you will be lacking some sphere matches in your initial phases, you won’t be able to play all of the cards in your hand until you get some other heroes rescued. For this, try to avoid tri-sphere decks, and play preferably mono-sphere. You can also add some copies of A Good Harvest to your deck for some early game sphere bleeding.
- While killing Jailor Gornakh isn’t required by the quest, you will have an easier time if you can kill him early in stage 3. Otherwise, he will continue to make attacks outside of the combat phase against the player with the highest threat. He is not a very strong enemy, so Tactics Eowyn will do well against him, though she needs a little help for that last hitpoint.
- Direct Damage is actually pretty good in this quest, as most early enemies only have 2/3 hitpoints. This makes it very easy to defend against them with a Gondorian Spearman or a Spear of the Citadel. Try to use some events that deal damage first, as they are found more easily in your opening hand than allies or attachments. Argalad is also a really nice hero to use here, as most enemies are immediately in his range to deal damage to.
- Dale decks suffer during this quest, as both their allies and their Item attachments will be stolen during setup. Don’t try to play a deck like that, as it will be hard to find the correct allies and attachments in the correct order. If you have attachments for allies, ask yourself if it is really necessary, as such a combo will not happen unless you are very lucky.
Playthroughs
As easy as this quest is, it isn’t too popular in the playthrough community. This is likely due to the long setup and the fact that players are unable to rely on allies or certain attachments for the majority of the game. Still, here are some videos to help you out.
- 3 players, modern cardpool: https://www.youtube.com/watch?v=6K0QFHouh0g
- 2 handed, progression style: https://www.youtube.com/watch?v=6T0a9JMcp_4
- 2 handed, progression style: https://www.youtube.com/watch?v=YHvXIz9BpOY
- 2 (1) players, modern cardpool: https://www.youtube.com/watch?v=gkBif6bmiV0
This article should conclude the Angmar Awakened cycle. We will take a short break through December before starting the Dream-chaser cycle at the start of 2019. This doesn’t mean that all articles will stop, there will still be trait analyses, staple articles, and perhaps the odd Nightmare scenario here and there. More information on this will follow soon.

4 thoughts on “Escape from Mount Gram”