Unearthly it looked, as though it had fallen from the sky, as some believed…
The Return of the King
This quest is another Print on Demand (POD) quest which focuses on finding Lamedon lord’s lost son. Nobody has seen the boy for many days. So his father asked, from you and your party, to track him down and safely return him to Lamedon. This quest might not be the most famous POD quest but can offer you great action and a handful of alternative and new mechanics. I have to admit that I’m in favor of this quest cause it branches off from the classic Orc enemies and reminds us that there is a lot more to fear than the living. This particular quest is designed for high willpower decks which happens to be really thematic as the scenario is about dark locations and undead enemies who will try to haunt you as soon as they see you. So you must be really dedicated to your purpose in order to carry through with it. The next thing you need to do, when you find Derufin (Lamedon lord’s son) at Blackroot Vale is to try to escape without losing your mind. And I promise you, the Lord of the Dead won’t make it easy for you.
The Stone of Erech
- Found in: The Stone of Erech print-on-demand scenario. Part of the 2013 Gen Con event.
- Official Difficulty: N/A
- Community Difficulty: 6.5
- Encounter Sets: The Stone of Erech
- Quest Cards: 3
- Play if: You want to face undead enemies instead of the classic Orcs, you want to test your Willpower deck, you like the Battle keyword on quest cards but don’t want to try the extremely difficult scenarios of Heirs of Númenor, and finally, if you want to experience an alternative time mechanic that punishes you progressively.
- What is different about this quest?: Objective cards playing the role of daytime, Spectral keyword, undead enemies and the Battle keyword.
- Solo or Multiplayer?: You can go with any number of players here, but keep in mind that with more players in the game, you’ll need a great amount of willpower. Furthermore, the 3A quest card will force you to reveal X+1 enemies, where X is the number of players in the game. Again, though you can give it a try even with 4 players.
- Can I bring Side-quests: I wouldn’t recommend bringing side-quests along. You should prioritize passing the quest cards as fast as possible before Midnight Objective is added into play. If you lose time exploring side quests and night comes, then a lot of encounter cards are going to get a great buff and will make the remainder of the game significantly more difficult. If you really want to fit side quests in this scenario you must be well prepared for a ton of negative effects and a Battle keyword waiting for you on the 3rd quest card.
- What to watch out for : Absence of willpower. You will need a great amount of willpower on your characters, not only for progress purposes but also for attacking, as all enemies in this scenario have the spectral keyword. Be careful of the mighty Lord of the Dead.
The Quest
Setup
The first quest card of the Stone of Erech scenario instructs the players to make Tarlang’s Neck the active location. Then, set Derufin, The Lord of the Dead, Stone of Erech, and the 3 night objectives aside out of play. Next, they are instructed to shuffle the encounter deck and place Eventide into play, next to the current quest.
The first thing we notice in the setup instructions is the fact that not a single card goes to the staging area. Although, when the players follow the when revealed effect of stage 1B, they are going to reveal 1 card per player and realize they aren’t so lucky to start the quest with no encounter cards in the staging area. Furthermore, Eventide objective and generally night objective cards, represent the current in-game time which replaces the time keyword introduced in Voice of Isengard Deluxe Expansion. While rounds come and go, other night objectives will get into play and will bring to the surface some unpleasant effects. We are going to discuss further, about night objectives later in this article. Before we proceed to the quest cards it’s necessary to introduce the Spectral keyword found in this scenario. The Spectral mechanic expresses the fact that the Undead cannot physically get injured by classic combat, and for this reason when a player gets into combat with an enemy who brings the Spectral keyword, attacks that enemy counting the total willpower of his characters, that were declared as attackers, instead of their attack power. Still, enemies attack with their attack power, and defenders are counting their defense power for both sides (characters and enemies). I find this mechanic pretty accurate because in that way only characters with great courage can face and harm our ghostly enemies without their blood run cold.
Quest card 1: The Disappearance – 6 quest points.

You are approaching Morthond Vale. As your heroes wander around, they note the villagers to snuff their candlelights and close their house doors behind them. When you finally find and ask some of them, they claim that they saw a young boy heading towards the hill of Erech. People are really scared for a mysterious reason. You have to hurry, the night is near. When the players proceed to stage 1B they have to reveal an encounter card per player. This won’t be a particular problem cause having 2 cards on the staging area at the beginning of the game is pretty common. Although, revealing a copy of Regretful Shade will be unfortunate as it can Surge to some nasty cards.
Taking into account that you have to clear Tarlang’s Neck to progress to the next quest card, the real amount of progress that must be placed to progress is at least 12.
You should always have in mind that progressing is the key to this quest. You have 4 turns to spare in each night objective card. So completing the scenario in under 8 turns is essential. Although, if the Midnight objective is added to the game you can still win,but it can make the quest twice as troublesome.
Quest card 2: Terror of the dead – 8 quest points.
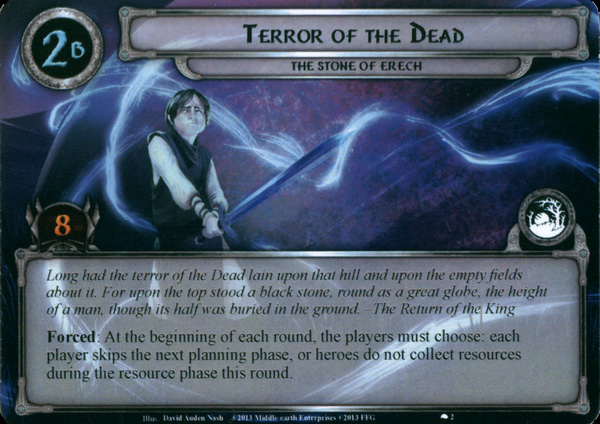
As your heroes continue their mission, they get closer to the Stone of Erech. All they see around is a thick fog, and inside the fog emerges a human figure. It’s Derufin! He is holding tight his father’s sword trying to communicate with the spirits. You have to get closer to the Stone and save Derufin before it’s too late.
When you reveal 2A quest card, put Stone of Erech into play and attach Derufin to it. Then on B side of the same card, you are directed to choose for every individual turn either to skip the planning phase or heroes don’t receive resources at the resource phase this round. In other words, the players are called to decide if they gonna play cards from their hands and don’t receive resources or receive resources and don’t play any cards (mostly allies and attachments, because events can be played almost any time).
In case you are playing with an event deck the above, forced effect won’t bother you much. In any circumstance, you should evaluate your current situation and think if you can afford to save some “money” for now and spend them for some great player cards next round. Moreover, this quest cards (as well as the previous one) doesn’t need any huge amount of progress, 8 progress can do the job here, but don’t be hasty. It would be beneficial if you clear Stone of Erech location before you advance to the next stage because stage 3 won’t let you place any progress, unless you control Derufin which means Stone of Erech must be explored first.
Quest card 3: The Shadow Host – 14 quest points.
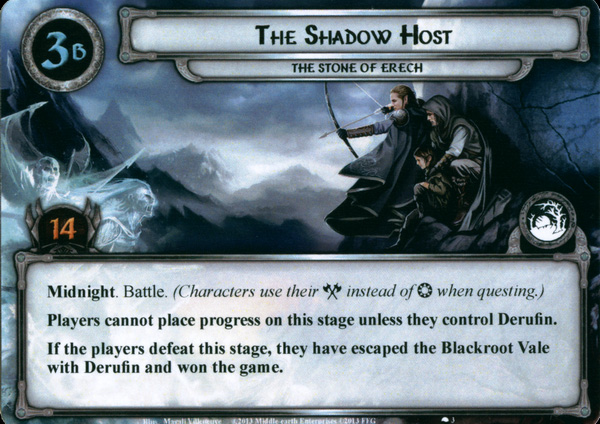
In the third and final part of our story, your presence has angered the spirits here and The Lord of the Dead summoned his minions to make sure nobody will live to tell the story.
When you advance to stage 3A, hopefully before midnight, every player must search the encounter deck and discard pile for 1 Oathbreaker enemy, reveal it, and add it to the staging area. Then, add The Lord of the Dead to the staging area and shuffle the encounter deck.
The enemy I always look for to reveal for this effect is Whisperer, and if I play this quest with up to 3 players I choose to reveal 3 Whisperers (there are only 3 in the encounter deck). In a 4 player game, I lean more on revealing 3 Whisperers and 1 Shadow-man but only when I’m sure that I can afford not to play an event this round. Another alternative option instead of choosing to reveal Shadow-man, is Shadow Host Captain because his high engagement cost will leave him be in the staging area giving you enough time to deal with the remaining Oathbreaker horde.
Flipping the quest card to Stage 3B, the first thing you notice is the Battle keyword. For those who don’t remember what the Battle keyword does. When a quest card has this keyword, when players commit characters to the quest, instead of counting their total willpower they count their total attack power. Furthermore, as said before you can’t place progress in this quest unless you control Derufin and if the players defeat this stage they have safely escaped Morthond (or Blackroot) Vale with Derufin and have won the game.
The Encounter deck
Global
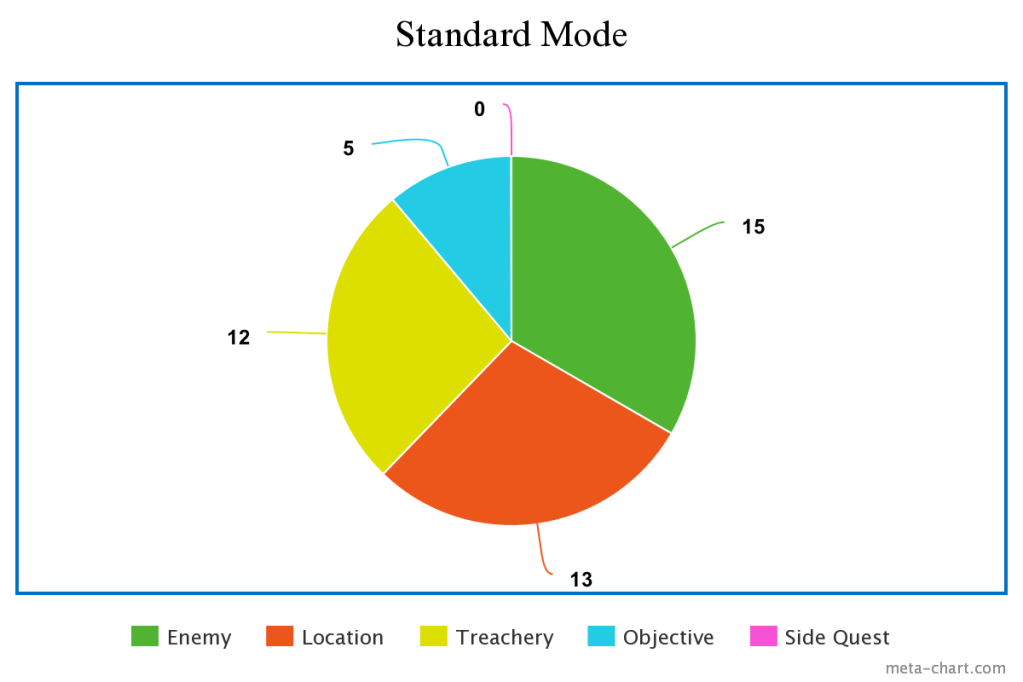
- The encounter cards in this scenario are 45 in both Normal and Easy mode but only 39 of them can end up in the encounter deck.
- The chance of a shadow effect is around 36% for both Normal and Easy mode. Always the chance of dealing a shadow card with a shadow effect is calculated excluding the cards that never end up in the encounter deck. Most of the shadow effects focus on increasing the attack of the attacking enemy, dealing additional shadow cards, dealing damage to the defender character and placing progress on night objectives.
- Average threat on cards revealed from the encounter deck is approximately 1.44 threat per card on both Normal and Easy mode with a high chance of increase. If the Dusk or Midnight Objective is in play and an encounter card with Surge is revealed then we talk about a much higher threat/card. However, if your deck is a willpower “factory” then you shouldn’t have any trouble progressing.
- Surge is printed on 5 cards. 3 of them are the copies of Regretful Shade and the other 2 are the copies of the treachery card The Gloaming. Additionally, Groping Horror treachery gains Surge at Midnight, plus there are a few card effects that can bring more enemies to the staging area, so always be prepared for more cards.
- There isn’t any Doomed keyword printed on the encounter cards.
- The Stone of Erech is immune to player card effects and The Lord of the Dead cannot have any attachments. Furthermore, at Midnight Midnight Throng When Revealed effect cannot be canceled and Murmurs of the Dead shadow effect cannot be canceled either.
Objective
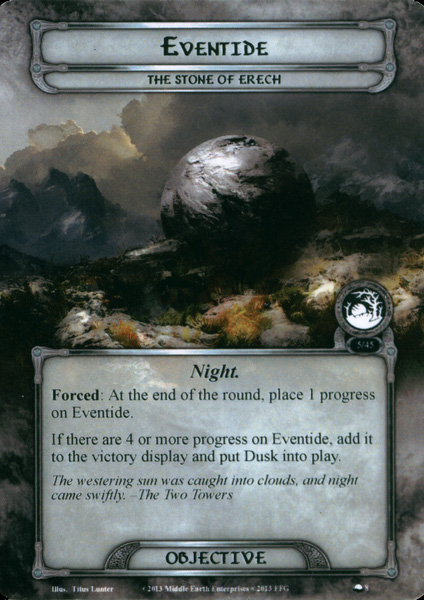
- Eventide: The first objective card we are going to discuss is Eventide. When this card is in play you should place 1 progress on it at the end of every round. When there are 4 progress on Eventide, it goes to the victory display and the Dusk Objective goes in play. I recommend to do as much progess as you can while you are in Eventide because when Dusk and Midnight comes a lot of nasty encounter card effects might trigger.
- Dusk: After Eventide comes the Dusk. Dusk works as a “Warning” in order to speed up and try to finish the quest before Midnight comes and the Spirits reach their maximum potential. While this card is in play all the Dusk effects of the encounter cards are triggered. Again, at the end of every round you should place a progress on Dusk and when it has 4 or more progress it goes to the victory display and you should put Midnight into play.
- Midnight: When Midnight comes and the Oathbreakers are more powerful than ever, you should hope to be towards the end of the quest otherwise you gonna have so hard time. This night Objectives follows the same pattern as the previous ones but now when you place a progress at the end of the round, each player raises his threat by the total number of progress on Midnight. Moreover, the Dusk effects that were triggered with the previous night Objective are now ignored but some other (Midnight) effects are enabled. Most of the times, the Midnight effects are the same as the Dusk effects but more enhanced.
- Relic from the Dark Years: This Objective card is actually a card that tries to help the players. Unfortunately, it’s effect can be triggered only when the players are in Midnight. So, when in Midnight the players can claim this Artifact and attach it to a hero. That hero, can attack an Oathbreaker enemy ignoring the Spectral keyword until the end of the phase. This card is always a good thing to see while you are at the stagging step even if you aren’t in Midnight, because you actually reveal a neutral card with no threat from the encounter deck and you have to care about one less card.

- Derufin: The last Objective card we are going to discuss is Derufin. Derufin is the son of the Lord of Lamedon that was lost and you and your team are trying to find and rescue. While you proceed to Quest card 2A you are instructed to attach Derufin to the Stone of Erech location in the staging area. Furthermore, when players Travel to the Stone of Erech, the first player gains control of Derufin. While it’s Dusk Derufin gets -1 willpower and while is Midnight Derufin gets -2 willpower for the remaining of the game. The most important part is to protect Derufin, because if he leaves play the players lose the game. All in all, Derufin is a cool Objective-Ally that you can earn, especially in early game, before he gets debuffed by Dusk and Midnight night Objectives.
Enemies
The enemies of this quest are exclusively Undeads. They are the men who swore an oath of allegiance to Isildur but broke it, when Isildur called them to fight against Sauron in the war of the last alliance.
- Restless Dead: The first Undead in our list is Restless Dead. He has a harsh when revealed effect which force you to return the topmost Undead enemy from the encounter discard pile to the staging area. This effect gives a more zombie feel to the enemies of this quest, which personally I find pretty clever. Although, Restless Dead would be a great draw at the beginning of the game (while there aren’t any Undead in the encounter discard pile yet), at late game where you propably have to deal with a handful of enemies, Restless Dead is going to reveal an extra couple enemies (including itself). On the other hand, if happens to have a copy of Straight Shot in your hands you can easily destroy Restless dead without any effort.

- Regretful Shade: This Undead enemy has a simpe but harsh Surge keyword. He has generally low stats of 1 threat, 2 attack, 1 defense and 3 hp (1/2/1/3) which makes him a weak attacker. If happens to deal it as a shadow card, the attacking enemy is going to receive 1 additional shadow card, or 2 if it’s Dusk ir even 3 if it’s Midnight.
- Shadow-man: Another Undead enemy in this quest, is the mighty Shadow-man. When this enemy is revealed, players cannot play events until the end of the round. This effect might make you unable to play a copy of Feint to reduce the amount of attacks you will receive but, depending on the situation, some traps might get handy here. Of course someone could say that traps aren’t so effective to Spirits but if it works it works. Some great examples of Feint alternates are Entangling Nets which might lower the high attack of Shadow-man from 4 to 2 and drop it’s defense to 0 (a possible combo with straight shot). Another alternate is Outmatched which might ready your defender, to withstand another attack. In case of Shadow-man, Outmatched would be a better choice, taking into account his 5 hp which means if you can’t kill him in one round the trap probably will get handy the next round too.

- The Lord of the Dead: The main villain of this POD scenario is The Lord of the Dead. First of all, he cannot have attachments (so forget traps on this guy). Secondly, when Lord of the Dead is engaged with you, you must treat all character’s text boxes as if they were blank (except for Traits). We should take a minute to realise how hatsh that effect might be, especially if you are playing with a deck that focuses on character effects. On the other hand, events and attachments still contribute while their text box is intact. You should always save a Feint or two for this Enemy as it’s 6 attack would probably deal a lot of damage to any character, so champ blocking might be a slippery slope. If you survive the attack of Lord of the Dead, in order to defeat him you need to deal him 3+9 damage, but remembering the Spectral keyword that leads to 12 willpower ! Thankfully, defeating Lord of the Dead isn’t necessary. To win the game the only thing you have to do is placing 14 progress in total and control Derufin. Although, I recommend to kill that bastard if you have the chance, in. my opinion is vital to get back your character’s effects. In case, this Enemy is revealed and you still are lower than 30 threat, he will contribute 5 threat to the total in the staging area which makes it a lot harder to progress quick. Most of the times I played this quest, I engaged him as soon as possible to have a better chance to outrun him and finish progressing on stage 3B.
- Whisperer: This is my favorite Enemy in this quest as it is the most mild one. He is a 2 threat, 2 attack and defense enemy who only gets +1 threat if it’s Dusk and +2 threat and doomed 2 if it’s Midnight. Once again, we see how important is to try and finish this quest before Midnight. This Enemy is my favorite in this scenario for couple of reasons. First, he has an amazing art work. It hasn’t so many details but it can give you a really thematic vibe and immerse you deeper into the plot of the quest. Moreover, he is the best choice when you are searching for enemies to reveal as the quest card 3A instructs you. Because 3A didn’t state that you must search for different enemies if you are in a 4 player game (for example) you can choose multiple copies of whisperers to reveal.
- Shadow Host Captain: This is the last enemy we are going to face in this quest. One can say that this enemy’s effect is supplementary to Whisperer’s effect as if it’s Dusk, he gets +1 attack and defense and if it’s Midnight he gets +2 attack and defense. On the other hand, he is kinda harder to kill him because of his 6 health. To make matters worse, he attacks with 4 but he potentially can reach even up to 6 attack. I can’t really see the reason to make his maximum attack and defense equal to the attack and defense of the Lord of the Dead but thankfully his threat will always be 3, so if your threat is under 42 (which in most cases will be) you can affford to leave him for a couple of rounds in the staging area in order to clear the board.
Locations
The locations of this POD Scenario depict the area of the Blackroot Vale and achieve to pass to the players, a strong thematic vibe of the spookiness of the region. The Stone of Erech, which of course is the main theme of the quest, is a Stone that Isildur rescued from the sinking of Númenor and brought to the hill of Erech in Gondor.
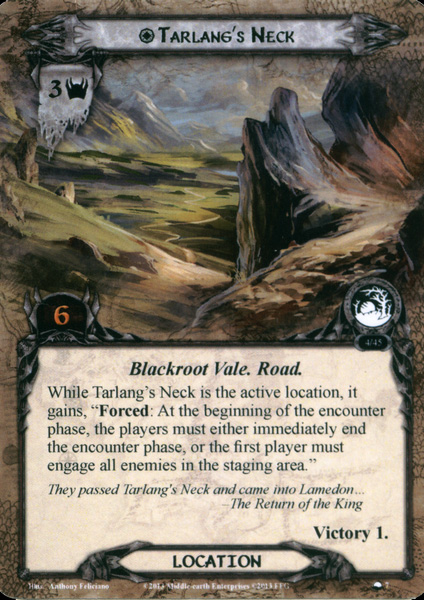
- Tarlang’s Neck: While you setting up this Scenario you are instructed to make Tarlang’s Neck the active location. When this unique location is in the staging area it gains the following effect : At the begging of the encounter phase, the players must either immediately end the encounter phase, or the first player must engage all enemies in the staging area. In other words, you need to decide if the first player can handle all enemies in the staging area or there won’t be any engagement checks for this round. This location must be cleared in order to proceed to quest card 2A and it’s 6 quest points are above average, so you must begin questing as hard as you can. In the bright side, Tarlang’s Neck has 1 Victory point and shares the same trait (Blackroot Vale) as all other locations in this quest so it makes a great opportunity to bring Rossiel along.
- Banks of Morthond: The pros of this location is it’s low threat of 2 which won’t contribute a lot in the total threat, and the effect that has when it gets to be the active location. While Banks of Morthond is the active location each location in the staging area gets -1 threat. The cons of this location are the 7 quest points that it requires to explore it and the shadow effect which forces the players to place a progress token on the current night Objective, if the attack of the enemy who Banks of Morthond is dealt as a shadow, destroys a character.
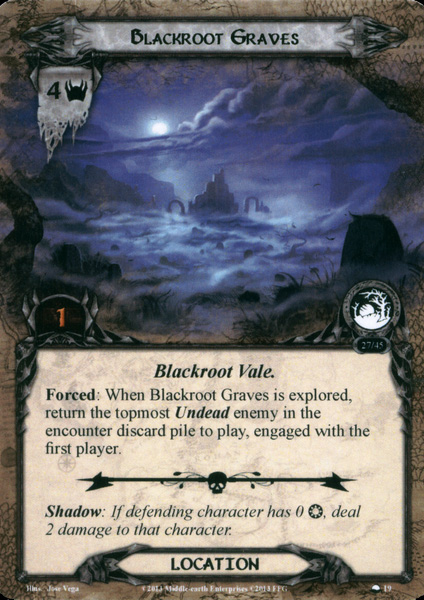
- Blackroot Graves: This gorgeous looking location has a relatively high threat of 4 but requires only a single progress to explore it. Be careful though! When you explore Blackroot Graves, an Undead will come back to “haunt” you. Literally, when you explore the Graves, the topmost Undead enemy in the encounter discard pile engages the first player. So, you must know when to place that progress or when to make it the active location. The shadow effect of this location is going to give you hard time too. If your defender has 0 willpower then you must deal him (her?) 2 damage and hope that this damage won’t kill him. If it does, then the attack will be undefended and your Heroes will probably have a problem. You should remember to always defend with characters that have at least 1 willpower if it happens not having any Hasty Stroke in your hands (or a Quicker Then Sight if you are a Silvan player).
- Haunted Valley: This spooky location has an interesting effect. While it is the active location, all ready Heroes lose their tactics, lore, spirit and leadership resource icons. So you won’t be able to play your Feint to the scary undead coming for your Heroes. In addition to that effect, this location gives you an opportunity to play your Feint (or any other card you like) providing you a Planning action giving every player the option to exhaust a Hero in order to be able to use his/her resources. In my opinion that effect gives a more tactical perspective to this quest and I find it as an opportunity to solve a “mini puzzle” inside the quest.
- Shadow of Dwimorberg: This is a straight forward location which (in first sight) has a pretty low threat of 1, but if the current night Objective is Dusk it gets an additional 2 threat and if you are unfortunate enough to play this quest in Midnight, it gets +4 threat for a total of 5 threat. Thankfully, this location is shadow effect free, so you don’t have to worry for worse.
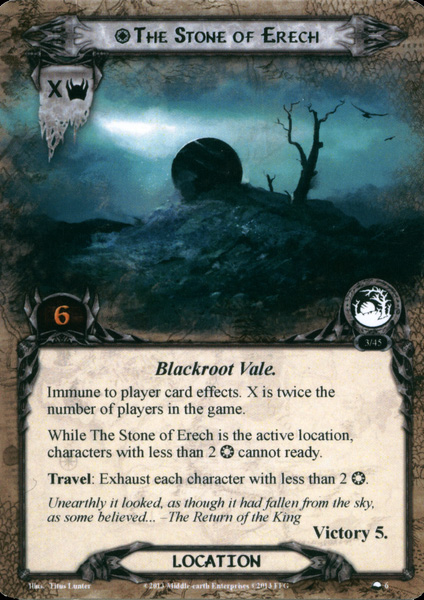
- The Stone of Erech: This is the main card of this POD Scenarios. With a threat that it’s double the number of players and a very punishing effect, this location is kinda hard to explore. When The Stone of Erech is the active location characters with less than 2 willpower cannot ready. Thankfully, this effect doesn’t focus on the printed willpower of the characters but their willpower, which might be modified by attachments, events or even other characters. Now you might think, “ok, I’ll maintain the characters with less than 2 willpower ready until it’s necessary to use them”, NOPE ! In order to Travel the Stone of Erech you must exhaust all characters in play who have less than 2 willpower. So, until you explore the Stone every low willpower character would be useless (except from Heroes, who can still collect and spend resources). Thankfully, stone of Erech has Victory 5, so if you explore it, you won’t see it again for the remaining of the quest. Final thought about this card is the amazing work is done to the Illustration by Titus Lunter. It’s amazing how he played with the dark, the shadows and the light passing from a hole through the thick dark clouds on the sky, giving hope to your Heroes to fight the undead and save Derufin.
- Vale of Shadows: The last location we are going to discuss here is Vale of Shadows. It has the old school effect, that when you reveal it from the encounter deck you have to make it the active location and if there is another active location you return it to the staging area. In addition to that effect, the night Objectives buffs the quest points of Vale adding 2 if it’s Dusk and 4 if it’s Midnight. In this situation, I find handy to have a copy of Distant Stars to change Vale of Shadows with Shadow of Dwimorberg if it’s Dusk or Midnight or Banks of Morthond if it’s Eventide.
Treacheries
The treacheries of this quest have some interesting effects that fit perfectly with the unique mechanics of the scenario. Moreover, the creators tried to boost the scary feeling this quest gives you, via the following Treacheries.

- Driven by Fear : The first treachery in our list is a classic “Condition attachment” treachery. When Driven by Fear is revealed from the encounter deck, the first player must choose and attach it to a Hero he controls. Then attached Hero’s willpower considered to be 0 and the players should treat his text box as if it was blank, except for traits. This is a pretty nasty treachery which can slow you down, especially in this scenario where you should have the most willpower you can find. Although, there are always a bunch of solutions in this type of treacheries, such as: A Test of Will, Miner of the Iron Hills, Power of Orthanc and a couple more options. Thankfully, Driven by Fear hasn’t any shadow effect, so finding it dealt as a shadow card is always a relief.
- Groping Horror: Now, this is an interesting card. When it is revealed, the first player must choose to either skip the next travel phase or each player must pass his hand to the other player on his left (discard it in solo game). To make matters worse, if it’s Midnight Groping Horror gains Surge. In most cases skipping the Travel phase for a round isn’t much. There are a lot of ways to get rid of the locations without traveling. Furthermore, in most cases if the players switch their hands they will lose the tempo of the game and crucial time (remember night Objectives) from bringing their deck combos into surface and maybe will end up with cards they can’t even bring into play. Again, this is a treachery without a shadow effect. All in all, I find this treachery pretty innovative but not so harsh against the players.
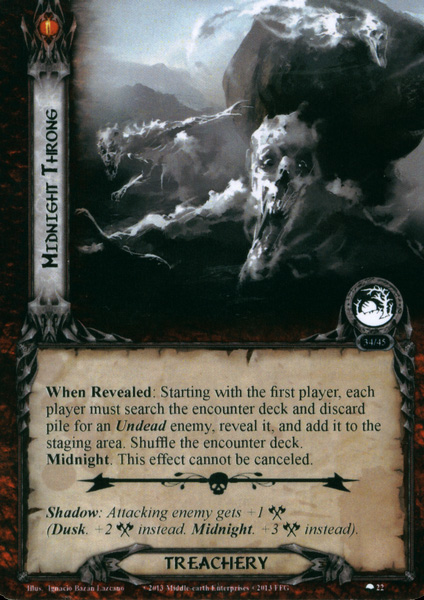
- Midnight Throng: As the name of the card suggests, when you reveal it from the encounter deck you are going to face a lot of enemies (at least in 3-4 player game). Specifically, when players reveal Midnight Throng, beginning from the first player, each player must search the encounter deck and discard pile for an Undead enemy, reveal it, and add it to the staging area. If you think that’s all, you are wrong! In addition to the horde of enemies the players will have to face, you cannot cancel this effect with any means. That’s a nasty card, especially when playing with a lot of players. When I face this Treachery, while playing The Stone of Erech POD, I usually choose to reveal multiple copies of Whisperer. He has kinda standard stats (2/2/2/4) and on top of that he hasn’t any when revealed effects. Don’t forget that you have to reveal the enemies and then add them to the staging area, so any when revealed effects are going to trigger. Even as a shadow card, Midnight Throng, is a bad shadow to have as the enemy’s attack is going to get a buff of +1, or +2 if it’s Dusk, or even +3 if it’s Midnight! So, for every enemy attack you are going to defend, always have in mind that their is a small chance for the enemy to attack with more power than it’s printed one.
- Murmurs of Dread: This treachery, might lead you to quest unsuccessfully, as when you reveal it every character gets -1 willpower until the end of the round. Moreover, taking into account the spectral keyword, this effect is going to make your characters weaker for this round! The key to cancel out this effect is to commit a few characters with a lot of willpower and not a lot of wharacters with low willpower. Few great questers, gonna make the difference. The Shadow effect of Murmurs of Dread only applies when is Dusk or Midnight. When shadow effect triggers the attacking enemy makes an additional attack after this one and especially for Midnight this effect cannot be canceled. Is clear that when time passes, the chances of winning the quest drops. This is a shadow effect you won’t like to see on The Lord of the Dead, Shadow Host Captain, or Shadow-man. This is a treachery i recomend to cancel, of course only when it’s Dusk.
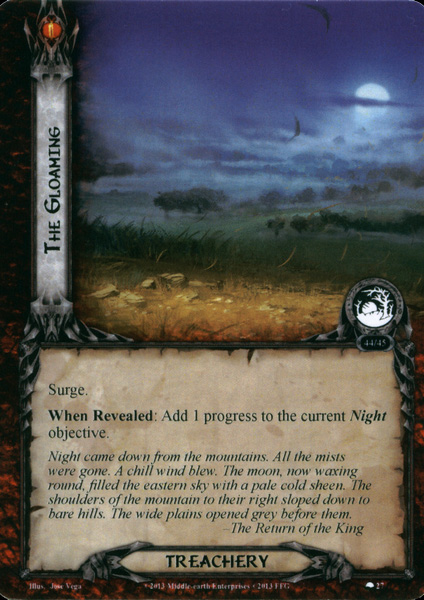
- The Gloaming: This is a pretty straightforward treachery. When it is revealed you place a progress token on the current night Objective which shortens your time for passing the quest. Of course there isn’t any time limit, but as we said this scenario is much easier when it’s Eventide ore even Dusk. Moreover, The Gloaming is the only Treachery which has a Surge keyword. On the bright side there isn’t any shadow effect printed on this card. I wouldn’t suggest to “Test of Will” this treachery, unless you are close for Midnight.
- The Dead Ride Behind: This last treachery we are going to discuss is (in my opinion) a softer version of Necromancer’s Reach. When it is revealed every character with less than 2 willpower receive 1 damage. If it’s Dusk, every character with less than 3 willpower receive 1 damage and if it’s Midnight every character with less than 4 (!) willpower receive 1 damage. Ok, this card can be ridiculous when it’s Midnight by in early game with the right deck you probably won’t have any trouble. Thankfully, there isn’t any shadow effect on this treachery. Unfortunately, Dead Ride Behind makes a great combo with Murmurs of Dread, while the last one reduces the willpower of the characters and the other deals damage to the characters with “low” willpower.
Tips and Tricks
- In this quest you are in need of a lot of willpower. Sometimes you might want to boost your willpower immediately, one ally that can help you achieve that is the good old Faramir. When I was building some decks for this scenario I choose to combine Faramir with the Messenger of the King Contract. In that way I had him ready from the first round to help when willpower was needed.
- Other cards that can boost the Willpower of a character when you need it are Protect of Lorien and Song of Hope. With the first you exchange cards from your hand for willpower or defense points, and with the secong you exchange resources from the attached hero for willpower. Both cards are capable of saving your game, so don’t underestimate them.
- Using willpower for commiting and attacking will push the players to build decks with as much willpower as they can. Some attachments that can give extra willpower to characters are Silver Circlet, Celebrian’s Stone and if you want to have fun try a couple copies of Stone of Elostirion. All those attachments can give a significant willpower increase to your Heroes.
- Speaking of Heroes, one could not make a willpower deck without the lovely Eowyn. I find tactics Eowyn fitting better in this scenario because in case Midnight Objective becomes the current night Objective, then the Stage 3B quest card is going to get Battle keyword and Eowyn’s Action can give a huge questing power. Moreover, you get a low threat cost hero and can make her (potentially) a great defender. You can achieve that with Golden Shield and a Protector of Lorien which can help both with defense and willpower.
- Considering the Tarlang’s Neck is the active location (with victory points) at the beginning of the quest and that all locations share a common trait (Blackroot Vale) one can think that a useful Hero for this scenario can be Rossiel. When you clear Tarlang’s Neck she will get +2 willpower when there is an active location. Additionally, when you destroy a non-unique enemy you can play None Return and ad that enemy to the vicotry display. Then, Rossiel get +2 defense when defending any enemy (because all enemies are Undead)!
- If you decide and go with tactics Eowyn, I recommend to bring tactics Theoden too, he can boost the tactics Heroes willpower a little and make you collect more tactics resources. In the strange case you want to try a mono sphere tactics deck (I don’t recommend it, especially in solo game) a third tactics Hero you can use is Aragorn. He can make the engaged enemies a little bit more vulnerable and can make a great combo with Straight Shot.
- A general tip for this quest is to try to avoid including chatacters, in your deck, with less than 2 willpower as the Stone of Erech location is going to exhaust them and then you can’t ready them again while is the active location.
- Because this scenario can reveal a ton of enemies in a single staging step (even with few players) you should always bring attack cancellation. Examples are (of course) Feint, Feigned Voices if you play with Silvans and in case you bring a unique Ranger or a Warrior character you can use Coney in a trap. All in all, be prepared to face more enemies than you expect.
- Experimenting with traits which might cope well with this scenario, I figured out that Ents are really useful, especially with the help of Treebeard who can help paying for Ents!
- You should bring shadow cancellation too! As said above, there’s some shadow effects you won’t like to see during the game. Hasty Stroke and Burning Brand can be nice companions during the game. Again, if you love the silvan trait, Quicker than Sight is your pal.
Playthroughs
- Two handed play: https://www.youtube.com/watch?v=uEJrbal-c3A&t=126s
- Solo Play : https://www.youtube.com/watch?v=bDKcuHQ87EE (Maybe some minor mistakes)
Before this review come to an end I’m going to post my favorite decks for passing this quest in Solo but also in 2 player game.
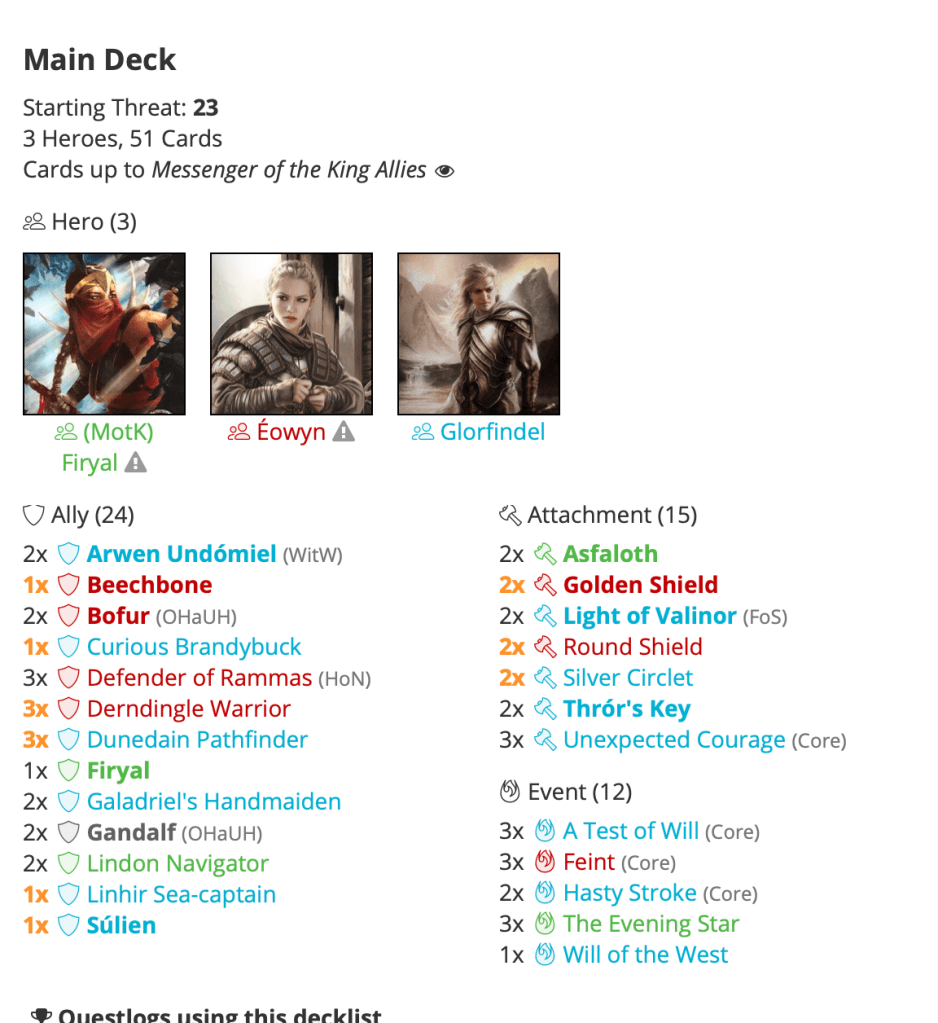
- For Solo play I choose the MotK contract in order to include Firyal as a hero and always have an advantage against the encounter deck. The deck is:
https://ringsdb.com/decklist/view/16926/stoneoferichsolo-1.0
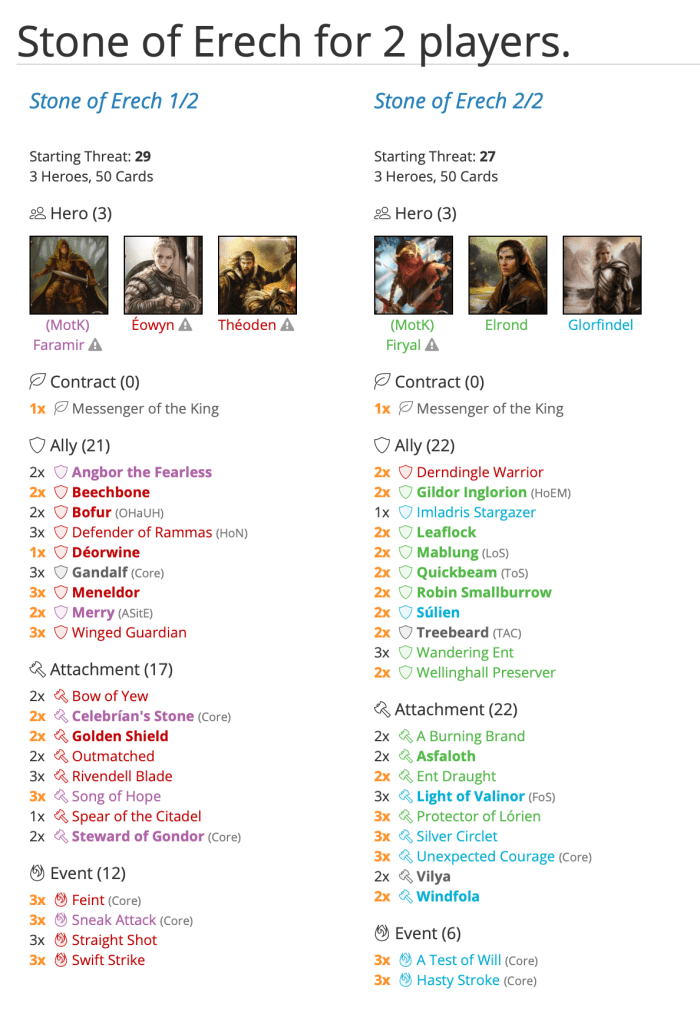
- For the 2 player decks I choose again Messenger of the King Contract on both decks. The one has Firyal as Hero (for the same reason as before) and the other has Faramir as Hero in order to have him ready from the beginning of the game to boost willpower any given time. Of course, someone could easily improve the decks to fit better to the quest but personally find them pretty enjoyable (especially the 2 player game).
The decks are: https://ringsdb.com/fellowship/view/9286/stoneoferechfor2players
In conclusion, this is a unique quest from many aspects. But that’s what we are waiting for from a POD scenario. Although, someone could say that it’s one of the easiest POD so far, it can be give you really hard time if you aren’t prepared and know what you’ll be face. Anyway, thank you very much for your time and I hope that my Stone of Erech review was enlightening to you. Your feedback is always welcomed. Till the next article, happy gaming!
PS: Special thanks to Durin’s Father for supporting all authors (including me) of the Blog!

2 thoughts on “The Stone of Erech”