Across the Ettenmoors used to be a quite enjoyable quest when it was released. It used fairly interesting mechanics and had a pretty distinctive feel to it, but it was quite a bit too easy. The nightmare deck changes that, and by how much I’ll explain in this article.
Nightmare Across the Ettenmoors
- Found in: Across the Ettenmoors Nightmare deck (you also need the AP and The Lost Realm)
- Difficulty (feeling of the author): 7.5
- New quest focus: keeping players from traveling to safe locations
- Increased quest focus: side-quests, direct damage
- Play if: you enjoyed the original quest and want to play it with increased difficulty, you want some of the best wilderness feeling this game has to offer, you want to fight big enemies again
Removed cards
As always, the nightmare setup card instructs you to remove some cards from the original encounter set. These are:
- Into the Ettenmoors: Yes, this is a quest card. It is stage 1, and as its replacement is quite strange in some ways, I’ll talk about it further below.
- Shrouded Hills: The replacing of this location was quite obvious, as it usually didn’t do much. In worst case, it surged, but its threat rarely went higher than 2.
- No Rest: This card was annoying, but not too harsh. As the nightmare version of the quest makes it much harder to travel to safe locations, though, it is understandable why only one copy was cut.
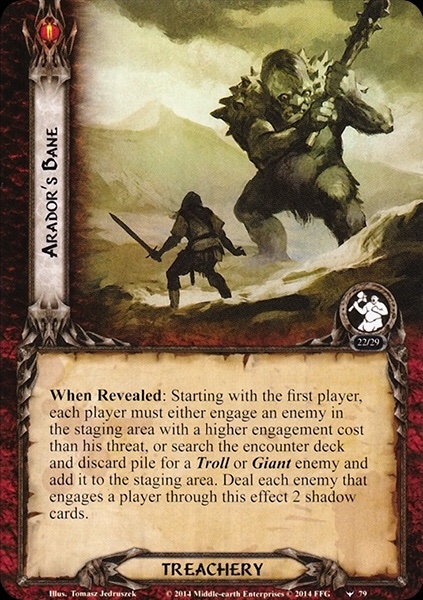
- Arador’s Bane: I’m quite sad that this treachery was removed, as the story behind it is interesting (Aragorn ‘s grandfather, Arador, was killed by trolls in the Ettenmoors a long time ago) and in player-numbers of higher than 1 it would usually force you to engage enemies you didn’t want to or have you put even more enemies into play.
- Troll-Fells: A pretty wimpy location. With only 1 threat, it didn’t do much other than net you a safe location to travel to. Even the doomed 1 on weather treacheries was not very frightening, so I’m glad this was cut for nightmare mode.
- Goblin Pursuer: Another card of which I was not happy it was removed, as it gave some sense of the goblins you just escaped hunting you. It was quite weak, but I’m still disappointed that it wasn’t replaced by a goblin, but by the Giant Beetle.
- Cold from Angmar: This card was removed down to one copy, which is interesting again as the card was usually pretty dangerous if you couldn’t cancel or remove it. Even if there’s only one copy in the encounter deck, I would have quite liked another card that would pull it from the encounter deck.
New Nightmare rules
As with most nightmare quests, after removing cards from the original encounter deck, you flip around the nightmare mode setup card to read which new rules are applied throughout the game. In this case, it makes you discard cards from the encounter deck until you discard a safe location upon revealing stage 2A and 3A, attaching it to the just revealed side-quest as a guarded objective. While this effect seems beneficial (and it definitely is), due to the new encounter cards trying to keep you from traveling to safe locations and the fact that most effects are harsh enough to make you crave for additional safe locations to find a little respite, this doesn’t feel like it makes the quest too easy, but just ensures you’ll see at least three safe locations, which are one of the quest’s main mechanics.
New stage 1A
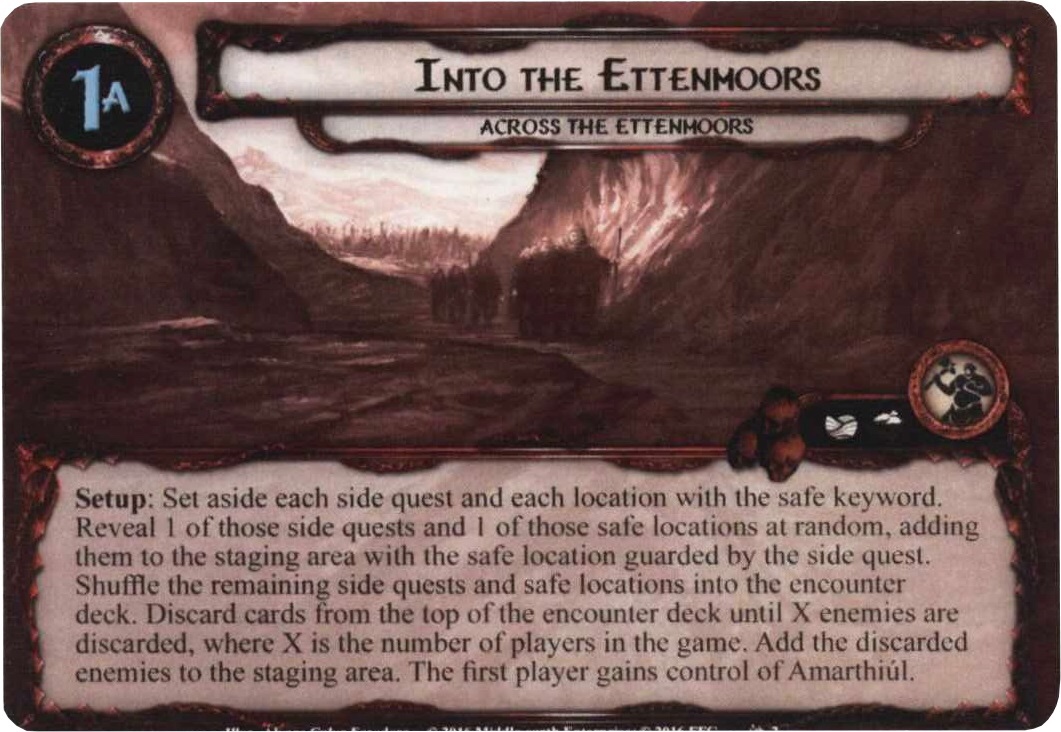
This addition is kind of odd. The new setup text definitely feels nightmarish, as it makes the side-quest being chosen from all of this quest’s ones instead of just the three in the original setup. That can be very troublesome, as this might lead to some stealing your heroes or your entire starting hand. The copies of Savage Troll-spawn are replaced by an equal amount of random enemies in the encounter deck, such as Coldfell Giants. The B-side is what makes this card strange, though, as the second forced effect on it is removed, which makes it possible to defeat all side-quests on stage 1!
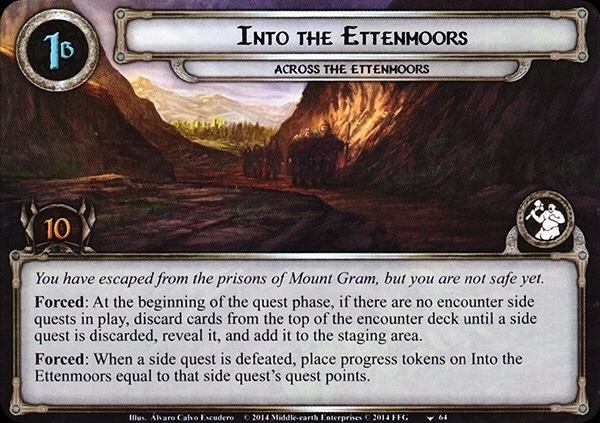
That makes the whole quest quite a bit easier, so I’d advise you to change it:
- You could replace the whole stage 1 card with the non-nightmare version, which would make the setup quite a bit easier, though
- You could use the nightmare stage 1A, but the normal stage 1B, which keeps the best of both.
I would highly recommend using method 2. I played this quest using it and I think this is what feels right, keeping both card’s best.
New nightmare encounter cards
Hoarwell River Serpent

The first new enemy, which has two copies in the NM deck. And a frightening one it is! The artwork is gorgeous, and the enemy itself is, too. It has quite high stats, but they are manageable. The really bad part is in the textbox, though: when you engage it, you have to deal 1 damage to each damaged character you control, so you should try to keep your characters well preserved and heal them up at every opportunity! The other effect synergies very well with the forced trigger: as an additional cost for traveling to a safe location, one player has to engage it! To make matters worse, after traveling to a safe location, you have to return all engaged enemies to the staging area, so the forced trigger is likely to be triggered again in the near future. A very awful enemy, but you can work around it via healing.
Scavenging Stone-Troll

Of course, in a quest centered around Trolls, the nightmare deck has to include at least one new one. As the others, this one features a high engagement cost, high attack and is very beefy. It is easy to get fooled by its low threat, but beware! While the troll doesn’t have any damage on it, players can’t travel to safe locations, meaning that you might want to engage the troll while you are able to deal with it, as direct damage is not really a viable strategy in this quest. The other effect is pretty awful, too, as you won’t be able to play or recurse or do anything with cards in your discard pile, which makes you want to engage this enemy, too. The only thing nice about this card is that there are only two copies of it in the encounter set. You don’t want to reveal this during staging!
Giant Beetle

The third new nightmare enemy, and it is rather harmless, actually. It keeps quite low stats, engagement cost and part of the textbox from its predecessor, the Goblin Pursuer, adds some stats and an annoying part of textbox: while it is engaged with a player (which is quite likely due to its low engagement cost), it adds a free attack by itself to the traveling cost for safe locations, meaning that you probably shouldn’t put a Forest Snare on it (if you can’t pay the cost, you can’t travel to the location!). The second part of the textbox can get quite dangerous, though, as damaged characters cannot defend against its attacks, and most characters won’t be able to defend for three, presumably getting damaged in the process. This makes it very important to consistently heal up your questing characters (through Self Preservation, for example) or to cancel damage via cards like Raven-winged Helm. All in all, this is a pretty harmless card and you’ll usually be happy to reveal it instead of something harsher. Again, there are only two copies of this in the encounter deck.
Rocky Foothills

This is the first nightmare location. It seems quite weak at first glance, but while playing, you’ll quickly see that it will hinder your journey more than one would think. The first part of the textbox states that you have to travel here in the travel phase (if you are able to), keeping you from getting very pressing ones out of the staging area or finding a little rest at a safe location! The other half makes matters even worse, as this location gets bonus quest points for every quest card in play, meaning those will always be at least 4, but can quickly (and easily) climb up to pretty high levels. The shadow effect here is also worth mentioning, as it makes it very important to keep your defenders healed up.
Vast Troll-Fells
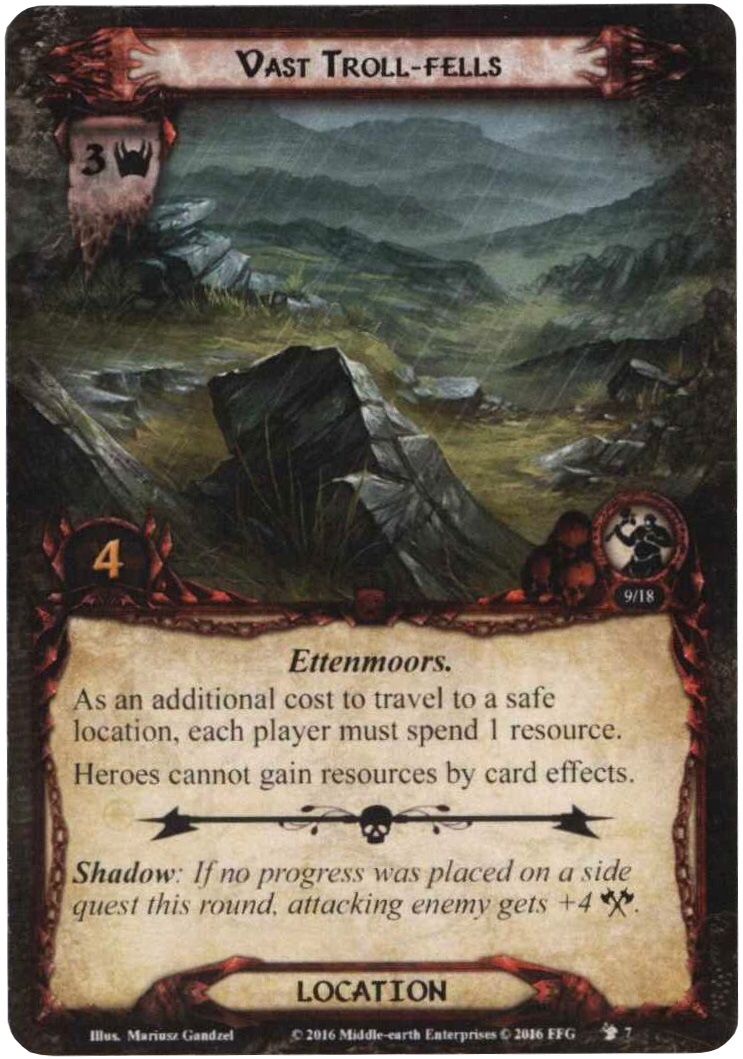
Nightmare mode shows its teeth again here with some beautiful art and a quite annoying location. Its stats are manageable and wouldn’t even be seen as harsh in normal mode, but it’s textbox is (again) a problem as it states that as an additional cost for traveling to a safe location, every player has to spend a resource. That is not much, but it might take away the one resource you needed to play a card. Also, heroes cannot gain resources by card effects, which might shut down a Gondor deck, but usually isn’t too troublesome, either. The most dangerous part of this location is probably going to be its shadow effect.
Crashing Thunder

The first of two new treacheries, both of which have three copies in the encounter deck. This one is a Weather treachery and inherits this cycle’s weather treacheries’ tendency to deal damage. The actual damage dealt is quite low, usually being around 2-3 per player, with the real meat being the effect of exhausting every damaged character in play! This means that you will either want to keep all your characters healed up or cancel this treachery or hope it doesn’t strike (pun intended) when you are engaged with an enemy. Again, it has a fairly nasty shadow effect which reminds me of Caradhras the Cruel and might lead to one or two rounds of harsh Weather cards dealing damage across the board.
Barren and Desolate

As you might know, the Ettenmoors are not really a fun, green and populated area, but very…, well, barren and desolate. This is a contender for the most annoying card in this nightmare deck (in my opinion, at least). Upon revealing it, you have to attach it to a side-quest in play and while that side-quest is the current quest, every character gets -1 willpower, making it much harder to defeat! This, together with Cold from Angmar and No Rest, makes some condition removal pretty useful. To make matters even worse, it surges. That wouldn’t be too bad if it only surged if it couldn’t attach to a side-quest, but it always surges. This is pretty much a must-cancel-card, as you are otherwise probably not going to defeat the attached quest, having to suffer from its effect throughout the rest of the game. The only good thing about it is that there is no shadow effect on this one.
Isolated
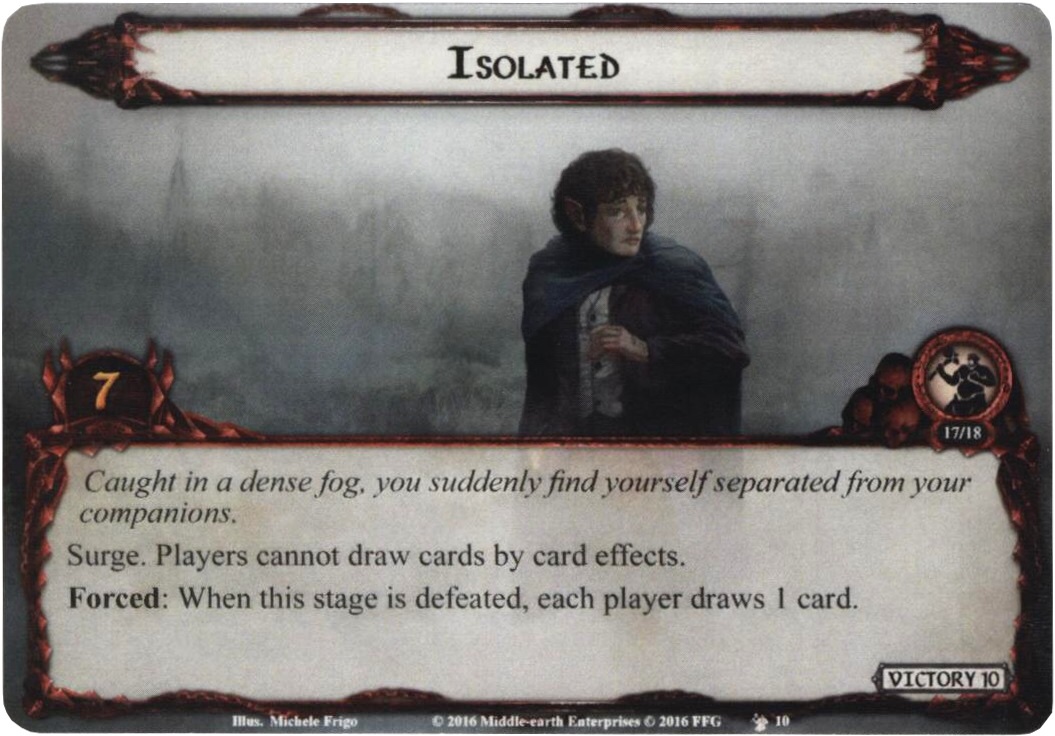
The first of two new side-quests, this can either be pretty harmless or severely cripple your deck. It simply states that nobody can draw cards by card effects, which absolutely destroys Erestor decks. When it is defeated, each player has to draw a card, which is not too terrific of a reward. The card surges and usually is pretty easy to ignore, although if you have enough time to defeat it, you might want to do so, as quite some encounter cards will get stronger for every side-quest in play.
Rescue from the Trolls

The deck’s second side-quest is far more troublesome than the first one, to a point where it almost seems ridiculous. When it is revealed, each player places their lowest-threat-hero underneath it, which now is considered out of play. Only when this card’s enormous 15 quest points are defeated, every player regains control of their hero. The designers were nice enough to give us an additional way of putting progress, though, as you may place three progress on this card whenever you defeat a Troll enemy (discarding them does not count as defeating them). You do not want to reveal this card upon setup; and after revealing it at any time, you’ll want to rush it to regain control of your heroes.
Nightmare Gameplay
Stage 1
During stage 1, assuming you are using the original stage 1B card, you will want to place progress on the main quest through finishing side-quests. As stage 2 can be quite brutal, you might want to turtle here a little, but not too long, as you might quickly reveal one or two more side-quests which would then put more pressure on you. I would recommend to finish the starting side-quest first, as it guards a safe location, which will get useful during stage 2. You should also try to defeat the enemies revealed during setup as these will contribute more threat during the quest phase. In a Mono-Lore deck, you might want to use The Great Hunt to discard the harder enemies put into play during setup. That strategy is also going to prove useful during the following stages, especially if you have some recursion.
Stage 2

This stage used to be the real “meat” of the quest, and nothing has changed in that. The extra encounter card per round is not to be underestimated, especially in lower player counts. You should try to quickly finish all upcoming side-quests to avoid them stacking up, remove all cards that keep you from traveling to safe locations quickly and travel to said ones when you need a break from everything. Also, it is advised to defeat this stage in little time to get away from the bonus card reveals.
Stage 3

The last stage seems to be harder than it is. Around this time, you probably have defeated all side-quests in the encounter deck. If you haven’t, you get an additional one and another safe location guarded by it into the staging area. Especially in nightmare mode, here you should take the time to defeat the side-quest and travel to the safe location to get a little respite. This stage can usually be defeated in 2-4 rounds if most of your characters are healed up, making that even more important.
The Encounter Deck

- There are 52 cards in this quest’s encounter deck, not counting Amarthiúl and the side-quest and safe location revealed during setup (as the count of enemies depends on the amount of players, they are included in the statistics). 17-18 of those are from the nightmare deck.
- Shadow effects are quite rare, at ~48% chance. They range from additional attacks over bonus attack strength to other nasty effects.
- Average threat of cards in the encounter deck is 1.0, not counting the effect on Rugged Country or others that might mess with character’s willpower. The low threat is due to many side-quests, safe locations, treacheries and rather low threat on enemies. This can change easily, though, as many cards surge.
- Surge is present on 7 cards, counting Pressing Needs.
- The three safe locations all have guarded, making the effective amount of cards revealed quite a bit higher.
- Only four cards are Doomed, making the use of Doomed player cards possible, though potentially dangerous.
- Immunity
- Characters cannot be healed while Make Camp is in play
- Players cannot draw cards by card effects while Isolated is in play
- All four safe locations are immune to player card effects
- When faced with the option to travel, players must travel to Rocky Foothills, if able
- Heroes cannot gain resources by card effects while Vast Troll-Fells is in play
- As long as there is no damage on Scavenging Stone-Troll, players cannot travel to safe locations and cards cannot leave a player’s discard pile while it is in the staging area
- Damaged characters cannot attack or defend against a Giant Beetle
- Damaged characters count as having a clear textbox while Cold from Angmar is attached to a quest card
- Heroes that have No Rest attached cannot be readied and don’t collect resources during the resource phase
Different to the previous iteration of the quest, the encounter deck seems to focus more on treacheries, causing some to chain if you are unlucky with the Surge keyword. The average threat on cards in the staging area can be quite low, allowing you to make some good progress in the later stages of the quest.
Tips and Tricks
- Bring healing! Seriously, without good healing across the board, you will get destroyed, as your characters will slowly die away and some encounter cards get stronger by more damaged characters
- Try to clear side-quests as quickly as possible, as their effects will stack up if you reveal more and many cards become stronger the more quest cards there are in play
- Try to keep your threat low to be able to decide when you are ready to engage enemies, and build up good combat strength to take them out one by one
- Thrór‘s Key can be very useful against this quest, as many locations are mainly harsh because of their textbox
- Treachery cancellation is very much needed here, as there are quite some treacheries that are extremely punishing. They are also pretty situational, so you have to decide about when to use cancellation depending on your board state.
- Shadow of the Past can help you retrieve safe locations in case they get discarded, so you might want to include 1 or 2 copies in your deck if you have enough space.
- Direct damage is not useful in this quest, as most enemies have huge pools of hitpoints and the Ruthless Hill-Troll even gets a stat boost when it has 3 or more damage. Instead, try to fit some cards into your deck that can directly discard enemies, so you can circumvent their high HP pools.

Playthroughs
This is a rather new nightmare deck, so I was only able to find two playthroughs:
- Two players, Eagles/Woodmen deck: https://youtu.be/G6KOos49hQo
- Solo, Bard/Great Yew Bow deck: https://youtu.be/-FJXfrcj-BA
This concludes my first ever nightmare review of my first ever nightmare deck of my all-time favorite cycle.
I really enjoyed this nightmare quest. I already liked the original one but always found it to be rather on the easier side, so this was my first nightmare deck ever. The new focus on damage and side-quests makes it feel fresh and more difficult, while maintaining and expanding the survival/wilderness theme. If you liked the original quest or want to get into nightmare mode with a slightly easier nightmare quest (although it is not as easy as many of the earlier ones), I can only recommend this one.

One thought on “Nightmare Across the Ettenmoors”