Classic Into the Pit is one of my favorite testing quests for new decks. It combines having to explore some locations in the first stage with a combat-focused second stage, so your deck has to do well at both. On top of that, the encounter deck has a large selection of horrible cards, ranging from 5 threat locations to treacheries that can instantly kill heroes if you aren’t careful. This is a great all-around quest in my eyes.
But we are not discussing the regular quest today. No, we are talking about the Nightmare version of this quest, which increases the difficulty and throws in a completely new stage 2. The new encounter cards also limit the use of one of the best objectives we’ve ever had: The Cave Torch. This objective now gets limited use and can run out if you use it needlessly. And you don’t want to sit in total darkness deep underground in Middle Earth. I am a big fan of the improvements made for the Nightmare version of this quest and will cover them all in this strategy article. I hope you can give it a shot someday as well!
Nightmare Into the Pit
- Found in: Nightmare Khazad-Dûm expansion, scenario 1
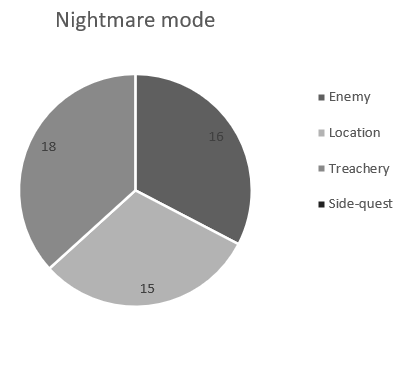
- Size: 18 encounter cards, 1 quest card, and 1 rules card.
- Quest cards: 3, but the Nightmare version has a brand new stage 2
- Increase in difficulty?: Yes, the enemies are a lot tougher and the locations have a better synergy with each other, which makes progression tougher from the start of the game.
- Fixed loopholes?: Stage 2 was quite easy to beat in true solo, and is now much more of a challenge. Players are also no longer able to spam the Cave Torch each round to clear locations in the staging area.
- New mechanics introduced: Cave Torch has limited fuel and is discarded once it has burned up all its fuel. Dark locations have better synergy which makes location lock a bigger threat than in the regular version.
- Play this scenario if: You are a fan of Into the Pit and feel like you have mastered it. You are new to Nightmare mode and want a decent but fair challenge to start with. You are starting a Nightmare progression run of the Dwarrowdelf cycle.
- What to look out for: Location lock, enemy swarm, torch running out and now you’re engaged by a 1/7/7/8 enemy, exhausted Cave Torch makes enemies and locations stronger, large jumps in threat if Signs of Conflict surges into itself.
New Rules
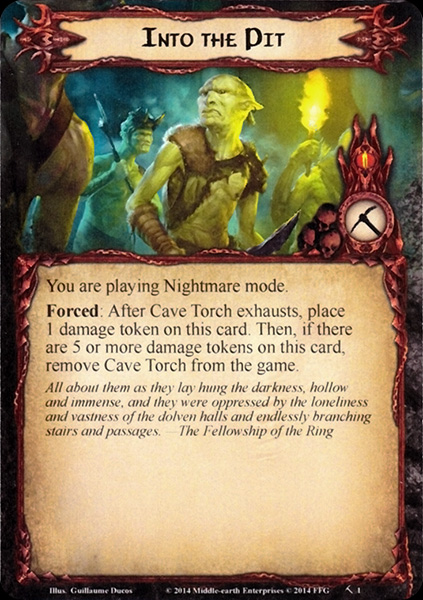
The rule card included with this quest comes with a single new rule. This is a Forced effect that triggers each time the Cave Torch is exhausted. Whether the players want to do this voluntarily to place progress on a location or have to exhaust the Cave Torch for an encounter card effect, it doesn’t matter; the Forced effect still triggers. You can remember this by triggering it the same time you look at the top card of the encounter deck for the Forced effect on the Cave Torch itself. The actual effect will see you place one damage token on the objective attachment. I find it easier to put these tokens on the rules card, but that’s not the point here. The tokens count as fuel, and once you have collected 5 or more damage tokens on the objective, you remove Cave Torch from the game.

Now removing the Cave Torch from the game comes with a few problems. You will no longer be able to place progress with it, but that’s not the biggest issue here. Losing the Cave Torch means that you no longer can cancel Burning Low, which can result in a ton of threat in the staging area as more locations get the Dark trait in this version of the quest. Players can also no longer travel to the Lightless Passage unless they have a means to avoid the travel cost with South Away!, Ghân-buri-Ghân, or Thror’s Map. The Nightmare cards also become worse when you no longer have a Cave Torch in play. The main threat out of this deck is the Shadow Dweller, who doesn’t make engagement costs while the Cave Torch is in play, allowing players to avoid this nasty enemy for a while. Without the Torch, however, the 0 engagement cost of this enemy will certainly cause it to engage players and will be a real pain to get rid of. There is some good news as well, the Narrow Fissure can now receive progress whenever you want, as there is no ready Cave Torch in play.
The goal for this quest is to avoid having to use the Cave Torch unless absolutely necessary. This will be easier to do in lower player counts, as fewer cards are revealed that require the Cave Torch to exhaust. Higher player counts will find themselves placing that 5 damage on the Torch rather quickly, so make sure you are careful when exhausting it. I would recommend only exhausting it if it means progressing to the next stage or at the final stage to bust you out of the quest. If you have all your fuel left by stage 3, there is little harm in exhausting it once, but make sure you do this towards the end of the round to avoid enemies engaging you.
New Setup
The setup of the game isn’t really much different from the regular setup of Into the Pit. You attach the Cave Torch to one of the first player’s heroes, make East Gate the active location, and set the other unique locations aside, out of play. The only two differences with the normal version of the quest are replacing some cards in the encounter deck with the Nightmare cards and swapping stage 2A Goblin Patrol with the new quest card 2A Goblin Ambush. This slots into the quest deck instead of the 2A you removed. After revealing one card per player for the effect of stage 1B, the game can begin. This does mean that you can reveal some nasty encounter cards at the start of the game. Cards like Goblin Lurker can be difficult to overcome from the start of the game, but luckily some treacheries can whiff this early on as well!
Cards Removed
The following cards are removed from the standard encounter deck and are replaced by the nightmare cards. These cards were deemed too easy or were replaced by more brutal versions.
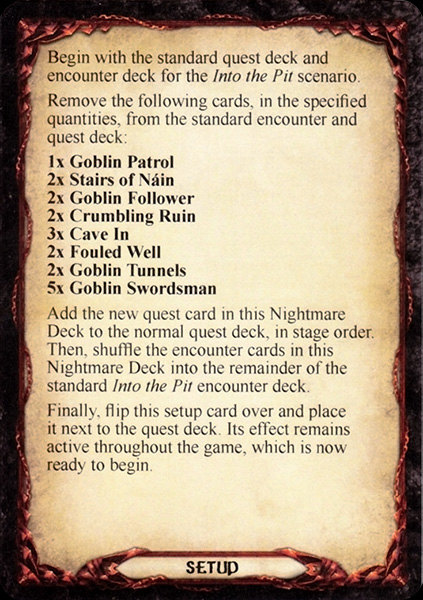
- 1x Quest card 2A: Goblin Patrol (Replaced by Goblin Ambush)
- 2x Stairs of Náin (Easy non-Dark location)
- 2x Goblin Follower (Not all copies are removed, but this makes way for other enemies)
- 2x Crumbling Ruin (A treachery that could easily whiff and can be tech’ed against)
- 3x Cave In (Very easy treachery to deal with, as players tended to place progress in one go)
- 2x Fouled Well (Makes way for more Dark locations that introduce Dark synergy. Does not remove all copies)
- 2x Goblin Tunnels (I’m not sure why, as the location was quite a headache in normal mode as a buffer of progress, and the shadow effect has cost me a few heroes down the line. Good to see it replaced!)
- 5x Goblin Swordsman (Easy enemy, replaced by four copies of Patrol Sentry)
The Quest

The quest itself is mostly impacted by the introduction of a new quest card halfway through the quest, as well as a heavier focus on location lock. Players will have to start with a lot of willpower now that some of the easier encounter cards have been removed from the deck. Just clearing the East-Gate can sometimes be problematic, as threat starts to accumulate in the staging area. After the players clear the East-Gate, they should try and rush to the First Hall so they can at least continue to clear those unique locations. Speed will be important during this quest, as staying at a stage for too long can mean you get overwhelmed by threat in the staging area or by enemies that engage you. And the longer you stay, the more often you will need to use the Cave Torch to get around effects like Burning Low. Avoid losing all of your fuel for the Torch though, as you will no longer be able to cancel treacheries, travel to certain locations, and will be engaged by the Shadow Dwellers.
Stage 3 will be a sprint to the finish. As you can no longer get resources during the resource phase, it will become more difficult to replace allies and afford events. Save up some resources before going to this stage, and try to get alternative means of resource acceleration. Quest with as many characters as you can, and use any tricks at your disposal to get through that final quest stage. The only requirement is the progress on the quest card, so engage enemies to lower the threat in the staging area, and maybe even use threat to clear Zigil Mineshafts in order to advance.
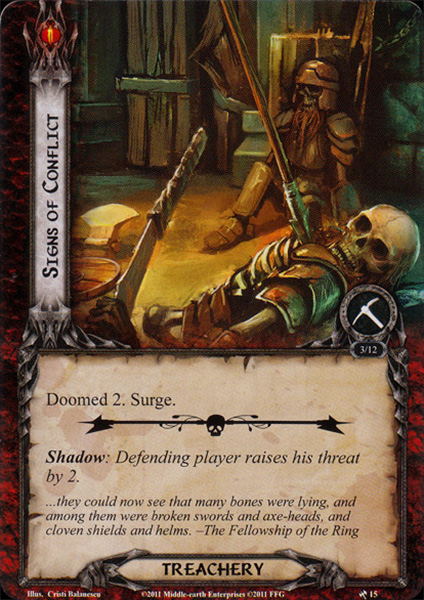
Threat is a big deal in this quest though. All copies of Signs of Conflict are still in the game, and there are several other effects that will see you increase your threat. The risk of getting to 50 threat is very real in this scenario, though once you get at a certain threat threshold, you will already start to see more and more enemies engaging you. Keeping a low threat and engaging enemies on your own terms will see you survive for longer against this quest. Especially in a solo game, the enemies can become too much, so make sure to leave characters ready for combat.
Since stage 2 is completely new and unique to this mode, I will cover it slightly more in-depth here. The rest of the quest follows the same rules and suggestions as my review of the normal mode of this scenario.
Quest stage 2: Goblin Ambush – X progress
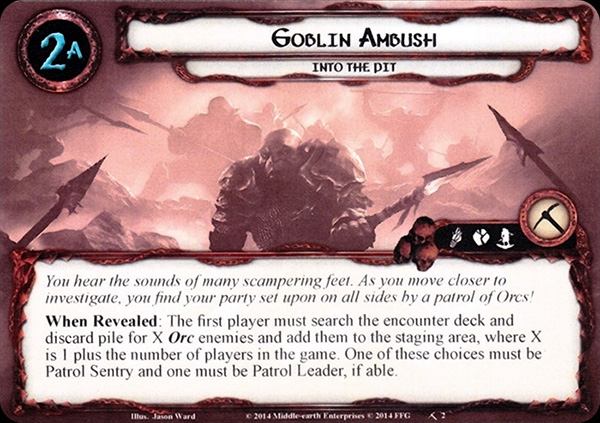
This is the first time with these Nightmare decks that a quest stage is replaced from the quest deck. While Conflict at the Carrock added an additional quest card at the end, it did not replace any of the previous quest stages. This time, the middle quest stage is removed from the quest deck and replaced by Goblin Ambush. This was done because the second quest card of the regular scenario was often too easy for players, especially in true solo. The regular quest stage involved killing all enemies in play or making 11 progress. Often, players would only have to deal with a single Patrol Leader or quest hard through the quest to advance. The benefit of this quest stage was that any newly revealed enemies would instantly be discarded, not even replaced by other cards.
The new quest stage does things a little differently. This is marked by the new title, artwork, and quest point value of the card. When the players advance to the second stage of the quest, the first player must search the encounter deck and discard pile for X Orc enemies, where X is the number of players in the game, plus one. This means 5 new Orc enemies will join the party for a 4 player game, while solo players have to find 2 enemies instead. Note that players cannot select the Shadow Dweller for this effect, as it is not an Orc enemy. Solo players don’t really get a choice anyway, as the quest card forces the players to have one of the selected enemies to be a Patrol Leader and another to be a copy of Patrol Sentry. If all copies of either card are already in play or in the Victory Display, other Orc enemies will replace them. All enemies are added to the staging area, which can really boost the threat in the staging area up. Luckily, you don’t make progress on this stage through questing successfully.

Flipping over to stage 2B, the quest card gains a variable quest point value of X, where X is the number of players plus one, the same as the number of enemies that were just added to the staging area. Progress cannot be placed on this quest card through regular questing, but instead, a point of progress is placed on the quest whenever a player defeats an enemy. Note that “defeat” means that the enemy must be killed and not be discarded through effects like Put Off Pursuit or The Great Hunt. Players must kill the enemy before placing progress, which can prove difficult in some cases. Note that while players were restricted to only choosing Orc enemies for the A-side of this quest, they can still kill non-Orc enemies in order to place progress on this stage.
The restriction of not being able to place progress on the quest card means that this stage is ideal for exploring some side-quests with your left-over progress. The side-quests can be any of your choosing. But some solid ones to choose are Rally the West to prepare for the final stage, Gather Information in case players are still looking for combo pieces, or Explore Secret Ways to lower threat in the staging area of some Dark locations that they also have as the active location. Other options are also possible, of course. An alternative to side-quests is to use the Explorer’s Almanac on locations in the staging area to try and clear those with your left-over progress. This helps to reduce the number of locations in the staging area and frees up some threat so that players will have an easier time getting through stage 3.

The goal at this stage is to make sure that players kill as many enemies as possible to make progress on this stage. A pure questing deck won’t be able to get far through this quest, as you are now being blocked from advancing until you kill some enemies. The weaker enemies have also already been removed from the encounter deck, although players can still kill enemies like the Goblin Scout in the staging area, which isn’t too difficult. Direct damage effects can also be very effective here, though it might not be a single solution to the Patrol Leader, which might be resistant to your direct damage effect. However, it is not required that you kill that specific enemy, any enemy will still place progress on the quest card, and players can advance even if enemies are still in play. So using an effect like Arrows from the Trees can destroy a lot of enemies in the staging area, after which players can immediately advance. It’s usually not that easy, but the stage can go by quite quickly.
After the players place progress equal to the number of players in the game plus one, they immediately advance to stage 3. There is no other restriction at that point, and stage 3 is the same as you are used to from the regular version of this quest.
The Encounter deck
Global
- The encounter deck contains a total of 5 cards, which is quite a lot. This means that any cards you discard, will take a while before you get to see them again!
- Shadow effects are relatively common at 64%. Many of the effects get worse if the active location is Dark. Effects tend to boost enemy stats (both attack and defence), add new enemies to the staging area, raise the player’s threat, or cancel any damage dealt in combat.
- Average threat per card revealed from the deck is 1.56 threat/card. However, this can range from a 1 threat location to a 5 threat location, not even counting some treacheries that can easily add 10+ threat to the staging area if you aren’t careful.
- 12 cards in the encounter deck can surge. This is mostly thanks to the 5 copies of Signs of Conflict, but some new NM cards will also add more cards to the staging area. Lanwyn and Minas Tirith Lampwright aren’t bad to bring to this quest.
- Doomed is also a common keyword; the 5 copies of Signs of Conflict will raise your threat by 2, and the 3 copies of Narrow Fissure will raise your threat by 1. Besides this, there can be other cards like Zigil Mineshaft that offer you to raise your threat even more. Don’t bring a Doomed deck of your own; you will have a difficult time getting through the quest.
- Immunity
- Narrow Fissure can only receive progress when the Cave Torch is exhausted or has left play.
- Goblin Scout cannot be optionally engaged by players with a threat of 25 or higher.
- Patrol Leader requires players to discard a card from the encounter deck before dealing damage to him. If that card is an enemy, the damage is cancelled.
- Goblin Lurker cannot be optionally engaged.
- Sudden Pitfall cannot be cancelled.
- While Bridge of Khazad-Dum is the active location, players cannot play cards
- East-Gate is immune to all card effects, and players don’t make engagement checks or can optionally engage enemies while it is the active location.
- At stage 3, heroes do not gain resources in the resource phase.
- Shadow effects from Lightless Passage and Patrol Leader cancel all damage dealt to the attacking enemy.
These statistics do not include the three unique locations that start out of play and won’t enter the encounter deck. The split of the card types is pretty even, with just a few more treacheries than locations and enemies in the deck. Overall, it is very difficult to predict what will be revealed next. The average threat per card revealed does assume that you are cancelling the When Revealed effects of some cards, like Goblin Follower and Dreadful Gap. It also assumes a minimum amount of Dark locations for locations like Branching Paths and Twisting Shadows, where they only buff themselves.
Enemies
The regular encounter deck already contained a fair amount of Goblin enemies, though the setup did remove all 5 copies of Goblin Swordsman from the deck. So to make up for this, the encounter deck gets 9 new enemies. These enemies interact with the new themes introduced in this Nightmare version of the game, and are obviously very dangerous.
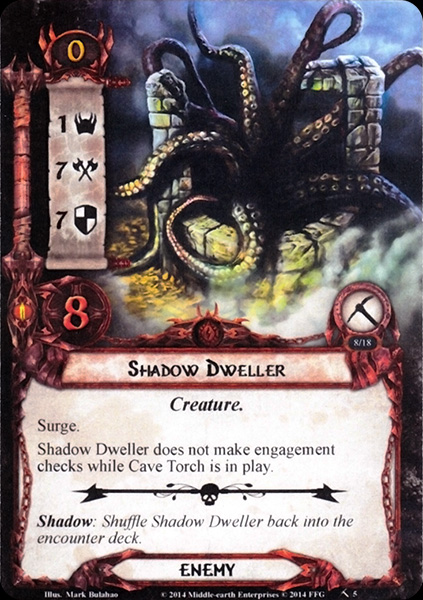
- Shadow Dweller: Every Nightmare scenario has that one card where you look at it and go: “Wait, why are those stats so damn high??”. The Shadow Dweller is that card for this scenario. This enemy is not a major threat for the early game, but as the players start using their Cave Torch more and more, the Shadow Dweller will need to be taken into account and planned for. This enemy is the stuff of nightmares. Not only for those afraid of the dark but also when it comes to the game. The stats on this enemy are insane, as it has a 7 attack, 7 defence, and 8 hitpoints. The 7 defence is on par with some legendary enemies like the Balrog, Smaug, and The Watcher in the Water. This makes it very difficult to deal damage to the Shadow Dweller. But luckily, the players don’t have to worry about the Shadow Dweller right away at the start of the game. When the Shadow Dweller is revealed from the encounter deck, it will surge into another encounter card. Then, it will go into the staging area, contributing just 1 threat to the total. The Shadow Dweller does not make engagement checks while the Cave Torch is in play, so as long as you have fuel left for the objective, you don’t have to worry about this one. You can still optionally engage this enemy, but I wouldn’t recommend it. This enemy is not a huge threat while it is in the staging area and can sometimes stay there until the end of the game. However, once the Cave Torch leaves play, the Shadow Dweller will make engagement checks during the engagement phase and will certainly engage thanks to its 0 engagement cost. Players now have to try and deal with the 7 attack on this enemy, which usually means that players will be chump blocking for this enemy. A nasty combo is to get the Sudden Pitfall treachery as a shadow effect, which discards the chump and makes it an undefended 7 attack. So make sure to have shadow cancellation ready when taking on this enemy. A safer strategy would be to cancel the attack with Feint. Attacking the Shadow Dweller back will be quite the challenge, though effects like Bow of Yew and Dwarrowdelf Axe have their chance to shine. These attachments deal damage that bypasses the 7 defence of the Dweller, allowing you to slowly chip away at this enemy. It will be a long time before you can get rid of this enemy though, and it can distract you from other enemies engaged with you.
This enemy is best dealt with by avoiding it altogether and just don’t run out with your Cave Torch. Otherwise, direct damage effects will help to bypass the defence on this enemy, but effects like The Great Hunt might be a better solution if you know you will be engaging this enemy next round. Traps are also a great solution to this enemy; with Poisoned Stakes being able to kill the Dweller in 4 rounds, Ranger Spikes can keep it in the staging area forever, and Forest Snare allows you to avoid the 7 attack on this enemy indefinitely. There are some decent cards that work against this enemy, but you’ll have to get lucky to find them in time. - Goblin Lurker: Back to our traditional Goblin enemies, the Goblin Lurker is an improved version of the Goblin Scout from the normal encounter deck. Both have 3 threat and cannot be optionally engaged. However, the Lurker isn’t such a push-over as the Scout when it eventually engages. The Lurker will get -40 engagement cost when the active location is a Dark location. It also gets +3 attack, which turns him into a 5 attack enemy that is difficult to kill right away. A Sneak Attack–Gandalf combo will take this enemy down in one shot, but there are many targets for that combo in this scenario, so you might still end up engaging this enemy. If you do, I would advise using cards to explore the active location. Place progress on it using Asfaloth or Evening Star so that the Lurker loses its +3 attack. If you do, he becomes much more manageable, on par with the Goblin Follower from the normal version of this quest. Players can also use Distant Stars to swap the active location with a different location that does not have the Dark trait. Dreadful Gap and Narrow Fissure are decent targets, though Narrow Fissure might require you to exhaust the Cave Torch next round. Killing the Goblin Lurker isn’t too difficult; as a 2 defence, 4 hitpoint enemy is pretty standard. The threat of this enemy comes in its suddenly high attack stat and the fact that it can swarm players along with other low engagement cost enemies.
- Patrol Sentry: This final new enemy is a straight upgrade from the five copies of Goblin Swordsman that were removed from the encounter deck. This is another one of those swarm-style enemies, but they actually have stats that are quite dangerous this time. The Patrol sentry is difficult to avoid, thanks to its 20 engagement cost, so the single point of threat won’t stay in the staging area for very long. This is one of the lowest threat cards to reveal though, so during the final stage of the game, it will be an excellent card to reveal in order to make the most progress. When the Patrol Sentry is engaged with a player, it gains a Forced ability that makes it attack the engaged player whenever the Cave Torch is being exhausted. Because of this, it is important to communicate with fellow players on when it is the best time to use the Cave Torch, as some people might take an additional attack from this enemy. The 4 attack on the Sentry isn’t something that must be ignored, as the Sentry hits quite hard, so you will want to avoid having him make multiple attacks. The good thing is that the Goblin Tunnel shadow effect is no longer in the encounter deck, so there is no longer the possibility of the Sentry gaining a +3 attack. You do still have to be careful with shadow cards, of course. Attacking the Sentry back can require some effort, as this enemy has 3 defence and 5 hitpoints. This makes him survive a Sneak Attack–Gandalf combo and can make him stay engaged for a little while longer than players would like. It isn’t an enemy that is killed in a single round as easily as the Goblin Swordsman was. Reducing the defence stat on the Sentry can help to get more damage on him more quickly, but direct damage effects are my personal preference for this enemy. Have a character with solid defence wield a Spear of the Citadel, and you can take a lot of attacks from this enemy while slowly killing him. The danger of this enemy is that you can quickly become overwhelmed by him thanks to his low-engagement cost. The shadow effect also doesn’t help things, as it will place the Sentry that was the shadow card into the staging area, where they will start to engage during the next engagement phase.

Locations
With the Nightmare version of this quest pushing the focus on Dark locations and trying to set up a location lock, it is logical that some new locations are introduced to the encounter deck. These will replace some of the easier non-Dark locations from the original encounter deck and will tempt players to use the Cave Torch to get past them.
- Twisting Shadows: The Twisting Shadows location will grow as the synergy between Dark locations grows. As an X/X location, the stats on this location change throughout the game, as X is the number of Dark locations in play. If players are keeping the location lock under control, this one can be relatively harmless. But if the encounter deck gets its way, the Twisting Shadows will be upwards of 5 threat and 5 quest points in no time. This location also comes with a When Revealed effect that attempts to counter location control. When this location is revealed, all progress from Dark locations is removed. This means that slow-burning location control cards like Northern Tracker will often fall short of clearing a Dark location in the staging area before one of the three copies of this card gets revealed. You would be better off using effects like Mirkwood Explorer, which places a lot of progress at once, enough to clear a location. While in play, the Twisting Shadows won’t do anything nasty besides raising the number of Dark locations in play. It is a relatively low priority location until players start getting more than 4 Dark locations in play at once. There are a few cards that work great with Twisting Shadows though. Thror’s Key will blank the location’s textbox, making X = 0. This means the location is explored immediately, and the players essentially get a free encounter card. There is also no punishment for travelling to this location, so it is a decent destination even if this is the only option for travelling. It is nice to get rid of this location before it grows too large. By the time you have 5+ Dark locations in play, it will also take a while to explore this location. Woodmen’s Path can help with this, always lowering the quest points on Twisting Shadows to 1, even if they get buffed by effects like Narrow Fissure.
- Narrow Fissure: Speaking of that location, let’s cover Narrow Fissure, the other new location in the encounter deck. This one isn’t a Dark location itself (unless Shadow-fall hits it), but it does contribute to the Dark trait synergy on locations. The Narrow Fissure will come into play with Doomed 1, so all players have to increase their threat by 1. It also provides a passive buff to all Dark locations of +2 quest points. This targets not only locations in the staging area but also any active locations with the Dark trait. This can make it harder to clear locations in the staging area and also makes the Cave Torch less useful than it was. To further pour salt into the wound of a next to useless Cave Torch, the Narrow Fissure cannot get any progress onto it while the Cave Torch is ready. That means that players need to exhaust it for some reason (by using its ability to cancel Burning Low or to travel to Lightless Passage) before being able to clear the single quest point on the Narrow Fissure. Since players don’t generally exhaust the Cave Torch in this Nightmare version, exploring the Narrow Fissure may cost some time. Things get worse if Shadow-fall hits this location, as it will suddenly get +5 quest points by boosting itself. So players can either accept that locations will take 2 more progress to clear (+6 if all copies of Narrow Fissure are in play, the effects will stack), or they can use some tricks to get around this location. Thror’s Key comes to mind again, as blanking this text box not only removes the buff but also allows players to place progress on the Narrow Fissure whenever. Players can also use the Mariner’s Compass to get rid of this location and swap it for another one. This clears the buff, too, allowing some locations to be explored more easily. Effects like Distant Stars and Explore Secret Ways are also interesting but will require some more effort. This location does lose its immunity to progress once the players lose control of the Cave Torch after 5 uses. Though by that time, this location won’t be the biggest concern you have.

Treacheries
With treacheries like Dark and Dreadful, and Sudden Pitfall, the Nightmare version of this quest didn’t need a lot more treacheries to be added. Only one new treachery is added to the encounter deck, which tries to set up more synergy with Dark locations.
- Shadow-fall: This is the only new treachery in the expansion, and its focus is to make more of the locations in the game gain the Dark trait. This means that the treachery can whiff if all locations in play are already Dark! That’s why this treachery always surges, so you potentially get hit by this and still have to reveal another encounter card. When this card is revealed, it will attach to any non-Dark location in play (players get to choose if there are multiple options). The attached location gains the Dark trait and gains +3 quest points to make it more difficult to escape. The +3 quest points also prevent players from clearing the location in the staging area with just the Cave Torch, as the location will require multiple uses of the torch to be cleared, and you really don’t want to do that. It should be noted that while nearly all non-Dark locations can be targets for this treachery, the East Gate is not! That is because the location is immune to card effects, including any and all encounter card effects. That means that if you reveal Shadow-fall as a part of setup, and there are no other non-Dark locations in play, it simply surges, and players avoid this condition attachment.
Having an extra location gain the Dark trait is bad in this scenario. Not only can the location now gain a lot of threat from Burning Low and Branching Paths, but it is also a target for the new locations in the game. Twisting Shadows will prevent players from clearing the location in the staging area through slow-burning effects like Northern Tracker, and Narrow Fissure will increase the quest points of the attached location even more! The one point where this Condition attachment is “helpful” is that any Goblin Lurkers will be coming down to you and will no longer contribute their threat to the staging area. They do get +3 attack, so if you aren’t ready for that, then you might end up losing because of this treachery.
The best counter to this treachery is simply canceling it, although you should really save your Test of Will for Dark and Dreadful and Burning Low. It is better to remove the location from the staging area if you get the chance or to put a ton of progress on the location at once with Evening Star or Mirkwood Explorers.

Tips and Tricks
- Only exhaust the Cave Torch when you really need to! You only get 5 uses before things get really tricky, so don’t waste it on something like a Zigil Mineshaft. You really have to change your mindset compared to the regular version of the quest, but only exhaust it if needed.
- Avoid putting Shadow-fall on the active location. The treachery may surge into cards like Dark and Dreadful, which will be a lot tougher to deal with if the active location is Dark. It is better to place this on a location in the staging area and try to find a way to clear the location. Cards like Mariner’s Compass and Distant Stars might be a better solution than placing progress on the location.

- Like in the normal mode, never quest with just your heroes! This encounter deck still contains Sudden Pitfall, which will delete a hero if it can. Always have a sacrificial ally quest along to make sure the treachery won’t kill a hero.
- Shadow cancellation can be huge here, as it can prevent you from being swarmed by enemies or enemies getting a sudden +3 to their attack. Cards like Burning Brand will be a great help (and not only in a thematic sense). Tides of Fate can also be useful to prevent heroes from taking as much damage from shadow effects.
- With nearly all locations having the Dark and Underground traits, the Dwarves get a natural advantage. Using Untroubled by Darkness can provide a sometimes much-needed willpower boost to get through a nasty Dark location. You can save up several copies of this event and use it for a final quest push at stage 3, though you might run into situations where you want to use it earlier. Dwarves also get to keep a lower threat with Ever my Heart Rises, which does amazing work in this quest.
- Quest stage 3 is not one that you want to end up spending very long at. Try and quest through with as many characters as you are comfortable with and try and boost with some willpower granting effects like the Free Peoples, Untroubled by Darkness, and Faramir. The sooner you are out of stage 3, the sooner you can win this difficult quest.
- If you want to get past the East Gate quickly, try and play Ghan-buri-Ghan as soon as possible. He’ll have 7 willpower while East Gate is the active location, allowing you to clear that location quickly and start engaging enemies.
Playthroughs
- True solo Dwarf deck: https://www.youtube.com/watch?v=06n4scyR20Q
- True solo Glaurung deck: https://www.youtube.com/watch?v=L3d9XSIijmU
- Three player: https://www.youtube.com/watch?v=PxkefxLP41Y
- Two player, mono Lore decks: https://www.youtube.com/watch?v=ZS-cKsQaNrA
This is the first of the Dwarrowdelf NM reviews, and I will look at covering the rest of the cycle soon. I do not yet own all of the NM packs for this cycle, but I hope to at least do articles on the Khazad-Dum quests in Nightmare mode in the first few months of this year. The rest of the NM articles will follow once I find the decks for a reasonable price somewhere. We are also working on releasing other NM articles by other authors in the near future, so stay tuned for those.

One thought on “Nightmare Into the Pit”