We start off this brand new cycle with one of my personal favourite quests. I often return to this quest to test my new decks against. The quest requires you to handle combat, quest enough to pass locations, even have a solid board state (or resource generation) during the last stage. This quest doesn’t have a lot of special gimmicks to it, though the Cave Torch and the 3 unique locations bring a really good theme to the quest. But all of these will be discussed in more detail as we analyse the first scenario of the Dwarrowdelf cycle:
Into the Pit
- Found in: Khazad-Dûm deluxe box, Scenario 1
- Official Difficulty: 5
- Community Difficulty: 4.8
- Encounter sets: Into the Pit, Twists and Turns, Hazards of the Pit, Goblins of the Deep
- Quest cards: 3
- Play if: You want to start a playthrough of this cycle, you have a deck to test against a tougher scenario than Passage, you want to play another game with new players after beating Journey along the Anduin
- What is different about this quest?: Not much, I’d say this quest gives a good indication of what the quests underneath the Misty Mountains will look like. You get access to Cave Torch and will have to fight a beefy enemy mid-way through the scenario. Besides that, it isn’t much different as future quests.
- Solo or Multiplayer?: I have played this scenario plenty of times solo, and it is pretty beatable. Multiplayer adds a bit of difficulty during the second stage, but it shouldn’t become too much of a challenge. Just play the scenario with however many players you have.
- Can I run Side-Quests for this scenario?: Yes, I would like to think that you could clear some during the game. Stage 1 can only be defeated if all unique locations are explored, which gives you some time to clear out the quest card and some potential side-quests. Stage 2 doesn’t require you to make progress on the quest card, so exploring another side-quest can help.
The Quest
Setup
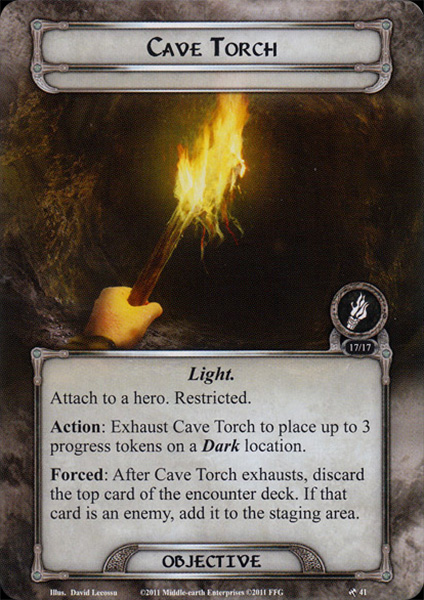
The scenario starts by making East-Gate the active location and having the first player attach Cave Torch to one of his heroes. The players also set the other 2 unique locations aside, out of play. These get added in after their predecessor has been explored. This gives this first part of the quest a really thematic flavour, as you can track your progress through Moria on an actual map. After these locations have been set aside, you can flip over to 1B.
Quest card 1: Entering the Mines – 7 quest points
This When Revealed effect is one of the most common ways a quest can begin in this game. Not only will it scale according to the number of players in the game, it also gives the players something to work with during the first round. Revealing Burning Low, Sudden Pitfall or Dark and Dreadful during this step is a nice way to get them out of the deck early. However, if a 4 or 5 threat location gets added, the players may struggle to overcome the threat in the staging area during the first round. Other bad cards to reveal during this stage are Goblin Scout, Watchful Eyes, Dreadful Gap, Crumbling Ruins and Goblin Follower. Depending on the cards you reveal, you will start the game with an average of 1.25 threat per player in the staging area (considering the Surge keyword).
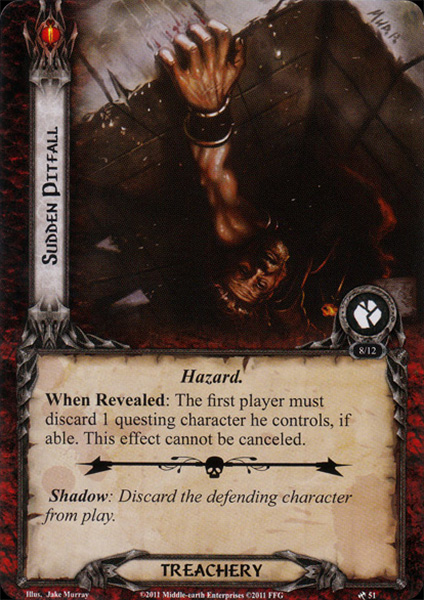
A quick note at the beginning of the first round: If you are the first player, be sure to play an ally and quest with that ally. DO NOT SEND YOUR HEROES IN ALONE. Too many times have I faced the terrible effect of Sudden Pitfall where you have to discard a questing character when I only quested with heroes. There is only 1 copy of it in the game, so once you’ve seen it, you should be fine for a while.
In order to pass this first stage, you have to explore the 3 unique locations. They enter play when you explore them. The first one, East-Gate, starts off as the active location during setup. You will explore this location during the first or second turn, as the 7 quest points on it may be difficult to muster in solo. Its high threat makes it a less than ideal target for West Road traveller, just leave it as the active location. Ghan-Buri-Ghan is a very good ally because of this threat, he will be questing for 7 willpower. That is good value for a 2 cost ally. While the East-Gate is active, you will probably not face a lot of combat. No engagement checks are made and players are unable to optionally engage enemies. This will not stop combat altogether though. Goblin Follower will still engage the last player, and player card effects like Dunedain Hunter can drag out even more enemies.

Once the East-Gate is explored, you move into the First Hall. It gets added to the staging area once you explore the previous location. However, you do not have to make the location active to pass through. The 2 quest points on the location make it a good target for some location control cards. Mirkwood Explorer could just get rid of this location if you have quested successfully during 2 previous turns. If you do decide to travel to First Hall, you will have to raise the threat of each player by 3. Between this effect and the Signs of Conflict, you will be raising your threat a lot during this quest. Note that all enemies that couldn’t engage because of the previous location will be able to be engaged at this point. Be ready for combat.
Finally, we move to a familiar location: The Bridge of Khazad-Dûm. This 3/3 location is harder to clear with location control so you could decide to travel to it. However, while the bridge is the active location, you are unable to play any cards. This includes from the top of your deck and from your discard pile. This might make it worth it to include Tighten Our Belts for even more resources after you have cleared the location (you are unable to play it while the Bridge is active). Try to clear the bridge in one turn, otherwise, you might find yourself with a full hand of cards, and no way to play them.
Once the Bridge of Khazad-Dum is added to the victory display, players will have to place 7 progress on the quest card. Usually, this progress has been spilling over from clearing the locations, but sometimes you still have to place a couple more points before you can advance. You can also decide to stall at this point, removing some threat from the staging area and clearing some side-quests. Keep a good eye on your threat though, you will still have a couple of rounds to go until you have won. The pit can raise your threat very fast. Best advice is to move on to the next stage once the bridge has been cleared and you have enough progress on the quest.
Quest card 2: Goblin Patrol – 11 quest points
Now that the questy side of the scenario has been covered, you will have to face the enemies of Moria. Goblin Patrol will have the players pick one enemy each from the discard pile or the encounter deck. Your best place to find enemies is probably the discard pile, as any enemies that are revealed from the encounter deck this turn, get discarded right away. One of the players must find a Patrol Leader and add him to the staging area if able. There might be a case where both of the leaders have been revealed early. If any of them died, a player must fish him out of the discard pile. For the rest of the enemies, Goblin Scout might be the best bet if any player is above the engagement cost of that enemy (or below 25, but that requires some work). Otherwise, pick Goblin Swordsman over the Follower.
The stage will have you discard any enemy that gets revealed from the encounter deck. Wait No Longer and Dunedain Hunter will still go off, as those enemies will immediately engage you. The Cave Torch will also still add enemies to the staging area, as the cards are first discarded before being added to the staging area. The stage can be defeated in 2 ways. Either you continue with questing and fulfil the 11 quest points on the stage or you decide to kill each enemy in play. Once all enemies are defeated, you immediately progress to stage 3. This is usually the way I pass the stage. The questing phase can still be used to good effect if you quest against side-quests. You might be able to clear 1 or 2 of them before the enemies are dead.
Quest card 3: A Way Up – 12 quest points
Now that there are probably no enemies in play and the Cave Torch has cleared a lot of locations, it should be easy to place the 12 required progress and win the scenario. In order to make this stage more difficult, players will no longer gain resources during the Resource Phase. Include some resource acceleration of use cheap cards in your deck in order to continue to play cards. With very few cards remaining in the staging area at this point, you can usually progress past this stage and win against the scenario in 1 turn. Just send everyone to the quest and hope that Dark and Dreadful doesn’t come up. If you have placed the final progress on this stage, you have won the game and are at the Seventh level of Moria. Now it is time to see what happened to Balin.
The Encounter Deck
Global
- The number of cards to reveal in Normal mode is 50 and 33 in Easy mode. This excludes the 3 unique locations and the Cave Torch

- Shadow effects are quite common on 56 and 64% of cards, bringing cancellation will definitely help
- Average threat on cards revealed is 1 and 1.18 per card, there are a number of cards that will add more cards to the staging area though
- 12 cards have the potential to surge, with 6 cards surging in any case. This is 1 in 4 cards that will surge, bringing Lanwyn is a very good decision for this quest.
- Doomed is only on the 5 Signs of Conflict, this will raise your threat with a potential 10 points.
- Only Sudden Pitfall is immune to player card effects, you are unable to cancel this treachery. Some shadow effects and enemy effects can make enemies immune to damage this turn.
- Chances of revealing enemies for Cave Torch is 28% in Normal Mode, and 40% in Easy mode.
Easy mode in this quest is not really beneficial to the Cave Torch and to the Shadow effects. You will remove a couple of very nasty cards though. It is a good way to get a feel of this quest before attempting it on Normal mode. The Normal mode has a lot more treacheries, where Easy mode has a higher density of enemies.
Objectives
Cave Torch is the only objective in this scenario. It is attached to a hero from the first player during Setup. Note that it counts as a Restricted attachment, so be sure to keep that in mind when deciding on who to attach the torch. Your combat heroes will usually need both of their restricted slots for weapons or armour.
The Torch has the ability to put 3 progress tokens on any Dark location. This can either be in the staging area or the active location. This effect alone will only clear Branching Paths, other locations will need additional location control or two activations from the Torch. The Cave Torch can also be used to cancel Burning Low. This treachery might make the threat in the staging area higher than the willpower of the questers, so exhausting the Cave Torch to cancel this is a good idea.
The exhaustion of the Cave Torch comes at a price though. Players must discard the top card of the encounter deck after exhausting the torch. If the discarded card is an enemy, it gets added to the staging area if the players aren’t on stage 2. Players will have to make the decision to risk another enemy for the use of the Cave Torch carefully. Another enemy might disrupt the way you were going to deal with combat for this round. The chances of revealing an enemy with this effect are 28% in a Normal game, and 40% in an Easy game.
The timing of the Cave Torch should always be after the staging step in order to cancel Burning Low. Perhaps the best time is directly after staging if you can clear a location and thereby remove its threat out of the staging area. Be aware that you will have to add the threat of the enemy in the staging area if you reveal one. Another good time is probably after combat if you can’t handle another enemy that turn.
Locations
The locations in this scenario are a lot tougher than during the previous cycle. These have a lot of quest points, in order to protect them against the Cave Torch. They can also pack a lot of threat, making Location Lock a real problem for the unprepared. Bring a Northern Tracker to chip away at these locations. I have covered the 3 unique locations during quest card 1 so I won’t repeat myself. Goblin Tunnels will be discussed during The Seventh Level as it is much more of a threat there.
- Stairs of Nain: A non-Dark location, so you can only clear it by other location control effects or by travelling to it. If you feel that you won’t be facing combat this round, feel free to exhaust a character in order to travel here. A very mild location to reveal, to be honest.
- Dreadful Gap: This isn’t mild at all. During the later stages of the game, this location can have more than 20 quest points that you have to clear before you can even put progress on the quest card. There is also no use in using Cave Torch, as the location isn’t Dark. The When Revealed of this location is one that I would like to cancel, just to have it not active during resolution. If you manage to put it in the staging area because of this cancellation or because of effects like West Road Traveller, there is 1 great tech piece that can help you to put this 1 off location in the Victory Display. Heirs of Earendil will trigger on the printed quest points. It is ruled that printed X is considered to be 0, making you have to raise your threat by 0 in order to discard the location. When discarding the location, keep in mind that it has Victory Points so you won’t face it again.
- Fouled Well: Revealing this location gives players the chance of discarding extra copies of uniques in their hands. However, you will have to discard a card from your hand regardless, or it gains surge. If one player doesn’t want to discard cards, none of the players will, but they still can in order to fuel their discard pile (looking at you Noldor and Caldara!). The surge on this card isn’t great, as you just revealed 3 threat. Cave Torch on this location will require 2 activations, or an activation and an Evening Star.
- Branching Paths: This location is quite thematic from the books and movies. you come up to a non-threatening location that requires you to explore 3 quest points. While you are not exploring this location, the threat of the other Dark location is boosted by 1. This effect stacks with more Branching Paths that get added to the staging area. A Cave Torch activation will clear the location, removing potentially a lot of threat from the staging area. Once the Branching Paths have been explored, players get to look at the top 3 cards of the deck and choose one of those cards to reveal. The other 2 cards get placed at the bottom of the deck. This is a great way to get rid of effects like Dreadful Gap, (another) Patrol Leader or Sudden Pitfall. What you will want to choose depends on what you have in your staging area. Another location is good if you have nowhere to travel, an enemy is good if you are ready for combat and you haven’t drawn any enemies this turn. Burning Low is a really good card to reveal, as the increase in threat doesn’t matter as the quest has already been resolved. Enemies during the second stage will be discarded immediately, so that is another great option.
- Zigil Mineshaft: This location is a tough one to reveal. 5 threat on one card can really flip your quest from progress to an increase in threat.However, you can choose to raise each players threat by X to place X progress on the Mineshaft. This feels a bit like Heirs of Earendil, but then for the entire party. Cave Torch on this location will reduce the amount of threat you have to take to 2, which makes exploring it easier. You can also travel to the Mineshaft to get the threat out of the staging area. The buffer of 5 quest points might make the next quest phase a bit harder though. If you do decide to travel, note that Ghan-Buri-Ghan is excellent tech as he will quest for 5 willpower while the location remains active.
- Lightless Passage: Just looking at the art gives me a dreadful feeling about what lies in wait behind that archway. No wonder this is a 4 threat location. It is a pretty heavy hit to your questing capabilities if this one is revealed alongside Zigil Mineshaft or additional copies of the Passage. Note that you will have to exhaust the Cave Torch in order to travel here. You will be able to also exhaust the Cave Torch to place 3 progress if you decide not to travel to the Lightless Passage. If you manage to get an additional progress on the location from say, Warden of Arnor, you have explored the location without the need to travel there. If you do decide to travel, note that Ghan-Buri-Ghan is excellent tech as he will quest for 4 willpower while the location remains active.

Enemies
Most of these enemies will be seen in future scenario’s as well, but I’ll cover them here since there will be plenty of enemies to cover in the next scenario. Most Goblins have very few hitpoints, making them susceptible to Thalin and other direct damage effects. Having a Gondorian Spearman in play to do your defending, might kill a lot of enemies before you can even fight back. Consider Quick Strike as well if you do not have enough defenders in play and want to kill the Goblins.
- Patrol Leader: The only enemy unique to this scenario. It is also the strongest enemy around with a beefy 3/4/3/4 stat line. The strength of the Patrol Leader lies in his Forced ability, however. If the Patrol Leader would be damaged from an attack or direct damage, you will have to discard the top card of the encounter deck. If that card is an enemy, you will have to cancel all damage dealt to Patrol Leader. The best strategy is to have multiple points during the round in which you damage him. That way you will have a higher chance of dealing damage to him. Heavy Stroke is a very good card if you are able to damage the Patrol Leader, as it deals even more damage, potentially killing him. He is able to cancel the damage from this effect though. However, you will be milling the encounter deck for enemies, which will leave fewer in the deck. This makes future combat easier and makes the risk of revealing an enemy with Cave Torch smaller.
- Goblin Scout: This enemy is not a big threat in combat, but is adding a lot of threat to the staging area. To make matters worse, you are unable to engage the Goblin Scout if your threat is between 25 and its engagement cost (usually 37). Don’t bring a Hobbit deck that increases engagement cost for this one, unless you can keep a low threat. Try to find these enemies with Dunedain Hunter and Wait No Longer, as it will come into play engaged with you. It is also very vulnerable to direct damage with only 2 hit points.
- Goblin Swordsman: This is a Goblin that we will encounter often. Its static effect of +2 attack makes it a 5 undefended attack, which will probably kill a hero or a decoy like Barliman or White Tower Watchman. Try to defend this one and deal with it during the round it engaged you. The Shadow effect on this one contributes to the Swarmy nature of these Goblins, and it will not be the last time we encounter this effect.
- Goblin Follower: This one requires a bit of explanation about who is the last player. In multiplayer, this is quite obvious, as it is the player who takes his actions last. However, in a solo game, you are considered to be the first ánd the last player. The When Revealed effect from the Follower will, therefore, cause it to engage you. This removes his threat from the staging area but will force players to deal with him during combat. The 4 hitpoints will make this enemy the most interesting target for a (Sneak Attack+) Gandalf.
A lot of shadow effects will make these goblins have a higher attack value. Bring a good defender and/or Tides of Fate to increase defence.

Treacheries
There are some really nasty treacheries in this scenario that we will encounter in the future as well. I will cover Watchful Eyes in the next scenario, as it will be present there and much more of a problem.
- Signs of Conflict: This is the only treachery unique to the scenario and has the tendency to work on my nerves. The Doomed 2 is bad enough, but the fact that it surges just adds insult to injury. There are 5 copies of this card, so they just might surge into each other, raising your threat even more. There is also no point in cancelling this card, as there is no When Revealed effect on it. Bring Lanwyn to benefit from the surge and endure is my advice.
- Burning Low: This is the return of the Driven By Shadow treachery from the previous cycle, but with a twist. All Dark locations get an added +3 to their threat, potentially raising the threat of a location to 11 (3 Branching Paths in play boost a Zigil Mineshaft to 8, 8+3=11). Players are able to cancel this effect by exhausting the Cave Torch. This might replace the treachery with an enemy, and you will not be able to place the 3 progress on a location this turn. If there are sufficient locations and enemies in the staging area, it is worth to cancel this effect.
- Dark and Dreadful: This is where you use your Test of Will. Chances are that your active location will be Dark. This buffs the effect of the Necromancer’s Rea… I mean Dark and Dreadful up to 2 damage on each exhausted character. This can cause you to lose a lot of your questing allies, and potentially a hero. Revealing 2 back-to-back is usually a scoop.
- Sudden Pitfall: I would save my cancellation for this one, were it not that this card cannot be cancelled. This 1 off treachery will influence the way that the first player has to quest each and every round. Out of the Wild and Scout Ahead will be good tools to remove this card from the game. Otherwise, you could also scry the card and remove it with Cave Torch. Note that the Shadow Effect is able to be cancelled, so bring Hasty Stroke or lose your defender.
- Crumbling Ruins: This treachery is quite difficult to deal with, especially if it comes up early and you don’t have a lot of characters to exhaust. There are a couple of ways around this effect:
- Don’t add expensive cards in your deck. Forget 5 and 4 cost cards and play a cheap deck that relies on low-cost cards. Chances that you will have to discard a character will be slim.
- Exhaust an ally you don’t really care about. Squire of the Citadel and Snowbourn Scout won’t impact your play too much if they get discarded.
- Scry your own deck. You will be able to discard a cheap card that you weren’t really looking for anyways, perhaps a copy of a unique card. Hero Gandalf works well with this, as do Imladris Stargazers.
- Cancel the treachery. This saves you the trouble of having to exhaust a character.
- Quest with everyone. Ok, this is a bit unlikely, but you can’t fulfil the treachery if there is nobody to exhaust.
- Cave In: Resets the stage and the active location by removing all of your hard earned progress from them. This isn’t too bad, as you won’t need any progress on the quest for stage 2, and can clear stage 3 in 1 turn probably. However, during stage 1 this can be a big deal.
- Many Roads: Honestly the Surge on this card is the worst of it. Reshuffling the locations in the discard pile back into the deck will make Cave Torch hit more consistently. You keep your defeated enemies and treacheries in the original discard pile and will end up with a location-heavy encounter deck. This will bring the risk of location lock in the future, be aware of this.

Tips and Tricks
- If you are the first player: DO NOT SEND ONLY YOUR HEROES TO THE QUEST!!! Sudden Pitfall will have no mercy and discard one of your heroes straight away. If you are only able to bring out a 0 willpower ally, bring it with you on the quest.
- Direct damage is a good way to deal with the Goblin Scouts in the staging area, they are quite weak but contribute a lot of threat to the staging area. Poison Spikes or Hands upon the Bow will come in handy against them.
- Ghan-Buri-Ghan is a great ally to get out while East-Gate is active, 7 willpower at 2 cost is great. Even after that location is explored, he will help in questing if you have a Zigil Mineshaft or Lightless Passage active. He can also deal with any nasty travel effects on locations.
- Most of the locations are Underground, this gives Dwarf decks a distinct advantage with Ever My Heart Rises and Untroubled by Darkness. Bringing a Dwarf deck is not only thematic, but it can really benefit you during the quest. This holds true for most of the cycle in fact.
- The scenario tends to raise your threat a lot. In order to avoid unwanted combat, play threat reduction or make the enemies unable to engage you with Advance Warning. To avoid threating out, it is advised to move past the stages as fast as you can. A chain of Signs of Conflict can make your situation dire in the blink of an eye.
- There is a lot of surge in this quest, so Minas Tirith Lampwright and especially Lanwyn are good inclusions for once.
- The locations in this scenario can really pack a punch. Explore Secret Ways would be a good way to lower the threat in the staging area if you are able to clear it early in the game.
- The enemies in this scenario are pretty weak on the defence. Try direct damage to finish them off in the staging area or before they can attack. Gondorian Spearman and Thalin will come in handy during this scenario.
- A good ally to deal with the Patrol Leader and the Goblin Follower is Skinbark. This Ent will stomp on any orc through their defence. This will outright kill the Follower, and could kill the Patrol Leader if his ability doesn’t discard an enemy. Definitly bring Skinbark on your quests.
With the first steps into Moria taken, our heroes will now face the hordes of Goblins that call this pit their home. Next time we will see what the Seventh Level has in store. Lets just hope they don’t have a Cave-Troll.

Regarding the Cave Torch- I don’t think stage 2 will discard an enemy that has been ‘Added’ via the torch. Only ‘Revealed’ enemies are discarded. Just thought id throw that out there. Thanks for theses articles!!
LikeLike
Thank you for pointing that out, mistake on my part that has gone unnoticed for 1.5 years, whoops. It has been corrected in the article itself.
LikeLike
Remember to to correct it in the Tips and Tricks section as well 🙂
Great articles by the way.
LikeLike