The Seventh Level is one of my testing quests (I test a lot against Dwarrowdelf in general) and particularly for my combat decks. The classic Seventh Level has always been a quest that pushes out a ton of enemies. It requires you to do well against them, while also making enough progress to get through the two stages. This Nightmare version doesn’t change the formula drasticly, but makes it a little more difficult by introducing new enemies to the encounter deck, as well as the new mechanic that lets enemies collect resources that can be used as stat boosts or damage cancellation. This makes the enemies a lot tougher than in the normal version of the quest, which causes you to really push out your combat characters quickly. This is a nice quest to bring out if you and your friends did well against the normal version of the quest, as the tone is the same, but the quest is changed just enough to make it a real challenge for you.
Nightmare The Seventh Level
- Found in: Khazad-Dum Nightmare deck, scenario 2
- Size: 19 encounter cards, 1 rules card
- Quest cards: 2, no new quest cards with this one.
- Increase in difficulty?: Yes, though I found this one easier than other Nightmare decks. The focus on combat hasn’t changed too much, so a deck that does well against the normal version of this quest, has a decent chance of beating the Nightmare version too. Some strategies might be less effective as the quest features stronger enemies, but solid attackers and defenders can get you a long way through this quest.
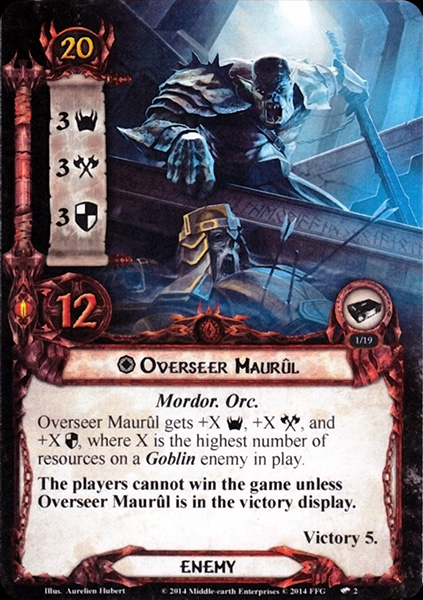
- Fixed loopholes?: The direct damage cheat that made Thalin a monster against this quest can be patched if certain cards like Orc Taskmaster and Chamber of Records are in play. There weren’t too many other cheats to this scenario, besides the people trying to rush through the quest by pushing out willpower over anything else. That is no longer a possibility, thanks to a new rule that requires players to kill Overseer Maurûl before winning the game.
- New mechanics introduced: Boss fight with a new unique enemy. You also get forced to go to a new and unique location, making the transition between stages 1 and 2 a lot more difficult. Enemies now also collect resources, which get turned into stat boosts or damage nullification by different cards in the game.
- Play this scenario if: You have a combat deck that needs a test, and you have already beaten regular Seventh Level with it. You want to play through the Khazad-Dum box in order, and this one is next. You want to try a Nightmare quest that is not too difficult but scales well if you bring the right cards.
- Solo or multiplayer?: The resources will seriously pile up if you are going to try this scenario with more than 2 people. I prefer this one in true solo, since you can generally handle the 1-2 encounter cards per round that way. But in higher player counts, there is a real chance you will be out swarmed after-effects like Beats and Echoes hits. True solo players will have to find a way to deal with Overseer Maurul though, as killing him is required to win the game.
- What to look out for: Enemy swarm is quite dangerous still. Enemies are getting a ton of resources that make them nearly unkillable. Transition to stage 2 is made a lot more difficult with the new unique encounter cards and the final boss-battle. Don’t forget to still quest in order to make progress, or else you will be stuck down there forever.
New Rules

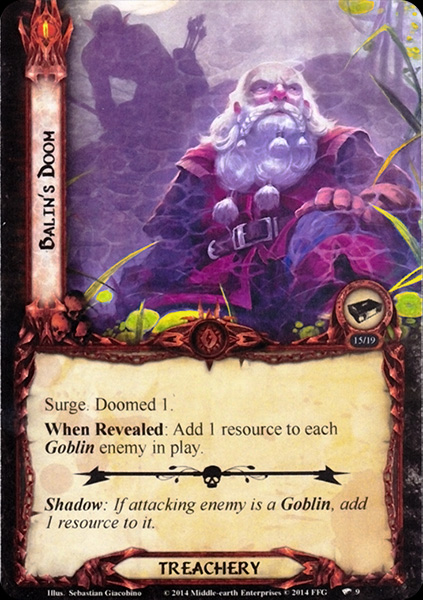
The Nightmare version of this quest does still come with its own rule card, but there are no passive effects on there that need to be kept in mind every turn. The new setup only happens at the beginning of the game, and the large Forced effect only happens when the players advance from stage 1 to 2. When this happens, the two unique cards set aside during setup are brought into play. Overseer Maurûl is placed in the staging area, and the Chamber of Records is made the active location. If there happened to be another active location at the time, it gets pushed back to the staging area. This can be bothersome if the location happens to be the Deep-Mines, as that means that newly revealed Goblin enemies will receive extra resources. It will also automatically get immunity from player card effects thanks to the Chamber of Records. Besides introducing these two unique cards to the game, the Forced effect also requires players to shuffle any copy of Balin’s Doom in the discard pile to the encounter deck. This again ensures that enemies in play get some more resources and that the threat of all players also increases a little faster. Plus it is a nice thematic nod that you learn of Balin’s doom in the Chamber of Records. The rest of the transition between the two phases remains the same, as you lose the Book of Mazarbul as usual. No other passive effects or anything happens with this card, so you can put it aside for the rest of the game. Just don’t forget to reshuffle the treachery into the deck when you transition; it is easy to forget.
New Setup
The new setup of the scenario remains pretty much unchanged. After the cards are removed, as per instruction on the rules card, the players need to remove Overseer Maurûl and the Chamber of Records from the encounter deck. These are easy to find since they are the only unique encounter cards in the game. The players will get these two encounter cards back when they transition to stage 2. The rest of setup remains the same, with the first player choosing a hero to take the Book of Mazarbul (use it on your defender or utility hero), and each player reveals one card from the encounter deck to begin. Since you can now reveal some new cards, there are some easy cards to reveal this early on, but also some horrible ones that will set you up for failure from the start of the game. If you happen to get unlucky with Beats and Echoes during setup, you will be revealing a lot of cards since no player will be engaged with an enemy yet. This can potentially drag out a lot of enemies for your setup, especially in higher player counts. Other cards like Balin’s Doom and the Orc Taskmaster are a little easier to start the game with since you won’t have Goblin enemies in play.
Cards Removed
The following cards are removed from the encounter deck at the start of the game to make some space for the new Nightmare cards. These cards are either replaced by tougher versions, or were too broken to keep included in this new version of the quest.
- 2x Plundered Armoury (Easy location and Goblin Skirmisher now adds attack boosts to enemies)
- 2x Hidden Threat (This treachery wasn’t too damaging to solo players who could discard the Book this way)
- 2x Upper Hall (Makes way for new locations, 1 copy is still in the encounter deck)
- 2x Goblin Scout (Makes way for the new enemies, 1 copy remains in the encounter deck)
- 2x Goblin Swordsman (Easy enemy, 3 copies remain to receive resource buffs)
- 2x Goblin Spearman (Easy enemy, 3 copies remain to receive resource buffs)
The Quest

The first part of the quest changes very little compared to the base version. You are getting swarmed with enemies and have to make your way through the Seventh Level to find out Balin’s fate. You do still get the Book of Mazarbul at the beginning of the quest, but will lose it as soon as you transition to the second stage. The enemy swarm you are used to is a little more dangerous this time, as new enemies have higher stats, and you will still engage a lot of enemies early on. Get your combat characters set up as quickly as possible so that you can start engaging and killing the smaller Goblin enemies. It is advisable to kill all Goblins you see, and prioritize them over any Troll or Orc enemies. These enemies do not get the boosts from any resources like the Goblins, so you don’t have to worry about them as much.
Try to remove any encounter card from the game as quickly as possible that grants resources or a bonus to enemies with resources. This includes most of the newer cards, which will take some time and effort to clear. But the more you can minimize the number of resources in play on enemies, the better off you’ll be.
Since this quest has so many enemies, most of your effort will be put towards killing them, and not so much on questing through hard. While you should still have enough willpower not to have to raise your threat and be able to clear some locations, the bulk of your characters should be keeping the enemies in check. You can also combine making progress with killing enemies if you bring cards like Tactics hero Legolas, Arod, and the Blade of Gondolin. These effects will place progress each time you kill an enemy, which can be very useful in clearing this quest.

The progression to stage 2 is a bit more serious in this quest, and should be timed just right so you can deal with the new encounter cards that will come out. Advancing to stage 2 loses the Book of Mazarbul, adds the 2 unique cards to the game, shuffles all copies of Balin’s Doom into the encounter deck, and has you potentially reveal more enemies each turn with the Forced effect on the quest card. And while you could blitz through stage 2 in the normal version of the quest, it is not that easy this time. First of all, there is the Chamber of Records, an 8 quest point location that has to be cleared in order to put progress on the main quest. And pumping out just enough willpower won’t win you the quest either. Overseer Maurûl has to be destroyed and placed in the victory display in order for you to win. Timing your progression to stage 2 is important so that you minimize the number of other enemies in the staging area. This gives you time to deal with Maurûl before his stats go crazy. Once he is down, it is a mad dash to the finish by placing all the progress you can on the main quest. If you complete all the quest points on the second quest card before Maurûl is dead, then you should throw everything you have at him, or at another enemy with the most resources on him to be able to bring down Maurûl’s stats.
With this quest swarming a lot of enemies at you, it will be best to be able to deal damage to them without having to declare attackers against some enemies. Especially in the early game, you will be outpaced by the encounter deck in most cases where a lot of enemies are revealed through encounter card effects or shadow effects on top of regular reveals during the quest phase. Direct damage effects will help a lot in lowering the amount of enemies in play, and effects that can deal splash damage to enemies, like Firefoot, Thorin Stonehelm, Azain Silverbeard, and Durin’s Axe is a great tool to kill 2 enemies in one attack! In higher player counts, Ranged and Sentinel will also be important, as even the players who generally take care of willpower will start to be engaged with enemies. Being able to help players out will save you later on in the quest.
It is no longer the easy quest that it used to be, but with enough attention to combat and with enough tricks in the Tactics and Lore sphere, you can get very far against this quest. There are some knock-out punches in the early game and you should try to wait to progress in this quest before you are ready to face phase 2. The best thing you can do is to wait until the encounter deck is empty before progressing, so that the deck won’t be stacked with Balin’s Doom, which will boost the stats on Maurûl to the point that it is very difficult to get past his defence. If you can time it right though, try to trap Maurûl with Poisoned Stakes and Ranger Spikes so that he remains trapped in the staging area and dies a slow death over the course of 6 rounds while you deal with the other enemies and try to make progress on the main quest. It isn’t easy, but this quest isn’t the hardest Nightmare quest out there.
The Encounter deck
Global
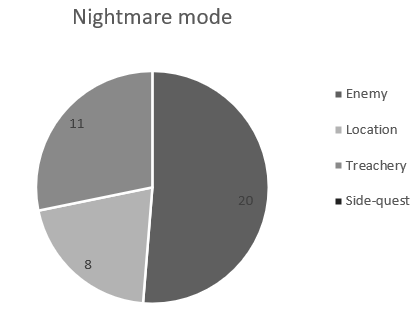
- The encounter deck is increased to 39 cards in total, not counting cards set apart during setup
- Shadow cards have a 54% chance of having a shadow effect
- Average threat per card revealed is 1.7 threat per card, ranging from several 4 threat cards to 0 threat treacheries.
- 4 cards have the surge keyword, but several other effects will drag out more encounter cards, like the Orc Horn Blower, shadow effects, and Beats and Echoes.
- The left over Upper Hall and the 3 copies of Balin’s Doom have the Doomed keyword. There aren’t many other effects that raise your threat, but with many lower engagement cost enemies, that doesn’t always matter.
- Immunity
- Chamber of Records is immune to player cards effects
- While Chamber of Records is in play, Goblin enemies with at least 1 resource are immune to player card effects.
- Players cannot win unless Overseer Maurul is in the victory display.
- Goblin Archer cannot be optionally engaged by players
- Orc Taskmaster gives Goblins immunity against damage while they have a resource on them
These statistics do not take into account the Book of Mazarbul, Overseer Maurul, or the Chamber of Records, as these cards either enter the game at the second stage, or are a part of setup. They will not be in the encounter deck at any point. The most noticeable part of this encounter deck is how far it is skewed towards enemies. Over half of the encounter cards are enemies, and many of the not-quite-surge cards will pick out any discarded enemies or show up as shadow cards. Locations take a backseat in this quest, though not as much as in the original quest, since there are some harmful locations this time.
Enemies
With this quest heavily focused on enemies, some new Orcs and Goblins are a logical inclusion for this Nightmare version. These enemies interact a lot more with the resources they get than their Normal counterparts.
- Overseer Maurûl: As this quest is so combat-heavy, it needs a boss-level enemy the players have to defeat in order to win. This unique enemy enters the staging area once the players advance to the second stage. He won’t stay in the staging area for too long, as the 20 engagement cost will certainly be low enough that Maurûl engages someone. With this boss being unique and having victory points, some events and effects won’t work against this enemy, but with a lack of immunity to player card effects, you can at least cancel his attacks and deal more damage to him if you have the right cards. However, Maurul is no push-over. His base stats are quite big already, especially his 12 hitpoints and 3 defence, but these stats will grow because of Maurul’s ability. This gives him +X to all his regular stats, where X is the highest number of resources on a Goblin enemy in play. If there are no other Goblin enemies in play, then you just have the regular version of Maurul, but that is not very likely in higher player counts. And with Chamber of Mazarbul being the active location, any new Goblins that engage a player get 2 resources, boosting Maurul up to at least 5 for all his stats. This is where he becomes tricky, as the high defence stat can prevent you from dealing enough damage. Direct damage can work here, as Maurul isn’t protected by Taskmasters, but even then, 12 hitpoints is a lot to chew through. The best course of action here is to try to get a Forest Snare on him, and kill off other enemies with a lot of resources. By the time you get all progress on stage 2 to win, you should then focus your attention on Maurul and take him down with everything you have. Killing him is required to win, so there is no avoiding this enemy. Take advantage of the lack of immunity to player card effects, and slowly bring him down with direct damage effects while you remove the Goblins with the most resources. Ranged support can also help to kill him if you are playing with multiple people.

- Orc Taskmaster: This is not a Goblin enemy, but just a Mordor Orc. That means that this enemy does not get resources from card effects and does not get the boosts that come with these resources. Instead, this enemy acts as a source of resources and new passive abilities for other enemies in the encounter deck. The 44 engagment cost and 1 threat of this enemy makes him a low priority while dealing with the smaller Goblin enemies that engage you early on, but this enemy should not be forgotten. The Orc Taskmaster has a When Revealed effect that places a resource on all Goblin enemies in play (both in the staging area and engaged with a player). These enemies now profit from the new passive rule that the Taskmaster provides Goblins with resources. Whenever a Goblin with at least one resource on it gets damaged, remove a resource from that enemy and cancel the damage. This makes the Goblins have improved resistance to direct damage attacks but also gives the players the option to discard resources from Goblins. To counter this effect, you can either use so many direct damage effects that you burn through the resources on all Goblins, or use your time to kill the Orc Taskmaster instead and deal with the Goblins afterwards. If you want to burn through the resources first, some weapons like Durin’s Axe, Bow of Yew, and Dwarrowdelf Axe are going to be very useful, as well as Thorin Stonehelm’s response. These effects stack damage one after another, allowing you to discard resources over and over again. This won’t work if Chamber of Records is in play, as the enemies will be immune to player card effects, but beyond that, it works quite well. If you are going to be engaging this enemy, be ready for some solid stats. While the Taskmaster does not get bonuses from resources, the plain enemy is trouble enough. 4 attack and 4 defence couples with 6 hit points means that it will take something like Tactics Eowyn’s ability to bring this enemy down. And in a game with Maurûl and Trolls, you might need that ability elsewhere. On his own, the Taskmaster isn’t too difficult to overcome. But if you are getting swarmed by enemies, this one might be too much to clear by yourself. If you somehow can pull it off, this enemy is ideal for The Great Hunt and Put Off Pursuit, so you can clear this enemy and start to damage Goblins again.
- Goblin Skirmisher: In typical Goblin-fashion, this Skirmisher is going to attack you very early on, thanks to its 15 engagement cost. However, unlike the other wimpy Goblins, this one actually has good stats that can make it a real problem in the early game. The Skirmisher comes in with 4 attack, and 3 hitpoints. The 3 hitpoints do allow you to do some fun tricks like Goblin-Cleaver to kill it right away (assuming Taskmaster and Chamber of Records aren’t in play or the Skirmisher has no resources). In any case, you will want to kill the Skirmisher quickly, as it has a nasty passive ability that you cannot slap a Key on and call it a day, like the Western Halls. While the Goblin Skirmisher is in play, all Goblin enemies (including itself) get +1 attack for each resource they have. While this effect does not stack with other copies of the Goblin Skirmisher (thank goodness, else you would get +8 attack with ease), it can still be a nasty weight in the scales to tip them in favour of the encounter deck. Though this will only target Goblin enemies, it can make even the weaker ones hit like a Troll, especially if they have a lot of resources saved up from various effects. Killing these enemies quickly is advised. But cancelling their attacks can buy you some precious action advantage on characters that can counter-attack pretty well. Suppose you are only facing one Skirmisher but a lot of other enemies. In that case it might be worth it to use Revealed in Wrath to blank the textbox of the Skirmisher so that it does not boost the attack of all enemies. This only gets you through the phase, so quick action is required to kill this enemy after you do this.
- Pit Goblin: Even if the encounter deck gets no synergy going, it will at least make sure that this enemy has some resources on it! That is because the Pit Goblin starts with 2 resources on it when it gets revealed. These 2 resources don’t do anything by themselves, but combine this with Goblin Skirmisher, and the Pit Goblin suddenly doubles its attack. With the Western Halls, the Pit Goblin also goes up to 5 threat, which is more likely to be a reason to engage this enemy. With 36 engagement cost, it is not an enemy you have to face early, but if you can bring him down and kill him quickly, you’ll thank yourself later. The 4 hitpoints on the Pit Goblin are asking for a Gandalf-bomb to kill it immediately, but remember that the Orc Taskmaster will cancel that damage at the cost of 1 resource from the enemy. And even when you have Thalin committed to the quest when this enemy appears, he still has a resource to protect itself from direct damage effects. On its own, the Pit Goblin is not very scary if you have no other enemies. But leave enough encounter cards in play, and you will wish that you killed this one a long time ago!

Locations
While the original quest did not focus too much on locations, this Nightmare version adds a few more to replace the easier locations removed. These locations also interact a lot with the resources given to enemies, boosting threat and making sure that enemies are guaranteed to have resources on them.
- Chamber of Records: Many people were missing this location from the original version of the quest, despite the Book of Mazarbul being in the game. So to set matters straight, the Chamber of Records is now a location in the Nightmare version and will become the active location immediately after the players reveal stage 2B. Any other active location at the time will be returned to the staging area. The players will have to explore the Chamber of Records, as there is no way to circumvent it. The location is immune to player card effects, so players must just brute-force their way through the location’s 8 quest points during the next quest phase. It is important that players clear this location quickly, since it is both a source of resources on enemies, and gives each Goblin enemy with at least 1 resource immunity to player card effects. This means that direct damage effects are no longer useful against any Goblin enemy, and that no tricks can be done while the Chamber of Records is in play. When a Goblin enemy engages a player, it also gets 2 resources, meaning it can get a sudden boost in attack strength if Goblin Skirmisher is in play. The 2 resources also boost the stats on Overseer Maurûl who enters play at the same time as the Chamber. While the Chamber of Records is the active location, players are in for a tough fight, so it is important to get through it as quickly as possible. With 5 threat, the location gives Ghân-buri-Ghân a lot of willpower, and the Underground trait of the location can allow Dwarf players to play Untroubled by Darkness for a significant willpower boost. There are no other tricks to get around this location thanks to its immunity. Exploring the Chamber of Records will place it in the Victory Display, meaning that players only have to deal with this location once.

- Deep-Mines: Since not all of the older Goblin enemies will enter play with resources on them, and the encounter deck cannot rely on Balin’s Doom and Chamber of Records to place resources at a constant rate, a more permanent solution is found in the Deep-Mines. This 2 threat / 6 quest point Underground location will have a passive ability that places one resource on each Goblin enemy that enters the staging area. This passive ability only triggers if the Deep-Mines are in the staging area, so an easy solution will be to travel to this location to prevent it from placing more resources on enemies. This will hinder your progress a little though, as the 6 quest points are quite a significant buffer on your progress for the main quest. Using Woodmen’s Path can reduce this value to 1, which is a good use of that attachment. Other attachments that are useful here are Thror’s Key, as it blanks the text box of the Deep-Mines. This way, the players can leave the 2 threat location in the staging area and prioritize travelling to other locations. There are multiple copies of this location though, and the effects will stack resources on incoming Goblin enemies. So this location must be dealt with quickly, especially in higher player counts where you are more likely to see fresh enemies coming out of the encounter deck more quickly. If you are finding that the Deep-Mines are staying in play too long and more are coming out quickly, then this is a great target for the Eryn Galen Settler, who can discard a second copy of this location as soon as you explore one as the active location.
- Western Hall: The final new location is the Western Hall, a 4/4 Underground location that can suddenly boost the threat in the staging area by a lot more than 4 thanks to its passive ability. While the Western Hall is in play, each Goblin enemy gets +1 threat for each resource on it, without an upper limit. That means that the Pit Goblin becomes a 5 threat enemy if it gained no other resources outside of its own ability. This can quickly spiral out of control if you have several high-engagement cost Goblins in the staging area that you are not yet ready for. Luckily, the Western Hall’s passive effect does not stack with other copies of itself, preventing an auto-loss if you reveal 2 copies in quick succession. The natural 4 threat of the location is also a tough brick to get through, and will cause most people to want to travel to this location. However, the Western Hall does come with a Travel cost, where players must add 1 resource to each Goblin enemy in play. If there are no Goblin enemies to receive resources, you can still travel, as all 0 Goblins received resources this way. But it will be rare where this travel cost is more or less free. It will be better to travel here when you don’t have a lot of enemies in play, because the resource each Goblin gains from this travel cost will raise their threat as well! The passive effect on the Western Hall is still around when it is the active location, so travelling doesn’t seem like the correct move. It would be better to explore this location in the staging area, by effects that chip away at the quest points like Asfaloth and Evening Star. If you do decide to travel to this location, do not overlook Ancestral Knowledge, which can place 4 progress on the location, clearing it immediately if it is the active location. Players can also use Thror’s Key for this location, though the multiple copies of this location cannot all be handled by just one key. Plus the threat on just a blank Western Hall is still quite high. Exploration in the staging area is your best bet against this location.

Treacheries
Only 2 new treacheries are included with this pack, both of which try to increase the number of enemies with resources in play. These treacheries can be deadly if you are not keeping the number of enemies down, but they aren’t as bad in true solo.
- Balin’s Doom: This is quite a simple treachery that even has the option to whiff, but with the Surge and Doomed 1 keywords, you will still get a bit of a sting even if the When Revealed doesn’t happen. This is a good treachery to get out early (especially during setup) as it won’t impact the game as much. When the treachery is revealed, the players must raise their threat by 1 and add 1 resource to each Goblin enemy in play. Note that not all enemies in this encounter deck have the Goblin trait, as some are just Orcs. The Orc Horn Blower, Orc Taskmaster, Overseer Maurul and the Cave-Troll won’t get a resource through this effect. All other enemies will. The extra resource does nothing by itself, so in isolation, this treachery is pretty easy. However, in higher player counts where enemies and locations start buffing each other, these resources will really matter. I don’t recommend cancelling this treachery, as there are worse cards in the encounter deck. Still, if you have plenty of cancellation effects and would really get screwed by the extra resource, then it won’t be a terrible target. Remember that all copies of Balin’s Doom in the encounter discard pile will be reshuffled into the encounter deck when the players advance to stage 2. This means that you will likely see more than just the three copies that are in the encounter deck.
- Beats and Echoes: The Seventh Level is notorious for swarming enemies at the players, and this treachery doubles down on that. This treachery has a very high chance of getting more enemies in play, though there are some moments when this treachery will whiff. When this treachery is revealed, the players must discard X cards from the top of the encounter deck, and put any enemies discarded by this effect in the staging area. The base value of X is 2, but this will increase by 1 for each player not engaged with a Goblin enemy at the moment this treachery hits. If you hit this treachery during setup, you will have to discard 1 card per player plus 2 in total. If players are engaged with just an Orc or Troll enemy, that still counts towards not having any Goblins engaged, so you will get even more enemies through this effect. This treachery should be cancelled to prevent the players from being overrun by enemies. In higher player counts, this single treachery can pull out 1 enemy per player, even if some players are already engaged with Goblins. If you have some good scrying effects out like Far-sighted and see that the top X cards do not contain enemies, then this is a free encounter card that probably got rid of some other nasty locations and treacheries. Note that the percentage of enemies in the encounter deck has now increased significantly, so you should be ready for combat! And seeing how more than half of the encounter deck is made up of enemy cards, the chance of this treachery whiffing is very low.

Tips and Tricks
- Remember that encounter card effects only target Goblin enemies with resources. Regular Orc enemies like Overseer Maurûl and the Orc Taskmaster cannot receive resources or the buffs that come with them. Only the little wimpy Goblins get the boost.
- Do not overlook the benefit of direct damage in this quest. While the Orc Taskmaster will protect Goblins with resources from being dealt damage, using direct damage effects is a good way to reduce the number of resources on the enemies. This makes them more vulnerable to attacks and can reduce the stat boosts they get. Thalin is still great for this quest and effects like Goblin-cleaver, which can take out an enemy before it would attack.
- This is a quest that you have to approach with aggression, as turtling will only grow the number of resources on your enemies. Taking out non-Goblin enemies can remove passive effects, and killing Goblins quickly can prevent them from getting more resources in the next round.
- Try to avoid placing resources on enemies if possible. This will make Maurul and even regular enemies easier to deal with. This won’t be easy but focus on travelling to places like Deep-Mines while leaving regular locations like Upper Hall in the staging area. The resources can really get out of hand in this quest, especially in higher player counts. Solo players can usually get by with only having a maximum of 3 resources on an enemy and taking care of Orc enemies and locations that provide boosts.
- If you are having a hard time clearing the active locations, try to use Ancestral Knowledge. This can clear active Western Halls and Upper Hall in one shot and can make significant progress on Deep-Mines and Goblin Tunnels.
- Being a quest taking place Underground, Dwarf decks have a natural advantage with cards like Ever My Heart Rises for action advantage and threat reduction, while Untroubled by Darkness gets you through the quest cards. Dwarves can also tank a lot of the smaller attacks made against you. It is not a direct solution to the quest, but it can help you on your way.
- While effects like Legolas and the Blade of Gondolin can get you through the quest cards quite easily, they are not a solution to the Chamber of Records. Be sure to have characters with actual willpower to burst through that location, after which these effects can start placing progress again.
Playthroughs
The following playthrough videos have been recorded by people going up against this quest with various decks.
- True solo, Glaurung deck: https://www.youtube.com/watch?v=Y3Bm8rlHvcg
- True solo, updated deck: https://www.youtube.com/watch?v=M-JbD66zzFQ
- Two players: https://www.youtube.com/watch?v=iSZ3YHwQgdk
- True solo, progression style: https://www.youtube.com/watch?v=-cPiaICZd2k
With that, only one more scenario remains in the Nightmare Khazad-Dum set: Flight from Moria. That is a quest I don’t play very often, so I will be curious to see how the nightmare version of the quest impacts its difficulty. From there, I have already handed out NM Redhorn Gate to a co-author to do so I can move on with Road to Rivendell. Slowly but surely, these NM scenarios will get completed! Hopefully, before that time, I can own them all as well. We are making good progress, though, as I am currently in possession of 43/50 of them, with the rest of the Dwarrowdelf cycle being offered up to the blog by an amazing follower of Twitter. Hopefully, the left-over 4 packs can be obtained at decent prices as well soon. I will also be looking to continue with the Vengeance of Mordor cycle soon, as progress on that cycle has been slow for a while. But I like to take my time with these reviews to give you the in-depth content you like!

One thought on “Nightmare The Seventh Level”