I have missed this, I really have. Shortly after the release of the Revised Core Set, I got word that the announced Dark of Mirkwood Scenario Pack was already in stock here in the Netherlands. And what do you know? It actually arrived the day after I ordered. So I get to revive an old series of mine in which I review packs as soon as they are released. In it, I used to share my initial thoughts on the player cards and the quest, but I suppose that will change a little with this expansion. I will be reviewing the Boons and Burdens that you collect in the campaign instead. I will also share my thoughts on finally getting physical versions of the Oath and Caves of Nibin-Dûm outside of the Collector’s Edition. Although, there is something extra packed with those quests for you to sink your teeth in.
***SPOILERS FOR THE MIRKWOOD PATHS CAMPAIGN #4 AND #5***
Boons
Let’s start with the good news first: You get some nice Boons for your deck if you play the two quests in this pack in Campaign mode. These events and attachments will aid you with little (one-time) buffs to help you get out of a sticky situation. These Boons can carry over to other campaigns, as is said in the rules booklet included with this pack. I would assume that means that there will be a reprint of the Shadows of Mirkwood cycle coming soon.
- The Fervor of Lore: The first four boons of this expansion are the Adaptation attachments that you may put onto your heroes at the beginning of the Oath. These attachments each grant the attached hero an extra sphere icon, as well as a “once-per-campaign” ability that will require a small fee in order to do a big effect. Luckily, each fee is typed after the sphere that is connected to this attachment, so the price isn’t that high.
We start with the Fervor of Lore. This grants the attached hero the Lore resource icon, which is pretty useful. Lore struggles with getting a lot of matching resources in the early game, so having an extra Lore hero in your deck like this will allow you to pay for more expensive cards more quickly. The attached hero will also become a target for effects like Leather Boots, which helps with action advantage.
The action on this card allows you to choose and discard 3 cards from your hand in order to chose a hero and heal all damage from them. It’s a shame this is only for heroes, and that it comes at quite a high cost of 3 cards. Yes, Lore draws a lot of cards, but there aren’t that many moments where you would want to discard cards like this if you can also fuel Protector of Lorien or the Noldor archetype. I understand this attachment a bit better in an Erestor-deck, but even then it’s strange that you should discard 75% of your cards for the round. Maybe you have a Silver Harp to lower the cost of this effect, or you are discarding cards that are better in your discard pile. Otherwise, I’d just leave this Action alone and play Lore of Imladris, which does the same thing but for every character. - The Might of Tactics: Moving on from Lore, we get to the Tactics attachment. This grants the attached hero the Tactics sphere, which allows them to equip some more combat-related attachments like Rohan Warhorse and War Axe. This will certainly help out off-sphere heroes with a high base attack, but who don’t really have access to a lot of weapons for themselves. When selecting what hero to use with this attachment, make sure that they have a lot of hitpoints or that you have healing in your deck.
The action will damage your hero, so you’d better not have it on a Hobbit hero with no healing in sight any time soon. In exchange for 1 damage on the attached hero, you may (once per campaign) deal 3 damage to an enemy engaged with you. This will certainly help to finish off any big enemy that you just couldn’t get rid of during the combat phase, or it can help you to discard a smaller enemy engaged with you so that you do not have to defend them. This ability is really useful, and I think it will see a lot more use than the Lore ability, as these quests will feature many enemies that you can straight-up kill with this effect. Very solid for crowd-control if a quest revealed more enemies than you were hoping for. - The Power of Spirit: The Spirit attachment will grant your hero the Spirit sphere, which opens up a handful of useful attachments, like Silver Circlet for more willpower! You also get another hero to save resources for useful events, like A Test of Will and Hasty Stroke. It also grants you easier access to more expensive Spirit cards that you might happen to draw. One of these is Unexpected Courage, which will fit wonderfully on the same hero because of the Boon’s effect.
This effect will require that you exhaust the hero in return for 3 progress on any location. This can be either the active location or a location in the staging area. This is a useful tool for players that are stuck in a location lock, as 3 progress is usually enough to blow up a location. It’s the most progress that any single card can place on its own, not counting 3 copies of Evening Star or the location having a particular trait for Ancestral Knowledge. Having to exhaust the hero is also not that big of a payment, since you can wait until the end of the round and see if your hero is still left standing. If you for example didn’t have many enemies come down, you can in theory use the ability to blow up a location in the staging area instead. This is of course best combined with the Woodmen archetype, where you blow up a location with a lot of attachments on it in order to get some more cards, threat reduction, or a free ally. You can be a bit greedy with this, but understand that this is a once-per-campaign effect, so you cannot rely on it in your next scenario.

- The Secret of Leadership: The last sphere receiving a Boon is Leadership. The extra resource match with Leadership allows you to pay for more expensive allies quickly, or equip some useful attachments like Armored Destrier to your hero. Having access to another resource pool for Leadership resources is really useful when paying for certain events as well, like Sneak Attack or Valiant Sacrifice. Usually, the sphere has enough resources once a single hero gets a lot of resource acceleration on them, but it doesn’t hurt to start with another hero who has access to the sphere.
The action on this Boon allows you to spend a resource from the attached hero’s pool to ready any hero on the table. This can include the attached hero or a hero from another player, which is really useful in a tight spot. You will need to keep a resource back during each round if you want access to this effect, or bring cards that allow you to move resources between heroes. The ability to ready any hero for just 1 resource is pretty cheap, considering you will have plenty of resources on your heroes if you are playing Leadership. This can for instance ready a defender if an enemy makes another attack, ready a utility hero to use their ability (like Beravor being able to quest and draw you cards), or ready an attacker to kill another enemy engaged with you. I see this ability being useful in the early game, when you are still lacking action advantage. - “No Time to Waste”: After the players have drawn their opening hands and have taken their mulligans, they must take one copy of “No Time to Waste” and add it to their hand at the beginning of The Caves of Nibin-Dum. This event Boon is now earned by the players, and can be removed from the campaign pool for a solid effect, or be used over and over again to make your deck a little more reliable. The easiest action on this event is the second one. This allows you to draw a card during the quest phase. Note that you are not allowed to use this in any other phase. You may only draw the card during the quest phase, so if you draw an ally or attachment, you have to wait until the next planning phase to play them. Still, you can thin your deck by including this card, making it more reliable. It is for the same reason why We Are Not Idle is included in non-Dwarf decks. This one is even better, since you don’t even need a Leadership hero in the deck! If you are playing with the Council of the Wise contract, this event will trigger your contract, getting you -1 threat, a resource, or an extra card!
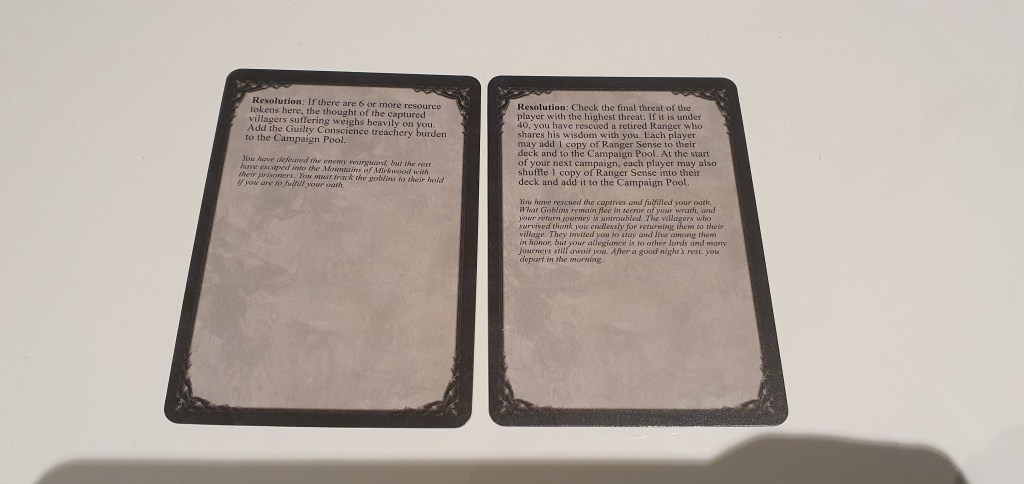
The other effect on this event is also a Quest Action and will remove the event from the game and from the campaign pool. This means you are no longer allowed to use this ability after having used it once. In return, each player in the game may lower their threat by 3. This is stronger than the shared action on The Galadhrim’s Greeting, but does come at an extra cost. The player who plays this event and lowers everyone’s threat must reveal the top card of the encounter deck. Note that this is done during the quest phase, so if you do this before the quest is resolved, that card will add any threat to the total in the staging area. Play this after the quest resolves, and it will hurt a lot less. If the encounter card is a treachery, you are allowed to cancel the effect with any cancellation you have, but enemies and locations will have to be dealt with in a regular fashion. Play this effect when you are facing a relatively empty staging area, or know what the top card of the encounter deck is. Let’s hope that whatever card you reveal does not have Doomed 3 on it, which would negate any benefit this card gives you. - Ranger Sense: If the players beat The Caves of Nibin-Dum with less than 40 threat each, they all earn the Ranger Sense Boon. This means you actually cannot play this Boon in the expansion, but it is awarded to you by the end if conditions are met. The Boon is added to the campaign pool and the players may shuffle it into their decks at the beginning of the next quest in the campaign (meaning that the Mirkwood Paths campaign isn’t over yet!). The Boon acts a lot like the “No Time to Waste” Boon, in that it has two actions, though these aren’t restricted to the quest phase. The easiest of these actions is to, again, simply draw a card, replacing this card with something else from your deck. The other action is much more interesting though, as it can be super useful to get your deck going in the early game faster. You may remove Ranger Sense from the game and the campaign pool to look at the top 4 cards of your deck. You may draw one of these cards to your hand, and put the other 3 back on top of your deck, in any order. This makes it easier for you to know what is coming off your deck in the coming rounds, but it is also perfect for setting up Vilya or Zigil Miner. There is a reason why the Imladris Stargazer is still an ally that sees regular play! The ability to dig through your top 4 cards for a card you might need is also really useful if you are looking for that one attachment/ally that you need to get your deck going. I can see myself using this Boon a lot sooner than “No Time to Waste” as there is no negative effect coupled to it. Even if you don’t need the consistency this card offers, the fact that it can replace itself means that it is not even taking up extra space in your deck!
Burdens
There are also three Burdens that you can earn from playing the two quests in the expansion. One of these can be avoided if players complete the first scenario quickly. The other two are shuffled into the encounter deck at the start of their respective scenario.
- Stalking Goblin: This first Burden is an enemy that will get shuffled into the encounter deck at the start of the Oath scenario if the players are playing in Campaign mode. He is also recorded in the Campaign Log at the same time, meaning that you will have to continue adding him to your scenarios for the rest of your campaign (even if that is just Caves of Nibin-Dum for now). Luckily, the Stalking Goblin is… well… a Goblin. And that means poor stats and a low engagement cost. The Goblin has 2’s for all its stats, and an engagement cost of 10. This makes him more of an ambushing Goblin than a stalker, but who knows how long he has been following you? If you do not deal with the Stalking Goblin while it is in the staging area and it engages you, it gets to trigger its effect. This will force you to search for a Goblin Sniper enemy. You first have to search the encounter deck for one. If there are none, check the discard pile if you killed all copies already. If there are no Goblin Snipers left there either (or all copies are in the staging area or victory display), search your collection for another copy of the Sniper and add him to the staging area.
The added difficulty of another Goblin Sniper opens up the possibility for 3 of them in the staging area at once, which is a nightmare I hope to soon wake up from. Direct damage or attacks into the staging area will be your best hope for that situation. The Stalking Goblin itself is no problem, unless you are getting swarmed by a ton of enemies already. Just set some direct damage aside for this guy, and you should be fine. Thalin already does half his hitpoints worth of damage! - Shiny Distraction: For a Burden-Treachery, this one is not really awful, it just presents you with a dangerous option. The Shiny Distraction is added to the campaign pool when the players first set up for the Caves of Nibin-Dum scenario. The surge and Doomed 1 are annoying, but not game-ending like some Burdens are. Instead, let’s focus on the When Revealed effect, which offers each player a choice. Either you do nothing, or you raise your threat by 5 in order to add one resource to the resource pool of each of your heroes. While 5 threat on top of the Doomed 1 is quite a lot, the extra resources are very tempting. Luckily, the treachery allows each player to make their own decision on whether or not to take the extra resources. With the prospect of this treachery appearing multiple times per game with the resetting of the encounter deck, you can end up with quite a high threat by the end, but also a lot of resource acceleration, even if you are not playing a deck that usually has that. If you have enough threat reduction in your deck, I’d definitely take the bait and get some extra resources. Effects like Spirit Elfhelm ally, The Galadhrim’s Greeting, and Free to Choose can lower your threat again, which means you get some spare resources out of the deal. Not bad for a Burden card. Do be careful with your threat during The Caves of Nibin-Dum scenario. If you end up with a threat over 40 by the end of the game, you will lose out on the Ranger Sense Boon.
- Guilty Conscious: The final Burden in the scenario pack is an optional one that the players earn if they took 6 or more turns to complete the Oath scenario. This incentivizes players to move quickly or they will end up with this Burden treachery that will attach itself to the highest threat cost hero in the game. That hero’s controller will now have to raise their threat by 2 by the end of each round. Note that this is on top of the +1 threat each round that all players have to do. You will be increasing your threat rapidly, drawing more enemies towards you and potentially ending your game prematurely. Luckily, there is an option to get rid of this attachment. It is not a Condition, so the traditional methods do not work on this one. But you do have an action on here that can discard the Burden if you spend 2 resources from the attached hero’s pool. This will set you back a few resources, but I think it is worth it, unless you are about to win the scenario. If you do discard it, know that it can appear again if the encounter deck is reshuffled. Just bring enough threat reduction and you will be fine, as long as you don’t take too long!

The Quests
This scenario pack comes with two quests that look really familiar to veterans of the game. The Oath and The Caves of Nibin-Dûm were a part of the Collector’s Edition a few years ago. Since the only way to physically play the quests was by buying the CE, and with that being a US-only kind of thing (without paying through your nose for shipping), the quests are relatively unplayed by a majority of players worldwide. I myself have played them digitally, and during Con of the Rings 2019, and I quite like them. The quests are relatively short and easy, but it makes sense to release them together with the renewed Core Set. The quests still offer some differences that are worth playing the quest for.
The two quests also come with extra incentive to play thanks to the various boons and burdens that you can earn by playing the quest in a mini-campaign format. This will add to your campaign pool for any future campaigns, wherever those may take place. For our full review of the two quests, check out MortenDall’s articles for The Oath and The Caves of Nibin-Dum.
Well, when I say we covered them completely, I suppose I am not telling the whole truth. You see, the Dark of Mirkwood versions of the quests add some more encounter cards that the CE versions did not have. This sort of addition to a quest has never happened before, but from a balancing point of view, I kind of get why they did this. Not many players have played the original CE versions, so if they wanted to stealth-errata the quests a little, this is the way to do it. Perhaps nobody would notice!
Alas, I have played the original versions of the quests before and found some odd-looking cards in the encounter decks while I was sleeving. The changes to the CE versions are as follows:
- Goblin Troop has renewed artwork to mirror that of the Mirkwood Patrol from Lost in Mirkwood instead of the Goblin Troop from the Grey Mountain Goblins set.
- Each quest now has an additional location in the encounter deck. They have unique abilities, but their art is from:
- Abandoned Camp: Passage through Mirkwood Nightmare version. Lot easier ability fortunately.
- Crumbling Stairs: Shadow and Flame Nightmare version. Again, a different ability and stats
- The Goblins encounter set has 3 additional encounter cards. They are 2 copies of Obsidian Arrows (NM Into Ithilien artwork, different ability), and 1 copy of Wild Wargs (Dungeons Deep and Caverns Dim, different stats and ability).

This will not mean that we will update our reviews of the two quests any time soon, but we may copy and paste the article someday and include a segment on the campaign mode. These new encounter cards will then also be added again.
Overall, I’m happy that we have gotten a physical release of these quests and get to experience some new stuff with the campaign mode added to them. I will not buy a revised Core Set, so you may have to wait for an impressions article on the Boons and Burdens in that set. Hopefully, FFG will open up Print&Play soon for that set! I think this expansion will be a great stepping stone for newer players fresh out of the Core Set to broaden their selection of quests and to keep them entertained until our first big-box collection of a cycle.


I wonder why FFG didn’t add these new encounter cards to their page as printable version. They only added campaing cards. I wonder is this a mistake or the way it should be? After all, they promised to add the campaing cards but didn’t mention about encounter’s changes.
LikeLike
Hi,
What do you think to put this 2 quests between the first scenario and Anduin ?
LikeLike
You are free to play them whenever you want, but the campaign does dictate that you should play the two scenarios after Escape from Dol Guldur. They will offer a bit of an easier time than that quest for sure, but if you want to play them out of order, there is nobody stopping you
LikeLiked by 1 person