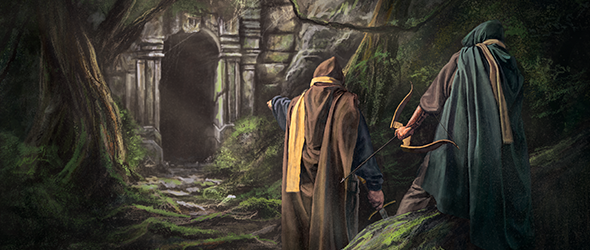
You have chased the Goblins through Mirkwood, and into their caves. However, the caves go on, deeper into the ground, into a forgotten dwarf-realm. You light a torch and press on, eager to fulfil the oath you swore to the Woodsmen. But as you venture into the depths of dim caverns, you realize that the stonework does not resemble the crafts of the dwarves from the Iron Hills or Erebor. These are the tunnels of of the Noegyth Nibin, the petty-dwarves, a smaller race of dwarves, who were exiled from the Eastern cities when the world was young. No one has walked in these halls for a long time. And now you have to follow the goblins down there, if you dare!
The caverns of Nibin-Dûm is the second quest of the collectors edition. Whereas the Oath focuses on Mirkwood, and represents a nice callback to the first cycle of the game, the second quest is a nostalgic callback to the second cycle of the game, the Dwarrowdelf cycle, and features fan-favorites such as the Cave torch (famously loved by Cardboard of the Rings Brandon). The quest has twisting passages, labyrinthine halls of stone, and hordes of Goblins. Like the Oath, it is meant as an entry point into the game for new players. But unlike the Oath, the Caves of Nibin-Dûm will not go down easily…
The Caves of Nibin-Dûm
- Found in: The 2-player limited edition starter set, scenario 2
- Official Difficulty: N/A
- Community Difficulty: 4.5
- Encounter sets: The Goblins, The Caves of Nibin-Dûm
- Quest cards: 4
- Play if: You want a nostalgic trip back to the Dwarven caverns of the Dwarrowdelf cycle. You want to fight hordes of goblins. You want to show a friend that this game is no cake-walk, and teach them about picking the right location/enemy when given a choice. You love the cave torch (I mean, who doesn’t?).
- What is different about this quest?: The beautiful art style, a unique location mechanic later in the quest, a Cave-Torch quest outside of the Dwarrowdelf cycle.
- Solo or multiplayer?: The quest was designed as a two-player experience to be played with the decks of the limited edition starter set, but can be played at all player counts. In higher player counts, the risk of location lock will become more dangerous, so bring some cards to avoid this.
- Can I run side-quests for this scenario?: You can, and it might be a good way to stall a little at the first quest stages.
- What to look out for?: Cave trolls (they have a cave troll!). Location lock. Goblin swarms.
The Quest
Setup and quest card 1: The Dark of Nibin-Dûm (8 quest points)

You begin the quest by setting aside the Goblin Chieftain, The Cracked Pillar and The Cave Torch. The first player attaches the Cave torch to one of his or her heroes, and shuffles the encounter deck. Then, each player searches the encounter deck for a different location, adds them to the staging area, and shuffles the encounter deck once more.
Picking the locations may be an overwhelming task for a new player. For a two-player game, I recommend a collapsed mine and a Goblin tunnels, as both only adds two threat with negligible effects. If you begin the game with Thror’s map in your opening hand or use a deck that can quest hard from the beginning, you can pick a Goblin Dungeon.

The travel cost (which can be nerfed with Thror’s map) is steep and can initiate all kinds of surge train/cave troll issues, but the reward of a free ally can let you hit the ground running. Use this option with caution. Lightless passage can be tempting as it only requires 4 quest points, but it is a deceptively low cost as you need to exhaust the cave torch to travel there, essentially adding 3 more progress (but without the risk of pulling an enemy). Furthermore, the 4 threat makes location lock a very real threat. Branching paths is a tricky location for setup. With 1 threat and 3 quest points, it seems easy to quest over. However, it adds +1 threat to all Dark locations (including itself) when it is in the staging area, making location lock a distinct possibility if you draw too many locations during the early game. When it leaves play as an explored location, it replaces itself with a card from the top 3 of the encounter deck. Since players can choose, this can help getting a nasty treachery out of the way, or play treacheries that can whiff, such as Lost in the dark. As the card is revealed, it cannot be used to bypass When revealed effects on enemies, but as the encounter deck contains weak enemies, you might still be lucky and draw out a Goblin-town scavenger. It should also be emphasized that the two cards you don’t pick gets send to the bottom of the encounter deck, meaning that you can send a Goblin troop or a Cave troll away for the time being. It can go both ways, and I therefore recommend that you step with caution when picking the Branching paths.
You main priority should be to keep the staging area clear. Use the cave torch to place extra progress on the active location, and try to get the upper hand over the encounter deck. Quest hard, and try to avoid location lock. Location control is a big help here, as most locations require a lot of progress to clear. Try to deal with enemies as they pop up, but leave the two big ones (Goblin troop and Cave troll ) until you are ready to deal with them. You must be prepared to deal with them when you advance, as all enemies come down in Stage 2. When you place the 8th progress, you are ambushed by goblins!
Quest Card 2: The Surprise Attack (0 quest points)

When you reveal quest card 2, you add this quest’s boss enemy The Goblin Chieftain to the staging area. His statline is X/X/X where X is the Stage number (foreshadowing that we will probably see him again later…), 8 hit points and 40 engagement cost. He cannot take damage and cannot have attachments. When he attacks you must either remove 2 progress from the main quest or return him to the staging area. Furthermore, each player must search the encounter deck and discard pile for a different enemy, and add them to the staging area. This is a prime option to remove a Goblin runner from the encounter deck, negating the Surge keyword. If there are none of those in the encounter deck, my first choice would be a Goblintown Scavenger as these guys only attack for 1 (making undefended attacks relatively safe) and have 0 defense. If you have even more players, I recommend Goblin Sniper (if you can take the pinging for some rounds) and a Cavern Warg as it can be Feinted with Cave torch in a pinch.
Quest card 2B has 0 printed quest points, but gets +4 quest points per enemy in play (meaning that it will require at least four progress, as the goblin chieftain cannot take damage). Furthermore, all enemies gets 0 engagement cost, so Goblin troop and the Cave troll can be deadly at this point. At this point you need to fight the enemies, to avoid the progress threshold from increasing. Ideally, you should work to pick off enemies so you don’t get overrun, and so you lower the quest point value. You will probably have locations around still, so you also need to do some questing. Use the cave torch to place progress, but think twice if you are being overrun by enemies. In a few rounds, you should have cleared the board (minus the chieftain) while having placed enough progress to advance.
Quest Card 3: The Chasm (- quest points)

You have successfully chased off the goblins! The goblins have now let you to a big chasm, with no obvious way to cross. However, you eye a huge pillar of stone near the edge, and get a crazy idea… At this point, put the Goblin Chieftain away out of play, and instead add The Cracked Pillar to the staging area. You advance once Cracked Pillar is explored. You cannot place progress on it while it is in the staging area, and until you explore it you reveal an additional encounter card during staging! Cracked pillar has a rather unique travel cost, as you are required to remove 4 damage from it before you can travel there. It is a unique location with 2 threat and 2 quest points, and you place damage on it by declaring attacks against it during the combat phase, using the threat value in place of defense. Essentially, you are hacking down the pillar, using it to cross the chasm! If you advanced from Stage 2B by killing all the enemies, you should have a pretty good board state, allowing you to attack the pillar without problems. However, if you advanced by power-questing, you might have to wait until you have cleared more of the enemies, before you have the resources to attack the pillar. Don’t linger at this stage, as the extra encounter card can severely location lock/overrun you. Keep in mind that enemies engage as normal at this stage, meaning that you can keep trolls in the staging area. You need to spend at least two rounds here (one to knock down the pillar, one to travel to it and one to explore it), so be prepared to deal with the extra encounter card (quest with more than you normally would, hold an extra blocker back in case you get multiple enemies, etc.). But at this point your deck should be firing and your board state should be ready to advance within a few rounds.
Quest Card 4: Oathkeepers (8 Quest points)
As you resume your pursuit of the goblins, you reach the area where the abducted villagers are kept, and prepare for a final battle against the goblins. The Goblin Chieftain is added back to the staging area, but this time he is a 4/4/4, still with 8 hit points and 40 engagement cost. He still cannot have attachments or take damage, and he now removes 4 progress from the main quest after attacking! You can alternatively return him to the staging area rather than removing progress. Your goal is to defeat him, and when Stage 4B has 8 progress, you can damage him. Your goal is therefore to pile on enough progress so that you can survive an attack and still have enough progress for damaging him. A dedicated defender with 4+ defense is a good idea, so you don’t have to rely on chump blocking. Location lock can make it really hard to reach 8 progress, but if you have managed to keep the staging area clear, it should be manageable. This stage does not pull out more enemies or reveal extra cards. hence, you should be able to keep up with the pace of the encounter deck. Also keep in mind that the goblin chieftain can be feinted, so you can hold back your characters to attack him. Or if you have managed to keep your threat low, you can leave him in the staging area until you are ready to deal with him. If possible, take him out in one alpha strike. If you hold back, you must be prepared to quest heavily, to add more progress, hold back blockers to take his attacks, and hold back attackers. If possible, send him back to the staging area after attacking for a few rounds to pile up progress on the main quest. Once you place the final damage on him, you have freed the villagers and won the quest. And hopefully, you will by now have ensnared a new player into the world of Lord of the Rings: The Card Game.
The Encounter Deck
Global
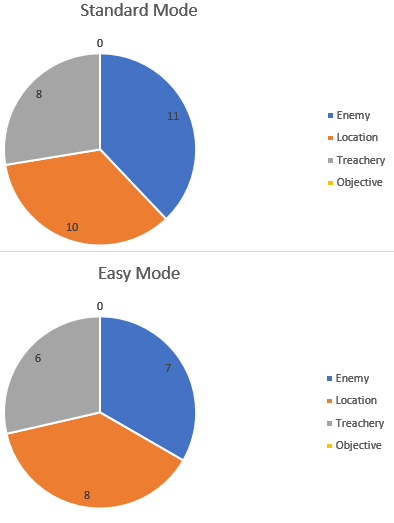
- The encounter is of medium size, having 29 cards in Normal mode, and 21 in Easy mode
- Shadow card chances are moderate as well, ranging from 49% in Normal mode, to 65% in Easy mode
- Average threat on cards revealed is roughly equal between both modes, at 1.9 threat/card.
- The Surge keyword is present on only the Goblin Runners in this quest, making it either a 2 off, or 0.
- Doomed 1 is the only Doomed card in the encounter deck, so players will be relatively safe to bring their own Doomed cards. Keep in mind that this quest can take a while, so threat reduction will also be advised.
- Immunity
- Goblin Chieftain cannot take damage or have attachments
- Great Cave-troll cannot have attachments
- With Collapsed Mine in the staging area, the players cannot make more than 4 progress on the quest.
- Goblin Troop cannot have attachments
- Goblin Sniper cannot be engaged if there are other enemies in the staging area
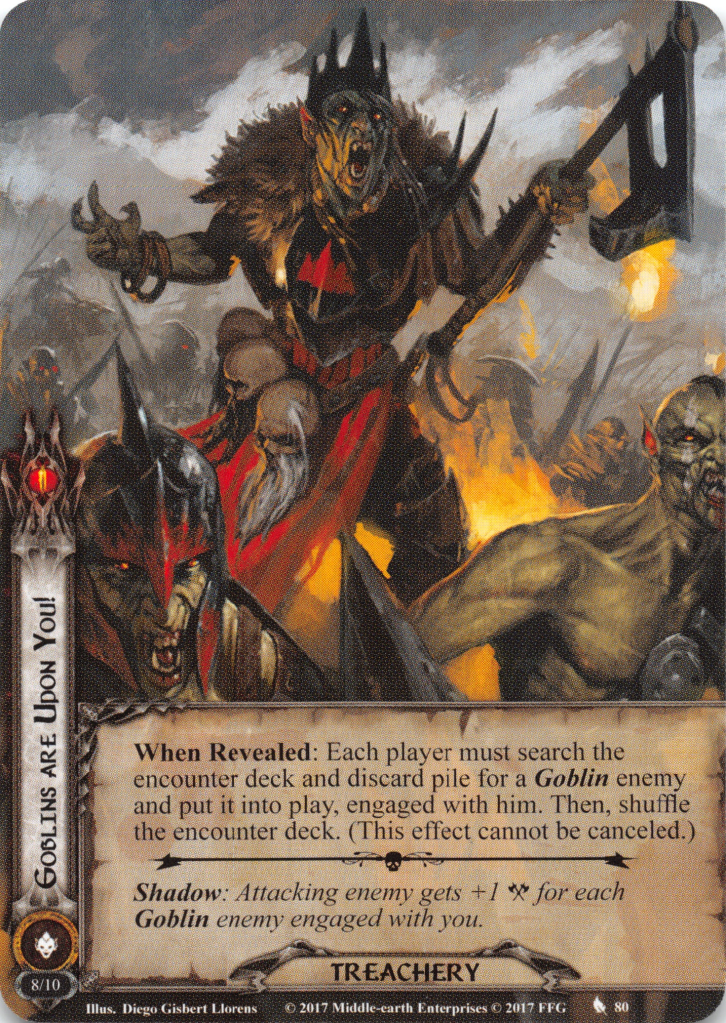
- Goblins are Upon you cannot be cancelled
As can be seen in the pie chart, there is a roughly equal spread of card types in the encounter deck. This makes guessing with Wingfoot a bit tricky, but in higher player counts, you are bound to reveal one of each type each round. The statistics above do not take into account the unique cards set aside at the beginning of the game, and also don’t include the Cave Torch.
Locations
For a discussion on what location to pick for setup, see the section on quest card 1B. Location management through the cave torch is a major requirement for success. It is still worth it to go through the locations. The Cave Torch can be exhausted to place 3 progress on a dark location, with the caveat that you have to discard the top card of the encounter deck whenever the cave torch exhausts. If the discarded card is an enemy, you add it to the staging area, indicating that you draw attention with the torch. As most locations have a high quest point value, you will likely need the cave torch to clear locations reliably. Woodsmen’s Path is a gold card here, as it can help you clear locations more consistently.
- Collapsed Mine is a 2 threat location with 6 quest points. It is a dark location, meaning that it can be targeted by the cave torch. When a collapsed mine is in the staging area, no more than 4 progress can be placed on the quest each round. This can be an inconvenience, but as so many locations have high quest points values, it might be rare to place more progress. The collapsed mine can tank your attempt to power quest through the final stage so you can damage the goblin chieftain. Hence, the collapsed mine should be dealt with at one point. The location also has a shadow effect, causing you to raise your threat by 1 for each damage dealt by this attack. Unless you are about to threat out, this should only be a minor inconvenience.
- Goblin Dungeon is not a dark location, meaning that you have to deal with this location through normal questing, or through location control. It has 3 threat and 5 quest points, and to travel there you need to reveal the top card of the encounter deck. This means that you should postpone travelling until you have a fairly good board state, as you might be overrun or location locked from the revealed card. But this location actually benefits you – when you explore it, the first player get to search the top 5 cards of his/her deck for an ally, and put it into play. It has no adverse effects from remaining in the staging area, and you should therefore think long and hard about when you travel there. If you can combine it with Imladris Stargazer to ensure that you have a good ally in top 5, this is of course preferable.
- Goblin tunnels is an underground and dark location, with a threat of 2 and 7 quest points. When goblin tunnels is in the staging area, it removes a progress from the current quest card when a goblin is revealed. This can of course be annoying, especially in higher player counts, but most of the time removing a few progress tokens won’t matter much. With a relatively low threat, it might be safe to leave it in the staging area. You can leave it and use the cave torch for a few rounds, and then make the final push through. As a shadow card it can be fatal – +1 attack or +3 if the attacking enemy is a goblin. As most enemies in this game are goblins, this can hurt quite a lot.
- Lightless passage is probably the toughest location in the encounter deck. With a whooping 4 threat, it can location lock you right out of the gate. It has a steep travel cost, requiring you to exhaust the cave torch to travel to it. The forced effect on cave torch means that it WILL trigger from this travel effect, forcing you to discard an encounter card, potentially adding an enemy. On the upside, it only has 4 quest points, meaning that you should be able to quest through it in the next round (possibly with some help from the cave torch). As a shadow card it can also be annoying, especially if you are getting overrun: It cancels all damage dealt to the attacking enemy. This is especially unwelcome during the ambush in stage 2B, when you are trying to clear the board of enemies, or towards the end when you are trying to defeat the goblin chieftain. You should consider saving your shadow cancellation for this one.
- Branching paths is a location that is deceptively benign. Only 1 threat and 3 quest points? And it is dark, meaning that it is a perfect target for the cave torch? Where do I sign up?The branching paths has some additional text, making it a bit less benign – first of all it adds +1 threat to all dark locations (including itself), making the risk of location lock much more real. Furthermore, the branching paths replace themselves when explored, forcing the first player to look at the top 3 cards of the encounter deck, and pick one of them. The other two are moved to the bottom of the deck. This is a good opportunity to remove a cave troll or a lightless passage, or pick a treachery that will whiff. But it can make a situation worse if you are unlucky. Often a location will be the most harmless choice, and if you used the cave torch for this one, you might end up with more threat in the staging area than before you cleared the Paths, without the torch to add progress. For this reason, I don’t recommend using the Torch to clear branching paths without thought.

Enemies
- The Goblin Chieftain has already been discussed at length above, and I will therefore not spend too much time on him. He represents an interesting design approach, where the difficulty level of the boss increases as the game progress. When the time comes to defeat him, try taking him out in one or two turns so you don’t have to keep wasting progress keeping him engaged with you.
- Goblin Runners is a surprisingly tough enemy with the hated surge keyword, meaning that he is only part of your troubles for the round. He only adds 1 threat, but attacks for 3 , meaning he can be deadly with the right shadow card effect. With a threat of only 20, he likely comes down to swing at you right away, unless you are in secrecy. Defensively he doesn’t pack much, with 1 defense and 2 hit points. He is an excellent target for Wait no longer, Dunedain Hunter or other effects that bypass the Surge keyword. All in all, he shouldn’t cause too much trouble, but he might be worth chump blocking if you have not seen all copies of Goblin tunnels yet. As a shadow he has the hated “attacking enemy makes an additional attack after this one” (even stating that a new shadow card is dealt for this attack. I wonder how many times Caleb has been asked about that). The additional attack can tank your strategy for the goblin chieftain in stage 4B, as this will remove another 4 progress from the main quest, which again might mean that you cannot damage him this turn. Together, this means that you will rarely be glad to see the Runner.
- On the other hand, I’m often glad to see the Goblintown Scavenger, who makes a return from Hunt for Gollum. With 1 threat, 1 attack, 0 defense and 3 hp, they are easily dealt with. 1 attack is most of the time safe to take undefended, though you do run the risk of getting an attack of 4 due to Goblin Tunnels. With an engagement cost of 12, they will come at you right away, but if you have a dedicated attacker, you should be fine. When revealed, the Scavengers cause you to discard the top card of each players deck, and increase the threat of the Scavengers by the cost of the cards for this round. This can be a nuisance if you are unlucky (especially at higher player counts) or if you are trying to clear a stage/location, but most of the time this will at it’s worst cost you a round and some threat. It will rarely be what cost you the game (unless you discard 4 Gandalfs). The card has no shadow effect.
- As mentioned in the article for the Oath, Goblin Sniper has experienced a revival, being present in both this Collector’s edition and the first Rhovanion deluxe quest. With 2 threat, 2 attack, 0 defense and 2 HP he is not too much of a threat, and with an engagement cost of 48 you won’t see him until very late in the game. However, he cannot be optionally engaged if there are other enemies in the staging area, which can be particularly problematic at higher player counts. While he is in the staging area, he forces each player to deal 1 damage to 1 character at the end of the combat phase. He is a prime target for Direct Damage effects, Scorpagorn or a straight shot. He might make it worthwhile to bring healing.
- Cavern Warg is an original creation of the Starter set. It has 2 threat, 3 attack, 2 defense and 3 HP, making it slightly harder to kill than the goblins. Surprisingly it does not have the original warg trick, triggering off shadow cards without effects. Instead, this one has can be returned to the staging area by exhausting the cave torch (which again, will trigger the Forced effect on Cave torch!). Of course this requires the cave torch to be ready, meaning that it might be a good idea to hold back the cave torch until staging is over. As it attacks for 3 it requires a decent defender for blocking, but as the warg is a creature, it cannot get the big boost from Goblin tunnels. Hence, it can be safely blocked by most heroes. The defense/HP statline requires a bit more than your average goblin, but should not cause you too much trouble. As a shadow card, cavern warg returns the attacking enemy to the staging area if the attack destroys a character. This makes chump blocking a bit risky, and can be a setback in stage 2B or 4B.
- Goblin troop makes a return, this time as a minion rather than as a boss enemy. It has 3 threat, 5 attack, 3 defense, and 6 hit points, making it a major threat. An engagement cost of 35 means that you might have to deal with it the round it appears if you don’t manage your threat. And remember that you run the risk of pulling it out during normal staging AND whenever the cave torch exhausts. It cannot have attachments and boosts other goblin enemies with +1 attack and +1 defense when it is engaged with you. If the troop appears you need to deal with it hard and fast. As it requires 9 attack to deal with in one go, you will likely need a few rounds to chip away at it’s health pool. You need a blocker of Beregond size to block it repeatedly. Therefore, it is a card you will be happy to see as a shadow card early on, even if this might place some damage on your hero or cost you a chump blocker (the troop gives +2 attack).
- Great cave-troll makes a dread return from the Khazad-dum box. It goes without saying that you need to say “They have a cave troll” whenever this card hits the table. 3 threat, 6 attack, 4 defense and 6 hp means that this is no small feat. And the encounter deck has two of them. The troll cannot have attachments, and for each excess damage dealt when you chump block, it removes 1 progress from the current quest. This can be an absolute disaster if it shows up during the final battle with the chieftain. 36 engagement means that it is highly likely that you have to deal with this enemy right out of the gate if you draw it mid-game/late-game. The troll is another good reason to include a dedicated defender, such as spirit Dain or Beregond. It should be your main priority unless the goblin troop or chieftian is in play. Both the cave troll and goblin troop make compelling arguments for keeping your threat low throughout the quest. It can make all the difference in the world when you get a round to prepare for a mini-boss fight, rather than having to face it right away. The troll has no shadow effect, meaning that it is one of the best shadow cards to see.

Treacheries
- Goblins are upon you! forces each player to search the encounter deck and discard pile for a goblin enemy, and put it into play engaged with him/her. This effect cannot be cancelled, so there is no easy way around it. For an in-depth discussion on what enemies to pick, see the discussion of quest card 2. As a shadow card, this card grants +1 attack per goblin enemy engaged with you, which hopefully should not be too many. If you are getting overrun, this might be the card that seals your defeat.
- Eyes in the Dark has doomed 1, and forces you to either raise your threat by 1 for each questing character you control (which may be quite a lot if you get it late-game) or discard a questing character. What option to pick is really depend on your board state, and is really highlighting how much skill is required to play this card game effectively. The threat increase might seems like no big deal if you are resting around 30 threat, but keep in mind that if you go above 35, you have to deal with the goblin troop and the troll on the round they appear. It might therefore be safer to discard a low cost ally. Late game you might have no choice if you quest with a Dwarf/Gondor/Silvan swarm, but if you run swarm decks, it shouldn’t be too bad to discard a cheap character. This is usually not a treachery I’m dreading to see. As a shadow card, it punishes unblocked attacks, making it a bit more risky to take one from the goblin-town scavengers. If the attack was blocked, you discard an ally. Again, this might not be terrible if you have some cheap allies available, but it can be devastating if you run bigger allies.
- Crumbling ruins punishes you for having ready characters, and for playing expensive allies. Each player must exhaust a character and discard the top card of his/her deck, if able. If the cost of the discarded card is equal to or higher than the remaining hit points of the exhausted character, that character is discarded as he/she falls into shadow. This is where you either exhaust your super defender (potentially flipping the table when you discard Gandalf), or exhaust your chump blocker and take it on the chin. This is a treachery that can single-handedly ruin a game, and is worth saving a Test of Will for.
- Lost in the Dark plays around with the cave torch. Either the cave torch must be exhausted, or progress cannot be placed on the main quest this round. Keep in mind that exhausting the torch can potentially pull out an enemy. I prefer picking the second option in true solo, unless I’m making a final push to kill the goblin chieftain, but like Eyes in the dark, you have to analyse the board state before making a decision. Most locations require a lot of progress in this quest, so it might not be such a major setback to wait a round before placing progress on the main quest. As a shadow effect this can really ruin your day, dealing 1 damage to the defending character which can make the attack unblocked if you defended with a 1 hp character. This is also a potential candidate for your shadow cancellation.
- Watchful Eyes is the only condition attachment in the quest, attaching to a hero. If the attached hero is exhausted at the end of the combat phase, you reveal 1 encounter card, essentially taking out one of your heroes. Of course you can work around it with certain heroes (Noldor hero with Light of Valinor, Haldan with attachments on the location, readying effects to trigger after combat). Otherwise, you need to deal with this through Condition Control (miner of the Iron Hills, Power of Orthanc, Steven Seagal Elrond). This is an incredibly annoying card that will only be welcomed as a shadow card.
Tips and Tricks
- The quest is full of cards that forces you to choose between effects, use the cave torch or pick out locations and enemies. This is a fantastic opportunity for new players to learn how to analyse the game state. Use this opportunity if you play this with new players, but be prepared to offer advice if they feel overwhelmed.
- The woodsmen trait is full of new and exciting ways to deal with locations. As locations are very prominent in this quest, it might be worth looking to Haldan’s muscular chest for comfort if you are struggling with this quest.
- Knowing when to trigger the cave torch is key to master this quest. Keeping the torch ready throughout staging can be a good idea, so you know whether to place progress on the active location, or one appearing in the staging area. Likewise, if you draw a goblin runner and a cave troll during staging, it might be a good idea to keep the torch ready for this round, so you don’t risk drawing additional enemies.
Playthroughs
Being a relatively new quest, and a rare one at that, there aren’t that many playthroughs to be found online. The list will be updated when new playthroughs are published by the community.
- The Chap from Cardboard of the rings. They can be found here and here.
- LOTR Deck Tech: https://www.youtube.com/watch?v=nd0bBtHCRbk
- Three players, modern decks: https://www.youtube.com/watch?v=DR1icskngGk

5 thoughts on “The Caves of Nibin-Dûm”