I have talked at length about all the different archetypes players can build their decks around, from spamming Dwarves and Outlands allies to investing in a strong army of Dale allies with attachments. But it is important to realize that the enemy forces also have attended their Corporate Synergy seminars and have come up with interesting synergies for their own factions. Since they are not as deep as player card synergies, I will try and cover them all in a single article. I will exclude archetypes that only appear in a single scenario, like the Huorn enemies from Into Fangorn. Else this article would be pretty lengthy, detailing every enemy in the game.
Orc/Uruk/Goblin
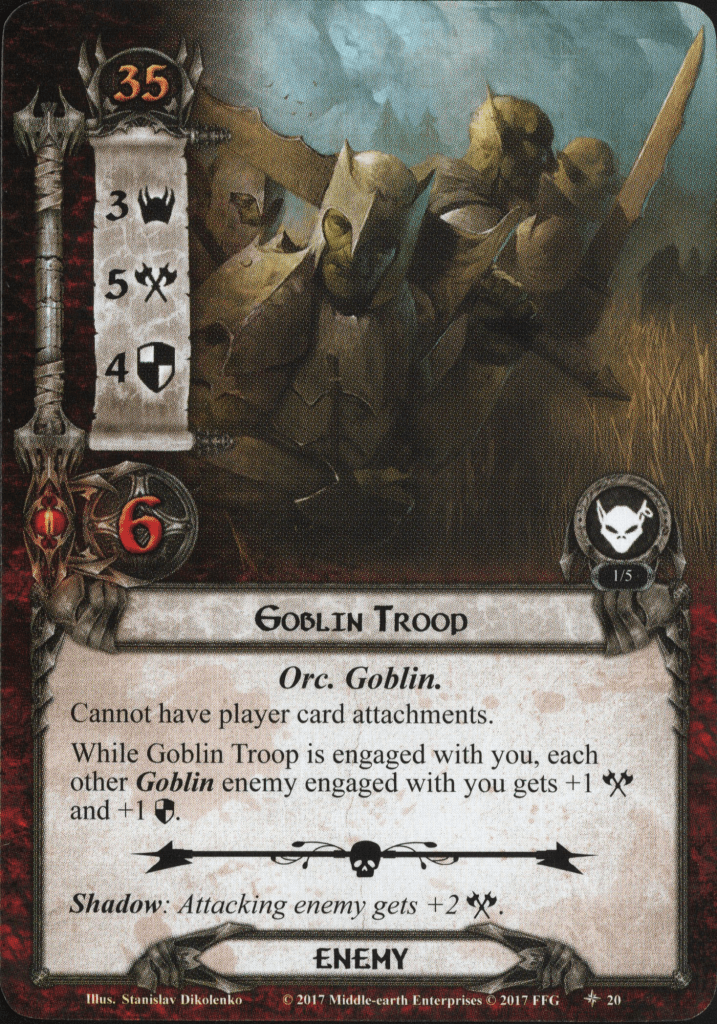
I start this article with probably the most common enemy in the game, Orcs. Nearly every cycle in the game has an enemy with this trait (with the exception of the Dream-chaser cycle and Black Riders Saga). However, being so common means that there is not really a single synergy connecting them all together. They are as basic as enemies get, with some stronger variants later in the game. These are usually the Chieftains/Captains, who have higher stats and perhaps even some synergy with other Orcs, like the Uruk Chieftain from the Harad cycle. There will also be some recurring enemies in the cycles to boost Orcs, like the Goblin Troop from the Ered Mithrin and Dark of Mirkwood scenarios.
Uruks tend to be the tougher enemies of the Orc race, with more hitpoints, a possible leadership function in the encounter deck, and the Toughness keyword if you are facing the Uruk-hai during the Treason of Saruman quests. In the game, though, the Uruk keyword is almost never interacted with and serves more as a warning to players that this enemy might be a bit stronger than you would think of an Orc.
The opposite of an Uruk would be a Goblin, as they tend to be weaker than your standard Orcs but have strength in numbers. Especially if you have played through the Dwarrowdelf cycle, you’ll know that these enemies love to swarm players and punish them for taking their weak attacks undefended. This is seen again during your travels through the Ered Mithrin cycle, where Stray Goblins can surprise players as well. Goblin enemies also tend to have a shadow effect that puts them into the staging area or into play engaged with you (like the Wolf Rider). This, in combination with the low engagement cost on these enemies, results in more Goblins engaging you all the time. Luckily, they are often not that strong, with little more than 3 hitpoints and very little defense. This makes them good targets for direct damage effects while your attackers focus on the stronger enemies out there.
Troll
Notable quests: Journey Along the Anduin, Conflict at the Carrock, Across the Ettenmoors
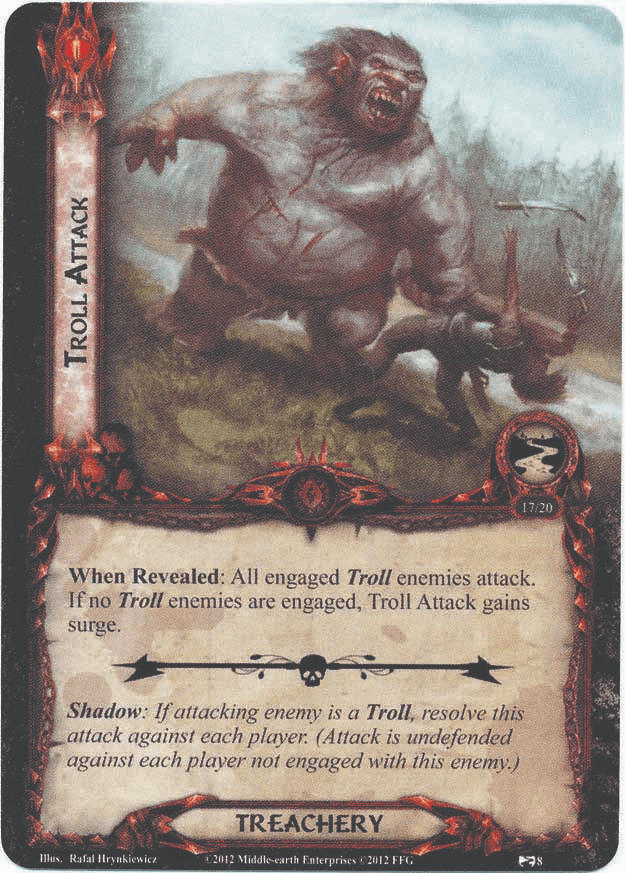
Speaking of enemies that are worth sending your attackers up against, we come to one of the more fearsome traits that an enemy might have: The Troll trait. Trolls are easily recognizable by their insane stats, especially for attack and hitpoints. They tend to have a medium to high engagement cost, so you can manage to avoid them for a while. When you do finally engage these Trolls, you will be required to have a solution for their high attack stat. For most Trolls, chumping is a big no-no since they often have an ability that interacts with excess damage dealt by the attack. It can be dealt as damage to other characters, can be counted towards your threat, or discard cards from the top of your deck. This ensures that the players send their strongest defender to the defence of this troll.
Attacking Trolls is also made difficult by the often high defence and hitpoint total. It may take several turns to deal enough damage to Trolls to kill them finally. Killing them can sometimes put them in the victory display, meaning you only have to deal with each Troll once, but in later quests, the Trolls will just go to the encounter discard pile and might turn up again. Interacting with Troll enemies is also limited thanks to their immunity to attachments in many cases. This is done to prevent players from trapping these big enemies and ignoring them for the rest of the game. On the other hand, this can be a good thing, as your Guarded (Enemy) cards won’t pull out a big Troll.
Trolls are pretty common in the game, though there are several cycles where they don’t show up. You can encounter them from the highest peaks of Caradhras to the sunken caves of the Blue Mountains, so you can be taken by surprise if you are going into a quest blind. But beyond the quests that take place in mountains and hills, you should not encounter them as frequently.
Harad
Notable quests: The Black Serpent, Escape from Umbar, Into Ithilien, Journey to the Cross-Roads

Harad enemies were introduced a bit later in the game than Goblins and Trolls, as they became part of the reason why the Against the Shadow cycle was so difficult. These early Harad enemies were tougher than the enemies you had encountered in earlier cycles and were a major contributor to the Archery total in each quest they were in. But their real synergy came in cycle 7 when the players were stranded in Harad and had to fight their way back to safe lands. The Haradrim tried to waylay the players by literally taking away their progress. Most of the Harad enemies in that cycle have an ability that gives the players a choice between taking away progress from the main quest or doing something horrible. This can range from extra attacks to discarding allies, so the progress option always seems appealing. But without progress and with progress limits on most quest cards in that cycle, you often get stuck with these enemies stealing all the progress you just made in the quest phase.
A common technique for dealing with these enemies is, therefore, to kill them in the staging area before they engage you and steal progress or do something else. The Rohan trait has been a good counter to them, but also direct damage and traps. It should also be noted here that the Harad trait is also a player card trait and is, therefore, the only really developed trait based on enemies. Other archetypes like Corsair and Isengard only give a small selection of characters without expanding on the trait further. The Harad trait for player cards is further discussed in this article.
Closely linked to the Harad trait, we have their steeds: The Mumakil. Though these massive elephants also appear in wild forms during a single quest, the players will encounter them more often whilst being ridden by Haradrim soldiers, adding to the Archery of the quest. But the biggest synergy found across all Mumaks is their immunity to damage beyond a certain limit. Most Mumaks can only take 3-4 damage per turn while having upwards of 9 hitpoints combined with high defence. So when encountering these behemoths, you will have to last for a few turns against them or use some trickery to make use of their lack of immunity to player card effects. The Great Hunt can discard Mumaks from the staging area, and Fierce Defense can discard one engaged with you if you are in Valour mode. These effects ignore the damage limit on the Mumak and are, therefore, worth including when you see these enemies appear.
Easterlings
Notable quests: Vengeance of Mordor cycle, Massing at Osgiliath, The Black Gate Opens
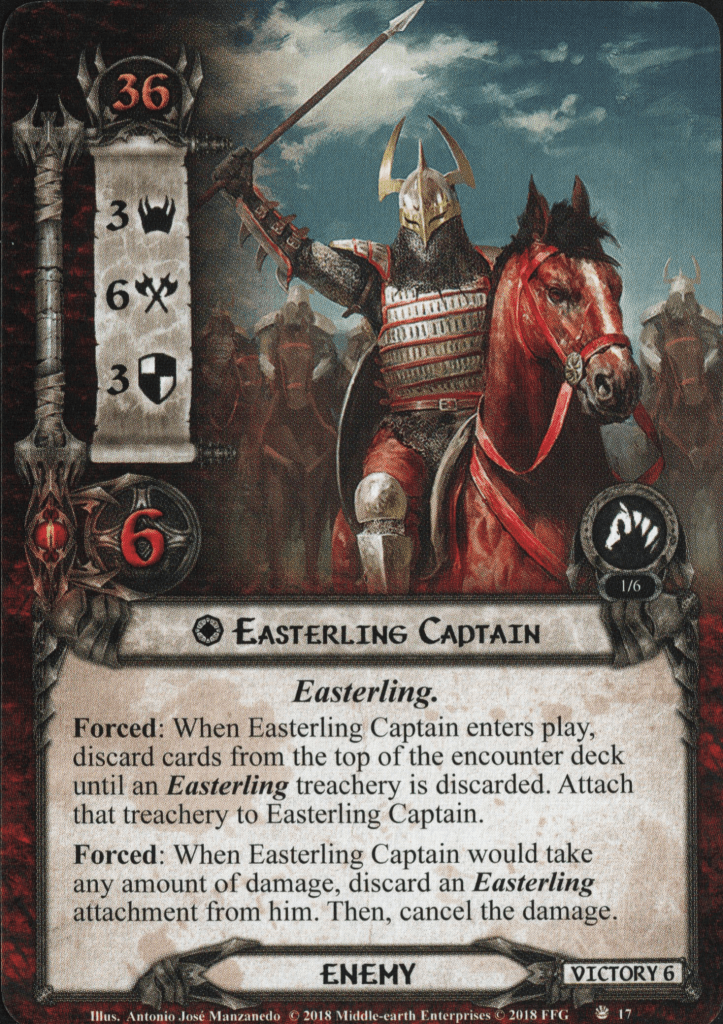
For as big as the faction of Rhûn is in Middle Earth, we didn’t see a lot of Easterlings for the majority of the game’s life span outside of the Massing at Osgiliath POD and some fan-made scenarios about the Battle of Erebor. This all changed when the final cycle of the game brought our heroes to the lands of Dorwinion, Mordor, and Rhûn. This is where we first encountered the Easterlings and one of the best-developed enemy-archetypes in the game.
The Easterlings took note of the Dale archetype with having attachments on characters and implemented it for themselves. The encounter deck will contain several treacheries that attach to Easterling characters, boosting their attack, Archery, or sending them back to the staging area each turn. While enemies in the past have had attachments, like the Nazgul getting their Morgul attachments and some Wargs turning into mounts, it has never been focused on as much for several scenarios as with the Easterling trait. There are a number of attachments that are used in multiple scenarios, but you can also come across some attachments unique to the scenario, which tend to be worse. A good example of that is Fury from Wrath and Ruin. This grants the Easterling it is attached to a second life when it would otherwise be defeated.
Not only do the attachments boost the enemies, some enemies also benefit from having attachments. Easterling Raider, for example, gets an additional +1 attack and defence for each attachment on it, and the Warrior of Rhun fetches attachments from the discard pile. This further improves the synergy that the Easterlings have, focusing more on strong individual enemies than boosting all of the enemies on the field through global effects like the Haradrim do.
This synergy makes combat pretty difficult, though luckily, players have gotten some tools for these enemies as well. An often overlooked event from the Ered Mithrin cycle (Valour of the North) can boost your attack or defence against enemies with attachments, making it a great counter to strong Easterling enemies. You can also try to put as many of their attachments into the victory display, preventing the enemies from powering up. Your tactics should lie in killing these enemies while they don’t have attachments yet, as they’ll be at their weakest, making easier prey for your deck.
Undead

Notable quests: The Three Trials, Deadmen’s Dike, The Treachery of Rhudaur, The Dread Realm, The Temple of the Deceived, The Ghost of Framsburg, Passage of the Marshes, Passing of the Grey Company, The Stone of Erech
As you can tell, there are quite a few quests out there with Undead enemies, and I haven’t even listed them all! There’s just a lot of Ghost-busting that needs to be done in Middle Earth. Despite there being so many ghosts and reanimated dead in the game, there aren’t any synergies that capture each version of the Undead enemies. But there are certainly some trends.
The first is related to your threat. This is seen often with the Wight and Wraith traits as well. Players engaging these enemies will often have to raise their threat or are not allowed to lower their threat while they are engaged with these scary enemies. A good take on this is done with the Phantom keyword in the Passing of the Grey Company, where instead of damage, excess attack strength from enemies after defence is instead dealt to you as threat. This can cause you to threat out more easily or be engaged by more and more enemies.
The other common interaction with this trait is with discard piles. These are sometimes called graveyards in other games, which seems fitting for this trait to interact with. The Undead from the Angmar Awakened cycle interact with the encounter discard pile, where enemies can be resurrected if you engage the wrong enemy at the wrong time. The Undead you find in the Dream-chaser cycle do not necessarily interact with your discard pile but with the bottom of your deck. The cost of these cards can sometimes make the difference between additional attacks, improved stats for the enemies, or them being resurrected, like the Throngs of the Unfaithful. This inability to die, combined with the focus on threat and resurrection, makes this one of the more thematic traits that enemies can have, even if the basic enemies are not that strong compared to other traits.
Dunland

Notable quests: The Fords of Isen, The Dunland Trap, The Antlered Crown, Helm’s Deep
The Ringmaker cycle showed us that drawing cards is not always a good thing. We get taught this lesson early on, with the Fords of Isen proving a difficult quest for those going in blind. This is all thanks to the various Dunland-traited enemies in the quest, which thrive on your hand size or on your ability to draw cards. Some enemies get increased attack when you have a lot of cards in your hand; others will attack each time you draw a card. Combine this with locations and treacheries that pretty much do the same, and you will quickly find yourself unable to progress.
The inability to draw additional cards at risk of the enemy getting boosted is very effective in slowing the players down. Some treacheries even prevent you from playing events to lower your hand size. You can also find yourself in situations where encounter cards encourage you to draw cards, like with Dunland Tribesman. While this would be amazing in other quests since you get to find your combo pieces a lot sooner, it also boosts the Tribesman’s threat, as well as helps out any other enemies on the table.
Fortunately, there are plenty of strategies to get around the Dunland synergy. If you can isolate the enemies and make sure that not many triggers happen when you draw a card, then it is not so bad. This often means approaching these quests solo, as you otherwise might get stuck drawing additional cards and revealing more enemies. Discard archetypes like Noldor are also perfect for trimming down your hand size. Other cards like Protector of Lorien can even work in any deck since the encounter deck will likely fuel the card’s ability for you. Just make sure to remove some card draw in your own deck since you will likely not be using the effect during your game.
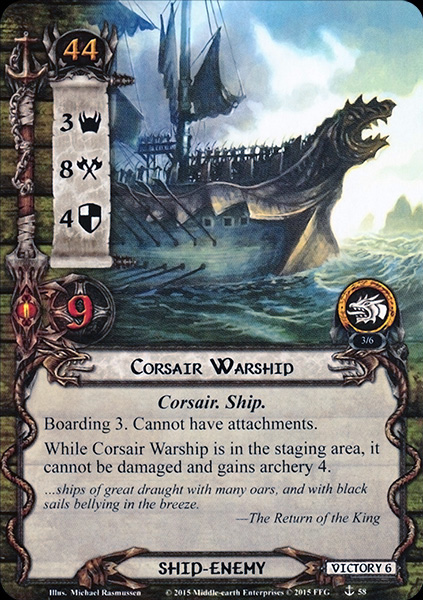
Corsair

Notable quests: Dream-chaser cycle, The Hunt for the Dreadnaught, The Siege of Gondor
Where the Dunland trait took advantage of your cards, the Corsair trait does the same with your resources. In true pirate fashion, they steal your coins and grow stronger with them. Most of the Corsairs will be encountered during the Dream-chaser cycle, where many will engage thanks to the Boarding keyword of their ships. As several enemies can engage a player at once because of this keyword, they are not the strongest enemies out there, though they can be annoying to take care of.
When a Corsair enemy engages you or makes an attack, you will often be instructed to add a resource to that enemy. It can be either from a hero’s resource pool or by discarding cards and giving the resource cost to the enemy. It’s a really mixed bag, but that makes the Corsairs a pretty cool enemy type to deal with. You won’t see all enemies during some games, making it feel new when you have to deal with the one you otherwise never see. The resources on the Corsairs are used by them for stat buffs, dealing damage to characters when they attack or to cancel damage dealt to them. The use of resources in this way is also seen in the single player card with this trait, Na’asiyah, who can get +2 attack and defence at the cost of a resource.
Corsair enemies can often surprise players when they engage from the Boarding keyword, so there isn’t much you can do to prepare for them. Still, if you manage to spend all your resources before the enemies engage you, there will be less for them to steal. This makes them a little easier to deal with. Blanking textboxes with Revealed in Wrath can also help to save some resources or to ignore an ability that a Corsair might have.
Nameless

Notable quests: Foundations of Stone, The Ruins of Belegost, Under the Ash Mountains
The deep places of the world house some of the most horrible creatures in the legendarium, creatures so vile that they even go without a name. Still, these can be enemies encountered when your quests lead you to the roots of Middle Earth’s mountains. The Nameless enemies tend to have high stats but also variable stats depending on a game mechanic. In Foundations of Stone, you have to attach cards from your deck to the enemy, after which it gains attack and hitpoints based on those cards’ costs. In Under the Ash Mountains, you have to discard a card from your deck, after which the enemy gets an attack boost depending on the cost of the card you discarded. The Nameless Cave Dweller from the Ruins of Belegost works a little differently, where all of their stats depend on the Discover value of the active location.
Most of these Nameless enemies can be dealt with by having a very cheap deck to play. If you have nothing but 0-cost cards in your deck, then the enemies from Foundations of Stone will have 0 hitpoints when they engage, thus defeating them before they even make an attack. Most of these enemies are also very volatile to Revealed in Wrath since their X-values for their stats are determined by the rule in their text box. This can make them weak enough to kill a lot easier. There isn’t much synergy for this trait, as you will not encounter these enemies often. Still, it will be a memorable encounter that can give you nightmares in the following nights!
Nazgûl

Notable quests: The Black Riders saga scenarios, The Morgul Vale, Massing at Osgiliath
The Nazgûl are some of the more recognisable Tolkien villains out there and will often serve as the final boss of some scenarios. You encounter them early on in Escape from Dol Guldur and get to fight them throughout the game. The more notable Nazgul, like Khamul and Witch-King even more, additional appearances during the Massing at Osgiliath POD and various Vengeance of Mordor quests. But most of the Nazgul will be encountered during your LOTR Campaign. There’s a reason why the first Saga box is named “The Black Riders,” after all.
The Nazgul are, in general, pretty tough enemies, boasting high stats and often immunity to attachments that aren’t meant for them. They will have their own encounter card attachments, like their horses and Pale Blade, to increase their stats and provide extra immunities to themselves. Nazgul taking less damage than usual isn’t that strange either, as the Nazgul of Minas Morgul has a damage cap of 1 damage per attack, and many are immune to attacks made by players not engaged with them. This adds up to making these enemies quite difficult to kill unless you have a river crossing filled with elf-magic nearby.
Most of the campaign-Nazgul also interact a lot with The One Ring. If that is exhausted, it makes it more difficult to escape these wraiths as their engagement cost can be lowered, or your willpower is reduced for a while. Because of this, exhausting the ring during quests with these enemies might be a risk not worth taking. Leave it ready and engage these enemies on your own terms, taking them down one by one until you have collected the set of nine!
Warg
Notable quests: Wastes of Eriador, The Ring Goes South, Race Across Harad
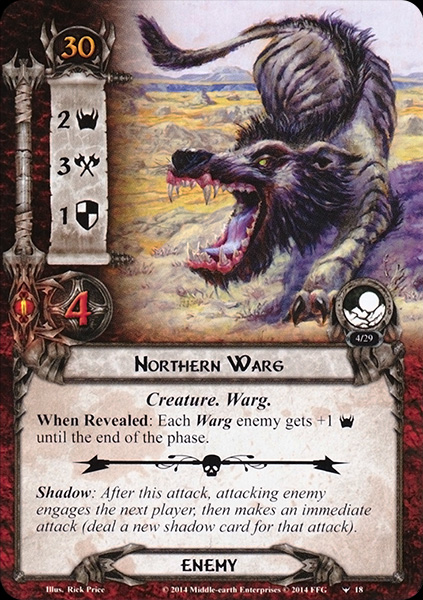
Of course, there are a lot more Wargs to be found in the game, but these three scenarios are where you will find the most synergy between Wargs. There are several others found throughout the game, but the most you’ll see from their synergy is that they will go back to the staging area if their shadow card does not have a shadow effect. This can be troublesome in many quests where the chances of hitting a shadow effect are low. Direct damage and attacks into the staging area with the Rohan archetype, Hands Upon the Bow, or Great Yew Bow will be most effective against Warg enemies. You can also cancel the attack of engaged Warg enemies, so that their shadow card is not flipped over. This will cause the enemy to stay engaged with you, allowing you to hit it back. This is usually just a temporary solution, so make sure you have enough attack strength to kill the Warg if you leave it engaged with you.
In the more notable quests, the same rules apply. These puppies are slippery and do not like to stay engaged with players. Others can lower the engagement cost of enemies, where you can suddenly find yourself surrounded by a pack of Wargs at the same time. This pack mentality gives the Wargs strength in numbers, which is something that you must watch out for as a player. Have enough defenders ready to go since you might end up engaging more Wargs through shadow effects. These shadows either cause the attacking enemy to engage another player, send the attacking enemy back to the staging area, or will cause the enemy to make an additional attack. So if you are not bringing shadow cancellation, you will have to keep some defenders in reserve.
Some of the Warg enemies will also serve as Mount attachments for Orcs in the same scenario. This team-up can cause you to have enemies with increased stats and worse abilities (same as Easterlings with their attachments), and you might end up with the Warg engaging you after you’ve killed the orc. I wish that the player Mount attachments were that powerful!
Ship
Notable quests: A Storm on Cobas Haven, The Hunt for the Dreadnaught, Voyage Across Belegaer, Flight of the Storm-Caller
Out of all the traits mentioned so far, perhaps the one most noteworthy is that of the Ship enemies. This is because Ship enemies are handled differently from other enemies, as they cannot be defended by heroes and allies. Instead, you need your own ships to block attacks. The ship enemies also have some of the biggest stats on non-unique enemies in the game, easily getting more than 8 hitpoints and a boatload of attack and defence stats. Most of the synergy is with the Sailing mechanic from the Dream-chaser cycle, where being off course will decrease the engagement cost of several ship enemies.
The ships also often come with either a Forced effect when you engage it or with the Boarding keyword, where you will be engaged by several Corsair enemies as well. This means that engaging one ship enemy can actually get you engaged with several enemies all at once. A dream for Dunedain decks, but others might not be so thrilled by this. As I mentioned, you will need ships of your own to defend against the attack done by these vessels, and any undefended attack must also be dealt as damage to your own ship. Heroes and allies cannot defend them, but they can attack the ship back. And you’ll need all the help you can get since these ships are quite sturdy enemies.
Another common quirk of Ship enemies is that they are immune to player card attachments. Traps obviously don’t work, but you also cannot use Guarded (enemy) attachments during these quests. These ships can also have a pretty high engagement cost if you are on course, keeping them in the staging area while you sail and quest. However, some ships, like the Umbar Warship, punish you for keeping it in the staging area by increasing its Archery stat and granting it immunity to damage. You will eventually have to engage these ships or use tricks like Hunting Party or The Great Hunt to discard them from the staging area, as they are not unique enemies.
Dragon
Notable quests: Ered Mithrin cycle, The Ruins of Belegost, The Battle of Lake-Town

The last archetype I want to cover here is the Dragons of Middle Earth. While they are not common enemies outside of PODs and the Ered Mithrin cycle, they do leave their mark on the quests that they are in. They often serve as the final boss of a scenario after you have been working throughout the rest of the quest to make sure these enemies can take any damage at all. This either comes by clearing side-quests for Dagnir, finding the Thrush to defeat Smaug or finding the right cards to defeat Naurlhug and the other dragons.
Dragons are known for their high defence stat, insane attacks that can sometimes deal damage to all characters you control, and immunity to many sources of damage. Combine this all with immunity to player card effects/attachments, and you can start to understand why these enemies are so fearsome. The only real dragon that is somewhat killable is the Dragon Hatchling from the Withered Heath scenario. But even that one can get pretty dangerous in the late game.
The positive side of this is that the quest often provides you with the tools required to defeat the dragon. Killing them also marks the end of several quests so that you can direct more attention to the slaying of the dragon. Large boosts to defence and attack will also be really useful here, with Black Arrow being a thematic win as well. Boosting your own characters in order to deal enough damage will get you through the high defence and many hitpoints as soon as those wyrms lose their immunity to damage in some way.
I hope this taught you a bit about the different enemies in the game and what you can expect from them. Of course, it’s not literally every enemy ever, but that would make the article a bit too long. You will still encounter Wose and Brigand enemies, as well as various Creatures that weren’t covered in the article. It keeps combat exciting and forces you to strategize a little with the traits not described here. Of course, all enemies have also been described in detail in their respective scenario analyses, so if you want to cheat, look there. 😉

One thought on “Enemy Archetypes”